catalogue
2, Construction of Baidu Tiangong Internet of things platform
preface
Based on MQTT protocol, with the help of Baidu Tiangong Internet of things platform and Arduino IDE burning program, wechat applet sends instructions to ESP8266 Node MCU, so as to simply control the forward, backward, left and right rotation of the car.
As a practical novice, I don't know anything about this. After watching the video of station B and many blogs, I finally chose to follow the video of station B released by Anxin technology step by step: https://www.bilibili.com/video/BV1W7411o7cg
Of course, this video was released a year ago. Now there will be some content updates, which I will mention below. I didn't succeed in installing the IDE environment. Finally, I burned the program on the Arduino IDE. In addition, there are some problems and pits I have encountered, which will be described below.
1, Preparation tools
- Trolley chassis, battery, motor drive module (I use zhufei Technology), steering gear
- esp8266Node Mcu 12-E (Anxin Technology), serial port cable connecting computer
- Baidu Tiangong Internet of things platform Internet of things core Suite_ Internet of things access Baidu Intelligent Cloud (baidu.com) If it is the first time to use, you need to turn on the function of Internet of things access
- Arduino IDE http://www.taichi-maker.com/homepage/download/#software-download
- Wechat developer tools Wechat public platform (qq.com)
2, Construction of Baidu Tiangong Internet of things platform
After opening the function of object access platform, enter the console.

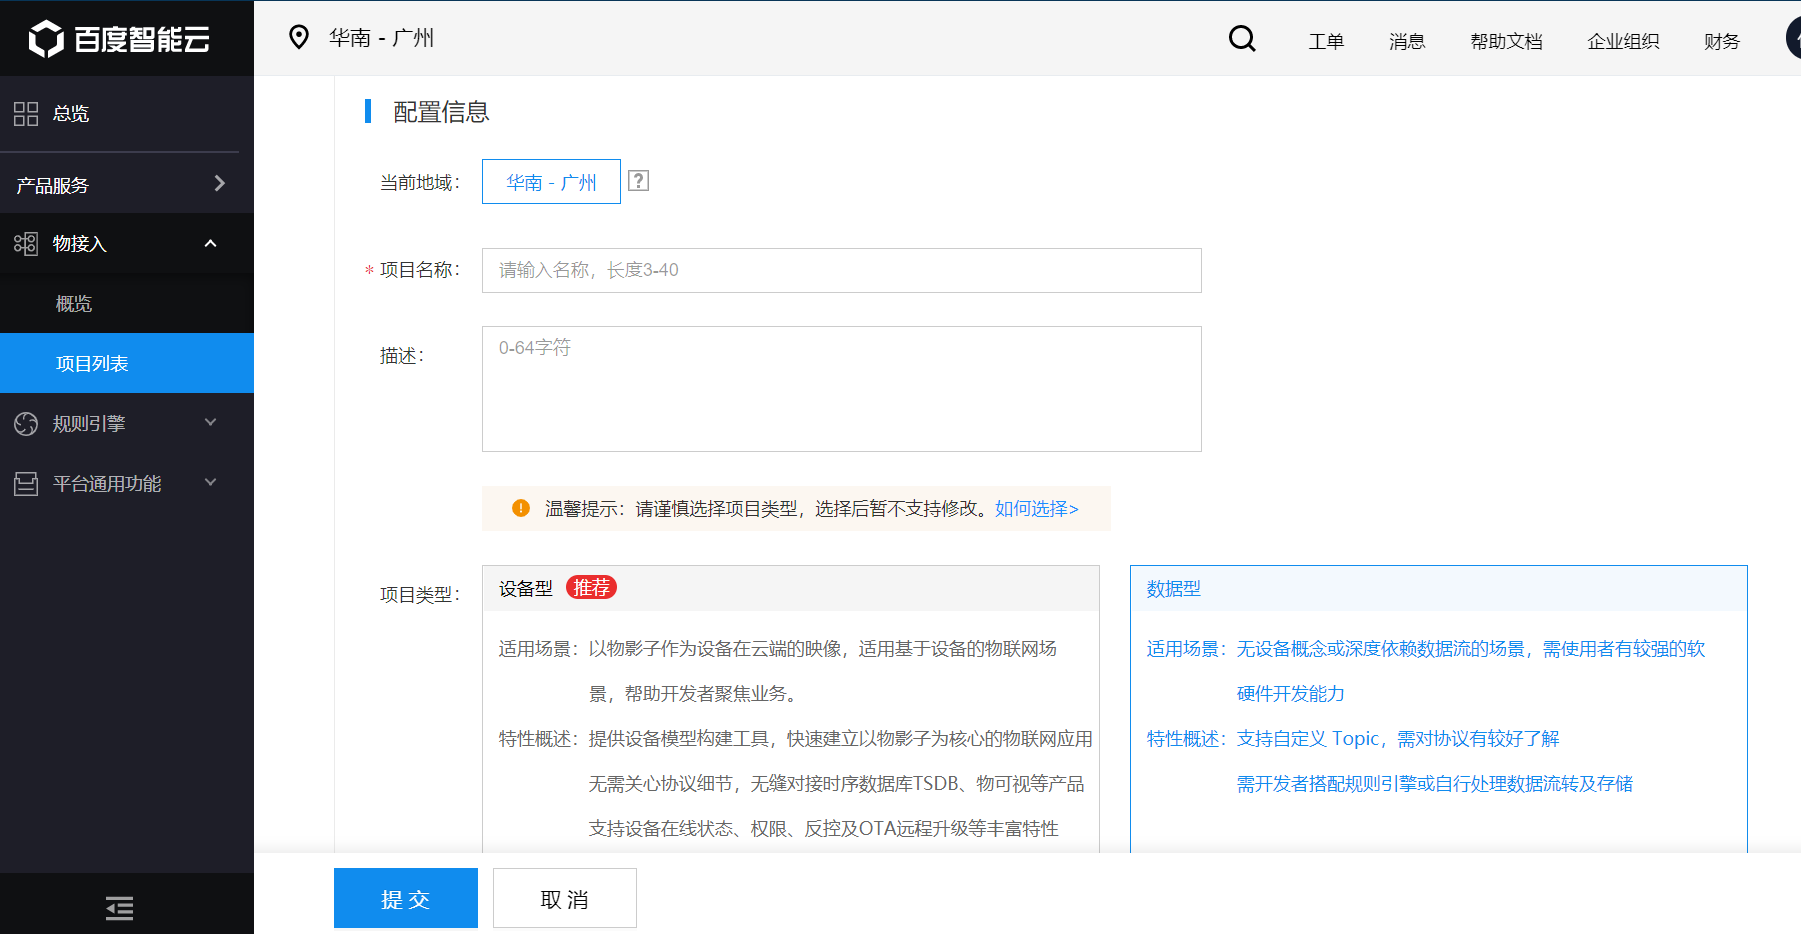
Create a project, select a region, fill in your own project name and description, and select the project type as data type.
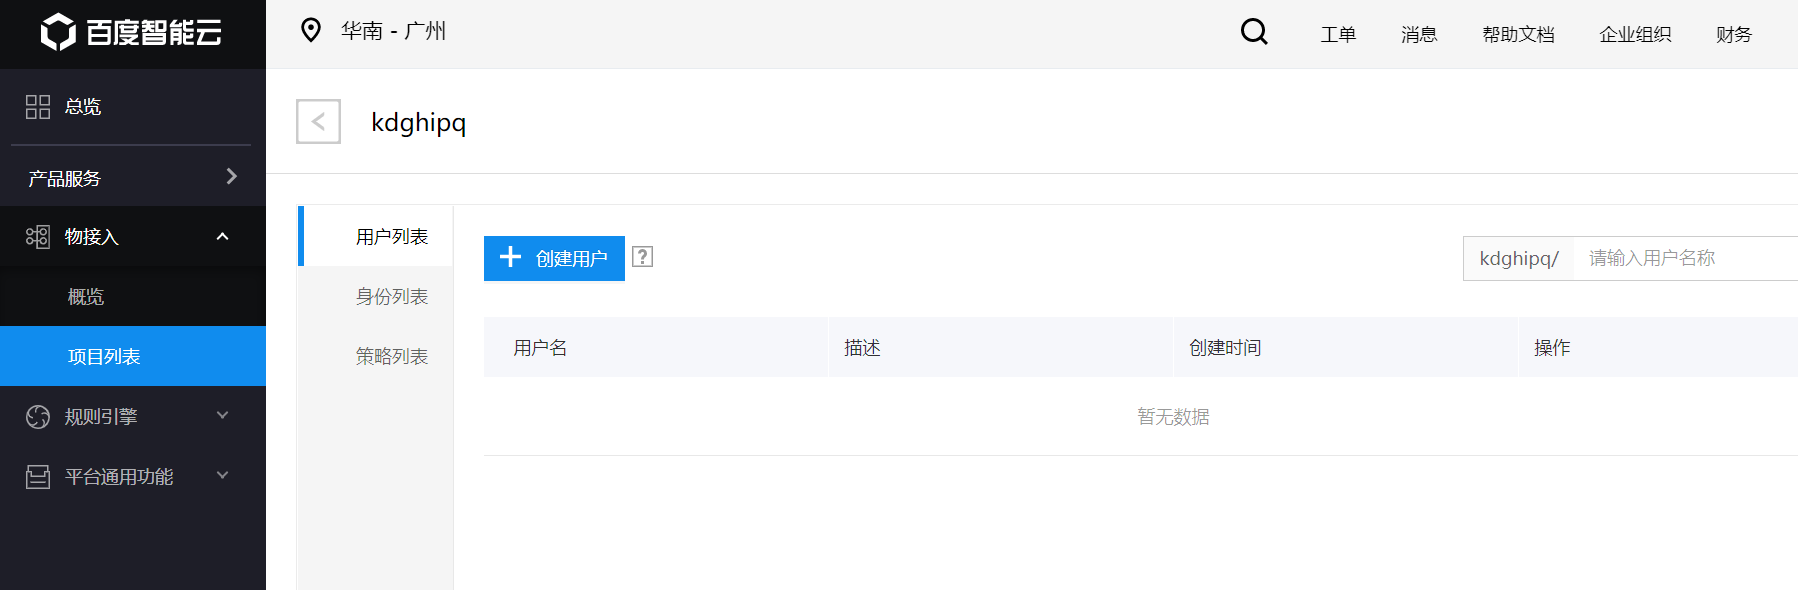
After creating the project, click the blue project name to enter the project list
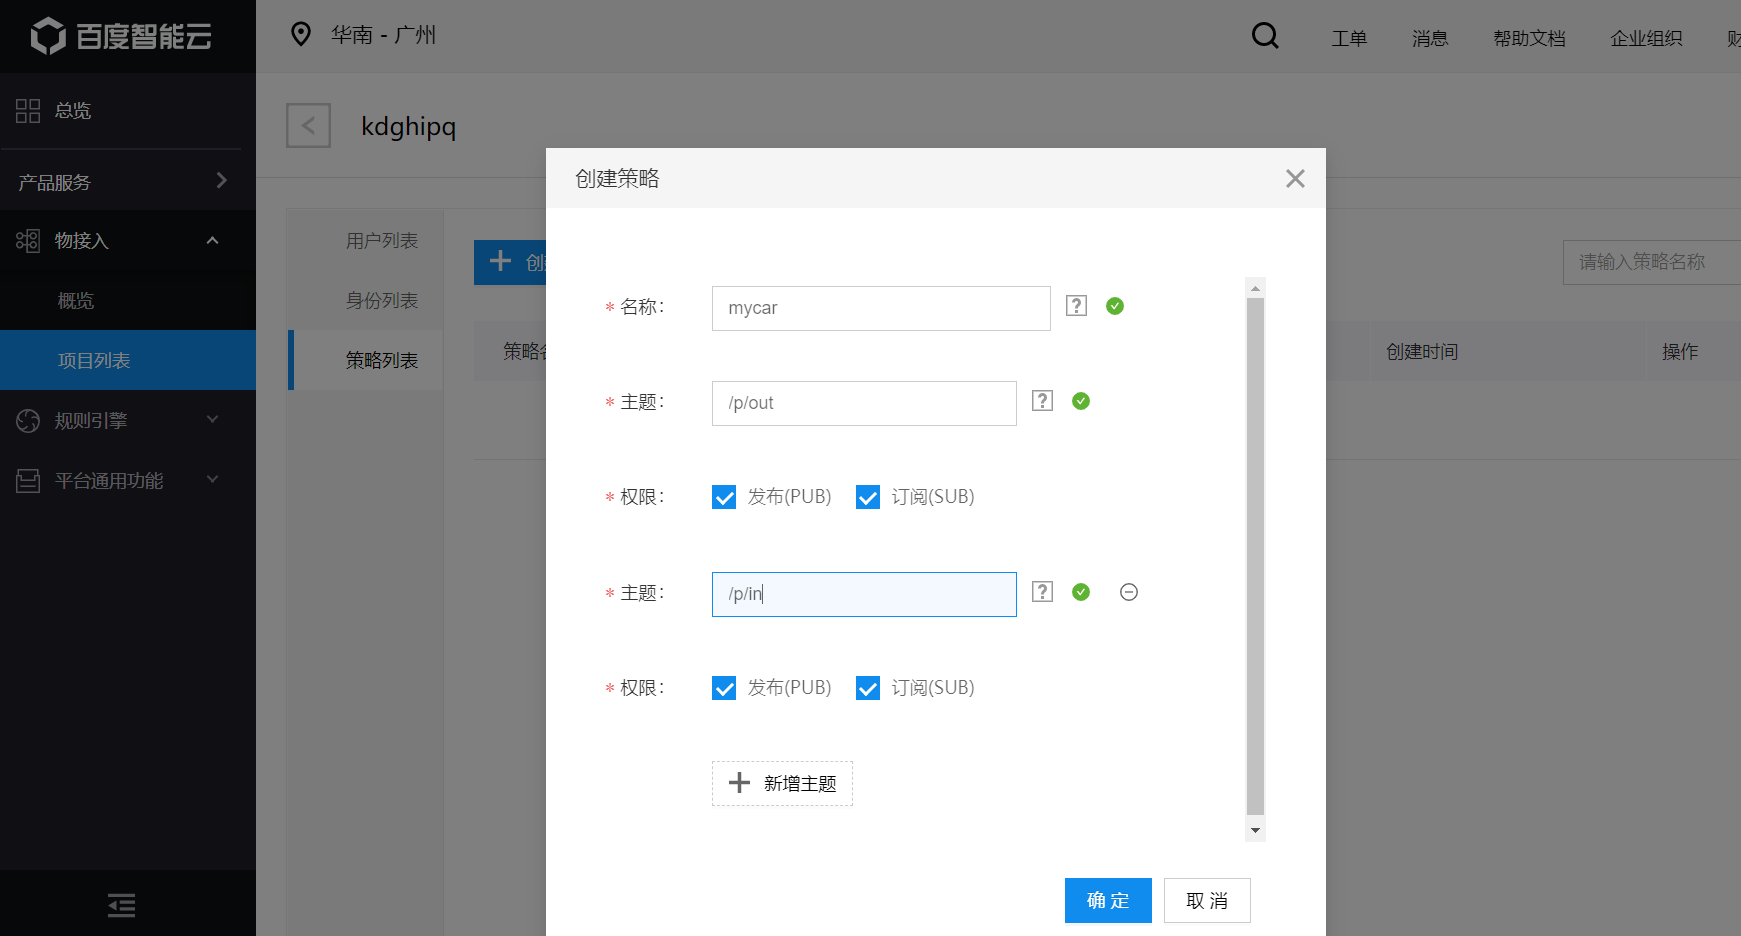
Create a strategy. If the wechat terminal needs to send instructions to the ESP8266 terminal and the wechat terminal needs to receive 8266 feedback information, create two topics to be subscribed and published by the wechat terminal and 8266 terminal respectively. Here, it should be noted that the topic subscribed by the wechat terminal is the topic to be published by the 8266 terminal, and the topic subscribed by the 8266 terminal is the topic published by the wechat terminal.
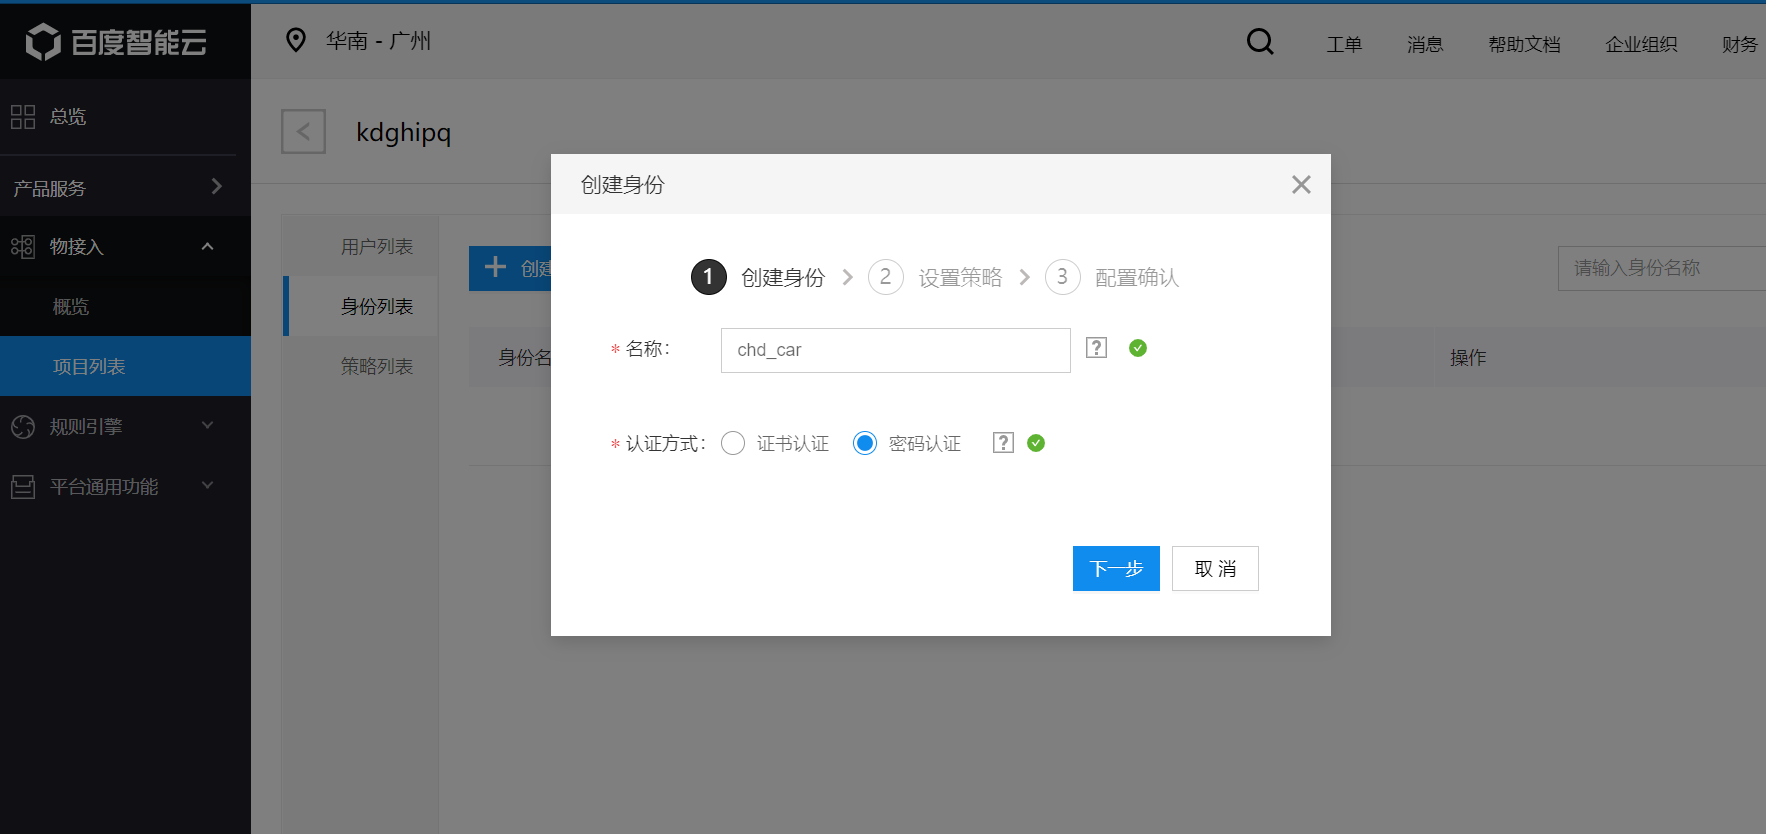
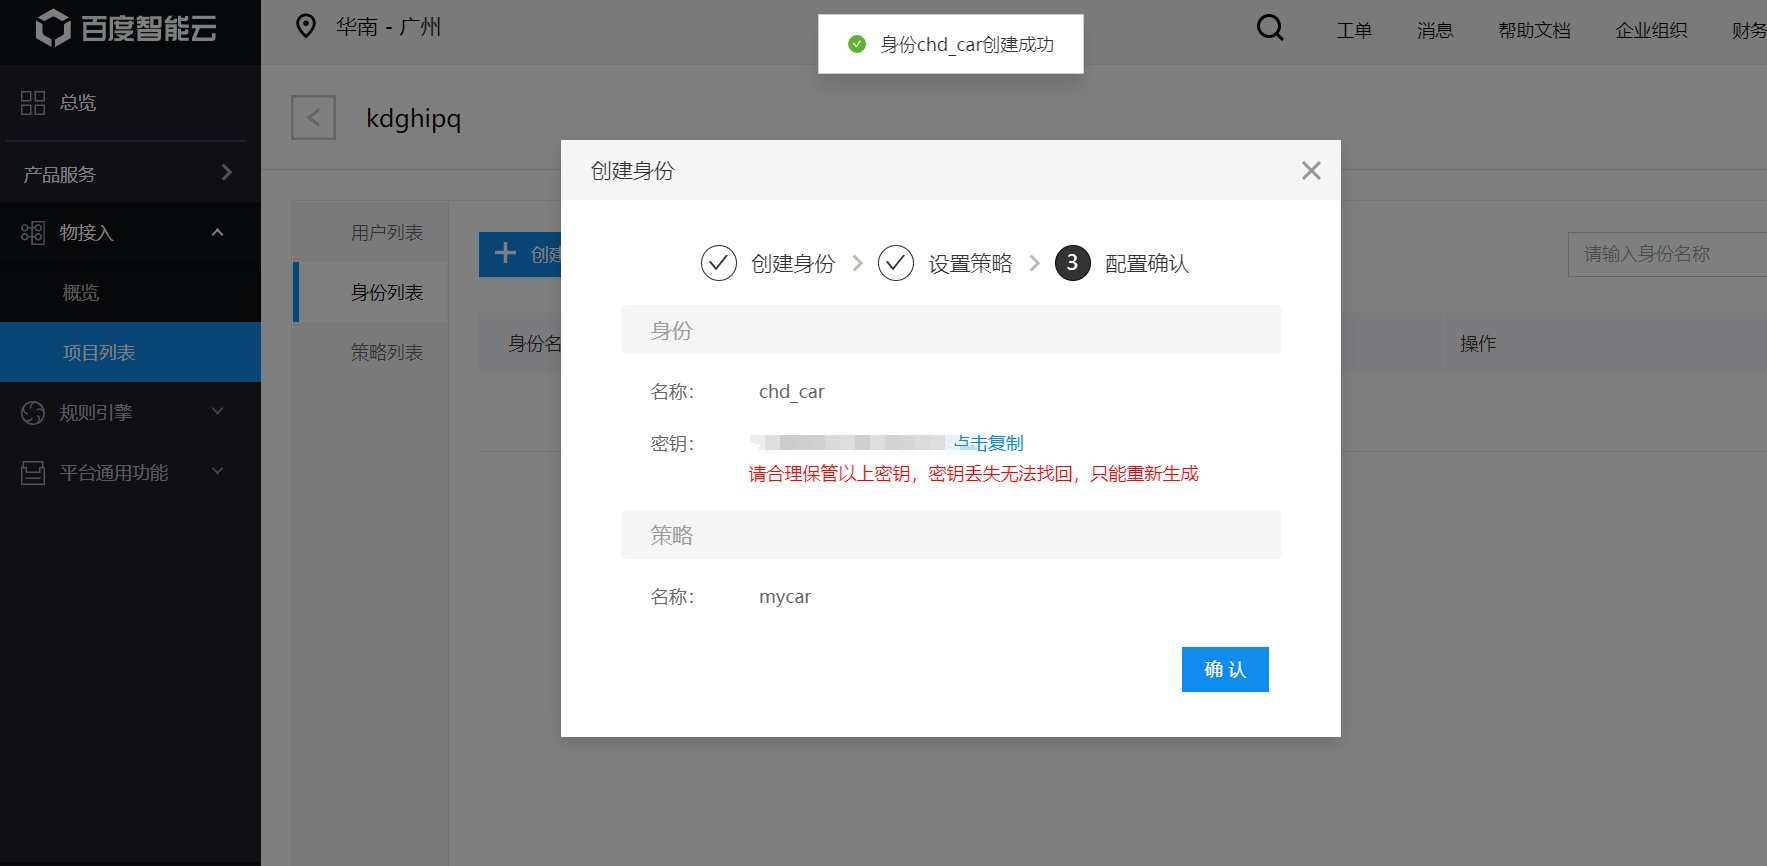
Create identity, select password authentication, click next, select the policy just created, and click next to complete the creation of identity. Save the identity key, which is the password for 8266 and wechat applet to connect to MQTT server.

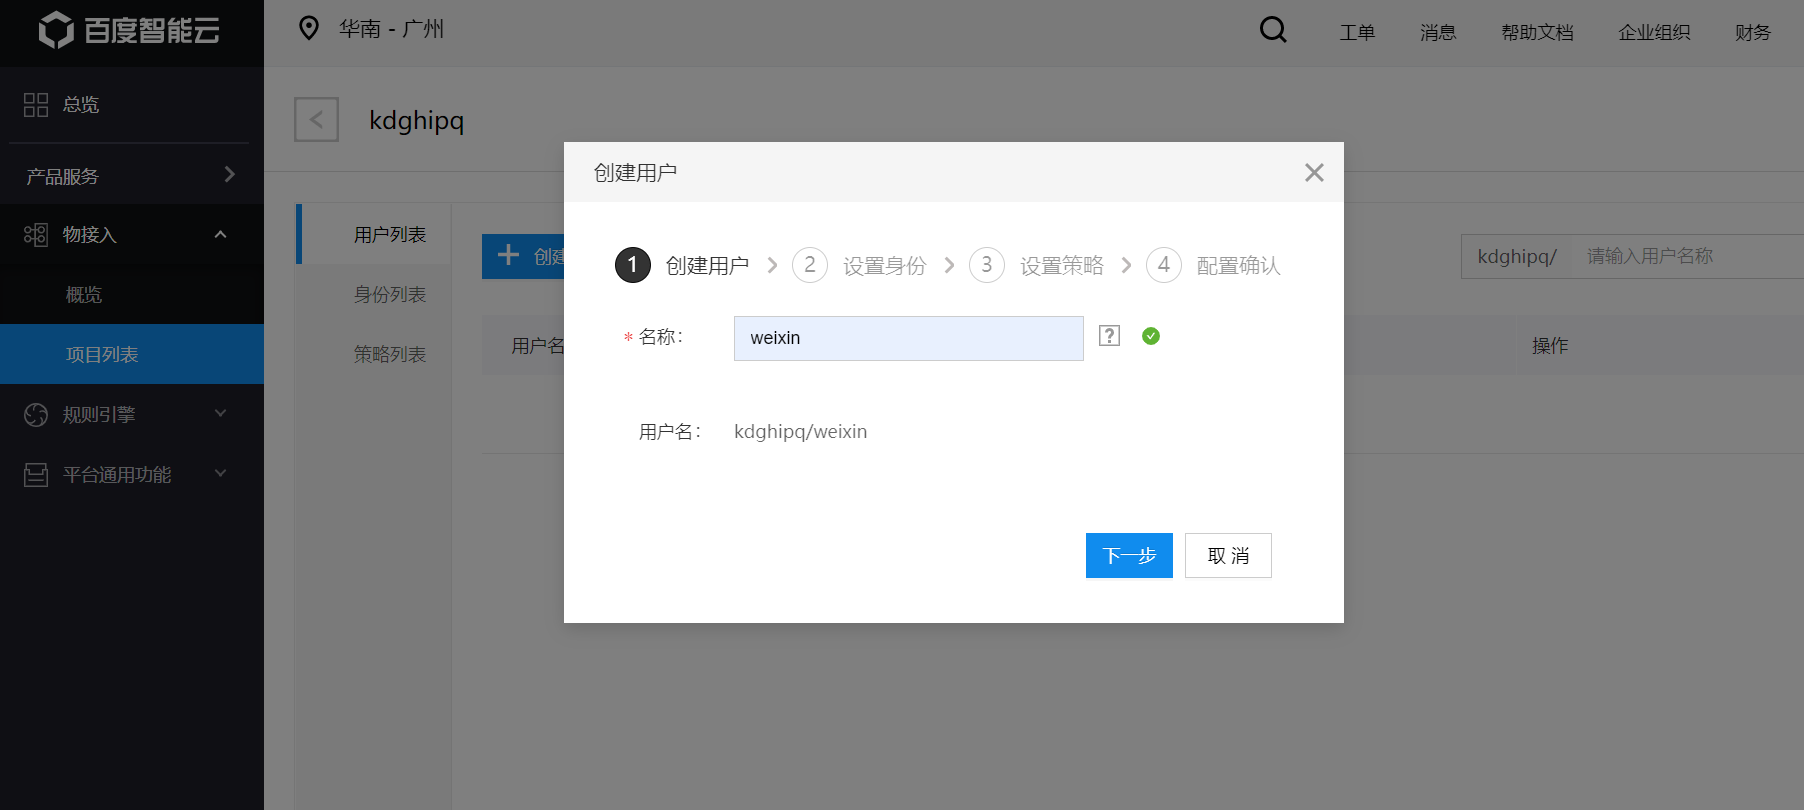
Click the user list to create a user. First, create a wechat applet user, and select the identity as the identity just created and the policy just created. Similarly, create 8266 end users.

So far, the server is basically built.
3, Construction and code of Arduino IDE environment
Since the WiFi function is required to realize the remote control function of wechat applet, the WiFi environment needs to be configured for Arduino.
Open Arduino IDE, click Tools - > development board - > development board manager, enter ESP8266, and then download the 8266 library. It should be noted that since the download here is on the background official website of Arduino, the download may fail more than once. My solution is to disconnect the wireless network and connect your mobile hotspot when the download fails, that is, when there is a red error, that is, as long as the download fails, switch back and forth between WiFi and mobile hotspot and jump repeatedly. The flow used is about 300M.
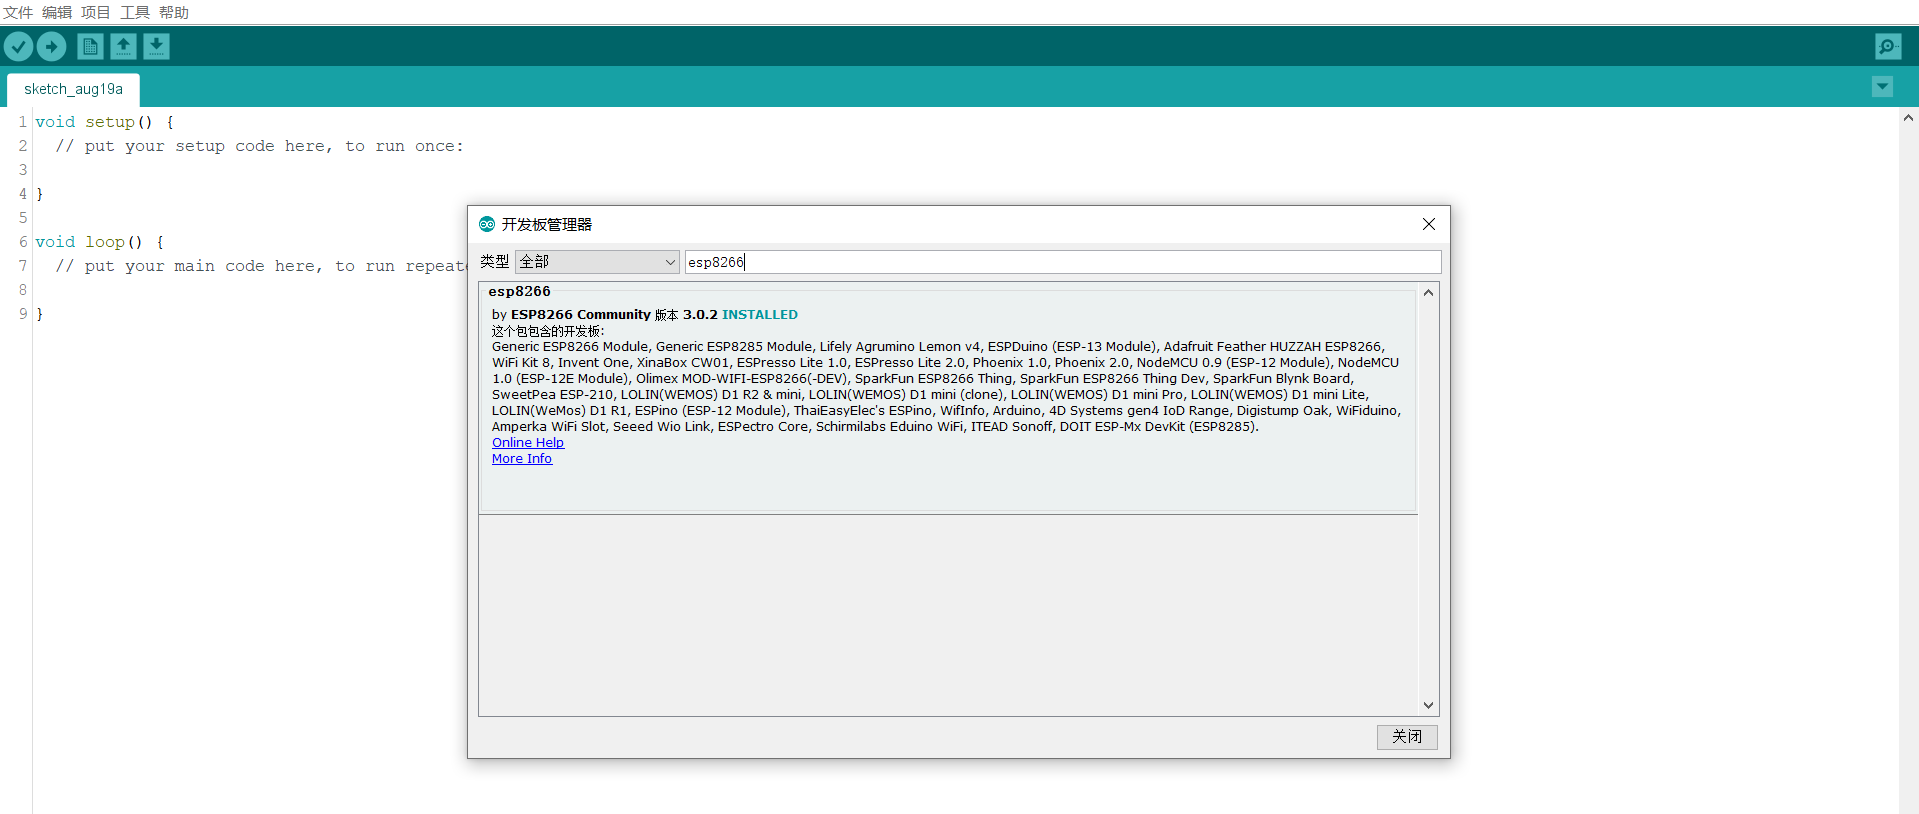
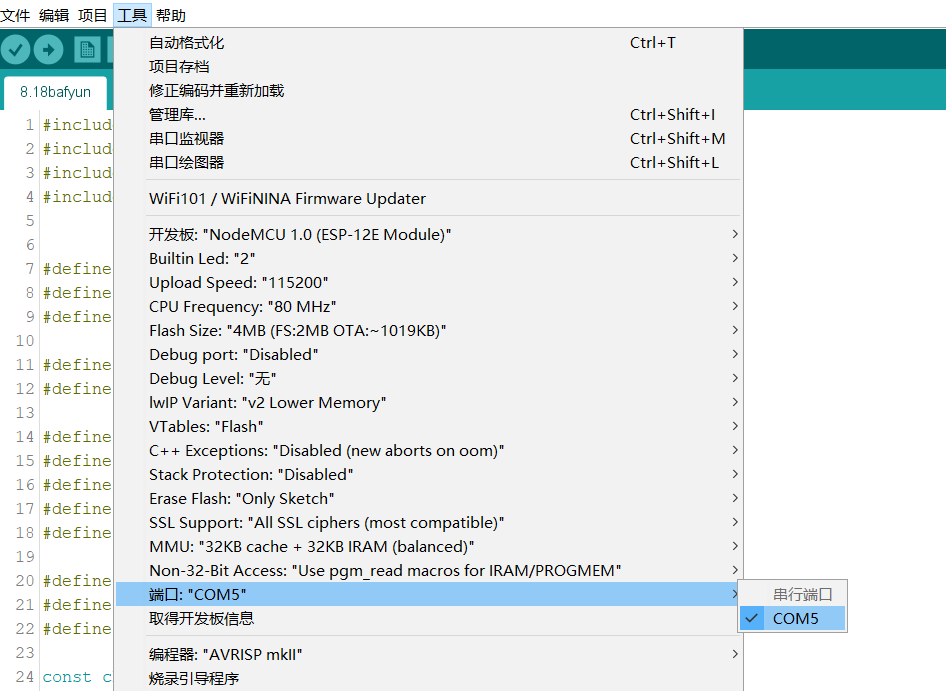
After downloading, click Tools - > development board and select NodeMcu 1.0.
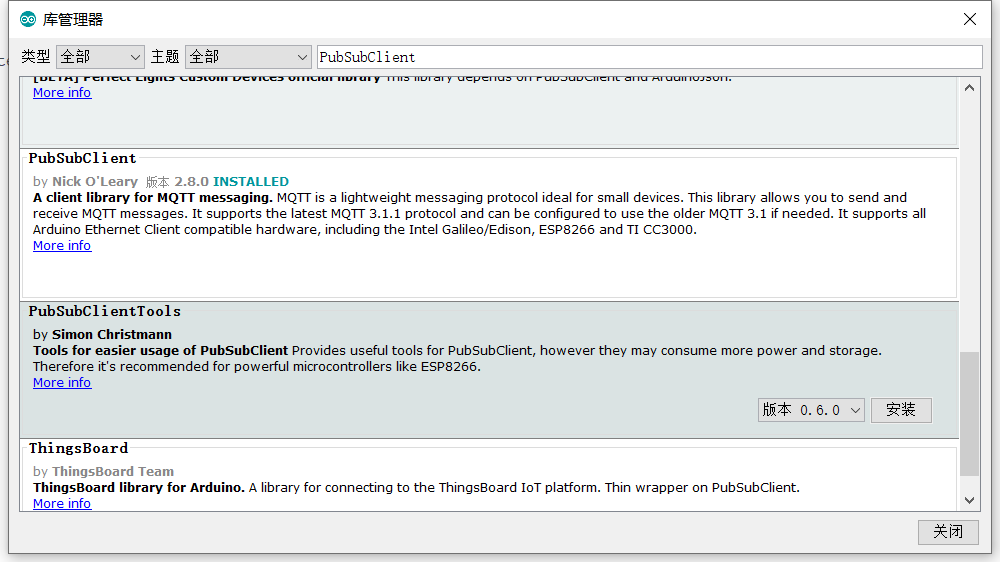
Next, download the relevant libraries connected to the MQTT server, click Project - load Library - management library, and enter PubSubClient to download.
This basically completes the IDE configuration.
Then write code in the IDE environment and burn it into 8266.
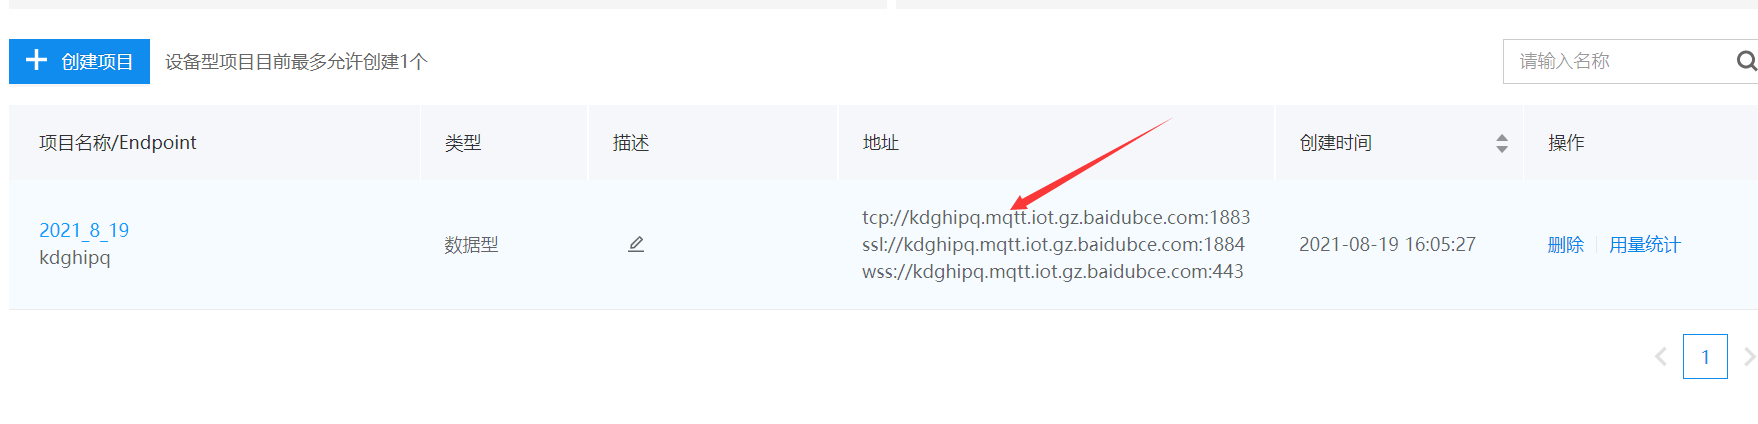
The server address created by Baidu Tiangong
Topics to subscribe to and publish

User name of the server
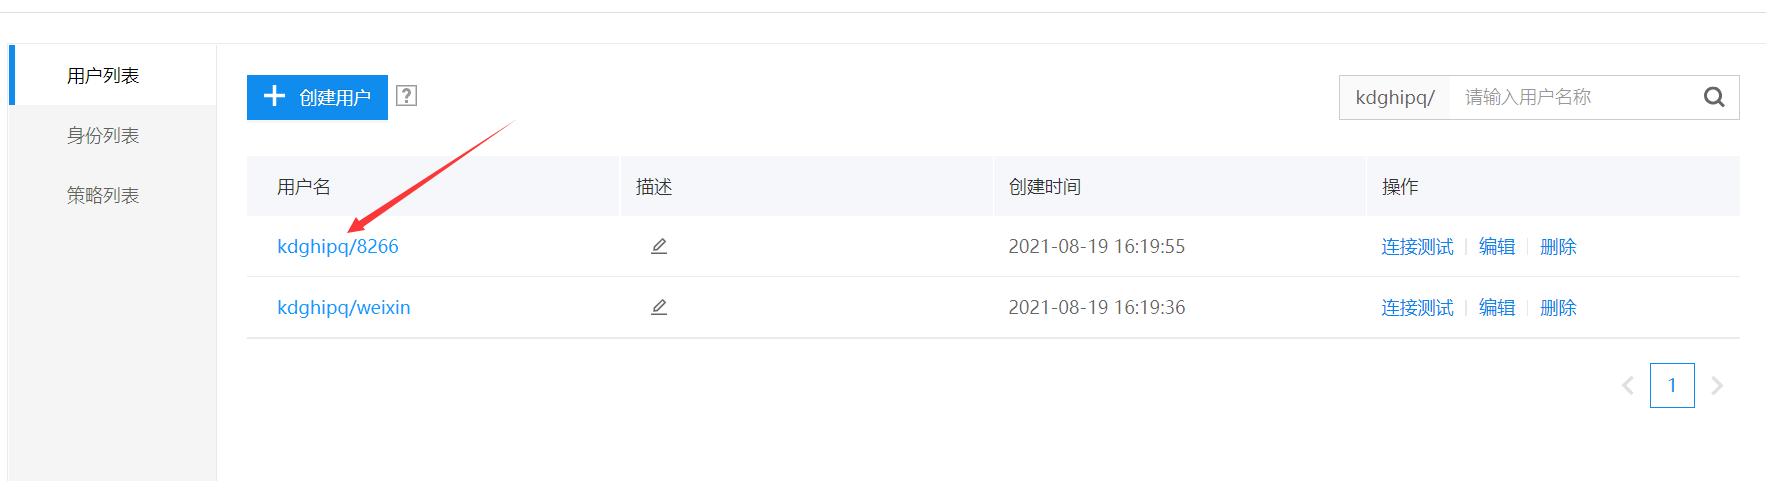
The user name of the 8266 terminal in the user list, and click the connection test as the user ID


#include <ESP8266WiFi.h>
#include <PubSubClient.h>

const char* STA_SSID = "8266 connect WiFi name";
const char* PSD = "WiFi password";
const char *mqtt_server = "Server address created by Baidu Tiangong";
const char *subTopic = "Topics to subscribe to";
const char *pubTopic = "Topics to publish";
const char *client_id = "User name of 8266 terminal in user list";
const char *mqtt_username = "User name of the server";
const char *mqtt_password = "When creating an identity, note the connection used to connect MQTT Password for";

WiFiClient wifiClient;
PubSubClient mqttClient(wifiClient); //Define MQTT client

void setup() {

  Serial.begin(9600);
  WiFi.begin(STA_SSID, PSD);                  // Start network connection
  Serial.print("Connecting to ");              // Serial port monitor outputs network connection information
  Serial.print(STA_SSID); Serial.println(" ...");  // Inform the user that nodemocu is trying to connect to WiFi

  int i = 0;                                   // This program statement is used to check whether the WiFi connection is successful
  while (WiFi.status() != WL_CONNECTED) {      // WiFi. The return value of the status() function is determined by the nodemocu
                                                  WiFi Determined by the connection status.
    delay(1000);                               // If the WiFi connection is successful, the return value is WL_CONNECTED
    Serial.print(i++); Serial.print(' ');      // Here, let nodemocu check WiFi every second through While loop Return value of status() function
  }                                            // At the same time, nodemocu will output the connection time reading through the serial port monitor
                                                  Seconds.
                                               // This second reading is realized by adding 1 to variable i every second.
  Serial.println("");                          // After WiFi connection is successful
  Serial.println("Connection established!");   // Nodemocu will output the "connection success" message through the serial port monitor
                                                  Rest.
  Serial.print("IP address:    ");             // The IP address of nodemocu will also be output. This function is through
                                                  Over call
  Serial.println(WiFi.localIP());              // WiFi. Implemented by the localip () function. The return value of the function
                                                  Namely NodeMCU of IP Address.


  mqttClient.setServer(mqtt_server, 1883); //Set the port used by the MQTT server and. 1883 is the default MQTT port
  mqttClient.setCallback(callback);        //Set the callback method. This method will be called when ESP8266 receives the subscription message
  delay(1500);
}
//Start the MQTT callback here, that is, after receiving the information from the server, you can perform corresponding actions on ESP8266,
void callback(char *topic, byte *payload, unsigned int length)
{
  Serial.print("Message arrived [");
  Serial.print(topic);
  Serial.print("] ");
  Serial.println();
  Serial.println(String(length));
  for (int i = 0; i < length; i++)
  {
Serial.print((char)payload[i]);
 }
  Serial.println();
}

void reconnect()            //To prevent the MQTT server from going offline, try reconnecting when the service is disconnected/
{
  while (!mqttClient.connected())
  {
    Serial.print("Attempting MQTT connection...");
    // Attempt to connect
    if (mqttClient.connect(client_id, mqtt_username, mqtt_password))
    {
      Serial.println("connected");

      if (mqttClient.subscribe(subTopic, 1))
      {
        Serial.println("subscribe success");
      }
      else
      {
        Serial.println("subscribe fail");
      }
    }
    else
    {
      Serial.print("failed, rc=");
      Serial.print(mqttClient.state());
      Serial.println(" try again in 5 seconds");
      // Wait 5 seconds before retrying
      delay(5000);
    }
  }
}
When burning, connect the 8266 to the computer with the serial port cable and use the device manager——


Port view the COM port number and set the access in Arduino as the corresponding port.
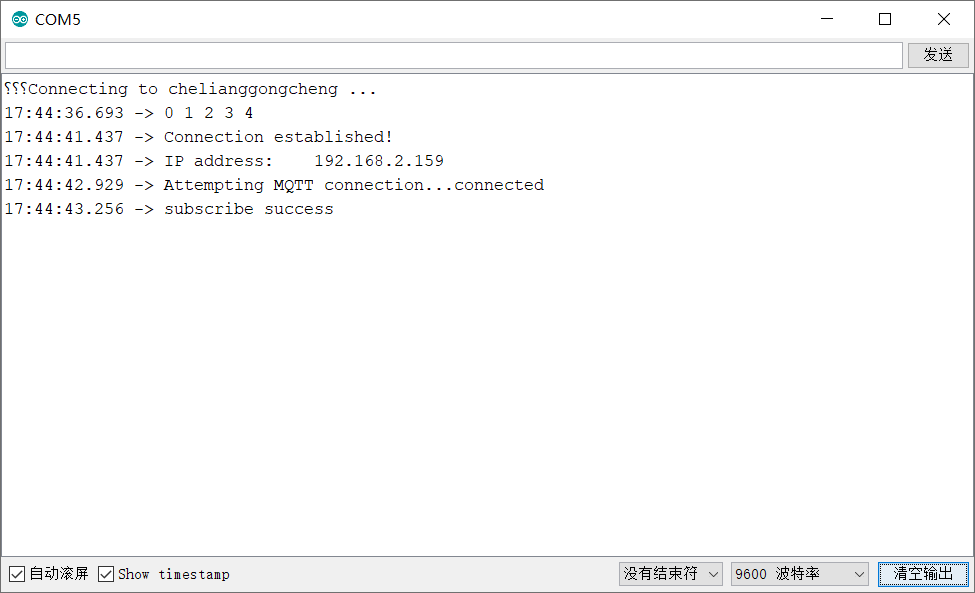
Then burn. After successful burning, press the reset button on 8266 to see the successful WiFi connection and server connection on the serial port detector.
4, Construction and code of wechat applet
Open the wechat developer tool. I use the test number here. Modify the project name, define the directory, and click OK without modifying others.

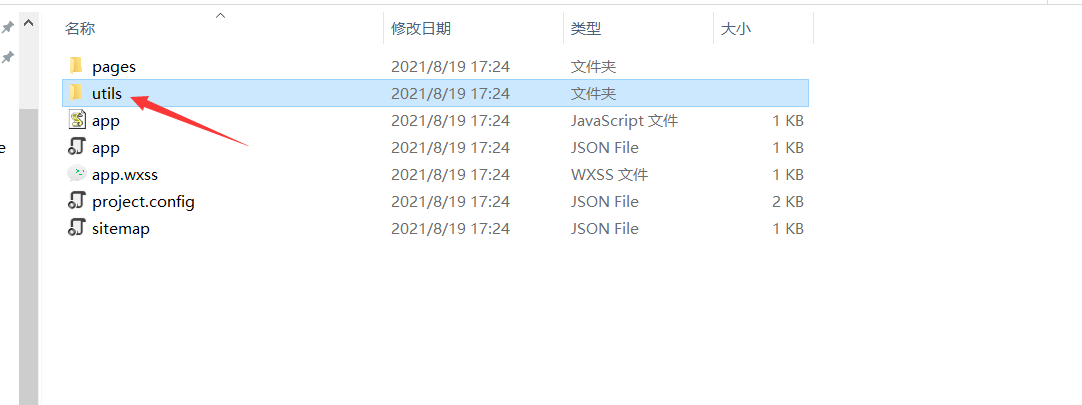
Then download the third-party library connected to the mqtt server, open the following link, right-click and save as an mqtt file, and copy this file into utils in the applet directory you created.
https://unpkg.com/mqtt@2.18.8/dist/mqtt.js
I don't involve the code of wechat applet interface here. Please find it on the Internet.
After the applet connects to the server, write it Tiring