	* Static inner class. be used for hash Operation!
	*/
public static class SimpleHash {
	private int cap;
	private int seed;
	public SimpleHash(int cap, int seed) {
		this.cap = cap;
		this.seed = seed;
	}

	/**
		* Calculate hash value
		*/
	public int hash(Object value) {
		int h;
		return (value == null) ? 0 : Math.abs(seed * (cap - 1) & ((h =
value.hashCode()) ^ (h >>> 16)));
}
}
}
### 3) Use the bloom filter in Google's open source Guava
 The purpose of self realization is to make myself understand the principle of Bloom filter, Guava The implementation of Bloom filter in is quite authoritative, so we don't need to implement a bloom filter manually in the actual project.

First, we need to introduce Guava Dependencies:
```java
<dependency>
	<groupId>com.google.guava</groupId>
	<artifactId>guava</artifactId>
	<version>28.0-jre</version>
</dependency>
The actual use is as follows:
We have created a bloom filter that can store up to 1500 integers, and we can tolerate a false positive probability of 0.01%
// Create a bloom filter object
BloomFilter<Integer> filter = BloomFilter.create(
	Funnels.integerFunnel(),
	1500,
	0.01);
// Determine whether the specified element exists
System.out.println(filter.mightContain(1));
System.out.println(filter.mightContain(2));
// Add element to bloom filter
filter.put(1);
filter.put(2);
System.out.println(filter.mightContain(1));
System.out.println(filter.mightContain(2));
In our example, when the mightcontainer () method returns true, we can 99% determine that the element is in the filter. When the filter returns false, we can 100% determine that the element does not exist in the filter.
The implementation of the bloom filter provided by Guava is still very good (you can see its source implementation for details), but it has a major defect that it can only be used on a single machine (in addition, capacity expansion is not easy). Now the Internet is generally distributed. In order to solve this problem, we need to use the bloom filter in Redis.
2, GeoHash find people nearby
Like WeChat's "nearby people", the "nearby restaurant" of the US group, how did Alipay share the "nearby car"?
1. Use the database to find people nearby
As we all know, any position on the earth can be represented by two-dimensional longitude and latitude. Longitude range [- 180, 180], latitude range [- 90, 90], latitude plus and minus are bounded by the equator, North plus South minus, longitude plus and minus are bounded by the prime meridian (Greenwich Observatory, UK), East plus West minus. For example, the longitude and latitude coordinates of the monument to the people's Heroes in Beijing are (39.904610, 116.397724), which are positive numbers, because China is located in the Northeast hemisphere.
Therefore, after we use the database to store the longitude and latitude information of all people, we can divide a rectangular range based on the current coordinate node to know the people nearby, as shown in the following figure:
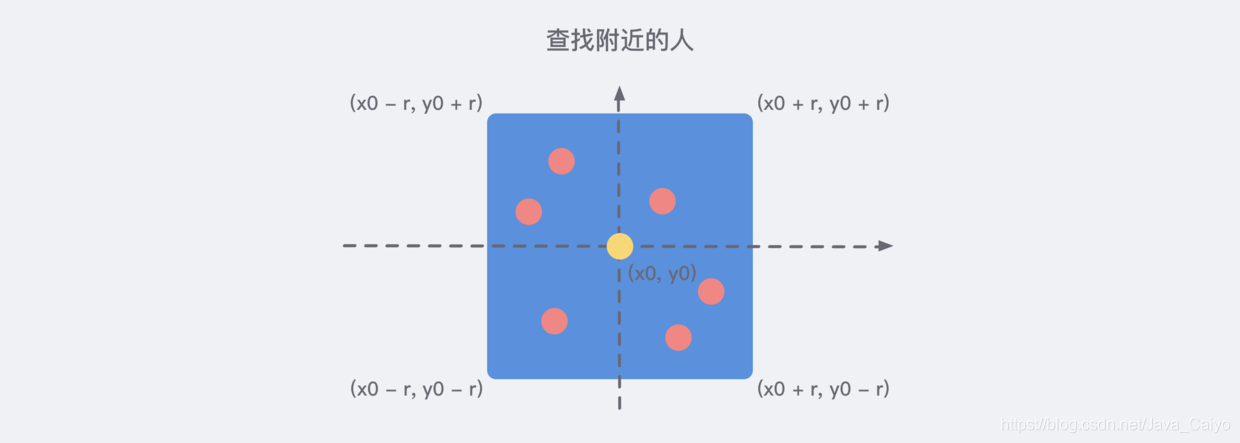
Therefore, it is easy to write the following pseudo SQL statements:
SELECT id FROM positions WHERE x0 - r < x < x0 + r AND y0 - r < y < y0 + r
If we want to know the distance from each coordinate element and sort it further, we need some calculation.
When the distance between two coordinate elements is not very far, we can simply use the Pythagorean theorem to get the distance between them. However, it should be noted that the earth is not a standard sphere, and the density of longitude and latitude is different. Therefore, when we use the Pythagorean theorem to calculate the square and then sum, we need to weigh according to certain coefficients. Of course, if you are not accurate, weighting is not necessary.
Referring to reference 2 below, we can almost write the following optimized SQL statements: (for reference only)
SELECT
	*
FROM
	users_location
WHERE
	latitude > '.$lat.' - 1
	AND latitude < '.$lat.' + 1
	AND longitude > '.$lon.' - 1
	AND longitude < '.$lon.' + 1
ORDER BY
	ACOS(SIN( ( '.$lat.' * 3.1415 ) / 180 ) * SIN( ( latitude * 3.1415 ) / 180 ) + COS( ( '.$lat.' * 3.1415 ) / 180 ) *
	COS( ( latitude * 3.1415 ) / 180 ) * COS( ( '.$lon.' * 3.1415 ) / 180 - ( longitude * 3.1415 ) / 180 ) ) * 6380 ASC LIMIT 10 ';
In order to meet the high-performance rectangular region algorithm, the data table also needs to add the longitude and latitude coordinates with the two-way composite index (x, y), which can meet the maximum optimization query performance.
2. Brief description of geohash algorithm
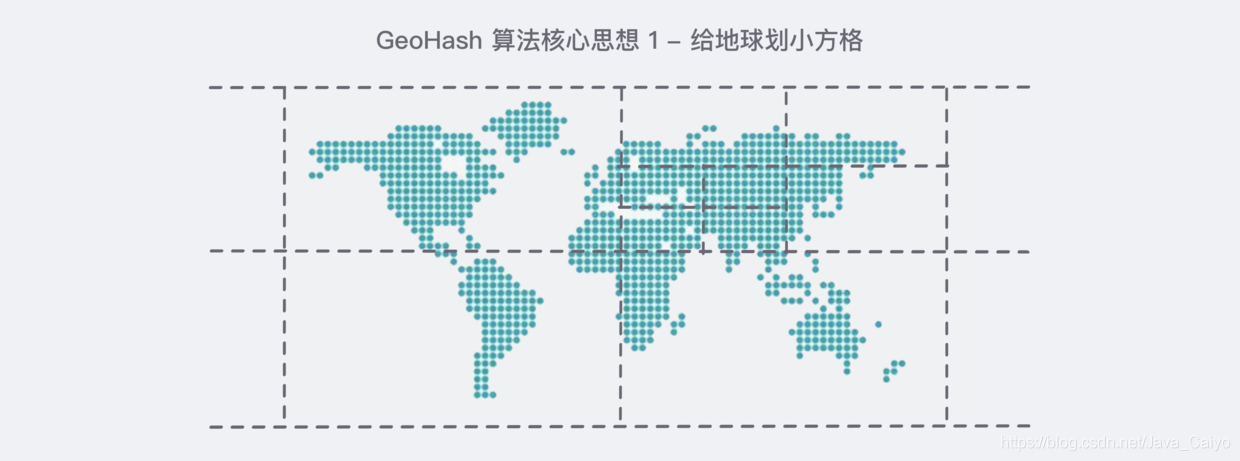
This is an algorithm commonly used in the industry for sorting geographic location distance, and Redis also adopts this algorithm. GeoHash algorithm maps the two-dimensional longitude and latitude data to one-dimensional integers, so that all elements will be mounted on a line, and the distance between the two-dimensional coordinates close to each other will be very close to the points after mapping to one-dimensional coordinates. When we want to calculate "people nearby", we first map the target position to this line, and then get the nearby points on this one-dimensional line.
Its core idea is to regard the whole earth as a two-dimensional plane, and then divide the plane into a small grid. Each coordinate element is located in the only grid. The smaller the grid after equal division, the more accurate the coordinates are, similar to the following figure:
We need to code the divided earth:

After coding in this order, if you observe it carefully for a while, you will find some rules:
- In all horizontal codes, the 2nd and 4th bits are the same, for example, the first 0101 and the second 0111 in the first row, and their 2nd and 4th bits are 1;
- In all vertical codes, the first and third bits are incremented. For example, the first 0101 in the first row, if the first and third bits are carried out separately, it is 00. Similarly, look at the second 0111 in the first row. In the same way, the first and third bits are carried out as 01, which happens to be 00 incremented by one;
Through this rule, we encode each small block in a certain order. The benefits of this are obvious: the coordinates of each element can be uniquely identified on the encoded map, and the specific location will not be exposed. Because the area is shared, I can tell you that I am near the park, But you don't know where it is.
In short, through the above idea, we can turn any coordinate into a string of binary codes, similar to 11010010110001000100 (note that longitude and dimension appear alternately...), through this integer, we can restore the coordinates of the element. The longer the integer, the smaller the loss of the restored coordinate value. For the "people nearby" function, the loss of a little longitude is negligible.
Finally, the encoding operation of Base32 (0~9, a~z, removing the four letters a/i/l/o) turns it into a string. For example, the string above becomes wx4g0ec1.
In Redis, the longitude and latitude are encoded with 52 bit integers and put into zset. The value of zset is the key of the element and the score is the 52 bit integer value of GeoHash. Although the score of zset is a floating-point number, it can be stored losslessly for 52 bit integer values.
3. Use Geo in Redis
The following is quoted from reference 1 - Redis deep adventure
When using Redis for Geo query, we should always think that its internal structure is actually just a zset(skiplist). Other elements near the coordinates can be obtained by zset's score sorting (the actual situation is more complex, but this understanding is enough). The original coordinates of the elements can be obtained by restoring the score to the coordinate value.
Redis provides only 6 Geo commands, which can be easily mastered.
1) Increase
The geoadd instruction carries a set name and multiple longitude and latitude name triples. Note that multiple triples can be added here.
127.0.0.1:6379> geoadd company 116.48105 39.996794 juejin
(integer) 1
127.0.0.1:6379> geoadd company 116.514203 39.905409 ireader
(integer) 1
127.0.0.1:6379> geoadd company 116.489033 40.007669 meituan
(integer) 1
127.0.0.1:6379> geoadd company 116.562108 39.787602 jd 116.334255 40.027400
xiaomi
(integer) 2
It's strange... Redis does not directly provide Geo deletion instructions, but we can operate Geo data through zset related instructions, so the zrem instruction can be used for element deletion.
2) Distance
The geodist instruction can be used to calculate the distance between two elements, carrying the set name, two names and distance units.
127.0.0.1:6379> geodist company juejin ireader km
"10.5501"
127.0.0.1:6379> geodist company juejin meituan km
"1.3878"
127.0.0.1:6379> geodist company juejin jd km
"24.2739"
127.0.0.1:6379> geodist company juejin xiaomi km
"12.9606"
127.0.0.1:6379> geodist company juejin juejin km
"0.0000"
We can see that nuggets are closest to meituan because they are all in Wangjing. The units of distance can be m, km, ml and ft, representing meters, kilometers, miles and feet respectively.
3) Get element location
The geopos instruction can obtain the longitude and latitude coordinates of any element in the set, and can obtain multiple coordinates at a time.
127.0.0.1:6379> geopos company juejin
1) 1) "116.48104995489120483"
	2) "39.99679348858259686"
127.0.0.1:6379> geopos company ireader
1) 1) "116.5142020583152771"
	2) "39.90540918662494363"
127.0.0.1:6379> geopos company juejin ireader
1) 1) "116.48104995489120483"
	2) "39.99679348858259686"
2) 1) "116.5142020583152771"
	2) "39.90540918662494363"
We observe that there is a slight error between the obtained longitude and latitude coordinates and the coordinates entered by geoadd. The reason is that the one-dimensional mapping of two-dimensional coordinates by Geohash is lossy, and there will be a small difference in the values restored through mapping. For the function of "people nearby", this error is nothing at all.
4) Gets the hash value of the element
Geohash can obtain the longitude and latitude encoding string of elements. As mentioned above, it is base32 encoding. You can use this coded value to http://geohash.org/ Direct positioning in ${hash}, which is the standard coding value of geohash.
127.0.0.1:6379> geohash company ireader
1) "wx4g52e1ce0"
127.0.0.1:6379> geohash company juejin
1) "wx4gd94yjn0"
Let's open the address http://geohash.org/wx4g52e1ce0 , observe whether the map points to the correct position:
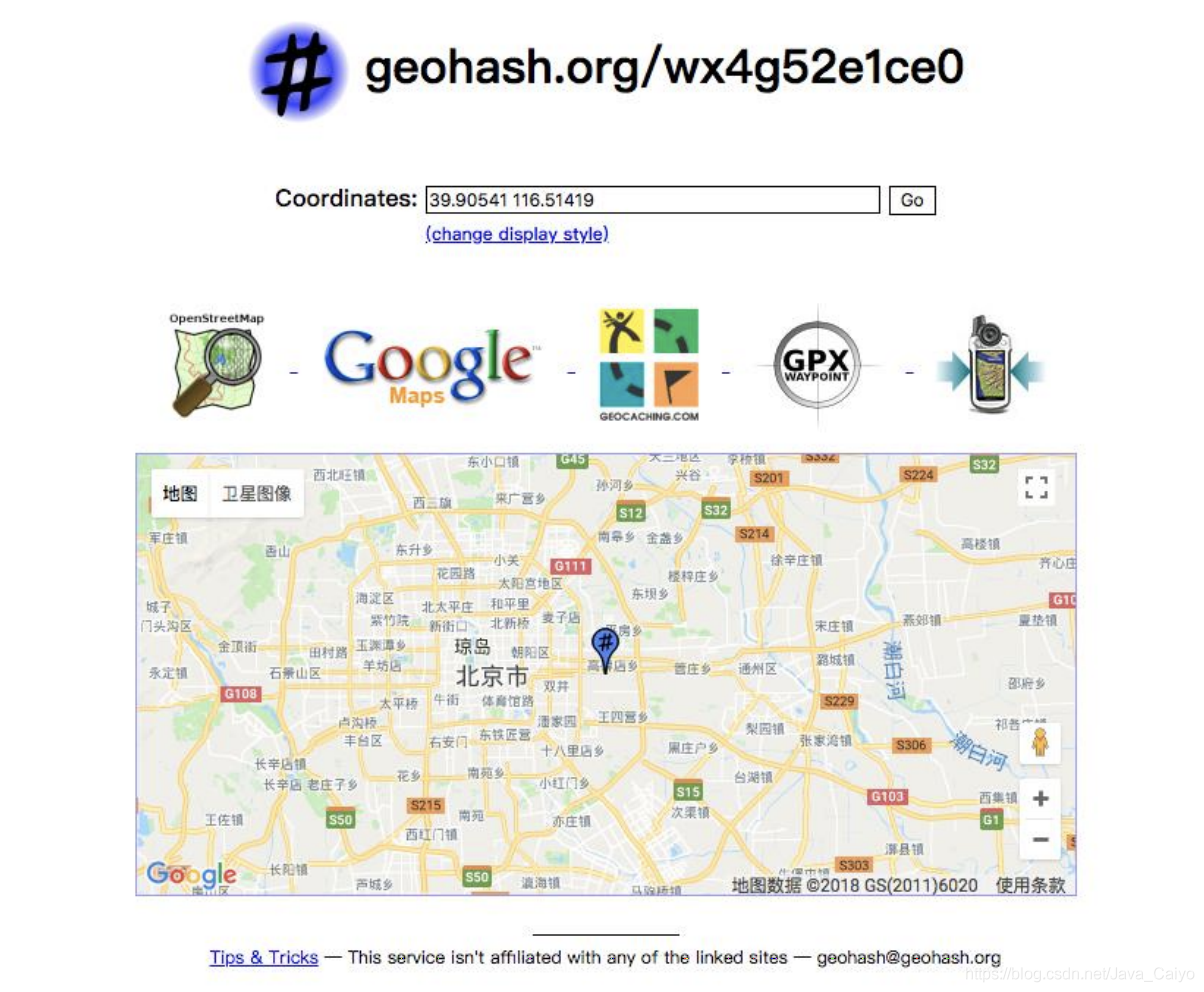
Good, that's the position. It's very accurate.
5) Nearby companies
Geordiusbymember instruction is the most critical instruction. It can be used to query other elements near the specified element. Its parameters are very complex.
# Up to 3 elements within 20 kilometers are arranged in a positive direction according to the distance, and it will not exclude itself
127.0.0.1:6379> georadiusbymember company ireader 20 km count 3 asc
1) "ireader"
2) "juejin"
3) "meituan"
# Up to 3 elements within 20km are inverted by distance
127.0.0.1:6379> georadiusbymember company ireader 20 km count 3 desc
1) "jd"
2) "meituan"
3) "juejin"
# Three optional parameters withclass withlist withhash are used to carry additional parameters
# Withlist is very useful. It can be used to display the distance
127.0.0.1:6379> georadiusbymember company ireader 20 km withcoord withdist withhash count 3 asc
1) 1) "ireader"
	2) "0.0000"
	3) (integer) 4069886008361398
	4) 1) "116.5142020583152771"
	2) "39.90540918662494363"
2) 1) "juejin"
	2) "10.5501"
	3) (integer) 4069887154388167
	4) 1) "116.48104995489120483"
	2) "39.99679348858259686"
3) 1) "meituan"
	2) "11.5748"
	3) (integer) 4069887179083478
	4) 1) "116.48903220891952515"
	2) "40.00766997707732031"
In addition to the geordiusbymember command to query nearby elements according to elements, Redis also provides to query nearby elements according to coordinate values. This command is more useful. It can calculate "nearby cars" and "nearby restaurants" according to the user's location. Its parameters are basically the same as those of geordiusbymember, except that the target element is changed to the longitude and latitude coordinate value:
127.0.0.1:6379> georadius company 116.514202 39.905409 20 km withdist count 3 asc
1) 1) "ireader"
	2) "0.0000"
2) 1) "juejin"
	2) "10.5501"
3) 1) "meituan"
	2) "11.5748"
6) Precautions
In a map application, there may be millions of car data, restaurant data and human data. If Redis's Geo data structure is used, they will all be placed in a zset set. In the Redis cluster environment, collections may migrate from one node to another. If the data of a single key is too large, it will have a great impact on the migration of the cluster. In the cluster environment, the amount of data corresponding to a single key should not exceed 1M, otherwise the cluster migration will be stuck and the normal operation of online services will be affected.
Therefore, it is recommended that Geo's data be deployed using a separate Redis instance instead of a cluster environment.
If the amount of data is more than 100 million or more, Geo data needs to be split by country, province, city, and even by district in populous megacities. This can significantly reduce the size of a single zset set.
3, Persistence
1. Introduction to persistence
All Redis data is stored in memory. If it goes down suddenly, all data will be lost. Therefore, there must be a mechanism to ensure that Redis data will not be lost due to failure. This mechanism is Redis's persistence mechanism, which will save the database state in memory to disk.
1) What happens to persistence? From memory to disk
Let's think about the persistence of Redis as an "in memory database". Generally speaking, the following things need to happen from the client initiating the request to the server actually writing to the disk:
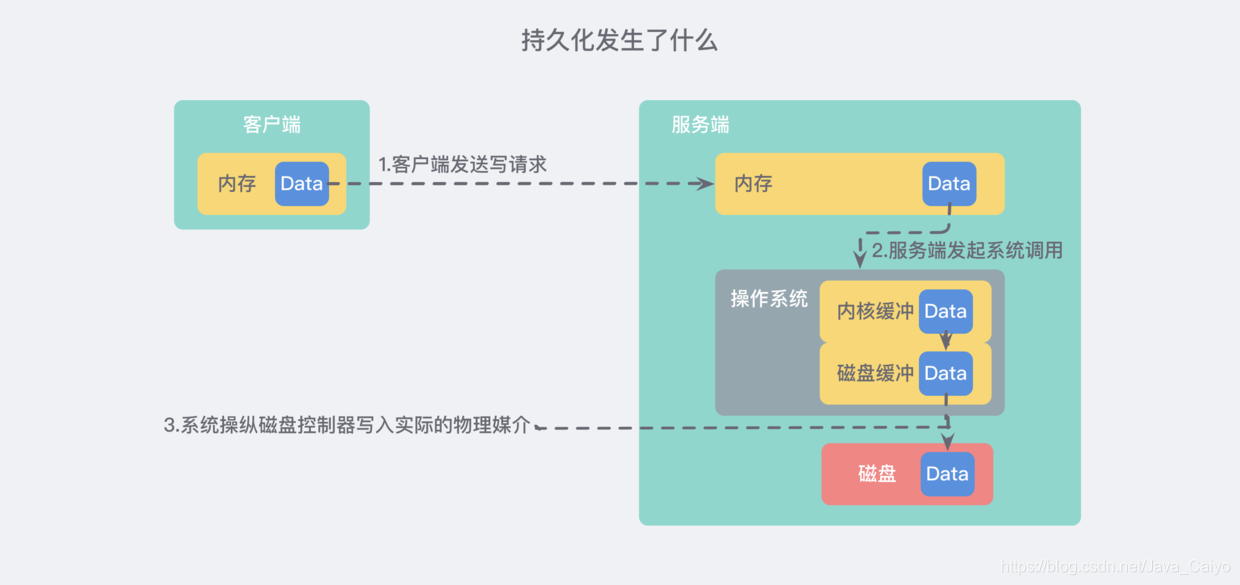
The detailed text description is as follows:
- The client sends a write command to the database (the data is in the memory of the client)
- The database receives a write request from the client (the data is in the memory of the server)
- The database calls the system API to write data to disk (the data is in the kernel buffer)
- The operating system transfers the write buffer to the disk controller (the data is in the disk cache)
- The disk controller of the operating system writes data to the actual physical medium (the data is on disk)
Note: the above process is actually extremely streamlined. In the actual operating system, there will be much more caches and buffers
2) How to ensure the security of persistence as much as possible
If our fault only involves the software level (the process is terminated by the administrator or the program crashes) and does not touch the kernel, we will consider it successful after the successful return of step 3 above. Even if the process crashes, the operating system will still help us write data to disk correctly.
If we consider more catastrophic things such as power failure / fire, it is safe only after completing step 5.
Therefore, we can conclude that the most important stages of data security are steps 3, 4 and 5, namely:
- How often does the database software call the write operation to transfer the user space buffer to the kernel buffer?
- How often does the kernel flush data from the buffer to the disk controller?
- How often does the disk controller write data to the physical media?
- Note: if a catastrophic event really happens, we can see from the process in the figure above that any step may be accidentally interrupted and lost, so we can only ensure the security of data as much as possible, which is the same for all databases.
Let's start with step three. The Linux system provides a clear and easy-to-use POSIX file API for operating files. Over the past 20 years, many people still talk about the design of this API. I think one of the reasons is that you can clearly know the purpose of this API from the name of the API:
int open(const char *path, int oflag, .../*,mode_t mode */);
int close (int filedes);int remove( const char *fname );
ssize_t write(int fildes, const void *buf, size_t nbyte);
ssize_t read(int fildes, void *buf, size_t nbyte);
Therefore, we have a good API available to complete the third step, but we don't have much control over the time spent on the system call before the successful return.
Then let's talk about step four. We know that in addition to those people who knew about computers in the early days (the operating system was made by these people), the actual physical hardware is not what we can operate directly, but we can achieve the purpose through operating system calls. In order to prevent too slow I/O operations from slowing down the operation of the whole system, a lot of efforts have been made at the operating system level. For example, the write buffer mentioned in step 4 above will not be written to the disk immediately, but will first pass through a buffer. By default, Linux will actually commit the write after 30 seconds.
However, it is obvious that 30 seconds is not affordable to Redis, which means that if a failure occurs, all data written in the last 30 seconds may be lost. Fortunately, PROSIX API provides another solution: fsync. This command will force the kernel to write the buffer to the disk, but it is a very performance consuming operation. Each call will block and wait until the device reports that IO is completed. Therefore, in general, Redis usually executes fsync every 1s in the server of the production environment.
So far, we have learned how to control step 3 and step 4, but for step 5, we have no control at all. Maybe some kernel implementations will try to tell the driver to actually submit the data on the physical media, or the controller may reorder the write operations in order to improve the speed. Instead of writing the data to the disk as soon as possible, it will wait for more than a few milliseconds. This is completely beyond our control.
2. Two persistence methods in redis
1) Method 1: Snapshot
Redis snapshot is the simplest redis persistence mode. When certain conditions are met, it will generate a point in time snapshot of the dataset. For example, if the previous snapshot was created 2 minutes ago and there have been at least 100 new writes, a new snapshot will be created. This condition can be controlled by the user configuring the redis instance, or can be modified at runtime without restarting the server. A snapshot is a single that contains the entire dataset rdb file generation.
However, we know that Redis is a single threaded program, which means that we not only need to respond to user requests, but also need to take memory snapshots. The latter requires Redis to perform IO operations, which will seriously affect the performance of the server.
Another important problem is that while we are persisting, the memory data structure may also change. For example, a large hash dictionary is persisting, and a request comes and deletes it, but it has just ended. What should we do?
① . use the system multi process COW(Copy On Write) mechanism | fork function
The operating system multi process COW(Copy On Write) mechanism saved us. During persistence, Redis will call glibc's fork function to generate a sub process, which is simply understood as copying a process based on the current process, and the main process and sub process will share code blocks and data segments in memory:
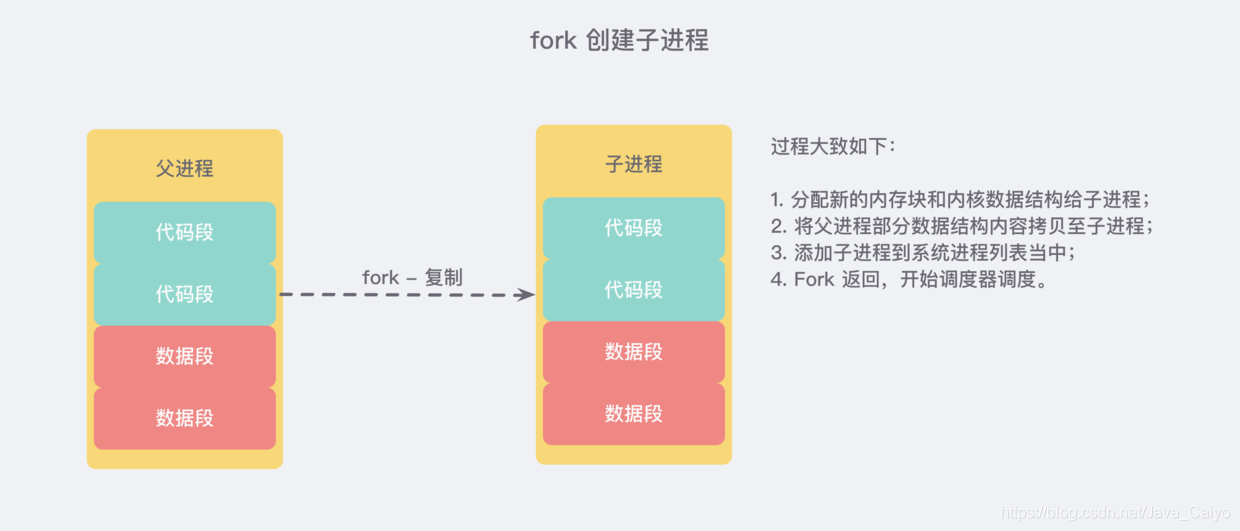
Here's a little more. Why are there two return values after a successful call to fork? Because the child process copies the stack segment of the parent process during copying, both processes stay in the fork function (both continue to execute "simultaneously" in the same place) and wait for return. Therefore, the pid of the child process is returned in the parent process once, and zero is returned in the child process once. When the system resources are insufficient, a negative number is returned. (pseudo code is as follows)
pid = os.fork()
if pid > 0:
	handle_client_request() # The parent process continues to process client requests
if pid == 0:
	handle_snapshot_write() # Child processes handle snapshot writes to disk
if pid < 0:
	# fork error
Therefore, snapshot persistence can be completely handed over to the child process, and the parent process continues to process client requests. The subprocess does data persistence. It will not modify the existing memory data structure. It just traverses and reads the data structure, and then serializes it to disk. But the parent process is different. It must continue to serve client requests, and then continuously modify the memory data structure.
At this time, the COW mechanism of the operating system will be used to separate the data segment pages. The data segment is composed of many operating system pages. When the parent process modifies the data of one page, it will copy and separate the shared page, and then modify the copied page. At this time, the corresponding page of the sub process does not change, or the data at the moment when the process is generated.
Because the data of the child process does not change, the data in the memory it can see solidifies at the moment when the process is generated and will never change again. This is why the persistence of Redis is called "snapshot". Next, the child process can safely traverse the data, serialize and write to disk.
2) Mode 2: AOF
Snapshots are not very persistent. If the computer running Redis stops running, the power cord fails, or your instance of kill -9 occurs unexpectedly, the latest data written to Redis will be lost. Although this may not be a big problem for some applications, some use cases have sufficient durability, in which case snapshots are not a viable option.
AOF(Append Only File - append only file) works very simply: every time a write operation to modify a dataset in memory is performed, the operation will be recorded. Assuming that the AOF log records all the modified instruction sequences since the Redis instance was created, you can restore the state of the memory data structure of the current Redis instance by sequentially executing all the instructions, that is, replay, on an empty Redis instance.
To show how AOF works in practice, let's do a simple experiment:
./redis-server --appendonly yes # Set a new instance to AOF mode
Then we perform some write operations:
redis 127.0.0.1:6379> set key1 Hello
OK
redis 127.0.0.1:6379> append key1 " World!"
(integer) 12
redis 127.0.0.1:6379> del key1
(integer) 1
redis 127.0.0.1:6379> del non_existing_key
(integer) 0
The first three operations actually modify the dataset, and the fourth operation does not because there is no key with a specified name. This is the text saved by the AOF log:
$ cat appendonly.aof *2 ## last In view of the fact that many people are interviewing recently, I have also sorted out a considerable number of interview special materials, as well as the experience of other large factories. I hope I can help you. > The latest interview questions >  > The answers to the above interview questions are compiled into document notes. > I also sorted out some interview materials&The latest 2021 collection of real interview questions from some large factories,**If necessary, you can[Click here to get it for free](https://codechina.csdn.net/m0_60958482/java-p7)** > Latest finishing e-book  > Organize the latest interview documents of large factories  Interview materials, there are also face-to-face experience of other large factories. I hope I can help you. > The latest interview questions > [External chain picture transfer...(img-a0dQRBdF-1630038932560)] > The answers to the above interview questions are compiled into document notes. > I also sorted out some interview materials&The latest 2021 collection of real interview questions from some large factories,**If necessary, you can[Click here to get it for free](https://codechina.csdn.net/m0_60958482/java-p7)** > Latest finishing e-book [External chain picture transfer...(img-Ckar0X4Y-1630038932561)] > Organize the latest interview documents of large factories [External chain picture transfer...(img-M3awLDvC-1630038932562)] The above is the whole content of this article. I hope it will be helpful to your study and I hope you can support it.