

Introduction to Amazon Kinesis Data Analytics
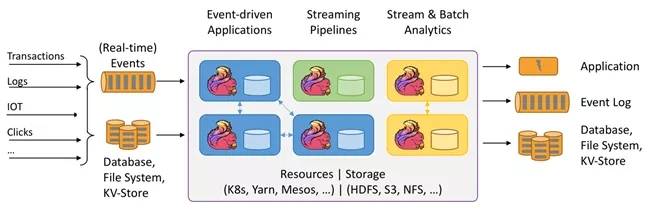
Nowadays, all kinds of enterprises are facing the need to process the continuously generated data every day. These data may come from log files generated by mobile or Web applications, online shopping data, gamer activities, social networking site information or financial transactions. It is very important for enterprises to process and analyze these stream data in time. Through good stream data processing and application, enterprises can quickly make business decisions, improve the quality of products or services, and improve user satisfaction.
At present, there are many tools on the market that can help enterprises process and analyze stream data. Among them, Apache Flink is a popular framework and engine for processing data streams, which is used for stateful computing on unbounded and bounded data streams. Flink can run in all common cluster environments and can calculate at memory speed and any size.
- Apache Flink
https://flink.apache.org
The picture is from Apache Flink official website
Amazon Kinesis Data Analytics is a simple way to quickly use Apache Flink to transform and analyze stream data in real time. It realizes the processing and analysis of stream data through a serverless architecture. With Amazon Kinesis Data Analytics, you can build Java, Scala, and Python applications using Apache Flink based open source libraries.
Amazon Kinesis Data Analytics provides the underlying infrastructure for your Apache Flink application. Its core functions include providing computing resources, parallel computing Automatic scaling and application backup (in the form of checkpoints and snapshots). You can use advanced Flink programming features (such as operators, functions, sources and receivers, etc.) just as you use them when hosting your Flink infrastructure.

📢 To learn more about the latest technology release and practical innovation of Amazon cloud technology, please pay attention to the 2021 Amazon cloud technology China summit! Click the picture to sign up ~
Using Python at Amazon Kinesis Data Analytics
Amazon Kinesis Data Analytics for Apache Flink now supports building streaming data analysis applications using Python 3.7. This enables you to use Apache Flink v1.0 on Amazon Kinesis Data Analytics in Python 11 running big data analysis is very convenient for Python language developers. Apache Flink v1.11. Python support is provided through the PyFlink Table API, which is a unified relational API.

The picture is from Apache Flink official website
In addition, Apache Flink provides a DataStream API for fine-grained control of state and time, and has supported Python DataStream API since Apache Flink version 1.12. For more information about the API in Apache Flink, please refer to the introduction to the official website of Flink.
- Introduction to Flink official website
https://ci.apache.org/project...
Amazon Kinesis Data Analytics Python application example
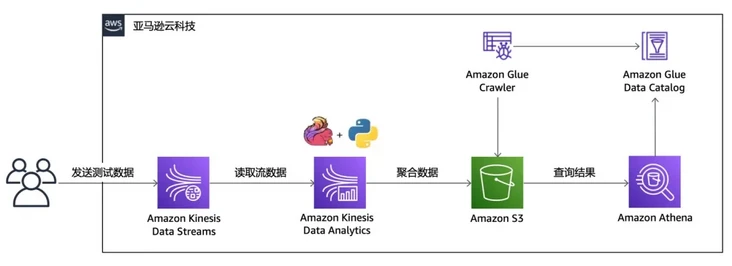
Next, we will demonstrate how to quickly start building the python version of Amazon Kinesis Data Analytics for Flink application. The reference architecture of the example is shown in the figure below. We will send some test data to Amazon Kinesis Data Stream, then do basic aggregation through the Tumbling Window function of Amazon Kinesis Data Analytics Python application, and then persist these data to Amazon S3; You can then use Amazon Glue and Amazon Athena to quickly query these data. The whole sample application adopts a server free architecture, which can not only realize rapid deployment and automatic elastic scaling, but also greatly reduce the burden of operation and maintenance and management.
The following example is conducted in Amazon cloud technology China (Beijing) region operated by halo new network.
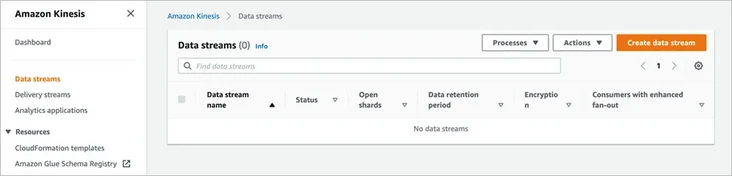
Create Amazon Kinesis Data Stream
The example will create Amazon Kinesis Data Stream on the console. First select Amazon Kinesis Service - data stream, and then click "create data stream".
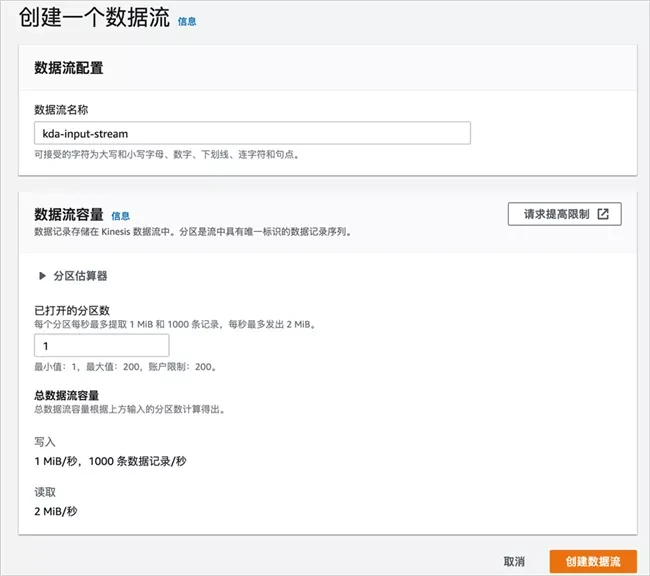
Enter the data stream name, such as "kDa input stream"; the number of partitions in the data stream capacity is set to 1. Note that this is for demonstration. Please configure the appropriate capacity according to the actual situation.
Click create data flow, wait a moment, and the data flow is created.
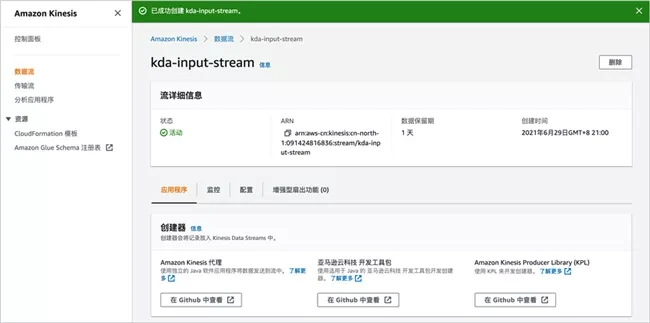
Later, we will send sample data like this Amazon Kinesis data stream.
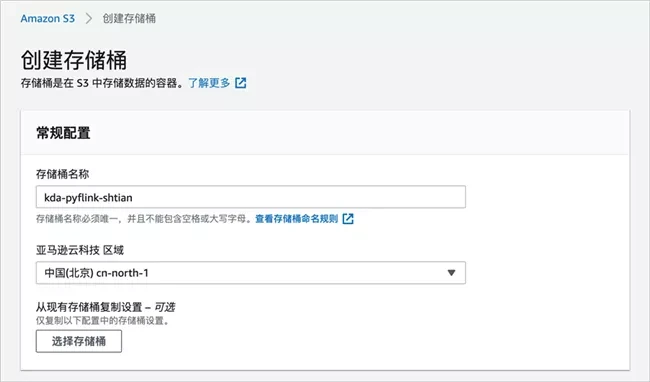
Create Amazon S3 bucket
The example will create an Amazon S3 bucket on the console. First select the Amazon Kinesis service, and then click "create bucket".

Enter the bucket name, such as "kDa pyflink -", which we will use later in the Amazon Kinesis application.
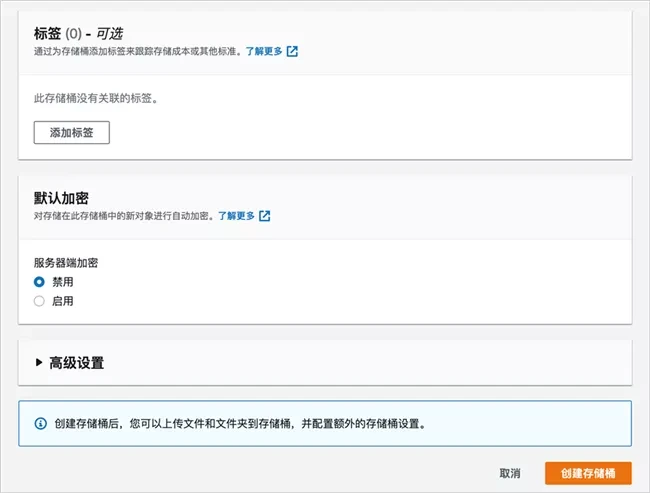
Keep other configurations unchanged and click "create bucket".
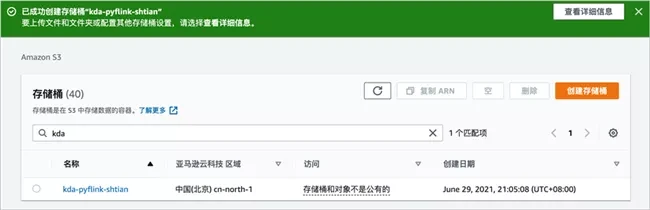
After a moment, you can see that the bucket has been successfully created.
Send sample data to Amazon Kinesis Data Stream
Next, we will use a Python program to send data to the Amazon Kinesis data stream. Create kDa input stream Py file and copy the following contents to this file. Pay attention to modifying STREAM_NAME is the name of the Amazon Kinesis data stream you just created, profile_name is configured as the corresponding user information.
import datetime
import json
import random
import boto3

STREAM_NAME = "kda-input-stream"

def get_data():
    return {
        'event_time': datetime.datetime.now().isoformat(),
        'ticker': random.choice(['AAPL', 'AMZN', 'MSFT', 'INTC', 'TBV']),
        'price': round(random.random() * 100, 2)}

def generate(stream_name, kinesis_client):
    while True:
        data = get_data()
        print(data)
        kinesis_client.put_record(
            StreamName=stream_name,
            Data=json.dumps(data),
            PartitionKey="partitionkey")

if __name__ == '__main__':
    session = boto3.Session(profile_name='<your profile>')
    generate(STREAM_NAME, session.client('kinesis', region_name='cn-n
Execute the following code to start sending data to the Amazon Kinesis data stream.
$ python kda-input-stream.py
Write Pyflink code
Next, we write the PyFlink code. Create kDa PyFlink demo Py file and copy the following contents to this file.
# -*- coding: utf-8 -*-

"""
kda-pyflink-demo.py
~~~~~~~~~~~~~~~~~~~
1. establish Table Environment
2. Create source Kinesis Data Stream
3. Create target S3 Bucket
4. Execute window function query
5. Write results to destination
"""

from pyflink.table import EnvironmentSettings, StreamTableEnvironment
from pyflink.table.window import Tumble
import os
import json

# 1. Create a {Table} Environment
env_settings = (
    EnvironmentSettings.new_instance().in_streaming_mode().use_blink_planner().build()
)
table_env = StreamTableEnvironment.create(environment_settings=env_settings)
statement_set = table_env.create_statement_set()


APPLICATION_PROPERTIES_FILE_PATH = "/etc/flink/application_properties.json"


def get_application_properties():
    if os.path.isfile(APPLICATION_PROPERTIES_FILE_PATH):
        with open(APPLICATION_PROPERTIES_FILE_PATH, "r") as file:
            contents = file.read()
            properties = json.loads(contents)
            return properties
    else:
        print('A file at "{}" was not found'.format(APPLICATION_PROPERTIES_FILE_PATH))


def property_map(props, property_group_id):
    for prop in props:
        if prop["PropertyGroupId"] == property_group_id:
            return prop["PropertyMap"]


def create_source_table(table_name, stream_name, region, stream_initpos):
    return """ CREATE TABLE {0} (
                ticker VARCHAR(6),
                price DOUBLE,
                event_time TIMESTAMP(3),
                WATERMARK FOR event_time AS event_time - INTERVAL '5' SECOND

              )
              PARTITIONED BY (ticker)
              WITH (
                'connector' = 'kinesis',
                'stream' = '{1}',
                'aws.region' = '{2}',
                'scan.stream.initpos' = '{3}',
                'format' = 'json',
                'json.timestamp-format.standard' = 'ISO-8601'
              ) """.format(
        table_name, stream_name, region, stream_initpos
    )


def create_sink_table(table_name, bucket_name):
    return """ CREATE TABLE {0} (
                ticker VARCHAR(6),
                price DOUBLE,
                event_time TIMESTAMP(3),
                WATERMARK FOR event_time AS event_time - INTERVAL '5' SECOND

              )
              PARTITIONED BY (ticker)
              WITH (
                  'connector'='filesystem',
                  'path'='s3a://{1}/',
                  'format'='csv',
                  'sink.partition-commit.policy.kind'='success-file',
                  'sink.partition-commit.delay' = '1 min'
              ) """.format(
        table_name, bucket_name)


def count_by_word(input_table_name):
    #Using the Table API
    input_table = table_env.from_path(input_table_name)

    tumbling_window_table = (
        input_table.window(
            Tumble.over("1.minute").on("event_time").alias("one_minute_window")
        )
        .group_by("ticker, one_minute_window")
        .select("ticker, price.avg as price, one_minute_window.end as event_time")
    )

    return tumbling_window_table


def main():
    #KDA} application property key
    input_property_group_key = "consumer.config.0"
    sink_property_group_key = "sink.config.0"

    input_stream_key = "input.stream.name"
    input_region_key = "aws.region"
    input_starting_position_key = "flink.stream.initpos"

    output_sink_key = "output.bucket.name"

    #Input / output data sheet
    input_table_name = "input_table"
    output_table_name = "output_table"

    #Get KDA application properties
    props = get_application_properties()

    input_property_map = property_map(props, input_property_group_key)
    output_property_map = property_map(props, sink_property_group_key)

    input_stream = input_property_map[input_stream_key]
    input_region = input_property_map[input_region_key]
    stream_initpos = input_property_map[input_starting_position_key]

    output_bucket_name = output_property_map[output_sink_key]

    # 2. Create source # Kinesis # Data # Stream
    table_env.execute_sql(
        create_source_table(
            input_table_name, input_stream, input_region, stream_initpos
        )
    )

    # 3. Create target S3 Bucket
    create_sink = create_sink_table(
        output_table_name, output_bucket_name
    )
    table_env.execute_sql(create_sink)

    # 4. Execute window function query
    tumbling_window_table = count_by_word(input_table_name)

    # 5. Write results to destination
    tumbling_window_table.execute_insert(output_table_name).wait()

    statement_set.execute()


if __name__ == "__main__":
    main()
Because the application needs to use Amazon Kinesis Flink SQL Connector, the corresponding amazon-kinesis-sql-connector-flink-2.0 3. Download the jar.
- amazon-kinesis-sql-connector-flink-2.0.3.jar
https://repo1.maven.org/maven...
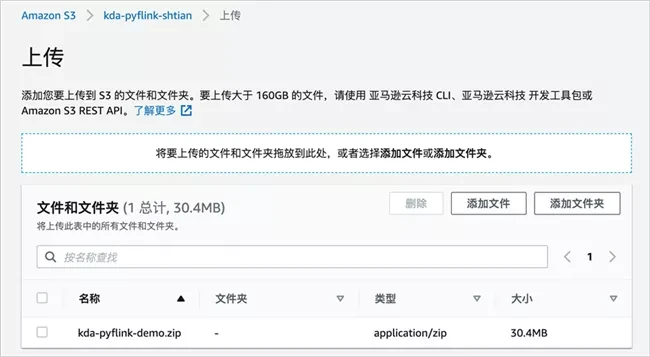
Add kDa pyflink demo Py and amazon-kinesis-sql-connector-flink-2.0 3. Jar is packaged into a zip file, such as kDa pyflink demo zip/; Then, upload the zip package to the Amazon S3 bucket just created. Enter the Amazon S3 bucket just created and click "Upload".

Select the zip file just packaged, and then click "Upload".
Create Python Amazon Kinesis Data Analytics application
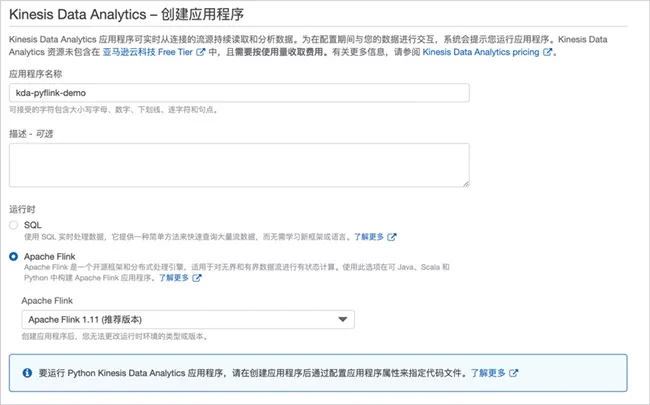
First select Amazon Kinesis Service - Data Analytics, and then click "create application"

Enter the application name, such as "kDa pyflink demo"; Select Apache Flink at runtime and keep the default version 1.11.
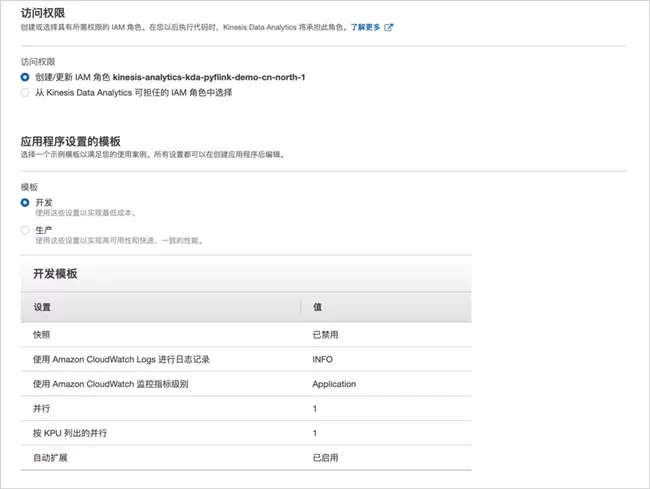
The access permission remains the default, such as "create / update Amazon IAM role kinesis-analytics-kda-pyflink-demo-cn-north-1"; Select "development" for the template set by the application. Note that this is for demonstration. You can select "production" according to the actual situation.
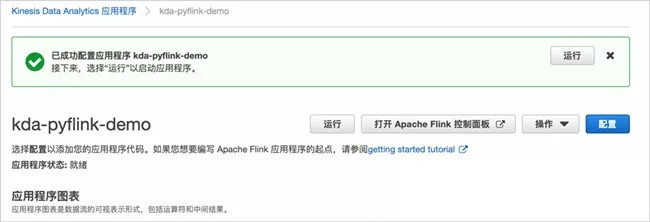
Click "create application", wait a moment, and the application is created.
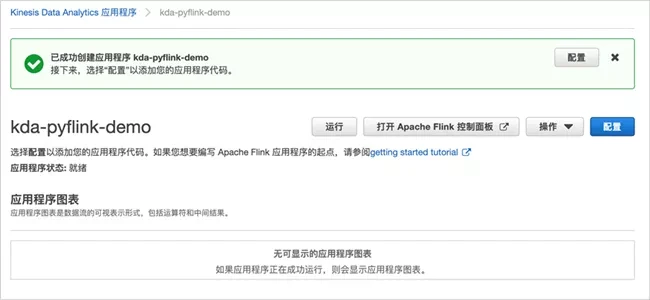
According to the prompt, we continue to configure the application and click "configure"; The code location is configured as the zip package location in the Amazon S3 you just created.
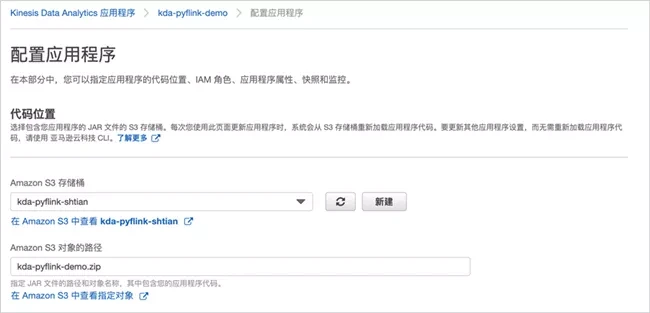
Then expand property configuration.
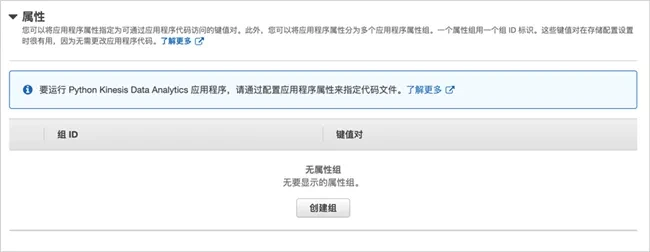
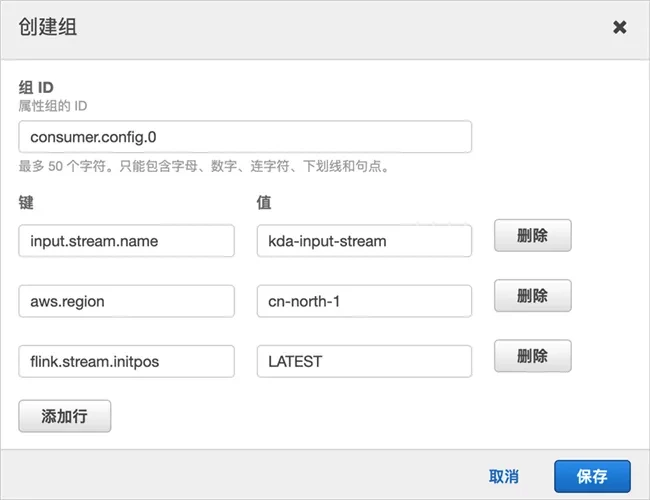
Create an attribute group, set the group name to "consumer.config.0", and configure the following key value pairs:
input.stream.name is the Amazon Kinesis data stream just created, such as kDa input stream
aws.region is the current region. Here is cn-north-1 Flink stream. Initpos sets the position of the read stream and is configured as last
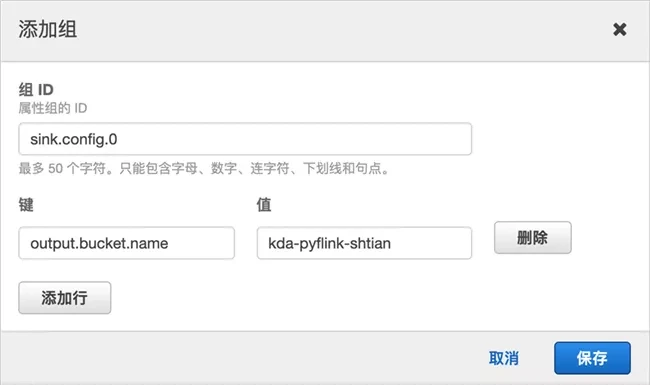
Create an attribute group, set the group name to "sink.config.0", and configure the following key value pairs:
output.bucket.name is the Amazon S3 bucket just created, such as kDa pyflink shtian
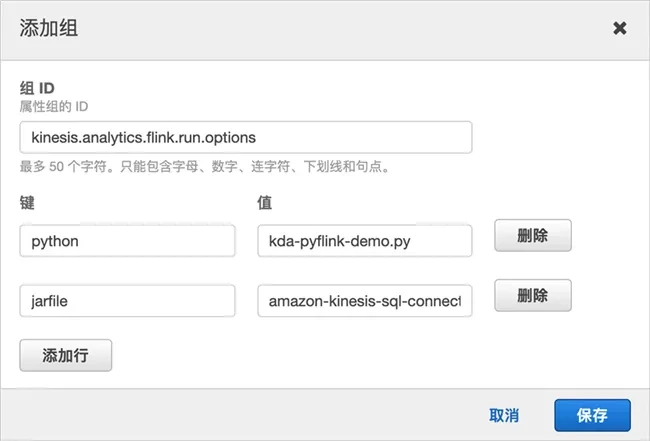
Create an attribute group, set the group name to "kinesis.analytics.flink.run.options", and configure the following key value pairs:
python is the PyFlink program just created, kDa PyFlink demo py
jarfile is the name of Amazon Kinesis Connector, here is amazon-kinesis-sql-connector-flink-2.0 3.jar
Then click Update to refresh the application configuration
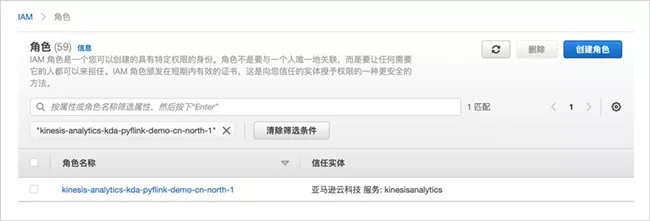
Next, configure the permissions of the Amazon IAM role used by the application. Enter the Amazon IAM interface, select the role, and then find the newly created role.
Then, expand additional policies and click Edit policy.
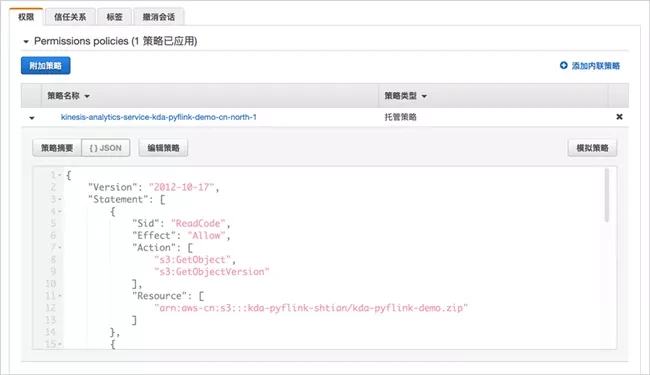
Supplement the last two paragraphs of Amazon IAM policy to allow the role to access Amazon Kinesis data stream and Amazon S3 bucket. Note that it needs to be replaced with your Amazon cloud technology China account.
{
    "Version": "2012-10-17",
    "Statement": [
        {
            "Sid": "ReadCode",
            "Effect": "Allow",
            "Action": [
                "s3:GetObject",
                "s3:GetObjectVersion"
            ],
            "Resource": [
                "arn:aws-cn:s3:::kda-pyflink-shtian/kda-pyflink-demo.zip"
            ]
        },
        {
            "Sid": "ListCloudwatchLogGroups",
            "Effect": "Allow",
            "Action": [
                "logs:DescribeLogGroups"
            ],
            "Resource": [
                "arn:aws-cn:logs:cn-north-1:012345678901:log-group:*"
            ]
        },
        {
            "Sid": "ListCloudwatchLogStreams",
            "Effect": "Allow",
            "Action": [
                "logs:DescribeLogStreams"
            ],
            "Resource": [
                "arn:aws-cn:logs:cn-north-1:012345678901:log-group:/aws/kinesis-analytics/kda-pyflink-demo:log-stream:*"
            ]
        },
        {
            "Sid": "PutCloudwatchLogs",
            "Effect": "Allow",
            "Action": [
                "logs:PutLogEvents"
            ],
            "Resource": [
                "arn:aws-cn:logs:cn-north-1:012345678901:log-group:/aws/kinesis-analytics/kda-pyflink-demo:log-stream:kinesis-analytics-log-stream"
            ]
        },
        {
            "Sid": "ReadInputStream",
            "Effect": "Allow",
            "Action": "kinesis:*",
            "Resource": "arn:aws-cn:kinesis:cn-north-1:012345678901:stream/kda-input-stream"
        },
        {
            "Sid": "WriteObjects",
            "Effect": "Allow",
            "Action": [
                "s3:Abort*",
                "s3:DeleteObject*",
                "s3:GetObject*",
                "s3:GetBucket*",
                "s3:List*",
                "s3:ListBucket",
                "s3:PutObject"
            ],
            "Resource": [
                "arn:aws-cn:s3:::kda-pyflink-shtian",
                "arn:aws-cn:s3:::kda-pyflink-shtian/*"
            ]
        }
    ]
}
Go back to the Amazon Kinesis Data Analytics application interface and click "run".
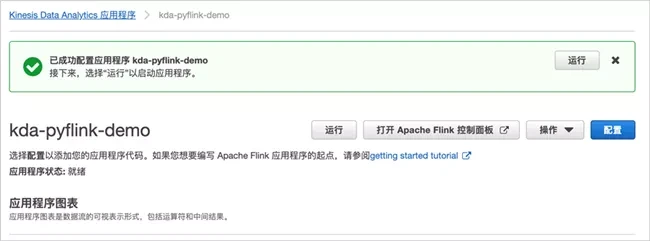
Click "open Apache Flink control panel" to jump to Flink's interface.
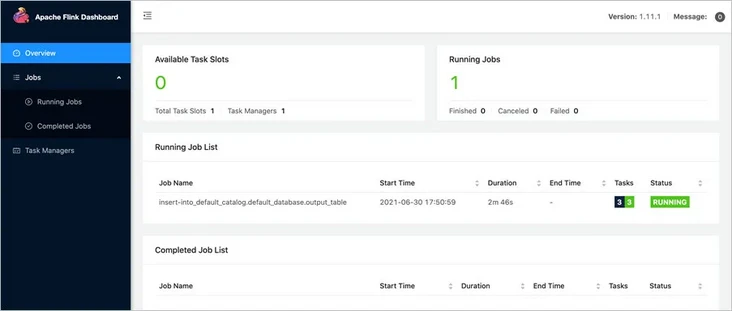
Click to view the running tasks.
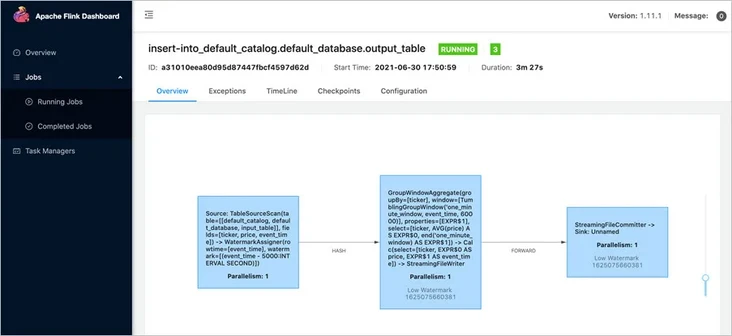
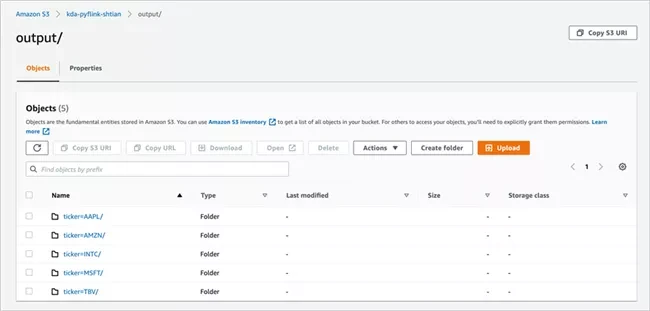
You can view further details as needed. Next, we go to Amazon S3 to verify whether the data has been written. After entering the created bucket, we can see that the data has been successfully written.
Crawling data using Amazon Glue
Enter the Amazon Glue service interface, select the crawler, click "add Crawler" and enter the crawler name.
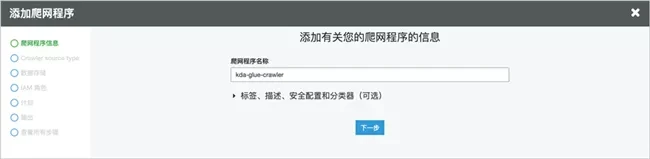
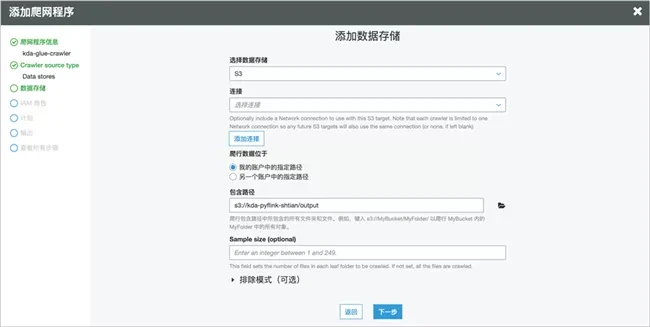
Keep the source type unchanged and add the data store as the output path of the created Amazon S3 bucket.
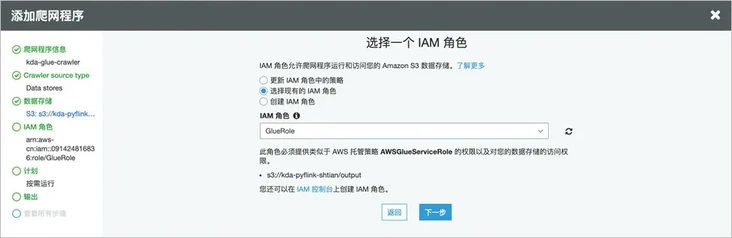
Select an existing role or create a new one.
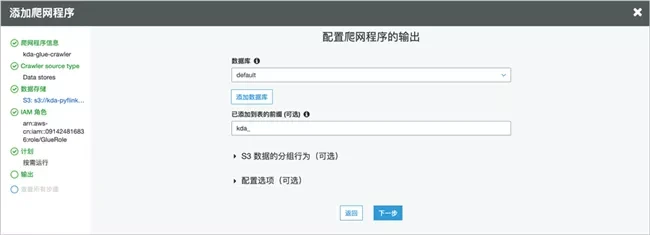
By selecting the default database, you can add table prefixes as needed.
After creation, click execute.
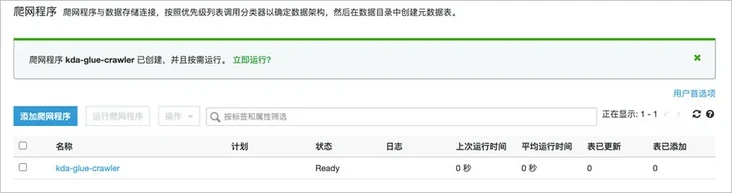
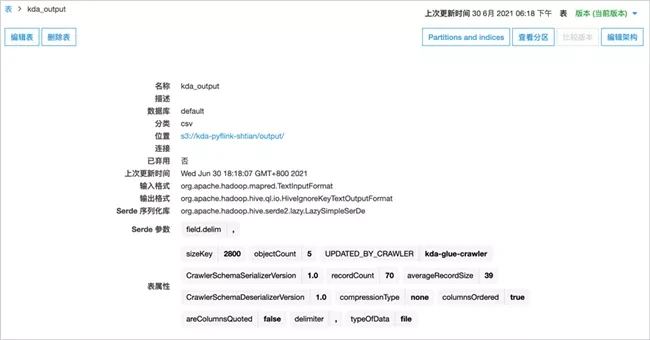
After successful crawling, you can view the details in the data table.
You can then switch to the Amazon Athena service to query the results.

Note: if Amazon Glue crawler or Amazon Athena query permission error occurs, it may be caused by opening Lake Formation. You can refer to the document to grant corresponding permissions to the role.
Summary
This paper first introduces a fast way to use Apache Flink on Amazon cloud technology platform - Amazon Kinesis Data Analytics for Flink, and then demonstrates how to realize Python stream data processing and analysis through PyFlink on Amazon Kinesis Data Analytics for Flink through an example of serverless architecture, And perform ad hoc query on the data through Amazon Glue and Amazon Athena. Amazon Kinesis Data Analytics for Flink's support for Python has also been launched in Amazon cloud technology China (Beijing) operated by halo new network and Amazon cloud technology China (Ningxia) operated by West cloud data. Welcome to use.
reference material
1.https://aws.amazon.com/soluti...
2.https://docs.aws.amazon.com/l...
3.https://docs.aws.amazon.com/k...
4.https://ci.apache.org/project...
Related reading
Author of this article
Shi Tian
Amazon cloud technology solution architect
He has rich experience in cloud computing, big data and machine learning. At present, he is committed to the research and practice in the fields of data science, machine learning, no server and so on. Translated into machine learning as a service, DevOps practice based on Kubernetes, Prometheus monitoring practice, etc.