preface
This blog will build Hadoop based on the data of the National College Students' big data skills competition in previous years and this year's training. There are corresponding screenshots of each step. The following blog is only used as a record of the process of building Hadoop ~ if there are deficiencies, you are welcome to point out and learn and progress together. Attach a link to the information.
Data link
Training link on building Hadoop cluster in the 4th national big data skills competition for college students:
https://www.qingjiaoclass.com/market/detail/4486
All environment tools Baidu network disk links:
https://pan.baidu.com/s/1oOW7WqHK4fiqv4Xja5f7gQ
Extraction code: vvi7
When you practice building a Hadoop cluster, try to take a snapshot at every step to prevent errors. If you can't solve them, you have to rebuild them. It's very troublesome
Prepare three virtual machines and modify the network to bridge before configuring with VMware
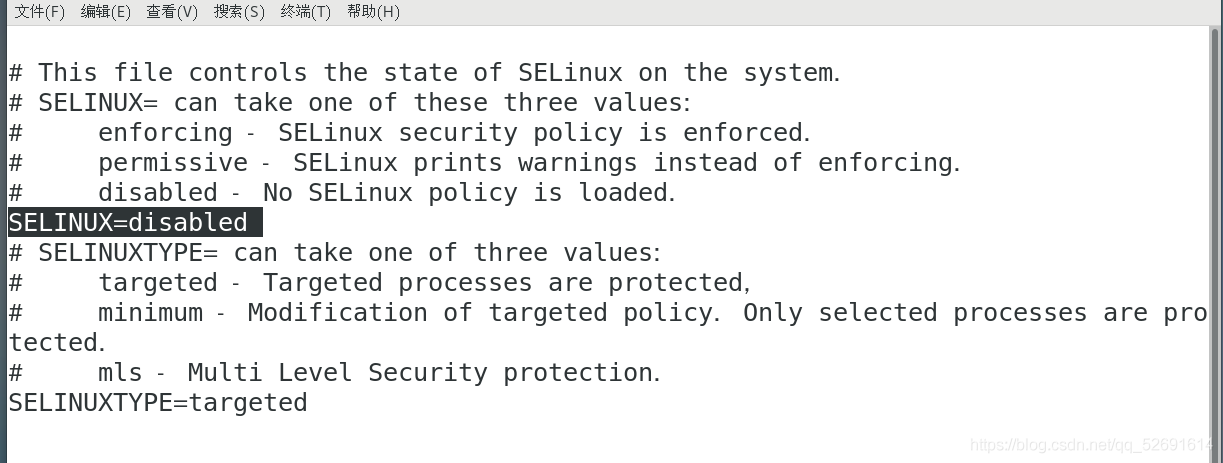
1. Temporarily turn off the firewall and selinux
systemctl stop firewalld
setenforce 0
2. Permanent shutdown
systemctl disable firewalld
vi /etc/sysconfig/selinux
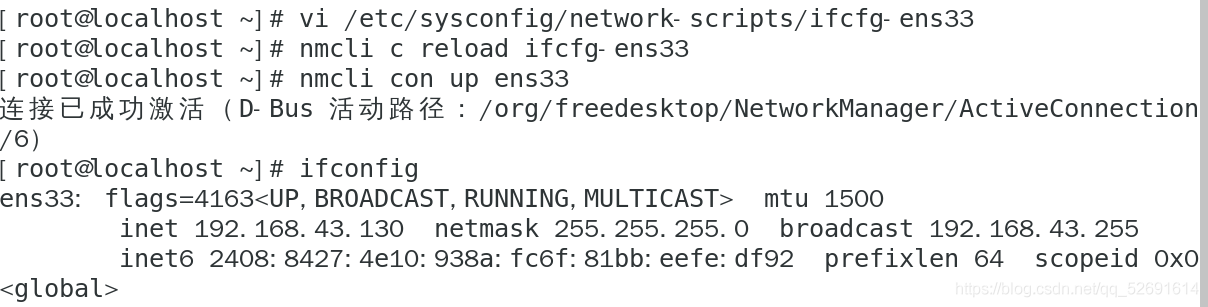
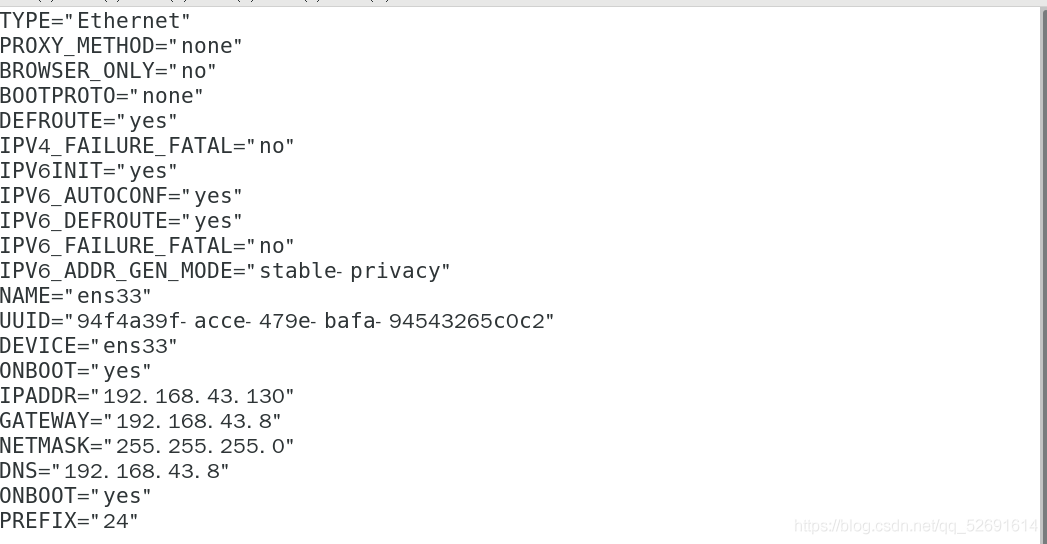
2. Configure the network bridging mode and modify the static ip address
vi /etc/sysconfig/network-scripts/ifcfg-ens33
nmcli c reload ifcfg-ens33
nmcli con up ens33
ifconfig
3. Clone two virtual machines and modify the IP address
Clone virtual machine
Modify the ip addresses of the two cloned virtual machines as follows:
192.168.43.140,192.168.43.150
Open SecureCRT and remotely log in to the three virtual machines
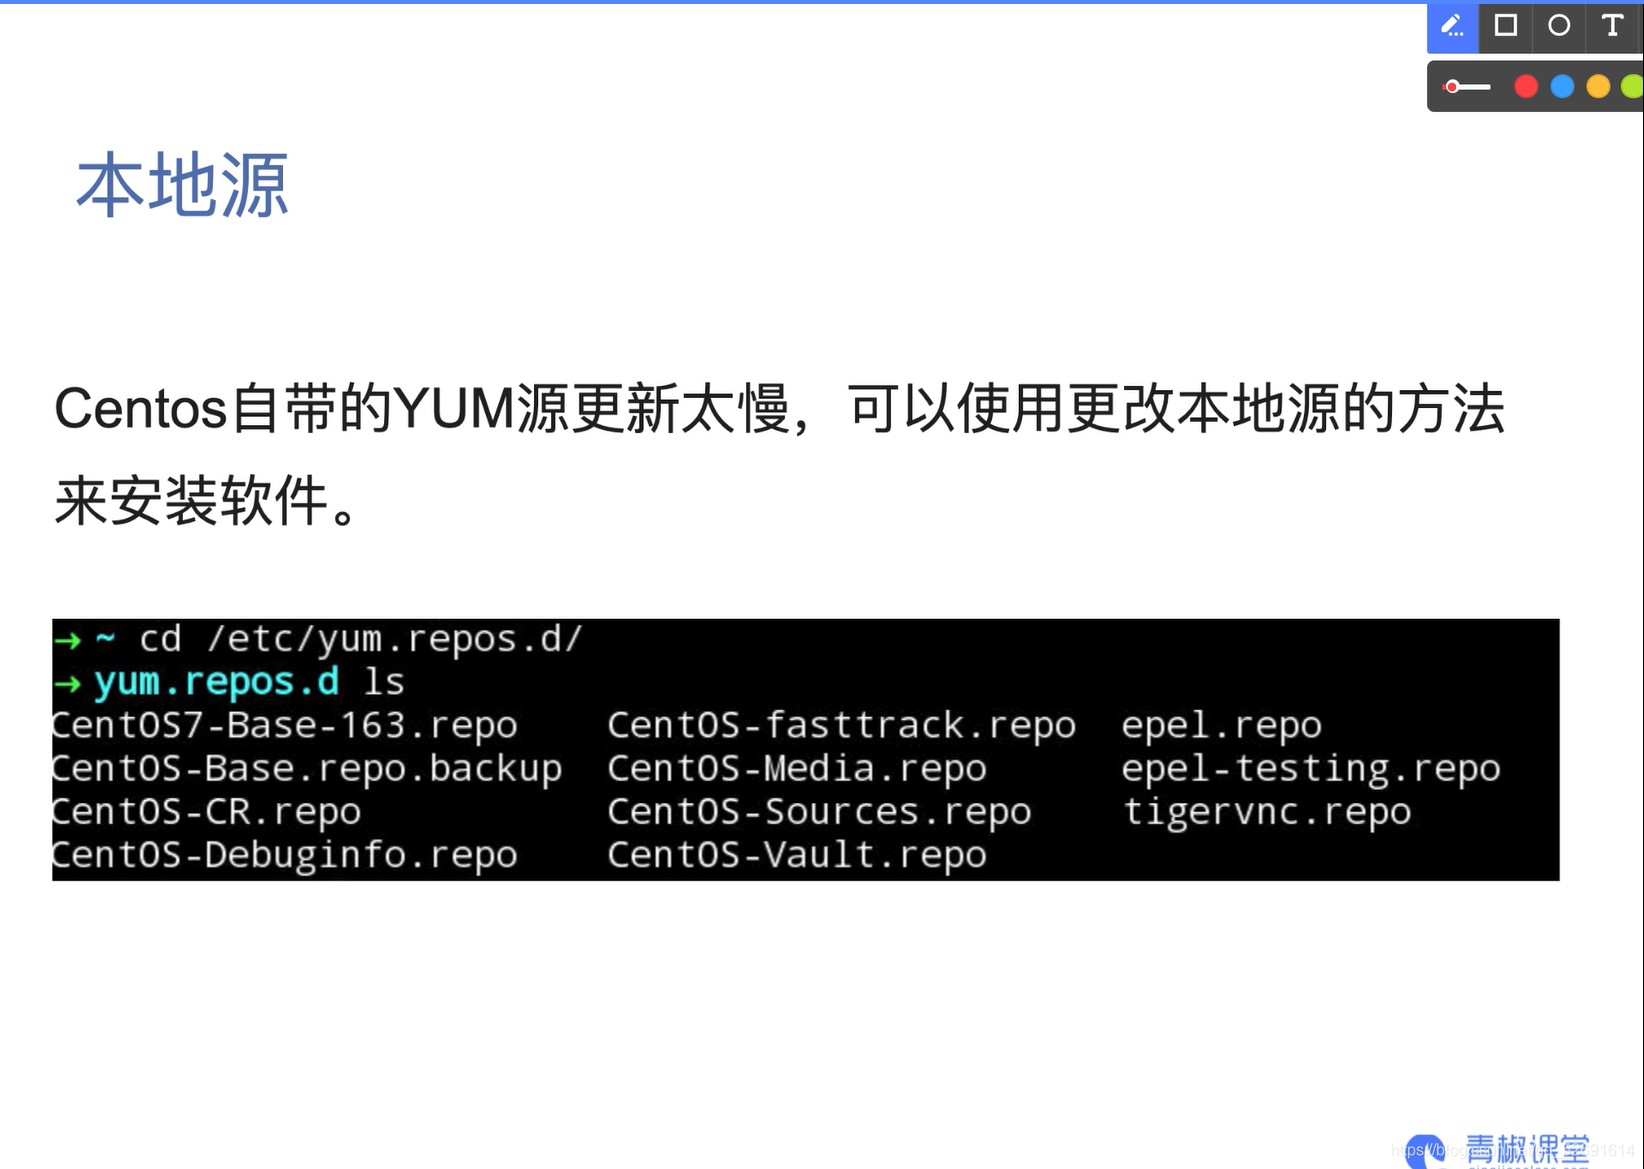
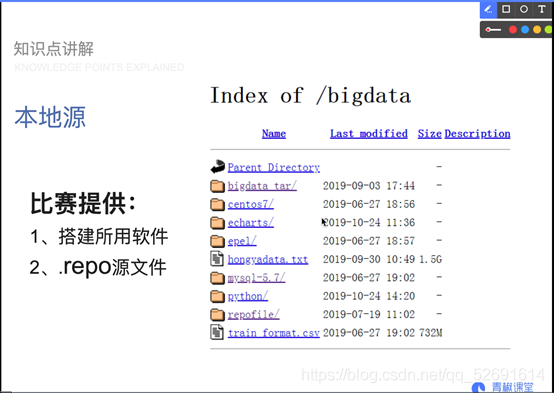
01 local source YUM
02 basic environment configuration
1. Firewall
systemctl stop firewalld
systemctl status firewalld
2. Host name and mapping
2.1 modify host name
There are three nodes in this cluster construction, including a master node and two slave nodes slave1 and slave2. You need to modify the host names of the three nodes respectively.
1. Take the host point master as an example and switch to the root user for the first time: su
2. Modify the host name to master:
hostnamectl set-hostname master
3. Effective immediately:
bash

4. To permanently modify the host name, edit the / etc/sysconfig/network file
vi /etc/sysconfig/network
The contents are as follows:
NETWORKING=yes
HOSTNAME=master

Save the file and restart the computer: reboot
Check whether it works: hostname
2.2 add mapping
Enable each node to connect to the corresponding address using the corresponding node host name.
The hosts file is mainly used to determine the IP address of each node, so that subsequent nodes can quickly find and access it. This file needs to be configured on the above three virtual machine nodes.
vi /etc/hosts

3. Time synchronization
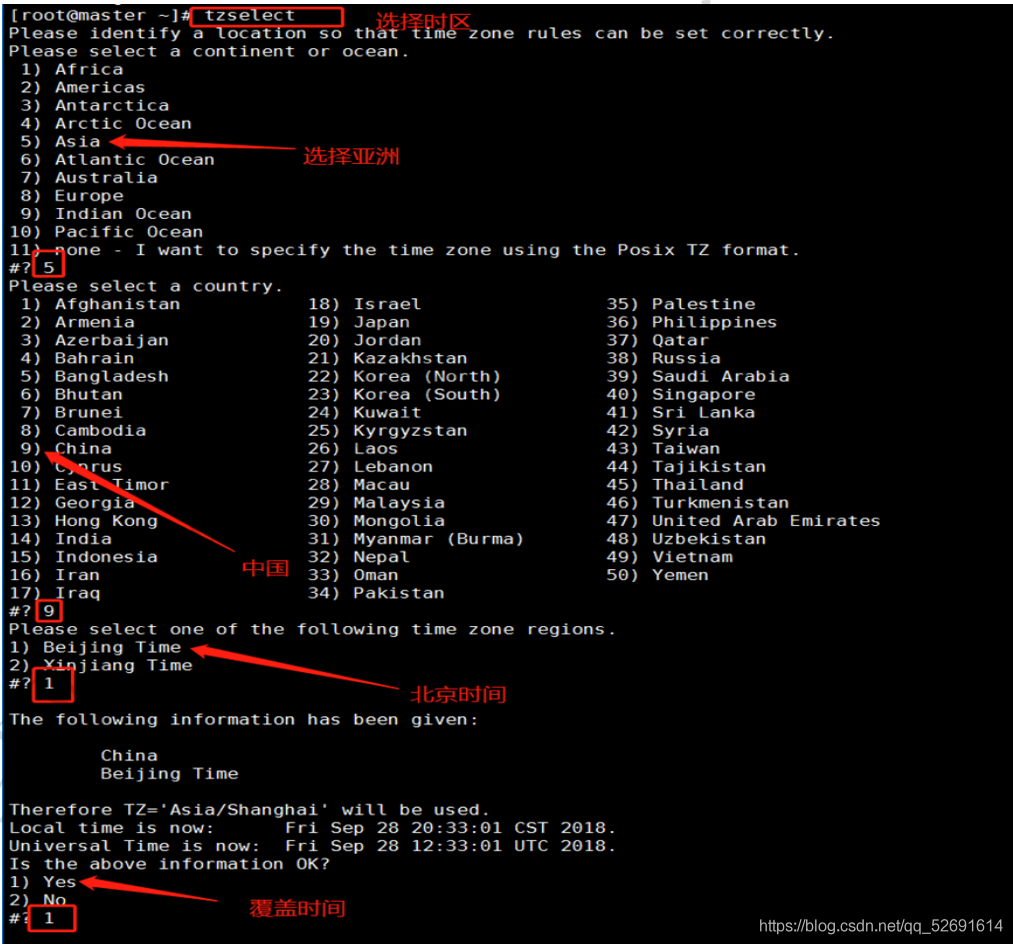
3.1 time zone
1. Check your machine time:
date
2. Select time zone:
tzselect
3.2 time synchronization protocol NTP
1.3 machine installation ntp:
yum install -y ntp

2. As an ntp server, the master modifies the ntp configuration file. (executed on the master)
vi /etc/ntp.conf
Find line 58, the last line
add to
server 127.127.1.0
fudge 127.127.1.0 stratum 10

3. Restart the ntp service.
/bin/systemctl restart ntpd.service

4. Synchronization of other machines (slave1, slave2)
Wait about five minutes, and then synchronize the time of the machine on another machine.
ntpdate master


4. Scheduled task crontab
4.1 description
- Asterisk (*): represents all possible values, such as the month field. If it is an asterisk, it means that the command is executed every month after the constraints of other fields are met.
- Comma (,): you can specify a list range with comma separated values, for example, "1,2,5,7,8,9"
- Middle bar (-): the middle bar between integers can be used to represent an integer range, for example, "2-6" means "2,3,4,5,6"
- Forward slash (/): you can specify the interval frequency of time with forward slash. For example, "0-23 / 2" means to execute every two hours.
- At the same time, the forward slash can be used with the asterisk, for example * / 10. If it is used in the minute field, it means that it is executed every ten minutes

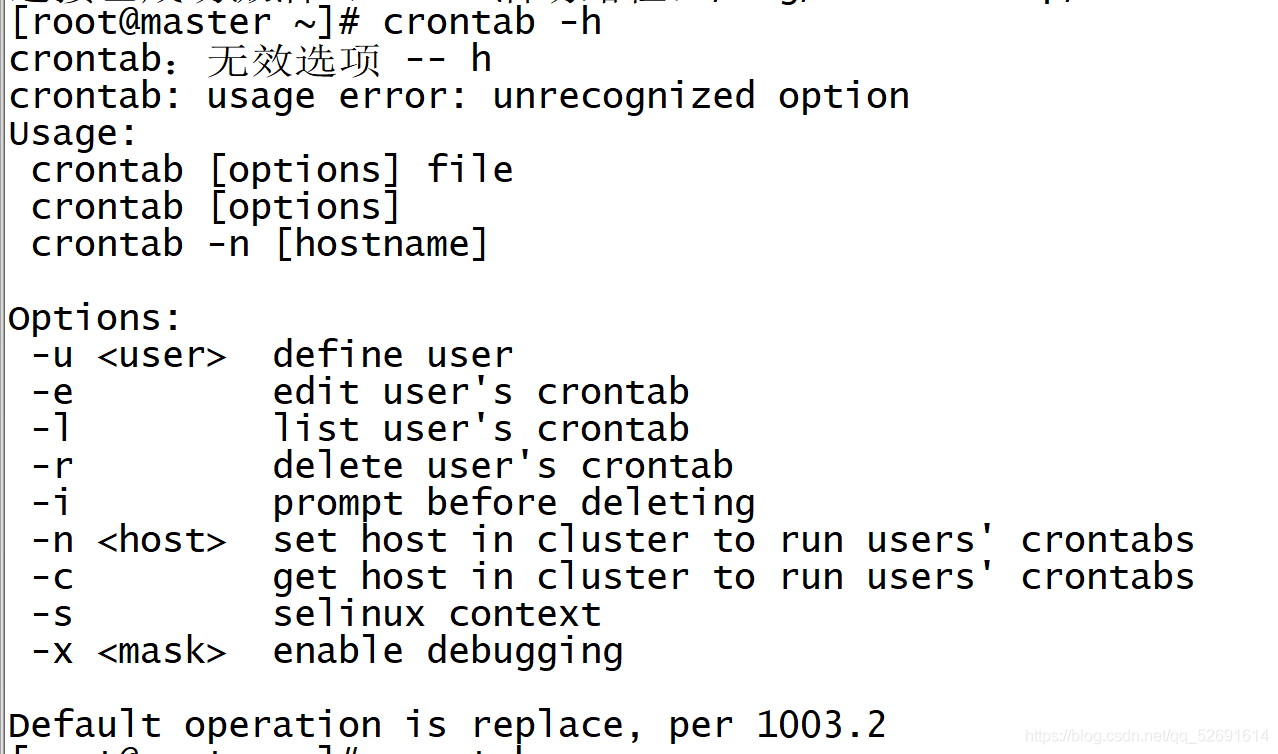
input
crontab -h
You can view command related operations
4.2 case: scheduled task
Requirement: every 10min
Write a scheduled task:
crontab -e
Type i to enter editing mode
Input:
*/10 * * * * usr/sbin/ntpdate master

To view a scheduled task list:
crontab -l

03 remote login ssh
In order to enable the master node of the master node to log in to the slave node of the two child nodes through SSH without password.
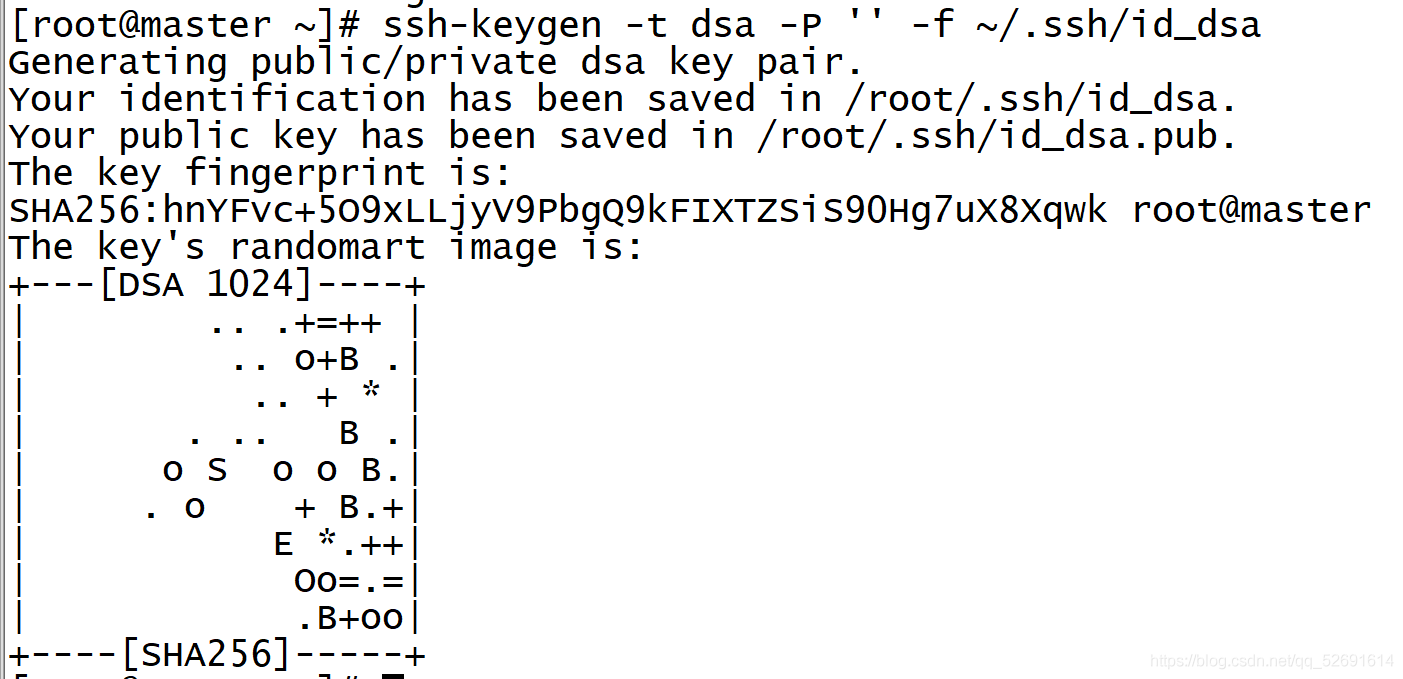
1. The three machines execute respectively
ssh-keygen -t dsa -P '' -f ~/.ssh/id_dsa
2. Execute only on the master node
cd .ssh/
ls
id_dsa.pub is the public key, id_dsa is the private key

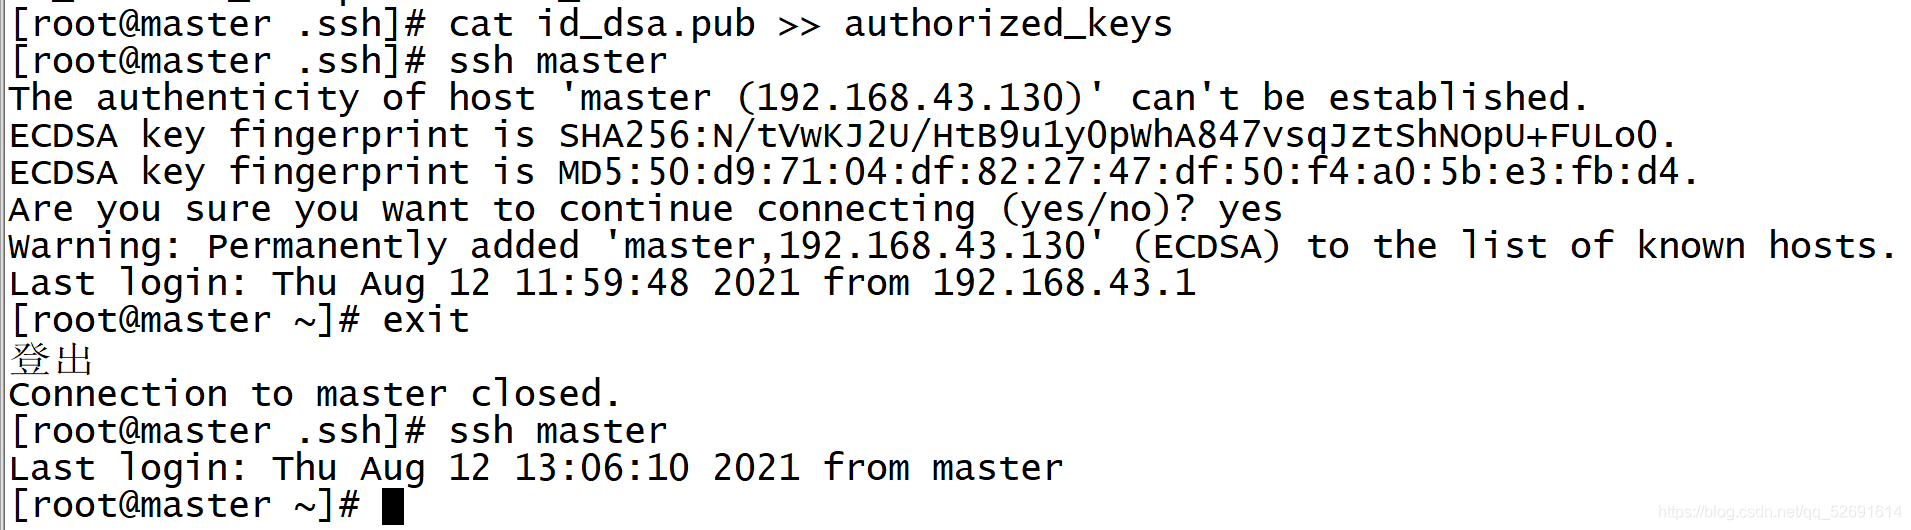
3. Copy the public key file to authorized_keys file: (master only)
cat id_dsa.pub >> authorized_keys
Verify ssh inner loop
ssh master
 input yes
exit
ssh master#You do not need to enter yes validation this time
4. Execute the following commands on the master node:
scp ./authorized_keys root@slave1:~/.ssh/
scp ./authorized_keys root@slave2:~/.ssh/

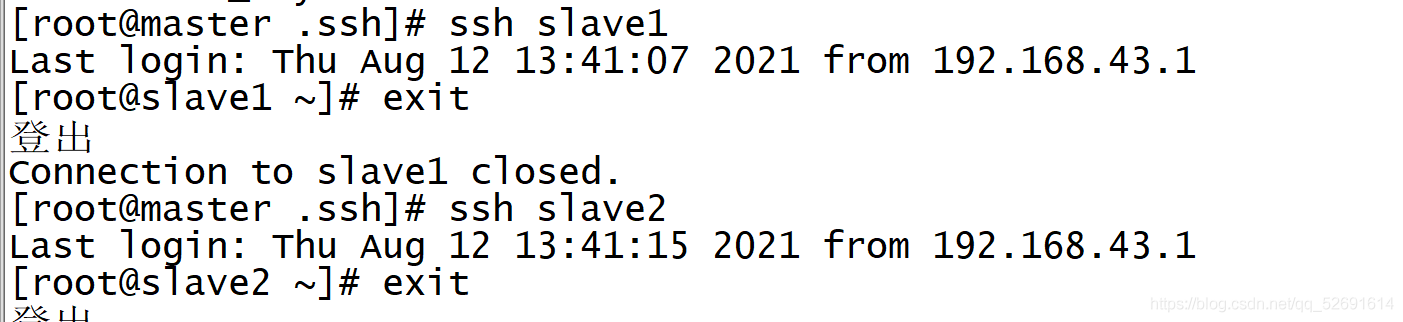
5. Verify ssh password free login
ssh slave1
exit
04 locale - Java
Install JDK
All three virtual machines need to be installed
1. Establish work path
mkdir -p /usr/java
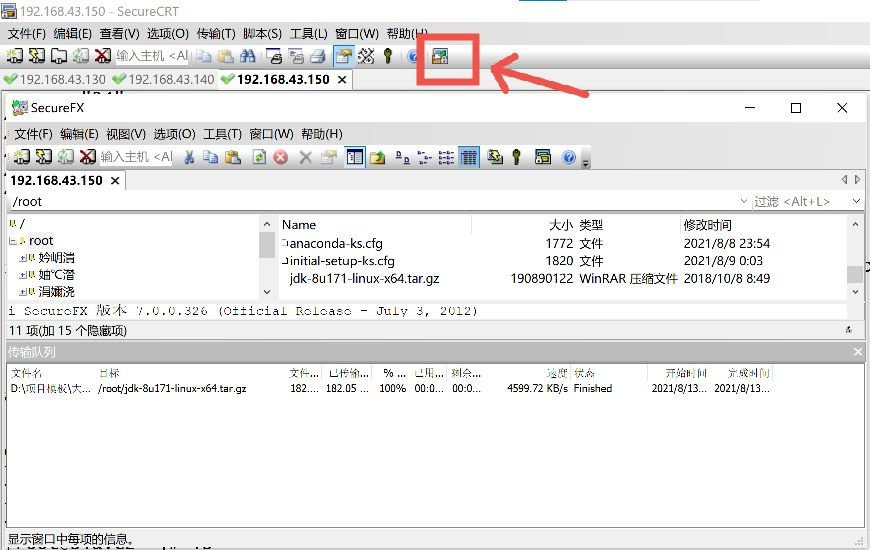
2. Transfer the file to the local root directory (SecureCRT I use)
Under Windows, first copy the jdk installation package, click the one indicated by the arrow, then right-click and paste, and wait for the file transfer to complete.
3. Decompression
tar -zxvf jdk-8u171-linux-x64.tar.gz -C /usr/java/
4. Modify environment variables
vi /etc/profile
Add the following to line 55 of the file
export JAVA_HOME=/usr/java/jdk1.8.0_171
export PATH=$PATH:$JAVA_HOME/bin

Effective files and viewing jdk versions
source /etc/profile
java -version

Installation succeeded!
05 coordination services zookeeper installation
Note: Step 1 is performed on three virtual machines, steps 2 to 10 are performed on the master virtual machine, step 11 is performed on slave1 and slave2 virtual machines, and step 12 is performed on three virtual machines
1. Modify the host name to ip address mapping configuration (three virtual machines)
vi /etc/hosts
192.168.43.130 master master.root
192.168.43.140 slave1 slave1.root
192.168.43.150 slave2 slave2.root

2. Upload the zookeeper installation package to the root directory of the virtual machine
3. Create a new directory
mkdir -p /usr/zookeeper

4. Decompression
tar -zxvf zookeeper-3.4.10.tar.gz -C /usr/zookeeper/
5. Modify the / etc/profile file and configure the zookeeper environment variable.
vi /etc/profile
Add on line 58
export ZOOKEEPER_HOME=/usr/zookeeper/zookeeper-3.4.10
PATH=$PATH:$ZOOKEEPER_HOME/bin

6. Enter the zookeeper configuration folder conf and set the zoo_ sample. A copy of CFG file named zoo cfg
cd /usr/zookeeper/zookeeper-3.4.10/conf/
cp -p zoo_sample.cfg zoo.cfg

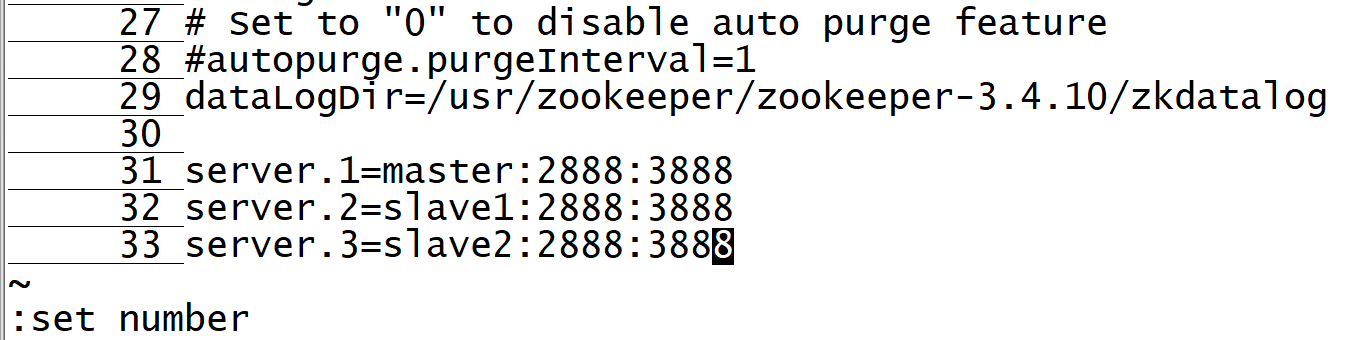
7. Configuration file zoo cfg
vi zoo.cfg
Modify act 12
dataDir=/usr/zookeeper/zookeeper-3.4.10/zkdata

On line 29, at the end of the file, add the following
dataLogDir=/usr/zookeeper/zookeeper-3.4.10/zkdatalog
server.1=master:2888:3888
server.2=slave1:2888:3888
server.3=slave2:2888:3888
8. In the directory of zookeeper, create two folders, zkdata and zkdata log, which are required in the configuration.
mkdir zkdata
mkdir zkdatalog

9. Enter the zkdata folder and create the file myid to indicate the server number. In the master host, set the server id to 1.
cd zkdata
vi myid

10. ZooKeeper has been configured on the master node. Now you can remotely copy the configured installation file to the cluster
Under the directory corresponding to each node in (in this case, the child node):
scp -r /usr/zookeeper root@slave1:/usr/
scp -r /usr/zookeeper root@slave2:/usr/

11. For the configuration file myid file, slave1 is 2 and slave2 is 3
cd /usr/zookeeper/zookeeper-3.4.10/zkdata
vi myid


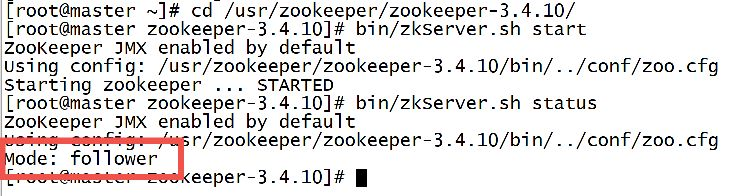
12. Start the zookeeper cluster
Each virtual machine must first enter the zookeeper directory
cd /usr/zookeeper/zookeeper-3.4.10/
Then execute separately
bin/zkServer.sh start
bin/zkServer.sh status
If one node is a leader and the other nodes are follower s, the installation is successful~


06.Hadoop installation
Extract the installation package and configure environment variables
1. Copy the Hadoop installation package to the root directory, create a working directory, and unzip the Hadoop installation package
mkdir –p /usr/hadoop
tar -zxvf hadoop-2.7.3.tar.gz -C /usr/hadoop/
2. Configure environment variables and modify the / etc/profile file
vi /etc/profile
Add on line 60
#HADOOP
export HADOOP_HOME=/usr/hadoop/hadoop-2.7.3
export CLASSPATH=$CLASSPATH:$HADOOP_HOME/lib
export PATH=$PATH:$HADOOP_HOME/bin

3. Effective configuration file
source /etc/profile
Configure Hadoop components
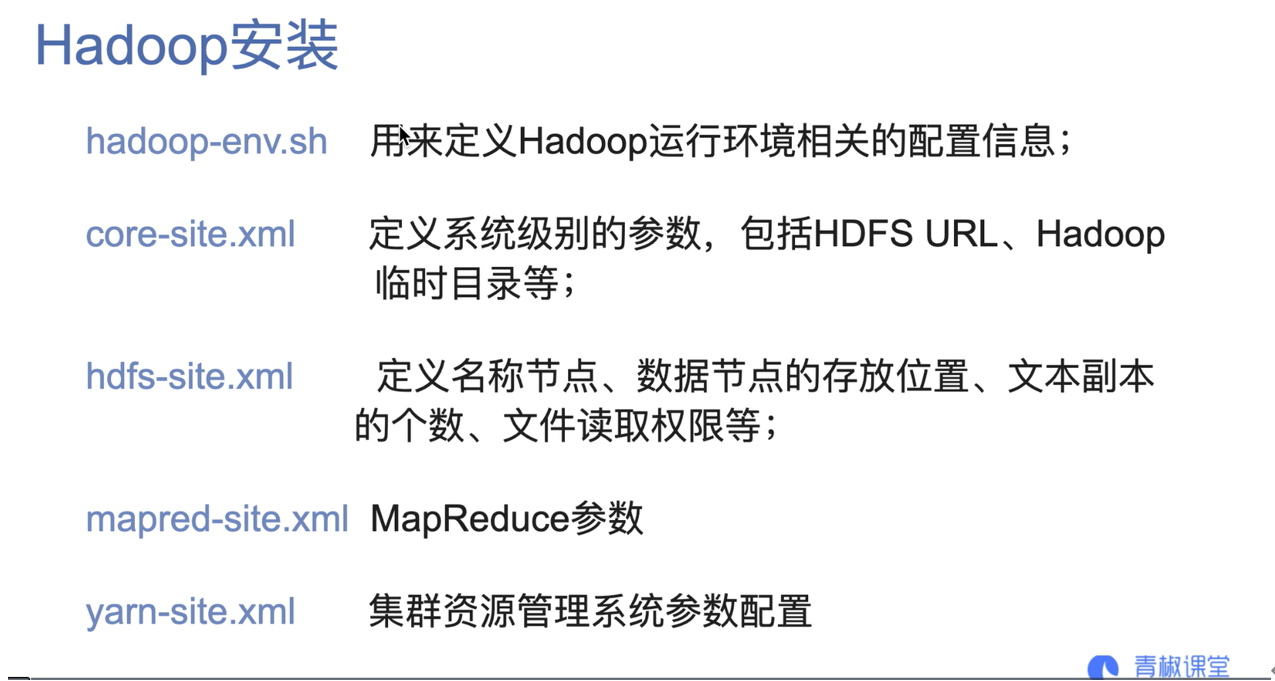
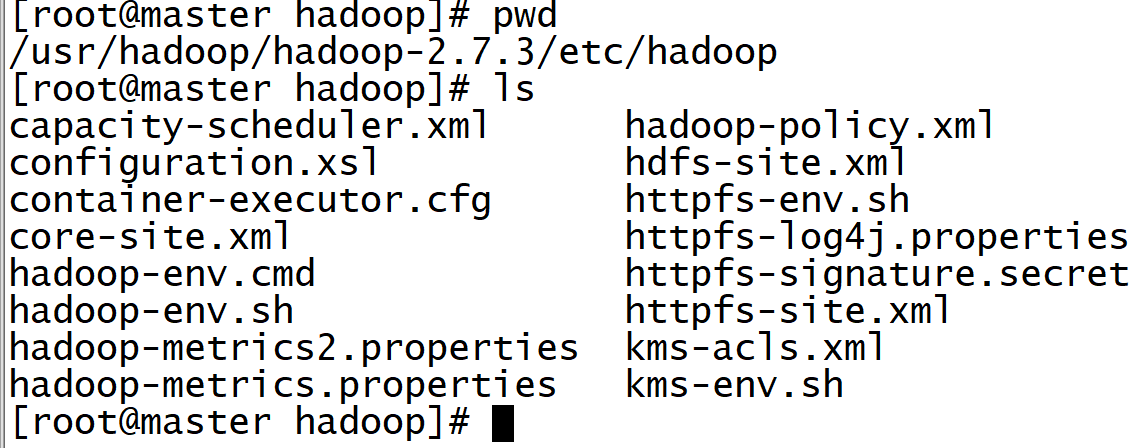
1. Enter the / etc/hadoop directory of Hadoop
cd /usr/hadoop/hadoop-2.7.3/etc/hadoop
2. Edit Hadoop env SH file
vi /hadoop-env.sh
Add the following on line 28
export JAVA_HOME=/usr/java/jdk1.8.0_171

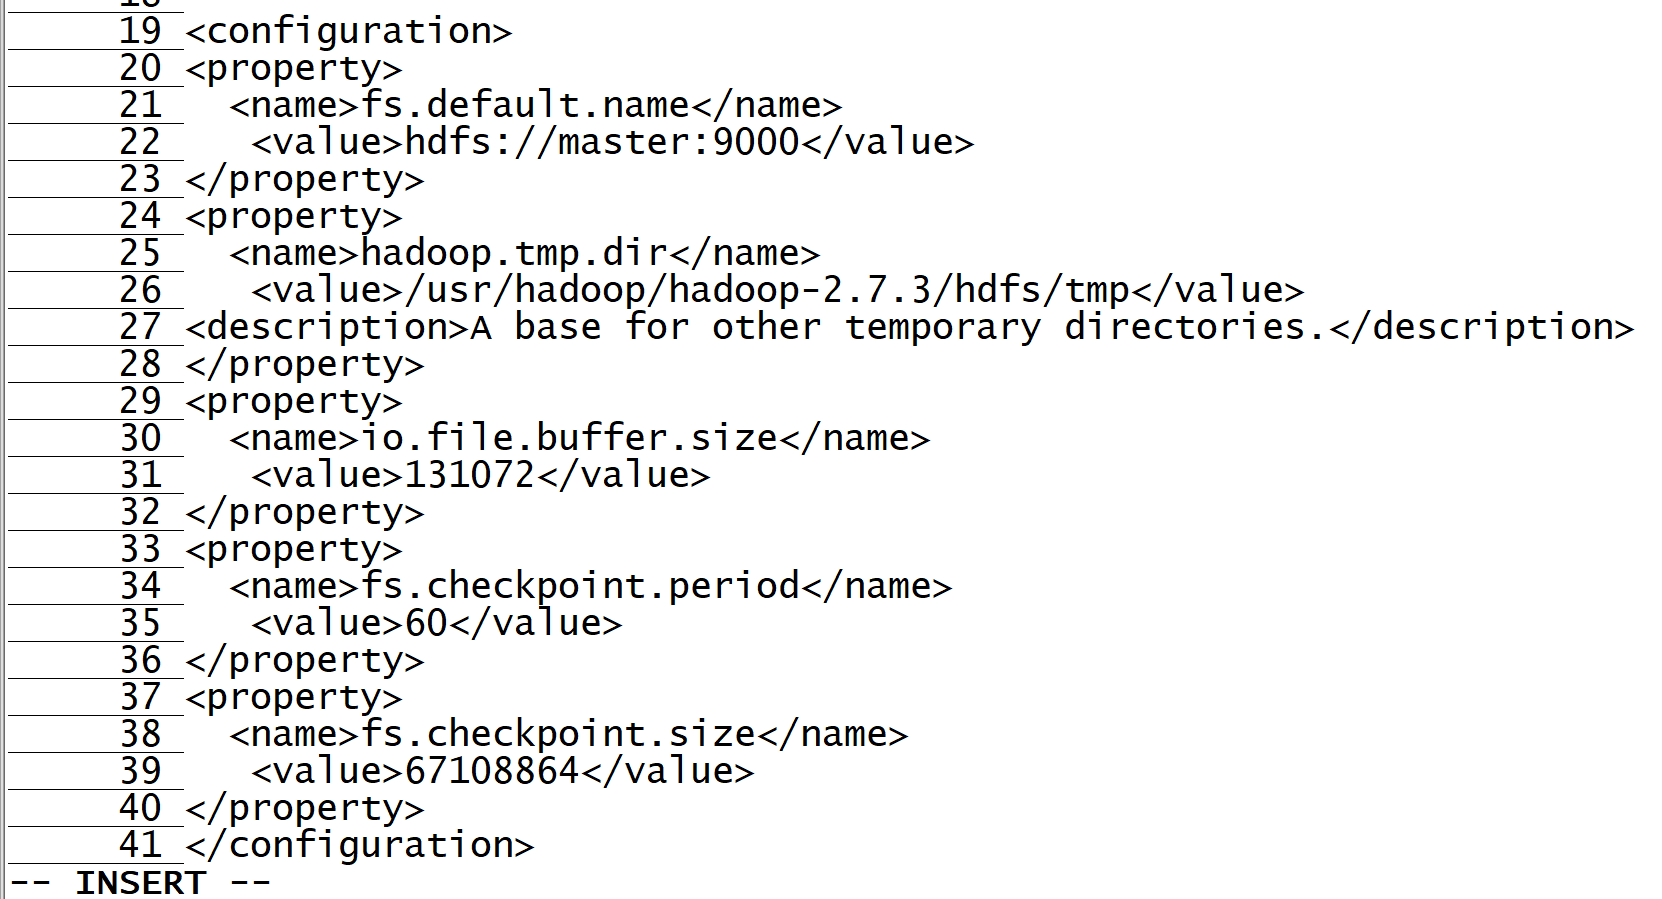
3. Edit core site xml
vi core-site.xml
Add the following
<configuration>
<property>
  <name>fs.default.name</name>
   <value>hdfs://master:9000</value>
</property>
<property>
  <name>hadoop.tmp.dir</name>
   <value>/usr/hadoop/hadoop-2.7.3/hdfs/tmp</value>
<description>A base for other temporary directories.</description>
</property>
<property>
  <name>io.file.buffer.size</name>
   <value>131072</value>
</property>
<property>
  <name>fs.checkpoint.period</name>
   <value>60</value>
</property>
<property>
  <name>fs.checkpoint.size</name>
   <value>67108864</value>
</property>
</configuration>
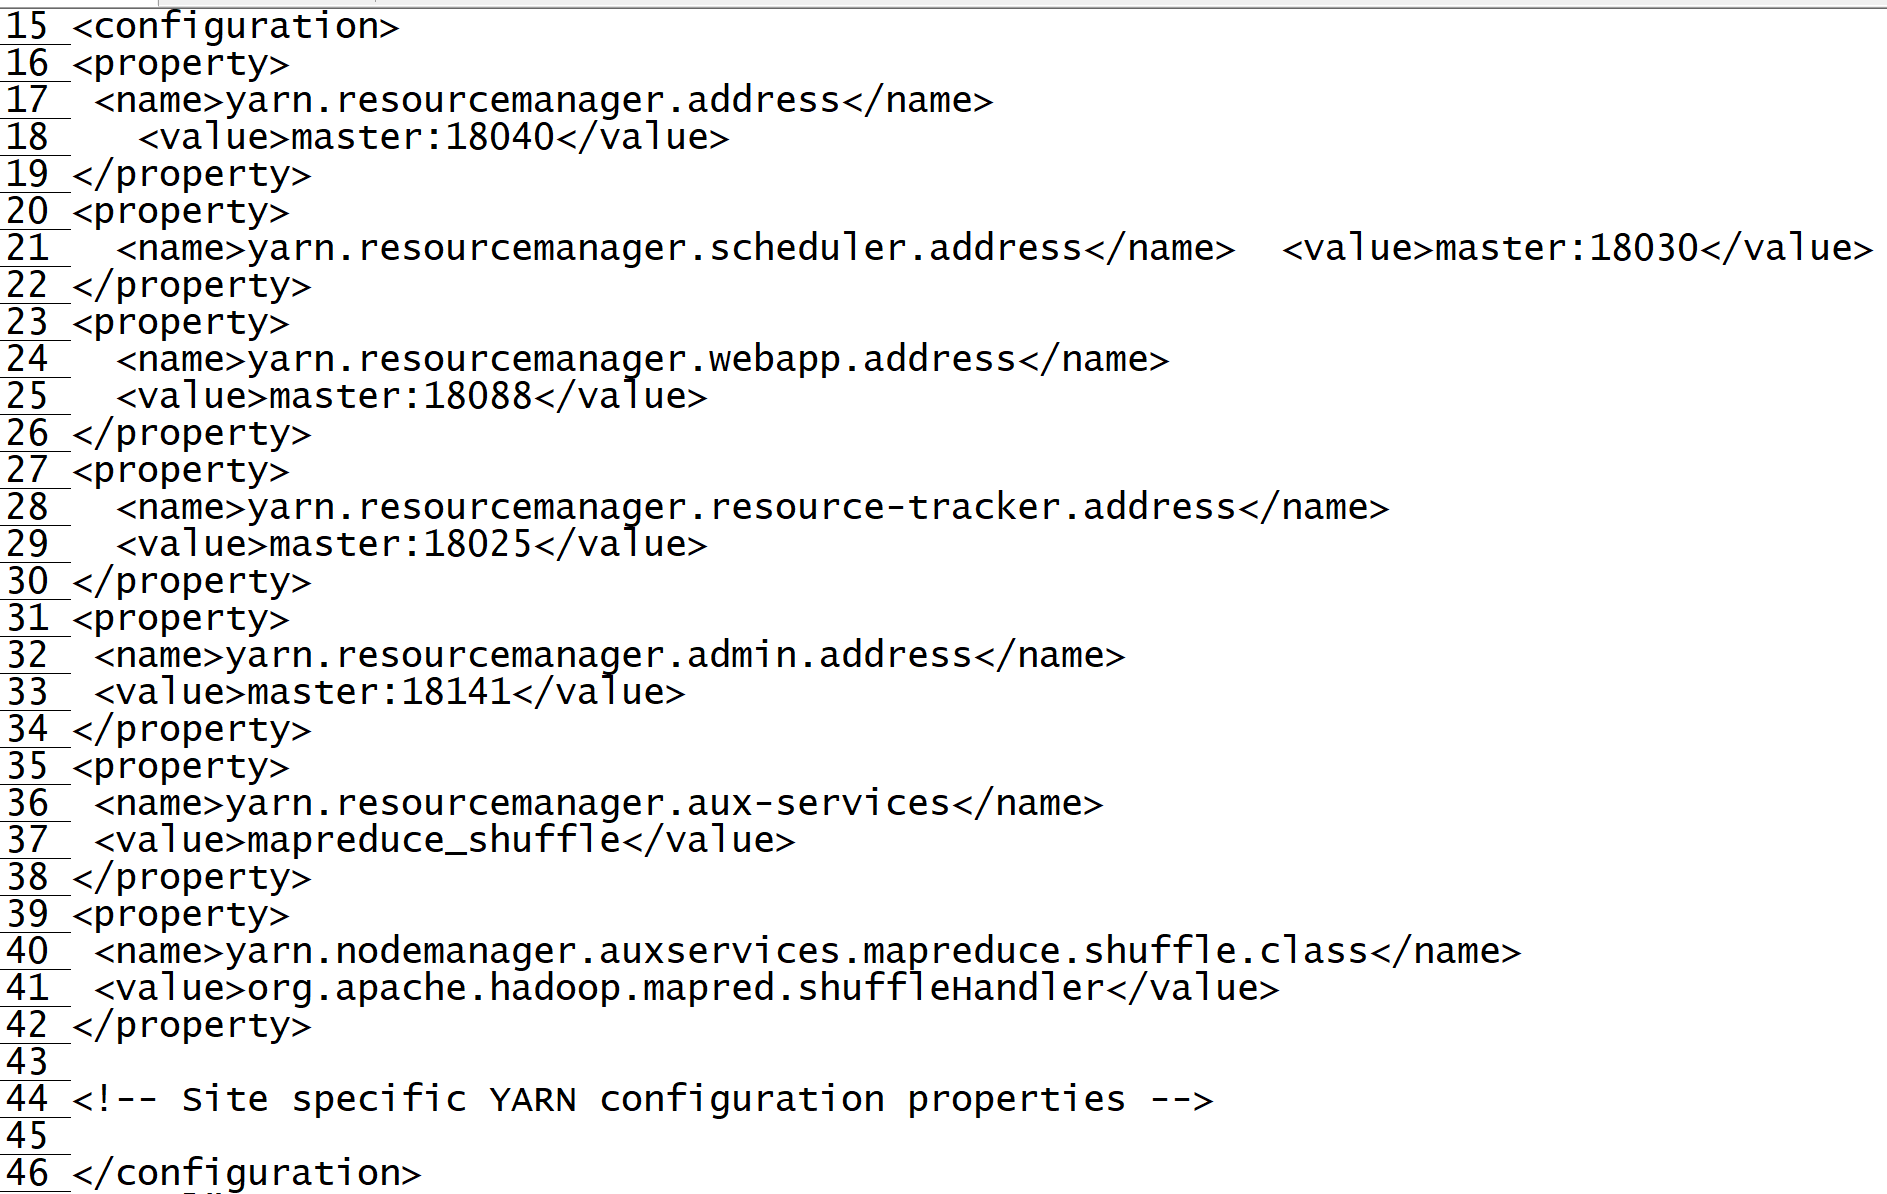
4. Edit yarn - site xml
vi yarn-site.xml
<property>
 <name>yarn.resourcemanager.address</name>
   <value>master:18040</value>
</property>
<property>
  <name>yarn.resourcemanager.scheduler.address</name>  <value>master:18030</value>
</property>
<property>
  <name>yarn.resourcemanager.webapp.address</name>
  <value>master:18088</value>
</property>
<property>
  <name>yarn.resourcemanager.resource-tracker.address</name>
  <value>master:18025</value>
</property>
<property>
 <name>yarn.resourcemanager.admin.address</name>
 <value>master:18141</value>
</property>
<property>
 <name>yarn.resourcemanager.aux-services</name>
 <value>mapreduce_shuffle</value>
</property>
<property>
 <name>yarn.nodemanager.auxservices.mapreduce.shuffle.class</name>
 <value>org.apache.hadoop.mapred.shuffleHandler</value>
</property>
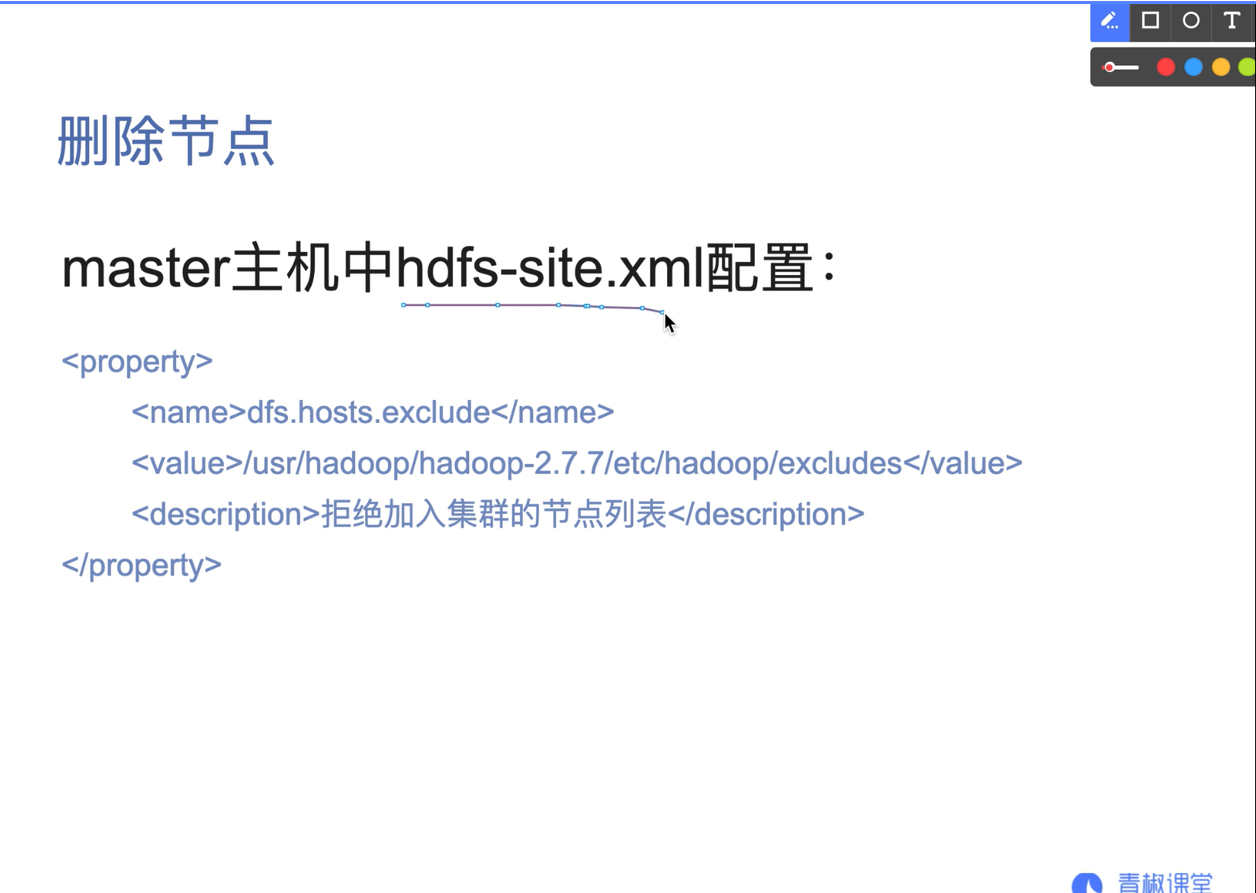
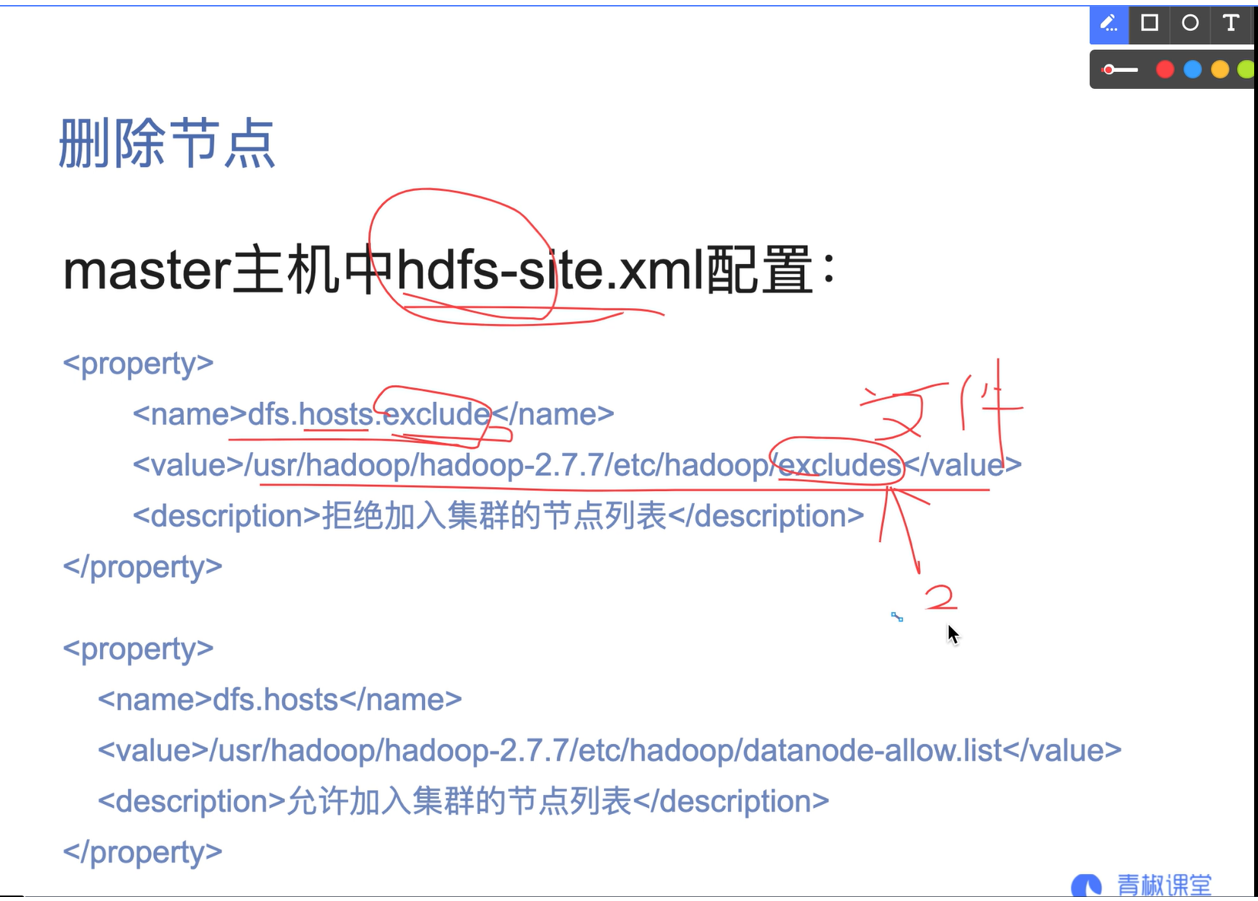
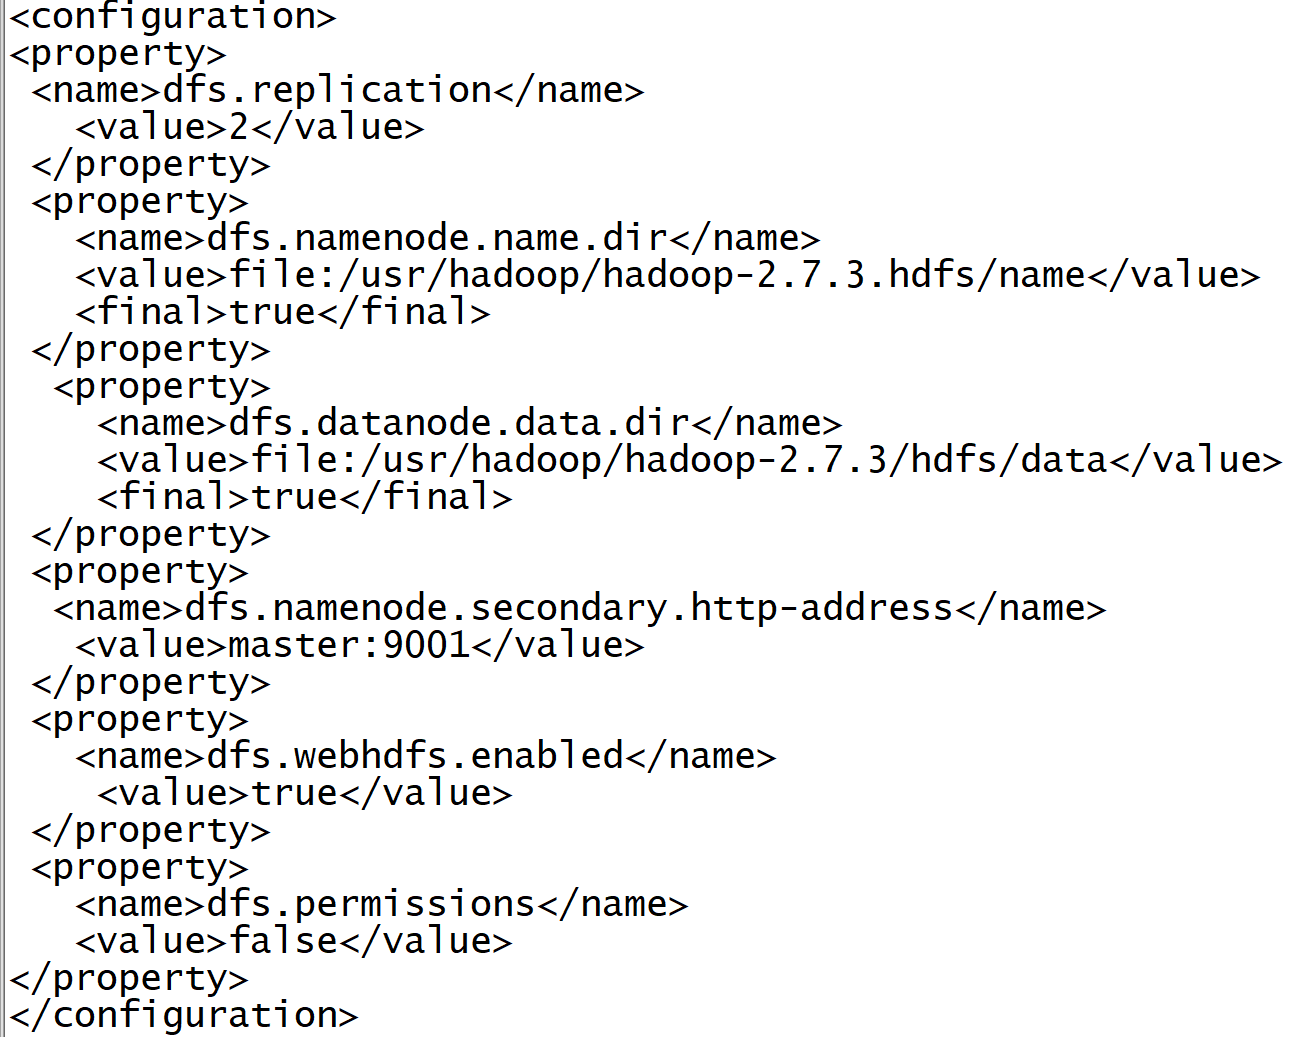
5. Edit HDFS site xml
vi hdfs-site.xml
Add the following
<configuration>
<property>
 <name>dfs.replication</name>
   <value>2</value>
 </property>
 <property>
   <name>dfs.namenode.name.dir</name>
   <value>file:/usr/hadoop/hadoop-2.7.3.hdfs/name</value>
   <final>true</final>
 </property>
  <property>
    <name>dfs.datanode.data.dir</name>
    <value>file:/usr/hadoop/hadoop-2.7.3/hdfs/data</value>
    <final>true</final>
 </property>
 <property>
  <name>dfs.namenode.secondary.http-address</name>
   <value>master:9001</value>
 </property>
 <property>
   <name>dfs.webhdfs.enabled</name>
    <value>true</value>
 </property>
 <property>
   <name>dfs.permissions</name>
   <value>false</value>
</property>
</configuration>
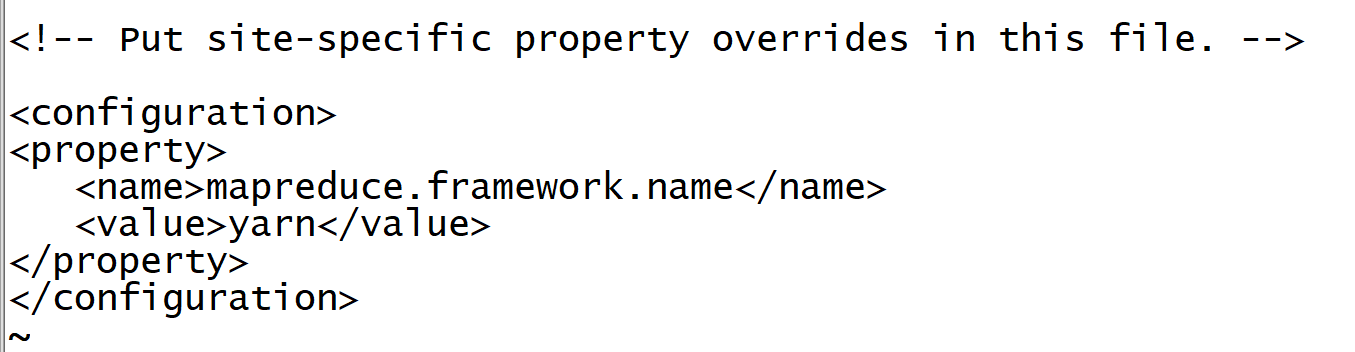
6. Edit mapred site xml
hadoop does not have this file. You need to add mapred site xml. Copy template as mapredsite xml.
cp mapred-site.xml.template mapred-site.xml
vi mapred-site.xml

Add the following
<property>
   <name>mapreduce.framework.name</name>
   <value>yarn</value>
</property>
7. Set node file
vi slaves
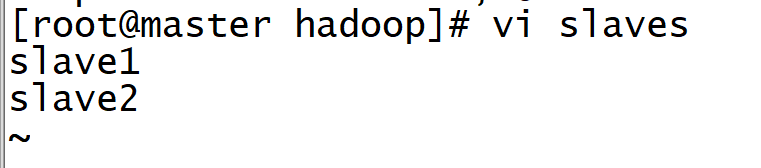
vi master

8. Distribute hadoop
scp -r /usr/hadoop root@slave1:/usr/
scp -r /usr/hadoop root@slave2:/usr/
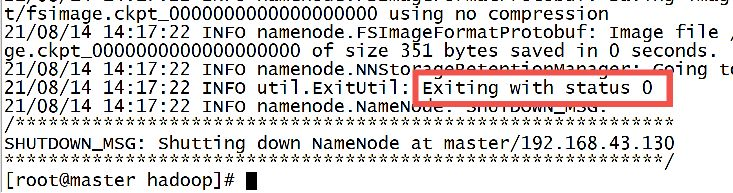
9.hdfs format (executed by master virtual machine)
hadoop namenode -format
When the following sentence appears, congratulations on your ~ formatting success!
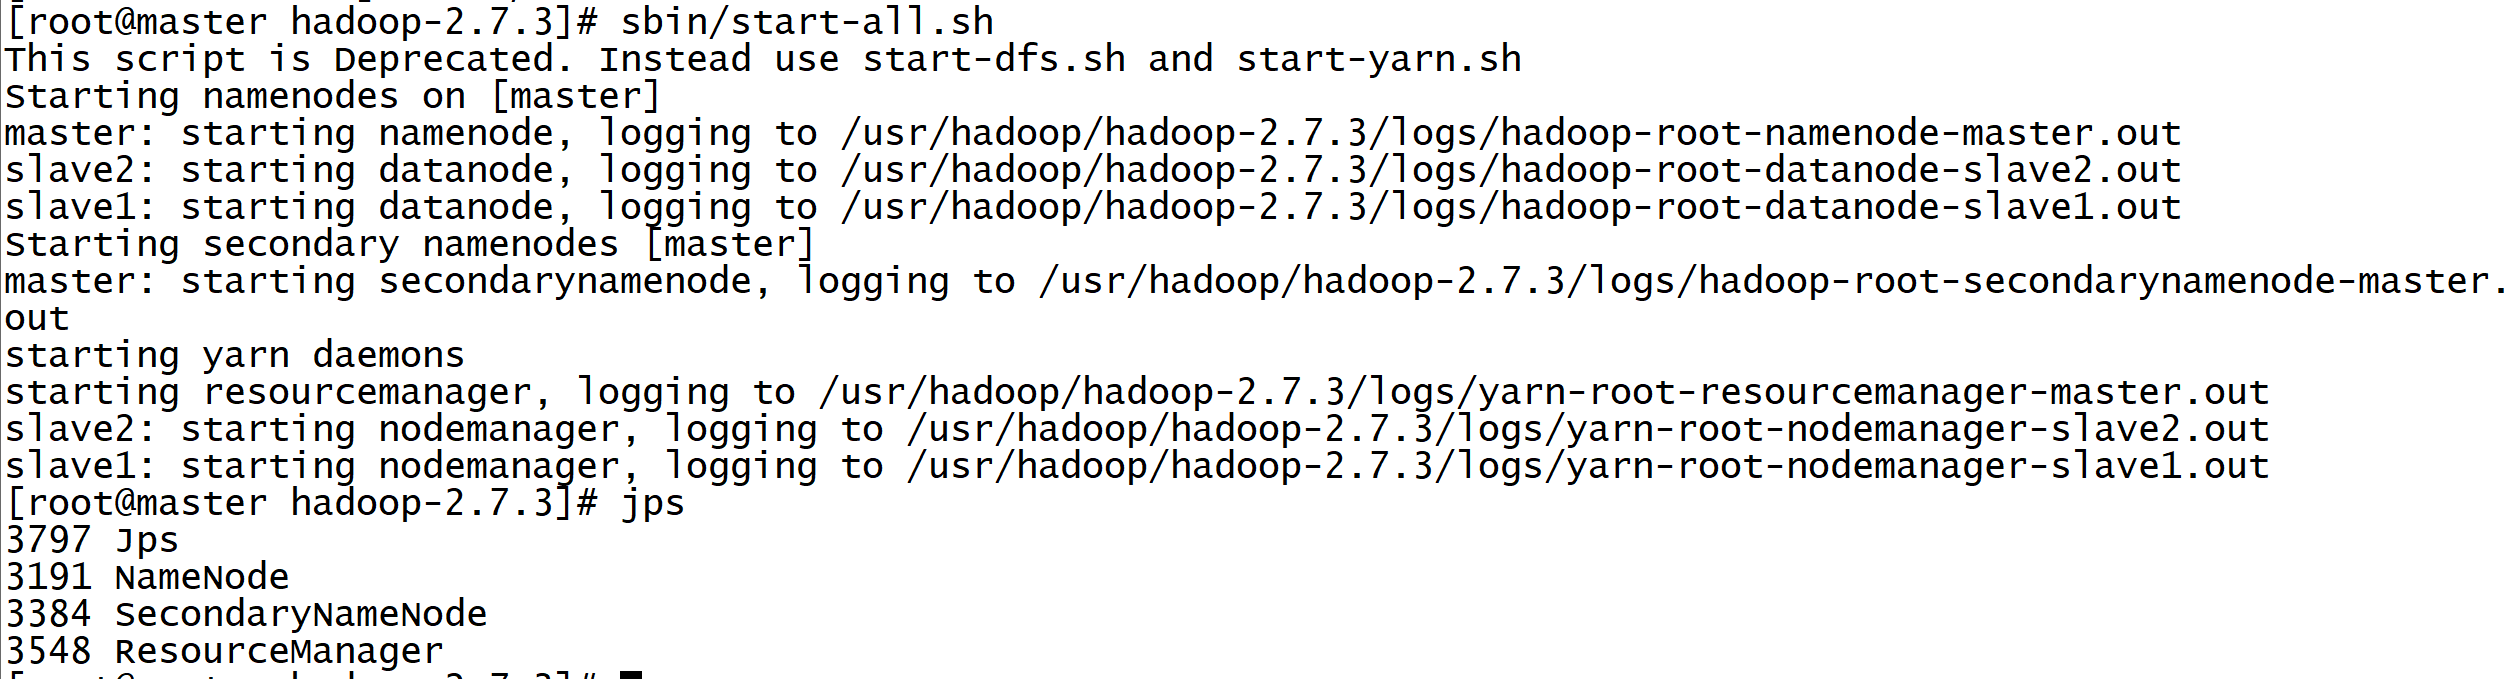
10. Start the cluster
Open the operation command only on the master host. It brings up the start of the slave node.
Start the cluster:
Enter the Hadoop directory and execute:
sbin/start-all.sh
perhaps
start-all.sh start
View process:
jsp
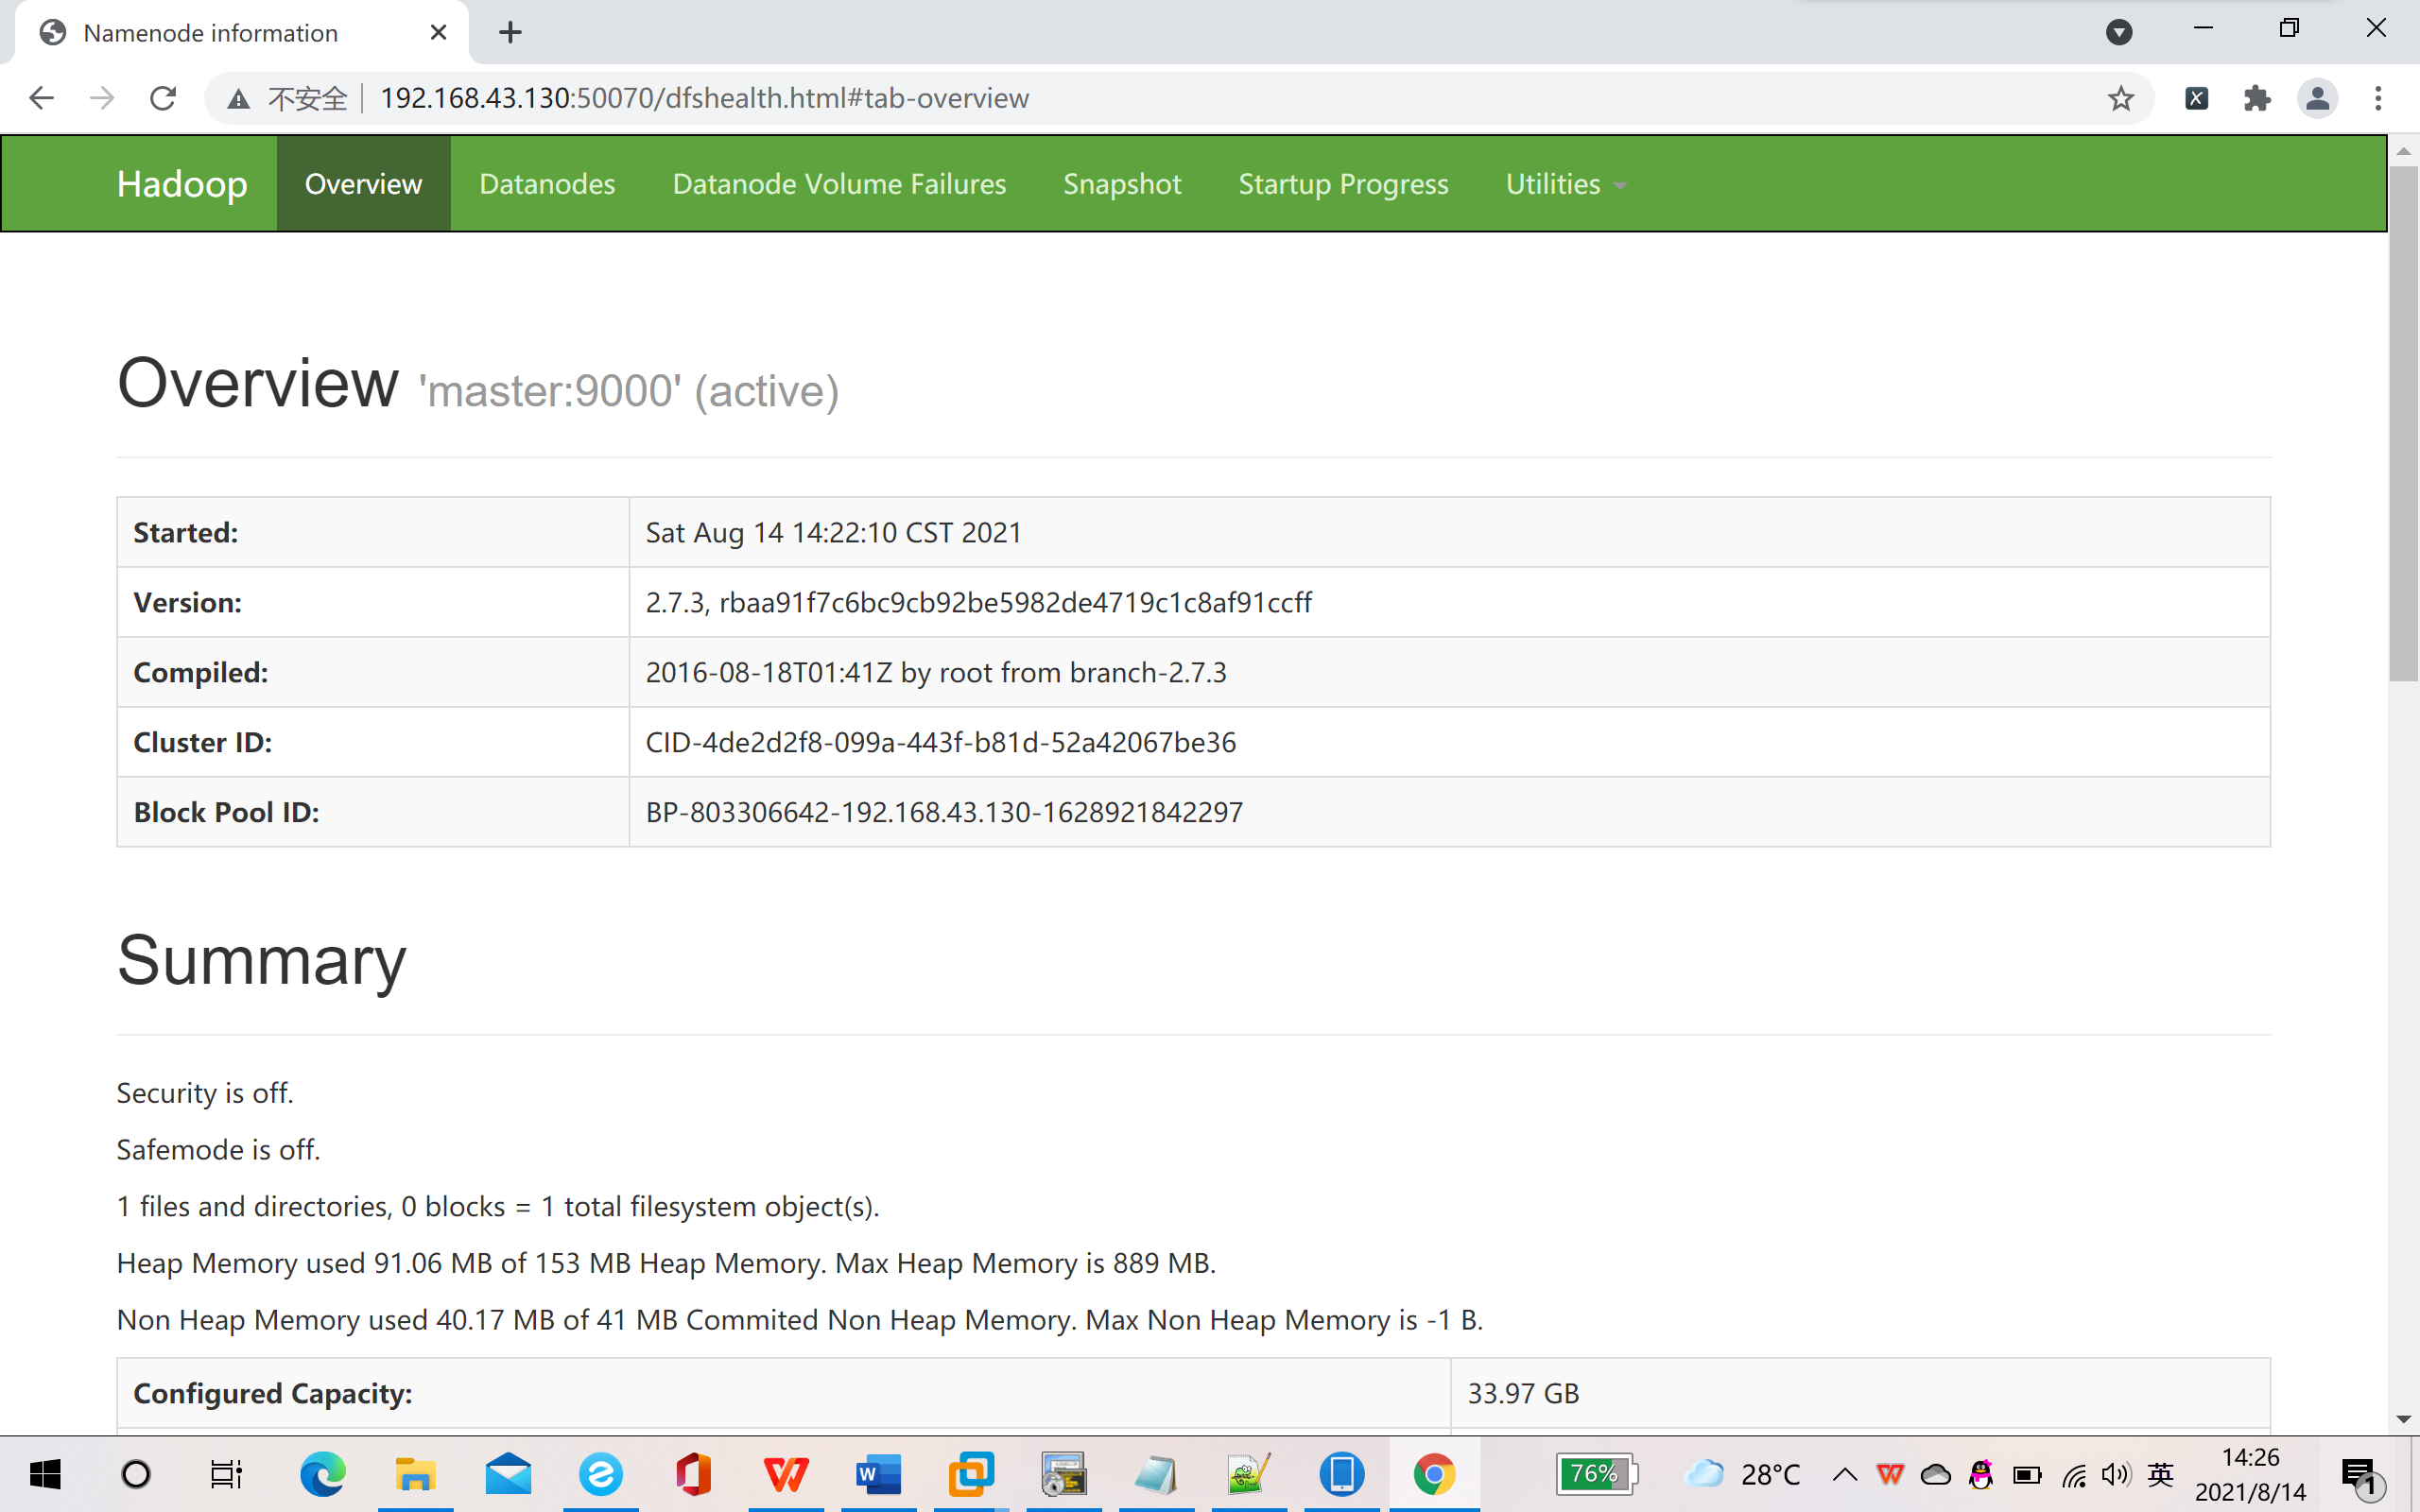
11. Browser access: masterIP: 50070
The following page appears, and the surface is successfully built~~
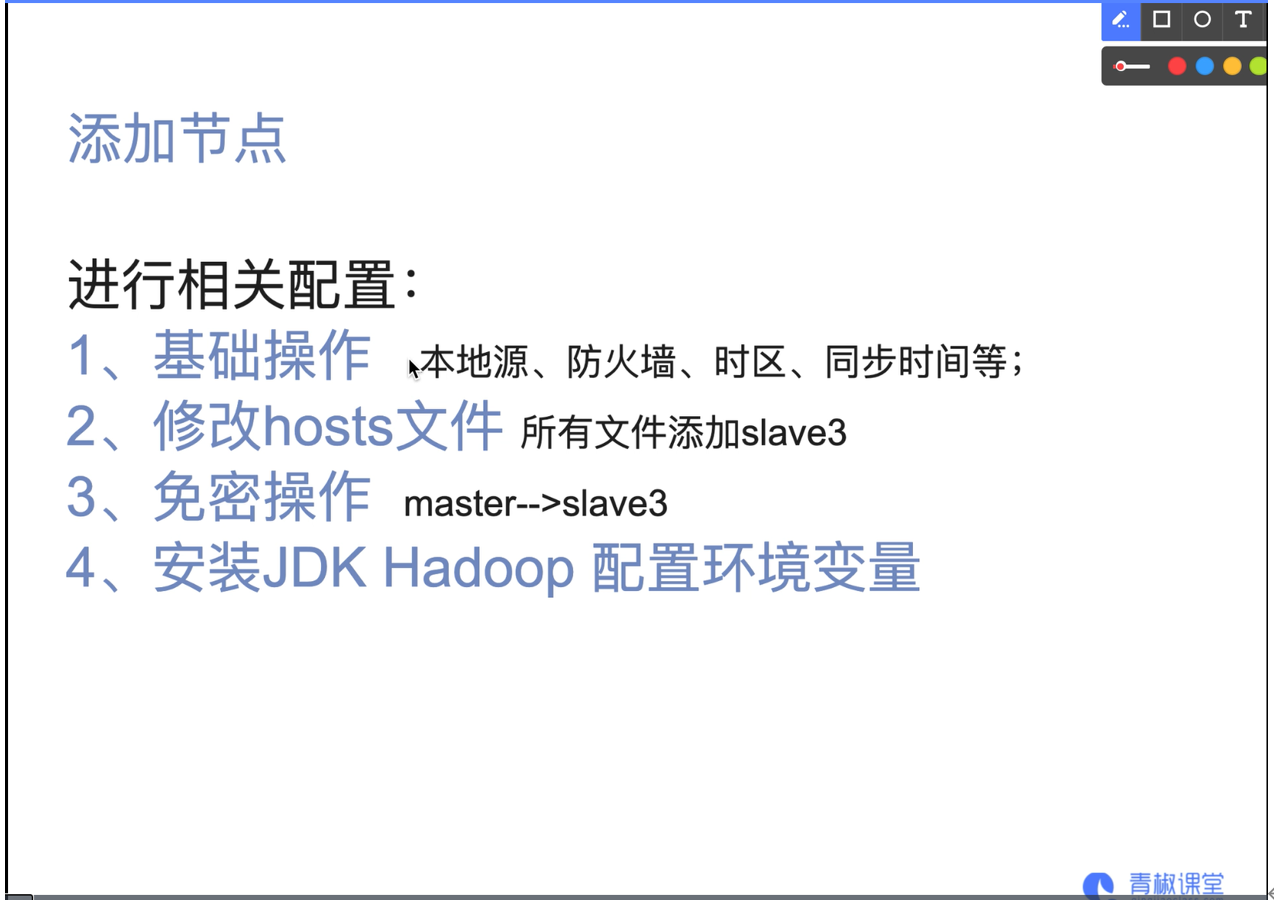
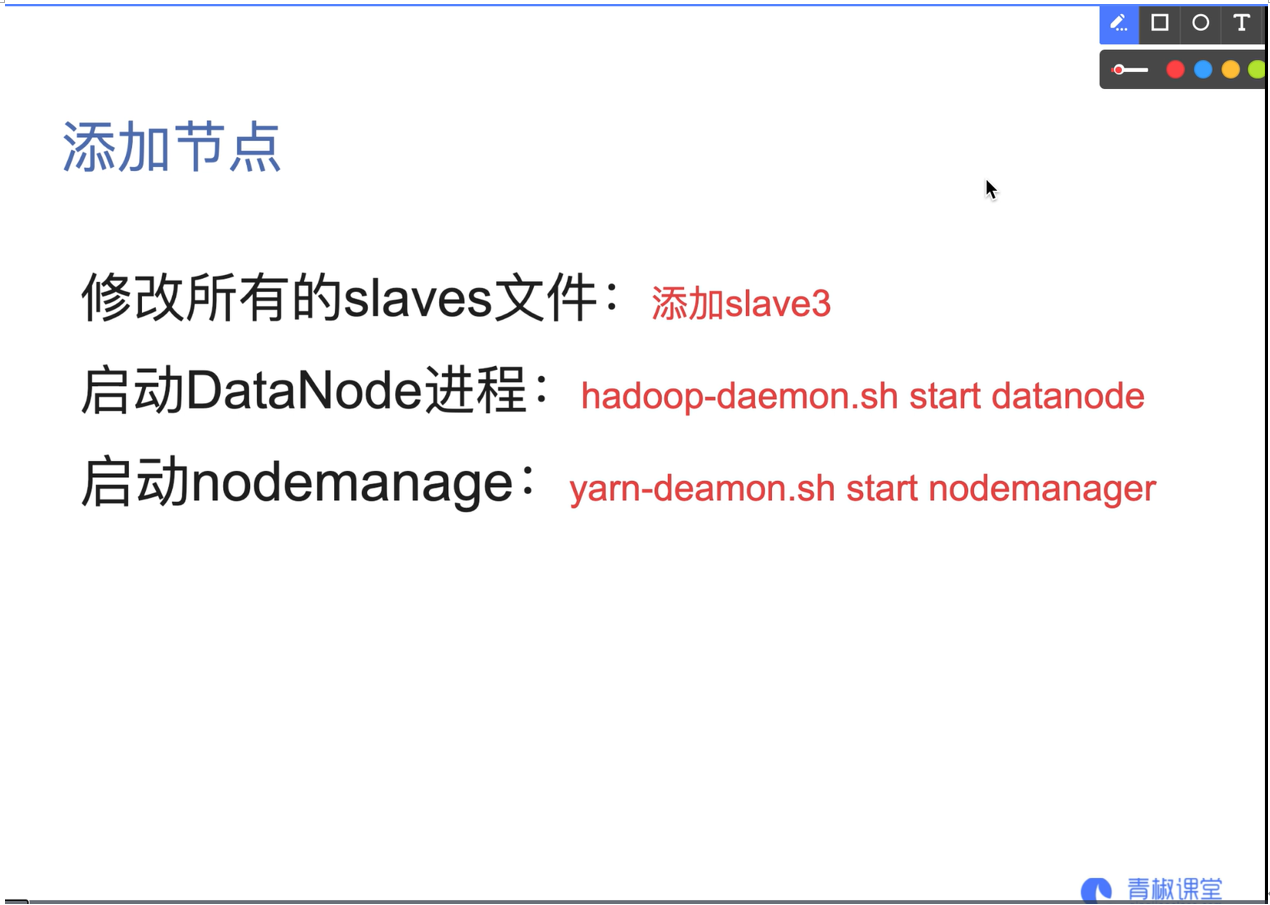
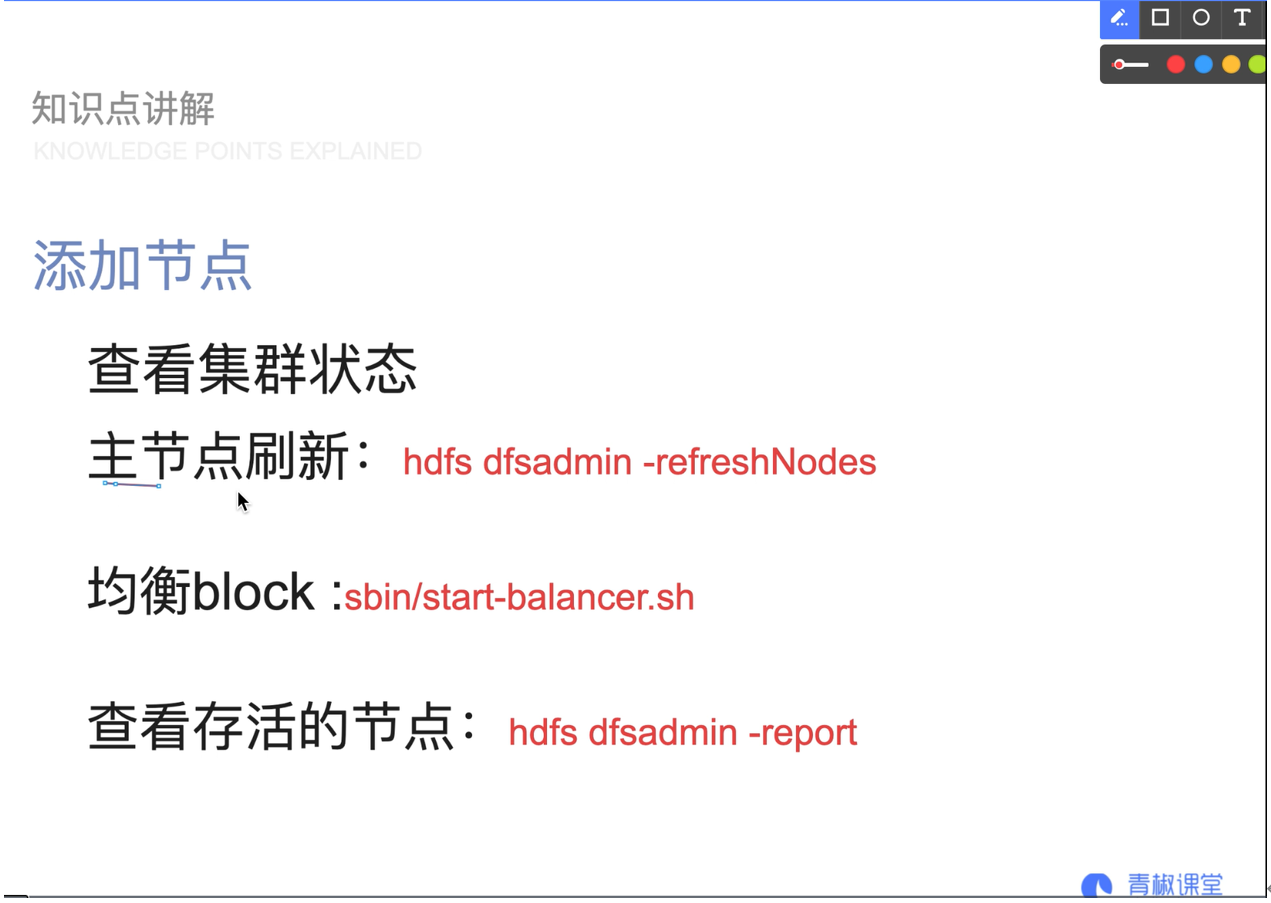
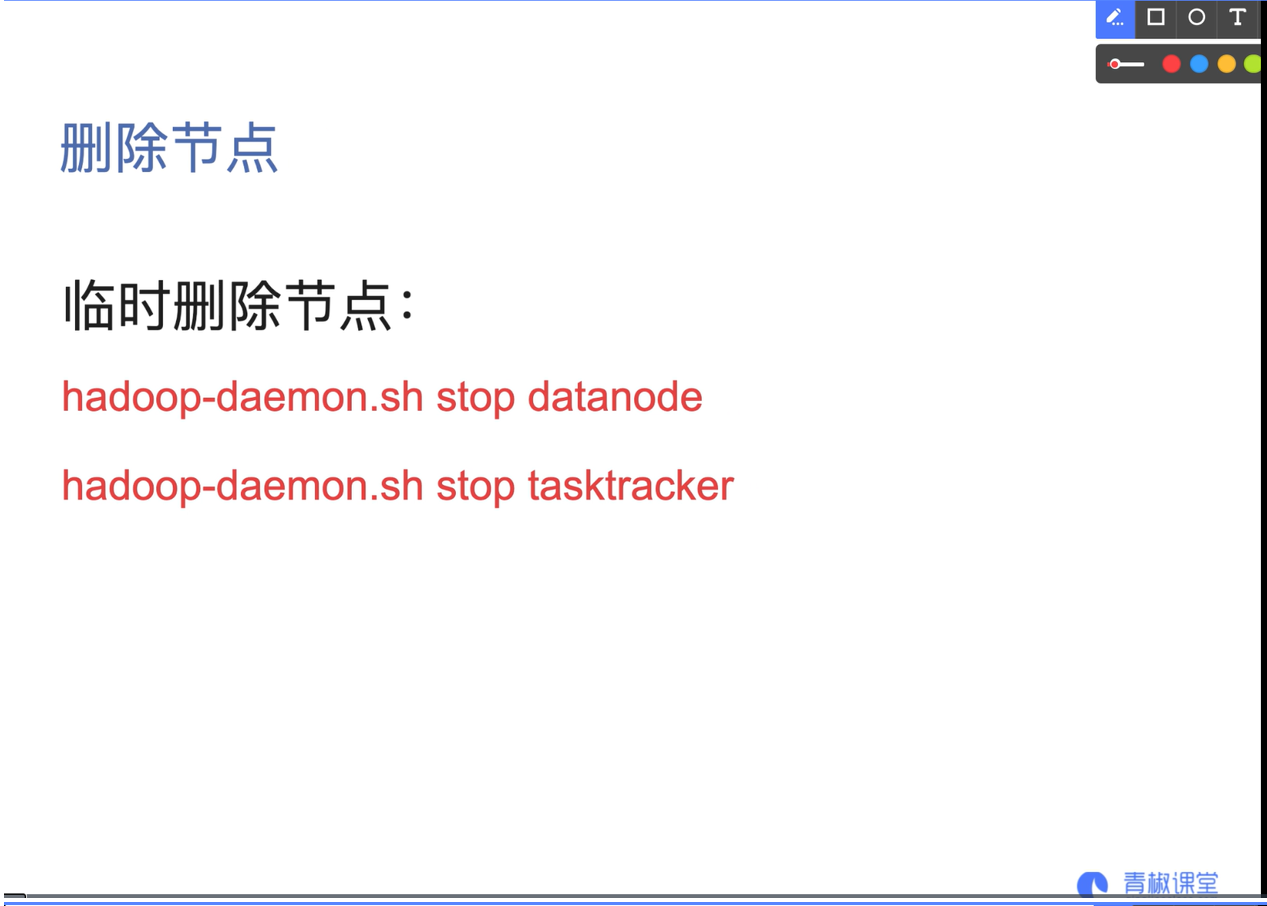
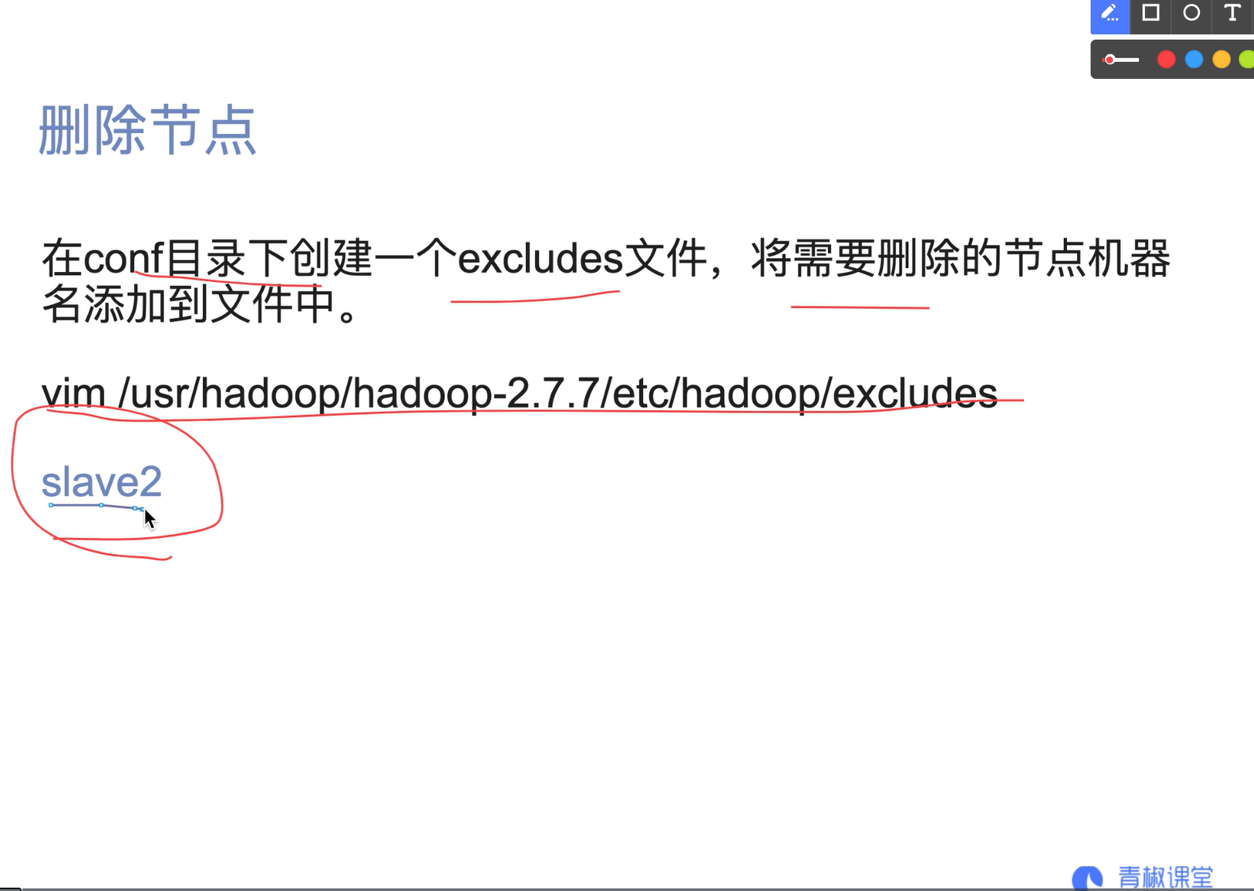
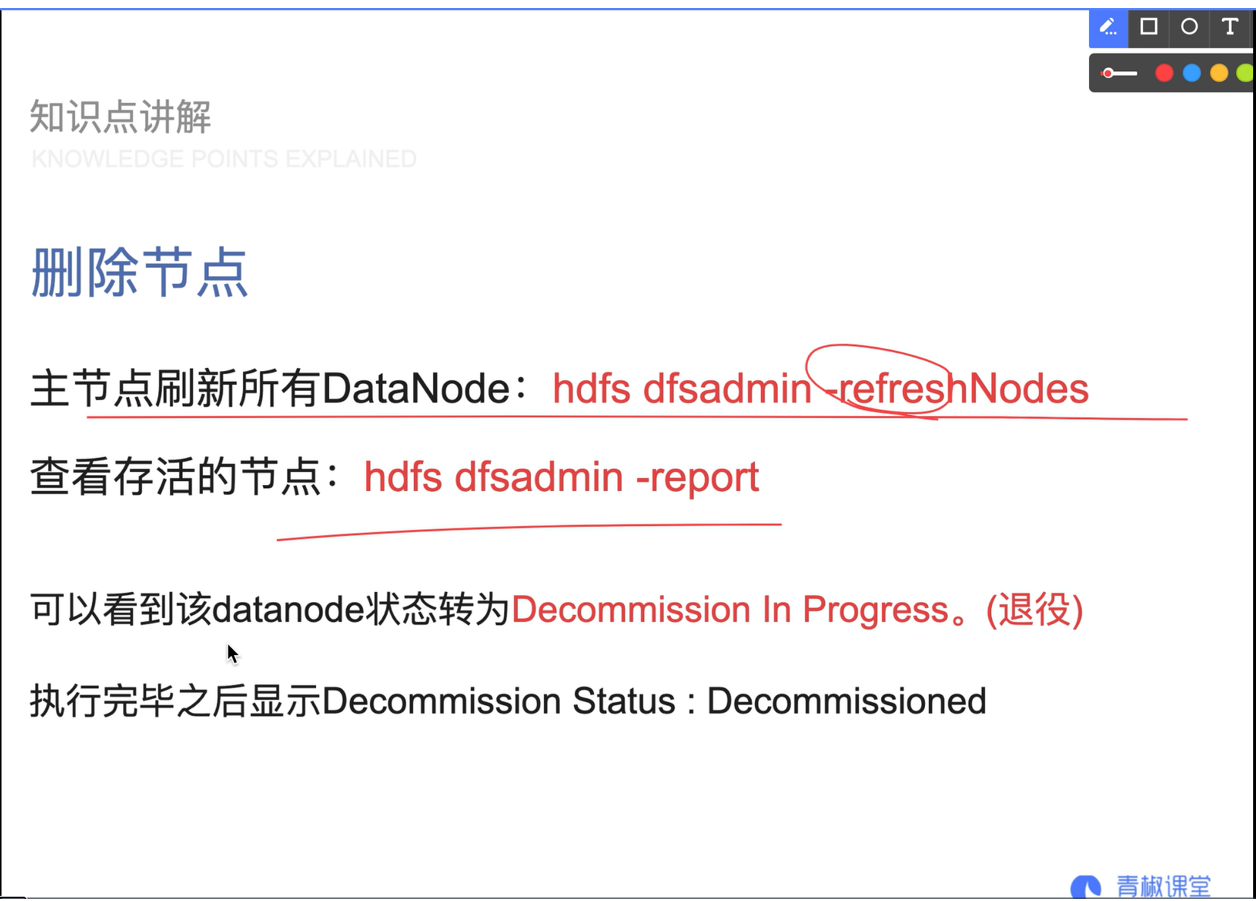
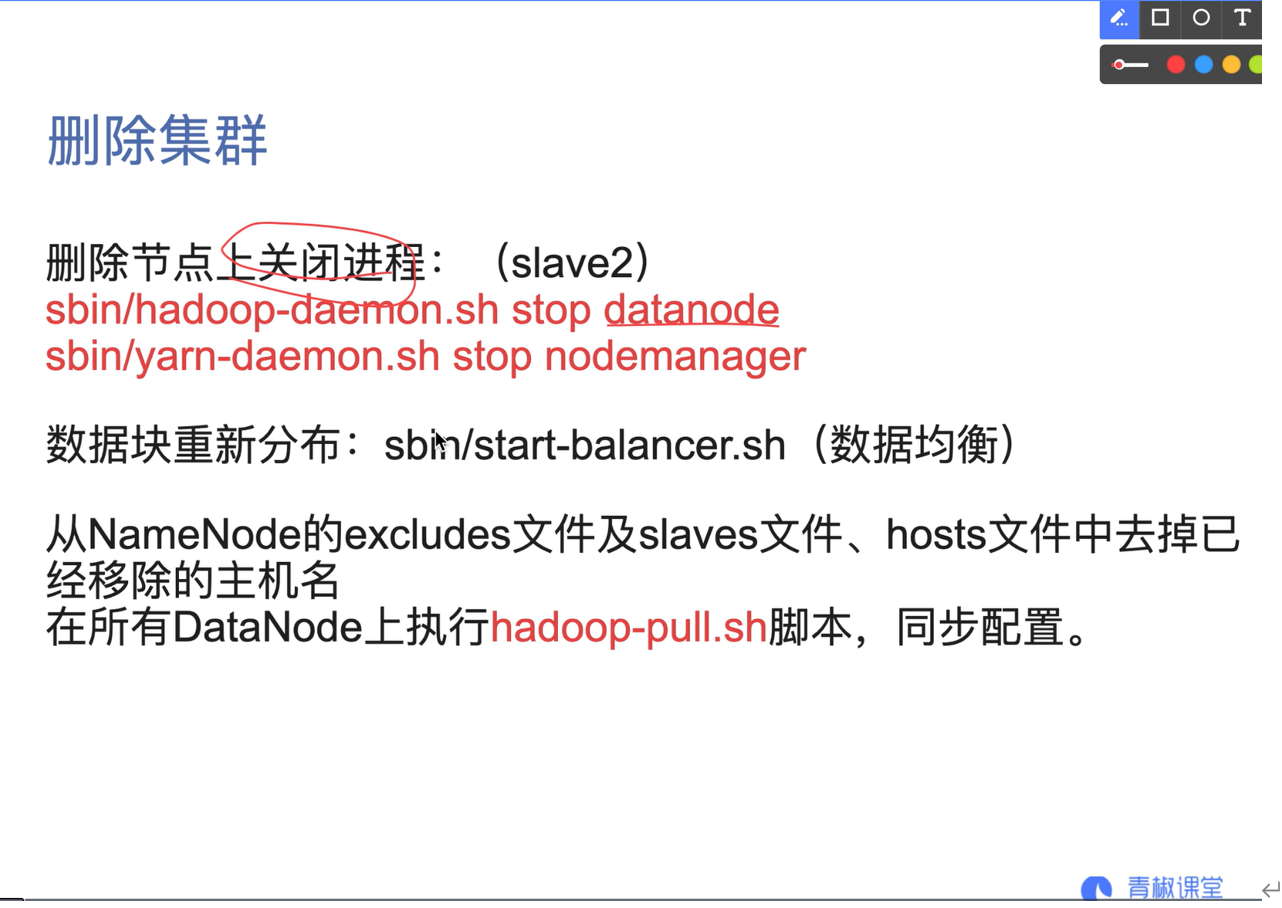
07. Add or delete nodes