Yesterday, we added a big progress bar to the operating system. Let's continue to make the operating system!
Today's main tasks include using structure, text display and starting mouse movement.
Use structure to receive startup information (harib02b)
The last one was in bootpack In C, 0xa0000, 320 and 200 are written directly into the program.
According to the idea of normal programming, these data should be used as initialization variables in asmhead NAS is taken from the previously saved values.
Save these variables to the structure. If you forget the content of the structure, you can turn to the university textbook. There is no explanation here——
bootpack.c excerpt:
struct BOOTINFO {
	char cyls, leds, vmode, reserve;
	short scrnx, scrny;
	char *vram;
};

void HariMain(void)
{
	char *vram;
	int xsize, ysize;
	struct BOOTINFO *binfo;

	init_palette();
	binfo = (struct BOOTINFO *) 0x0ff0;
	xsize = (*binfo).scrnx;
	ysize = (*binfo).scrny;
	vram = (*binfo).vram;

	init_screen(vram, xsize, ysize);

	for (;;) {
		io_hlt();
	}
}
Use arrow mark (harib02c)
In C language, we often see a writing method similar to (* binfo). scrnx, which looks very uncomfortable.
This paper introduces an ellipsis, binfo - > scrnx, which is called arrow marking.
You can also write "xsize=(*binfo).scrnx" as "xsize = binfo - > scrnx".
Rewrite relevant contents in HariMain into arrow marks:
void HariMain(void)
{
	struct BOOTINFO *binfo = (struct BOOTINFO *) 0x0ff0;

	init_palette();
	init_screen(binfo->vram, binfo->scrnx, binfo->scrny);

	for (;;) {
		io_hlt();
	}
}
Display character (harib02d)
Now we begin to write on the screen and write a function to display characters by ourselves.
Characters can be 8 × 16 rectangular pixel dot matrix, 8 "bits" is a byte, and a character is 16 bytes.
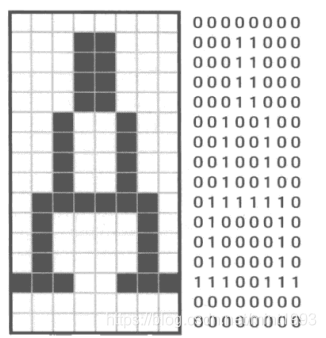
This kind of data describing the shape of text is called font data. We write this font data into the program. We rewrite the arrangement of 0 and 1 in the above figure into hexadecimal numbers.
static char font_A[16] = {
		0x00, 0x18, 0x18, 0x18, 0x18, 0x24, 0x24, 0x24,
		0x24, 0x7e, 0x42, 0x42, 0x42, 0xe7, 0x00, 0x00
	};
Next, draw it on the screen:
void putfont8(char *vram, int xsize, int x, int y, char c, char *font)
{
	int i;
	char *p, d /* data */;
	for (i = 0; i < 16; i++) {
		p = vram + (y + i) * xsize + x;
		d = font[i];
		if ((d & 0x80) != 0) { p[0] = c; }
		if ((d & 0x40) != 0) { p[1] = c; }
		if ((d & 0x20) != 0) { p[2] = c; }
		if ((d & 0x10) != 0) { p[3] = c; }
		if ((d & 0x08) != 0) { p[4] = c; }
		if ((d & 0x04) != 0) { p[5] = c; }
		if ((d & 0x02) != 0) { p[6] = c; }
		if ((d & 0x01) != 0) { p[7] = c; }
	}
	return;
}
Embed the above program into bootpack C, the character "A" can be displayed——

Add font (harib02e)
It's too monotonous to display only "A" font in the screen. Let's let the screen display more characters.
Because there are too many symbols, it is too troublesome to write each one in this way. Therefore, the font data in OSASK system designed by the author in the book, namely hankaku TXT text file.
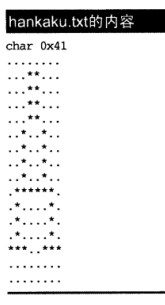
This is neither assembly language nor C language, and requires a special compiler makefont exe.
Its function is very simple. It reads in the above text file (256 character font) and outputs it as 16 characters × 256 = 4096 bytes.
Generate hankaku.exe after compilation Bin file, and then bin2obj Generate hankaku.exe Obj file, resulting in hankaku Obj and bootpack Obj connection.
bin2obj. The function of exe is to convert the given file into an object program (obj).
Of course, we can also modify hankaku Txt file to modify the font.
If you want to use this font data in C language, you only need to add the following statement:
extern char hankaku[4096]
This kind of data prepared outside the source program needs to be added with the extern attribute, so that the C compiler can know that it is external data.
OSAKA font data is encoded according to ASCII characters and contains 256 characters.
The character code of A is 0x41, so the font data of A is placed in the 16 bytes starting from "hankaku + 0x41*16".
The character code of A in C language can be represented by 'A', so it can also be written as "hankaku + 'A' * 16“
Use the above font data to the bootpack C added a lot of content.
make run and see the results——

Display string (harib02f)
The so-called string refers to the character code composed of 0x00 at the end of the string which is arranged in memory in sequence.
S refers to the address at the beginning of the string. Use * s to read the character encoding.
Let's sort out the HariMain function a little:
void HariMain(void)
{
struct BOOTINFO *binfo = (struct BOOTINFO *) 0x0ff0;
init_palette();
init_screen(binfo->vram, binfo->scrnx, binfo->scrny);
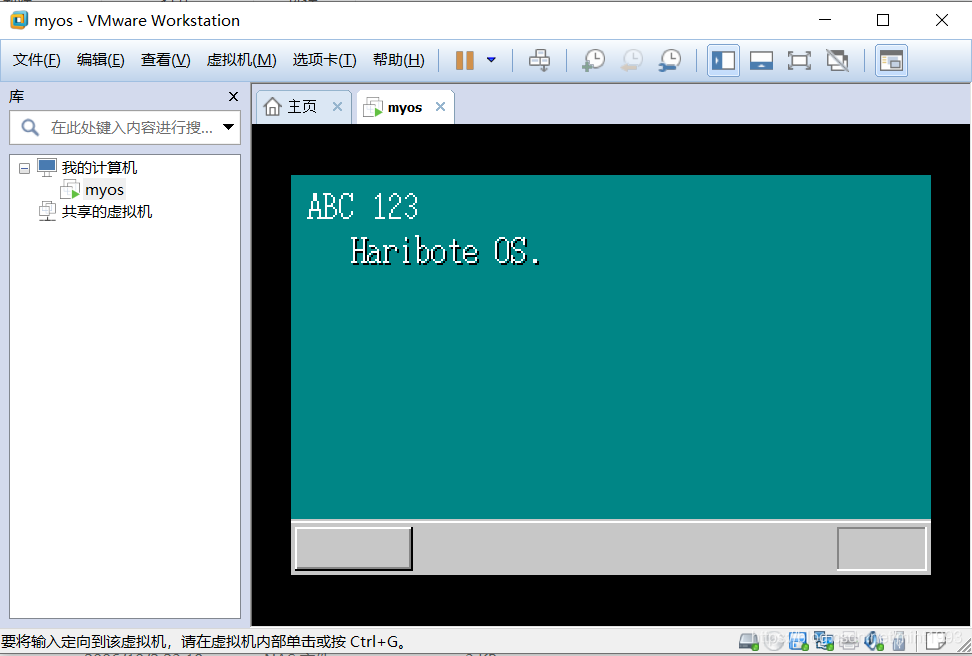
putfonts8_asc(binfo->vram, binfo->scrnx, 8, 8, COL8_FFFFFF, "ABC 123");
putfonts8_asc(binfo->vram, binfo->scrnx, 31, 31, COL8_000000, "Haribote OS.");
putfonts8_asc(binfo->vram, binfo->scrnx, 30, 30, COL8_FFFFFF, "Haribote OS.");
for (;;) {
io_hlt();
}
}
make run——
Display variable value (harib02g)
Whether the value of the variable can be displayed has a great impact on the development of the operating system.
When learning C language in school, we used to use a debugger to view the value of variables.
However, in the development of operating system, it is not so easy. You can only make a debugger yourself.
Before the debugger works out, we first locate the error by displaying the value of the variable.
So what about displaying the value of the variable like this?
Use the sprintf function.
In the operating system, you can't use the printf function casually, but you can use the sprintf function, which is very similar to the printf function in C language.
Because the sprintf function does not output in the specified format, it just writes the output as a string in memory.
Using the sprintf function in HariMain:
	sprintf(s, "scrnx = %d", binfo->scrnx);
	putfonts8_asc(binfo->vram, binfo->scrnx, 16, 64, COL8_FFFFFF, s);
The sprintf function is used as follows: sprintf (address, format, value, value, value...)
The address is the storage address of the generated string. The format is basically a simple string. If there is a mark like% d, it will be replaced with the following value content.
Let's make run and see the effect——

Display mouse pointer (harib02h)
The operating system must have a mouse pointer. The idea of drawing the mouse pointer is similar to that of displaying characters.
First, set the size of the mouse pointer to 16 × 16, prepare again 16 × 16 = 256 bytes of memory, and then write the data of the mouse pointer into it.
Write this program in init_mouse_cursor8.
void init_mouse_cursor8(char *mouse, char bc)
/* マウスカーソルをPreparation (16x16) */
{
	static char cursor[16][16] = {
		"**************..",
		"*OOOOOOOOOOO*...",
		"*OOOOOOOOOO*....",
		"*OOOOOOOOO*.....",
		"*OOOOOOOO*......",
		"*OOOOOOO*.......",
		"*OOOOOOO*.......",
		"*OOOOOOOO*......",
		"*OOOO**OOO*.....",
		"*OOO*..*OOO*....",
		"*OO*....*OOO*...",
		"*O*......*OOO*..",
		"**........*OOO*.",
		"*..........*OOO*",
		"............*OO*",
		".............***"
	};
	int x, y;

	for (y = 0; y < 16; y++) {
		for (x = 0; x < 16; x++) {
			if (cursor[y][x] == '*') {
				mouse[y * 16 + x] = COL8_000000;
			}
			if (cursor[y][x] == 'O') {
				mouse[y * 16 + x] = COL8_FFFFFF;
			}
			if (cursor[y][x] == '.') {
				mouse[y * 16 + x] = bc;
			}
		}
	}
	return;
}
The variable bc refers to the back color, which is the background color.
To display the background color to, you also need the following function to copy the data in buf to vram.
void putblock8_8(char *vram, int vxsize, int pxsize,
	int pysize, int px0, int py0, char *buf, int bxsize)
{
	int x, y;
	for (y = 0; y < pysize; y++) {
		for (x = 0; x < pxsize; x++) {
			vram[(py0 + y) * vxsize + (px0 + x)] = buf[y * bxsize + x];
		}
	}
	return;
}
VRAM and vxsize are information about VRAM, and their values are 0xa0000 and 320 respectively.
pxsize and pysize are the size of the picture you want to display, and the size of the mouse pointer is 16 × 16, so both values are 16.
px0 and py0 specify where the graphics are displayed on the screen.
buf and bxsize respectively specify the storage address of the graph and the pixel value contained in each row.
Next, you can use these two functions——
init_mouse_cursor8(mcursor, COL8_008484);
putblock8_8(binfo->vram, binfo->scrnx, 16, 16, mx, my, mcursor, 16);
make run——

Initialization of GDT and IDT (harib02i)
The mouse pointer is displayed. We try to move the mouse to control it, but the mouse pointer doesn't move. emm
That's because we haven't done this function yet. We need to make it move anyway.
How can you make it move?
First, initialize GDT and IDT. Here we will explain what GDT and IDT are.
GDT and IDT are CPU related settings. In order for the operating system to use 32-bit mode, various CPU settings need to be made.
GDT(global descriptor table) means the global segment number record table. These data are neatly arranged in a certain place in the memory, and then the starting address and the number of valid settings of the memory are placed in a special register called GDTR in the CPU, and the setting is completed.
IDT(interrupt descriptor table) is literally translated as "interrupt record table". When the CPU encounters changes in external conditions or some internal errors, it will temporarily switch to deal with such emergencies. This is the interrupt function.
Let's talk about segmentation first——
Generally speaking, 4G memory is divided into many blocks, and the starting address of each block is treated as 0. The blocks divided like this are called segment s.
In order to represent a segment, the following information is required:
·Segment size
·Actual address of segment
·Management attributes of segments (no writing, no straight line, system specific, etc.)
The CPU uses 8 bytes (= 64 bits) of data to represent this information, but the register used to specify the segment has only 16 bits.
Imitate the method of the palette, first start a segment number, put it in the segment register, and then set the corresponding relationship between the segment number and the segment.
In the color palette, the number of color numbers can be 0255. The segment number can use the number of 08191.
The segment register is 16 bits and should be able to handle numbers in the range of 0 ~ 65535. However, due to the defects in CPU design, the lower 3 bits of the segment register cannot be used.
Therefore, only 13 bits of segment number can be used, and only the area between 0 and 8191 can be processed.
Since the segment register can use the range of 0 ~ 8191, that is, 8192 segments can be defined, 8192 is required to set so many segments × 8 = 65536 bytes (64KB), and the 64KB data is called GDT.
The computer has multiple devices. You need to check the device status regularly. At the same time, the CPU should also ensure rapid response. If the query method is used to check the status of each device in turn, the CPU will be unable to cope and work normally.
To solve the above problems, there is an interrupt mechanism.
After the interrupt occurs, the CPU stops the task being processed, prepares to continue processing, and executes the interrupt program instead.
After the interrupt program is executed, call the preset function to return to the processing task.
Because of the interrupt mechanism, the CPU can not always query the status of keyboard, mouse, network card and other devices and focus on processing tasks.
In short, to use the mouse, you must use interrupts.
Therefore, we must set the IDT. The IDT records the corresponding relationship between the interrupt number of 0 ~ 255 and the calling function, which is very similar to GDT.
First set GDT, bootpack C excerpt:
struct SEGMENT_DESCRIPTOR {
	short limit_low, base_low;
	char base_mid, access_right;
	char limit_high, base_high;
};

struct GATE_DESCRIPTOR {
	short offset_low, selector;
	char dw_count, access_right;
	short offset_high;
};

void init_gdtidt(void)
{
	struct SEGMENT_DESCRIPTOR *gdt = (struct SEGMENT_DESCRIPTOR *) 0x00270000;
	struct GATE_DESCRIPTOR    *idt = (struct GATE_DESCRIPTOR    *) 0x0026f800;
	int i;

	/* GDT Initialization of */
	for (i = 0; i < 8192; i++) {
		set_segmdesc(gdt + i, 0, 0, 0);
	}
	set_segmdesc(gdt + 1, 0xffffffff, 0x00000000, 0x4092);
	set_segmdesc(gdt + 2, 0x0007ffff, 0x00280000, 0x409a);
	load_gdtr(0xffff, 0x00270000);

	/* IDT Initialization of */
	for (i = 0; i < 256; i++) {
		set_gatedesc(idt + i, 0, 0, 0);
	}
	load_idtr(0x7ff, 0x0026f800);

	return;
}

void set_segmdesc(struct SEGMENT_DESCRIPTOR *sd, unsigned int limit, int base, int ar)
{
	if (limit > 0xfffff) {
		ar |= 0x8000; /* G_bit = 1 */
		limit /= 0x1000;
	}
	sd->limit_low    = limit & 0xffff;
	sd->base_low     = base & 0xffff;
	sd->base_mid     = (base >> 16) & 0xff;
	sd->access_right = ar & 0xff;
	sd->limit_high   = ((limit >> 16) & 0x0f) | ((ar >> 8) & 0xf0);
	sd->base_high    = (base >> 24) & 0xff;
	return;
}

void set_gatedesc(struct GATE_DESCRIPTOR *gd, int offset, int selector, int ar)
{
	gd->offset_low   = offset & 0xffff;
	gd->selector     = selector;
	gd->dw_count     = (ar >> 8) & 0xff;
	gd->access_right = ar & 0xff;
	gd->offset_high  = (offset >> 16) & 0xffff;
	return;
}
SEGMENT_ The 8-byte content of GDT stored in the descriptor is written in the form of structure based on the data of CPU.
GATE_ The 8-byte content of IDT stored in the descriptor is also based on the data of CPU.
The variable GDT is assigned 0x00270000, which means that 0x270000~0x27ffff is set as GDT.
The same is true for the variable IDT, which is set to 0x26f800~0x26ffff.
This for statement completes the setting of all 8192 segments, and sets their upper limit (limit - bytes of segment - 1), base address (base) and access permission to 0.
Let's look further:
set_segmdesc(gdt + 1, 0xffffffff, 0x00000000, 0x4092);
set_segmdesc(gdt + 2, 0x0007ffff, 0x00280000, 0x409a);
The above statement sets the two segments with segment numbers 1 and 2.
For the segment with segment number 1, the upper limit value is 0xffffffff (the size is exactly 4G), and the address is 0. It represents all the memory itself that can be managed by the CPU. The attribute of the segment is set to 0x4092, and the meaning will not be discussed for the time being.
For the segment with segment number 2, the upper limit value is 0x0007ffff (size 512KB), and the address is 0x280000, which is exactly bootpack Prepared by HRB. With this segment, you can execute bootpack hrb,bootpack.hrb is a machine language translated on the premise of ORG 0.
Next sentence:
load_gdtr(0xffff, 0x00270000);
Since C language cannot assign values to GDTR, here we use assembly language.
Here, the initial setting is simply made. make run, and nothing is displayed on the screen.
The mouse pointer still can't move here. Let's leave this part until tomorrow~
Resource address:
https://gitee.com/mint1993/myos.git