In the ABP VNext framework, even in all the cases it provides, there is no case introduction of Winform program, but a console program is provided in the microservice solution to understand the calling and processing of its IDS4. Because I have developed many Winform projects, the Winform client is included in the ABP rapid development framework developed based on the ABP framework, Therefore, I am also concerned about the use of ABP VNext on Winform. I spent a lot of time studying the authorization and form construction processing of the framework. Therefore, I sorted out the content of this essay, which is mainly used to introduce the development of Winform terminal and the processing of client authorization information in ABP VNext framework.
1. Development of Winform terminal in ABP VNext framework
No matter which terminal project needs to apply ABP VNext Module, you need to create a Module class, inherit from AbpModule, introduce relevant dependent modules, and configure Servcie information. The following is the Module class in Winform project, as shown below.
namespace Winform.TestApp
{
    [DependsOn(
        typeof(MicroBookStoreHttpApiClientModule),
        typeof(AbpHttpClientIdentityModelModule)
        )]
    public class WinformApiClientModule : AbpModule
    {
        public override void ConfigureServices(ServiceConfigurationContext context)
        {
        }
    }
}
The initialization of ABP VNext module is related according to the dependency. When creating Winform project (based on. net Core development), we need to create an application interface in the Main function, as shown below.
 // Create an application using abppapplicationfactory
 var app = AbpApplicationFactory.Create<WinformApiClientModule>();
 // Initialize application
 app.Initialize();
This app interface object is very important. You need to use it to create some interface services, as shown below.
var service = app.ServiceProvider.GetService<IService1>();
However, since this app object may be used throughout the life cycle of the application to build some used interface objects, we need to create a static class object to store relevant application interface information. We can use it directly when we need it, otherwise we can't build an interface if we lose it.
First, we create a GlobalControl class for storing global information, as shown below.
    /// <summary>
    ///Application global object
    /// </summary>
    public class GlobalControl
    {
        public MainForm? MainDialog { get; set; } = null;
        public IAbpApplicationWithInternalServiceProvider? app { get; set; }

        /// <summary>
        ///Creates a window instance of the specified type
        /// </summary>
        /// <typeparam name="T"></typeparam>
        /// <returns></returns>
        public T CreateForm<T>() where T :Form
        {
            if (app == null) return null;
            else
            {
                var form = app.ServiceProvider.GetService<T>();
                return form;
            }
        }

        /// <summary>
        ///Create an interface instance of the service class
        /// </summary>
        /// <typeparam name="T"></typeparam>
        /// <returns></returns>
        public T GetService<T>() where T : class
        {
            if (app == null) return null;
            else
            {
                var service = app.ServiceProvider.GetService<T>();
                return service;
            }
        }
In this way, when we create in the Main method, we build a static class object to store the information we need, so that the application interface objects mentioned above can be stored,
    public static class Portal
    {
        /// <summary>
        ///Application's global static object
        /// </summary>
        public static GlobalControl gc = new GlobalControl();

        /// <summary>
        ///  The main entry point for the application.
        /// </summary>
        [STAThread]
        static void Main()
        {
            Log.Logger = new LoggerConfiguration()
                .MinimumLevel.Debug()
                .Enrich.FromLogContext()
                .WriteTo.Console()
                .WriteTo.File("logs/myapp.txt", rollingInterval: RollingInterval.Day)
                .CreateLogger();

            // Create an application using abppapplicationfactory
            var app = AbpApplicationFactory.Create<WinformApiClientModule>();
            // Initialize application
            app.Initialize();
            gc.app = app;

            Application.SetHighDpiMode(HighDpiMode.SystemAware);
            Application.EnableVisualStyles();
            Application.SetCompatibleTextRenderingDefault(false);

            var form = app.ServiceProvider.GetService<MainForm>();
            gc.MainDialog = form;
            Application.Run(gc.MainDialog);
        }
    }
The part marked in red above is to store this important app for later use.
And we noticed that when we created the form, we didn't use
var form = new MainForm();
Instead of using interfaces.
var form = app.ServiceProvider.GetService<MainForm>();
The interface is built the same way we mentioned earlier.
var service = app.ServiceProvider.GetService<IService1>();
Why? Because we need to inject the interface mode through the constructor to reference the relevant interface services in the form.
Since there is no default constructor, it can no longer be built in the way of new. You need to use the conventional interface parsing of ABP VNext to obtain the corresponding form object.
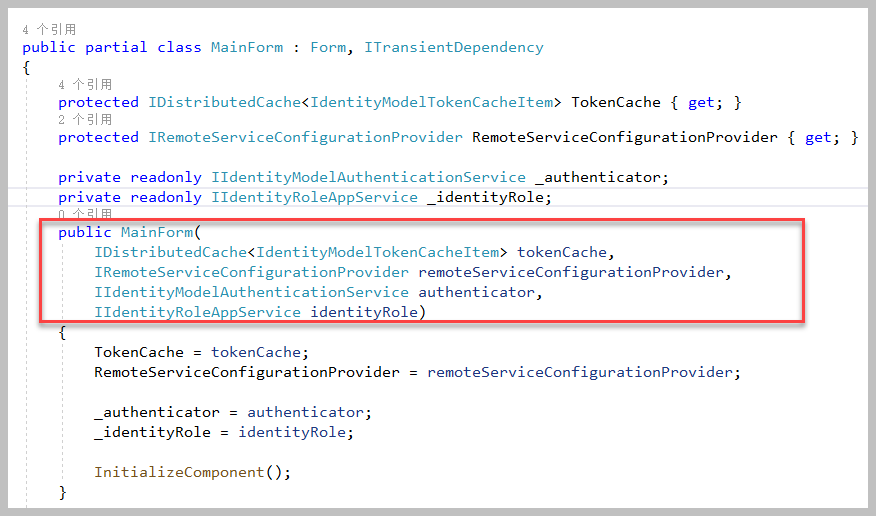
Note: the form here needs to inherit from the {ITransientDependency} interface, so that it can be built through the interface, otherwise it won't work.
If we call other windows in the main form or other interface events, it is also similar, as shown in the following figure.
        private void button2_Click(object sender, EventArgs e)
        {
            var form2 = Portal.gc.CreateForm<SecondForm>();
            form2.ShowDialog();
        }
This place uses the method construction in the static object GlobalControl, because the app application interface object has been stored when the program starts, and it can be used to build relevant interfaces or form objects.
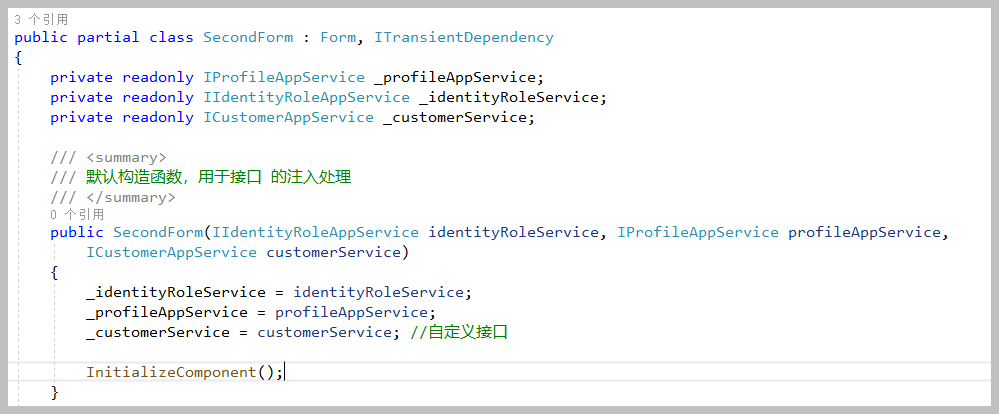
Of course, the SecondForm here cannot use the New method to build form objects, but also needs to use the standard method of service construction. After all, its default constructor is used for interface injection.
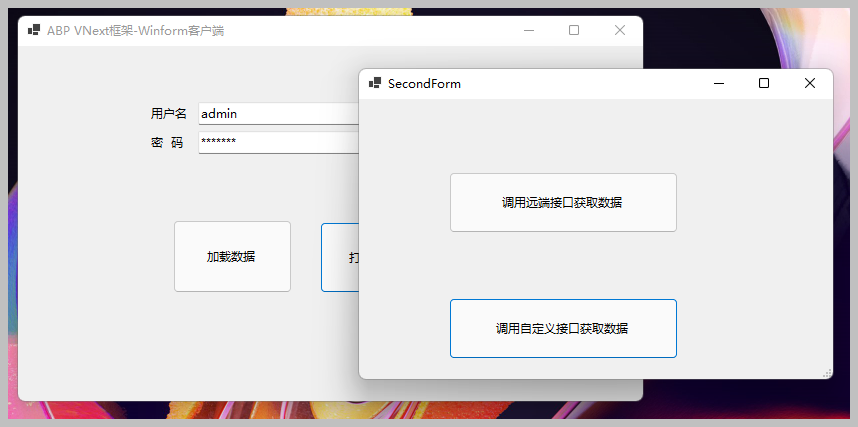
The program looks as follows. You can open the form normally.
2. Processing of Winform client authorization information
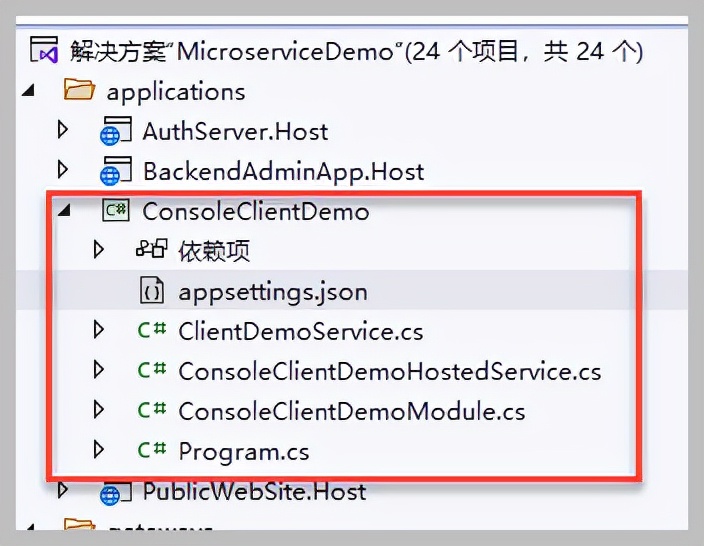
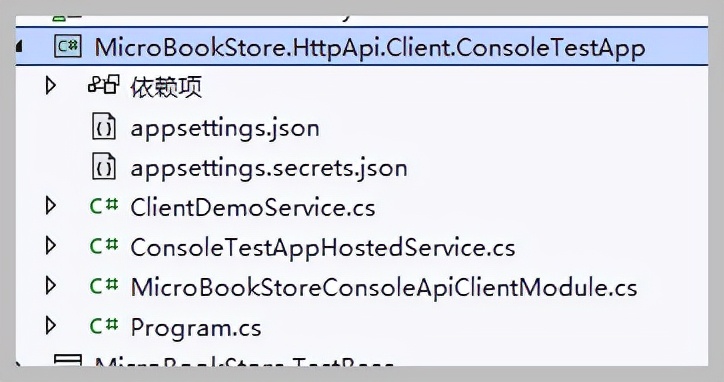
In the solution of ABP VNext microservice, there is a test project for console calling service interface, as shown below.
It mainly introduces how to configure the authorization rules of identity server 4 (also known as IDS4) to obtain the interface call service of dynamic client.
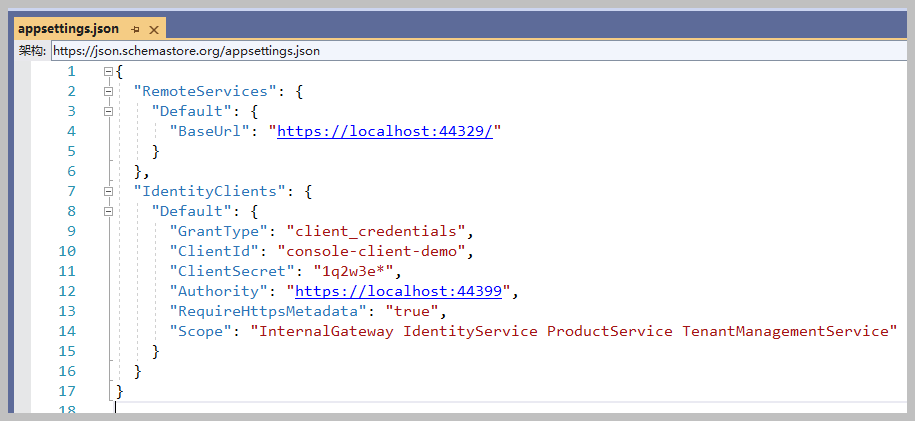
Its configuration is through Appsettings The node information of IdentityServer4 terminal is configured in JSON to perform relevant authorization processing (obtain token) in the client call class, because we need token information to call the service interface, and these are encapsulated internally.
appsettings. The configuration information of JSON is as follows. This IDS4 authentication adopts client_credentials authentication.
When building the ABP VNext project template, a test project similar to the console is also provided, as shown below.
The app settings JSON uses user name and password for authentication and password for authorization.
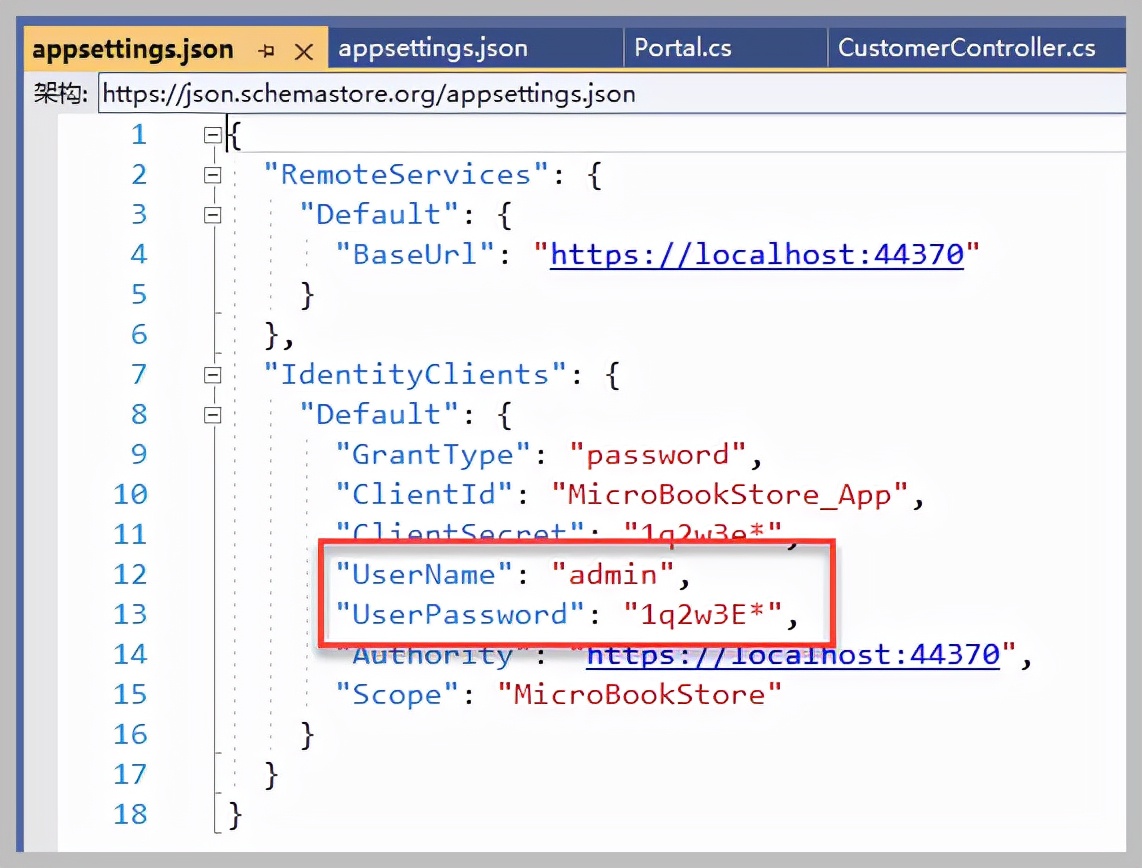
Seeing this information, you may notice that the user name and password are inside.
I was thinking that if you let users use the Winform program every time, you can modify the Appsettings JSON, that must be unfriendly. If the IDS4 information is dynamically built and passed into the interface for use, can the configuration file not be used?
By analyzing the class library of ABP VNExt framework, you can see that the authorization and authentication processing of IDS is in
In the IdentityModelAuthenticationService interface implementation class, it obtains the communication token information through the following interface.
public async Task<string> GetAccessTokenAsync(IdentityClientConfiguration configuration)
We can get the token information of the interface by passing in the configuration object of the corresponding IDS4.
We pass
The IIdentityModelAuthenticationService interface can obtain the token information and cache it. However, how to set the token header information of HttpClient every time it is called? We know by analyzing the code of # IdentityModelAuthenticationService class. If we are in appsetting JSON is configured with the standard configuration of IDS4. It can obtain the cache of token information according to the configuration information and set it to the called HttpClient. If we use the incoming of the dynamic configuration object just mentioned to obtain the token, it can't extract the token cache information without IDS4 configuration file information.
        public async Task<bool> TryAuthenticateAsync(HttpClient client, string identityClientName = null)
        {
            var accessToken = await GetAccessTokenOrNullAsync(identityClientName);
            if (accessToken == null)
            {
                return false;
            }

            SetAccessToken(client, accessToken);
            return true;
        }
Is there any other way to dynamically set token information or similar operations?
have We note that,
IRemoteServiceHttpClientAuthenticator interface is the interface used to solve terminal authorization processing. Its interface definition is as follows.
namespace Volo.Abp.Http.Client.Authentication
{
    public interface IRemoteServiceHttpClientAuthenticator
    {
        Task Authenticate(RemoteServiceHttpClientAuthenticateContext context);
    }
}
Our reference project
Volo.Abp.Http.Client.IdentityModel.Web thinking
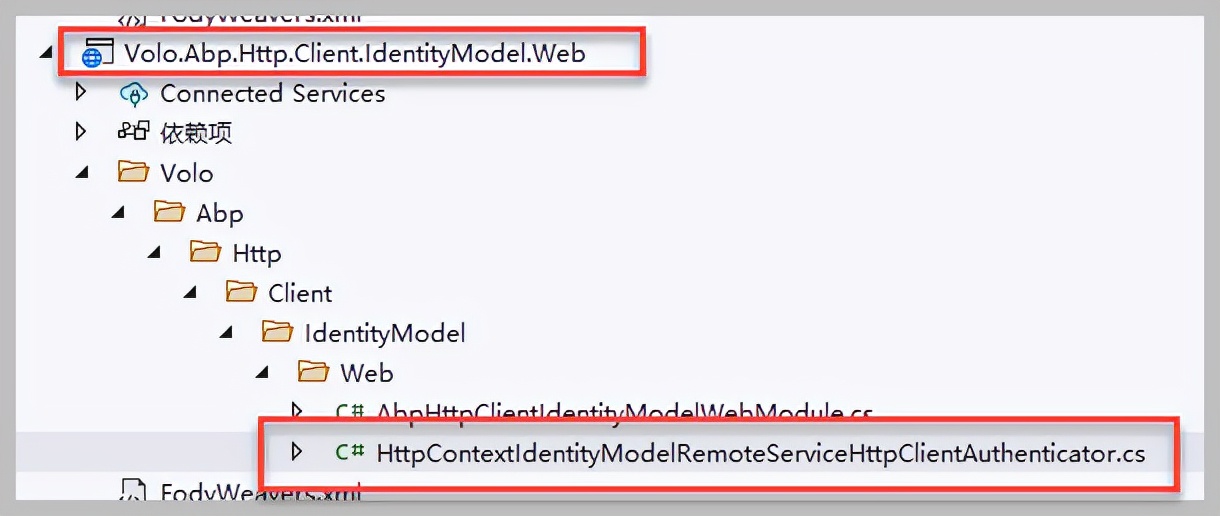
This project uses a custom interface implementation class
HttpContextIdentityModelRemoteServiceHttpClientAuthenticator replaces the default IdentityModelRemoteServiceHttpClientAuthenticator class. Let's take a look at its implementation
namespace Volo.Abp.Http.Client.IdentityModel.Web
{
    [Dependency(ReplaceServices = true)]
    public class HttpContextIdentityModelRemoteServiceHttpClientAuthenticator : IdentityModelRemoteServiceHttpClientAuthenticator
    {
        public IHttpContextAccessor HttpContextAccessor { get; set; }

        public HttpContextIdentityModelRemoteServiceHttpClientAuthenticator(
            IIdentityModelAuthenticationService identityModelAuthenticationService)
            : base(identityModelAuthenticationService)
        {
        }

        public override async Task Authenticate(RemoteServiceHttpClientAuthenticateContext context)
        {
            if (context.RemoteService.GetUseCurrentAccessToken() != false)
            {
                var accessToken = await GetAccessTokenFromHttpContextOrNullAsync();
                if (accessToken != null)
                {
                    context.Request.SetBearerToken(accessToken);
                    return;
                }
            }

            await base.Authenticate(context);
        }

        protected virtual async Task<string> GetAccessTokenFromHttpContextOrNullAsync()
        {
            var httpContext = HttpContextAccessor?.HttpContext;
            if (httpContext == null)
            {
                return null;
            }

            return await httpContext.GetTokenAsync("access_token");
        }
    }
}
As you can see here, it mainly obtains access from httpContext_ The header information of the token is then set to the corresponding HttpRequest request through the interface of SetBearerToken, that is, the token is obtained first, and then the token of the request object is set, so as to complete the information processing of the authorization token.
If we are Winform or console, the call request class is HttpClient, and we can imitate the project
Volo. Abp. Http. Client. IdentityModel. Create a project through web, and then replace the implementation of the default authorization processing interface through dependency; You can also replace the default by creating a subclass of IdentityModelRemoteServiceHttpClientAuthenticator in the local project, as shown below.
namespace Winform.TestApp
{
    public class MyIdentityModelRemoteServiceHttpClientAuthenticator : IdentityModelRemoteServiceHttpClientAuthenticator
    {
In ABP VNext framework class
When the token is obtained in IdentityModelAuthenticationService, the obtained token will be set to the distributed cache, and its key is generated by the key value of IdentityClientConfiguration object, as shown in the following code logic.
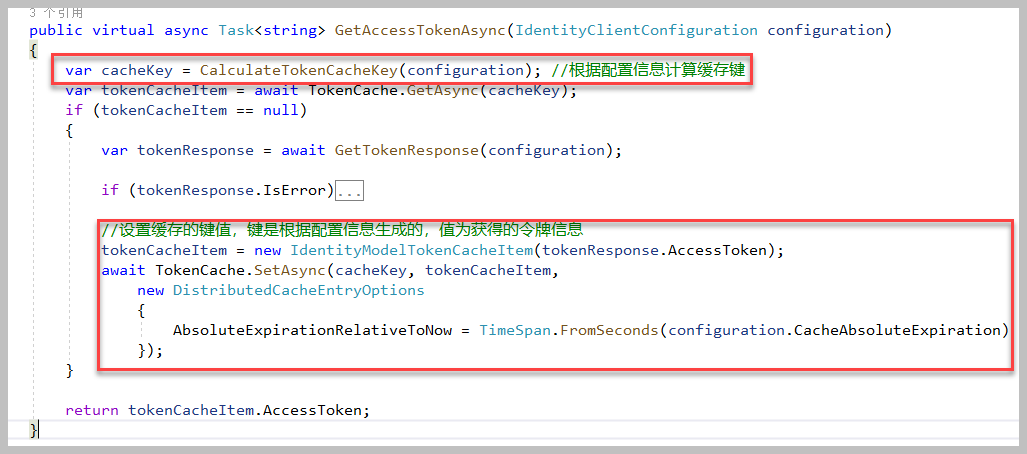
Then we only need to customize the
In the MyIdentityModelRemoteServiceHttpClientAuthenticator class, you can set the token information by obtaining the cache according to the key.
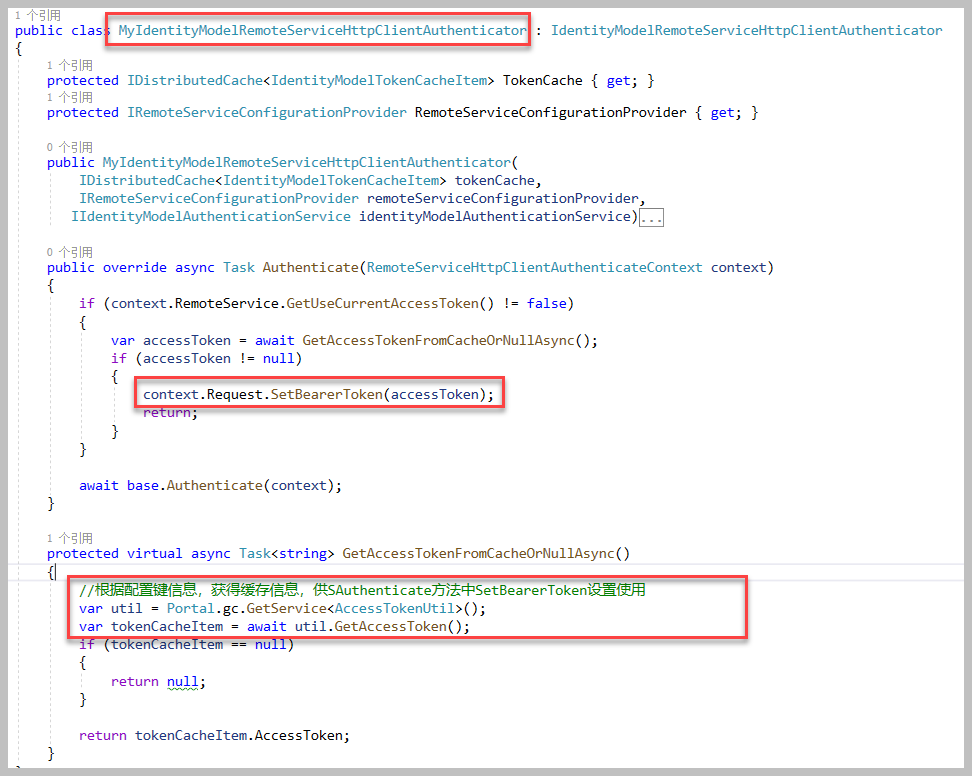
Through the above processing, we can dynamically obtain the token according to the account password, obtain the token from the cache according to the key of the configuration information, set it to the corresponding object, and complete the token information setting. In this way, the proxy interface class of ABP VNext dynamic client can obtain data with normal calls.
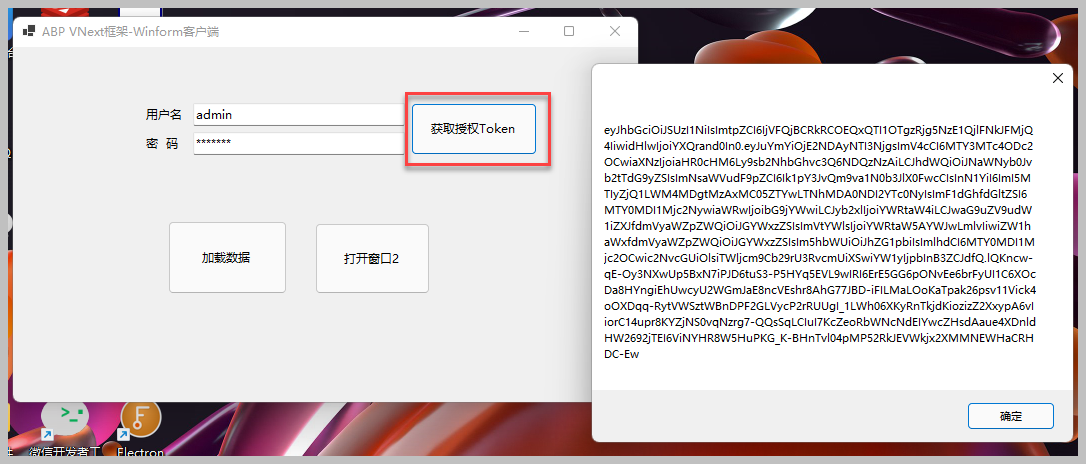
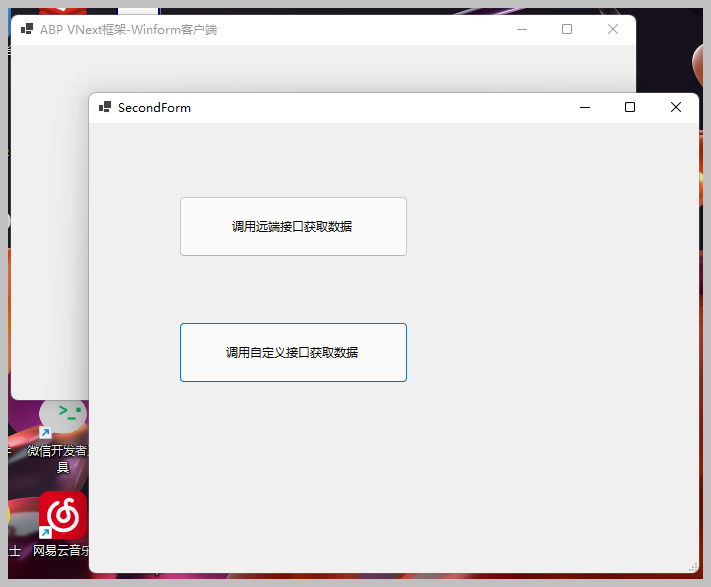

In this way, the whole test example completes the generation and call display of multiple Winform forms, completes the IDS4 authorization of the client through the token processing, and can call the interface class of the dynamic client normally, which perfectly solves the relevant technical points. The relevant technical points have been.