https://github.com/ultralytics/yolov3
The source code is trained by COCO data set.
Official details: https://github.com/ultralytics/yolov3/wiki/Train-Custom-Data
The dataset format of the library is neither VOC2007 nor MS COCO format, but a new format, YOLO format
COCO (2014 / 17) format - > Yolo format
download
http://images.cocodataset.org/zips/train2014.zip
http://images.cocodataset.org/zips/val2014.zip
https://pjreddie.com/media/files/coco/labels.tgz
https://pjreddie.com/media/files/coco/5k.part
https://pjreddie.com/media/files/coco/trainvalno5k.part
Connect the two Modify the suffix of the part file to txt, and then put it in the following format (note that the two shapes files are generated later). For the coco directory, you need to adjust the path in the data/coco2014.data file. Theoretically, the coco dataset and weight file can be automatically obtained by running getxxxx.sh file, but one is to cross the wall in China

coco2014.data:
classes=80
train=../coco/trainvalno5k.txt
valid=../coco/5k.txt
names=data/coco.names
Download the pre training weight file (there are many kinds, which correspond to the configuration file in the cfg directory one by one)
Note that the default in the code is yolov3 spp.
https://pjreddie.com/media/files/yolov3-tiny.weights
https://pjreddie.com/media/files/yolov3-spp.weights
By studying ultralytics in utils/google_utils.py code, you can also directly download the following weight file.
Note that the code of ultralytics here is written in V1 0, it is said that there is a V9 0 is to match the latest version of yolov5. Choose which one you want.
If you download the pt file directly here, you can skip the conversion weight file
(in addition, if you directly run detect.py, it will automatically help you download the corresponding pt file)
https://github.com/ultralytics/yolov3/releases/download/v1.0/yolov3.pt
https://github.com/ultralytics/yolov3/releases/download/v1.0/yolov3-tiny.pt
https://github.com/ultralytics/yolov3/releases/download/v1.0/yolov3-spp.pt
Convert weight file
The downloaded weight file is in darknet format and needs to be manually converted to pytorch format of pt. Of course, you can also go directly to the Internet to search yolov3 spp ultralytics pt this file, but most need points to download.
Source code in models Py provides a convert function, which can convert weights files into pt files.
The converted pt file is modified to yolov3 spp ultralytics After pt, put it in the weights directory.
train
1. Download coco dataset
First of all, there is really no need to use coco2014 now. Go directly to coco2017. According to scripts / get_ coco. The download path and decompression path specified in SH to download and decompress train2017 Zip and other files. If you download it yourself and place it in different locations, you need to modify the yml configuration file.
https://github.com/ultralytics/yolov5/releases/download/v1.0/coco2017labels.zip
http://images.cocodataset.org/zips/train2017.zip
http://images.cocodataset.org/zips/val2017.zip
http://images.cocodataset.org/zips/test2017.zip
1. Modify profile
The old version of yolov3 has a cfg directory. The following is the configuration of cfg. However, the latest version v9 places the yml file in the data directory as the configuration. Let's follow the latest version.
In train Py, the default is coco128 YML, this coco128 is a small data set composed of the first 128 pictures taken from coco.
If it is downloaded according to the default location, it will be automatically decompressed to the correct location. If it is downloaded manually, please follow coco YML or coco128 The configuration path of the YML configuration file places the file.
If it needs to be placed elsewhere, modify coco YML or coco128 Configuration in YML file.
2. Modify train Py file
The default source code is the coco128 dataset used. Here, you need to pay attention to the location of the weight file and the location of the dataset file used.

VOC2007 format - > Yolo format
Training error report (written at the top):
YOLOv3 compilation error: AssertionError:No labels found in data/VOC2007/JPEGImages/
Problem analysis: an error occurred when replacing images with labels. JPEGImages are used in the dataset, not images
 Method 1: modify datasets The images in py can be JPEGImages
Method 2: in the later dataset construction, replace the JPEGImages folder name with the images folder
VOC2007 format
-data
    - VOCdevkit
        - VOC2007
            - Annotations (label XML File, with the corresponding image processing tool LabelImg Artificially generated)
            - ImageSets (The method of generation is to use sh perhaps MATLAB Language generation)
                - Main
                    - test.txt
                    - train.txt
                    - trainval.txt
                    - val.txt
            - JPEGImages(Original file)
            - labels (xml File corresponding txt file)
Four txt files in the Main folder are generated. python script:
import os
import random

trainval_percent = 0.9
train_percent = 1.0
xmlfilepath = 'Annotations'
txtsavepath = 'ImageSets\Main'
total_xml = os.listdir(xmlfilepath)

num=len(total_xml)
list=range(num)
tv=int(num*trainval_percent)
tr=int(tv*train_percent)
trainval= random.sample(list,tv)
train=random.sample(trainval,tr)

ftrainval = open('ImageSets/Main/trainval.txt', 'w')
ftest = open('ImageSets/Main/test.txt', 'w')
ftrain = open('ImageSets/Main/train.txt', 'w')
fval = open('ImageSets/Main/val.txt', 'w')

for i  in list:
    name=total_xml[i][:-4]+'\n'
    if i in trainval:
        ftrainval.write(name)
        if i in train:
            ftrain.write(name)
        else:
            fval.write(name)
    else:
        ftest.write(name)

ftrainval.close()
ftrain.close()
fval.close()
ftest.close()
Generate txt file in labels folder, voc_label.py file:

# -*- coding: utf-8 -*-
import xml.etree.ElementTree as ET
import os

sets = ['train', 'val', 'test']
# classes = ["a", "b"]   # Change to your own category
classes = ["aeroplane", 'bicycle', 'bird', 'boat', 'bottle', 'bus', 'car', 'cat', 'chair', 'cow', 'diningtable', 'dog',
           'horse', 'motorbike', 'person', 'pottedplant', 'sheep', 'sofa', 'train', 'tvmonitor']  # class names
abs_path = os.getcwd()


def convert(size, box):
    dw = 1. / (size[0])
    dh = 1. / (size[1])
    x = (box[0] + box[1]) / 2.0 - 1
    y = (box[2] + box[3]) / 2.0 - 1
    w = box[1] - box[0]
    h = box[3] - box[2]
    x = x * dw
    w = w * dw
    y = y * dh
    h = h * dh
    return x, y, w, h


def convert_annotation(image_id):
    in_file = open(abs_path + '/Annotations/%s.xml' % (image_id), encoding='UTF-8')
    out_file = open(abs_path + '/labels/%s.txt' % (image_id), 'w')
    tree = ET.parse(in_file)
    root = tree.getroot()
    size = root.find('size')
    w = int(size.find('width').text)
    h = int(size.find('height').text)
    for obj in root.iter('object'):
        difficult = obj.find('difficult').text
        # difficult = obj.find('Difficult').text
        cls = obj.find('name').text
        if cls not in classes or int(difficult) == 1:
            continue
        cls_id = classes.index(cls)
        xmlbox = obj.find('bndbox')
        b = (float(xmlbox.find('xmin').text), float(xmlbox.find('xmax').text), float(xmlbox.find('ymin').text),
             float(xmlbox.find('ymax').text))
        b1, b2, b3, b4 = b
        # Mark out of range correction
        if b2 > w:
            b2 = w
        if b4 > h:
            b4 = h
        b = (b1, b2, b3, b4)
        bb = convert((w, h), b)
        out_file.write(str(cls_id) + " " + " ".join([str(a) for a in bb]) + '\n')


for image_set in sets:
    if not os.path.exists(abs_path + '/labels/'):
        os.makedirs(abs_path + '/labels/')

    image_ids = open(abs_path + '/ImageSets/Main/%s.txt' % (image_set)).read().strip().split()
    list_file = open(abs_path + '/%s.txt' % (image_set), 'w')
    for image_id in image_ids:
        list_file.write(abs_path + '/JPEGImages/%s.jpg\n' % (image_id))
        convert_annotation(image_id)
    list_file.close()
OK, the VOC format data set is constructed, But, continue to construct the YOLO format data set.
Note: if you intend to use the coco evaluation standard, you need to construct the json format in coco. If the requirements are not high, you only need the VOC format, and use the mAP calculation program written by the author.
Create your own data / * Names file
Save all categories of your training data, one category per line, such as data / coco names:
person
bicycle
car
...
Voc2007 (class 20):
aeroplane
bicycle
bird
boat
bottle
bus
car
cat
chair
cow
diningtable
dog
horse
motorbike
person
pottedplant
sheep
sofa
train
tvmonitor
Create your own data / * Data, which holds a lot of configuration information
classes = 1 # Change to the number of categories of your dataset
train = ./data/2007_train.txt # Via VOC_ label. txt file generated by py file
valid = ./data/2007_test.txt # Via VOC_ label. txt file generated by py file
names = data/voc2007.names # Record category
# backup = backup/ # Not used in this library
# eval = coco # Select the map calculation method (available in v5v6 version)
Modify yolov3 CFG, or create (recommend) a yolov3-voc2007.cfg file with category information
You only need to change the number of filter s in front of each [yolo] layer:
every last[region/yolo]In the last convolution layer before the layer filters=Number of prediction boxes(mask Corresponding number, e.g mask=0,1,2, Representative used anchors For the first three pairs in, the number of prediction frames here should be 3*(classes+5) ,5 The meaning of is 5 coordinates (in the paper) tx,ty,tw,th,po),3 The meaning is to use three anchor.
For example: if I have three classes, n = 20, then filter = 3 × (n+5) = 75
[convolutional]
size=1
stride=1
pad=1
filters=255 # Change to 75
activation=linear


[yolo]
mask = 6,7,8
anchors = 10,13,  16,30,  33,23,  30,61,  62,45,  59,119,  116,90,  156,198,  373,326
classes=80 # Change to 20
num=9
jitter=.3
ignore_thresh = .7
truth_thresh = 1
random=1
Format analysis of VOC2007-YOLO dataset
- yolov3
    - data
      - 2007_train.txt
      - 2007_test.txt
      - voc2007.names
      - voc2007.data
      - annotations(json files)
      - images(Will 2007_train.txt Put pictures in train2014 Folder, test Similarly)
        - train2014
          - 0001.jpg
          - 0002.jpg
        - val2014
          - 0003.jpg
          - 0004.jpg
      - labels(voc_labels.py The generated content needs to be reorganized)
        - train2014
          - 0001.txt
          - 0002.txt
        - val2014
          - 0003.txt
          - 0004.txt
      - samples(Store pictures to be tested)
2007_train.txt content example:
/home/dpj/yolov3-master/data/images/val2014/Cow_1192.jpg
/home/dpj/yolov3-master/data/images/val2014/Cow_1196.jpg
.....
Note that the image and labels file architectures are consistent (corresponding to the previous error message), because txt is obtained through simple replacement:
images -> labels
.jpg -> .txt
Details can be found in datasets A detailed replacement was found in the. Py file.
train
Download the pre training model:
Darknet *.weights :
https://pjreddie.com/media/files/yolov3.weights
https://pjreddie.com/media/files/yolov3-tiny.weights
https://pjreddie.com/media/files/yolov3-spp.weights

PyTorch *.pt :
https://drive.google.com/drive/folders/1uxgUBemJVw9wZsdpboYbzUN4bcRhsuAI
The first three Darknet weights are easy to download (they should be used for training below v6). PyTorch weight training is required after v7. The Darknet weight is converted into PyTorch weight through the convert function in models.py.
python train.py --cfg cfg/yolov3.cfg --data data/coco.data
((mine) python train.py --cfg cfg/yolov3-voc2007.cfg --data my_data/VOC2007/voc2007.data --epochs 300 --batch-size 16
If interrupted, you can resume training
python train.py --data data/coco.data --cfg cfg/yolov3.cfg --resume
test
The picture is in data/samples
python detect.py --cfg cfg/yolov3.cfg --weights weights/best.pt

Image: --source file.jpg
Video: --source file.mp4
Directory: --source dir/
Webcam: --source 0
RTSP stream: --source rtsp://170.93.143.139/rtplive/470011e600ef003a004ee33696235daa
HTTP stream: --source http://wmccpinetop.axiscam.net/mjpg/video.mjpg
Evaluation model
python test.py --weights weights/best.pt
If you use the cocoAPI, use the following command:
$ python3 test.py --img-size 608 --iou-thr 0.6 --weights ultralytics68.pt --cfg yolov3-spp.cfg

Namespace(batch_size=32, cfg='yolov3-spp.cfg', conf_thres=0.001, data='data/coco2014.data', device='', img_size=608, iou_thres=0.6, save_json=True, task='test', weights='ultralytics68.pt')
Using CUDA device0 _CudaDeviceProperties(name='Tesla V100-SXM2-16GB', total_memory=16130MB)
               Class    Images   Targets         P         R   mAP@0.5        F1: 100% 157/157 [03:30<00:00,  1.16it/s]
                 all     5e+03  3.51e+04    0.0353     0.891     0.606    0.0673
 Average Precision  (AP) @[ IoU=0.50:0.95 | area=   all | maxDets=100 ] = 0.409
 Average Precision  (AP) @[ IoU=0.50      | area=   all | maxDets=100 ] = 0.615
 Average Precision  (AP) @[ IoU=0.75      | area=   all | maxDets=100 ] = 0.437
 Average Precision  (AP) @[ IoU=0.50:0.95 | area= small | maxDets=100 ] = 0.242
 Average Precision  (AP) @[ IoU=0.50:0.95 | area=medium | maxDets=100 ] = 0.448
 Average Precision  (AP) @[ IoU=0.50:0.95 | area= large | maxDets=100 ] = 0.519
 Average Recall     (AR) @[ IoU=0.50:0.95 | area=   all | maxDets=  1 ] = 0.337
 Average Recall     (AR) @[ IoU=0.50:0.95 | area=   all | maxDets= 10 ] = 0.557
 Average Recall     (AR) @[ IoU=0.50:0.95 | area=   all | maxDets=100 ] = 0.612
 Average Recall     (AR) @[ IoU=0.50:0.95 | area= small | maxDets=100 ] = 0.438
 Average Recall     (AR) @[ IoU=0.50:0.95 | area=medium | maxDets=100 ] = 0.658
 Average Recall     (AR) @[ IoU=0.50:0.95 | area= large | maxDets=100 ] = 0.746
mAP calculation
mAP@0.5 run at --iou-thr 0.5, mAP@0.5...0.95 run at --iou-thr 0.7
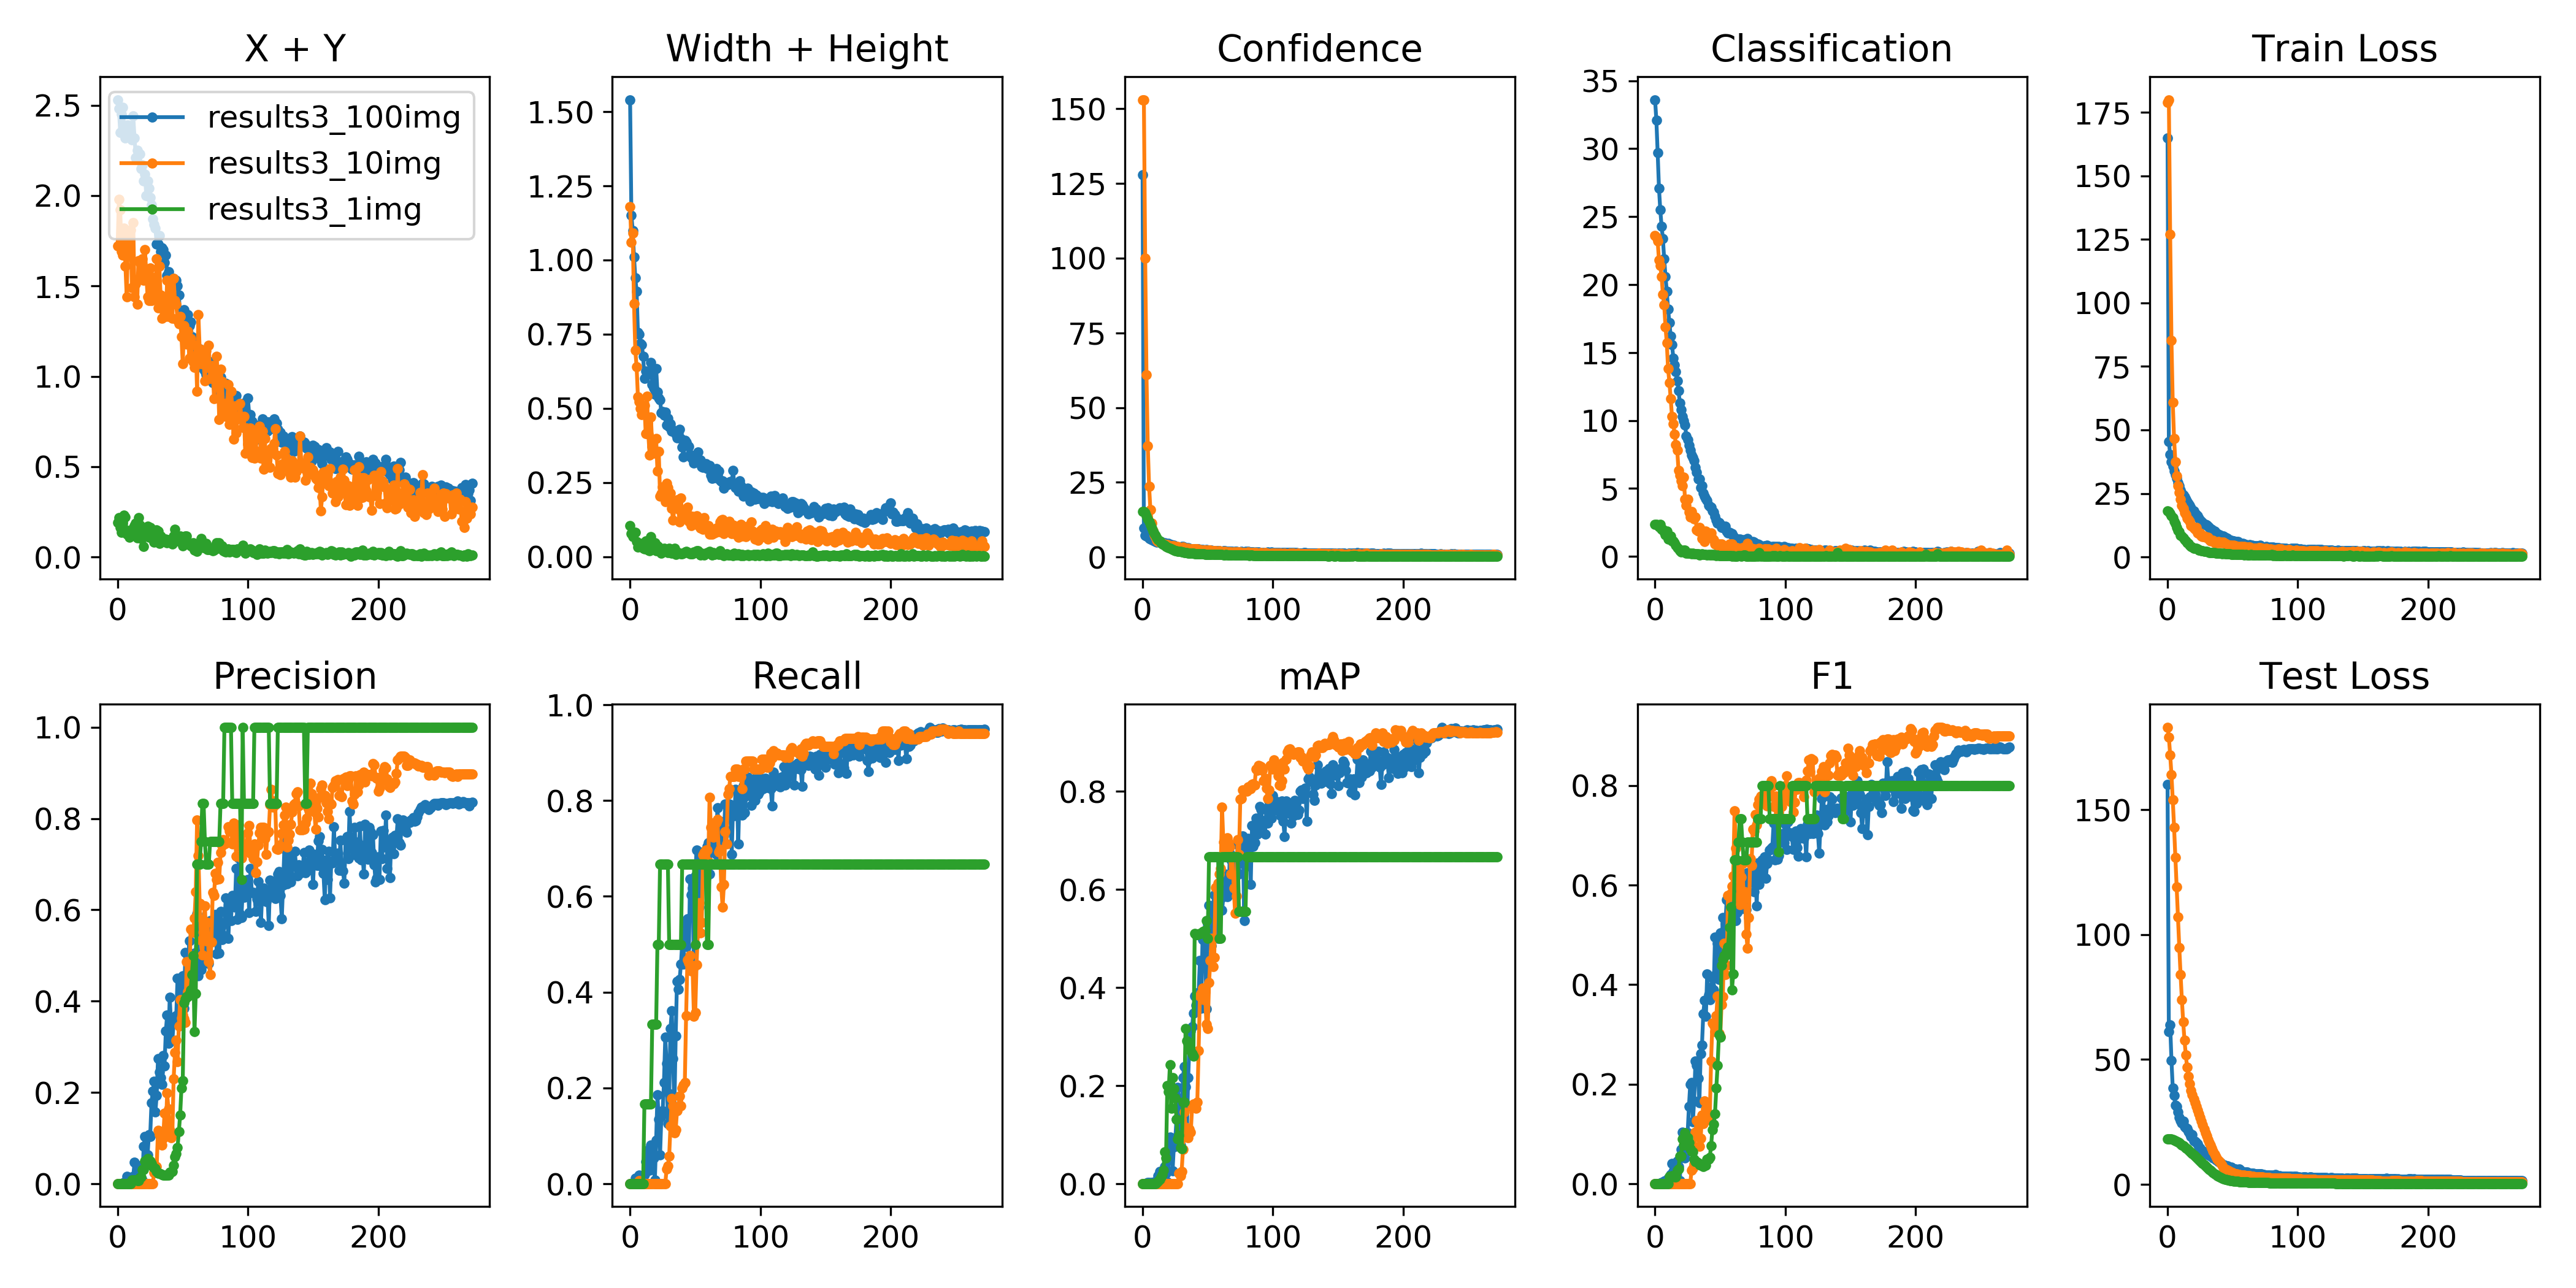
visualization
You can use python -c from utils import utils;utils.plot_results()
Create drawlog py
def plot_results():
    # Plot YOLO training results file 'results.txt'
    import glob
    import numpy as np
    import matplotlib.pyplot as plt
    #import os; os.system('rm -rf results.txt && wget https://storage.googleapis.com/ultralytics/results_v1_0.txt')

    plt.figure(figsize=(16, 8))
    s = ['X', 'Y', 'Width', 'Height', 'Objectness', 'Classification', 'Total Loss', 'Precision', 'Recall', 'mAP']
    files = sorted(glob.glob('results.txt'))
    for f in files:
        results = np.loadtxt(f, usecols=[2, 3, 4, 5, 6, 7, 8, 17, 18, 16]).T  # column 16 is mAP
        n = results.shape[1]
        for i in range(10):
            plt.subplot(2, 5, i + 1)
            plt.plot(range(1, n), results[i, 1:], marker='.', label=f)
            plt.title(s[i])
            if i == 0:
                plt.legend()
    plt.savefig('./plot.png')
if __name__ == "__main__":
    plot_results()
Data set matching code
If you see here, Congratulations, you can avoid the slightly complex data processing above. We provide a set of code that integrates the above scripts. As long as you have jpg images and corresponding xml files, you can directly generate qualified data sets, and then modify some codes as required.
Code address: https://github.com/pprp/voc2007_for_yolo_torch
Please follow the processing in readme to get the data set.
recommend:
[learn YOLOv3 from scratch]
https://blog.csdn.net/dd_pp_jj/category_9682353.html
https://blog.csdn.net/itsgoodtobebad/article/details/107377029