Introduction: This is a learning note blog about the installation and deployment of flume. The main contents include: flume installation and deployment and two entry cases of flume. They are: the official case of monitoring port data and the file changes tracked by multiple files in the specified directory in real time. If there are mistakes, please criticize and correct!!!
flume Brief
flume is a highly available, reliable and distributed system for massive log collection, aggregation and transmission. At the same time, the lightweight service framework based on streaming architecture is flexible and simple.
It is mainly used in the data transmission phase of big data.
flume installation deployment
Installation related address
Flume official website address
Document viewing address
Download address
Installation deployment
1. Prepare the installation package to your own compressed package directory. Mine is in: / home/lqs/software /
2. Decompress
[lqs@bdc112 software]$ pwd
/home/lqs/software
[lqs@bdc112 software]$ tar -zxvf apache-flume-1.9.0-bin.tar.gz -C /home/lqs/module/
3. Modify name
[lqs@bdc112 software]$ cd ../module/
[lqs@bdc112 module]$  mv apache-flume-1.9.0-bin/ flume-1.9.0
4. Put guava-11.0. In the lib file 2. Remove the jar to make flume compatible with Hadoop 3.1 three
[lqs@bdc112 module]$ rm flume-1.9.0/lib/guava-11.0.2.jar
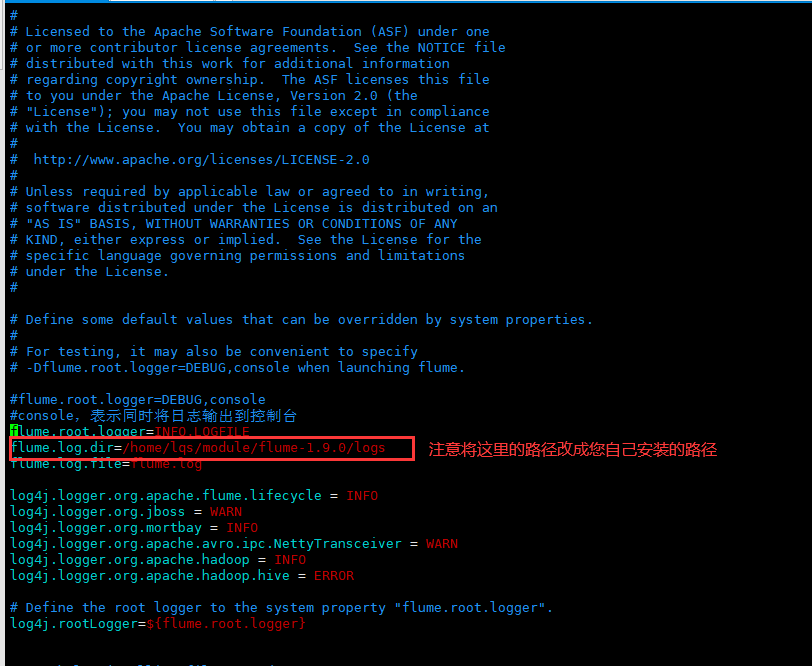
5. Modify log4j. Under conf Properties file
[lqs@bdc112 conf]$ pwd
/home/lqs/module/flume-1.9.0/conf
[lqs@bdc112 conf]$ vim log4j.properties
Modify it as follows
flume introduction case
Case 1: Official case of monitoring port data
Introduction and requirements
Official case of monitoring port data. Requirements: use flume to listen to a port, collect the port data, and print it to the console.
Implementation steps
1. Install the netcat tool (if installed, you don't need to install it)
[lqs@bdc112 flume-1.9.0]$ sudo yum install -y nc
2. Create job / NC flume log. In flume file Conf file
[lqs@bdc112 flume-1.9.0]$ mkdir job
[lqs@bdc112 flume-1.9.0]$ touch nc-flume-log.conf
[lqs@bdc112 flume-1.9.0]$ vim job/nc-flume-log.conf
Add the following:
# Name the components on this agent
a1.sources = r1
a1.sinks = k1
a1.channels = c1

# Describe/configure the source
a1.sources.r1.type = netcat
a1.sources.r1.bind = localhost
a1.sources.r1.port = 44444

# Describe the sink
a1.sinks.k1.type = logger

# Use a channel which buffers events in memory
a1.channels.c1.type = memory
a1.channels.c1.capacity = 1000
a1.channels.c1.transactionCapacity = 100

# Bind the source and sink to the channel
a1.sources.r1.channels = c1
a1.sinks.k1.channel = c1
Source: http://flume.apache.org/FlumeUserGuide.html
5. Start flume listening port first
Writing method I
[lqs@bdc112 flume-1.9.0]$ bin/flume-ng agent -c conf/ -n a1 -f job/taildir-flume-hdfs.conf -Dflume.root.logger=INFO,console
Writing method 2
[lqs@bdc112 flume-1.9.0]$ bin/flume-ng agent --conf conf/ --name a1 --conf-file job/taildir-flume-hdfs.conf -Dflume.root.logger=INFO,console
Parameter Description:
--Conf: indicates the directory where the configuration files are stored. By default, they are all in ${FLUME_HOEM}/conf /. The configuration command can be abbreviated as: - c
--Name: indicates the name given to the agent. Here, the configuration file is named a1. The configuration command can be abbreviated as: - n
--Conf file: the configuration file read by flume this time is under that configuration file. By default, it is under conf /, and mine is under job /.
be careful:
-Dflume.root.logger=INFO,console: - D indicates that flume is dynamically modified when flume is running root. The logger parameter property value, and set the console log printing level to info level. Log levels include: log, info, warn and error. The log parameters have been modified in the configuration file. You no longer need to enter them repeatedly.
6. Use the netcat toolkit to send content to the 44444 port of the machine
Determine whether port 44444 is occupied sudo netstat -nlp | grep 44444
[lqs@bdc112 flume-1.9.0]$ nc localhost 44444
ninhao
OK
flume
OK
#Another window displays
2021-12-27 14:14:11,148 (lifecycleSupervisor-1-0) [INFO - org.apache.flume.source.NetcatSource.start(NetcatSource.java:166)] Created serverSocket:sun.nio.ch.ServerSocketChannelImpl[/127.0.0.1:44444]
2021-12-27 14:14:41,155 (SinkRunner-PollingRunner-DefaultSinkProcessor) [INFO - org.apache.flume.sink.LoggerSink.process(LoggerSink.java:95)] Event: { headers:{} body: 6E 69 6E 68 61 6F                               ninhao }
2021-12-27 14:14:46,816 (SinkRunner-PollingRunner-DefaultSinkProcessor) [INFO - org.apache.flume.sink.LoggerSink.process(LoggerSink.java:95)] Event: { headers:{} body: 66 6C 75 6D 65                                  flume }
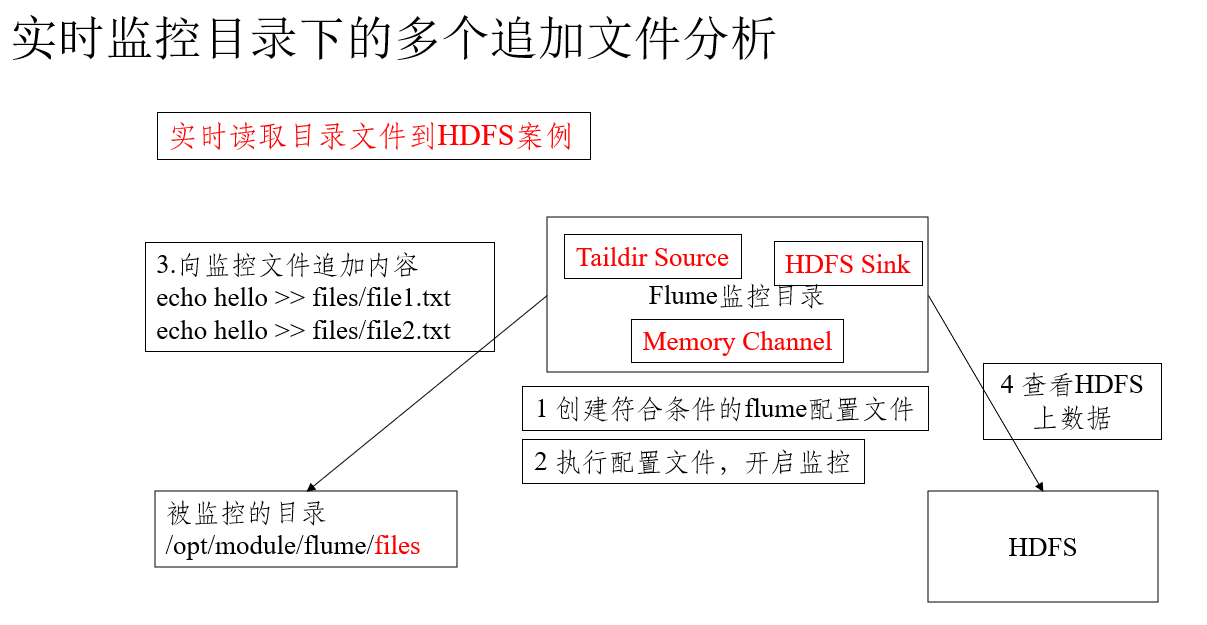
Case 2
Description: real time monitor multiple additional files in the specified directory
aildir Source is suitable for listening to multiple real-time appended files, and can realize breakpoint continuation.
Requirements and requirements analysis
Use flume to listen for the real-time additional files of the whole directory and upload them to hdfs
The demand analysis is shown in the figure below
Implementation configuration steps
1. Create the configuration file taildir flume HDFS. Exe in the job directory conf
[lqs@bdc112 job]$ pwd
/home/lqs/module/flume-1.9.0/job
[lqs@bdc112 job]$ vim taildir-flume-hdfs.conf
And enter the following:
a1.sources = r1
a1.sinks = k1
a1.channels = c1

# Describe/configure the source
a1.sources.r1.type = TAILDIR
a1.sources.r1.filegroups = f1 f2
# It must be accurate to the file. You can write a matching expression to match multiple files
a1.sources.r1.filegroups.f1 = /home/lqs/module/flume-1.9.0/files1/.*file.*
a1.sources.r1.filegroups.f2 = /home/lqs/module/flume-1.9.0/files2/.*log.*
# The file storage location of the breakpoint continuation can be realized without changing the default location
a1.sources.r1.positionFile = /home/lqs/module/flume-1.9.0/taildir_position.json

# Describe the sink
a1.sinks.k1.type = hdfs
a1.sinks.k1.hdfs.path = hdfs://bdc112:8020/flume-1.9.0/%Y%m%d/%H
#Prefix of uploaded file
a1.sinks.k1.hdfs.filePrefix = log-

#Use local timestamp
a1.sinks.k1.hdfs.useLocalTimeStamp = true
#How many events are accumulated to flush to HDFS once
a1.sinks.k1.hdfs.batchSize = 100

#Set the file type to support compression
a1.sinks.k1.hdfs.fileType = DataStream


#How often do I generate a new file
a1.sinks.k1.hdfs.rollInterval = 30
#Set the scroll size of each file to about 128M
a1.sinks.k1.hdfs.rollSize = 134217700
#File scrolling is independent of the number of events
a1.sinks.k1.hdfs.rollCount = 0

# Use a channel which buffers events in memory
a1.channels.c1.type = memory
a1.channels.c1.capacity = 1000
a1.channels.c1.transactionCapacity = 100

# Bind the source and sink to the channel
a1.sources.r1.channels = c1
a1.sinks.k1.channel = c1
2. Start monitor folder command
[lqs@bdc112 flume-1.9.0]$ bin/flume-ng agent --conf conf/ --name a1 --conf-file job/group2/flume02
Add data to file
[lqs@bdc112 files1]$ pwd
/home/lqs/module/flume-1.9.0/files1
[lqs@bdc112 files1]$ echo test >> file7.txt
[lqs@bdc112 files1]$ echo demo >> file8.txt
3. View data

be careful:
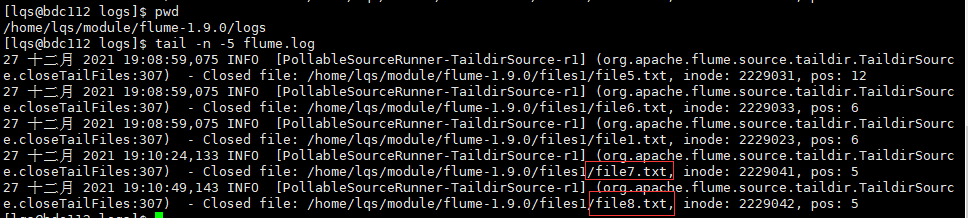
The area where file metadata is stored in Linux is called inode. Each inode has a number. The operating system uses the inode number to identify different files. The Unix/Linux system does not use the file name, but uses the inode number to identify files. TailDir source uses inode and the full path of the file to identify the same file, so after modifying the file name, if the expression can match, it will re read the data of a file.
Check in the log
[lqs@bdc112 logs]$ pwd
/home/lqs/module/flume-1.9.0/logs
[lqs@bdc112 logs]$ tail -n -5 flume.log