First, let's understand what message queue MQ is?
Message queuing and RocketMQ
Message queuing MQ
Message Queue (MQ for short) is a cross process communication mechanism, which is usually used for asynchronous data transmission between applications. MQ products are usually called "message middleware" in the architecture. Its main responsibility is to ensure reliable data transmission between services and realize decoupling between services.
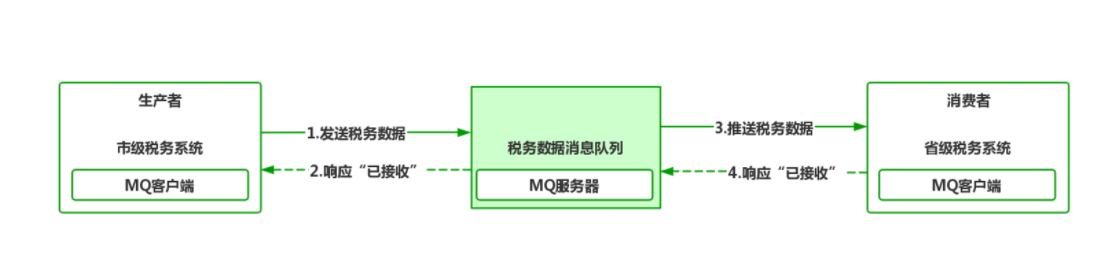
This is too academic. Let's look at the actual case of a project. Suppose that the municipal tax system reports the tax summary data of this year to the provincial tax system. According to the previous design, the municipal tax system as the data producer needs to understand many details such as IP, port and interface of the provincial tax system, and then through RPC RESTful and other methods to synchronously send data to the provincial tax system. The provincial tax system, as the consumer of the data, responds with "data received".
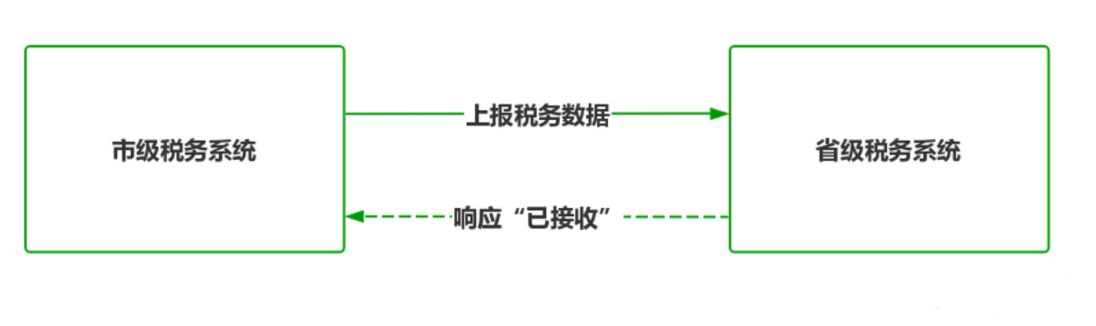
Although there is no problem logically, three new problems arise from the technical level:
- If the provincial tax system is being upgraded and maintained at the time of reporting, the municipal tax system must design an additional retransmission mechanism to ensure the integrity of the data;
- If the provincial tax system needs 1 minute to receive data and the municipal tax system adopts synchronous communication, the transmission thread of the municipal tax system will be blocked for 1 minute. In the high concurrency scenario, such a long blocking is easy to cause the system to crash;
- If there is any change in the calling mode, interface, IP and port of the provincial tax system interface, the municipal tax system must be notified immediately for adjustment, otherwise there will be communication failure.
From the above three problems, it can be seen that the changes generated by the provincial system directly affect the implementation of the municipal tax system, and the two have strong coupling. If the problem is placed in the micro service architecture of the Internet, dozens of services are called in series, and similar strong coupling occurs between each service, the system must be difficult to maintain.
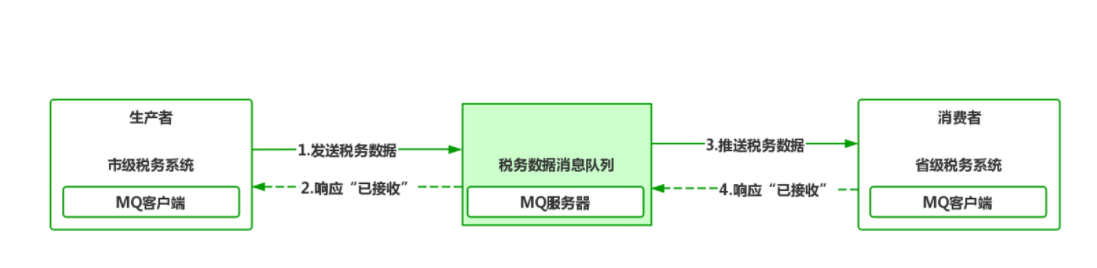
It can be seen that after the introduction of message queue, both producers and consumers only process data for message queue. Data producers do not need to know the information of specific consumers at all, but just put the data in the specified queue as agreed in advance. The same is true for consumers. The consumer listens to the message queue. If new data is generated in the queue, MQ will enable consumers to obtain new data for subsequent processing through "PUSH" or "draw lots" PULL.
As can be seen from the schematic diagram, as long as the message queue product is stable and reliable, the message communication process is guaranteed. In the architecture field, many manufacturers have developed their own MQ products. The most representative open source products are:
- Kafka
- ActiveMQ
- ZeroMQ
- RabbitMQ
- RocketMQ
Each product has its own different design and implementation principles, but the fundamental goal is the same: to provide a reliable asynchronous transmission mechanism for inter process communication. As an Alibaba product, RocketMQ is naturally integrated into the Spring Cloud Alibaba ecosystem. After many double 11 tests, RocketMQ is excellent in performance, reliability and ease of use. Let's learn about RocketMQ.
RocketMQ
RocketMQ is a Distributed Message Queuing Middleware. RocketMQ was originally designed to meet the needs of Alibaba's own business for asynchronous message delivery. In 3 After the X version, it was officially open source and donated to Apache. At present, it has been incubated as the top project of Apache. At the same time, it is also one of the most widely used and used MQ products in China.
RocketMQ has many excellent features. In terms of availability, RocketMQ emphasizes that the cluster has no single point, and any point is highly available. The client has load balancing capability, which can easily realize horizontal capacity expansion; In terms of performance, the 100 million level message processing behind the tmall double 11 promotion is guaranteed through RocketMQ; In terms of API, it provides rich functions, which can realize rich functions such as asynchronous message, synchronous message, sequential message and transaction message, and can meet most application scenarios; In terms of reliability, the functions of message persistence, failure retry mechanism and message query traceability are provided to further ensure reliability.
After understanding many features of RocketMQ, let's understand several important concepts of RocketMQ:
- Message: in a broad sense, messages are business data transmitted between processes. In a narrow sense, different MQ products attach additional attributes to messages, such as Topic, Tags, etc;
- Message Producer: refers to the role responsible for production data. In the previous case, the municipal tax system acted as a message Producer;
- Message Consumer: refers to the role of using data. The provincial tax system in the previous case is a message Consumer;
- MQ message service Broker: the general term of MQ message server, which is used for message storage and message forwarding;
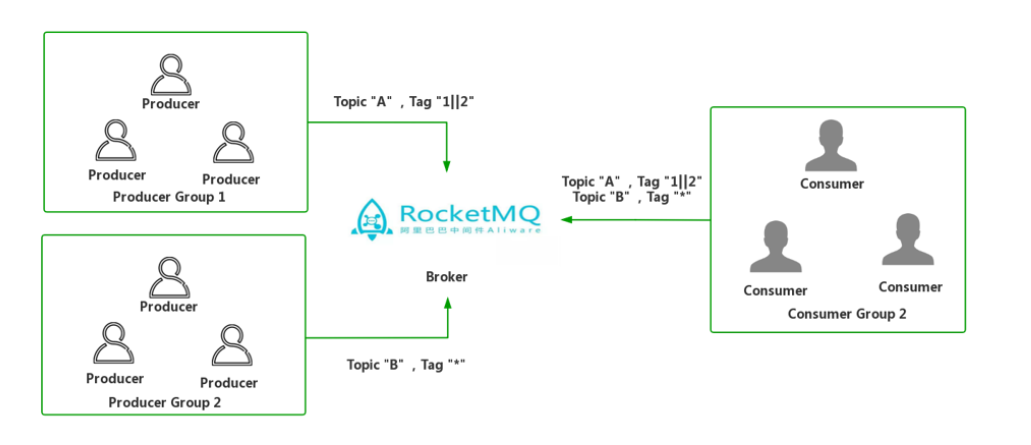
- Producer Group: RocketMQ groups producers that send the same type of messages into producer groups;
- Consumer Group: RocketMQ groups consumers who consume the same type of messages into consumer groups.
After understanding these basic concepts, we officially enter the deployment and use of RocketMQ, and understand the execution process of RocketMQ through case code. For RocketMQ, it requires two stages: setting up a RocketMQ server cluster and accessing the RocketMQ queue. First, let's deploy the RocketMQ cluster.
Deploy RocketMQ cluster
RocketMQ naturally adopts the cluster mode. There are three common forms of RocketMQ cluster: multi Master mode, multi Master and multi Slave asynchronous replication mode, and multi Master and multi Slave synchronous double write mode. The advantages and disadvantages of these three modes are as follows.
- Multi Master mode is the simplest configuration mode and the most used mode. The advantage is that the downtime or restart maintenance of a single Master has no impact on the application. When the disk is configured as RAID10, even if the machine downtime cannot be recovered, because the RAID10 disk is very reliable, the synchronous disk brushing message will not be lost, and the performance is the highest; The disadvantage is that during the downtime of a single machine, messages that have not been consumed by the machine can not be subscribed before the machine is restored, and the real-time performance of messages will be affected.
- Multi master multi Slave asynchronous replication mode. Each master is configured with a Slave. There are multiple master Slave pairs. The HA adopts asynchronous replication. The active and standby have a short message millisecond delay. Even if the disk is damaged, only a small number of messages will be lost, and the real-time performance of messages will not be affected. At the same time, after the Master goes down, consumers can still consume from Slave, and this process is transparent to the application without manual intervention, and the performance is almost the same as that of multi master mode; The disadvantage is that the Master goes down, and a small amount of messages will be lost when the disk is damaged.
- Multi Master and multi Slave synchronous double write mode. HA adopts synchronous double write mode, that is, it returns success to the application only when both active and standby are successfully written. In this mode, there is no single point of failure in data and services. In the case of Master downtime, there is no delay in messages, and the service availability and data availability are very high; The disadvantage is that the performance is about 10% lower than that of asynchronous replication mode, and the execution time of sending a single message will be slightly higher. In the current version, after the primary node goes down, the standby machine cannot automatically switch to the host.
To build a spatial Master server cluster, let's first look at the deployment architecture diagram:
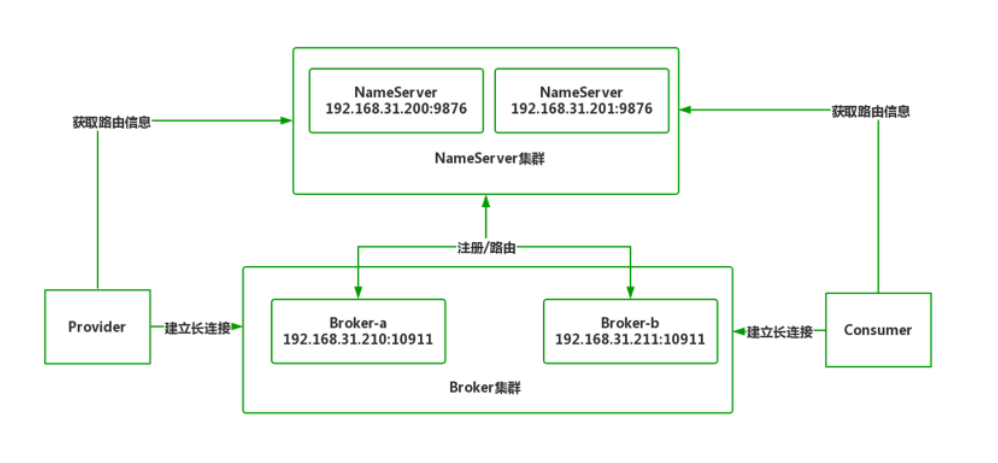
In the dual Master architecture, A new role named server appears (naming server). NameServer is a lightweight routing registry built into RocketMQ. It supports brokers to initiate dynamic registration and discovery. After the Broker is started, it will automatically send a heartbeat report to NameServer to notify the Broker to go online. When the Provider obtains routing information from NameServer, it will establish a long connection to the Broker at the specified location to complete the data transmission.
In order to avoid the single node bottleneck, more than two nameservers are usually deployed as high availability redundancy. NameServer itself is stateless and there is no communication between instances. Therefore, during Broker cluster configuration, all NameServer nodes should be configured to ensure state synchronization.
There are two steps to deploy a RocketMQ cluster: deploying a NameServer and deploying a Broker cluster.
The first step is to deploy the NameServer cluster.
We created two CentOS7 virtual machines with IP addresses of 192.168 31.200 and 192.168 31.201, the memory of the two virtual machines shall be greater than 2G, and the 64 bit jdk1 shall be installed 8. The specific process will not be demonstrated.
Then visit the Apache RocketMQ download page:
https://www.apache.org/dyn/closer.cgi?path=rocketmq/4.8.0/rocketmq-all-4.8.0-bin-release.zip
Get the latest version of RocketMQ
rocketmq-all-4.8.0-bin-release.zip, unzip and edit {RocketMQ-all-4.8 0-bin-release/bin/runserver. SH file. Because RocketMQ is a server software, it is configured with 8G memory by default, which is too much for PC s and notebooks. Therefore, reduce the JVM memory to 1GB near line 82 for demonstration.
Before modification:
JAVA_OPT="${JAVA_OPT} -server -Xms8g -Xmx8g -Xmn4g -XX:MetaspaceSize=128m -XX:MaxMetaspaceSize=320m"After modification:
cd /usr/local/rocketmq-all-4.8.0-bin-release/bin/
sh mqnamesrv
mqnamesrv is the startup command of RocketMQ's own NameServer. After execution, you can see the name server boot success Serializetype = JSON means that the NameServer is started successfully. The NameServer will occupy port 9876 to provide services. Don't forget to set the release in the firewall. Then deploy NameServer on another 201 device to form a NameServer cluster.
Step 2: deploy the Broker cluster.
We will create two additional CentOS7 virtual machines with IP addresses of 192.168 31.210 and 192.168 31.211, it is also required that the memory of the two virtual machines should be greater than 2G, and the 64 bit jdk1 should be installed 8.
open
rocketmq-all-4.8.0-bin-release directory, edit / bin / runbroker SH file, also reduce the default memory occupied by the startup Broker from 8G to 1G, and adjust 64 lines to the following:
JAVA_OPT="${JAVA_OPT} -server -Xms1g -Xmx1g -Xmn512m"In the conf directory, RocketMQ has prepared three groups of cluster configuration templates for us:
- 2m-2s-async stands for dual master and dual slave asynchronous replication mode;
- 2m-2s-sync represents double master, double slave, synchronous and double write mode;
- 2m noslave stands for dual master mode.
In the 2m noslave dual main mode directory, we add the address of NameServer cluster at the end of broker-a.properties and broker-b.properties. To facilitate understanding, I also annotate the meaning of each item in the template. First, the complete contents of broker-a.properties are as follows:
#Cluster name. Brokers in the same cluster must be unified
brokerClusterName=DefaultCluster
#broker name
brokerName=broker-a
#brokerId=0 represents the master node, and greater than zero represents the slave node
brokerId=0
#Delete the log file at 4 a.m. by default
deleteWhen=04
#Log file retention time, 48 hours by default
fileReservedTime=48
#Role of Broker
#- ASYNC_MASTER asynchronous replication master
#- SYNC_MASTER synchronous double write master
brokerRole=ASYNC_MASTER
#Disc brushing mode
#- ASYNC_FLUSH asynchronous disk brushing, good performance, number of downtime lost
#- SYNC_FLUSH synchronous brush disk, poor performance and no loss of data
flushDiskType=ASYNC_FLUSH
#The NameServer node list is appended at the end, separated by semicolons
namesrvAddr=192.168.31.200:9876;192.168.31.201:9876
broker-b.properties is only different from the broker name, as shown below:
brokerClusterName=DefaultCluster
brokerName=broker-b
brokerId=0
deleteWhen=04
fileReservedTime=48
brokerRole=ASYNC_MASTER
flushDiskType=ASYNC_FLUSH
#The NameServer node list is appended at the end, separated by semicolons
namesrvAddr=192.168.31.200:9876;192.168.31.201:9876
After will
rocketmq-all-4.8. Upload the 0-bin-release directory to the / usr/local directory, and run the following command to start the broker node a.
cd /usr/local/rocketmq-all-4.8.0-bin-release/
sh bin/mqbroker -c ./conf/2m-noslave/broker-a.properties
Add the c parameter after the mqbroker startup command to specify which Broker configuration file to load.
After successful startup, you will see the following log. The Broker will occupy port 10911 to provide services. Please set firewall clearance.
The broker[broker-a, 192.168.31.210:10911] boot success. serializeType=JSON and name server is 192.168.31.200:9876;192.168.31.201:9876
Similarly, execute the following command on another Master to start and load the broker-b configuration file.
cd /usr/local/rocketmq-all-4.8.0-bin-release/
sh bin/mqbroker -c ./conf/2m-noslave/broker-b.properties
Here, the NameServer cluster and Broker cluster are deployed. Next, execute two commands to verify.
First, use the mqadmin command to view the cluster status.
The mqadmin command exists in the bin directory to manage the RocketMQ cluster. We can use the clusterList to view the cluster nodes. The commands are as follows:
sh mqadmin clusterList -n 192.168.31.200:9876
By querying the registration information on NameServer, the following results are obtained.

You can see that there are two brokers in the DefaultCluster cluster because the BID number is 0, which means that they are both Master nodes.
Second, use the tools provided with RocketMQ The SH tool tests the actual operation of MQ by generating demonstration data. Use the following command in the bin directory.
export NAMESRV_ADDR=192.168.31.200:9876
sh tools.sh org.apache.rocketmq.example.quickstart.Producer
You will see the screen output log:
SendResult [sendStatus=SEND_OK, msgId=7F0000010B664DC639969F28CF540000, offsetMsgId=C0A81FD200002A9F00000000000413B6, messageQueue=MessageQueue [topic=TopicTest, brokerName=broker-a, queueId=1], queueOffset=0]
SendResult [sendStatus=SEND_OK, msgId=7F0000010B664DC639969F28CF9B0001, offsetMsgId=C0A81FD200002A9F000000000004147F, messageQueue=MessageQueue [topic=TopicTest, brokerName=broker-a, queueId=2], queueOffset=0]
SendResult [sendStatus=SEND_OK, msgId=7F0000010B664DC639969F28CFA30002, offsetMsgId=C0A81FD200002A9F0000000000041548, messageQueue=MessageQueue [topic=TopicTest, brokerName=broker-a, queueId=3], queueOffset=0]
SendResult [sendStatus=SEND_OK, msgId=7F0000010B664DC639969F28CFA70003, offsetMsgId=C0A81FD300002A9F0000000000033C56, messageQueue=MessageQueue [topic=TopicTest, brokerName=broker-b, queueId=0], queueOffset=0]
SendResult [sendStatus=SEND_OK, msgId=7F0000010B664DC639969F28CFD60004, offsetMsgId=C0A81FD300002A9F0000000000033D1F, messageQueue=MessageQueue [topic=TopicTest, brokerName=broker-b, queueId=1], queueOffset=0]
SendResult [sendStatus=SEND_OK, msgId=7F0000010B664DC639969F28CFDB0005, offsetMsgId=C0A81FD300002A9F0000000000033DE8, messageQueue=MessageQueue [topic=TopicTest, brokerName=broker-b, queueId=2], queueOffset=0]
...
The alternation of broker-a and broker-b} indicates that the cluster is effective.
The service provider is tested earlier, and the consumer is tested below. Run the following command:
export NAMESRV_ADDR=192.168.31.200:9876
sh tools.sh org.apache.rocketmq.example.quickstart.Consumer
You will see that consumers also get data. Here, the construction of RocketMQ dual Master cluster is completed. As for the configuration of multi Master and multi Slave, it is also similar. You can get started quickly by consulting the official documents.
ConsumeMessageThread_11 Receive New Messages: [MessageExt [brokerName=broker-b, queueId=2, storeSize=203, queueOffset=157, sysFlag=0, bornTimestamp=1612100880154, bornHost=/192.168.31.210:54104, storeTimestamp=1612100880159, storeHost=/192.168.31.211:10911, msgId=C0A81FD300002A9F0000000000053509, commitLogOffset=341257, bodyCRC=1116443590, reconsumeTimes=0, preparedTransactionOffset=0, toString()=Message{topic='TopicTest', flag=0, properties={MIN_OFFSET=0, MAX_OFFSET=158, CONSUME_START_TIME=1612100880161, UNIQ_KEY=7F0000010DA64DC639969F2C4B1A0314, CLUSTER=DefaultCluster, WAIT=true, TAGS=TagA}, body=[72, 101, 108, 108, 111, 32, 82, 111, 99, 107, 101, 116, 77, 81, 32, 55, 56, 56], transactionId='null'}]]

ConsumeMessageThread_12 Receive New Messages: [MessageExt [brokerName=broker-b, queueId=3, storeSize=203, queueOffset=157, sysFlag=0, bornTimestamp=1612100880161, bornHost=/192.168.31.210:54104, storeTimestamp=1612100880162, storeHost=/192.168.31.211:10911, msgId=C0A81FD300002A9F00000000000535D4, commitLogOffset=341460, bodyCRC=898409296, reconsumeTimes=0, preparedTransactionOffset=0, toString()=Message{topic='TopicTest', flag=0, properties={MIN_OFFSET=0, MAX_OFFSET=158, CONSUME_START_TIME=1612100880164, UNIQ_KEY=7F0000010DA64DC639969F2C4B210315, CLUSTER=DefaultCluster, WAIT=true, TAGS=TagA}, body=[72, 101, 108, 108, 111, 32, 82, 111, 99, 107, 101, 116, 77, 81, 32, 55, 56, 57], transactionId='null'}]]
After the cluster is deployed, how to use RocketMQ to send and receive messages? We will explain it in combination with the Spring Boot code.
Application access to RocketMQ cluster
Taking the tax declaration as an example, we use Spring Boot to integrate MQ client to realize messaging. First, we simulate the Producer.
The Producer sends a message
The first step is to create a rocketmq provider project using the Spring Initializr wizard to ensure POM XML introduces the following dependencies.
<dependency>
    <groupId>org.springframework.boot</groupId>
    <artifactId>spring-boot-starter-web</artifactId>
</dependency>
<!-- RocketMQ Client, version and Broker bring into correspondence with -->
<dependency>
    <groupId>org.apache.rocketmq</groupId>
    <artifactId>rocketmq-client</artifactId>
    <version>4.8.0</version>
</dependency>
Step 2: configure the application yml.
Rocketmq client mainly realizes communication through coding, so it does not need to be in application YML for additional configuration.
server:
  port: 8000
spring:
  application:
    name: rocketmq-producer
Step 3: create a Controller and send messages to the producer.
@RestController
public class ProviderController {
    Logger logger = LoggerFactory.getLogger(ProviderController.class);
    @GetMapping(value = "/send_s1_tax")
    public String send1() throws MQClientException {
        //Create DefaultMQProducer message producer object
        DefaultMQProducer producer = new DefaultMQProducer("producer-group");
        //Set the address of the NameServer node. Multiple nodes are separated by semicolons
        producer.setNamesrvAddr("192.168.31.200:9876;192.168.31.201:9876");
        //Establish a long connection with NameServer
        producer.start();
        try {
            //Send 100 pieces of data
            for(int i = 0 ; i< 100 ; i++) {
                //Data body
                String data = "{\"title\":\"X Municipal tax summary data for the first quarter of 2021\"}";
                /*Create message
                    Message The message has three parameters
                    topic Represents the message subject, which is customized as tax data topic. The description is tax data
                    tags The representative flag is used for data filtering when consumers receive data. 2021S1 represents the data of the first quarter of 2021
                    body Represents the message content
                */
                Message message = new Message("tax-data-topic", "2021S1", data.getBytes());
                //Send a message to get the sending result
                SendResult result = producer.send(message);
                //Print the sending result object on the console
                logger.info("Message sent: MsgId:" + result.getMsgId() + ",Send status:" + result.getSendStatus());
            }
        } catch (RemotingException e) {
            e.printStackTrace();
        } catch (MQBrokerException e) {
            e.printStackTrace();
        } catch (InterruptedException e) {
            e.printStackTrace();
        } finally {
            producer.shutdown();
        }
        return "success";
    }
}
After the program runs, access
http://localhost:8000/send_s1_tax , you will see the following output on the console, indicating that the data has been received by the Broker, and the Producer side task has been completed after the Broker receives it.
Message sent: MsgId:7F00000144E018B4AAC29F3B7B280062,Send status:SEND_OK
 Message sent: MsgId:7F00000144E018B4AAC29F3B7B2A0063,Send status:SEND_OK
Let's develop Consumer.
Consumer receives message
The first step is to create a rocketmq consumer project using the Spring Initializr wizard to ensure POM XML introduces the following dependencies.
<dependency>
    <groupId>org.springframework.boot</groupId>
    <artifactId>spring-boot-starter-web</artifactId>
</dependency>
<!-- RocketMQ Client, version and Broker bring into correspondence with -->
<dependency>
    <groupId>org.apache.rocketmq</groupId>
    <artifactId>rocketmq-client</artifactId>
    <version>4.8.0</version>
</dependency>
Step 2, application YML also requires no additional settings.
server:
  port: 9000
spring:
  application:
    name: rocketmq-consumer
Step 3: at the application startup portal
RocketmqConsumerApplication adds consumer monitoring code, and key codes have been annotated.
@SpringBootApplication
public class RocketmqConsumerApplication {
    private static Logger logger = LoggerFactory.getLogger(RocketmqConsumerApplication.class);
    public static void main(String[] args) throws MQClientException {
        SpringApplication.run(RocketmqConsumerApplication.class, args);
        //Create consumer object
        DefaultMQPushConsumer consumer = new DefaultMQPushConsumer("consumer-group");
        //Set NameServer node
        consumer.setNamesrvAddr("192.168.31.200:9876;192.168.31.201:9876");
        /*Subscribe to topics,
        consumer.subscribe Contains two parameters:
        topic: Explain which topic the consumer subscribes to from the Broker, which should be consistent with the Provider.
        subExpression: Subexpressions are used to filter tags.
            Many different tags can be included under the same topic. subExpression is used to filter qualified tags for reception.
            For example, if it is set to *, all tags data will be received.
            For example, if it is set to 2020S1, only messages with tags=2020S1 will be received in the Broker, and 2020S2 will be excluded.
        */
        consumer.subscribe("tax-data-topic", "*");
        //Create a listener. When there is a new message, the listener will catch and process it in time.
        consumer.registerMessageListener(new MessageListenerConcurrently() {
            public ConsumeConcurrentlyStatus consumeMessage(
                    List<MessageExt> msgs, ConsumeConcurrentlyContext context) {
                //Batch data processing
                for (MessageExt msg : msgs) {
                    logger.info("Consumer consumption data:"+new String(msg.getBody()));
                }
                //Return data received ID
                return ConsumeConcurrentlyStatus.CONSUME_SUCCESS;
            }
        });
        //Start the consumer, establish a long connection with the Broker, and start listening.
        consumer.start();
    }
}
After the application is started, when the Provider generates a new message, the Consumer end will consume it immediately and the console will generate output.
2021-01-31 22:25:14.212  INFO 17328 --- [MessageThread_3] c.l.r.RocketmqConsumerApplication        : Consumer consumption data:{"title":"X Municipal tax summary data for the first quarter of 2021"}
2021-01-31 22:25:14.217  INFO 17328 --- [MessageThread_2] c.l.r.RocketmqConsumerApplication        : Consumer consumption data:{"title":"X Municipal tax summary data for the first quarter of 2021"}
The above is the process of Spring Boot accessing RocketMQ cluster. For the current case, we control the sending and receiving of messages through code. The Spring Cloud Stream module is also provided in the Spring Cloud ecology, which allows programmers to use the "declarative" development method to achieve easier access to MQ. However, the encapsulation of Spring Cloud Stream itself is too high, and many details of RocketMQ are hidden, This is not a good thing for getting started. After mastering the relevant contents of RocketMQ, you will understand Spring Cloud Stream more thoroughly.