This article records my experience of using vscode for one year. I learned git, json and regular (go to hell qwq) for this editor
Just stop talking about that pile of nonsense and start directly!
1. Installation
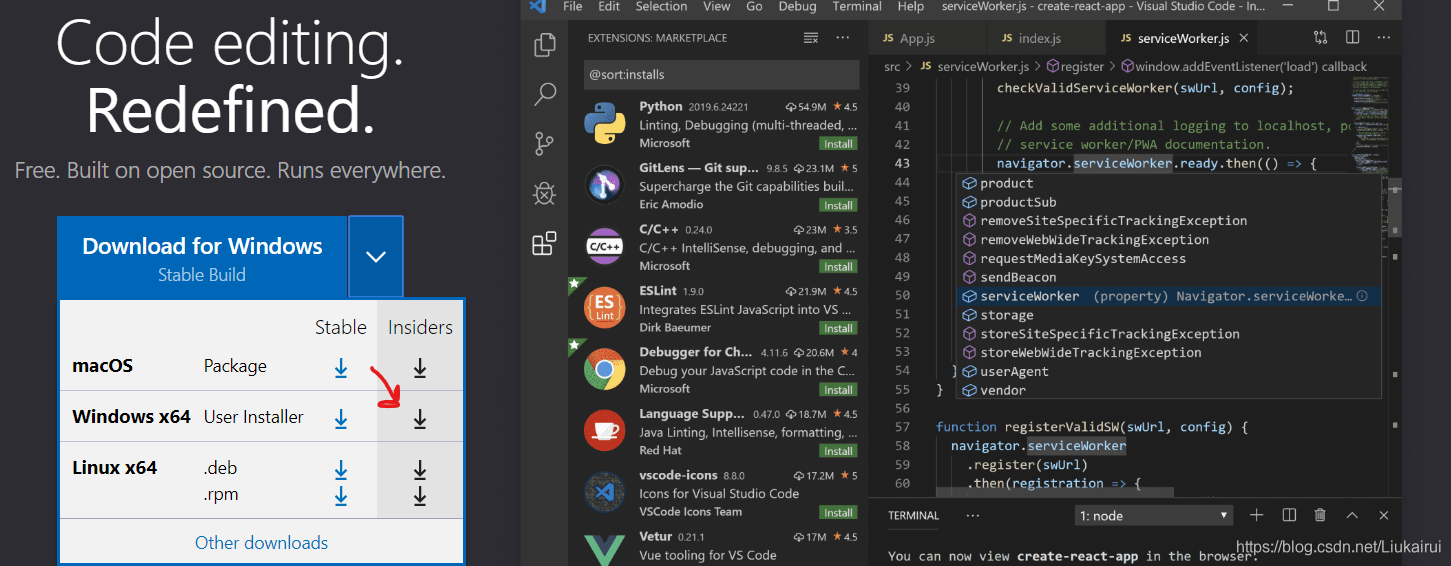
open Official website Download directly (beta insider is recommended),
During installation, there are several checkmarks on one interface, all of which are marked to the next step
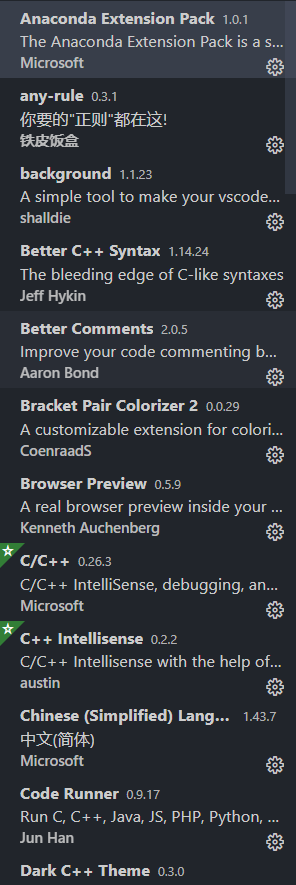
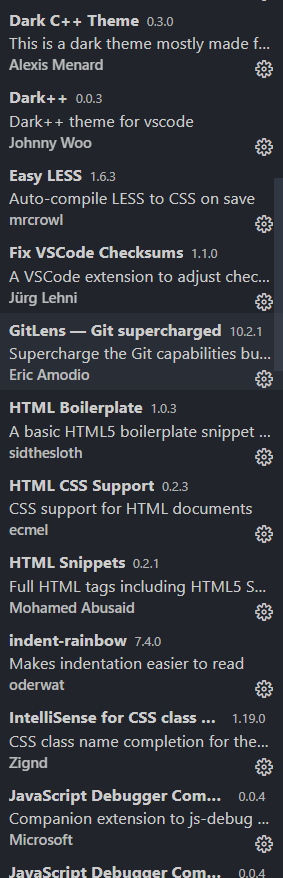
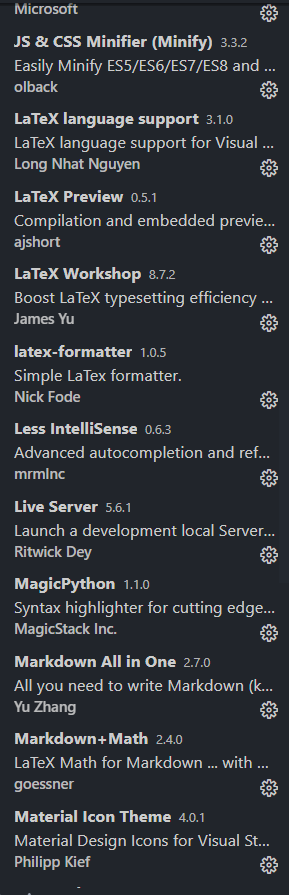
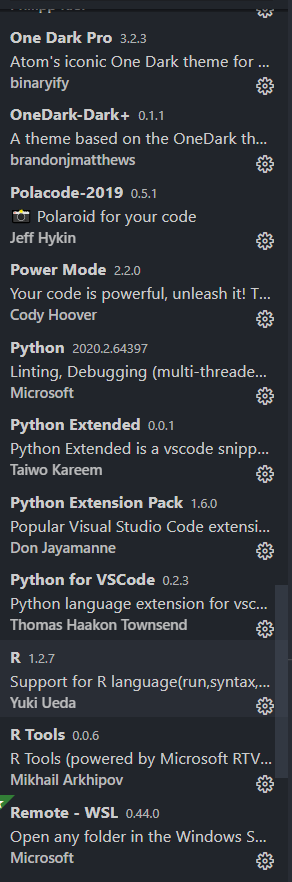
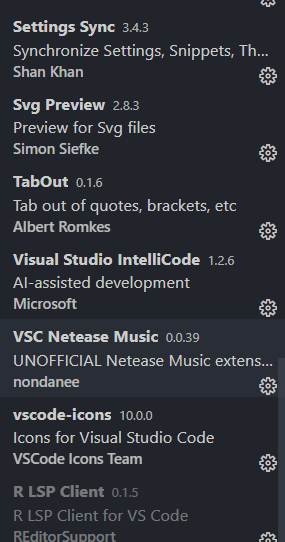
wow, all the easy-to-use plug-ins are in the picture
2. Basic usage
- After opening it for the first time, I found that this thing is actually in English. Don't panic. There is such a toolbar on the left
-
The first is the resource manager, the second is git, the third is debugging, and the fourth is expanding the market
Select the fourth plug-in, enter chinese, select the first plug-in, and click Install to restart it

So far, you have mastered the installation method of plug-in (extension) - As a modern editor, vscade can't run files directly. It needs a working folder, so please select File - > select folder when using it. In fact, drag the folder directly to the icon of vscode qwq
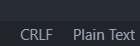
- New file: open resource management, which is the first one in the left column (Ctrl+B), right-click - > New - > test cpp - > write code - > * * not highlighted** Generally, there are some. You don't choose cpp in the lower right corner. (the same is true for other languages)
- Shortcut key configuration
The keyboard shortcut is also set in the setting button in the lower left corner. After opening, you can see the interface above.
The default shortcut key is very convenient. I didn't modify the shortcut key.
Here are some of the most commonly used shortcut keys, which can greatly improve efficiency (flexible use or even lose the mouse to write code):
- Editor and window management
Open Ctrl+O
New window Ctrl+Shift+N
New tab Ctrl+N
Close the entire VSC window Ctrl+Shift+W
Close current tab Ctrl+W
Reopen the tab you just closed Ctrl+Shift+T
Switch tabs Ctrl+Tab
Create a new editor and copy the current page past Ctrl+
Switch between the first three editors Ctrl+1 2 3
Move the focus editor to the position. Press Ctrl+K first. After the prompt appears in the lower left corner, use ←→ to move or Ctrl+Alt + ←→
Switch between tabs Alt+1~9 - Code editing
Search Ctrl+F
Replace Ctrl+H
To copy the line where the cursor is located, just press Ctrl+C.
Remove trailing spaces Ctrl+K and then Ctrl+X
Toggle line comment (multiline) Ctrl+/
Code indent Ctrl + [or Ctrl +]
Move current line up and down Alt + ↑↓
Insert a row after the current row Ctrl+Enter
Insert a row before the current row Ctrl+Shift+Enter
Select the next row Ctrl+i
(divine auxiliary key) undo the last movement of the cursor Ctrl+U
Select the next highlighted match Ctrl+D
Multi cursor mode Atl + mouse click to create a new cursor at the click
(this mode is very flexible and can be combined with multiple operations to improve efficiency)
(divine auxiliary key) quick view definition Alt+F12
Go to definition F12
Zen mode (a strange full screen mode) Ctrl+K and then Z
Open AutoSave Ctrl+Shift+P, enter AutoSave, select, and press enter.
Open terminal Ctrl+~ - Middle mouse button
Press and hold the middle mouse button and select = Alt+Shift selection (select both rectangular areas)
Close the editor / tab / notification with the middle mouse button: press the middle button anywhere in the empty editor / tab / notification bar
Even if you don't use this language, you should skip the following content and read it later!
C/C + + configuration
- You need to install the g++/gcc environment and press the environment variables. Search this part yourself
- Search for installed vscode extensions
C/C + + plug-in (required)
Better C++ Syntax optional
coderunner plug-in can help you run the plug-in with one click without configuring the debugging file, but you need to configure it for the first time, as shown below
C++ Intellisense code prompt and highlight
Install the general conscience recommendation plug-in written at the end - Run your code (run directly on the terminal without using the running method of vscode and cannot be debugged):
coderunner runs directly - Run your code (it can be debugged in vscode environment)
Press F5 to start debugging code. Shift+F5 can run directly without debugging
emm, of course, can't run haha
You need to tell vscode how to run
Is vscode stupid? He doesn't know. Is this a C + + file??
For high customization qwq
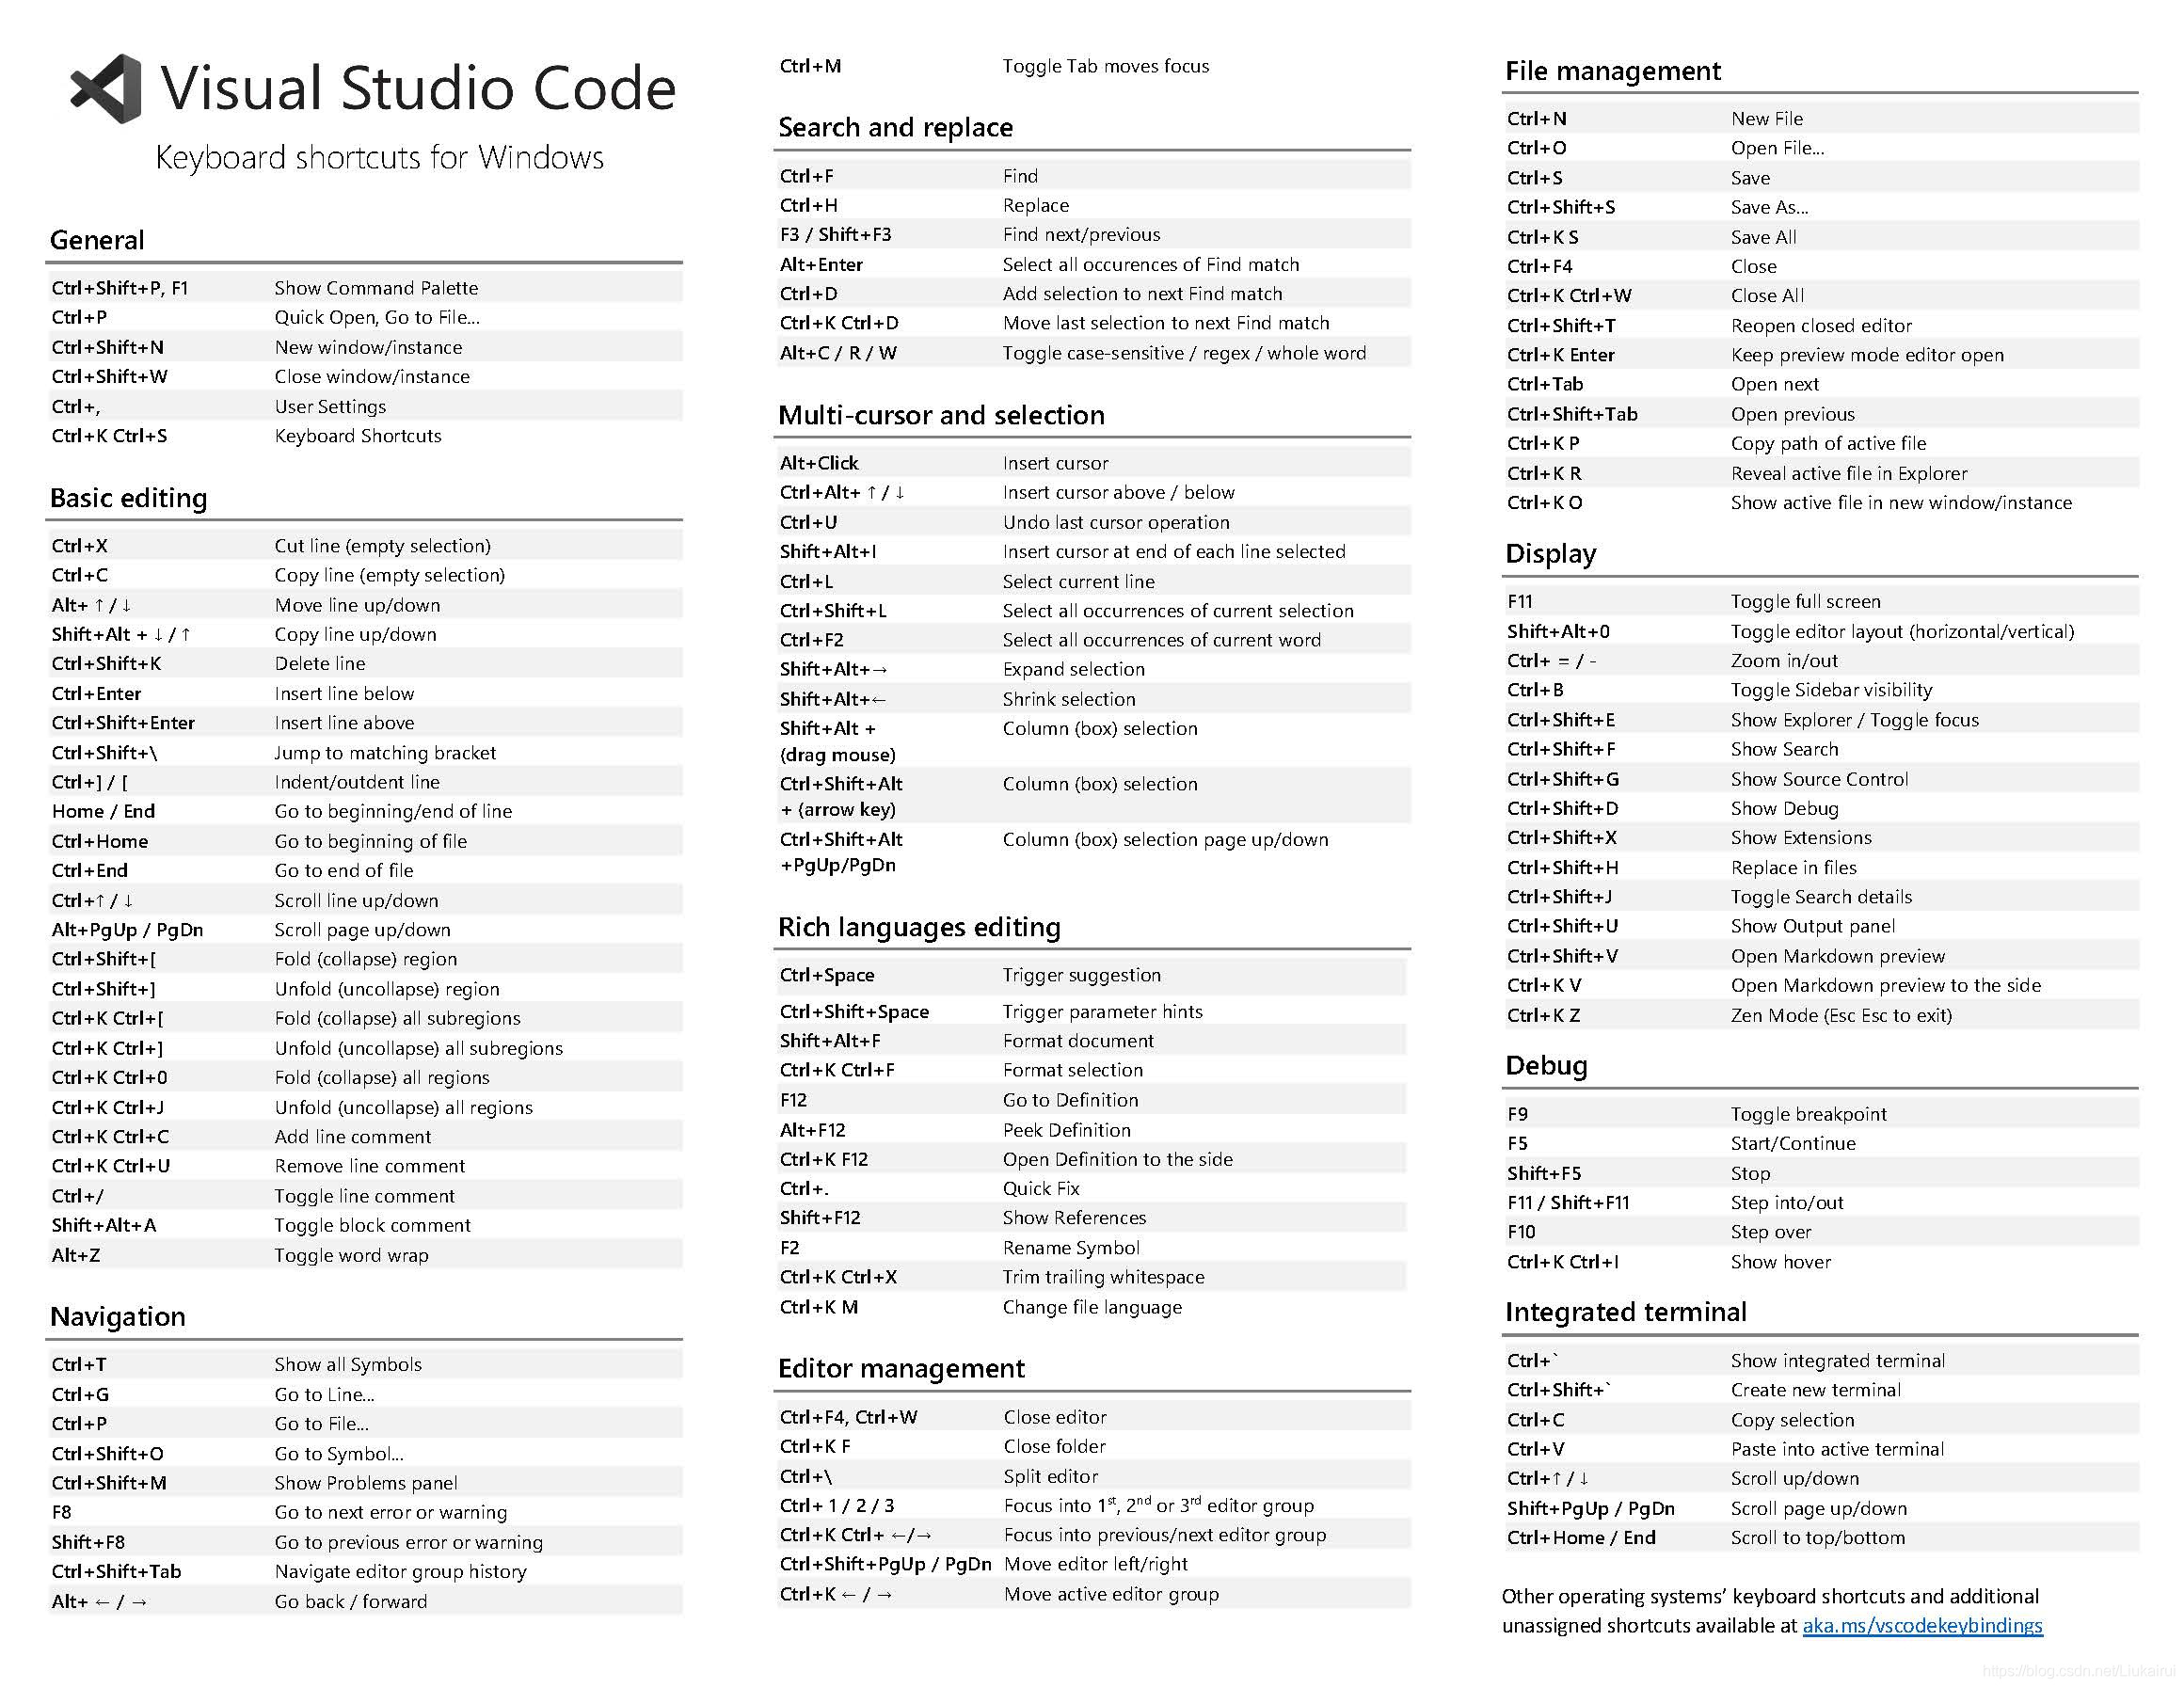
We need to manually create a folder in the working directory containing the following configuration files
What document begins with an English dot?
It is a hidden file under Linux, so it is not recommended that you create it directly in windows Explorer. It is recommended to create it directly in vscode
The file must be created exactly the same, and then the contents must be copied
launch.json
This line needs to be modified to your gcc path "miDebuggerPath": "C:/mingw64/bin/gdb.exe",
{
    "version": "0.2.0",
    "configurations": [
        {
            "name": "C/C++",
            "type": "cppdbg",
            "request": "launch",
            "program": "${fileDirname}/${fileBasenameNoExtension}.exe",
            "args": [],
            "stopAtEntry": false,
            "cwd": "${workspaceFolder}",
            "environment": [],
            "externalConsole": true,
            "MIMode": "gdb",
            "miDebuggerPath": "C:/mingw64/bin/gdb.exe",
            "preLaunchTask": "g++",
            "setupCommands": [
                {
                    "description": "Enable pretty-printing for gdb",
                    "text": "-enable-pretty-printing",
                    "ignoreFailures": true
                }
            ],
        },
    ]
}
tasks.json
{
    "version": "2.0.0",
    "command": "g++",
    "args": [
        "-g",
        "${file}",
        "-o",
        "${fileDirname}/${fileBasenameNoExtension}.exe"
    ],
    "problemMatcher": {
        "owner": "cpp",
        "fileLocation": [
            "relative",
            "${workspaceRoot}"
        ],
        "pattern": {
            "regexp": "^(.*):(\\d+):(\\d+):\\s+(warning|error):\\s+(.*)$",
            "file": 1,
            "line": 2,
            "column": 3,
            "severity": 4,
            "message": 5
        }
    },
    "group": {
        "kind": "build",
        "isDefault": true
    }
}
So you can happily set breakpoints and monitor happy programming
It's too troublesome to configure these every time!!!
My solution is to create a new folder in the root directory of drive C with a random name (preferably different from other folders), and then put your configured tasks and launch files in it. Write this on the terminal every time you create a new work folder
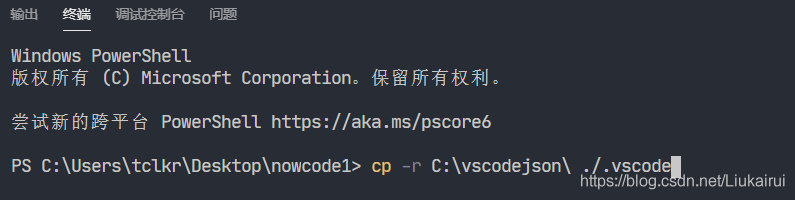
I create a new vscodejason folder under C to put the json configuration file. When using it, enter C: \ vscodejason \ and just enter \ v+Tab to complete it automatically, in uppercase
Cool
Python configuration
-
You need to install the Python environment and press the environment variable. Search for it yourself
-
Install extensions for vscode
- Python extension (required)
- Anaconda Extension Pack (installed with Anaconda)
- Python Extended optional
- Python Extension Pack optional
- Python for VSCode optional
- coderunner plug-in can help you run the plug-in with one click without configuring the debugging file. See the plug-in configuration below
- MagicPython
-
Happy run (run directly using coderunner)
-
F5/Shift+F5 run + debug is different from c + + vscode folders can be generated automatically
Latex \ latex configuration
-
You need to install TeX \TeX TEX tex environment and press the environment variable to search by yourself
-
Install extensions for vscode
- LaTeX language support extension (required)
- LaTeX Preview
- LaTeX Workshop
- Latex formatter option
-
Finish
When you create a new one TeX . \TeX . After the Tex file, you will find that once you open the file, a TeX \TeX TEX icon will appear in the left column. After writing happily, click TeX \TeX TEX in the left column and click
build LaTeX Project, expand View LaTeX PDF, and select View in VSCode Tab
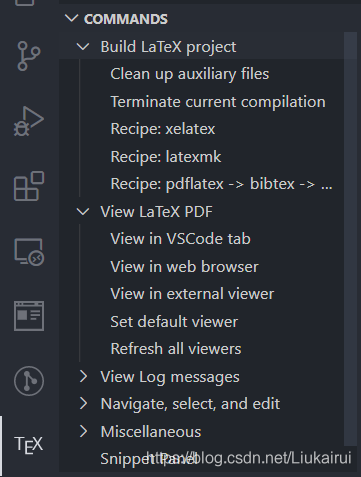
The first command will help us compile, and then the second will help us open PDF, but it's a little troublesome to modify every time
First of all, view in vscade can be clicked. It should be that the vscode will refresh automatically after compiling a new PDF, so we only need to execute it each time
Then there is the build LaTeX Project. We found that it has shortcut keys. I usually use coderunner to run the file. When running, Ctrl+Alt+N, but coderunner cannot run tex (you can modify the configuration file to run, we won't discuss it first), so we can set shortcut keys to execute build LaTeX Project by pressing Ctrl+Alt+N under the Tex file. Here we write
First press' key recording ', press the combination of the original shortcut keys, then right-click, change the key binding, press Ctrl+Alt+N, select' yes' for conflicts, and then press the same key to record. Ctrl+Alt+N is modified as follows

The original coderunner is

To modify the content in when, right-click the entry and select Modify when expression
coderunner input is-
LaTeX... Enter as! config. LaTeX-workshop. bind. altKeymap. enabled && editorLangId == 'LaTeX'
Now, just press Ctrl + Alt + n to compile each time, and then click View in vscope once. After each refresh, just press Ctrl + Alt + n. if you don't believe it, please ctrl+s to save it or use the last method to save it automatically
UpDate: This module has a lot to teach
- Default compiler
"latex-preview.command": "xelatex",
- Automatically compile after canceling saving
"latex-workshop.latex.autoBuild.run": "never",
- Error Page XXX on XXX not appears
"latex-workshop.latex.recipes": [
      {


        "name": "xelatex",
        "tools": [
          "xelatex"
        ]
      },
      {


        "name": "xelatex -> bibtex -> xelatex*2",
        "tools": [
          "xelatex",
          "bibtex",
          "xelatex",
          "xelatex"
        ]
      }
    ],
- I also forgot why I wrote the configuration at that time
"latex-workshop.latex.tools": [
      {


        "name": "latexmk",
        "command": "latexmk",
        "args": [
          "-synctex=1",
          "-interaction=nonstopmode",
          "-file-line-error",
          "-pdf",
          "%DOC%"
        ]
      },
      {


        "name": "xelatex",
        "command": "xelatex",
        "args": [
          "-synctex=1",
          "-interaction=nonstopmode",
          "-file-line-error",
          "%DOC%"
        ]
      },
      {


        "name": "bibtex",
        "command": "bibtex",
        "args": [
          "%DOCFILE%"
        ]
      }
    ],
- When using bibliography, be sure to use the last recipe: xelatex - > under build project
HTML&css&Js
-
Install extensions
- Easy LESS (necessary for less, but the core version of less is a little old)
- HTML Boilerplate
- HTML CSS Support
- HTML Snippets
- JS & CSS minifier (minify) compression
- Less IntelliSense
- Live server (required)
- Browser Preview (you can open the browser tag in vscode, but it is blurred occasionally. Do not use it without mactype)
-
As a front-end engineer, we generally need to preview the web page in real time, which needs to be saved automatically. The method is at the back, and then select live share at the bottom right when we want to preview the browser, but it's a little troublesome. I want to set a shortcut
I usually use coderunner to run files. The operation is Ctrl+Alt+N, but coderunner cannot run html, so we can set shortcut keys. Here we write
First press' key recording ', press the combination of the original shortcut keys, then right-click, change the key binding, press Ctrl+Alt+N, select' yes' for conflicts, and then press the same key to record. Ctrl+Alt+N is modified as follows

To modify the content in when, right-click the entry and select Modify when expression
LiveShare input: editorLangId == 'html'
Coderunner input:-
Finish
3. For min and less, you can use them directly
There may be some easy-to-use plug-ins that will be updated in the future
R language
Due to the subtle relationship between our school and home of R, R is too small to be used for data analysis, which is particularly troublesome
-
Install the R environment. I won't say this
-
Install plug-ins
- R (mandatory)
- CodeRunner
- R LSP Client
- R Tool (optional, it's a little troublesome to expand the old version of. Net)
-
Configure in R environment to bridge with vscode: enter under R
install.packages("languageserver")
- Install R terminal
You need a python environment, and then
pip install -U radian
cmd, enter which radial replication return value
Enter Rterm in vscode settings and select extension - > R - > Rterm: windows
Enter the content you just copied
cmd, enter which r replication return value
ctrl+shift+P under vscode
Enter json, select preferences, open Settings
Write down before the last}
"r.rterm.windows": "C:\\Users\\tclkr\\AppData\\Local\\Programs\\Python\\Python37\\Scripts\\radian.exe",
    "r.rterm.option": [
      // "--no-save",
      // "--no-restore",
      "--no-site-file"
    ],
Replace the first line with the address you copied
If a red wavy line appears, check whether the previous line is forgotten at last and fill it in
- usage method:
a. Want to run the file directly: coderunner runs, Ctrl+Alt+N. It will call rscript, but it will close after running
b. There will be a radial terminal under ctrl+enter, then select the code to run, ctrl+enter to send to the terminal, or source(". / file name")
c. I'm trying a new method to run with radial one click. The specific idea is to change the coderunner configuration to
"r": "-join('source(','\"','$fileName','\"',')') | radian.exe",
radian can be opened, but it can't add the contents of the pipeline. I hope the boss points out
Git
Vscade comes with git. You can find it in the git on the left by clicking the terminal init. If you want stronger functions, you can install the plug-in GitLens
regular
Don't want to write regular?
There is a plug-in that can insert common regular
It's any rule
Develop practical plug-ins
- Bracket Pair Colorizer 2
It can be used after direct installation. It can realize multi-color brackets, place wrong matching, and the wrong brackets will be marked in red. The effect picture is from the official website
[external chain picture transfer failed. The source station may have anti-theft chain mechanism. It is recommended to save the picture and upload it directly (img-psi4rknd-164050442062)( https://github.com/CoenraadS/Bracket-Pair-Colorizer-2/raw/master/images/forceUniqueOpeningColorDisabled.png )][external chain picture transfer failed. The source station may have an anti-theft chain mechanism. It is recommended to save the picture and upload it directly (IMG roaqbqdb-16405042062)( https://github.com/CoenraadS/Bracket-Pair-Colorizer-2/raw/master/images/forceUniqueOpeningColorEnabled.png )][the external chain picture transfer fails. The source station may have an anti-theft chain mechanism. It is recommended to save the picture and upload it directly (img-wbxnlmfr-16450542063)( https://github.com/CoenraadS/Bracket-Pair-Colorizer-2/raw/master/images/forceIterationColorCycleEnabled.png )][external chain picture transfer failed. The source station may have anti-theft chain mechanism. It is recommended to save the picture and upload it directly (img-aq7ecweeb-164050442063)( https://github.com/CoenraadS/Bracket-Pair-Colorizer-2/raw/master/images/consecutiveExample.png )] - Svg Preview
You can open the svg file and install it - Remote - WSL
Programming directly under WSL - Polacode-2019
You can convert your code into a high-B picture. After installation, when you need it, Ctrl+shift+p enter plolacode, click the camera, select the part to be converted on your code, select whether to transport and shadow, and then click the shutter below to save it as a file
The effect is shown in the figure (official website)
- indent-rainbow
Colorful reduction, installation can be used, wrong Monogram red, python is practical, and other languages can also be used as a whole (official website map)
7.settings Sync
You can synchronize your configuration to GitHub to prevent loss
Log in GitHub > your profile > Settings > developer Settings > personal access tokens > generate new token, enter the name, check Gist and submit
Save Github Access Token
Install the plug-in and click the login button
Enter GitHub account secret
Set, find setting sync and enter your gist

If you need to upload the configuration, just ctrl+shift+P and enter sync to find the upload. The network is not smooth. Please climb on your own
You can see the progress shown below
- To be supplemented (pit excavation)
coderunner usage
Settings - > extension - > run code config
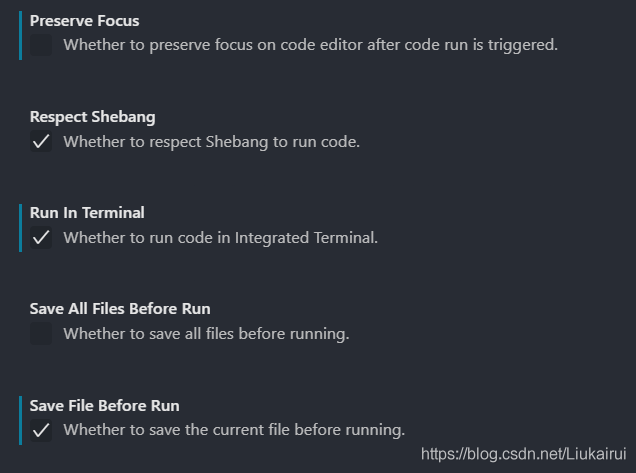
The blue part is consistent with me
It is recommended to enable: auto save
Open the settings, the first item is
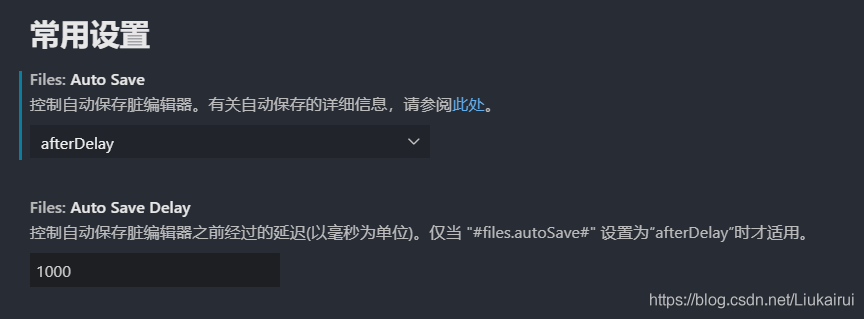
The first four options mean:
- shut
- How many seconds is the delay
- Focus change
- Window change
Select the second item and configure the delay time next
Beautification plug-in
1. Theme beautification
The hottest one dark pro is recommended. It can be used after installation
If you only use c + +, you can try Dark C++ Theme instead of 2.0. The fit is good, but it's inexplicable that your eyes ache qwq
2. Icon package
Material Icon Theme is recommended, which can be used after installation
3. Background
Please run as Administrator during installation and configuration
The thing in the lower right corner
Setting method
Download the background plug-in (there are too many names, see the author)

Then find a place to save your background and copy the path
Press ctrl+shift+P
Enter json, select preferences, open Settings
input
"background.useDefault": false,
    "background.customImages": [
      "file:///C:vscodebg.png ", / / three different addresses can be set. Three backgrounds appear in turn when the screen is divided
      "file:///C:vscodebg.png",
      "file:///C:vscodebg.png"
    ],
    "background.style":{
      "content": "''",
      "pointer-events": "none",
      "position": "absolute",
      "right":"10px",			The distance from the picture to the right can be changed to right:
      "bottom":"0px",			//How far is the picture from the bottom? You can change it to top:
      "z-index": "99999",
      "width": "100%",      "height": "100%",
      "background-repeat": "no-repeat",//Whether to display repeatedly is one or more
      "opacity": 0.2//transparency
    },
If a red wavy line appears, check whether the previous line is forgotten at last and fill it in
The plug-in principle is to modify the css file of vscode, so the above are css options
Multi picture effect is shown in the figure (official website)
Then save
He will prompt you to restart vscode and select restart
Then it will appear
This is because the css file of vscode we modified can be closed. However, it will be prompted every time, and the title bar will also prompt [untrusted]. At this time, the plug-in Fix VSCode Checksums needs to be installed
Then ctrl+shift+P, enter fix checks apply, and click restart to operate normally
After that, you will find that the background is gone every time you update. The plug-in will automatically prompt restart to display it, and then select restart. After restarting the software, you will find that it is untrusted again. fix again. You need to come every update
Note that when uninstalling this plug-in, you should follow the prompts on the introduction page. Direct uninstallation cannot turn off the effect
Here we talked about the common configurations of vscade, most of which did not explain the purpose of the plug-in. The following is the reference website for me to learn about the relevant principles again
VScode overview
https://segmentfault.com/a/1190000017949680
C/C++
https://www.zhihu.com/question/30315894/answer/154979413
https://www.luogu.com.cn/blog/GNAQ/VSC-guide
R language
https://sspai.com/post/47386
LaTeX
https://blog.csdn.net/qq_28303495/article/details/89848209
settings sync
https://blog.csdn.net/niexia_/article/details/84063656
Beautification and plug-ins
https://www.luogu.com.cn/blog/crab-in-northeast/great-features-and-plugins-for-vscode
Attachment: my setting JSON file
{


  "window.zoomLevel": 0,
    "python.formatting.provider": "yapf",
    "python.linting.flake8Args": ["--max-line-length=248"],
    "python.linting.pylintEnabled": false,
    "python.linting.pylintArgs": [
        "--generate-members"
    ],
    "oneDarkPro.editorTheme": "Onedark Pro",
    "workbench.colorTheme": "One Dark Pro",
    "code-runner.preserveFocus": false,
    "code-runner.runInTerminal": true,
    "code-runner.saveFileBeforeRun": true,
    "editor.renderWhitespace": "all",
    "editor.renderControlCharacters": false,
    "http.proxySupport": "off",
    "editor.fontFamily": "'JetBrains Mono',Consolas, 'Courier New', monospace",
    "editor.suggestSelection": "first",
    "vsintellicode.modify.editor.suggestSelection": "automaticallyOverrodeDefaultValue",
    "[html]": {


    },
    "files.associations": {


      "*.html": "html",
      "*.txt": "plaintext",
      "*.rmd": "markdown",
      "array": "cpp",
      "atomic": "cpp",
      "*.tcc": "cpp",
      "cctype": "cpp",
      "clocale": "cpp",
      "cmath": "cpp",
      "cstdarg": "cpp",
      "cstddef": "cpp",
      "cstdint": "cpp",
      "cstdio": "cpp",
      "cstdlib": "cpp",
      "cstring": "cpp",
      "cwchar": "cpp",
      "cwctype": "cpp",
      "deque": "cpp",
      "unordered_map": "cpp",
      "vector": "cpp",
      "exception": "cpp",
      "algorithm": "cpp",
      "memory": "cpp",
      "memory_resource": "cpp",
      "optional": "cpp",
      "string": "cpp",
      "string_view": "cpp",
      "system_error": "cpp",
      "tuple": "cpp",
      "type_traits": "cpp",
      "utility": "cpp",
      "fstream": "cpp",
      "initializer_list": "cpp",
      "iosfwd": "cpp",
      "iostream": "cpp",
      "istream": "cpp",
      "limits": "cpp",
      "new": "cpp",
      "ostream": "cpp",
      "sstream": "cpp",
      "stdexcept": "cpp",
      "streambuf": "cpp",
      "typeinfo": "cpp"
    },
    "python.jediEnabled": false,
    "powermode.enabled": true,
    "powermode.comboTimeout": 1000,
    "powermode.comboThreshold": 3,
    "powermode.shakeIntensity": 0,
    "powermode.explosionOffset": 0.3,
    "tabout.disableByDefault": true,
    "background.useDefault": false,
    "background.customImages": [
      "file:///C:vscodebg.png ", / / background picture address
      "file:///C:vscodebg.png",
      "file:///C:vscodebg.png"
      //If you're curious why you have to repeat it three times, the reader will prove it (cross it out) see the instructions
    ],
    "background.style":{


      "content": "''",
      "pointer-events": "none",
      "position": "absolute",
      "right":"10px",
      "bottom":"0px",//-47px",
      "z-index": "99999",
      //Students familiar with css must understand what the above means. There's no need to change this.
      "width": "100%",//How wide is the background picture zoomed
      "height": "100%",//How high is the zoom of the background picture
      "background-repeat": "no-repeat",//You don't have to change this
      "opacity": 0.2//Transparency. In fact, for ordinary needs, just change this qwq
    },
    "powermode.enableShake": false,
    "powermode.enableStatusBarComboCounter": false,
    "powermode.enableStatusBarComboTimer": false,
    "files.autoSave": "afterDelay",
    "polacode.target": "snippet",
    "workbench.iconTheme": "material-icon-theme",
    "sync.gist": "ac3709c566f85d9b6a44ff1dda335967",

    //R Language config @ https://sspai.com/post/47386
    //Pay Attention to config the tenminal
    //pip install -U radian

    "r.rterm.windows": "C:\\Users\\tclkr\\AppData\\Local\\Programs\\Python\\Python37\\Scripts\\radian.exe",
    "r.rterm.option": [
      // "--no-save",
      // "--no-restore",
      "--no-site-file"
    ],
    "r.rpath.lsp": "C:\\Program Files\\R\\R-3.6.2\\bin\\x64\\R.exe",
    "code-runner.executorMap": {


      "javascript": "node",
      "java": "cd $dir && javac $fileName && java $fileNameWithoutExt",
      "c": "cd $dir && gcc $fileName -o $fileNameWithoutExt && $dir$fileNameWithoutExt",
      "cpp": "cd $dir && g++ $fileName -o $fileNameWithoutExt && $dir$fileNameWithoutExt",
      "objective-c": "cd $dir && gcc -framework Cocoa $fileName -o $fileNameWithoutExt && $dir$fileNameWithoutExt",
      "php": "php",
      "python": "python -u",
      "perl": "perl",
      "perl6": "perl6",
      "ruby": "ruby",
      "go": "go run",
      "lua": "lua",
      "groovy": "groovy",
      "powershell": "powershell -ExecutionPolicy ByPass -File",
      "bat": "cmd /c",
      "shellscript": "bash",
      "fsharp": "fsi",
      "csharp": "scriptcs",
      "vbscript": "cscript //Nologo",
      "typescript": "ts-node",
      "coffeescript": "coffee",
      "scala": "scala",
      "swift": "swift",
      "julia": "julia",
      "crystal": "crystal",
      "ocaml": "ocaml",


      "r": "Rscript",

      // "r": "-join('source(','\"','$fileName','\"',')') |  r.exe --no-save",

      // "r": "-join('source(','\"','$fileName','\"',')') |  radian.exe",

      "applescript": "osascript",
      "clojure": "lein exec",
      "haxe": "haxe --cwd $dirWithoutTrailingSlash --run $fileNameWithoutExt",
      "rust": "cd $dir && rustc $fileName && $dir$fileNameWithoutExt",
      "racket": "racket",
      "scheme": "csi -script",
      "ahk": "autohotkey",
      "autoit": "autoit3",
      "dart": "dart",
      "pascal": "cd $dir && fpc $fileName && $dir$fileNameWithoutExt",
      "d": "cd $dir && dmd $fileName && $dir$fileNameWithoutExt",
      "haskell": "runhaskell",
      "nim": "nim compile --verbosity:0 --hints:off --run",
      "lisp": "sbcl --script",
      "kit": "kitc --run",
      "v": "v run",
      "sass": "sass --style expanded",
      "scss": "scss --style expa,nded"
    },
    "r.linting.trailingWhitespace": false,
    "r.linting.trailingBlankLines": false,
    "r.linting.trueFalseNames": false,
    "r.lsp.debug": true,
    "editor.wordWrap": "on",
    //LaTeX config from CSDN
    "latex-workshop.latex.recipes": [
      {


        "name": "xelatex",
        "tools": [
          "xelatex"
        ]
      },
      {


        "name": "xelatex -> bibtex -> xelatex*2",
        "tools": [
          "xelatex",
          "bibtex",
          "xelatex",
          "xelatex"
        ]
      }
    ],
    "latex-workshop.latex.tools": [
      {


        "name": "latexmk",
        "command": "latexmk",
        "args": [
          "-synctex=1",
          "-interaction=nonstopmode",
          "-file-line-error",
          "-pdf",
          "%DOC%"
        ]
      },
      {


        "name": "xelatex",
        "command": "xelatex",
        "args": [
          "-synctex=1",
          "-interaction=nonstopmode",
          "-file-line-error",
          "%DOC%"
        ]
      },
      {


        "name": "bibtex",
        "command": "bibtex",
        "args": [
          "%DOCFILE%"
        ]
      }
    ],
    "latex-preview.command": "xelatex",
    //auto compress
    "latex-workshop.latex.autoBuild.run": "never",
    // Error Page XXX on XXX not ...
}
Attachment: Extensions currently in use