Continuous integration and Jenkins introduction
software development life cycle
-
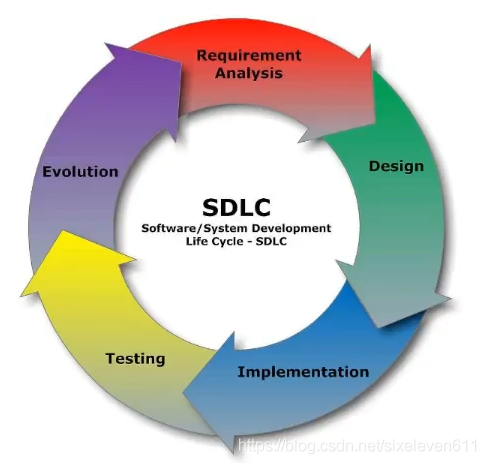
Software Development Life Cycle, also known as SDLC (Software Development Life Cycle), is a collection of planning, development, testing and deployment processes
-
As shown in the figure below
-
requirement analysis
- This is the first stage of the life cycle. According to the project requirements, the team performs an analysis of the feasibility plan. Project requirements may be proposed by the company or customers. This stage is mainly to collect information, or it may be to improve existing projects and make a new project. It is also necessary to analyze the length of the project budget, where it can benefit and layout, which is also the goal of project creation
-
Design
- The second stage is the design stage, the system architecture and satisfaction status (that is, what to make and what functions to have), and create a project plan. The plan can be presented in the form of charts, layout design or documents
-
realization
- The third stage is the implementation stage. The project manager creates and assigns work to developers. Developers develop code according to tasks and objectives defined in the design stage. It can take months or more to complete according to the size and complexity of the project
-
test
- Testers conduct code testing, including function testing, code testing, stress testing, etc
-
Evolution (maintenance)
- The last stage is the stage of continuous evolution, improvement and maintenance of the product. According to the user's use, it may be necessary to modify a function, repair a BUG, add a function, etc
What is continuous integration?
- Continuous integration (CI) refers to the frequent (multiple times a day) integration of code into the backbone.
- The purpose of continuous integration is to enable products to iterate quickly while maintaining high quality. Its core measure is that before the code is integrated into the trunk, it must undergo automated testing. As long as one test case fails, it cannot be integrated
- Through continuous integration, teams can quickly move from one function to another. In short, a large part of agile software development is due to continuous integration
Continuous integration process
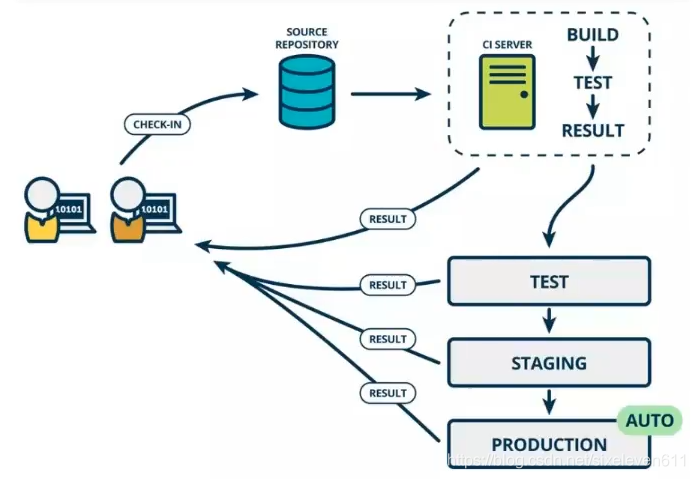
According to the design of continuous integration, the whole process of code from production to submission includes the following steps:
- Submit
- In the first step of the process, the developer submits the code to the code warehouse, and all subsequent steps begin with a Commit of the local code
- Test (first round)
- The code warehouse is configured with hook s for the commit operation. As long as the code is submitted or merged into the trunk, the automated test will be run
- structure
- After the first round of testing, the code can be merged into the trunk, even if it can be delivered
- After delivery, build first and then enter the second round of testing. The so-called build refers to converting the source code into actual code that can be run, such as installing dependencies, configuring various resources (style sheets, JS scripts, pictures), etc
- Test (second round)
- After the construction is completed, the second round of testing is required. If the first round has covered all the testing contents, the second round can be omitted. Of course, the construction steps should also be moved to the front of the first round of testing
- deploy
- After the second round of testing, the current code is an artifact that can be deployed directly. Package all files of this version (tar filename.tar *) for archiving and send them to the production server
- RollBACK
- Once there is a problem with the current version, it is necessary to roll back to the build result of the previous version. The simplest way is to modify the symbolic link to point to the directory of the previous version
Components of continuous integration
- An automatic build process, including checking out code, compiling and building, running tests, structure records, test statistics, etc., is completed automatically without manual intervention
- A code repository, that is, version control software is required to ensure the maintainability of the code. At the same time, as the material library of the construction process, SVN or Git is generally used
- A continuous integration server, Jenkins is a continuous integration server with simple configuration and convenient use
Benefits of continuous integration
- Reduce risk. Due to continuous integration, continuous construction, compilation and testing, problems can be found very early, so the cost of repair is very small
- Continuously check the system health to reduce the problems caused by release risk
- Reduce repetitive work
- Continuous deployment, providing deployable unit packages
- Continuously deliver available versions
- Enhance team confidence
Jenkins introduction

- Jenkins is a popular open source Continuous Integration tool, which is widely used in project development and has the functions of automatic construction, testing and deployment
- Official website: https://www.jenkins.io/
Jenkins properties
- Open source Java language develops continuous integration tools to support continuous integration and continuous deployment
- Easy to install, deploy and configure: you can quickly install and deploy through Yum, Download War package and Docker container, which is convenient for web interface configuration management
- Message notification and test report: integrate RSS/E-mail to publish the construction results through RSS or notify through E-mail when the construction is completed to generate JUnit/TestNG test report
- Distributed build: Jenkins support enables multiple computers to build / test together
- File identification: Jenkins can track which build generates which jars, which build uses which version of Jar package, etc
- Rich plug-in support: it supports extension plug-ins and can develop tools suitable for your team, such as Git, SVN, Maven, docker, etc
Jenkins installation and continuous integration environment configuration
Description of continuous integration process
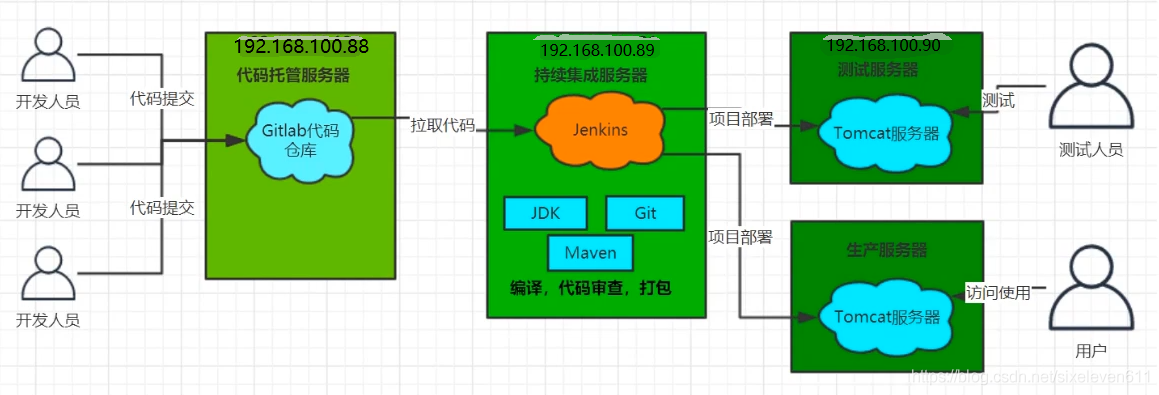
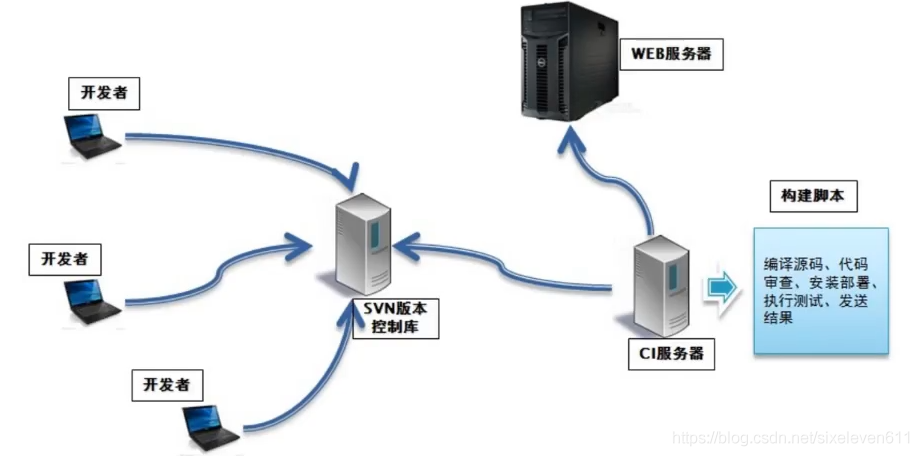
- First, developers submit code every day to the Git repository
- Then, as a continuous integration tool, Jenkins uses Git tool to pull the code from Git warehouse to the integration server, and then cooperates with JDK, Maven and other software to complete code compilation, code testing and review, testing, packaging and other work. If there is an error in each step in the process, the whole process will be executed again
- Finally, Jenkins distributes the generated Jar or War package to the test server or production server, and testers or users can access the application
Host planning
CentOS Linux release 7.5.1804 (Core)
| name | IP address | Installed software |
|---|---|---|
| Code hosting server | 192.168.100.88 | Gitlab-12.9.9 |
| Continuous integration server | 192.168.100.89 | Jenkins-2.290,JDK1.8,Maven3.6.2,Git,SonarQube |
| Application test server | 192.168.100.90 | JDK1.8,Tomcat8.5 |
Gitlab code managed server installation
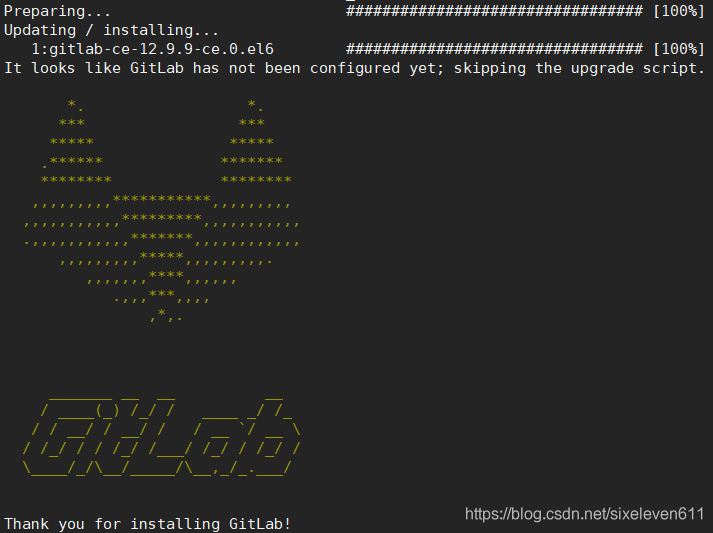
#Installation related dependencies
yum -y install policycoreutils openssh-server openssh-clients postfix policycoreutils-python

#Start ssh Service & set to boot
systemctl enable sshd && sudo systemctl start sshd

#Set postfix to start automatically and start. Postfix supports gitlab sending function
systemctl enable postfix && systemctl start postfix

#Open ssh and http services, and then reload the firewall list. If the firewall is closed, the above configuration is not required
firewall-cmd --add-service=ssh --permanent
firewall-cmd --add-service=http --permanent
firewall-cmd --reload

#Download Gitlab package and install
wget https://mirrors.tuna.tsinghua.edu.cn/gitlab-ce/yum/el6/gitlab-ce-12.9.9-ce.0.el6.x86_64.rpm
rpm -ivh gitlab-ce-12.9.9-ce.0.el6.x86_64.rpm
#Modify Gitlab configuration
vim /etc/gitlab/gitlab.rb

#Modify the Gitlab access address and port. The default value is 80 and the modified value is 90. Port 80 may conflict with the web application port on the server
external_url 'http://192.168.100.88:90'
nginx['listen_port'] = 90
gitlab_rails['time_zone'] = 'Asia/Shanghai'

#Overload configuration and start Gitlab
gitlab-ctl reconfigure
gitlab-ctl restart

#Add the port to the firewall. If the firewall is turned off, the above configuration is not required
firewall-cmd --add=public --add-port=90/tcp --permanent
firewall-cmd --reload
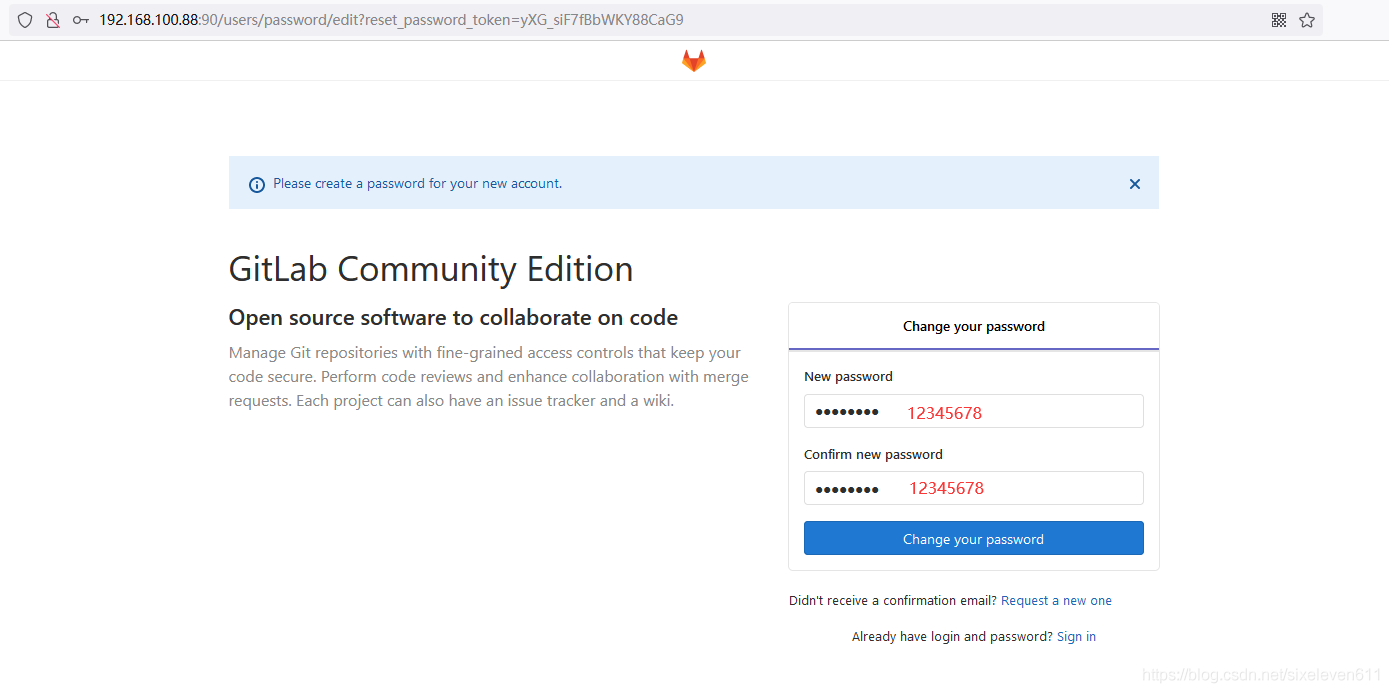
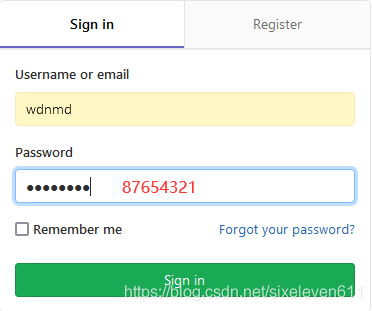
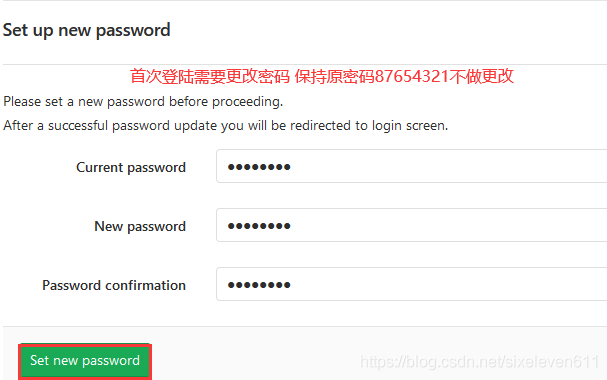
The ROOT account password needs to be modified for the first login. The experimental relationship is set as follows. Note: the password is 8 digits or more
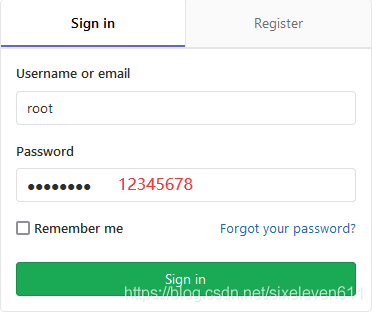
Log in to Gitlab, the user is ROOT, and the password is just set
Login succeeded
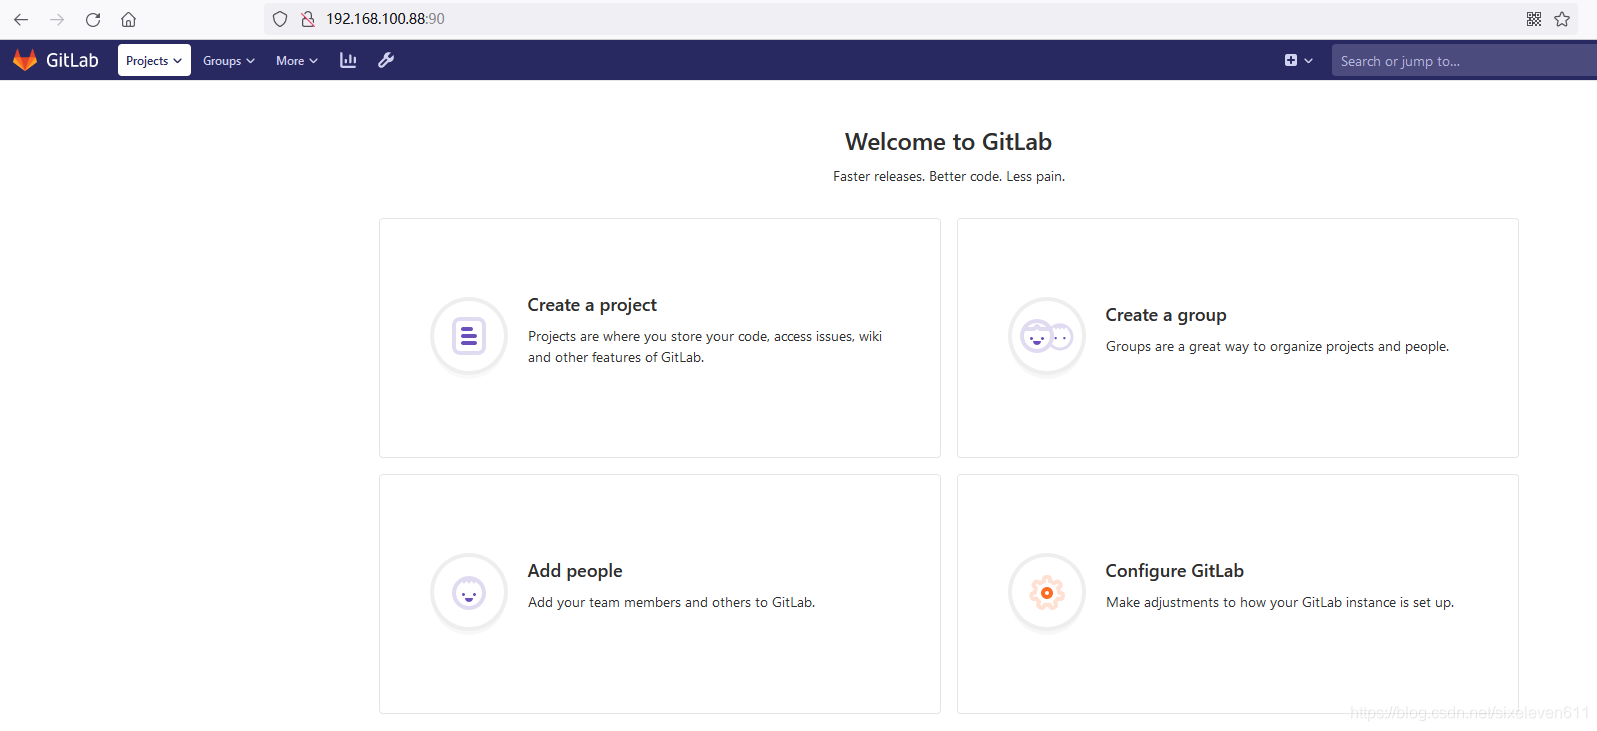
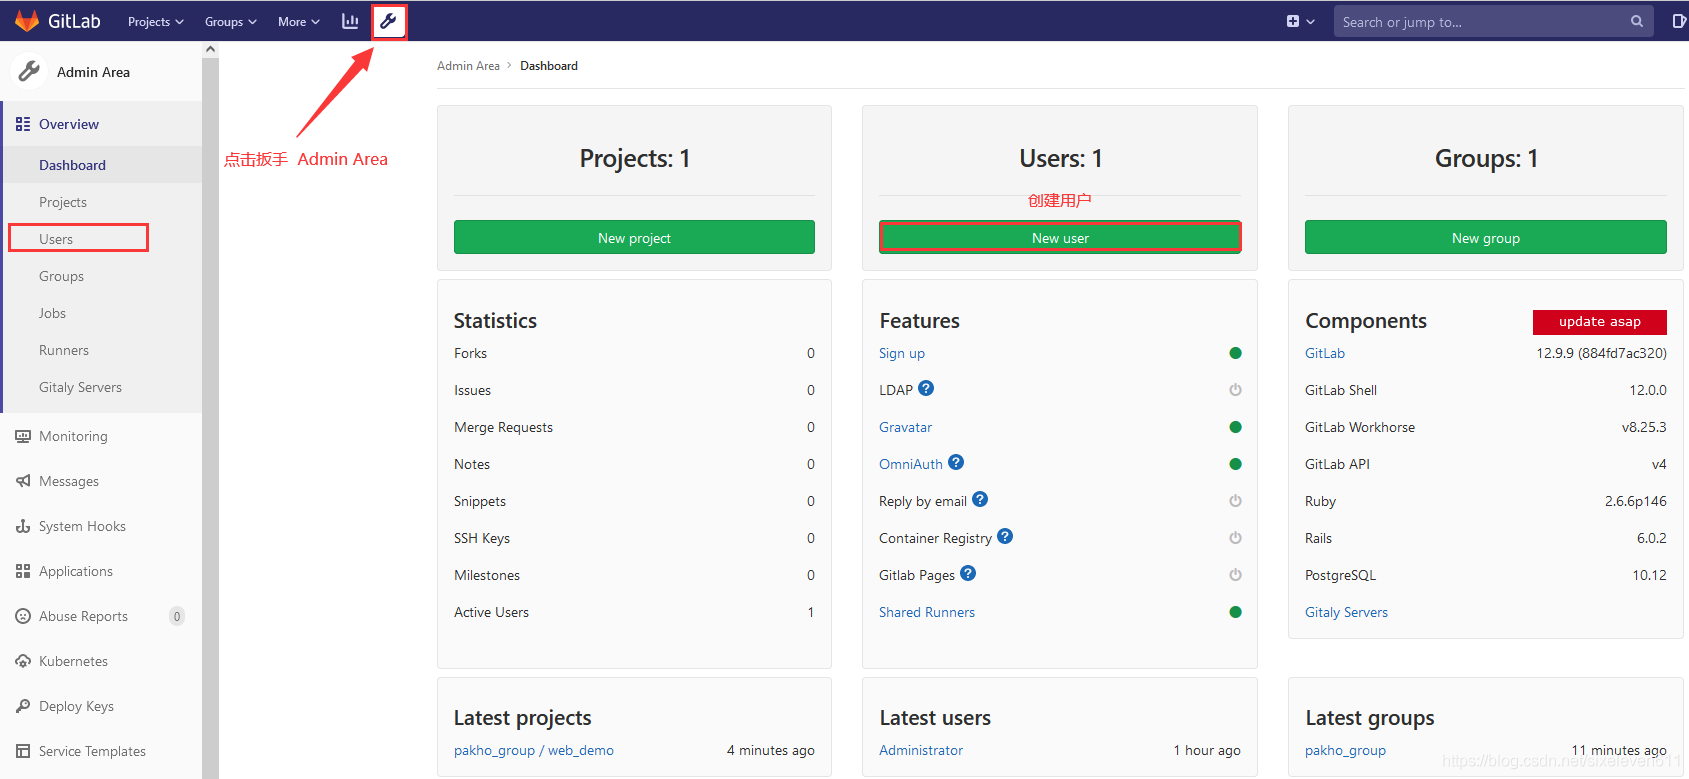
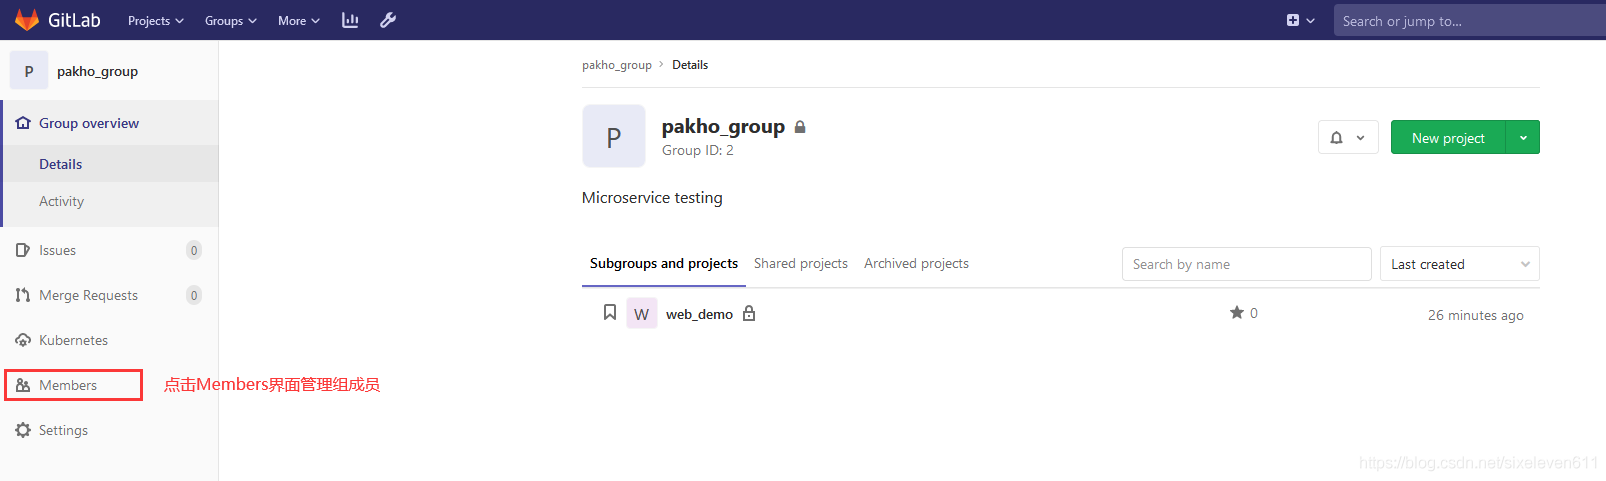
Gitlab add groups, create users, create projects
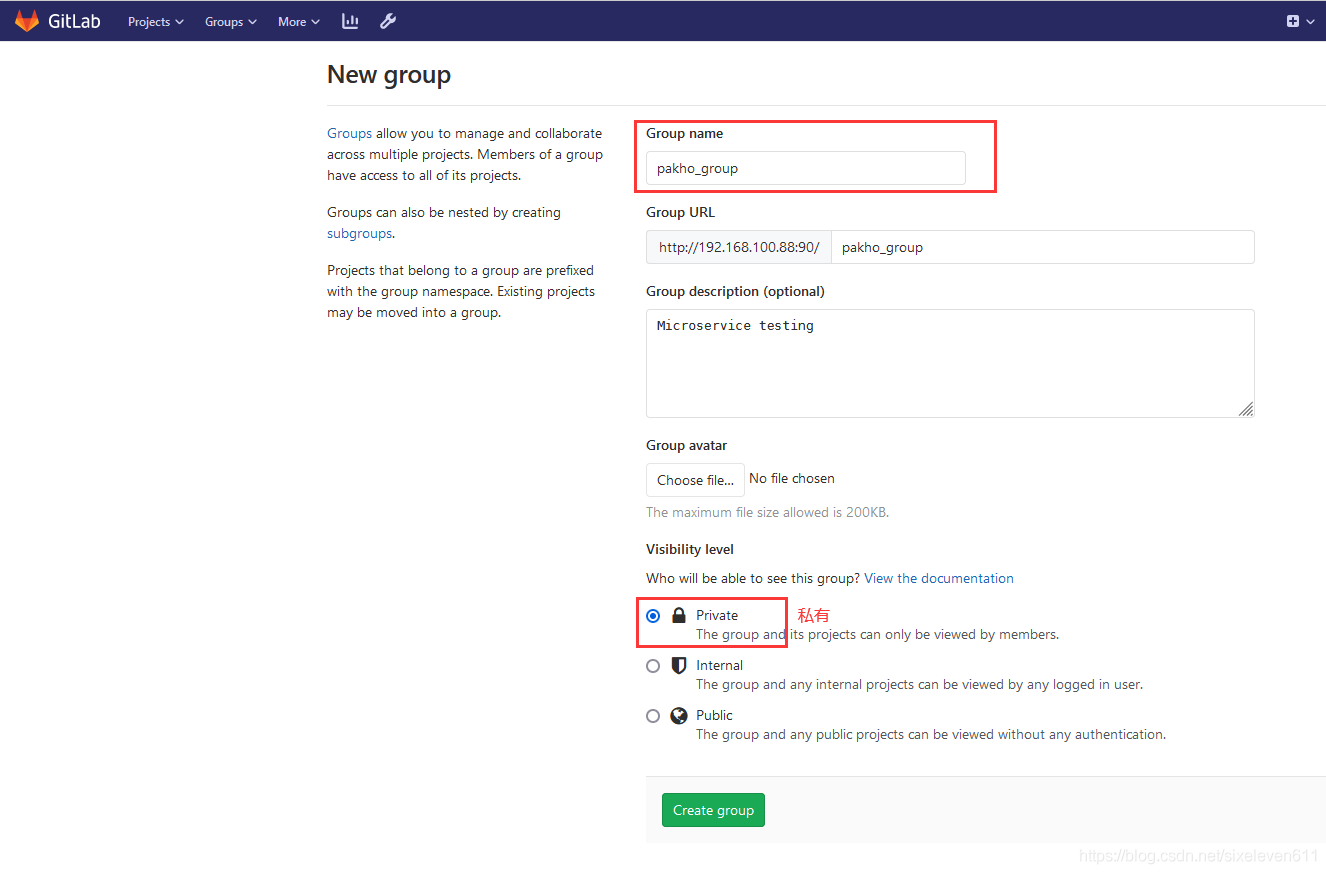
Create group
- The experimental administrator ROOT creates a group. There can be multiple project branches in a group. You can add development to the group to set permissions. Different groups are different development projects or service modules of the company. Different groups can add different development to realize the management of development setting permissions
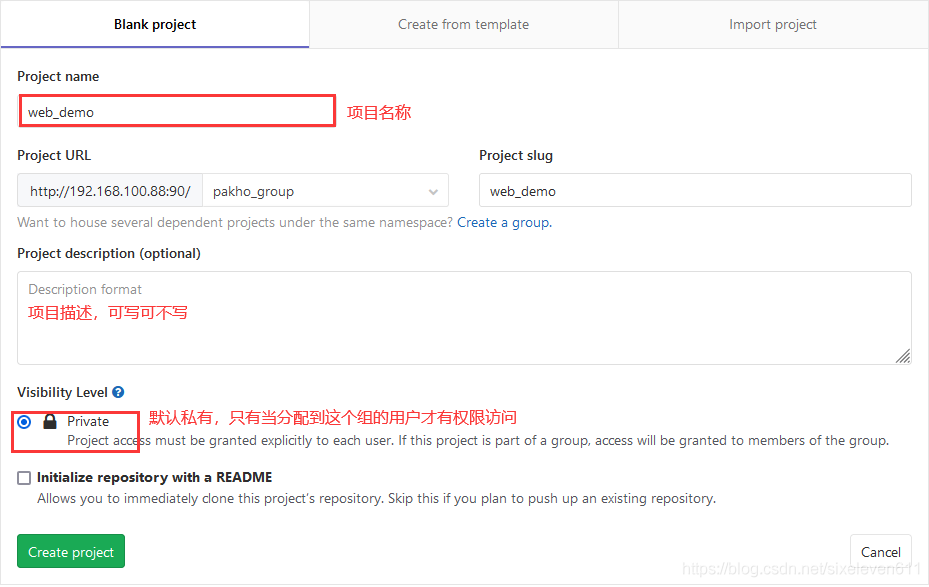
Create a project

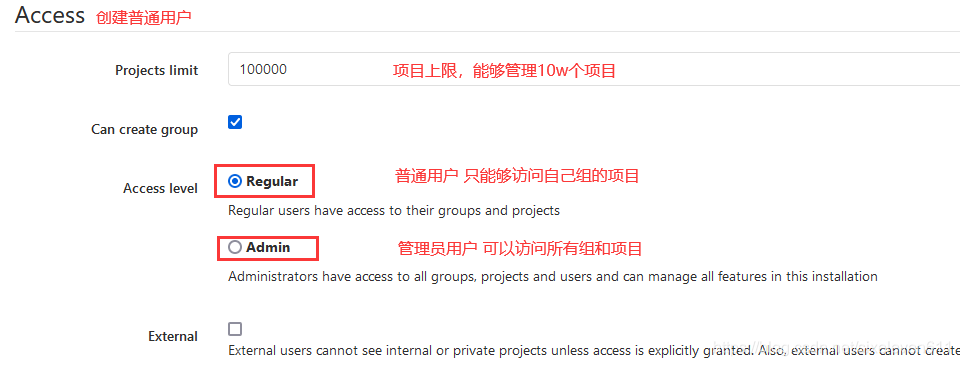
Create users and assign them to this group
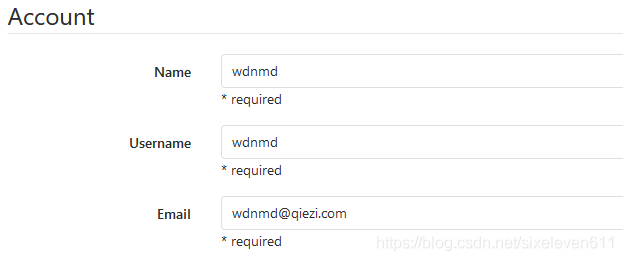
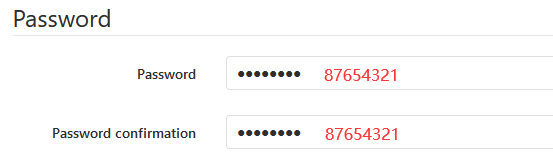
After the creation is successful, edit the user again to add a password

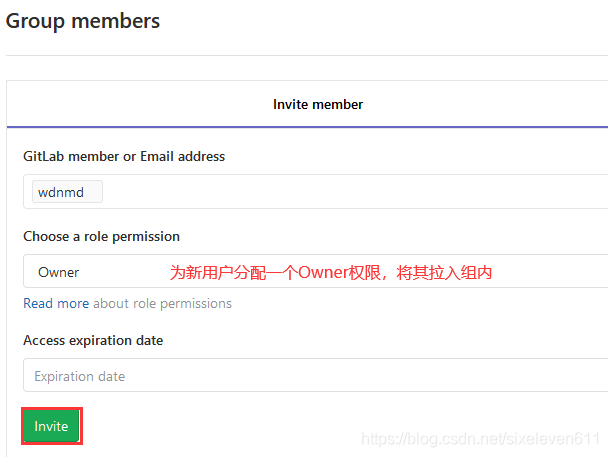
Add a new user to the created group
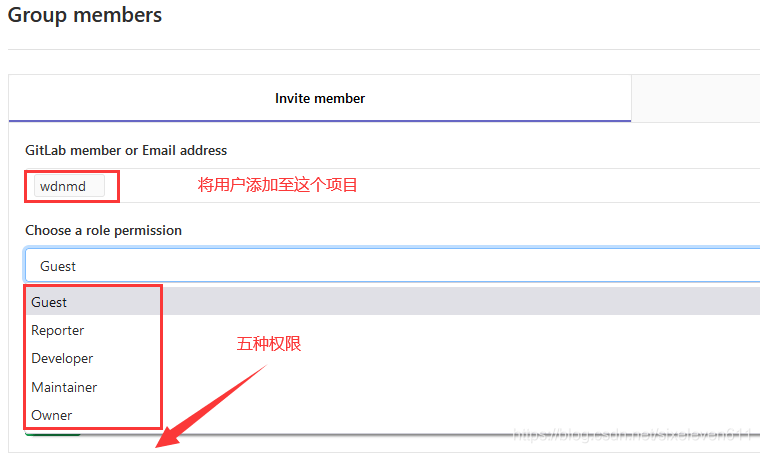
- Gitlab users have five different permissions in the group
- Guest: you can create an issue and post comments. You cannot read or write the library version
- Reporter: code can be cloned but not submitted. QA and PM can grant this permission (Project Manager)
- Developer: you can clone code, develop, submit and Push. Ordinary development can be given this permission
- Maintainer: you can create projects, add tags, protect branches, add project members, and edit projects. Core development can grant this permission
- Owner: you can set project access permission - Visibility Level, delete project, migrate project and manage team members. The development team leader can grant this permission

Log in with a new user
Upload the source code to Gitlab server
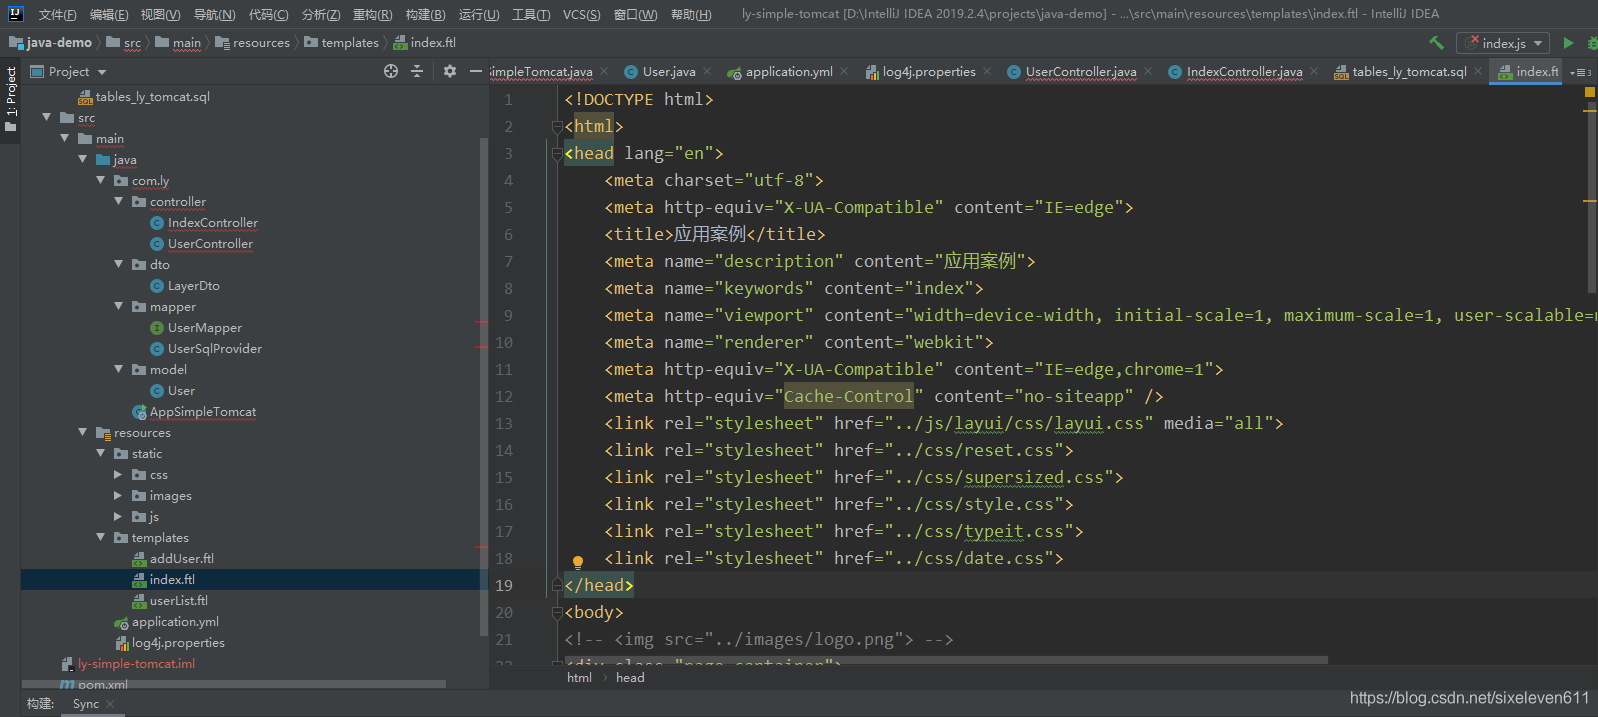
Importing Java projects from IDEA
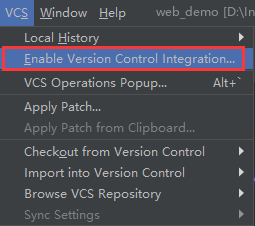
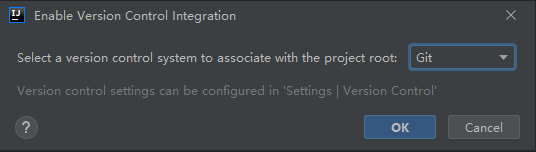
Enable version control integration
Select Git
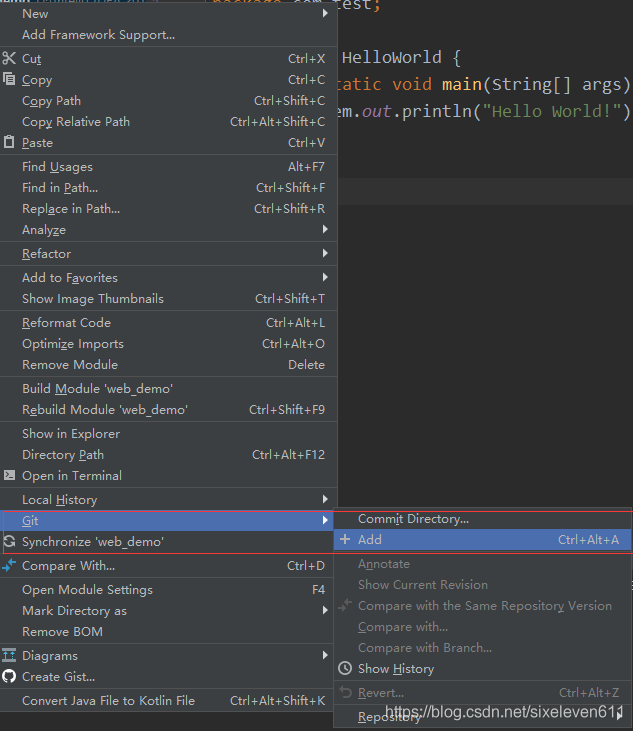
Submit the code to the local warehouse and Add it to the cache first
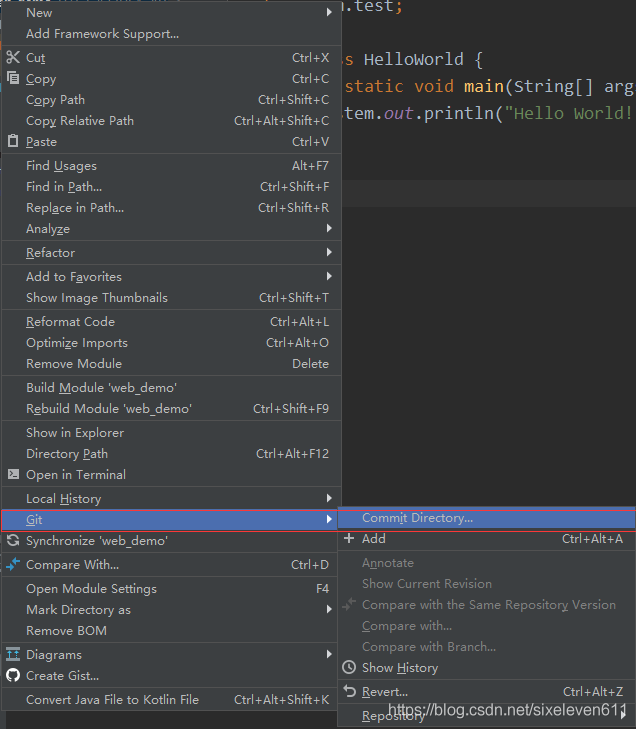
Submit code to local warehouse Commit Directory
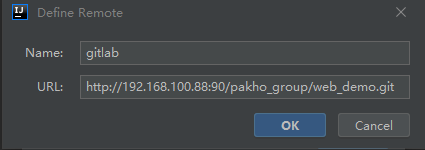
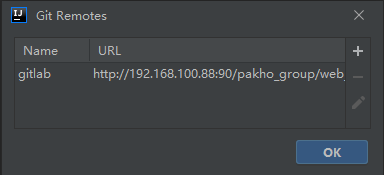
Add remote warehouse address
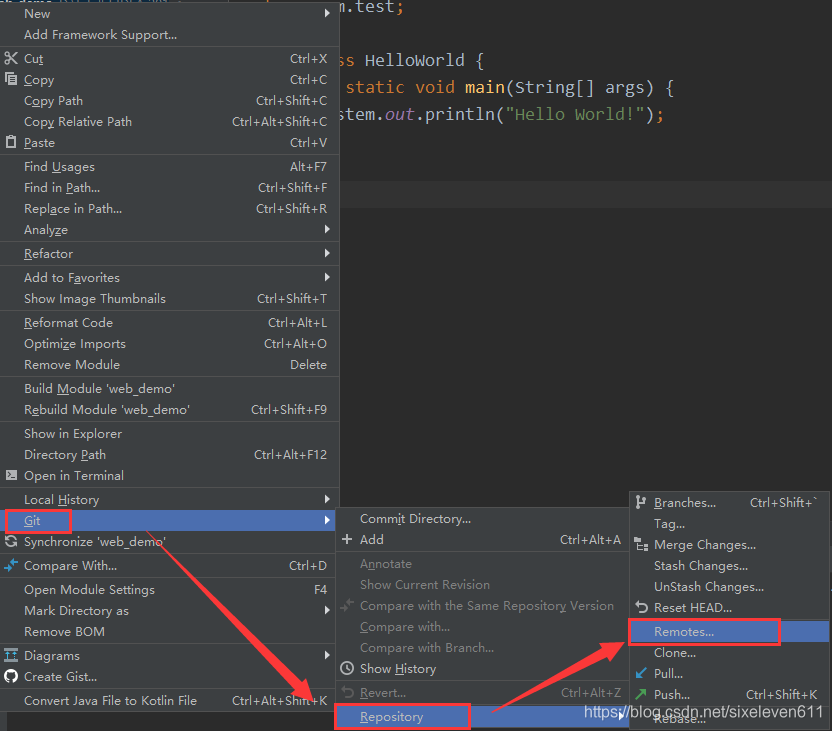
The address is the HTTP address of the item in Gitlab warehouse
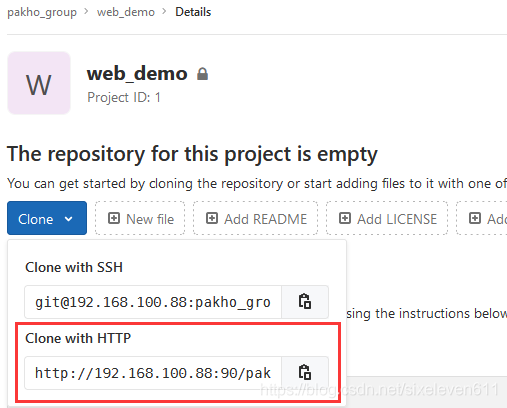
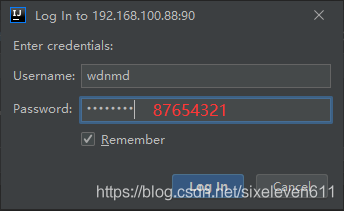
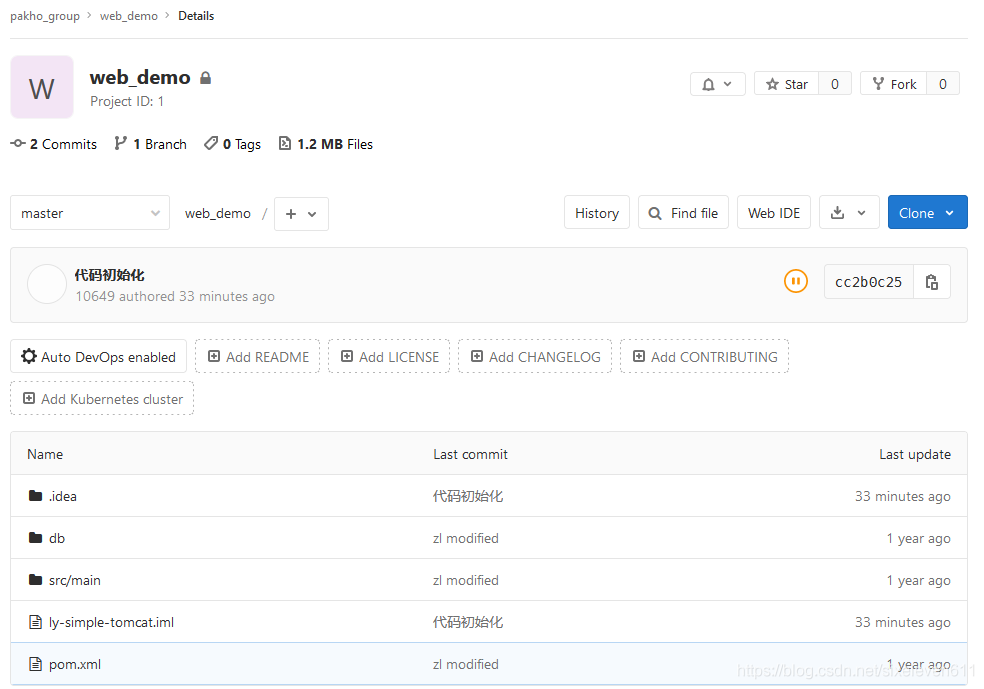
Push to Gitlab project warehouse
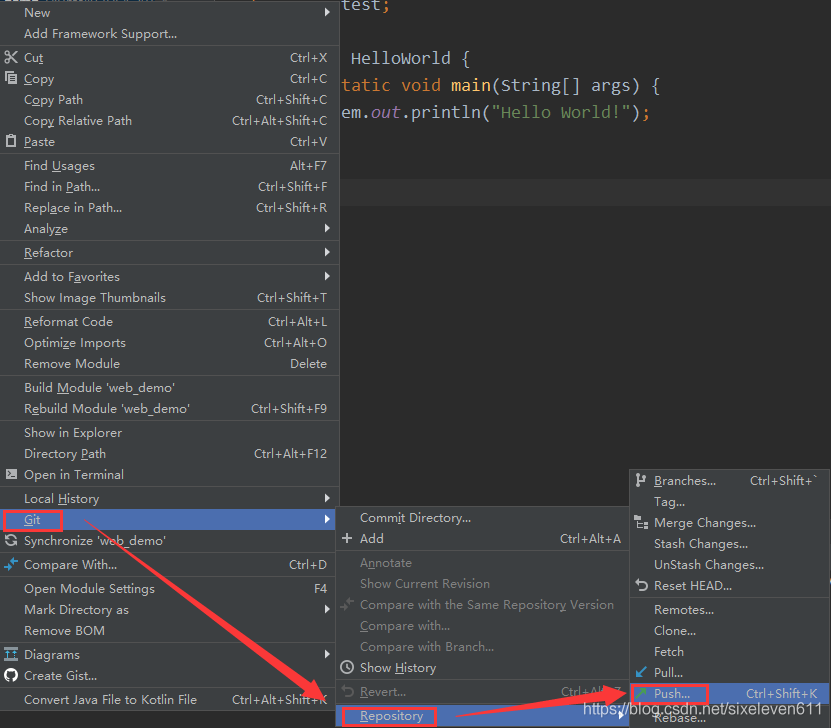
Enter the project warehouse to view
Jenkins server installation
Jenkins server installation
#Jenkins needs to rely on the JDK, so first case jdk1 eight
yum -y install java-1.8.0-openjdk*  #The installation directory is: / usr/lib/jvm

#Get Jenkins installation package
wget https://mirrors.tuna.tsinghua.edu.cn/jenkins/redhat/jenkins-2.290-1.1.noarch.rpm
rpm -ivh jenkins-2.290-1.1.noarch.rpm

#Modify Jenkins configuration
vim /etc/sysconfig/jenkins

#Modify the Jenkins operation user to root
JENKINS_USER="root"
#Modify the port from 8080 to 8888 by default
JENKINS_PORT="8888"

systemctl start jenkins && systemctl enable jenkins

#You can view Jenkins' initial password
cat /var/lib/jenkins/secrets/initialAdminPassword
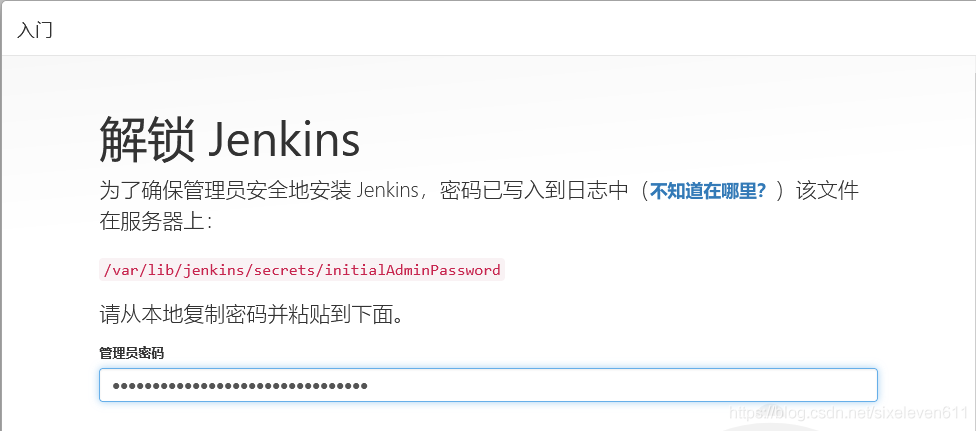
- Jenkins version is as follows

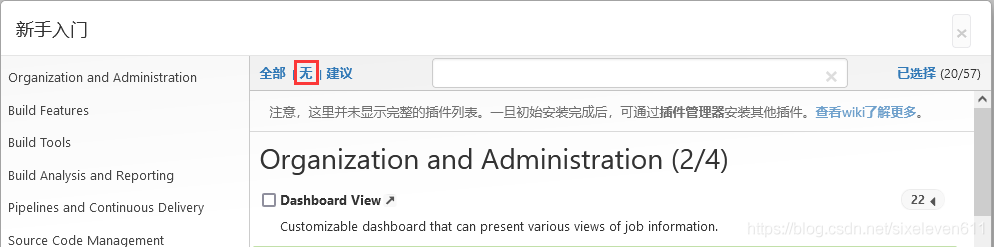
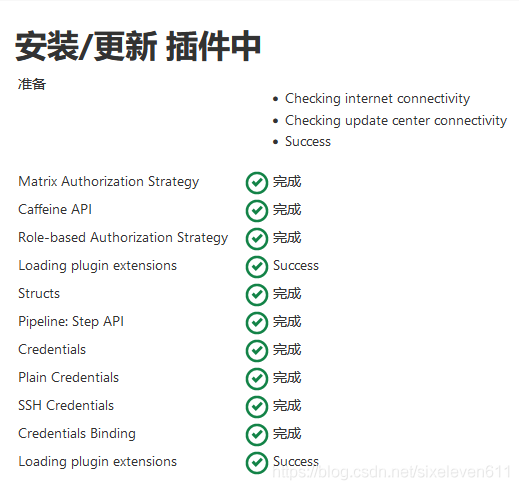
Skip plug-in installation
- Because the Jenkins plug-in needs to be downloaded from the default official website, the speed is very slow, and the process may fail, so skip the plug-in installation for the time being
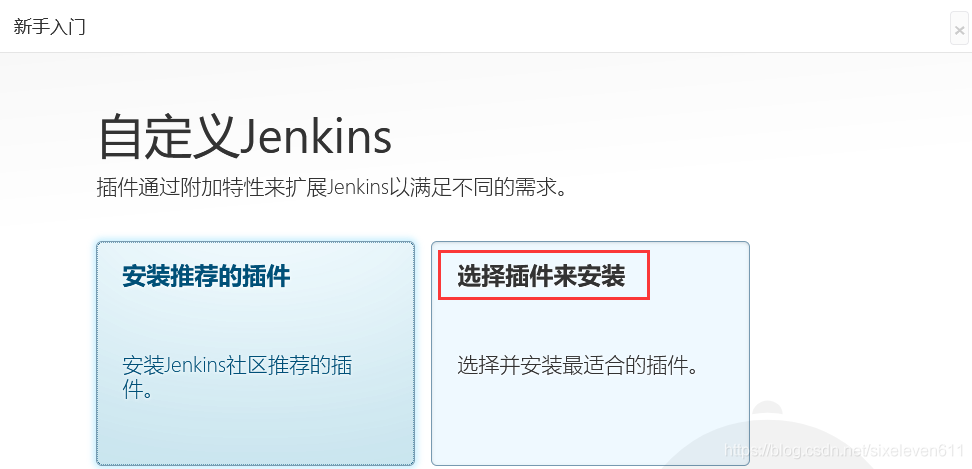
- Select none -- > installation (actually skipping the plug-in installation step)
Create administrator account

Jenkins plug-in management
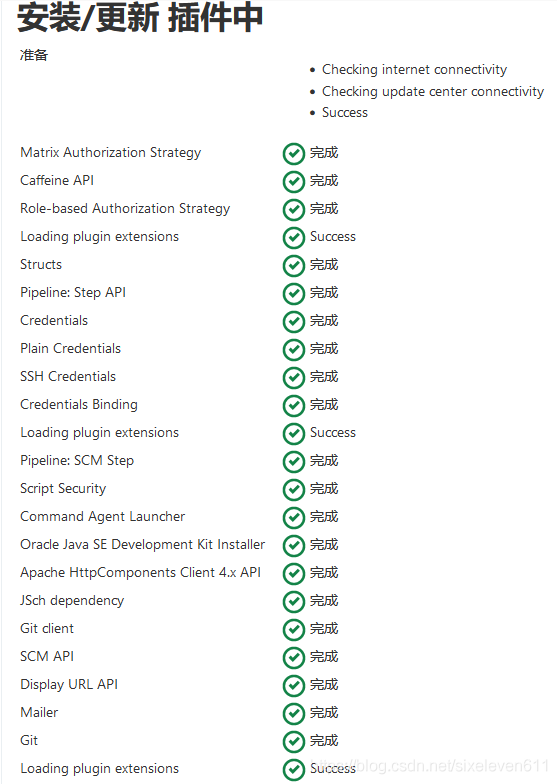
- Jenkins itself does not provide many functions and can be used through plug-ins. For example, pulling code from Gitlab and building projects using Maven need to be completed by plug-ins
Modify the Jenkins plug-in download address
- The download speed of Jenkins's foreign official plug-in address is very slow, so it is modified to the domestic plug-in address
- Jenkins -- > Manage Jenkins -- > Manage plugins, click available -- > and wait for the plug-in to load
- This is to download the Jenkins official plug-in list locally, and then modify the address file to replace it with the domestic plug-in address
#Enter Jenkins directory
cd /var/lib/jenkins/

[root@jenkins jenkins]# cd updates/
[root@jenkins updates]# ls
default.json  hudson.tasks.Maven.MavenInstaller #default.json records the address of the official download Plug-in

#Modified to the open source Jenkins download address of Tsinghua University
sed -i 's/http:\/\/updates.jenkins-ci.org\/download/https:\/\/mirrors.tuna.tsinghua.edu.cn\/jenkins/g' default.json && sed -i 's/http:\/\/www.google.com/https:\/\/www.baidu.com/g' default.json
- Go back to Jenkins manage plugins -- > advanced and change the Update Site to the download address of domestic plug-ins
https://mirrors.tuna.tsinghua.edu.cn/jenkins/updates/update-center.json
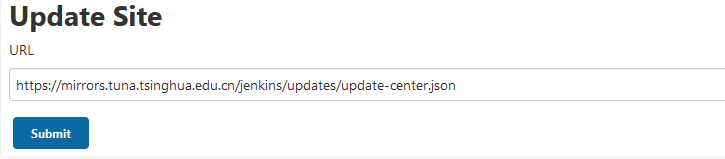
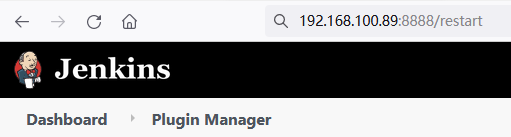
- After submitting, enter http:// IP address + port / restart in the browser and restart Jenkins
Download Chinese plugin
- Jenkins -- > Manage plugins -- > Click Available and search "Chinese"
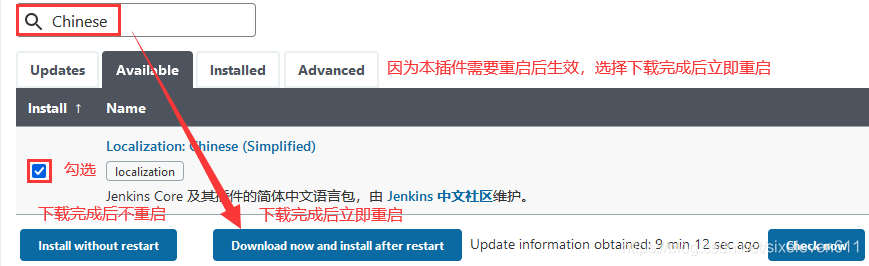
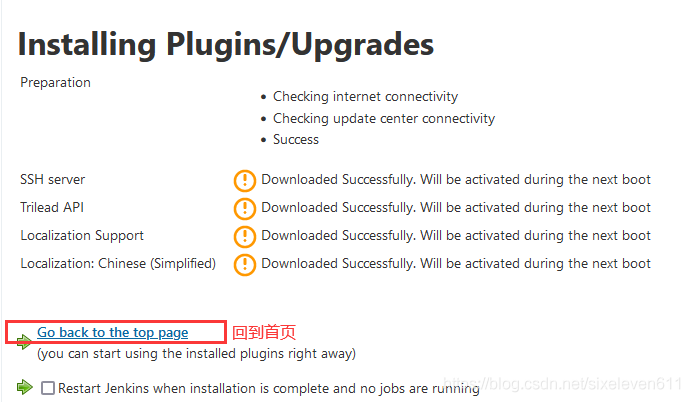
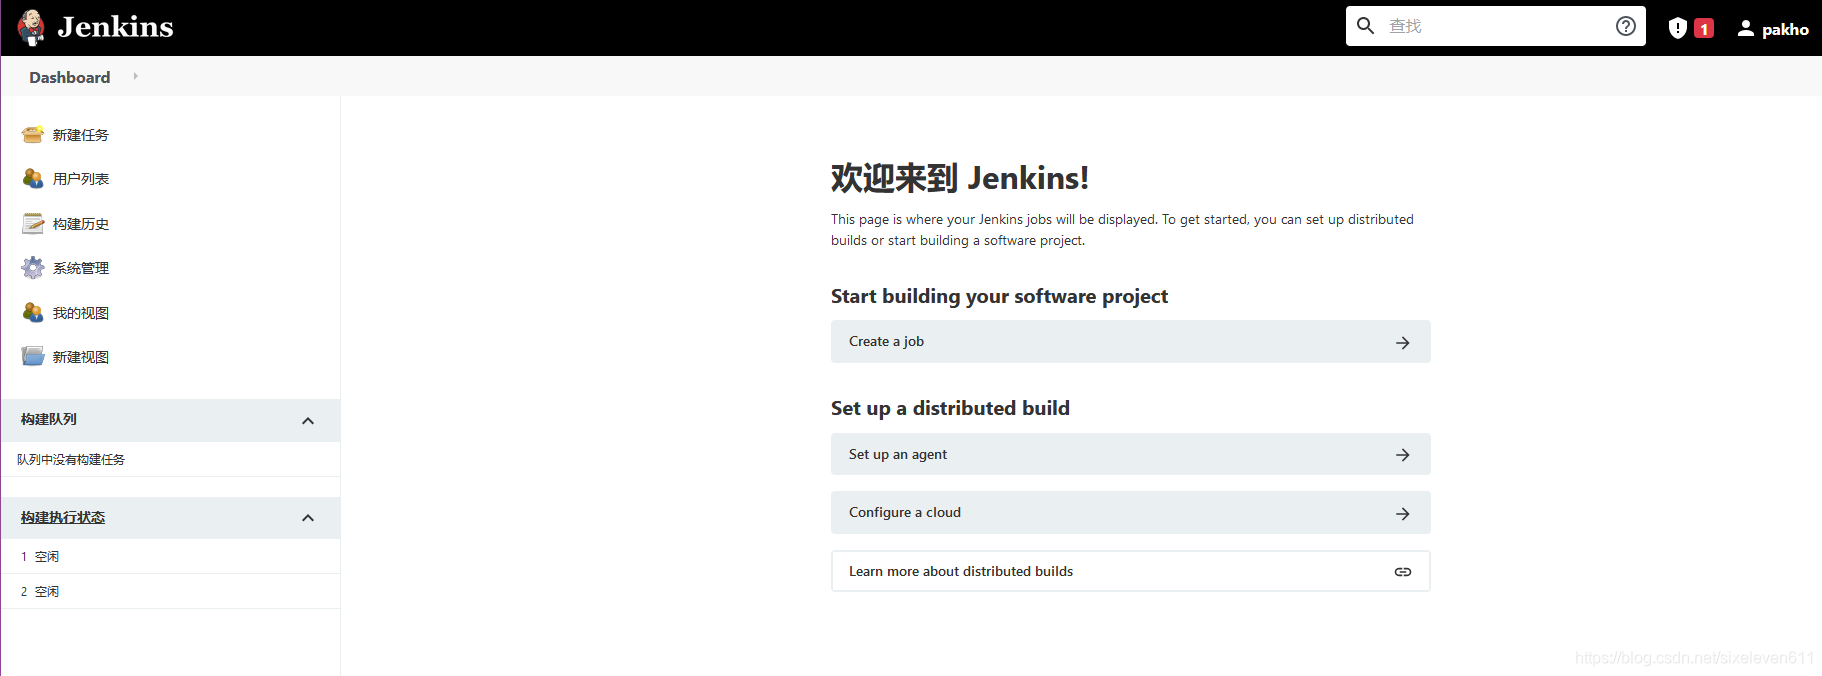
- Complete the Chinese operation after restart
Jenkins user rights management
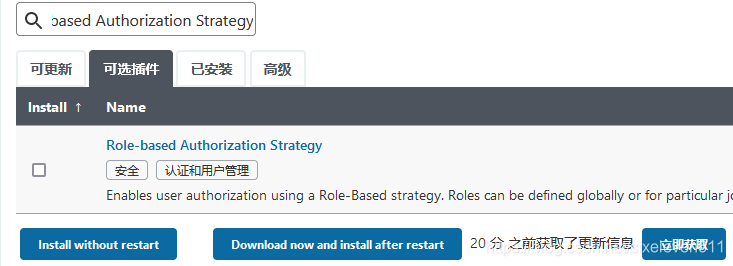
- The Role-based Authorization Strategy plug-in can be used to manage Jenkins user permissions
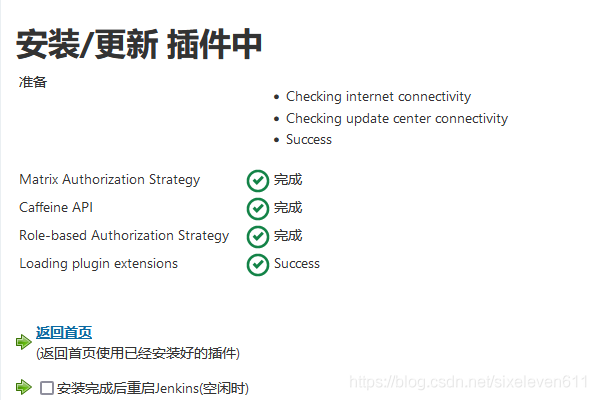
Install the role based authorization strategy plug-in

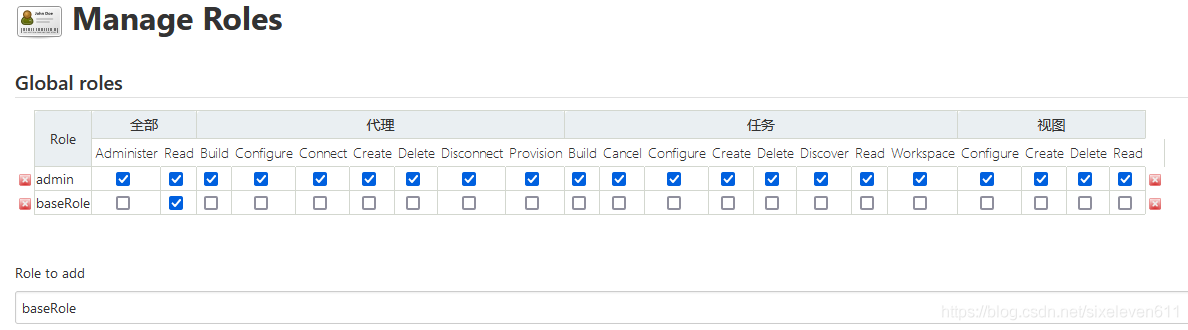
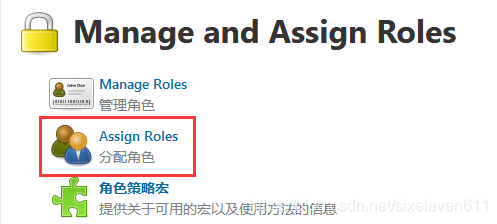
Create role -- > Manage roles

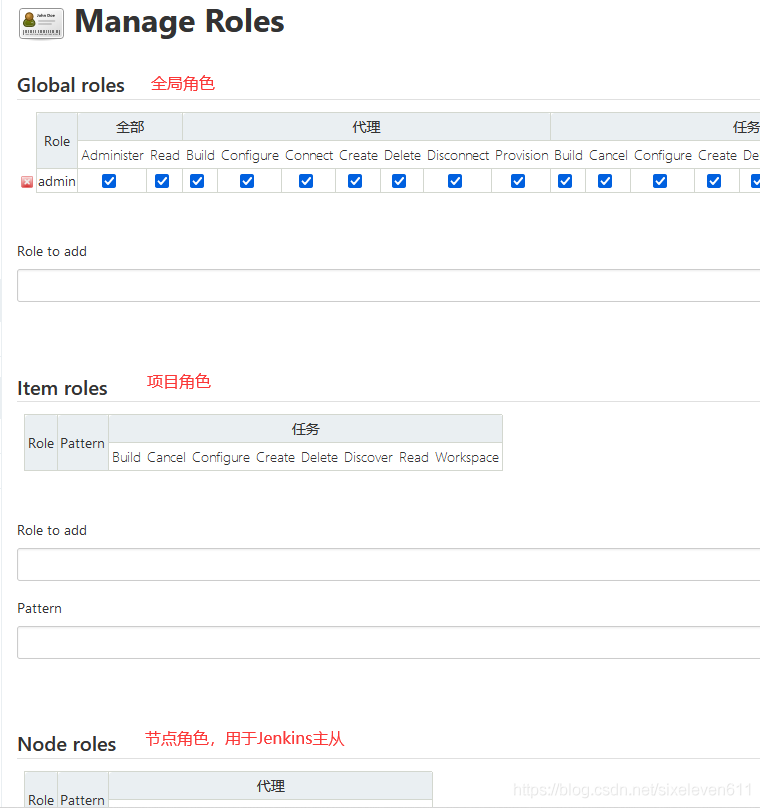
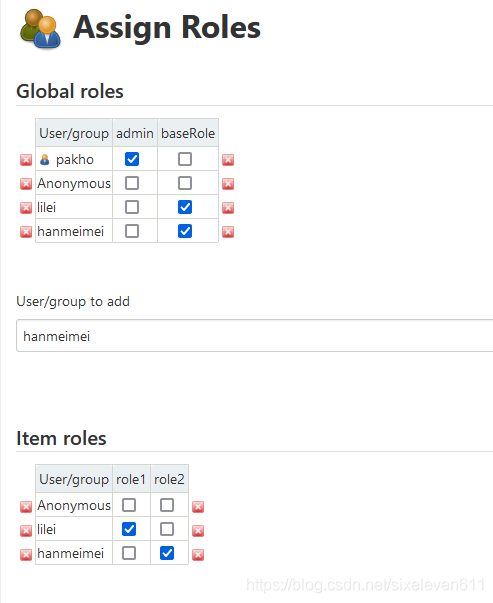
Create a global role with readable permissions
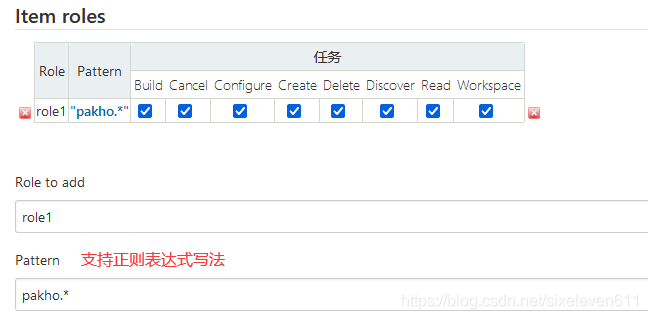
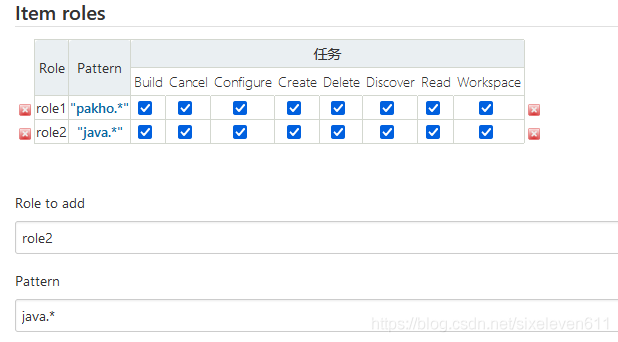
Create two project roles
- Pattern: indicates what prefix can access items starting with
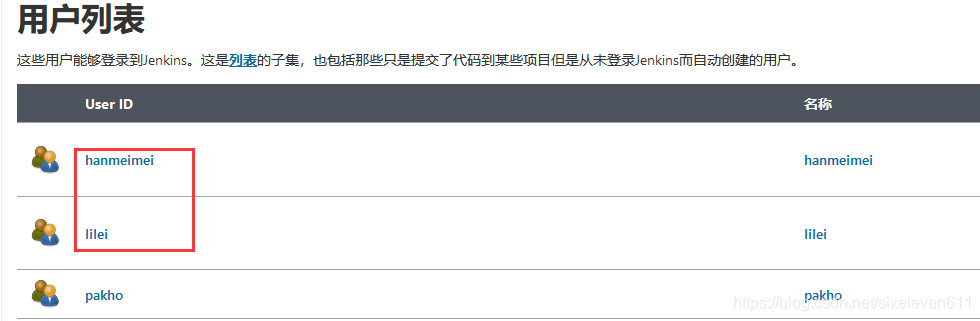
Create a user to test whether the role is available
Log in to Jenkins through a new user without permission

Assign roles to new users through administrator users
- Both accounts have basic login permissions. lilei only accesses items with pakho prefix and hammeimei only accesses items with java prefix
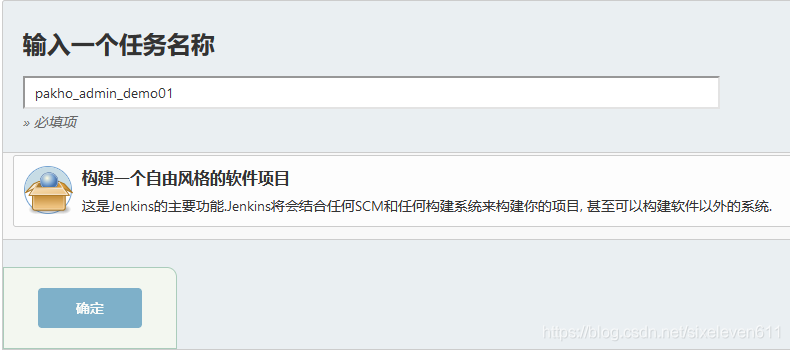
Create project for permission test

Login verification using different accounts
- lilei can only see items prefixed with pakho

- Hameimei can only see items with java prefix

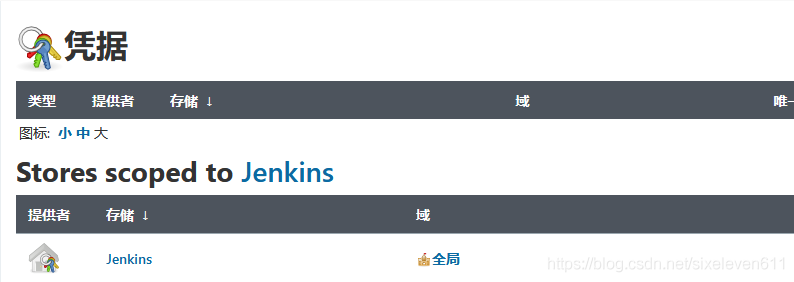
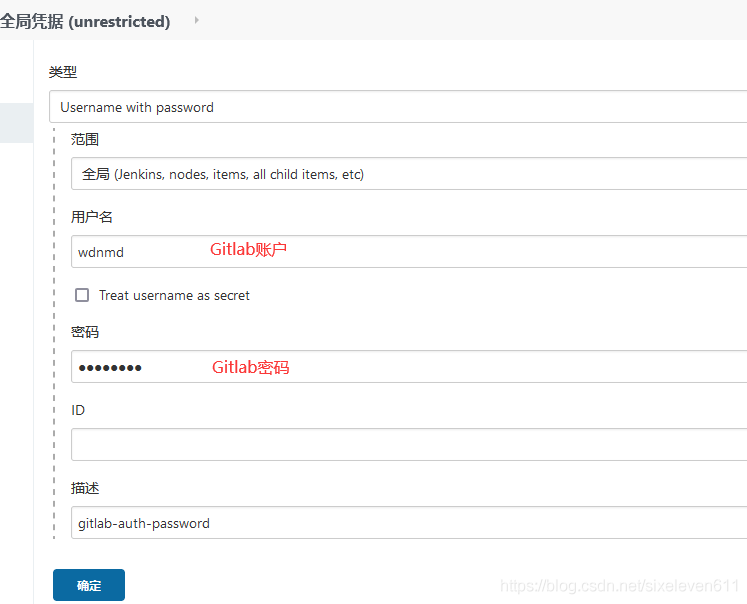
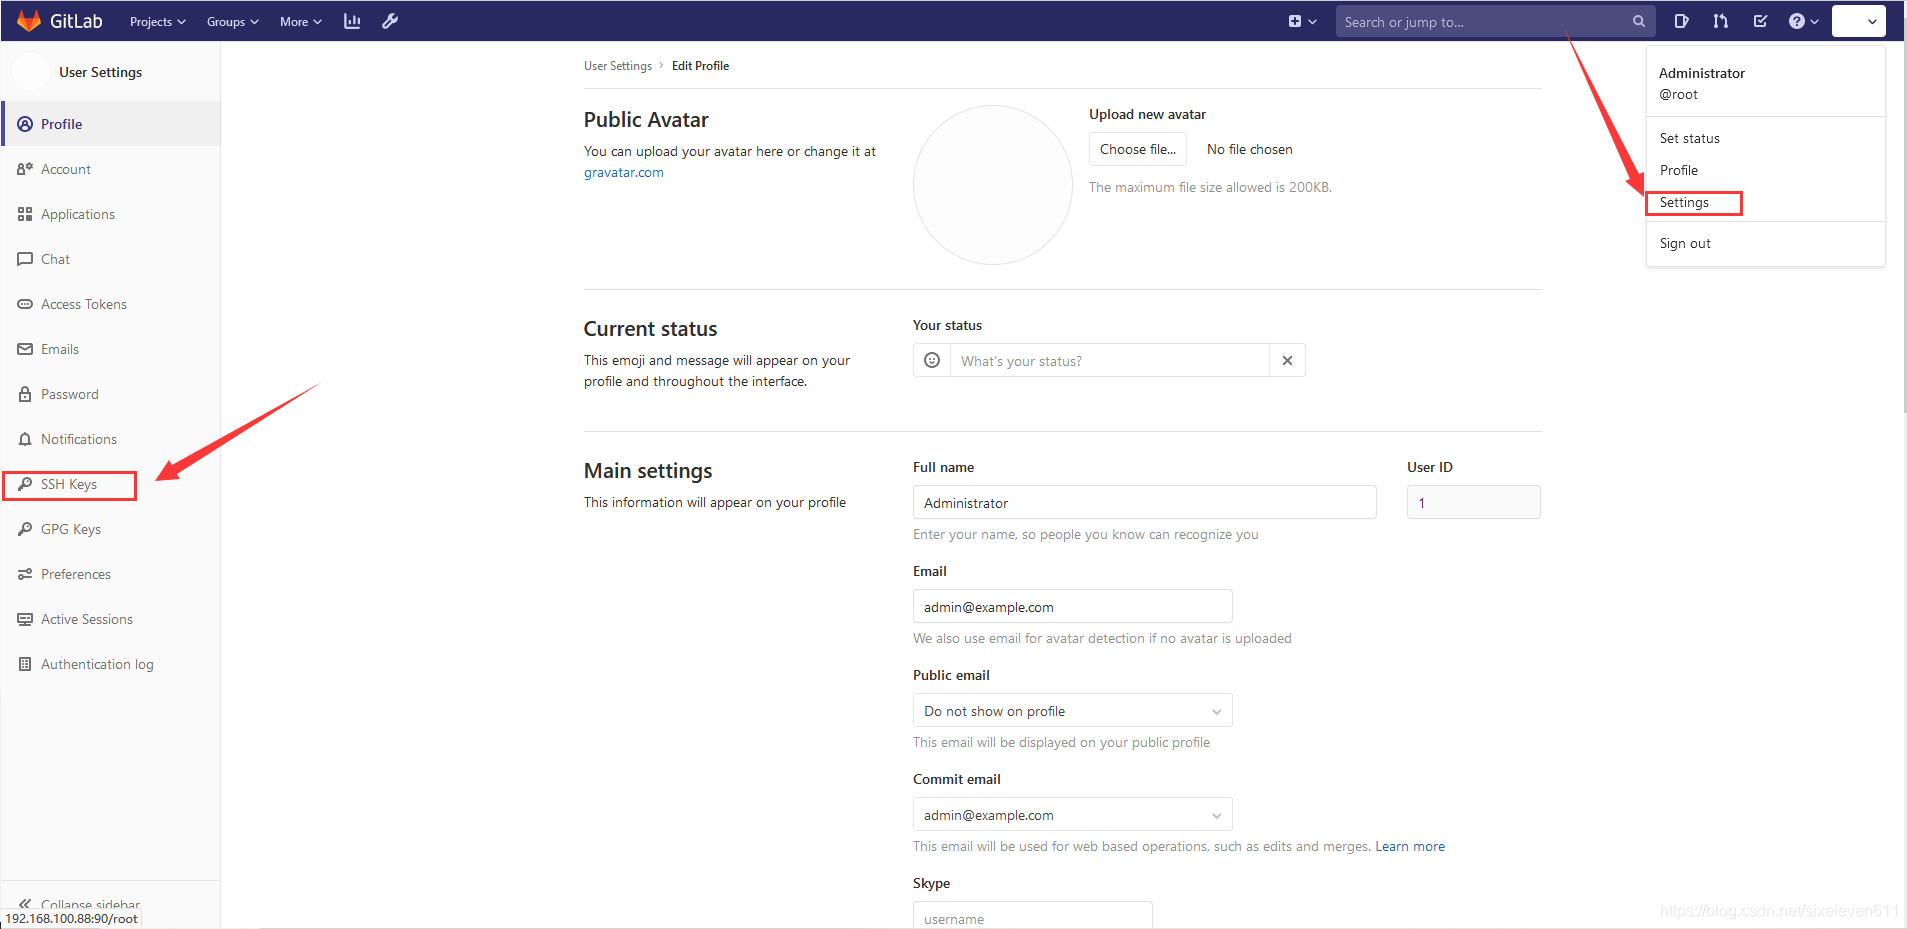
Jenkins voucher management
- Credentials are used to store the database password, Gitlab password information and Docker private warehouse password that need ciphertext protection, so that Jenkins can interact with these third-party applications
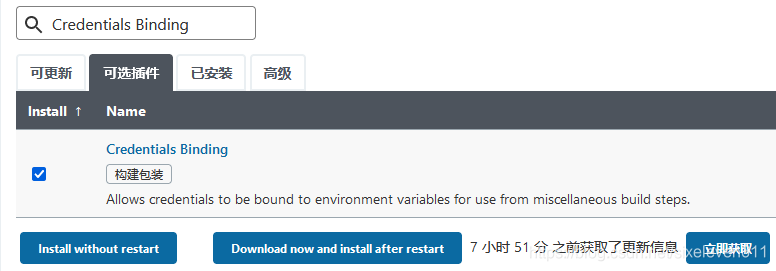
Install the Credentials Binding plug-in
- To use the credential management feature in Jenkins, you need to install the Credentials Binding plug-in
- After downloading, there is a credential menu in the security

- New credentials
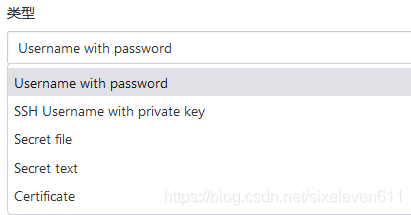
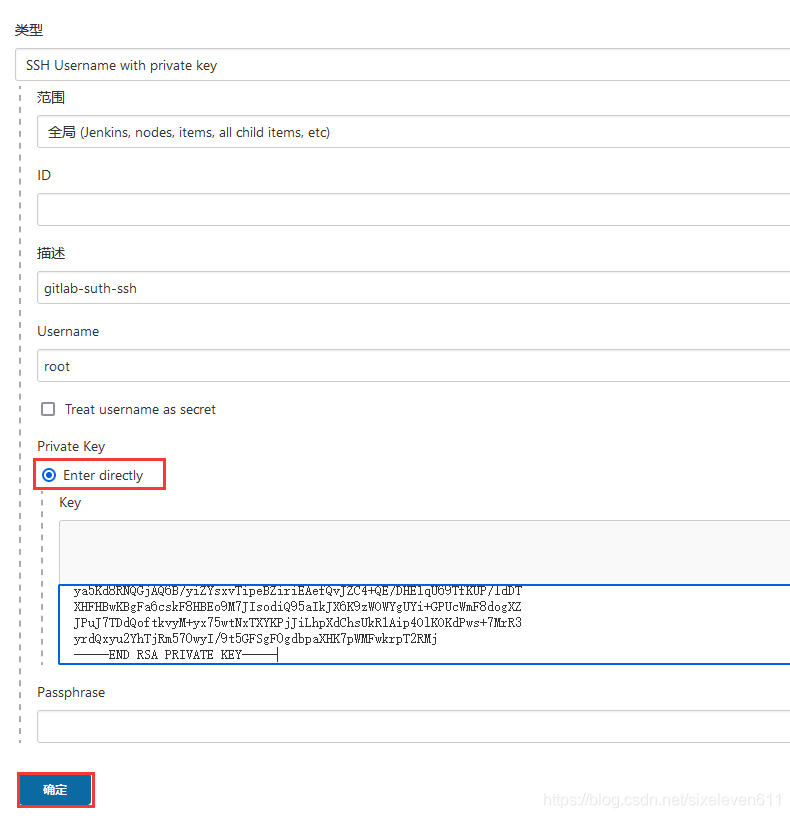
- There are five kinds of credentials that can be added:
- Username with password: stores credentials for logging in with username and password
- SSH Username with private key: SSH password free login
- Secret file: password file. When used, Jenkins will copy the file to a temporary directory and set the file path to a variable. After the construction is completed, the copied secret file will be deleted
- Secret text: an encrypted text string that needs to be saved, such as nail robot or Github's api token
- Certificate: by uploading the certificate file
- Common credential types are Username with password and SSH Username with private key
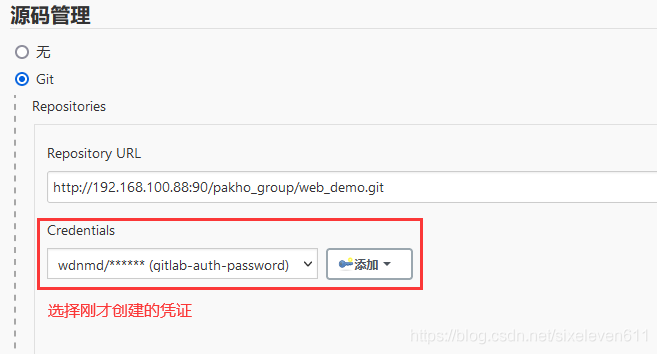
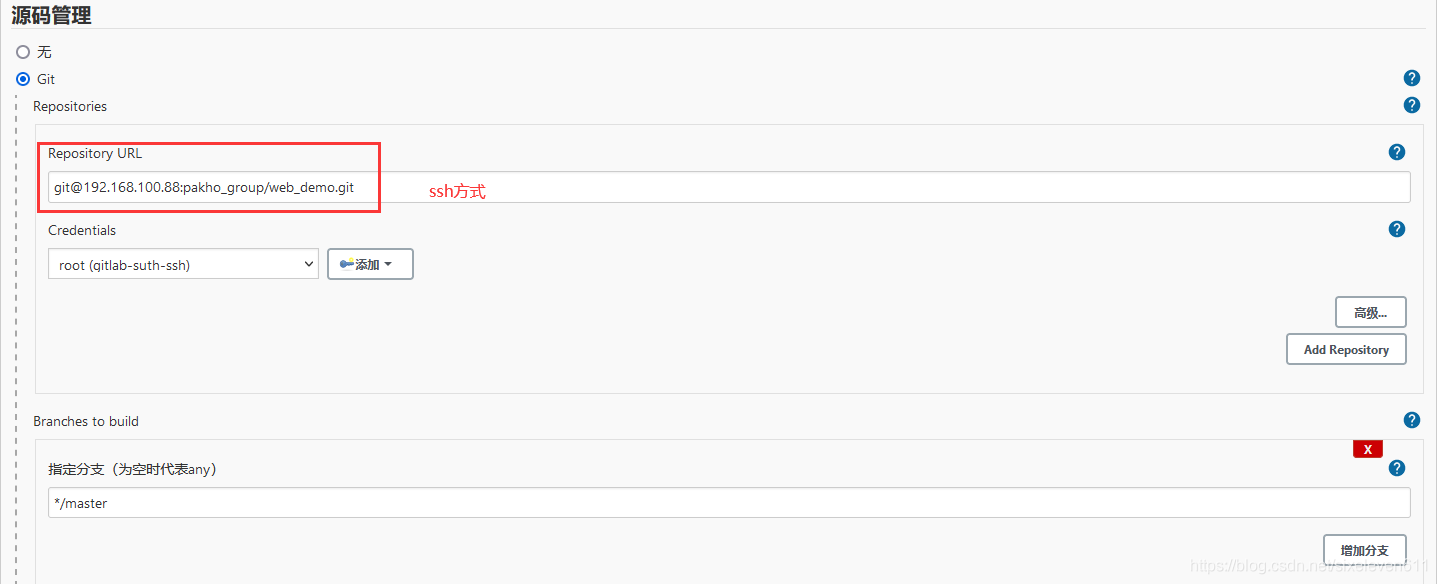
Configure credentials and use Git tool to pull the project source code from Gitlab
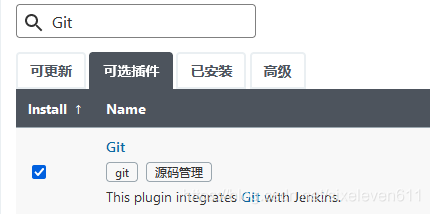
- In order for Jenkins to support pulling source code from Gitlab, you need to install Git plug-ins and Git tools on CentOS7
yum -y install git

git --version

[root@jenkins ~]# git --version
git version 1.8.3.1
User password type credentials
- Jenkins -- > credentials -- > System -- > Global credentials -- > Add credentials
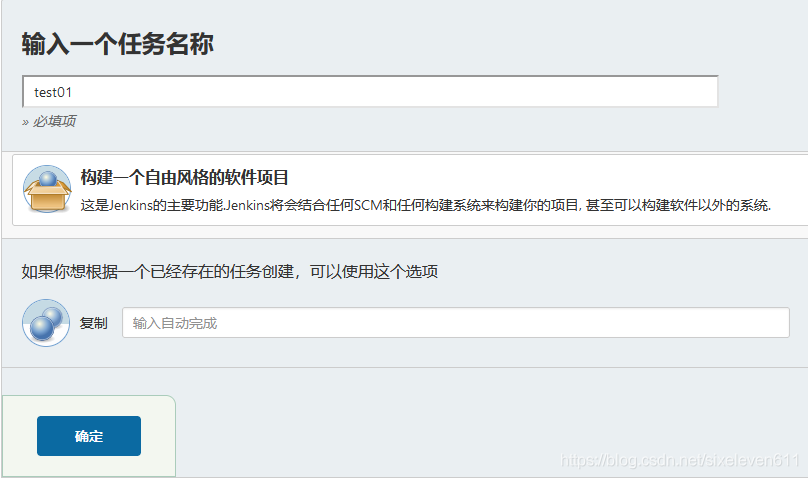
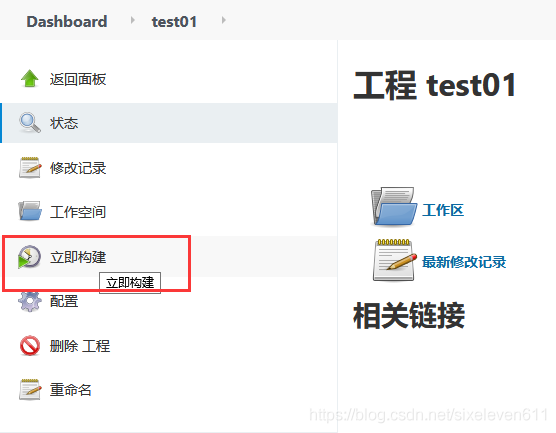
New test project Test01 project
Select Git to pull the code
Build project
View build details
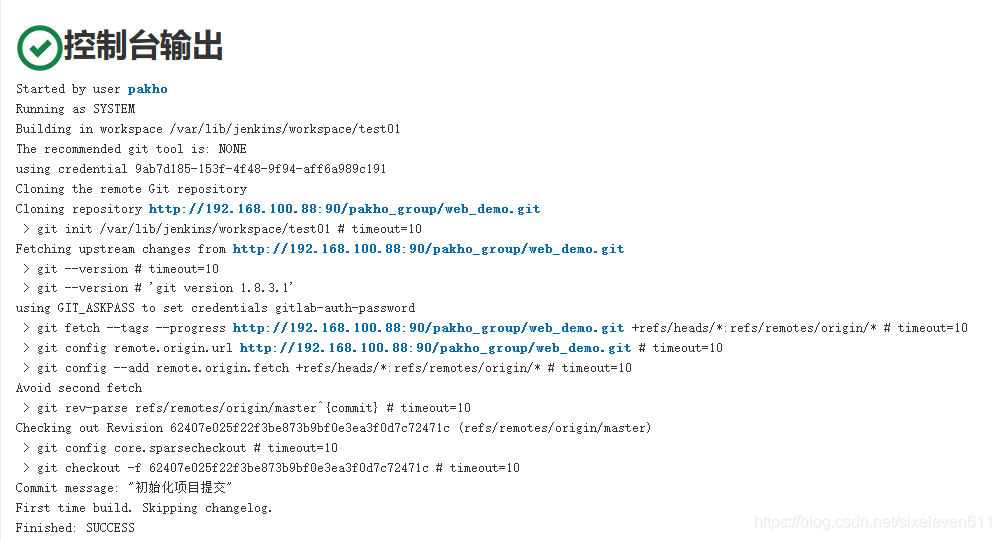
#Server side view
[root@jenkins ~]# cd /var/lib/jenkins/workspace/test01
[root@jenkins test01]# ls
out  src  web_demo.iml
SSH key type certificate
- SSH password free login diagram

[root@jenkins ~]# ssh-keygen -t rsa

[root@jenkins ~]# cd ~/.ssh/
[root@jenkins .ssh]# ls
id_rsa  id_rsa.pub

#id_rsa.pub: public key
#id_rsa: private key

#View public key
[root@jenkins .ssh]# cat id_rsa.pub
Log in to Gitlab with your ROOT account
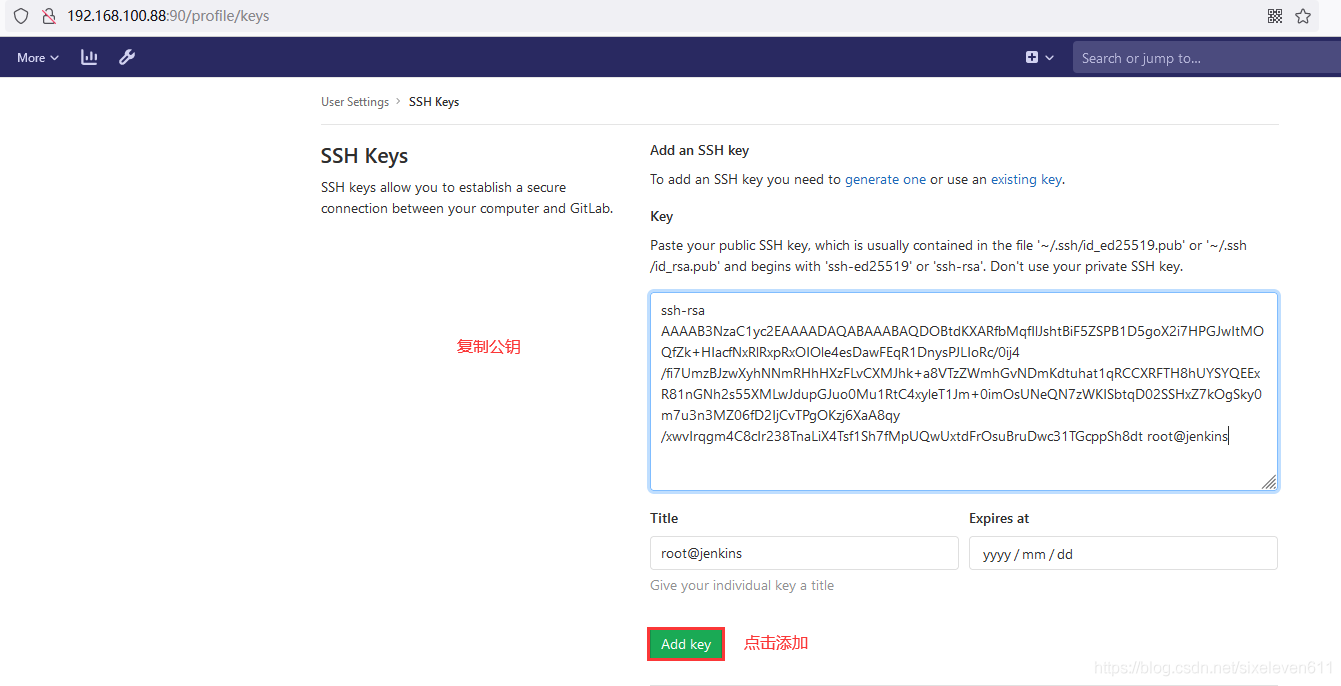
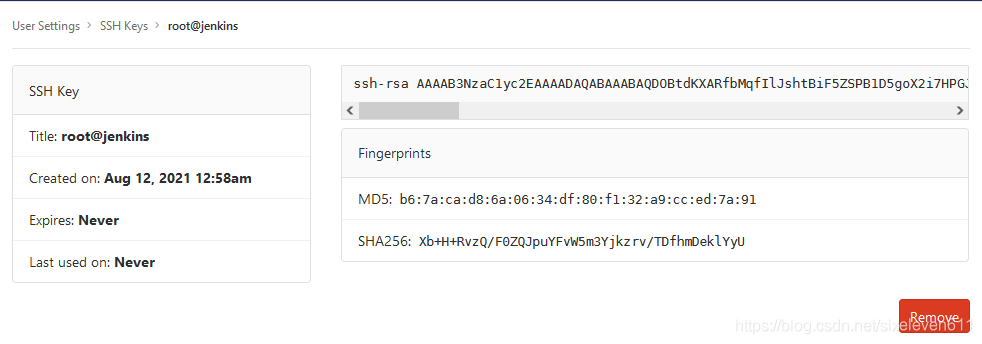
Jenkins server add private key
#View private key
[root@jenkins .ssh]# cat id_rsa

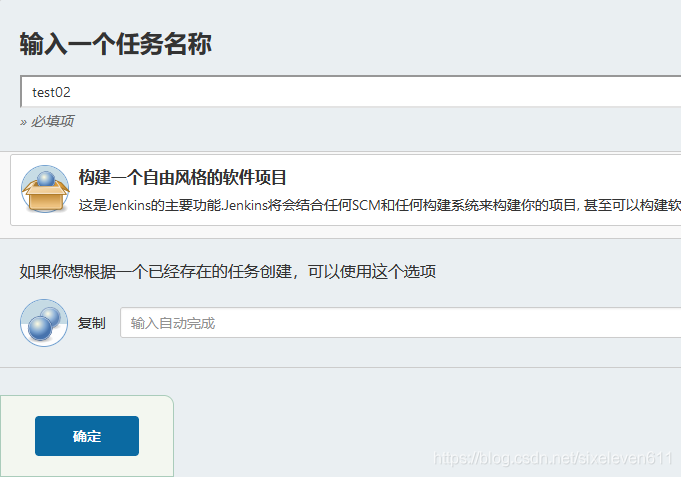
Add a new project to test
Build project
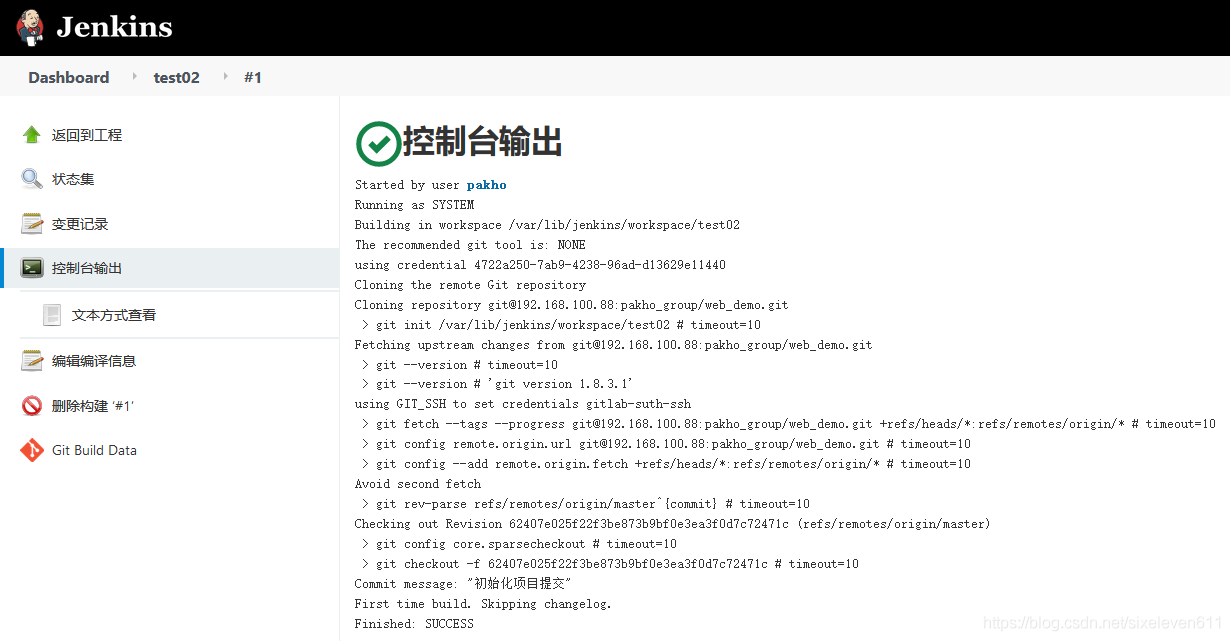
#Jenkins server view
[root@jenkins ~]# cd /var/lib/jenkins/workspace/test02
[root@jenkins test02]# ls
out  src  web_demo.iml
Maven installation and configuration
- On the Jenkins server, Maven needs to be installed to compile and package the project
wget https://mirror-hk.koddos.net/apache/maven/maven-3/3.8.1/binaries/apache-maven-3.8.1-bin.tar.gz
tar xf apache-maven-3.8.1-bin.tar.gz -C /usr/local/
mv /usr/local/apache-maven-3.8.1/ /usr/local/maven

#Configure environment variables
vim /etc/profile
export JAVA_HOME=/usr/lib/jvm/java-1.8.0-openjdk
export MAVEN_HOME=/usr/local/maven
export PATH=$PATH:$JAVA_HOME/bin:$MAVEN_HOME/bin

source /etc/profile

#View Maven version
mvn -v

[root@jenkins ~]# mvn -v
Apache Maven 3.8.1 (05c21c65bdfed0f71a2f2ada8b84da59348c4c5d)
Maven home: /usr/local/maven
Java version: 1.8.0_292, vendor: Red Hat, Inc., runtime: /usr/lib/jvm/java-1.8.0-openjdk-1.8.0.292.b10-1.el7_9.x86_64/jre
Default locale: en_US, platform encoding: UTF-8
OS name: "linux", version: "3.10.0-862.el7.x86_64", arch: "amd64", family: "unix"
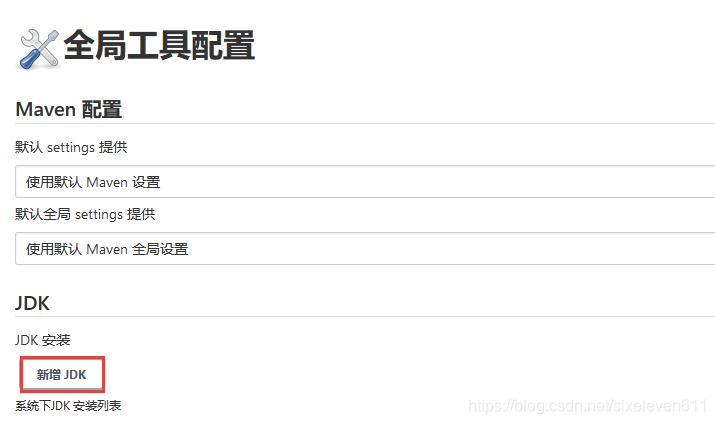
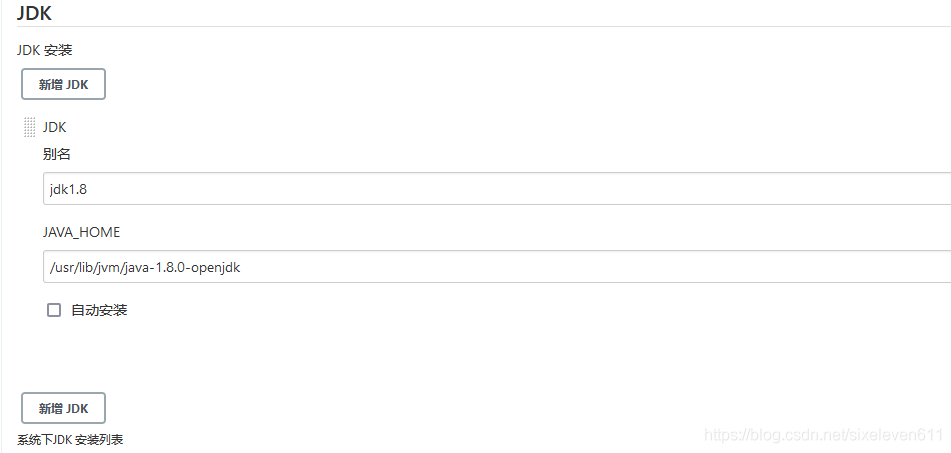
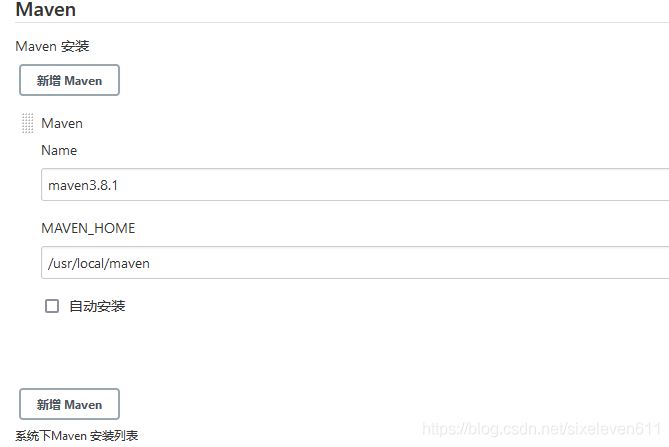
Global tool configuration is associated with JDK and Maven
- Jenkins -- > global tool configuration -- > JDK -- > New JDK

Add JDK
Configure Maven
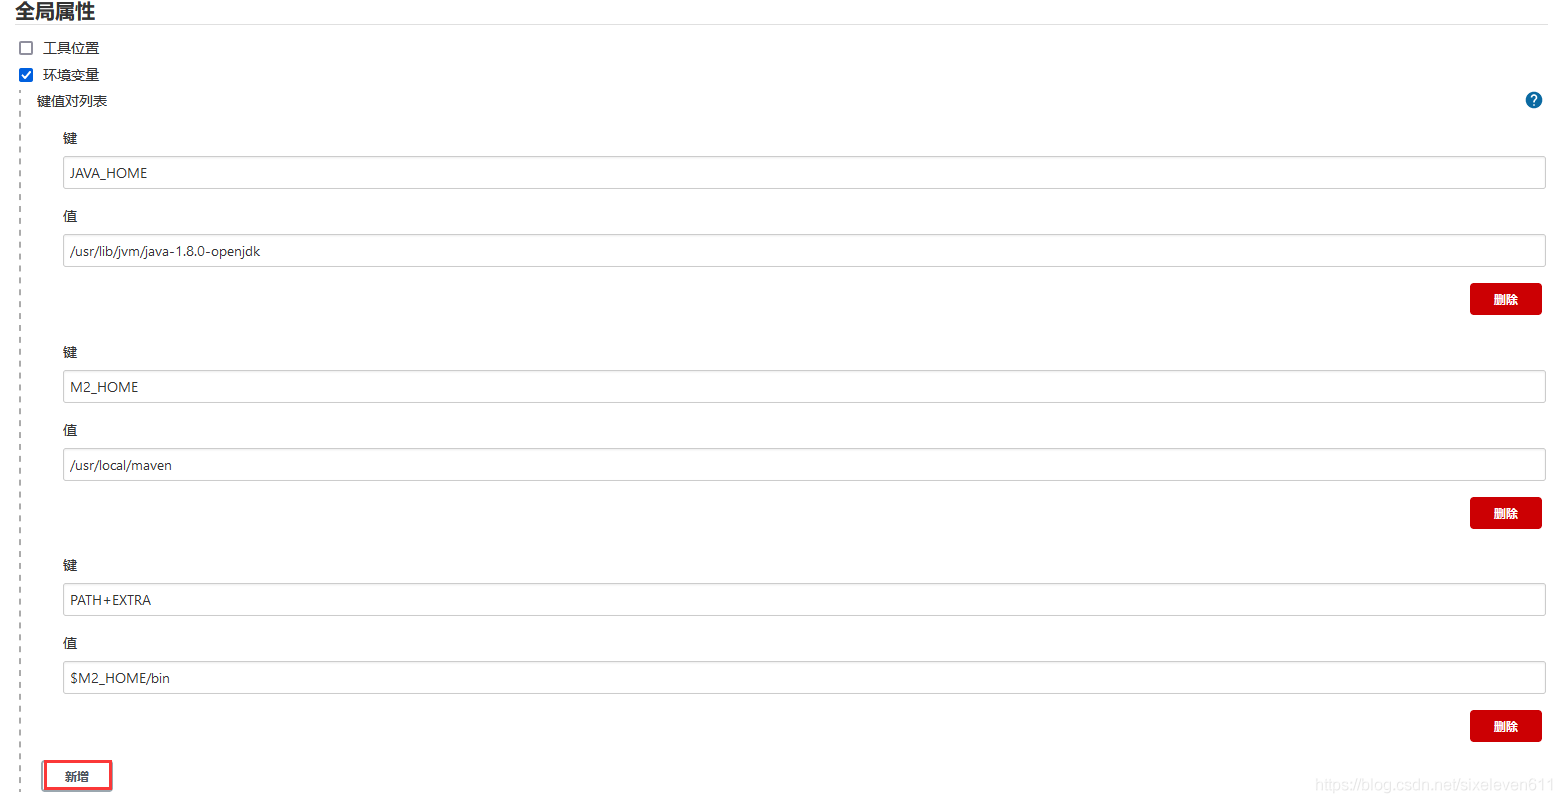
Add Jenkins global variable
- Manage Jenkins -- > configure system -- > global properties, add three global variables
- JAVA_HOME , M2_HOME , PATH+EXTRA
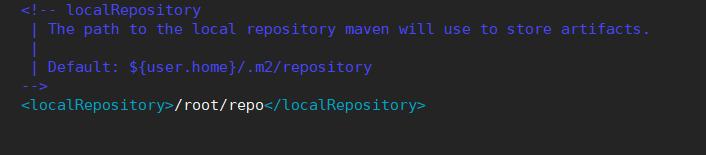
Modify Maven's settings xml
mkdir /root/repo
vim /usr/local/maven/conf/settings.xml
#Local warehouse settings
-->
<localRepository>/root/repo</localRepository>
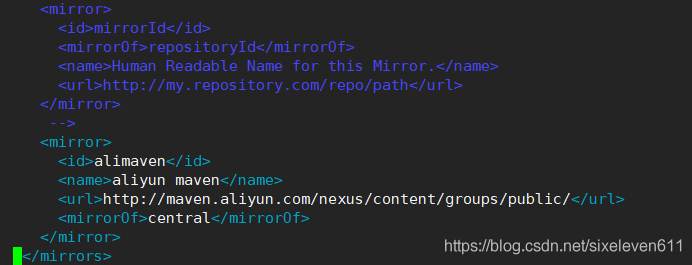
#Add an alicloud private server address. You can add, delete the original address, and then add
<mirror>
<id>alimaven</id>
<name>aliyun maven</name>
<url>http://maven.aliyun.com/nexus/content/groups/public/</url>
<mirrorOf>central</mirrorOf>
</mirror>
</mirrors>
Test whether Maven is successfully configured
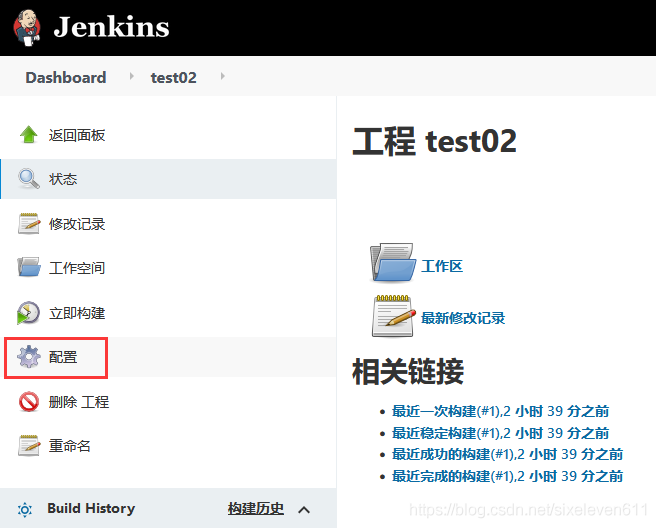
- Use the previous Gitlab password test project to modify the configuration
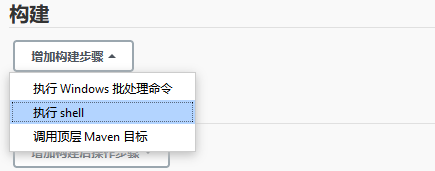
Call the mvn command to empty the bytecode and the built package first
Empty the build elements before packaging
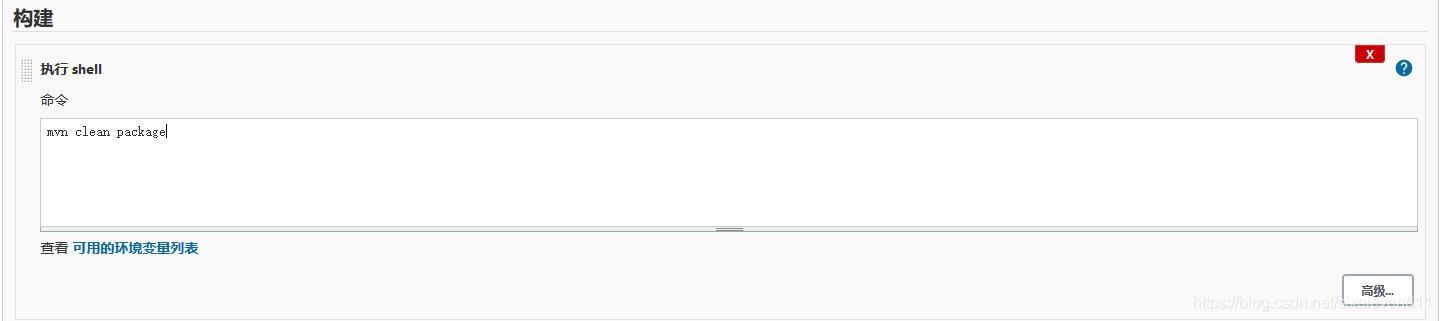
structure
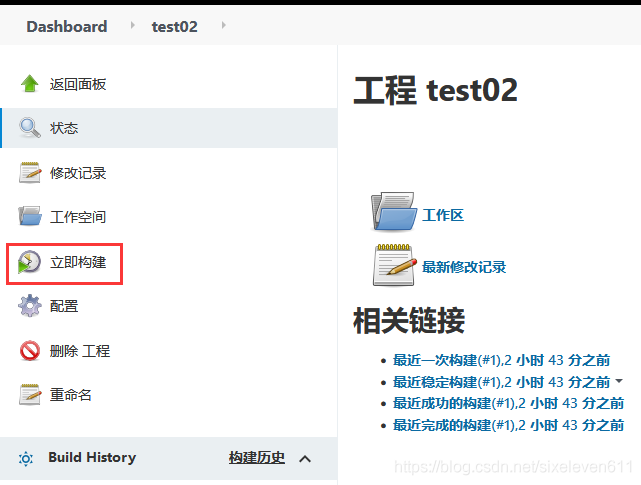
View the input on the console and pull the package using the configured Ali source
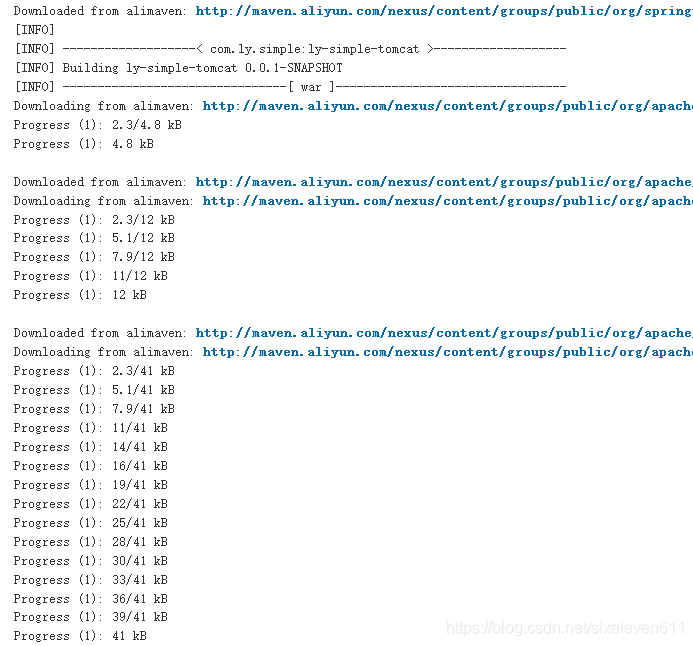
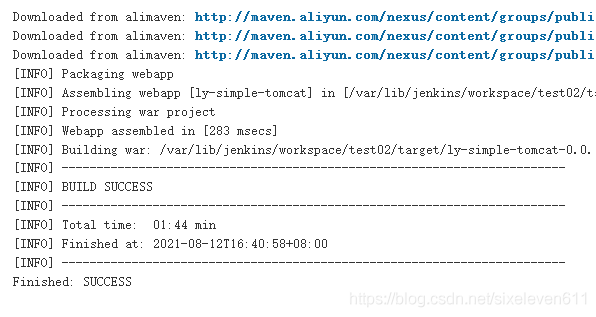
#View the local warehouse file and download the dependencies for building this project
[root@jenkins ~]# cd /root/repo/
[root@jenkins repo]# ls
backport-util-concurrent  classworlds  commons-io  javax  mysql  org      xpp3
ch                        com          io          junit  net    xmlpull

#View project directory
[root@jenkins ~]# cd /var/lib/jenkins/workspace/test02
[root@jenkins test02]# ls
db  ly-simple-tomcat.iml  pom.xml  src  target
[root@jenkins test02]# cd target/
[root@jenkins target]# ls
classes            ly-simple-tomcat-0.0.1-SNAPSHOT      maven-archiver
generated-sources  ly-simple-tomcat-0.0.1-SNAPSHOT.war  maven-status
Tomcat installation and configuration
#Install JDK
yum install -y  java-1.8.0-openjdk*
java -version

#Download Tomcat
wget https://archive.apache.org/dist/tomcat/tomcat-8/v8.5.47/bin/apache-tomcat-8.5.47.tar.gz
tar xf apache-tomcat-8.5.47.tar.gz -C  /usr/local/
mv /usr/local/apache-tomcat-8.5.47/ /usr/local/tomcat

#Start Tomcat
cd /usr/local/tomcat/bin/
./startup.sh

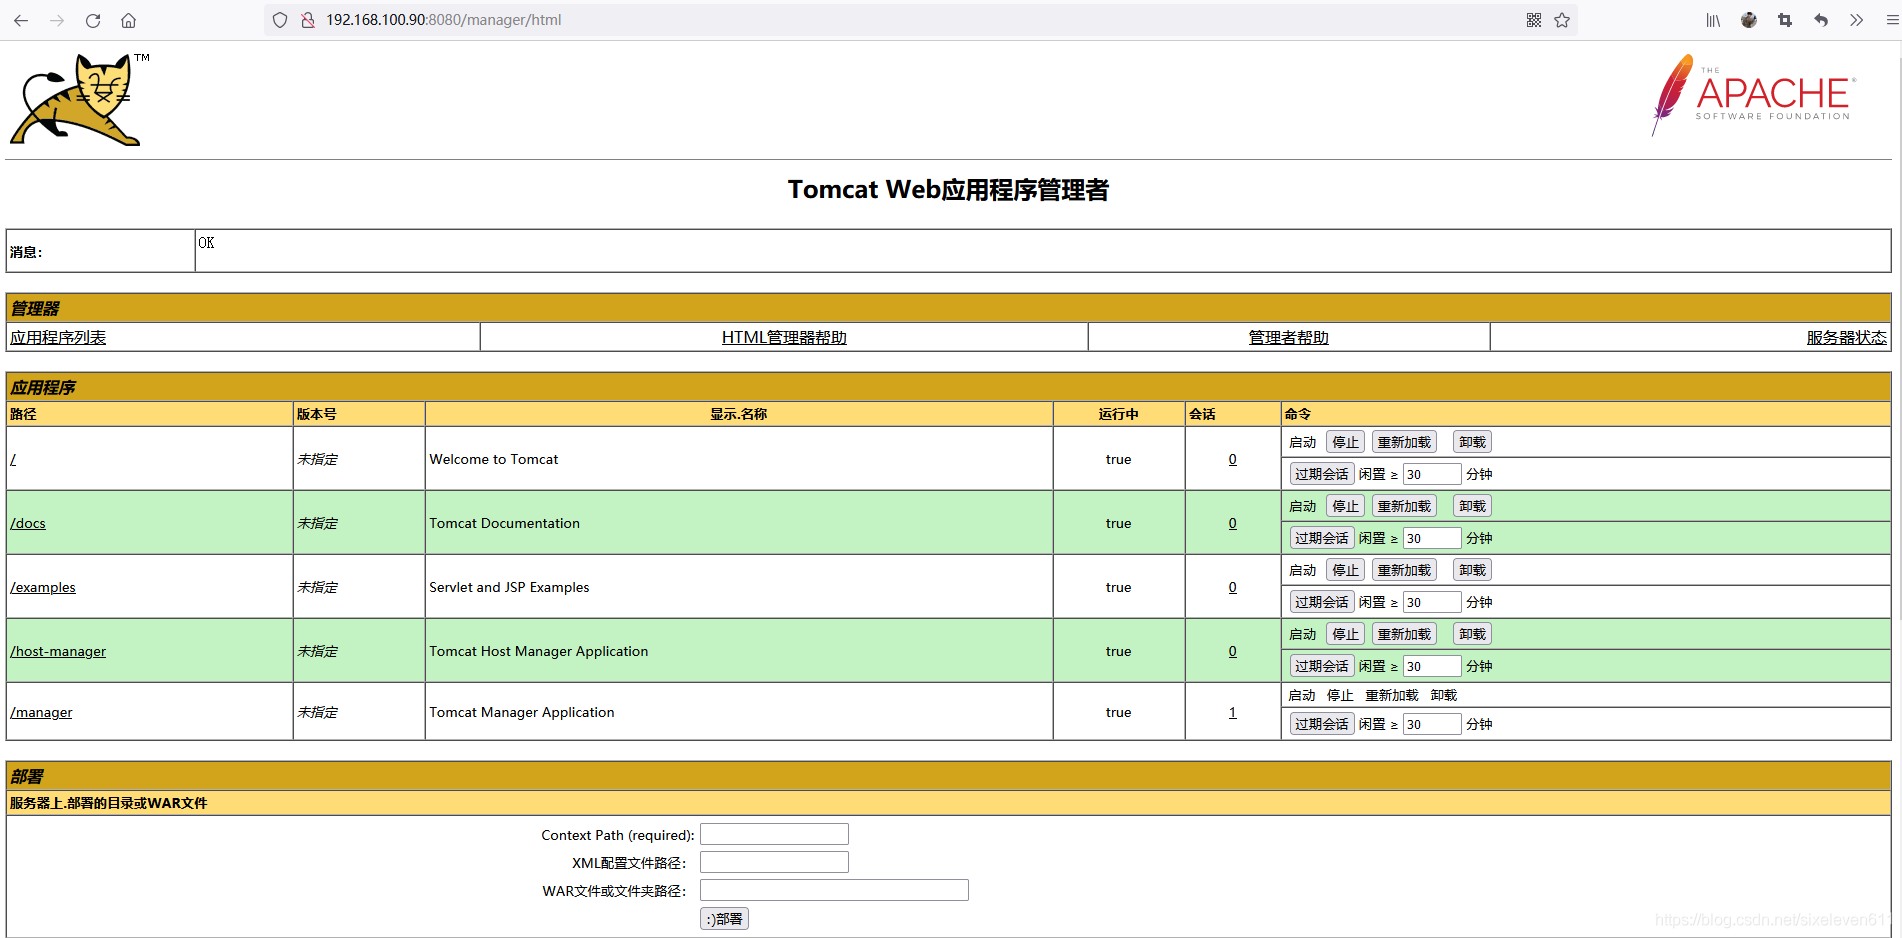
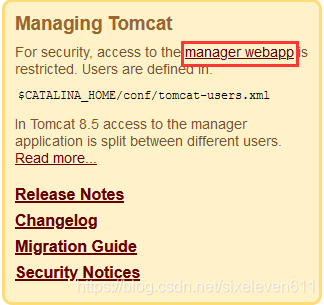
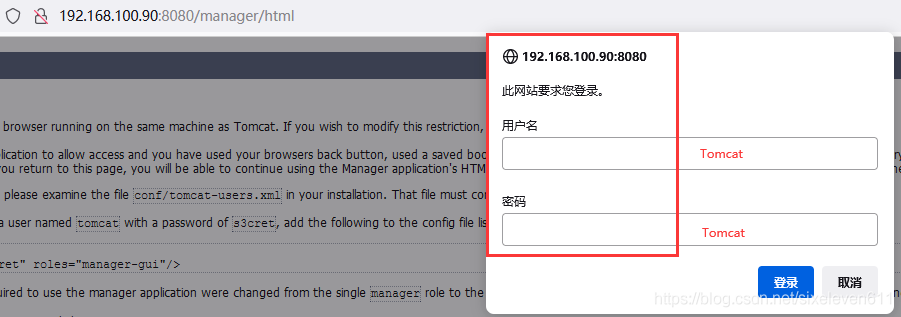
Configure Tomcat user role permissions
- Click Manager webapp under the home page
Insufficient prompt permission
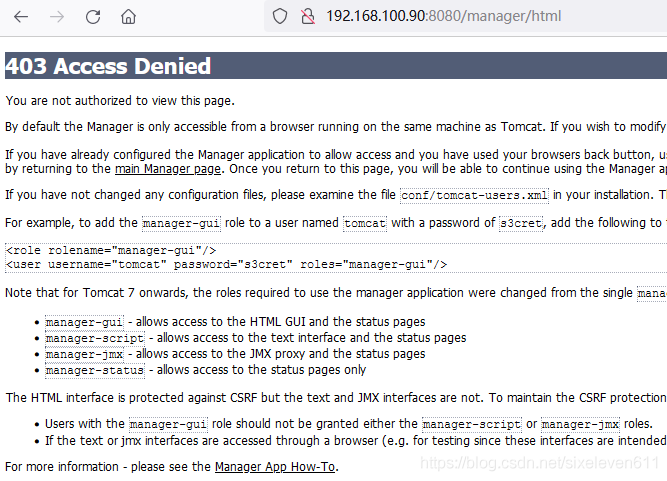
Adding roles for Tomcat
cd /usr/local/tomcat/conf/
vim tomcat-users.xml  #This configuration file holds all tomcat users and roles

  <role rolename="tomcat"/>
  <role rolename="role1"/>
  <role rolename="manager-script"/>
  <role rolename="manager-gui"/>
  <role rolename="manager-status"/>
  <role rolename="admin-gui"/>
  <role rolename="admin-script"/>
  <user username="tomcat" password="tomcat" roles="manager-gui,manager-script,tomcat,admin-gui,admin-script"/>
</tomcat-users>

- The user and password are: Tomcat
- Note: in order to enable the user just configured to log in to Tomcat, the following configuration needs to be modified
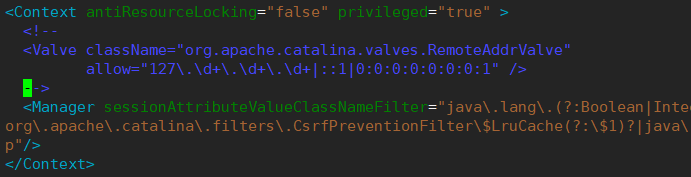
vim /usr/local/tomcat/webapps/manager/META-INF/context.xml

#Open the Tomcat remote access function and annotate the original part of the file
  <!--
  <Valve className="org.apache.catalina.valves.RemoteAddrValve"
         allow="127\.\d+\.\d+\.\d+|::1|0:0:0:0:0:0:0:1" />
  -->
#Restart Tomcat
/usr/local/tomcat/bin/shutdown.sh
/usr/local/tomcat/bin/startup.sh

#A password is required to access Tomcat again
Subsequently, Jenkins manages the Tomcat project through this Tomcat account to realize the remote release of the project