Hi ~ bean skin powder! What are you learning recently? Has it become better? This time, please read the basic configuration and package volume optimization strategy of fluent packaging carefully produced by byte beating "saucxs", so as to increase your cross domain knowledge and take a small step on the road of "full stack" at your front end.
Author: saucxs
Source: Original
preface
Readers, have you ever been happy with the development of the fluent project and it's time to go online, but you're not familiar with the packaging process and encounter large and small problems? Let's see how I package and optimize.
1, Background
In local development, use the fluent run command or Android studio to run or debug. Fluent builds the debug version, that is, the debug flag appears in the upper right corner of local debugging.
After the local debugging is OK, prepare the release version, such as publishing to the application mall or delivering it to the user.
2, Preliminary inspection
1. Check the AndroidManifest configuration
View the androidmanifest. In < app root > / Android / APP / SRC / main / XML file and verify that these attributes are correct, especially:
- Application property, which is the name of the application.
- The uses permission attribute enables the fluent tool to communicate with the app application. It is enabled by default. If it is not enabled, the line of this attribute will be deleted directly.
2. View build configuration
View < app root > / Android / APP / build Gradle, verify that these attributes are correct:
defaultConfig property
- applicationId: always make a unique appid.
- Versioncode & & versionname: app application version number and version number string.
- Minsdkversion & & targetsdkversion: Specifies the lowest API level and the API level applied by the application design.
3. app signature
Create a keystore.
If you have created a keystore before, skip this step and look directly at 4. Introducing a keystore into the application.
Create a keystore and execute the following command:
For more details, please visit https://support.apple.com/kb/HT208050.
yourMacBook-Pro:~ username$ keytool -genkey -v -keystore ~/key.jks -keyalg RSA -keysize 2048 -validity 10000 -alias key
The generated file is key jks
Default file address: / users / < your computer name > / key jks
Note: the key is a private file and should not be added to git.
The following is a detailed implementation process
Last login: Mon Nov  2 14:17:41 on ttys005

The default interactive shell is now zsh.
To update your account to use zsh, please run `chsh -s /bin/zsh`.
For more details, please visit https://support.apple.com/kb/HT208050.
yourMacBook-Pro:~ username$ keytool -genkey -v -keystore ~/key.jks -keyalg RSA -keysize 2048 -validity 10000 -alias key
 Enter the keystore password:
Enter the new password again:
They don't match. Please try again
 Enter the keystore password:
Enter the new password again:
What is your first and last name?
  [Unknown]:  C
 What is the name of your organizational unit?
  [Unknown]:  byte
 What is the name of your organization?
  [Unknown]:  byte
 What is the name of your city or region?
  [Unknown]:  nj
 Your province/city/What is the name of the autonomous region?
  [Unknown]:  nj
 The unit's two letter country/What is the area code?
  [Unknown]:  cn
CN=C, OU=byte, O=byte, L=nj, ST=nj, C=cn Is it correct?
  [no]:  y

Building 2 for,048 position RSA Key pair and self signed certificate (SHA256withRSA) (Valid for 10 years,000 day):
         CN=C, OU=byte, O=byte, L=nj, ST=nj, C=cn
 input <key> Key password for
        (If the password is the same as the keystore password, Press enter):
Enter the new password again:
[Storing/Users/username/key.jks]

Warning:
JKS The keystore uses a private format. Recommended use "keytool -importkeystore -srckeystore /Users/username/key.jks -destkeystore /Users/username/key.jks -deststoretype pkcs12" Migrate to industry standard format PKCS12.
yourMacBook-Pro:~ username$
4. Introducing keystore into the application
Create a new key under < app dir > / Android Properties, which contains a reference to the keystore:
storePassword=<The password you entered>
keyPassword=<The password you entered>
keyAlias=key
storeFile=/Users/<Your computer name>/key.jks
5. Add signature in build configuration
For < app dir > / Android / APP / build Modify the gradle file:
// ...
apply from: "$flutterRoot/packages/flutter_tools/gradle/flutter.gradle"

// New content
def keystorePropertiesFile = rootProject.file("key.properties")
def keystoreProperties = new Properties()
keystoreProperties.load(new FileInputStream(keystorePropertiesFile))


android {
    compileSdkVersion 28

// ...
// ...

    defaultConfig {
        // TODO: Specify your own unique Application ID (https://developer.android.com/studio/build/application-id.html).
        applicationId "com.example.flutter_tester"
        minSdkVersion 18
        targetSdkVersion 28
        versionCode flutterVersionCode.toInteger()
        versionName flutterVersionName
    }

    // The new content is from
    signingConfigs {
        release {
            keyAlias keystoreProperties['keyAlias']
            keyPassword keystoreProperties['keyPassword']
            storeFile file(keystoreProperties['storeFile'])
            storePassword keystoreProperties['storePassword']
        }
    }
    // New content
    buildTypes {
        release {
            // TODO: Add your own signing config for the release build.
            // Signing with the debug keys for now, so `flutter run --release` works.
            signingConfig signingConfigs.release
        }
    }
Now the release version packaged by the application will be signed automatically.
3, Packaging command
Then execute the package command to build the release APK. If you have completed the signing step in the previous section, the APK will be signed.
Use the command line:
cd <app dir> (<app dir> Create a directory for your project).
function flutter build apk (flutter build The default will include --release option).
The packaged release APK is located at < app dir > / build / APP / outputs / APK / APP release apk.
4, Packet volume optimization strategy
After step 3 is completed, the packaging process is over, but in order to pursue the ultimate, we will find that the volume after packaging is a little large.
Next, let's analyze the composition of the APK package. We mainly look at the case of no confusion.
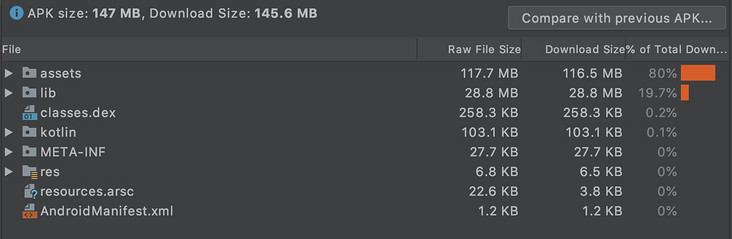
Generally, static resource files occupy a large amount of memory. We find that pictures account for 80% + 0% = 80% in apk
- Fluent reference resources (assets folder) 80%
- Android startup page background and app logo (res folder) 0%
This is mainly because a large number of pictures are used, and the background of the Android startup page and the logo of the app are not set.
(1) Image and code optimization
1. Processing picture resources using external services
Instead of bundling image assets within an application, it is better to host images on external services such as firebase and use package cached_network_image calls these images within the application. When you start the application for the first time, the package will get images from the provided URL and cache them, so you will get a cached image when you use the application later, so these images do not occupy download space because they are not bundled in the application.
2. Compress png and jpg
If some pictures do not want to be obtained from an external host, they must be obtained locally. The pictures used must be compressed png and jpg, because high-quality png and jpg will occupy the size of the application.
3. Use svg format Icon
We try to use vector graph svg instead of png, because svg can be compatible with different dpi devices and can reduce the size of apk.
4. Remove unused packages
In pubspec Libraries or packages that are not needed or used at all in yaml files.
5. Special fonts use http caching
Font is also a reason for program size. When UX needs to use a specific font, we don't need to put the font file, such as * ttf or The otf file is stored in the application and then mapped to pubspec Yaml file, we can get it once through http and cache it in the file system of the application.
6. Using the proguard optimizer
proguard is a java optimizer that does not change the presentation and optimizes the code in a more compact way.
proguard confuses the original name, regardless of the type, field and method name. Replace the long named string with a short string, such as a, b and c, to improve efficiency. However, package and class names can be long, but they do not affect efficiency.
We are at < app dir > / Android / APP / build The build types in gradle are similar to the following:
buildTypes {
        release {
            minifyEnabled true //Add proguard
            proguardFiles getDefaultProguardFile('proguard-android.txt'), 'proguard-rules.pro'   //Add proguard
            signingConfig signingConfigs.release     //This is the default for publishing
        }
    }
In the same directory, create the file Proguard rules Pro and add the following code:
## Flutter wrapper
 -keep class io.flutter.app.** { *; }
 -keep class io.flutter.plugin.** { *; }
 -keep class io.flutter.util.** { *; }
 -keep class io.flutter.view.** { *; }
 -keep class io.flutter.** { *; }
 -keep class io.flutter.plugins.** { *; }
# -keep class com.google.firebase.** { *; } // uncomment this if you are using firebase in the project
 -dontwarn io.flutter.embedding.**
 -ignorewarnings
Finally, we were at gradle Add to the properties file:
extra-gen-snapshot-options=--obfuscate
7. Shrink resources removes useless code
In build In gradle
buildTypes {
        release {
            minifyEnabled true // added previously
            shrinkResources true // add this
            proguardFiles getDefaultProguardFile('proguard-android.txt'), 'proguard-rules.pro' // added previously
            signingConfig signingConfigs.release // added previously
        }
    }
PS: using shrinkrource and proguard optimizer, the volume is reduced by 0.1MB after optimization.
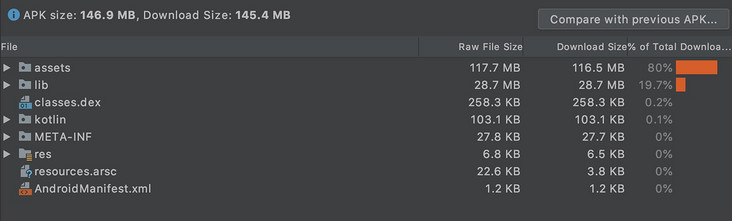
From 147.0MB to 146.9MB, the reduction is too small.
(2) so optimization
For the Apk package played by Flutter, lib ranked second, with 28.7MB, accounting for 19.7%
Convert the Dart code we write into so libraries under different architectures for native calls.
Meaning of different CPU architectures:
- x86_64: Intel 64 bit, generally used for tablet or simulator, supporting x86 and x86_64 CPU architecture devices.
- Arm64-v8a: the 8th generation of 64 bits, including two execution states of AArch32 and AArch64, corresponding to 32 and 64 bits, and supports armeabi, armeabi-v7a and arm64-v8a.
- Armeabi-v7a: the 7th generation arm v7 uses hardware floating-point operation and has advanced expansion function. It is compatible with armeabi and armeabi-v7a. At present, most mobile phones are based on this architecture.
We use the following different commands to package and build the APK package of the specified CPU architecture,
flutter build apk --target-platform android-arm,android-arm64,android-x64 --split-per-abi
Let's explain this:
- Fluent build APK indicates that the release package is currently built.
- After that, android-arm, android-arm64 and android-x64 represent the release package of the developed architecture.
- Finally -- split per ABI means that it is packaged according to different architectures. If it is removed, it will contain apk packages of all CPU architectures.
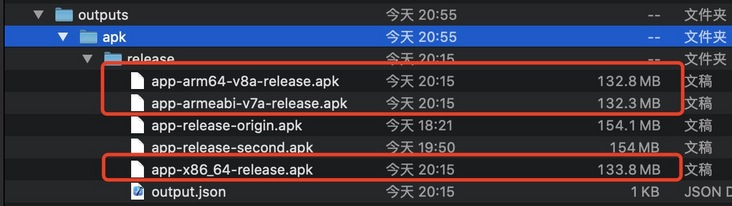
Look at app-armeabi-v7a-release The APK packet size is 126.2MB. Cool, it is directly reduced from 146.9 MB to 126.2 MB.
Let's look at the corresponding apk content:
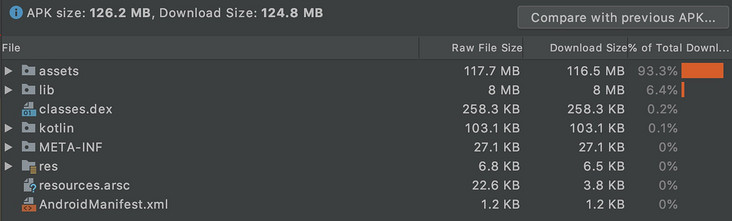
The proportion of lib also decreased from 19.7% and 28.7 MB to 6.4% and 8 MB.
(3) Confusion optimization
Flutter also provides us with confusion commands:
flutter build apk --obfuscate --split-debug-info=/<project-name>/<directory>
Briefly explain:
- --obfuscate: turn on the confusion switch.
- --Split debug info: the generated map symbol table is cached in this location.
Let's test the size of the complete apk.
implement
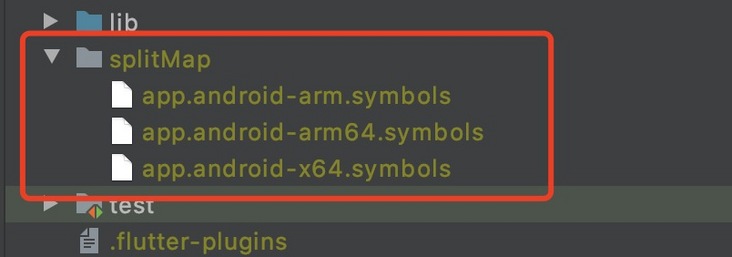
flutter build apk --obfuscate --split-debug-info=splitMap
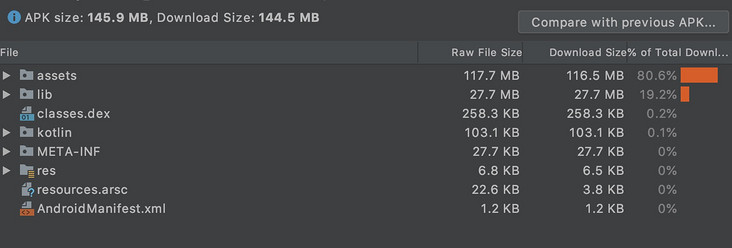
The size decreased from 146.9MB to 145.9MB, a decrease of 1MB.
Symbol files are generated in the project root directory:
Let's try again, directly generate the corresponding Apk for different CPU s and add the confusion results.
flutter build apk --obfuscate --split-debug-info=/<project-name>/<directory> --target-platform android-arm,android-arm64,android-x64 --split-per-abi
We execute:
flutter build apk --obfuscate --split-debug-info=splitMap --target-platform android-arm,android-arm64,android-x64 --split-per-abi
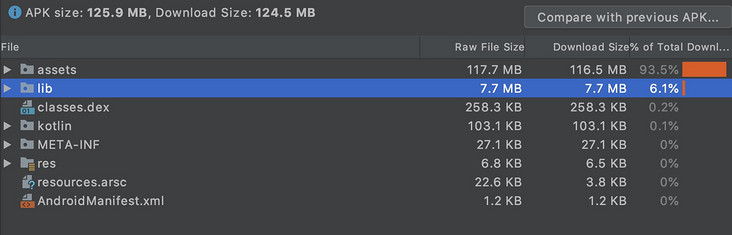
The v7a size of non aliasing is reduced from 126.2MB to 125.9MB compared with that of enabling aliasing. Open obfuscation reduced by 0.3 MB.
I don't think it's much different.
5, Summary
Once the packaged basic configuration is completed, there is basically no need to change it. After the optimized configuration is completed, an optimized packaging command is required.
I think this is a useful packing command:
flutter build apk --obfuscate --split-debug-info=splitMap --target-platform android-arm,android-arm64,android-x64 --split-per-abi
- Different CPU structures are packaged separately
- To confuse, the produced string Map is in the splitMap folder
The End