There's not much nonsense about how popular flutter is. Almost all app s from major manufacturers are in use. Let's start
preface
Fluent can be divided into three layers. The first layer is our dart code, including UI components, animation, Gesture, etc., that is, every time we create a dart file, we need to import the classes in the package:

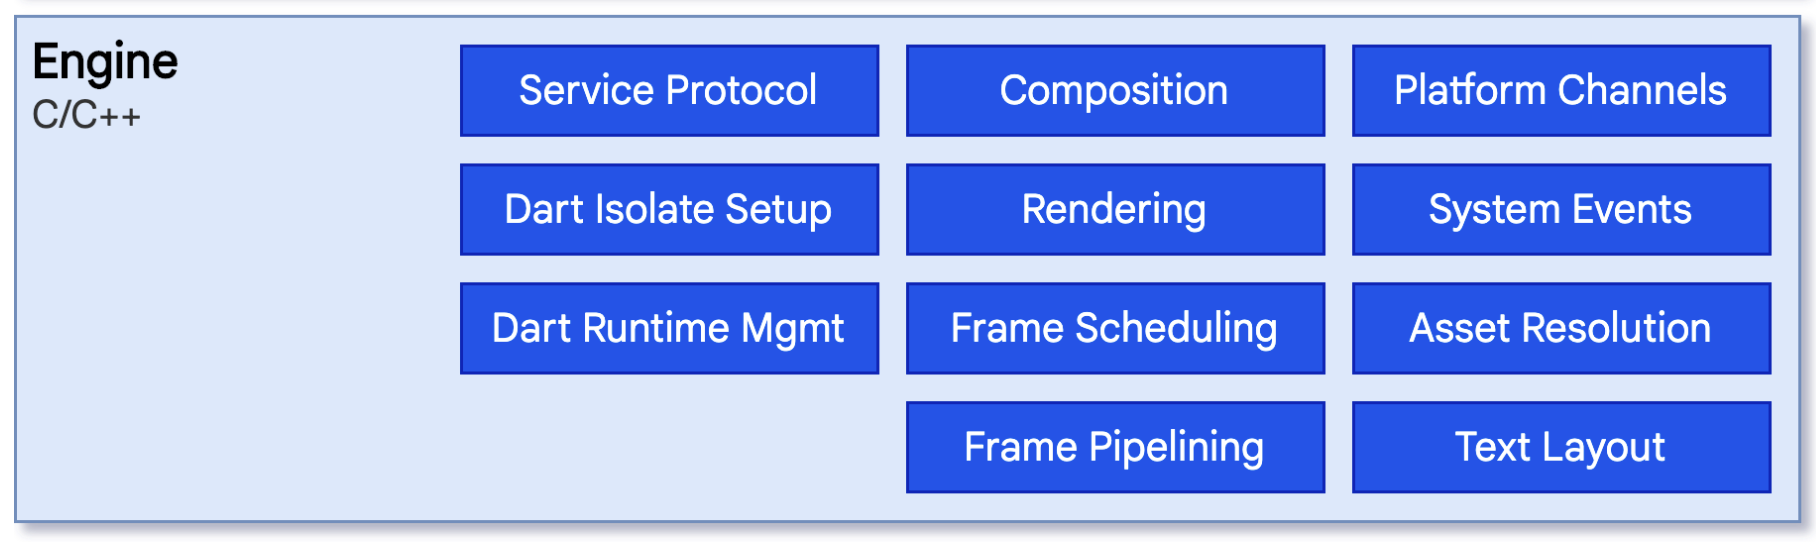
The engine layer has a separate repository on github flutter/engine , which is responsible for the bottom rendering of the page and the call of native api, including the management and scheduling of cpu and gpu.
In the platform related implementation layer, fluent will implement the corresponding platform (iOS, Android, Windows, Linux) for the interface agreed with the rendering engine layer. The implementation differences related to RunLoop, Thread and Surface rendering of common different platforms will be reflected in this layer.

It is worth noting that the flitter also uses some third_party, such as Skia for page rendering, is a set of cross platform graphics library of Google. The reason why flutter is called self drawing rendering engine is that Skia ensures the strong unity of rendering on different platforms
Ask a question: which layer do the Java classes fluteractivity belong to? Is it framework, engine or platform? Please give your answers in the comments section~
Here, android has been taken as an example, and iOS is similarly versatile. Fluent can be divided into two cases: one is a pure fluent project new fluent project, and the other is integrated into an existing project in the form of module
- Pure fluent project: fluent create will be called before compilation Under the project, init an android directory, which contains Manifest and build Gradle and mainActivity (inherited from fluteractivity) are all android projects, so when the packaged app runs, the entry class will be mainActivity under / android directory
- If it has been inherited in the form of module, we need to customize an Activity and let it inherit from the fluteractivity as the entry of the flutter, formulate an engine in this path, and the page loaded by the engine will be set to the Activity through setContent
Platform layer
Whether it is a pure fluent app or inherited in the form of module, we show that the activities of the fluent page inherit from the fluteractivity, so when the Activity is started, it will be transferred to the onCreate method in the fluteractivity. Let's see what's done here
  @Override
  protected void onCreate(@Nullable Bundle savedInstanceState) {
    switchLaunchThemeForNormalTheme();

    super.onCreate(savedInstanceState);

    lifecycle.handleLifecycleEvent(Lifecycle.Event.ON_CREATE);

    delegate = new FlutterActivityAndFragmentDelegate(this);
    delegate.onAttach(this);
    delegate.onActivityCreated(savedInstanceState);

    configureWindowForTransparency();
    setContentView(createFlutterView());
    configureStatusBarForFullscreenFlutterExperience();
  }
Let's analyze them one by one:
- FlutterActivity inherits the Activity and implements the Host interface in the FlutterActivityAndFragmentDelegate proxy class and the LifecycleOwner interface to obtain the life cycle, so that the life cycle can be monitored
- Configurewindowfotransparency: if the background mode of FlutterActivity is transparent (opaque mode by default), set the transparency of the whole FlutterActivity window and hide the status bar. In fact, if we do not use FlutterModule for mixed development in the native project, we do not need to pay attention to this method, because the default is non transparent mode.
- super.onCreate: call the onCreate method of the parent Activity to configure the Activity by default
- FlutterActivityAndFragmentDelegate: flutter encapsulates the same functions of FlutterActivity and FlutterFragment in this class, that is, this class contains the main functions of flutter operation
- onAttach: initialization entry for the shuttle system and engine
- onActivityCreated: start executing dart code to bind the engine to activity/fragment
- Configure window for transparency: if transparent is configured in the manifest, set the background to transparent
- createFlutterView: create a flutterview (flutterview will hold a flutterSurfaceView or flutterTextureView)
- setContentView: set the fleetview to the view of the current activity
- Configurestatusbarforfullscreenfluent experience: set the status bar to full screen mode
onAttach
onAttach mainly performs various initialization operations. The code logic is as follows
  void onAttach(@NonNull Context context) {
    ensureAlive();
    if (flutterEngine == null) {
      setupFlutterEngine();
    }
    platformPlugin = host.providePlatformPlugin(host.getActivity(), flutterEngine);

    if (host.shouldAttachEngineToActivity()) {
      flutterEngine
          .getActivityControlSurface()
          .attachToActivity(host.getActivity(), host.getLifecycle());
    }

    host.configureFlutterEngine(flutterEngine);
}- Ensuealive: judge whether the current activity/fragment has been released. The references of activities and fragments are passed in when delegate is instantiated
- setupFlutterEngine: initialize the flutter engine. First get it from memory. If not, get it from host (if FlutterActivity returns null. If FlutterFragment, try to get it through getActivity). If not, create a new one
- Platform plugin: it encapsulates many android methods, such as issuing prompt tone, exiting the current page, obtaining clipboard content, etc
- attachToActivity: register the Activity on the FlutterEnginePluginRegistry, which is also called the plug-in registry. Many libraries in our dependencies reuse native methods. While the main logic is implemented with dart, some logic is implemented in native android/iOS. Therefore, it is necessary to write a flutterPlugin and register it with method chennel. This class is equivalent to unified management of these plug-ins, The attachToActivity method notifies all plug-ins currently connected to the FlutterEngine to attach them to the Activity
- configureFlutterEngine: by rewriting this method in fluteractivity / fragment, you can do more operations on the engine. For example, fluteractivity will register this fluterrngine with pubspec In the plugins list of yaml
createFlutterView
The function of flutterview is to display a Flutter UI on android devices, and the drawing content is provided by FlutterEngine. There are four kinds of flutterviews in android. The first is the FlutterSurfaceView or FlutterTextureView used to display our app objects, but in addition to these two, there are FlutterSplashView and FlutterImageView
- The main function of flutersplashview is to display a splash screen (essentially Drawable) transition diagram (which can be understood as an open screen image) before the rendering of fluterview render.
- When creating a FlutterView, it depends on a FlutterTextureView or FlutterSurfaceView. The essence of its judgment condition is to see whether the window form background of FlutterActivity is transparent (FlutterFragment is determined by the flutterview_render_mode parameter of Arguments). Opacity is the surface and transparency is the texture.
  @NonNull
  View onCreateView(
	...
    if (host.getRenderMode() == RenderMode.surface) {
      ...
      flutterView = new FlutterView(host.getActivity(), flutterSurfaceView);
    } else {
      ...
      flutterView = new FlutterView(host.getActivity(), flutterTextureView);
    }

    flutterView.addOnFirstFrameRenderedListener(flutterUiDisplayListener);

    flutterSplashView = new FlutterSplashView(host.getContext());
    ...
    flutterView.attachToFlutterEngine(flutterEngine);

    return flutterSplashView;
}- attachToFlutterEngine: this method provides the Surface of the FlutterSurfaceView to the specified FlutterRender, which is used to draw the Flutter UI to the current FlutterSurfaceView
FlutterEngine
FlutterEngine is a stand-alone container for Flutter running environment, through which dart code can be run in Android applications. Dart code in the FlutterEngine can be executed in the background, or the dart side UI effect can be rendered to the screen using the attached FlutterRenderer and dart code. Rendering can start and stop, allowing the FlutterEngine to transfer from UI interaction to data processing only, and then return to UI interaction.
public FlutterEngine(
    @NonNull Context context,
    @NonNull FlutterLoader flutterLoader,
    @NonNull FlutterJNI flutterJNI,
    @NonNull PlatformViewsController platformViewsController,
    @Nullable String[] dartVmArgs,
    boolean automaticallyRegisterPlugins) {
  this.flutterJNI = flutterJNI;
  flutterLoader.startInitialization(context.getApplicationContext());
  ...
  attachToJni();
  this.dartExecutor = new DartExecutor(flutterJNI, context.getAssets());
  this.dartExecutor.onAttachedToJNI();
  this.renderer = new FlutterRenderer(flutterJNI);
  ...
  xxxChannel = new XxxChannel(...); // Create various message channels to deliver events and messages
  ...
}- FlutterJNI: the JNI interfaces of the engine layer are registered and bound here. Through it, you can call the c/c + + code of the engine layer
- DartExecutor: used to execute Dart code (it can be executed by calling the executeDartEntrypoint(DartExecutor.DartEntrypoint) of DartExecutor, and a FlutterEngine can be executed once)
- FlutterRenderer: the last RenderSurface of the FlutterRenderer instance attach, that is, the FlutterView
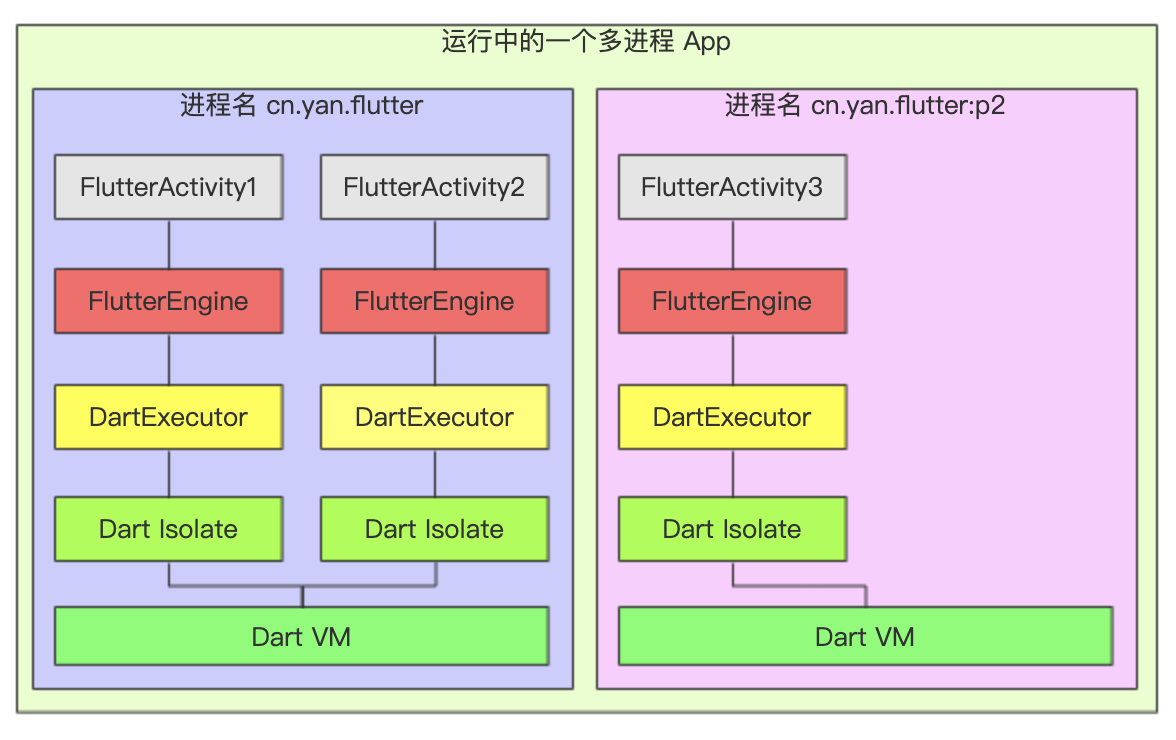
Here, the relationship between FlutterEngine and DartExecutor, Dart VM and Isolate can be summarized as follows:
- A Native process has only one DartVM.
- A dartvm (or a Native process) can have multiple flutterengines.
- Multiple flutterengines run in their respective isolates, and their memory data are not shared. They need to communicate through the port (top-level function) set in advance by isolates.
- FlutterEngine can run code in the background without rendering UI; You can also render the UI through FlutterRender.
- When the first FlutterEngine is initialized, DartVM will be created, and no other DartVM environment will be created later.
- FlutterEngine can manage the cache through FlutterEngineCache. It is recommended to use the FlutterEngine of Ali Xianyu_ Boost to manage native & fluent page mixed projects.
- We can manually change the entry function of the flutter project and the flutter_ Parameters such as assets, resource path, and initial Route of the shuttle project. The API s involved are FlutterLoader
- DartExecutor, fluterjni, Host, and so on. In a brief description, BinaryMessager is used to transmit data. After modifying the entry function and initializing the Route parameter, the execution code of DartExecutor is called
FlutterJNI
The function of FlutterJNI is to build an interface bridge between Android Java and Flutter Engine C/C + +. In order to facilitate the management of JNI interfaces, all JNI interfaces are encapsulated in FlutterJNI for easy use Most of the calls in fluterjni are related to a specific "platform view", and the number of "platform views" may be large. Therefore, after the attachToNative method is executed, each FlutterJNI instance holds a local "platform view" ID, which is shared with the bendingC/C + + engine code. This ID will be passed to all local methods of the specific platform view.
public class FlutterJNI {
  ...
  public FlutterJNI() {
    // We cache the main looper so that we can ensure calls are made on the main thread
    // without consistently paying the synchronization cost of getMainLooper().
    mainLooper = Looper.getMainLooper();
  }
  ...
  @UiThread
  public void attachToNative(boolean isBackgroundView) {
    ensureRunningOnMainThread();
    ensureNotAttachedToNative();
    nativePlatformViewId = nativeAttach(this, isBackgroundView);
  }

  private native long nativeAttach(@NonNull FlutterJNI flutterJNI, boolean isBackgroundView);
  ...
}
The platform layer will also implement the corresponding fluent for android/ios_ JNI class, for example, Android is platform_view_android_jni.cc, which registered the implementation of the c/c++ layer in FlutterJNI.
bool RegisterApi(JNIEnv* env) {
  static const JNINativeMethod flutter_jni_methods[] = {
      {
          .name = "nativeAttach",
          .signature = "(Lio/flutter/embedding/engine/FlutterJNI;Z)J",
          .fnPtr = reinterpret_cast<void*>(&AttachJNI),
      },
      ...
  };
  if (env->RegisterNatives(g_flutter_jni_class->obj(), flutter_jni_methods,
                           fml::size(flutter_jni_methods)) != 0) {
    FML_LOG(ERROR) << "Failed to RegisterNatives with FlutterJNI";
    return false;
  }
  ...
}

static jlong AttachJNI(JNIEnv* env,
                       jclass clazz,
                       jobject flutterJNI,
                       jboolean is_background_view) {
  fml::jni::JavaObjectWeakGlobalRef java_object(env, flutterJNI);
  auto shell_holder = std::make_unique<AndroidShellHolder>( // [6]
      FlutterMain::Get().GetSettings(), java_object, is_background_view);
  if (shell_holder->IsValid()) {
    return reinterpret_cast<jlong>(shell_holder.release());
  } else {
    return 0;
  }
}- AndroidShellHolder: This is the shell holding class of C/C + +. The Flutter engine adopts the core technology, Skia, a 2D graphics rendering library, Dart, an object-oriented language VM for garbage collection, and hosts them in a shell. Different platforms have different shells
FlutterJNIAndroidShellHolder
In the AndroidShellHolder, you can save the Flutter setting parameters, the Java reference of FlutterJNI, the PlatformViewAndroid object (which will be created later), the Shell object, and so on.
AndroidShellHolder::AndroidShellHolder(
    flutter::Settings settings,
    fml::jni::JavaObjectWeakGlobalRef java_object,
    bool is_background_view)
    : settings_(std::move(settings)), java_object_(java_object) {
  ...
  // Create three threads: UI thread, GPU thread and IO thread
  thread_host_ = {thread_label, ThreadHost::Type::UI | ThreadHost::Type::GPU |
                                    ThreadHost::Type::IO};
  ...
  fml::WeakPtr<PlatformViewAndroid> weak_platform_view;
  Shell::CreateCallback<PlatformView> on_create_platform_view =
      [is_background_view, java_object, &weak_platform_view](Shell& shell) {
        std::unique_ptr<PlatformViewAndroid> platform_view_android;
        ...
        platform_view_android = std::make_unique<PlatformViewAndroid>( // [7]
            shell,                   // delegate
            shell.GetTaskRunners(),  // task runners
            java_object,             // java object handle for JNI interop
            shell.GetSettings()
                .enable_software_rendering  // use software rendering
        );
        weak_platform_view = platform_view_android->GetWeakPtr();
        return platform_view_android;
      };
  ...
  // [8]
  shell_ =
      Shell::Create(task_runners,             // task runners
                    GetDefaultWindowData(),   // window data
                    settings_,                // settings
                    on_create_platform_view,  // platform view create callback
                    on_create_rasterizer      // rasterizer create callback
      );
  platform_view_ = weak_platform_view;
  ...
}- PlatformViewAndroid: it is responsible for creating and managing the platform side. Event processing is executed in the UI thread
- Shell: load third-party libraries and create Java virtual machines
Shell layer initialization
Shell is the "central nervous system" of fluent application, which contains multiple components and inherits their corresponding Delegate class.
std::unique_ptr<Shell> Shell::Create(
    TaskRunners task_runners,
    const WindowData window_data,
    Settings settings,
    Shell::CreateCallback<PlatformView> on_create_platform_view,
    Shell::CreateCallback<Rasterizer> on_create_rasterizer) {
  ...
  auto vm = DartVMRef::Create(settings); // Create Dart virtual machine
  auto vm_data = vm->GetVMData();
  return Shell::Create(std::move(task_runners),        //
                       std::move(window_data),         //
                       std::move(settings),            //
                       vm_data->GetIsolateSnapshot(),  // isolate snapshot
                       on_create_platform_view,        //
                       on_create_rasterizer,           //
                       std::move(vm)                   //
  );
}
After the Shell is created in the platform thread, Rasterizer is created in the rasterization thread, PlatformView is created in the platform thread, ShellIOManager is created in the IO thread, Engine is created in the UI thread, and these four are set in the Shell. The Shell inherits the Delegate of the four, and the four pass events to the Shell through the corresponding Delegate.
- Rasterizer: Rasterization of graphics
- PlatformView: a widget officially provided by fluent that can be embedded in the Native View of Android and iOS platforms. Using viewId search, the bottom layer is the fluent engine for rendering and rendering. It is mainly applicable to widgets that are not easy to implement in fluent (View that is mature and advantageous in Native), such as WebView, video player, map, etc.
- ShellIOManager: OpenGL Context (a cross language and cross platform application programming interface (API) for rendering 2D and 3D vector graphics. This interface consists of nearly 350 different function calls to draw from simple graphics bits to complex three-dimensional scenes.)
PlatformView
- In order to directly reference some existing native controls to the fluent app, the fluent team provides two widget s, AndroidView and UIKitView, to meet the requirements
- platform view is the general name of AndroidView and UIKitView. It allows the native view to be embedded into the shuttle widget system to complete the control of the native view by Datr code
void PlatformViewAndroid::NotifyCreated(
    fml::RefPtr<AndroidNativeWindow> native_window) {
  if (android_surface_) {
    InstallFirstFrameCallback();
    ...
    fml::TaskRunner::RunNowOrPostTask(
        task_runners_.GetRasterTaskRunner(),
        [&latch, surface = android_surface_.get(),
         native_window = std::move(native_window)]() {
          surface->SetNativeWindow(native_window);
          ...
        });
    ...
  }

  PlatformView::NotifyCreated();
}


void PlatformView::NotifyCreated() {
  std::unique_ptr<Surface> surface;
  auto* platform_view = this;
  ...
  fml::TaskRunner::RunNowOrPostTask(
      task_runners_.GetRasterTaskRunner(), [platform_view, &surface, &latch]() {
        surface = platform_view->CreateRenderingSurface();
        ...
      });
  ...
  delegate_.OnPlatformViewCreated(std::move(surface));
}- PlatformViewAndroid performs View drawing and event processing on JNI layer, registers SurfaceView to fluent eingine, provides canvas for engine drawing, and calls ANative_window class to connect the FlutterUI and Android UI
- The main function is to use native_ Set the window to the surface, and then notify the surface to the delegate (i.e. Shell). That is, PlatformView mainly plays the role of communicating the surface and Shell
Rasterizer
We know that the main work of the GPU thread is to rasterize the layer tree and then send it to the GPU. The core method is ScopedFrame::Raster(), which involves Rasterizer Rasterizer holds a currently active painted Surface displayed on the screen. Rasterizer draws layer tree s submitted from the Engine on this Surface
Rasterizer::Rasterizer(Delegate& delegate, TaskRunners task_runners)
    : Rasterizer(delegate,
                 std::move(task_runners),
                 std::make_unique<flutter::CompositorContext>(
                     delegate.GetFrameBudget())) {}
...
void Rasterizer::Draw(
    fml::RefPtr<flutter::Pipeline<flow::LayerTree>> pipeline) {
  TRACE_EVENT0("flutter", "GPURasterizer::Draw");

  flutter::Pipeline<flow::LayerTree>::Consumer consumer =
      std::bind(&Rasterizer::DoDraw, this, std::placeholders::_1);

  //The task of consuming pipeline [see Section 2.3]
  switch (pipeline->Consume(consumer)) {
    case flutter::PipelineConsumeResult::MoreAvailable: {
      task_runners_.GetGPUTaskRunner()->PostTask(
          [weak_this = weak_factory_.GetWeakPtr(), pipeline]() {
            if (weak_this) {
              weak_this->Draw(pipeline);
            }
          });
      break;
    }
    default:
      break;
  }
}- If the return value is PipelineConsumeResult::MoreAvailable after consumption() is executed, it indicates that there are still tasks to be processed, and then execute the Draw() process of different layertrees again
ShellIOManager
ShellIOManager, GrContext and skianunrequeue are all created in the io thread
class ShellIOManager final : public IOManager {
  ...
  void NotifyResourceContextAvailable(sk_sp<GrContext> resource_context);
  void UpdateResourceContext(sk_sp<GrContext> resource_context);
  ...
  fml::WeakPtr<GrContext> GetResourceContext() const override;
  fml::RefPtr<flutter::SkiaUnrefQueue> GetSkiaUnrefQueue() const override;
}- shellIOManager inherits from the IOManager class. IOManager is an interface class that manages methods to get GrContext resources and Skia queues. Both of them are related to graphics rendering, which will be analyzed in subsequent articles
- NotifyResourceContextAvailable and UpdateResourceContext methods are methods that notify GrContext of creation and acquisition
flutter start!
After initialization, everything is ready. We only owe Dongfeng gate. Let's see how the shuttle starts!
FlutterActivity
When we create a flitter_ App, a kotlin class will be generated here (it is already Java. It seems that Google is very tough on pushing kt)
class MainActivity: FlutterActivity() {
}
It is not implemented by default, so it will be directly transferred to fluteractivity. Our startup process mainly starts in onStart
@Override
protected void onStart() {
  super.onStart();
  lifecycle.handleLifecycleEvent(Lifecycle.Event.ON_START);
  delegate.onStart();
}
As you can see, the lifecycle is first set to on through lifecycle_ Start, and then the onStart method of fluteractivityandfragmentdelegate is called
FlutterActivityAndFragmentDelegate
There are two main methods here. Ensuealive has talked about it before. Here we mainly look at doInitialFlutterViewRun
void onStart() {
  ensureAlive();
  doInitialFlutterViewRun();
}
...
private void doInitialFlutterViewRun() {
  ...
  if (flutterEngine.getDartExecutor().isExecutingDart()) {
    // No warning is logged because this situation will happen on every config
    // change if the developer does not choose to retain the Fragment instance.
    // So this is expected behavior in many cases.
    return;
  }
  ...
  // Configure the Dart entrypoint and execute it.
  DartExecutor.DartEntrypoint entrypoint =
      new DartExecutor.DartEntrypoint(
          host.getAppBundlePath(), host.getDartEntrypointFunctionName());
  flutterEngine.getDartExecutor().executeDartEntrypoint(entrypoint); // [9]
}
Because reload is not supported in fluterview, or restart dart. Therefore, it is necessary to determine whether to reprint and execute dart code at present
- Then get the package path and dart entry method through the fluteractivity, create the DartEntrypoint, and then execute the dart code through the DartEntrypoint
- The executeDartEntrypoint method of the Executor is then called through the flutterEngine
DartExecutor
As we mentioned earlier, DartExecutor is created when FlutterEngine is created, and it is created in DartExecutor In the onattachedtojni method, set the DartMessager to the FlutterJNI. Here we focus on the executeDartEntrypoint method
public void executeDartEntrypoint(@NonNull DartEntrypoint dartEntrypoint) {
  ...
  flutterJNI.runBundleAndSnapshotFromLibrary(
      dartEntrypoint.pathToBundle, dartEntrypoint.dartEntrypointFunctionName, null, assetManager);
  ...
}- We found that DartExecutor continued to call the runBundleAndSnapshotFromLibrary method of FlutterJNI
FlutterJNI
Let's look at the runBundleAndSnapshotFromLibrary method
  @UiThread
  public void runBundleAndSnapshotFromLibrary( @NonNull String bundlePath, @Nullable String entrypointFunctionName, @Nullable String  @NonNull AssetManager assetManager) {
    ensureRunningOnMainThread();
    ensureAttachedToNative();
    nativeRunBundleAndSnapshotFromLibrary(
        nativeShellHolderId,
        bundlePath,
        entrypointFunctionName,
        pathToEntrypointFunction,
        assetManager);
}- nativeRunBundleAndSnapshotFromLibrary this is a native method
  private native void nativeRunBundleAndSnapshotFromLibrary(
      long nativeShellHolderId,
      @NonNull String bundlePath,
      @Nullable String entrypointFunctionName,
      @Nullable String pathToEntrypointFunction,
@NonNull AssetManager manager);- Here, the Launch method of AndroidShellHolder (cpp class) will be called through jni
AndroidShellHolder
The Launch method will configure some columns, and finally call the RunEngine method of the Shell
void AndroidShellHolder::Launch(std::shared_ptr<AssetManager> asset_manager,
                                const std::string& entrypoint,
                                const std::string& libraryUrl) {
  ...
  shell_->RunEngine(std::move(config.value()));
}
This leads to the core Shell layer
Shell
It is worth noting that we have seen earlier. As mentioned earlier, the Engine is created and run in the UI thread. Therefore, the Dart code executed by the Engine here needs to be executed in the UI thread. Let's first look at what the RunEngine method does:
void Shell::RunEngine(
    RunConfiguration run_configuration,
    const std::function<void(Engine::RunStatus)>& result_callback) {
    ...
  fml::TaskRunner::RunNowOrPostTask(
      task_runners_.GetUITaskRunner(), // [10]
      fml::MakeCopyable(
          [run_configuration = std::move(run_configuration),
           weak_engine = weak_engine_, result]() mutable {
            ...
            auto run_result = weak_engine->Run(std::move(run_configuration));
            ...
            result(run_result);
          }));
}- Here you will enter the Run method of Engine again
Engine
Let's look at what is done in the Run method:
// ./shell/common/engine.cc
Engine::RunStatus Engine::Run(RunConfiguration configuration) {
  ...
  last_entry_point_ = configuration.GetEntrypoint();
  last_entry_point_library_ = configuration.GetEntrypointLibrary();
  auto isolate_launch_status =
      PrepareAndLaunchIsolate(std::move(configuration)); // [11]
  ...
  std::shared_ptr<DartIsolate> isolate =
      runtime_controller_->GetRootIsolate().lock();

  bool isolate_running =
      isolate && isolate->GetPhase() == DartIsolate::Phase::Running;

  if (isolate_running) {
    ...
    std::string service_id = isolate->GetServiceId();
    fml::RefPtr<PlatformMessage> service_id_message =
        fml::MakeRefCounted<flutter::PlatformMessage>(
            kIsolateChannel, // Set here as IsolateChannel
            std::vector<uint8_t>(service_id.begin(), service_id.end()),
            nullptr);
    HandlePlatformMessage(service_id_message); // [12]
  }
  return isolate_running ? Engine::RunStatus::Success
                         : Engine::RunStatus::Failure;
}- PrepareAndLaunchIsolate: this method is used to start Isolate, and our dart code runs in this method
- Handleplatformmsage: the status of DartIsolate will be transferred to the Platform layer for processing
- Here we will study how dart code starts, so we will continue to look at the PrepareAndLaunchIsolate method
Engine::RunStatus Engine::PrepareAndLaunchIsolate(
    RunConfiguration configuration) {
  UpdateAssetManager(configuration.GetAssetManager());
  auto isolate_configuration = configuration.TakeIsolateConfiguration();
  std::shared_ptr<DartIsolate> isolate =
      runtime_controller_->GetRootIsolate().lock();
  ...
  if (!isolate_configuration->PrepareIsolate(*isolate)) {
    return RunStatus::Failure;
  }
  if (configuration.GetEntrypointLibrary().empty()) { // The library passed in before is empty. Enter this branch
    if (!isolate->Run(configuration.GetEntrypoint(),
                      settings_.dart_entrypoint_args)) {
      return RunStatus::Failure;
    }
  } else {
    if (!isolate->RunFromLibrary(configuration.GetEntrypointLibrary(),
                                 configuration.GetEntrypoint(),
                                 settings_.dart_entrypoint_args)) {
      return RunStatus::Failure;
    }
  }
}- After a series of judgments, it will enter dart_ Run method of isolate
DartIsolate
- Here is the last step, where the dart code is actually executed
[[nodiscard]] bool DartIsolate::Run(const std::string& entrypoint_name,
                                    const std::vector<std::string>& args,
                                    const fml::closure& on_run) {
  if (phase_ != Phase::Ready) {
    return false;
  }

  tonic::DartState::Scope scope(this);

  auto user_entrypoint_function =
      Dart_GetField(Dart_RootLibrary(), tonic::ToDart(entrypoint_name.c_str()));

  auto entrypoint_args = tonic::ToDart(args);

  if (!InvokeMainEntrypoint(user_entrypoint_function, entrypoint_args)) {
    return false;
  }

  phase_ = Phase::Running;

  if (on_run) {
    on_run();
  }
  return true;
}- Here, first set the state of Isolate to Running, and then call the main method of dart. Here, InvokeMainEntrypoint is the key to executing the main method
[[nodiscard]] static bool InvokeMainEntrypoint(
    Dart_Handle user_entrypoint_function,
    Dart_Handle args) {
  ...
  Dart_Handle start_main_isolate_function =
      tonic::DartInvokeField(Dart_LookupLibrary(tonic::ToDart("dart:isolate")),
                             "_getStartMainIsolateFunction", {});
  ...
  if (tonic::LogIfError(tonic::DartInvokeField(
          Dart_LookupLibrary(tonic::ToDart("dart:ui")), "_runMainZoned",
          {start_main_isolate_function, user_entrypoint_function, args}))) {
    return false;
  }
  return true;
}
It's done. Here, the dart code runs!
Four threads?
As we can see from the previous flutterjni Android shell holder, it creates three threads, ui, gpu and io, which are used repeatedly in the later running process, such as the grating. What are they and what are their functions? The fluent engine itself does not create or manage its own threads, and the thread control is the responsibility of the embedder layer. The engine requires the embedder to provide references to four task runner s, but does not care whether the thread of each runner is independent. But we only see three above? In fact, there is another platform thread, which refers to the main thread of our platform. Take android as an example, which is our main thread. What are the four threads used for? Here is a brief share:
Note: each engine has an independent UI, GPU and IO Runnter thread; All shared engines share the platform runner thread
Platform Task Runner
The function of Platform Task Runner (or Platform Thread) is to process platform (android/iOS) messages. For example, our MethodChannel callback method onMethodCall is on this thread
- However, there are differences between them. Generally speaking, an Engine instance will be created when a fluent application is started, and a thread will be created when the Engine is created for use by the Platform Runner
- However, although blocking the Platform Thread will not directly cause the jamming of the fluent application, it is not recommended to perform heavy operations in the main Runner, because blocking the Platform Thread for a long time may be forcibly killed by the Watchdog program of the system
UI Task Runner
UI Task Runner is used to execute root isolate code. It runs on the thread of the platform corresponding to the thread and belongs to a child thread. At the same time, root isolate binds many functions and methods required by fluent when the engine is started for rendering.
- When a new frame arrives, the engine notifies the shuttle engine through Root Isolate that there is a frame to render. After receiving the notification from the shuttle engine, the platform will create objects and components and generate a Layer Tree, and then submit the generated Layer Tree to the shuttle engine. At this time, only the content to be drawn is generated without screen rendering, and Root Isolate is responsible for drawing the created Layer Tree to the screen. Therefore, if the thread is overloaded, the frame will be stuck
- It should be noted here that blocking this thread will directly cause the Flutter application to jam and drop the frame. Therefore, during actual use, it is recommended to create a special GPU Runner thread for each Engine instance, or create other isolates. The created isolates do not bind the function of Flutter, and can only perform data operations, not call the function of Flutter. Moreover, the life cycle of the created isolates is controlled by Root isolate, and Root isolate stops, Other isolates will also stop, and the threads running on the created isolate are provided by the thread pool in DartVM
GPU Task Runner
The GPU Task Runner is mainly used to execute the instructions of the device GPU. Create a layer tree in the UI Task Runner, and convert the information provided by the layer tree into platform executable GPU instructions in the GPU Task Runner. In addition to converting the information provided by layer tree into platform executable GPU instructions, GPU Task Runner is also responsible for managing the GPU resources required for each frame drawing, including the creation of platform Framebuffer, Surface life cycle management, and the drawing timing of Texture and Buffers
- In general, UI Runner and GPU Runner run on different threads. The GPU Runner will request the UI Runner for the data of the next frame according to the execution progress of the current frame. When the task is heavy, the UI Runner may delay the task. However, the advantage of this scheduling mechanism is to ensure that the GPU Runner will not be overloaded and avoid unnecessary resource consumption of the UI Runner
- The GPU Runner can delay the frame scheduling of the UI Runner. The overload of the GPU Runner will cause the stumbling of the fluent application. Therefore, it is recommended to create a special GPU Task Runner thread for each Engine instance in actual use
IO Task Runner
IO Task Runner also runs in the sub thread corresponding to the platform. Its main function is to do some preprocessed read operations to prepare for the rendering operation of GPU Runner. We can think that IO Task Runner is the assistant of GPU Task Runner, which can reduce the extra work of GPU Task Runner. For example, during the preparation of Texture, IO Runner will first read the compressed image binary data, decompress it and convert it into a format that can be processed by GPU, and then transfer the data to GPU for rendering.
- The IO Task Runner will not block the Flutter. Although it may be delayed when loading pictures and resources, it is recommended to open a separate thread for the IO Task Runner.
epilogue
Answer: fluteractivity, flutervc and other business classes embedded in the native layer of the platform belong to the platform layer. Are you right? In fact, for the architecture diagram of fluent, native developers need to look at the platform - engine - framework from bottom to top, while fluent developers look at the framework - engine - platform from top to bottom