1, Appium introduction
Appium is a mobile automation framework, which can be used to test native applications, mobile web applications and hybrid applications, and is cross platform. Operating systems that can be used for IOS, Android and firefox.
Native applications refer to applications written in android or ios sdk; Mobile web application refers to web application, similar to safari application or Chrome application or browser like application in ios; Hybrid application refers to an application that wraps webview and is native to the interactivity of web content.
The important thing is that Appium is cross platform. What is cross platform means that you can write test cases with a set of APIs for different platforms.
2, Environment construction
The main points are as follows:

1. appium installation
Just unzip it directly and open appium exe
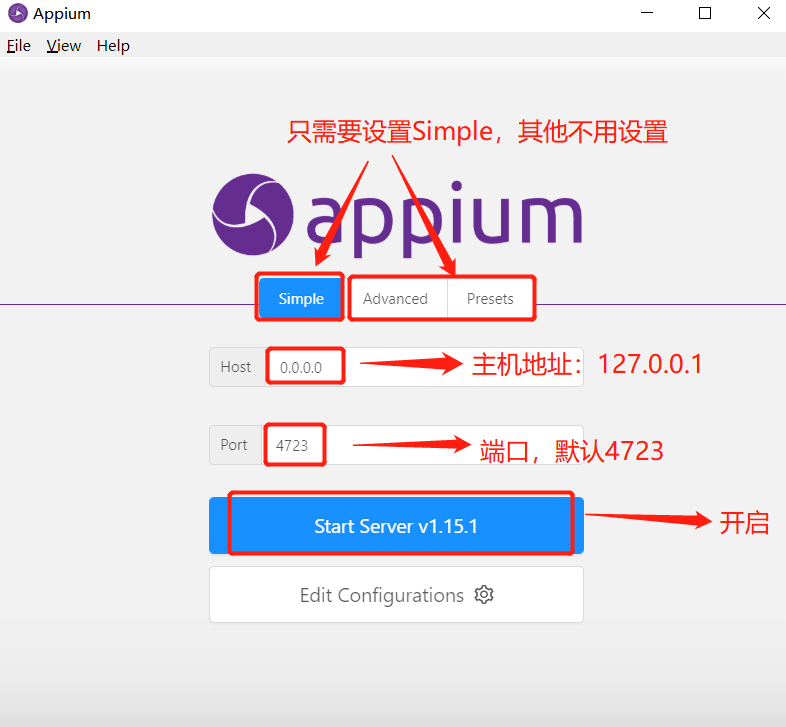
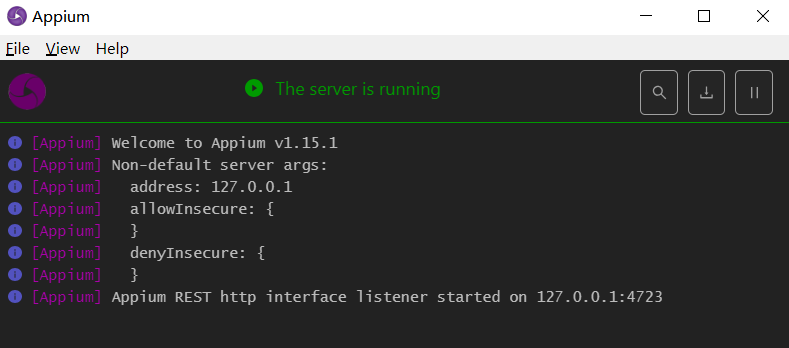
The successful startup is shown as follows:
2. Appium library installation
# install
pip install Appium-Python-Client
# Is the inspection successful
pip list
3, Appium uses
1. Open the application of simulator or real machine
① Open mobile app
② Open Appium
③ Create a python project and create a file
④ Copy the following code to a file
⑤ Get the current application package name and startup activity, and modify the file
from appium import webdriver
# server startup parameters
desired_caps = dict()
# Equipment information
# Platform information, case insensitive
desired_caps['platformName'] = 'Android'
# System version, 7.1 2 can write [7, 7.1, 7.1.2]
desired_caps['platformVersion'] = '7.1.2'
# The device name can be written casually, but it can't be written casually. Android can write casually, but ios must write it correctly
desired_caps['deviceName'] = 'emulator-5554'
# app information
desired_caps['appPackage'] = 'com.android.settings'
desired_caps['appActivity'] = '.Settings'
# Declare our driver object
driver = webdriver.Remote('http://127.0.0.1:4723/wd/hub', desired_caps)
driver.quit()
2. Start other app s in the script
driver.start_activity(appPackage,appActivity)
3. Close the app
driver.close_app() # Closing the app of the current operation will not close the driver object
4. Close the drive object
driver.quit() # Close the driver object and all associated app s at the same time
3, App basic operation API
Some basic conditions are needed to complete app automation. This section will explain the app initialization API.
3.1 pre code
# server startup parameters

desired_caps = {}
desired_caps['platformName'] = 'Android'
desired_caps['platformVersion'] = '5.1'
desired_caps['deviceName'] = '192.168.56.101:5555'
desired_caps['appPackage'] = 'com.android.settings'
desired_caps['appActivity'] = '.Settings'
desired_caps['unicodeKeyboard'] = True
desired_caps['resetKeyboard'] = True

# Declare driver object
driver = webdriver.Remote('http://127.0.0.1:4723/wd/hub', desired_caps)
3.2 installing APK to mobile phone
driver.install_app(app_path)
Parameter: app_path: APK file path in script machine
3.3 remove APP from mobile phone
driver.remove_app(app_id)
Parameter: app_id: the name of the app package to be unloaded
3.4 judge whether the APP has been installed
driver.is_app_installed(bundle_id)
Parameter: bundle_id: the app package name can be passed in, and the returned result is true (installed) / false (not installed)
3.5 sending files to mobile phone
import base64
data = str(base64.b64encode(data.encode('utf-8')),'utf-8')
driver.push_file(path,data)
Parameters:
Path: the path on the mobile device (for example: / sdcard/a.txt)
Data: data in the file. base64 encoding is required
Python3. All characters in X are unicode encoded, while the parameter of b64encode function is byte type, which needs to be transcoded first;
The generated data is of byte type, which needs to be converted back.
3.6 pulling files from mobile phones
import base64
data = driver.pull_file(path) # The returned data is base64 encoded
print(str(base64.b64decode(data),'utf-8')) # base64 decoding
Parameter: Path: the path on the mobile device
3.7 get the element structure in the current screen
driver.page_source
Function: returns the document structure of the current page to judge whether a specific element exists
4, Mobile control viewing tool uiautomatorviewer
4.1 tool introduction
A tool for scanning and analyzing UI controls of Android applications
4.1 how to use
- Enter the tools directory under the SDK directory and open uiautomatorviewer
- Connect the computer to the real machine or open the android simulator
- Start the app to be tested
-
Click Device Screenshot in the upper left corner of uiautomatorviewer to generate a screenshot of the UI control of the current page of the app
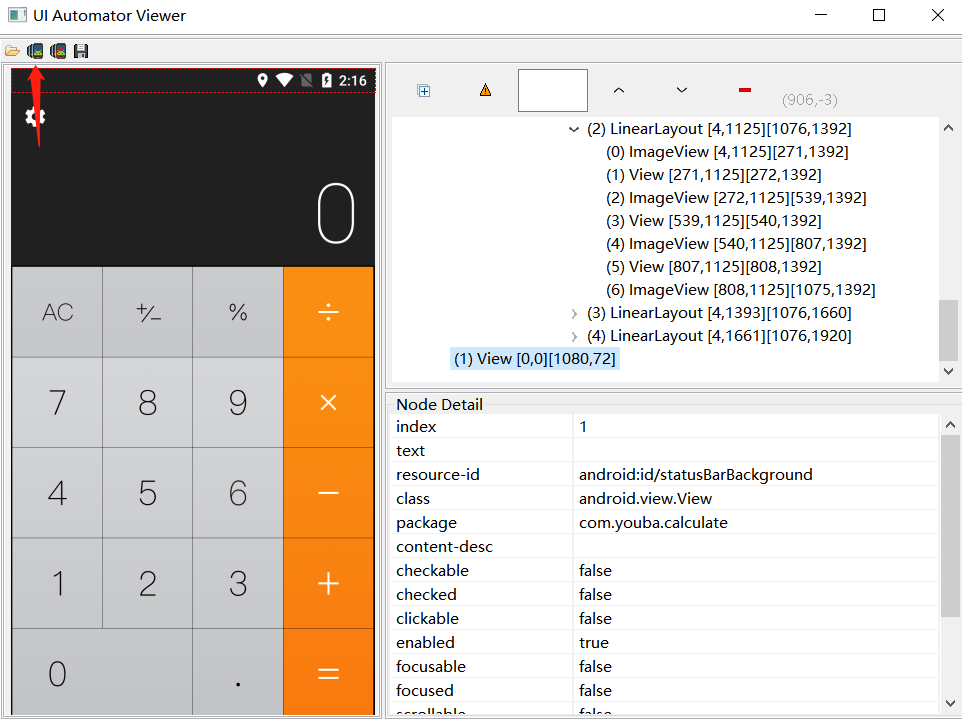
-
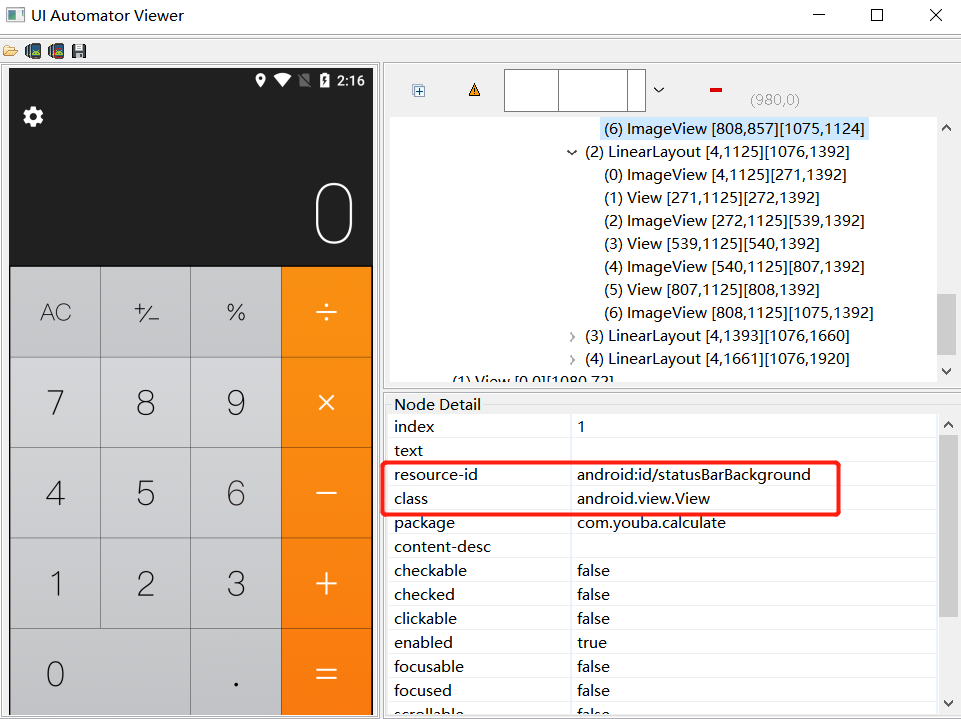
Select the control to be viewed on the screenshot to browse the id,class,text, coordinates and other information of the control
5, APP element positioning operation
Manual testing is mainly operated through visible buttons, while automation is interactive operation through elements.
The basic positioning of elements is based on the visible elements displayed within the current screen range.
5.1 Appium common element positioning method
| name | value |
|---|---|
| id | id attribute value |
| class | class attribute value |
| xpath | xpath expression |
5.2 pre code
from appium import webdriver
# server startup parameters
desired_caps = {}
# Equipment information
desired_caps['platformName'] = 'Android'
desired_caps['platformVersion'] = '5.1'
desired_caps['deviceName'] = '192.168.56.101:5555'
# app information
desired_caps['appPackage'] = 'com.android.settings'
desired_caps['appActivity'] = '.Settings'

# Declare our driver object
driver = webdriver.Remote('http://127.0.0.1:4723/wd/hub', desired_caps)
5.3 positioning by id
- Method: find_element_by_id(id_value) # id_value: is the ID attribute value of the element
- Business scenario:
1. Enter the setting page
2. Click the search button through ID positioning - Code implementation:
driver.find_element_by_id("com.android.settings:id/search").click()
driver.quit()
5.4 positioning by class
- Method: find_element_by_class_name(class_value) # class_value: is the class attribute value of the element
- Business scenario:
1. Enter the setting page
2. Click the search button
3. Click the return button in the input box through class positioning - Code implementation:
# id click the search button
driver.find_element_by_id("com.android.settings:id/search").click()
# class click the return button in the input box
driver.find_element_by_class_name('android.widget.ImageButton').click()
driver.quit()
5.5 locating through xpath
- Method: find_element_by_xpath(xpath_value) # xpath_value: is an XPath statement that can locate an element
android xptah common attribute positioning:- id ://*[contains(@resource-id,'com.android.settings:id/search')]
- class ://*[contains(@class,'android.widget.ImageButton')]
- text ://*[contains(@text,'WLA')]
- Business scenario:
1. Enter the setting page
2. Click WLAN menu bar - Code implementation:
# xpath click the WLAN button
driver.find_element_by_xpath("//*[contains(@text,'WLA')]").click()
5.6 locate a group of elements and pay attention to element - > elements
The application scenario is that the element values are repeated. You cannot directly locate an element through the element attribute. You can only select it through the elements method and return a list of locating objects
5.7 locating a group of elements by id
- Method: find_elements_by_id(id_value) # id_value: is the ID attribute value of the element
- Business scenario:
1. Enter the setting page
2. Click the WLAN menu bar (the first one in the id location object list) - Code implementation:
# Navigate to a set of elements
title = driver.find_elements_by_id("com.android.settings:id/title")
# Print title type, expected list
print(type(title))
# Take the title to return to the first location object in the list and execute the click operation
title[0].click()
5.8 locating a group of elements by class
- Method: find_elements_by_class_name(class_value) # class_value: is the class attribute value of the element
- Business scenario:
1. Enter the setting page
2. Click the WLAN menu bar (the third in the class positioning object list) - Code implementation:
title = driver.find_elements_by_class_name("android.widget.TextView")
# Print title type, expected list
print(type(title))
# Take the title to return to the first location object in the list and execute the click operation
title[3].click()
for index, item in enumerate(ele_list):
  print(index, item.text)  ```
5.9 locating a set of elements by xpath
- Method: find_elements_by_xpath(xpath_value) # xpath_value: is an XPath statement that can locate an element
- Business scenario:
1. Enter the setting page
2. Click the WLAN menu bar (the third in the class attribute locating object list in xpath) - Code implementation:
# Navigate to a set of elements
title = driver.find_elements_by_xpath("//*[contains(@class,'widget.TextView')]")
# Print title type, expected list
print(type(title))
# Take the title to return to the first location object in the list and execute the click operation
title[3].click()
6, WebDriverWait displays waiting operations
Within a timeout period, search for the existence of the element every other period of time. If it exists, the location object will be returned. If it does not exist, a timeout exception error will be reported until the timeout period is reached.
- Method: webdriver wait (driver, timeout, poll_frequency) until(method)
Parameters:
1.driver: mobile phone driver object
2.timeout: search timeout
3.poll_frequency: the interval between searches. The default time is 0.5s
4.method: location method (anonymous function) - Anonymous function:
lambda x: x
Equivalent to python function:
def test(x):
return x - Use example:
WebDriverWait(driver, timeout, poll_frequency).until(lambda x:x.find_elements_by_id(id_value))
- Explanation:
1.x the passed in value is: driver, so the positioning method can be used. - Function running process:
1. Instantiate the WebDriverWait class, pass in the driver object, and then the driver object is assigned to a class variable of WebDriverWait: self_ driver
2.until is the method of WebDriverWait class. until passes in the method method method (i.e. anonymous function), and then the method method will be passed in to self_ driver
3. After the element is searched, until returns the location object. If the function is not searched, until returns a timeout exception error - Business scenario:
1. Enter the setting page
2. Click the search button through ID positioning - Code implementation:
from selenium.webdriver.support.wait import WebDriverWait # Import WebDriverWait class
# The timeout is 30s. Search whether the element exists every 1 second. If the element exists, return to the positioning object and exit
search_button = WebDriverWait(driver, 30, 1).until(lambda driver:driver.find_element_by_id("com.android.settings:id/search"))
search_button.click()
driver.quit()
7, APP element information operation API
This section describes the acquisition and basic input operations of element information on the mobile terminal.
7.1. Click element
ele.click()
7.2. Send data to input box
-
Method: send_keys(vaue) # value: the text to be sent to the input box
-
Business scenario:
1. Open Settings
2. Click the search button
3. Input content abc -
Code implementation:
# Click the search button driver.find_element_by_id("com.android.settings:id/search").click() # Navigate to the input box and enter abc driver.find_element_by_id("android:id/search_src_text").send_keys("abc") -
Key point: you can change the abc input into Chinese. The result: there is no value input in the input box and the program will not hold errors
Solve the problem of inputting Chinese:1.server Two parameter configurations are added for startup parameters desired_caps['unicodeKeyboard'] = True desired_caps['resetKeyboard'] = True 2.Run again and you will find that the operation is successful # Click the search button driver.find_element_by_id("com.android.settings:id/search").click() # Navigate to the input box and enter abc driver.find_element_by_id("android:id/search_src_text").send_keys("Cumulus Education")
7.3. Clear the contents of the input box
- Method: clear()
- Business scenario:
1. Open Settings
2. Click the search button
3. Input content abc
4. Delete abc entered - Code implementation:
# Click the search button
driver.find_element_by_id("com.android.settings:id/search").click()
# Navigate to the input box and enter abc
input_text = driver.find_element_by_id("android:id/search_src_text")
# Enter abc
input_text.send_keys("abc")
time.sleep(1)
# Delete abc
input_text.clear()
7.4. Gets the text content of the element
- Method: text
- Business scenario:
1. Enter settings
2. Get the text content of all elements whose class attribute is "android.widget.TextView" - Code implementation:
ele_list = driver.find_elements_by_class_name("android.widget.TextView") for e in ele_list: print(e.text) for index, item in enumerate(ele_list): print(index, item.text) - Execution results:
  0 set up
  1
  2 The mobile data network is turned off
  3 Wireless and network
  4 WLAN
  5 "guest"
  6 Bluetooth
  7 deactivated
  8 Flow usage
  9 0 used B Data
  10 more
  11 equipment
  12 display
  13 The automatic brightness adjustment function is turned off
  14 notice
  15 All apps have been allowed to send notifications
7.5. Gets the attribute value of the element
-
Method: get_attribute(value) # value: the attribute of the element
⚠️ value='name 'returns the content desc / text attribute value
⚠️ value='text 'returns the property value of text
⚠️ value='className 'returns the class attribute value, which can only be supported by API = > 18
⚠️ value='resourceId 'returns the value of the resource ID attribute. Only API = > 18 can support it -
Business scenario:
1. Enter settings
2. Get the content desc attribute value of the search button -
Code implementation:
# Navigate to the search button
get_value = driver.find_element_by_id("com.android.settings:id/search")
print(get_value.get_attribute("content-desc"))
Execution results:
        search
7.6. Gets the coordinates of the element on the screen
- Method: location
- Business scenario:
1. Enter the setting page
2. Obtain the coordinate position of the search button on the screen - Code implementation:
# Navigate to the search button
get_value = driver.find_element_by_id("com.android.settings:id/search")
# Print the coordinates of the search button on the screen
print(get_value.location)
{'y': 44, 'x': 408}
7.7. Get app package name and startup name
- Get package name method: current_package
- Get startup Name: current_activity
- Business scenario:
1. Startup settings
2. Get package name and startup name - Code implementation:
print(driver.current_package)
print(driver.current_activity)
- Execution results:
com.tencent.news
.activity.SplashActivity
8, APP element event operation API
8.1. Pre code
from appium import webdriver
# server startup parameters
desired_caps = {}
# Equipment information
desired_caps['platformName'] = 'Android'
desired_caps['platformVersion'] = '5.1'
desired_caps['deviceName'] = '192.168.56.101:5555'
# app information
desired_caps['appPackage'] = 'com.android.settings'
desired_caps['appActivity'] = '.Settings'

# Declare our driver object
driver = webdriver.Remote('http://127.0.0.1:4723/wd/hub', desired_caps)
8.2. swip slip event
⚠️ Sliding from one coordinate position to another can only be between two points
- Method: swing (start_x, start_y, end_x, end_y, duration = none)
- Parameters:
1.start_x: Starting point X-axis coordinate
2.start_y: Y-axis coordinates of starting point
3.end_x: End X-axis coordinates
4.end_y. End point: Y axis coordinates
5.duration: total duration of sliding operation, unit: ms- Business scenario:
1. Enter settings
2. Slide from coordinate (148659) to coordinate (148248)
- Business scenario:
- Code implementation:
# Sliding has no duration
driver.swipe(188,659,148,248)
# Sliding lasts for 5 seconds
driver.swipe(188,659,148,248,5000)
8.3. scroll slide event
⚠️ Slide from one element to another until the page stops automatically
- Method: scroll(origin_el, destination_el)
- Parameters:
1.origin_el: element at the beginning of the slide
2.destination_el: element at the end of the slide - Business scenario:
1. Enter the setting page
2. Simulate the up sliding operation of the finger from the storage menu position to the WLAN menu position - Code implementation:
# Navigate to the storage menu bar
el1 = driver.find_element_by_xpath("//*[contains(@text, 'store')] ")
# Navigate to the WLAN menu bar
el2 = driver.find_element_by_xpath("//*[contains(@text,'WLAN')]")
# Perform sliding operation
driver.scroll(el1,el2)
8.4. drag drag event
⚠️ Slide from one element to another, and the second element replaces the original screen position of the first element
- Method: drag_and_drop(origin_el, destination_el)
- Parameters:
1.origin_el: element at the beginning of the slide
2.destination_el: element at the end of the slide - Business scenario:
1. Enter the setting page
2. Slide the storage menu to the WLAN menu bar with an analog finger - Code implementation:
# Navigate to the storage menu bar
el1 = driver.find_element_by_xpath("//*[contains(@text, 'store')] ")
# Navigate to the WLAN menu bar
el2 = driver.find_element_by_xpath("//*[contains(@text,'WLAN')]")
# Perform sliding operation
driver.drag_and_drop(el1,el2)
8.5. Application put in background event
APP is placed in the background to simulate hot start
- Method: background_app(seconds)
- Parameters:
1.seconds: time to stay in the background, unit: seconds - Business scenario:
1. Enter the setting page
2. Place the APP in the background for 5s - Code implementation:
driver.background_app(5)
- effect:
app Put in background 5 s After, show the current page again
9, APP analog gesture advanced operation
TouchAction is an auxiliary class of AppiumDriver. It mainly aims at gesture operations, such as sliding, long pressing, dragging, etc. the principle is to put a series of actions in a chain and send them to the server. After receiving the chain, the server parses each action and executes it one by one.
9.1. Pre code
from appium import webdriver
# server startup parameters
desired_caps = {}
# Equipment information
desired_caps['platformName'] = 'Android'
desired_caps['platformVersion'] = '5.1'
desired_caps['deviceName'] = '192.168.56.101:5555'
# app information
desired_caps['appPackage'] = 'com.android.settings'
desired_caps['appActivity'] = '.Settings'

# Declare our driver object
driver = webdriver.Remote('http://127.0.0.1:4723/wd/hub', desired_caps)
⚠️ All gestures are executed by the function
9.2. Finger tapping operation
Simulate a finger tap on the screen
- Method: tap(element=None, x=None, y=None)
- Method: perform() # sends a command to the server to execute the operation
- Parameters:
1.element: the element to be located
2.x: relative to the coordinates of the upper left corner of the element, the x-axis coordinates of the element are usually used
3.y: the Y coordinate of the element is usually used - Business scenario:
1. Enter settings
2. Click WLAN option - Code implementation:
# Tap the screen by element positioning
el = driver.find_element_by_xpath("//*[contains(@text,'WLAN')]")
TouchAction(driver).tap(el).perform()

# Tap the screen through the coordinate mode. WLAN coordinates: x=155,y=250
# TouchAction(driver).tap(x=155,y=250).perform()
9.3. Finger press operation
Analog fingers press the screen, press to leave
- Method: press(el=None, x=None, y=None)
- Method: release() # ends the action and leaves the screen with your finger
- Parameters:
1.element: the element to be located
2.x: the x-axis coordinate of the element is usually used
3.y: the Y coordinate of the element is usually used - Business scenario:
1. Enter settings
2. Click WLAN option - Code implementation:
# Press the screen by element positioning
el = driver.find_element_by_xpath("//*[contains(@text,'WLAN')]")
TouchAction(driver).press(el).release().perform()

# Press the screen through the coordinate mode. WLAN coordinates: x=155,y=250
# TouchAction(driver).press(x=155,y=250).release().perform()
9.4. Wait for operation
- Method: wait(ms=0)
- Parameters:
ms: number of milliseconds paused - Business scenario:
1. Enter settings
2. Click WLAN option
3. Long press the WiredSSID option for 5 seconds - Code implementation:
# Click WLAN
driver.find_element_by_xpath("//*[contains(@text,'WLAN')]").click()
# Navigate to WiredSSID
el =driver.find_element_by_id("android:id/title")
# Long press the element by element positioning
TouchAction(driver).press(el).wait(5000).perform()

# Simulate long press elements by coordinates
# Add wait (with long press) / do not add wait (without long press effect)
# TouchAction(driver).press(x=770,y=667).wait(5000).release().perform()
9.5. Long finger press operation
The analog mobile phone presses the screen for a period of time, and pressing it will correspond to leaving
- Method: long_press(el=None, x=None, y=None, duration=1000)
- Parameters:
1.element: the element to be located
2.x: the x-axis coordinate of the element is usually used
3.y: the Y coordinate of the element is usually used
4.duration: duration, which is 1000ms by default - Code implementation:
# Click WLAN
driver.find_element_by_xpath("//*[contains(@text,'WLAN')]").click()
# Navigate to WiredSSID
el =driver.find_element_by_id("android:id/title")
# Long press the element by element positioning
TouchAction(driver).long_press(el,duration=5000).release().perform()

# Long press the element in the coordinate mode. WiredSSID coordinates: x=770,y=667
# Add wait (with long press) / do not add wait (without long press effect)
# TouchAction(driver).long_press(x=770,y=667).perform()
9.6. Finger movement operation
Simulate the sliding operation of the mobile phone
- Method: move_to(el=None, x=None, y=None)
- Parameters:
1.el: positioned element
2.x: X-axis offset relative to the previous element
3.y: Y-axis offset relative to the previous element - Business scenario 1:
1. Enter settings
2. Slide the screen up - Code implementation:
# Navigate to storage el = driver.find_element_by_xpath("//*[contains(@text, 'store')] ") # Navigate to more el1 = driver.find_element_by_xpath("//*[contains(@text, 'more')] ") # Element mode sliding TouchAction(driver).press(el).move_to(el1).release().perform() # Coordinate sliding # TouchAction(driver).press(x=240,y=600).wait(100).move_to(x=240,y=100).release().perform() # Note that press connects to a move_to actually calls the swip method, which can be queried in the log without giving relative coordinates. - Business scenario 2:
1. Enter settings
2. Slide the screen up to see the "security" option
3. Access to security
4. Click screen lock mode
5. Click on the pattern
6. Draw patterns - Code implementation:
# Navigate to WLAN
el1 = driver.find_element_by_xpath("//*[contains(@text,'WLAN')]")
# Navigate to storage
el2 = driver.find_element_by_xpath("//*[contains(@text, 'store')] ")
# Slide storage to WLAN
driver.drag_and_drop(el2,el1)
# Navigate to user
el3 = driver.find_element_by_xpath("//*[contains(@text, 'user')] ")
# Note that drag is used this time_ and_ In the drop method, the incoming "storage location" still uses its original position on the screen, so the user can slide it up only when the storage slides to the user. Otherwise, the "storage location" needs to be relocated
# Slide user position on storage
driver.drag_and_drop(el2,el3)
# Click the security button
driver.find_element_by_xpath("//*[contains(@text, 'safe')] ". click()
# Click the screen lock mode button
driver.find_element_by_xpath("//*[contains(@text, 'screen locked')] ". click()
# Click the pattern button
driver.find_element_by_xpath("//*[contains(@text, 'pattern')] ". click()
# Draw four coordinates of the pattern: 1: (244967) 2: (723967) 3: (7231442) 4: (2441916)
TouchAction(driver).press(x=244,y=967).wait(100).move_to(x=479,y=0).wait(100)\
          .move_to(x=0,y=475).wait(100).move_to(x=-479,y=474).release().perform()
10, Mobile operation API
Operate some common setting functions of the mobile phone
10.1. Pre code
from appium import webdriver
# server startup parameters
desired_caps = {}
# Equipment information
desired_caps['platformName'] = 'Android'
desired_caps['platformVersion'] = '5.1'
desired_caps['deviceName'] = '192.168.56.101:5555'
# app information
desired_caps['appPackage'] = 'com.android.settings'
desired_caps['appActivity'] = '.Settings'

# Declare our driver object
driver = webdriver.Remote('http://127.0.0.1:4723/wd/hub', desired_caps)
10.2. Get mobile time
- Method: device_time
- Code implementation:
# Get the time of the current phone
print(driver.device_time)
- Execution results:
Wed Dec 27 08:52:45 EST 2017
10.3. Get the width and height of the phone
Get the width and height of the mobile phone. You can do some coordinate operations according to the width and height
- Method: get_window_size()
- Code implementation:
print(driver.get_window_size())
- Execution results:
{'height': 800, 'width': 480}
10.4. Send key to device
Simulate the operation of system key values, such as home key, volume key, return key, etc.
- Parameters:
keycode: the key code sent to the device
metastate: meta information about the key code to be sent, which is generally the default value - Business scenario:
1. Open Settings
2. Press the volume increase key several times - Code implementation:
for i in range(3):
    driver.keyevent(24)
Appium -- the keycode key value of Android
adb command use
adb shell input keyevent XX(EventCode) # enter the corresponding key value
adb shell input text "www.baidu.com "# send text to browser
| EventCode | KeyEvent | EventName |
|---|---|---|
| 0 | KEYCODE_UNKNOWN | Unknown key |
| 1 | KEYCODE_SOFT_LEFT | Left key |
| 2 | KEYCODE_SOFT_RIGHT | Right click |
| 3 | KEYCODE_HOME | Home key |
| 4 | KEYCODE_BACK | Return key |
| 5 | KEYCODE_CALL | Dialing key |
| 6 | KEYCODE_ENDCALL | Hang up key |
| 7 | KEYCODE_0 | Key "0" |
| 8 | KEYCODE_1 | Key "1" |
| 9 | KEYCODE_2 | Key "2" |
| 10 | KEYCODE_3 | Key "3" |
| 11 | KEYCODE_4 | Key "4" |
| 12 | KEYCODE_5 | Key "5" |
| 13 | KEYCODE_6 | Key "6" |
| 14 | KEYCODE_7 | Key "7" |
| 15 | KEYCODE_8 | Key "8" |
| 16 | KEYCODE_9 | Key "9" |
| 17 | KEYCODE_STAR | Key "*" |
| 18 | KEYCODE_POUND | Press "#" |
| 19 | KEYCODE_DPAD_UP | Navigation key up |
| 20 | KEYCODE_DPAD_DOWN | Navigation key down |
| 21 | KEYCODE_DPAD_LEFT | Navigation key left |
| 22 | KEYCODE_DPAD_RIGHT | Navigation key right |
| 23 | KEYCODE_DPAD_CENTER | Navigation key OK |
| 24 | KEYCODE_VOLUME_UP | Volume key plus |
| 25 | KEYCODE_VOLUME_DOWN | Volume key minus |
| 26 | KEYCODE_POWER | Power key |
| 27 | KEYCODE_CAMERA | Camera key |
| 28 | KEYCODE_CLEAR | Clear key |
| 29 | KEYCODE_A | Key "A" |
| 30 | KEYCODE_B | Key "B" |
| 31 | KEYCODE_C | Key "C" |
| 32 | KEYCODE_D | Key "D" |
| 33 | KEYCODE_E | Key "E" |
| 34 | KEYCODE_F | Key "F" |
| 35 | KEYCODE_G | Key "G" |
| 36 | KEYCODE_H | Key "H" |
| 37 | KEYCODE_I | Key "I" |
| 38 | KEYCODE_J | Key "J" |
| 39 | KEYCODE_K | Key "K" |
| 40 | KEYCODE_L | Key "L" |
| 41 | KEYCODE_M | Key "M" |
| 42 | KEYCODE_N | Key "N" |
| 43 | KEYCODE_O | Key "O" |
| 44 | KEYCODE_P | Press "P" |
| 45 | KEYCODE_Q | Key "Q" |
| 46 | KEYCODE_R | Key "R" |
| 47 | KEYCODE_S | Key "S" |
| 48 | KEYCODE_T | Key "T" |
| 49 | KEYCODE_U | Key "U" |
| 50 | KEYCODE_V | Key "V" |
| 51 | KEYCODE_W | Key "W" |
| 52 | KEYCODE_X | Key "X" |
| 53 | KEYCODE_Y | Key "Y" |
| 54 | KEYCODE_Z | Key "Z" |
| 55 | KEYCODE_COMMA | Press the key |
| 56 | KEYCODE_PERIOD | Key ' |
| 57 | KEYCODE_ALT_LEFT | Alt+Left |
| 58 | KEYCODE_ALT_RIGHT | Alt+Right |
| 59 | KEYCODE_SHIFT_LEFT | Shift+Left |
| 60 | KEYCODE_SHIFT_RIGHT | Shift+Left |
| 61 | KEYCODE_TAB | Tab key |
| 62 | KEYCODE_SPACE | Space bar |
| 63 | KEYCODE_SYM | Select input method |
| 64 | KEYCODE_EXPLORER | browser |
| 65 | KEYCODE_ENVELOPE | |
| 66 | KEYCODE_ENTER | enter key |
| 67 | KEYCODE_DEL | Backspace key |
| 68 | KEYCODE_GRAVE | Key ` ` |
| 69 | KEYCODE_MINUS | Key '-' |
| 70 | KEYCODE_EQUALS | Key '=' |
| 71 | KEYCODE_LEFT_BRACKET | Key '[' |
| 72 | KEYCODE_RIGHT_BRACKET | Key ']' |
| 73 | KEYCODE_BACKSLASH | Key '\' |
| 74 | KEYCODE_SEMICOLON | Key ',' |
| 75 | KEYCODE_APOSTROPHE | Key '' (single quotation mark) |
| 76 | KEYCODE_SLASH | Key '/' |
| 77 | KEYCODE_AT | Key '@' |
| 78 | KEYCODE_NUM | Key Number modifier |
| 79 | KEYCODE_HEADSETHOOK | Press the key Headset Hook |
| 80 | KEYCODE_FOCUS | Camera focus key |
| 81 | KEYCODE_PLUS | Key '+' |
| 82 | KEYCODE_MENU | Menu key |
| 83 | KEYCODE_NOTIFICATION | Notification key |
| 84 | KEYCODE_SEARCH | Search key |
| 85 | TAG_LAST_KEYCODE |
10.5. Operation mobile phone notification bar
Open the notification bar of the mobile phone to get the relevant information and element operations of the notification bar
- Method: open_notifications()
- Business scenario:
1. Startup settings
2. Open the notification bar - Code implementation:
driver.open_notifications()
10.6. Get the current network of mobile phone
Get the currently connected network of the mobile phone
- Method: network_connection
- Business scenario: get the current network mode of the mobile phone
- Code implementation:
print(driver.network_connection)
- Execution results:
6
| Value (Alias) | Data | Wifi | Airplane Mode |
|---|---|---|---|
| 0 (None) | 0 | 0 | 0 |
| 1 (Airplane Mode) | 0 | 0 | 1 |
| 2 (Wifi only) | 0 | 1 | 0 |
| 4 (Data only) | 1 | 0 | 0 |
| 6 (All network on) | 1 | 1 | 0 |
10.7. Set up mobile network
Change the network mode of the mobile phone and simulate the test cases under special network conditions
- Method: set_network_connection(connectionType)
- Parameters:
connectionType: the network type to be set - Business scenario:
1. Startup settings
2. Set the mobile network to flight mode - Code implementation:
driver.set_network_connection(1)
10.8. Screenshot of mobile phone
Capture the current screen of the mobile phone and save the picture in the specified format to the set position
- Method: get_screenshot_as_file(filename)
- Parameters:
filename: the image in the specified format under the specified path - Business scenario:
1. Open the settings page
2. Save the screenshot to the current directory and name it screen png - Code implementation:
import os
driver.get_screenshot_as_file(os.getcwd() + os.sep + './screen.png')
- Execution results:
Screen. Will be generated in the current directory PNG file
11, Script recording
11.1. Cognitive interface
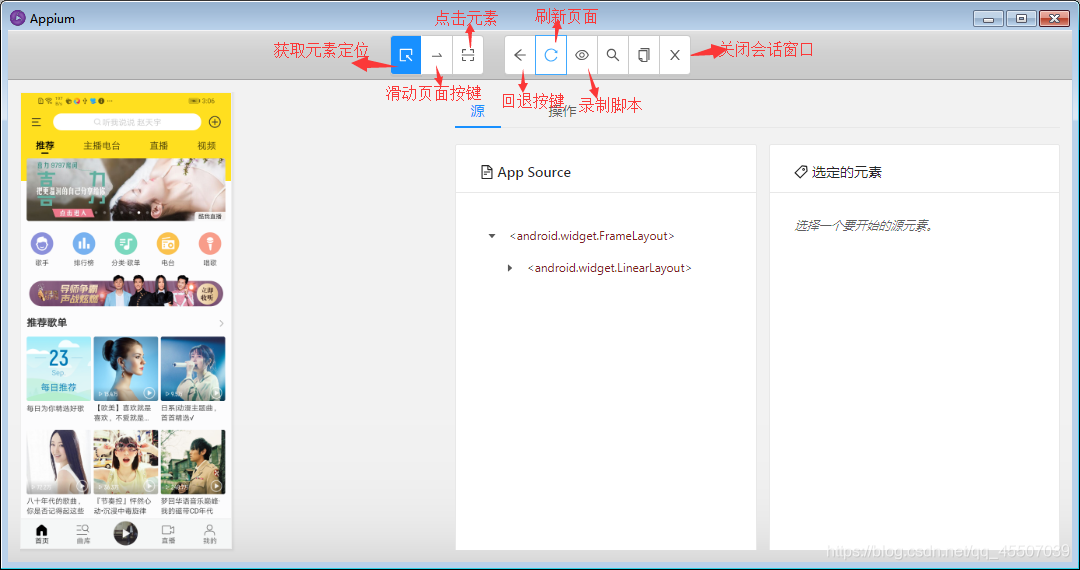
11.2. Click the start recording button to start recording the script
-
Click the first "select element" button on the left of the top navigation bar to select the search bar, and then click the "click" button on the right to operate (the recording process is to first select the APP element on the left of the recording window, and then record the operation mode on the right of the window).
-
After recording, click the "stop recording" button, and the operation code will be displayed synchronously in the upper right corner of the recording window. Select the code type, convert the template code into a formal code, and copy the code to pychart.
-
After the code is copied to pycharm, it is best to add the waiting time at each operation or page switching, otherwise it will not arrive at the next page in time due to network speed, APP design problems or other reasons, resulting in appium unable to obtain page elements and failure to locate elements, and an error will be reported when pycharm runs. After editing the code, click pycharm's run button, and appium will automatically run the script on the mobile phone.