preface
In the Internet era, in order to achieve faster development iterations and better flexibility of applications, Internet applications no longer use the traditional three-tier architecture, but use microservices to achieve the purposes of loose coupling, cross departmental development and rapid delivery of software systems. Docker defines the container technology standard, which makes the landing of container technology very simple, and the application can run stably and portable in the container
In the process of work, I need to package the developed SpringBoot application into a Docker image and deploy it to the k8s cluster for management. This article is a summary of my task. The following contents are for reference
There are the following steps
- Print the springboot project into jar package (I won't explain it too much this time)
- Make docker image
- Write charts
- Container deployment
1, Package the SpringBoot application
First, ensure that the springboot project runs successfully locally, and then print the maven package into a jar package
2, Make Docker image
2.1 upload the jar package to the server, create a Dockerfile (must be this name) and put the jar package in the same directory
The code is as follows (example):
vim Dockerfile
2.2 writing Dockerfile
The code is as follows (example):
# Pull basic image
FROM java:8

# Set author information
MAINTAINER xiaopeng "xiaopeng@baidu.com"

# Put warning-tool-0.0 1-SNAPSHOT. Add jar to the container and rename it warning tool jar
# Because jar and Dockerfile are in the same directory, just write the file name
ADD warning-tool-0.0.1-SNAPSHOT.jar warning-tool.jar

# Set the port number. Only one port 8089 is open here
EXPOSE 8089

# Execute the command and run warning tool here Jar specifies the configuration file
RUN bash -c 'touch /warning-tool.jar'
ENTRYPOINT ["java","-jar","warning-tool.jar","--spring.config.location=/config/application.properties"]
The parameters are explained in detail here.
FROM: Specifies the base image, which must be the first instruction. FROM: tag optional
MAINTAINER: MAINTAINER information
ADD: ADD local files to the specified directory of the container. tar files will be automatically decompressed (network compressed resources will not be decompressed). You can access network resources, similar to wget
Export: set the port number. If you want to have a mapping relationship between the container and the host port, you must add the - P parameter when the container is started
RUN: the instruction executed when building the image
  Note: do not write multiple lines of commands RUN,as a result of Dockerfile Each instruction in establishes a layer.

  How many? RUN Depending on how many layers of images are built, the image will be bloated and multi-layer, which not only increases the time of component deployment, but also prone to errors. RUN The newline character in writing is\

  RUN Is the command that runs when the container is built and the result that is submitted

  CMD It is a command executed when the container is started. It does not run during construction. The construction specifies what the command looks like
LABEL: the function is to specify a LABEL for the image
ENTRYPOINT: configure the container to make it executable. With CMD, commands can be omitted and only parameters can be used.
COPY: the function is similar to ADD, but it will not automatically decompress files or access network resources.
VOLUME: used to specify the persistent directory
2.3 packaging image
Just run a command (note that there is a. Sign at the end):
docker build -f Dockerfile -t registry.xxx.baidu.com/dev/warningtool:v1.0 .
-f: Specify the Dockerfile file. Note: the name should be registry xxx. baidu. COM / dev /... Otherwise, it can't be uploaded to the warehouse
-t: Specifies the label information for the mirror
2.4 check whether the image is generated successfully
docker images | grep warningtool
2.5 running image
// -p is followed by two ports: host port and container port
docker run -p 8083:8083 --name=warningtool registry.xxx.baidu.com/dev/warningtool:v1.0
2.6 downloading images
docker save -o warningtool.tar registry.xxx.baidu.com/dev/warningtool
3, Write Charts
There are two ways to deploy k8s services
- Write the corresponding resource control yaml, kubectl apply - f XX YML deployment
- Deploy using helm charts
Helm is a package management tool developed by Deis for Kubernetes application, which is mainly used to manage Charts.
The following figure shows the creation of charts through helm create test. The following is the directory structure
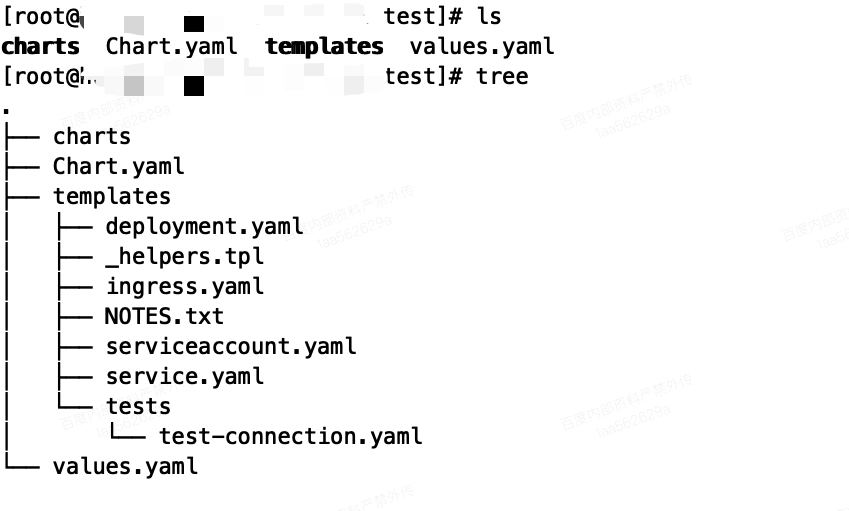
There are three parts under the folder: chart Yaml, templates folder, values yaml
3.1 Charts.yaml file
Description: charts YML is used to write version information
Example: charts yaml
apiVersion: v1
appVersion: "1.0"
description: A Helm chart for Kubernetes
name: warningTool
version: 0.1.0
3.2 values.yaml file
Description: values Yaml is used to write the parameter information of the whole charts application, such as image, service type, and other variable information. It mainly defines some variables and assigns them to other yaml.
Example: values yaml. Here, you can use nginx's charts as a template for modification
# Default values for nginx.
# This is a YAML-formatted file.
# Declare variables to be passed into your templates.

warningtool:
# Defines the name of the application
  fullname: warningtool-1-0-0
  fullnameapp: nginx-app
# Define the number of copies to apply
  replicaCount: 1

  liveinitialDelaySeconds: 5
  readinitialDelaySeconds: 5

# Define the warehouse address tag version number of the image
image:
  repository: registry.det.baidu.com/xxx/warningtool
  tag:  v1.0
  pullPolicy: IfNotPresent

hostPath:
# Set whether the site mode is enabled. If true, map the / data directory of the host through the site mode.
  enabled: true
  path: /data
  type: ''

nameOverride: ""
fullnameOverride: ""

# Define the type and port of the service.
service:
  type: NodePort
  port: 8090


resources:
  # We usually recommend not to specify default resources and to leave this as a conscious
  # choice for the user. This also increases chances charts run on environments with little
  # resources, such as Minikube. If you do want to specify resources, uncomment the following
  # lines, adjust them as necessary, and remove the curly braces after 'resources:'.
#  limits:
#    cpu: 2
#    memory: 1Gi
# The minimum requirements for startup, if not met, it cannot be started.
  requests:
    cpu: 1
    memory: 2Gi

# The specified pod is assigned to the specified node node.
nodeSelector: {}
# Node affinity (tolerance) is an attribute of pod, which makes pod attracted to a specific class of nodes.
tolerations: []

affinity: {}
# Survival probe to determine whether pod (application container in) is healthy
livenessProbe:
  periodSeconds: 5
  timeoutSeconds: 20
  successThreshold: 1
  failureThreshold: 3
# Ready probe, pod ready, we can understand that this pod can take over requests and accesses
readinessProbe:
  periodSeconds: 5
  timeoutSeconds: 20
  successThreshold: 3
  failureThreshold: 1
3.3 templates folder
The templates directory is the actual k8s resource control deployment file (focus)
There is warning cm in the template folder yaml, warning-deployment,.yaml, warning-service.yaml
configMap is used to uniformly manage configuration information, service is used to provide external services, and deployment is used to deploy pod and system upgrade.
3.3.1 configmap.yaml
Note: configMap is used to uniformly manage configuration information, and the file name can not be fixed. However, the type of kind in the sample file should be configMap (focus)
Example: warningtool cm yaml
apiVersion: v1
kind: ConfigMap
metadata:
  name: {{ .Values.warningtool.fullname  }}
  namespace: {{ .Release.Namespace }}
data:
  application.properties: |
    server.port= 8089
    phones= xxxxxxxx,xxxxxxxx
    logging.level.root=INFO
    logging.file.name=./logs/warningtool.log
    logging.logback.rollingpolicy.max-file-size=50MB
Parameter details:
Name: defines the service name and references values Yaml defined application name namespace: the namespace where the definition is located
application.properties: similar to this default Conf mounts this configuration to cm for easy modification. Including port, log level, log generation path, etc
3.3.2 service.yaml
Note: a Service can be regarded as a group of external access interfaces of pods that provide the same Service. With the help of Service, applications can easily realize Service discovery and load balancing.
Example: warning service yaml
apiVersion: v1
kind: Service
metadata:
  name: {{ .Values.warningtool.fullname  }}

# Determine which labels the Service will use through the spec.selector field.
# In this example, the Service named warning Service will manage all pods with the tag app: warningtool.
spec:
  type: {{ .Values.service.type }}
  selector:
    app: warningtool
    version: warningtool-1.0.0
  ports:
    - port: 8089
      nodePort: {{ .Values.service.port }}
      targetPort: 8089
      protocol: TCP
      name: http
Parameter details:
type: service type nodePort
   There are four options 1. ClusterIP fictitious ip Cluster internal access
              2.NodePort take Service Through the specified Node Ports on are exposed to the outside
              3.LoadBalancer stay NodePort On the basis of cloud provider Create an external load balancer. This mode can only be used on ECs
              4.ExternalName Pass the service through DNS CNAME Forward the record to the specified domain name (via spec.externlName Setting)
Selector: it must be consistent with the selector matchLabels of deployment before it can be bound together. (focus)
| parameter | meaning |
|---|---|
| port | Ports accessed between services in kubernetes |
| nodePort | Ports accessible to external machines. For example, if a Web application needs to be accessed by other users, you need to configure type=NodePort |
| targetPort | The port of the container (the most fundamental port entry) is consistent with the port exposed when making the container (export in DockerFile). For example, the official nginx of docker.io exposes port 80. |
3.3.3 deployment.yaml
Note: deployment is used to deploy the pod and upgrade the system.
Example: warning deployment yaml
apiVersion: apps/v1beta2
kind: Deployment
metadata:
  name: {{ .Values.warningtool.fullname  }}
  namespace: {{ .Release.Namespace }}
  # The key value pair of the deployment tag app:warningtool
  labels:
    app: warningtool
    version: warningtool-1.0.0
spec:
  replicas: {{ .Values.warningtool.replicaCount }}
  # The service can be provided only when it corresponds to the label of the selector in the service
  selector:
  # Consistent with the following labels, otherwise an error will be reported directly: the selected does not match the template label
    matchLabels:
      app: warningtool
      version: warningtool-1.0.0
  template:
    metadata:
    # Attach a label to the pod to be created
      labels:
        app: warningtool
        version: warningtool-1.0.0
    spec:
      containers:
        - name: {{ .Values.warningtool.fullname  }}
          image: "{{ .Values.image.repository }}:{{ .Values.image.tag }}"
          imagePullPolicy: {{ .Values.image.pullPolicy }}
          resources:
{{ toYaml .Values.resources | indent 12 }}
          ports:
            - name: http
              containerPort: 8089
              protocol: TCP
          livenessProbe:
            httpGet:
              path: /healthcheck
              port: 8089
            initialDelaySeconds: {{ .Values.warningtool.liveinitialDelaySeconds }}
            periodSeconds: {{ .Values.livenessProbe.periodSeconds }}
            timeoutSeconds: {{ .Values.livenessProbe.timeoutSeconds }}
            successThreshold: {{ .Values.livenessProbe.successThreshold }}
            failureThreshold: {{ .Values.livenessProbe.failureThreshold }}
          readinessProbe:
            httpGet:
              path: /healthcheck
              port: 8089
            initialDelaySeconds: {{ .Values.warningtool.readinitialDelaySeconds }}
            periodSeconds: {{ .Values.readinessProbe.periodSeconds }}
            timeoutSeconds: {{ .Values.readinessProbe.timeoutSeconds }}
            successThreshold: {{ .Values.readinessProbe.successThreshold }}
            failureThreshold: {{ .Values.readinessProbe.failureThreshold }}
          # Location mapped to container
          volumeMounts:
      {{- if .Values.hostPath.enabled }}
          - mountPath: /data
            name: data
      {{- end }}
          - name: config
            mountPath: /config/application.properties
            subPath: application.properties
          - name: log
            mountPath: /logs
      volumes:
      - name: config
        configMap:
          name: {{ .Values.warningtool.fullname  }}
      {{- if .Values.hostPath.enabled }}
      - name: data
        hostPath:
          path: {{ .Values.hostPath.path }}
          type: {{ .Values.hostPath.type }}
      - name: log
        hostPath:
          # Directory of the host
          path: /data/logs
          type: DirectoryOrCreate
      {{- end }}
{{- if .Values.nodeSelector }}
      # The specified pod is assigned to the specified node node, which is mandatory. If our target node has no available resources, our pod will always be in Pending state
      nodeSelector:
{{ toYaml .Values.nodeSelector | indent 8 }}
{{- end }}
The detailed explanation of parameters is written in the notes. Points needing attention
4, Container deployment
4.1 importing images
docker load -i warningtool.tar
4.2 push image
docker push registry.xxx.baidu.com/dev/warningtool:v1.0
4.3 viewing the image list
docker images | grep warning
4.3 helm deployment k8s application
helm install warningtool -f values.yaml .
4.4 viewing application service status
The above is to make and package docker images from scratch and make Charts. Deploy to k8s cluster in helm mode.kubectl get po | grep warning