1. iptables basic management
1.1 problems
This case requires you to practice the use of iptables command and complete the following tasks as required:
- Close firewalld and start iptables service
- View firewall rules
- Append and insert firewall rules
- Delete and clear firewall rules
1.2 scheme
iptables firewall has 4 tables and 5 chains, 4 tables are filter table, nat table, raw table and mangle table respectively, and 5 chains are INPUT chain, OUTPUT chain, FORWARD chain, preouting chain and POSTROUTING chain respectively. Firewall rules are required to be written in a specific chain of a specific table. The effect is shown in figure-1.
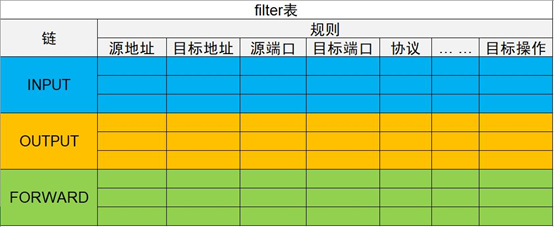
Figure-1
1.3 steps
To implement this case, you need to follow the following steps.
Step 1: close firewalld and start iptables service
1) Shut down firewalld server
[root@proxy ~]# systemctl stop firewalld.service
[root@proxy ~]# systemctl disable firewalld.service
Step 2: be familiar with iptables framework
1) 4 tables of iptables (case sensitive):
iptables has four tables by default: nat table (address translation table), filter table (data filtering table), raw table (status tracking table) and mangle table (package tag table).
2) Five chains of iptables (case sensitive):
INPUT chain (inbound rule)
OUTPUT chain (outbound rule)
FORWARD chain (forwarding rules)
Preouting chain (pre routing rules)
POSTROUTING chain (post routing rule)
Step 3: basic usage of iptables command
1) iptabels syntax format
[root@proxy ~]# Iptables [- t table name] option [chain name] [condition] [- j target operation]
[root@proxy ~]# iptables  -t  filter  -I  INPUT -p  icmp  -j  REJECT
[root@proxy ~]# iptables -F    #Clear all rules
[root@proxy ~]# iptables -t filter -I  INPUT   -p  icmp  -j  ACCEPT
[root@proxy ~]# iptables  -I  INPUT  -p  icmp  -j  REJECT
#Precautions and rules:
#You can not specify a table. The default is the filter table
#No chain can be specified. It defaults to all chains of the corresponding table
#Match in order, and the matching will stop. If no matching condition is found, the firewall default rule will be executed
#Option / chain name / target operation is in uppercase, and the rest are in lowercase
########################################################################
#Target operation:
# ACCEPT: pass / release allowed
# DROP: discard directly without giving any response
# REJECT: REJECT, and prompt will be given if necessary
# LOG: record the LOG and then pass it to the next rule
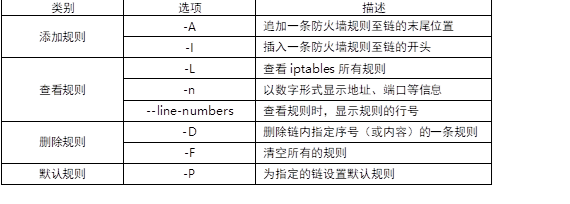
The common options of iptables command are shown in TABLE-1.
TABLE-1 iptables common options
2) Use cases of iptables command
Cases of creating rules:
[root@proxy ~]# iptables -F           #Clear all rules
[root@proxy ~]# iptables  -t  filter  -A  INPUT  -p tcp  -j  ACCEPT
#Append the rule to the end of the INPUT chain in the filter table to allow anyone to access the machine using TCP protocol
[root@proxy ~]# iptables  -I  INPUT  -p  udp  -j  ACCEPT
#Insert the rule to the beginning of the INPUT chain in the filter table to allow anyone to access the machine using UDP protocol
[root@proxy ~]# iptables  -I  INPUT 2  -p  icmp  -j  ACCEPT
#Insert the rule into line 2 of the INPUT chain in the filter table, allowing anyone to access the machine using the ICMP Protocol
View iptables firewall rules
[root@proxy ~]# iptables  -nL  INPUT                    #View rules for INPUT chain only
target     prot opt source               destination
ACCEPT     udp  --  0.0.0.0/0            0.0.0.0/0
ACCEPT     icmp --  0.0.0.0/0            0.0.0.0/0
ACCEPT     tcp  --  0.0.0.0/0            0.0.0.0/0
[root@proxy ~]# iptables  -L  INPUT  --line-numbers        #View rules and display line numbers
num  target     prot opt source         destination
1    ACCEPT     udp   --  anywhere     anywhere
2    ACCEPT     icmp --   anywhere     anywhere
3    ACCEPT     tcp  --   anywhere     anywhere
Delete rules and clear all rules
[root@proxy ~]# iptables  -D  INPUT  3
#Delete rule 3 of the INPUT chain in the filter table
[root@proxy ~]# iptables  -nL  INPUT                #View the rule and confirm whether to delete it
[root@proxy ~]# iptables  -F
#Clear firewall rules for all chains in the filter table
[root@proxy ~]# iptables  -t  nat  -F
#Clear firewall rules for all chains in nat table
[root@proxy ~]# iptables  -t  mangle  -F
#Clear firewall rules for all chains in mangle table
[root@proxy ~]# iptables  -t  raw  -F
#Clear firewall rules for all chains in the raw table
Set firewall default rules
[root@proxy ~]# iptables  -t  filter  -P  INPUT  DROP     #Set the default rule of INPUT chain to DROP
[root@proxy ~]# iptables  -nL
Chain INPUT (policy DROP)
... ...
[root@proxy ~]# iptables  -t  filter  -P  INPUT  ACCEPT     #Set the default rule of INPUT chain to ACCEPT
2. filter filtering and forwarding control
2.1 problems
This case requires the creation of common host firewall rules and network firewall rules:
- Outbound and inbound control for Linux host
- Using ip_forward mechanism to realize Linux routing / gateway function
- Implementation of packet forwarding access control on Linux gateway
2.2 scheme
According to the different objects protected by the firewall, the firewall can be divided into host firewall and network firewall, as shown in figure-2.
The host firewall mainly protects the server (filtering data packets threatening the server).
Network firewall mainly protects other servers behind the firewall, such as web server, FTP server, etc.
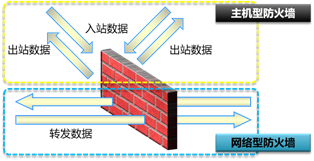
Figure-2
2.3 steps
To implement this case, you need to follow the following steps.
Step 1: conditions of iptables firewall rules
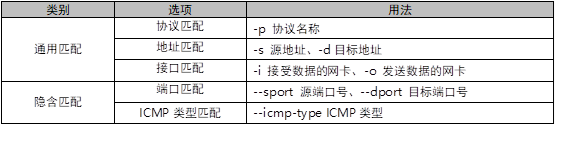
iptables firewall can filter according to many rules. The specific common filtering conditions are shown in table-2.
Table-2 iptables filter conditions
Step 2: Host Firewall case
[root@proxy ~]# iptables -I INPUT -p tcp --dport 80 -j REJECT
[root@proxy ~]# iptables -I INPUT -s 192.168.2.100 -j REJECT
[root@proxy ~]# iptables -I INPUT -d 192.168.2.5 -p tcp --dport 80 -j REJECT
[root@proxy ~]# iptables -I INPUT -i eth0 -p tcp --dport 80 -j REJECT
[root@proxy ~]# iptables  -A  INPUT -s  192.168.2.0/24  -j  DROP
#Discard 192.168 2.0/24 all packets sent by all hosts in the network to the local machine
[root@proxy ~]# iptables -A  INPUT -s  114.212.33.12  -p tcp --dport 22 -j  REJECT
#Reject 114.212 33.12 remote connection to local ssh (port 22) using tcp protocol
Step 3: network firewall case
1) Network firewall case
When deploying the network topology shown in table-3, the routing forwarding function of the proxy host must be turned on.
Table-3 experimental topology (network card name is for reference only)
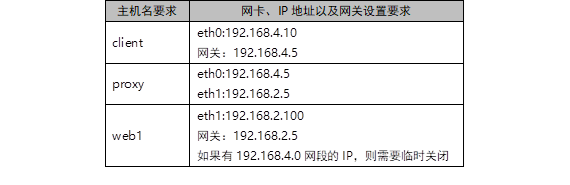
1) client host configures IP and adds gateway (the network card name is for reference only and cannot be copied)
Note: if the client host has a network card with 2 network segment IP, the network card must be closed
[root@client ~]# nmcli connection modify eth0 ipv4.method manual \
ipv4.addresses 192.168.4.10/24 autoconnect yes
[root@client ~]# nmcli connection modify eth0 ipv4.gateway 192.168.4.5
[root@client ~]# nmcli connection up eth0
[root@client ~]# iptables -F
2) The proxy host configures IP, adds a gateway, and enables routing forwarding (the network card name is for reference only and cannot be copied)
 [root@proxy ~]# nmcli connection modify eth0 ipv4.method manual \
ipv4.addresses 192.168.4.5/24 autoconnect yes
[root@proxy ~]# nmcli connection up eth0
[root@proxy ~]# nmcli connection modify eth1 ipv4.method manual \
ipv4.addresses 192.168.2.5/24 autoconnect yes
[root@proxy ~]# nmcli connection up eth1
[root@proxy ~]# iptables -F
The Linux kernel supports the soft routing function by default. The routing forwarding function can be turned on or off by modifying the kernel parameters.
[root@proxy ~]# echo 0 > /proc/sys/net/ipv4/ip_forward            #Turn off routing forwarding
[root@proxy ~]# echo 1 > /proc/sys/net/ipv4/ip_forward            #Turn on routing forwarding
#Note that the above operations are only valid for the time being, but not after the computer is restarted
[root@proxy ~]# echo 'net.ipv4.ip_forward=1' >> /etc/sysctl.conf
#Modify / etc / sysctl Conf configuration file, which can realize permanently valid rules
3) web1 host configures IP and adds gateway (the network card name is for reference only and cannot be copied)
Note: if the web1 host has a network card with 4 IP segments, the network card must be turned off
[root@web1 ~]# nmcli connection modify eth0 ipv4.method manual \
ipv4.addresses 192.168.2.100/24 autoconnect yes
[root@web1 ~]# nmcli connection modify eth0 ipv4.gateway 192.168.2.5
[root@web1 ~]# nmcli connection up eth0
4) Confirm the connectivity of different networks
[root@client ~]# ping 192.168.2.100
[root@web1 ~]# ping 192.168.4.10
5) Start http service on web1 host
[root@web1 ~]# yum -y install httpd
[root@web1 ~]# echo "test page" > /var/www/html/index.html
[root@web1 ~]# systemctl restart httpd
client accessing web services without firewall
[root@client ~]# curl http://192.168. 2.100 # success
Set the firewall rules of the proxy host to protect the Web server behind the firewall
[root@proxy ~]# iptables -I FORWARD -s 192.168.4.10 -p tcp --dport 80 -j DROP
After setting the firewall rules, use the client client again to access the test results
[root@client ~]# curl http://192.168. 2.100 # failure
Step 3: relevant strategies for disabling ping
The process of pinging (host A pinging host B) is shown in figure-3.
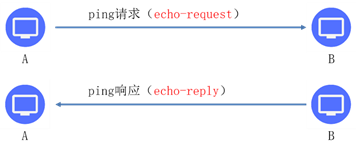
Figure-3
1) The problem of disabling ping directly by default?
[root@proxy ~]# iptables -I INPUT -p icmp -j DROP
#After setting the above rules, other hosts cannot ping this machine, but this machine cannot ping other hosts
#When the local machine ping s other hosts, the responses of other hosts also use icmp, and the responses of the other hosts are discarded
2) Prohibit other hosts from pinging this machine, and allow this machine to ping other hosts
[root@proxy ~]# iptables  -A  INPUT  -p icmp  \
 --icmp-type echo-request  -j  DROP
#Only prohibit inbound ping requests and do not reject inbound ping response packets
···
Note: About ICMP For the type of, you can refer to help For help, refer to the following commands:
```shell
[root@proxy ~]# iptables -p icmp --help
3. Firewall Extension Rules
3.1 problems
This case requires to be familiar with the extension rules of iptables, realize richer filtering functions, and complete the following tasks:
- Block the host according to the MAC address
- Open multiple TCP services in one rule
- Set blocking rules according to IP range
3.2 scheme
Iptables also extends many other conditions based on the basic filter conditions. When using iptables, you need to use the - m parameter to start these extension functions. The syntax is as follows:
iptables select Necklace name - m extension module - specific extension condition - j action
3.3 steps
To implement this case, you need to follow the following steps.
Step 1: filter according to MAC address
1) According to the rules of IP filtering, when the other party modifies the IP, the firewall will fail
[root@proxy ~]# iptables -F
[root@proxy ~]# iptables -I INPUT -s 192.168.4.10 -p tcp --dport 22 -j DROP
#192.168 4.10 remote native Using ssh
However, when the client host modifies the IP address, the rule will expire. Note that the remote connection to the client host will be disconnected because the IP address is modified. Filtering according to MAC address can prevent this from happening.
[root@client ~]# ip link show eth0                    #View the MAC address of the client
eth0: <BROADCAST,MULTICAST,UP,LOWER_UP> mtu 1500 qdisc pfifo_fast state UP mode DEFAULT qlen 1000
link/ether 52:54:00:00:00:0b brd ff:ff:ff:ff:ff:ff
[root@proxy ~]# iptables  -A  INPUT  -p tcp --dport 22\
 -m   mac --mac-source  52:54:00:00:00:0b  -j  DROP
#Reject 52:54:00:00:00:0b this host is remote
Step 2: set filtering rules based on multi ports
1) It is convenient to filter or release many ports at one time
[root@proxy ~]# iptables  -A  INPUT  -p tcp   \
 -m  multiport --dports  20,25,80,110,143,16501:16800  -j  ACCEPT
#Open all ports from 20,25,8011014316501 to 16800 at one time
Tip: multiple ports can also limit multiple source ports, but they are generally not used because the source ports are not fixed. The parameter limiting multiple source ports is – sports
Step 3: set rules according to IP address range
1) Allow from 192.168 4.10-192.168. 4.20 host ssh Remote Login
[root@proxy ~]# iptables  -A  INPUT  -p tcp  --dport  22  \
 -m  iprange  --src-range  192.168.4.10-192.168.4.20   -j  ACCEPT
Note that the range of multiple target IP S can also be limited here. The parameter is – DST range, and the usage is the same as – SRC range.
2) Prohibit from 192.168 Other hosts in the 4.0/24 network segment can log in to this machine ssh remotely
[root@proxy ~]# iptables -A INPUT -p tcp --dport 22 -s 192.168.4.0/24 -j DROP
4. Configure SNAT to realize shared Internet access
4.1 problems
This case requires setting firewall rules to allow hosts located in the LAN to access the external network, mainly including the following services:
- Build an intranet and Intranet case environment
- Configure SNAT policy to realize shared Internet access
4.2 steps
To implement this case, you need to follow the following steps.
Step 1: build an intranet and Intranet case environment
Table-4 experimental topology
Here, we set 192.168 The 2.0/24 network is an external network, 192.168 4.0/24 is the internal network.
Now, there is a web server 192.168 in the external network 2.100. Because the gateway is set, the client can access this web server. However, if you look at web1's log, you will find that 192.168 is recorded in the log 4.10 visit the web page.
The effect we need to achieve is that the client can access the web server, but it should be disguised as 192.168 Access the web server after 2.5 (simulate that all computers in the company use private IP. If you want to access the external network, you need to disguise as the external network IP of the company).
Step 2: set firewall rules to realize IP address camouflage (SNAT source address translation)
1) Ensure that the proxy host has enabled the routing forwarding function
[root@proxy ~]# echo 1 > /proc/sys/net/ipv4/ip_forward #Turn on routing forwarding
2) Set firewall rules to realize SNAT address translation
[root@proxy ~]# iptables  -t  nat  -A POSTROUTING \
 -s  192.168.4.0/24 -p tcp --dport 80  -j SNAT  --to-source 192.168.2.5
3) Log in to the web host to view the log
[root@web1 ~]# tail  /var/log/httpd/access_log
.. ..
192.168.2.5 - - [12/Aug/2018:17:57:10 +0800] "GET / HTTP/1.1" 200 27 "-" "Mozilla/4.0 (compatible; MSIE 6.0; Windows NT 5.1; SV1)"
Through the log, you will find that the client is disguised as 192.168 web server accessed after 2.5!
4) Expand the knowledge. When the proxy external network IP is not fixed, you can perform the following address camouflage and dynamically camouflage IP.
[root@proxy ~]# iptables  -t  nat  -A POSTROUTING \
 -s  192.168.4.0/24 -p tcp --dport 80 -j MASQUERADE
Finally, all iptables rules are temporary rules. If you need to keep the rules permanently, you need to execute the following commands:
Install iptables services and start the service to save the firewall rules.
[root@proxy ~]# yum -y install iptables-services
[root@proxy ~]# systemctl start iptables.service
[root@proxy ~]# systemctl enable iptables.service
[root@proxy ~]# iptables -F
[root@proxy ~]# service  iptables save           #Save firewall rules
Additional thinking topology, as shown in figure-4:
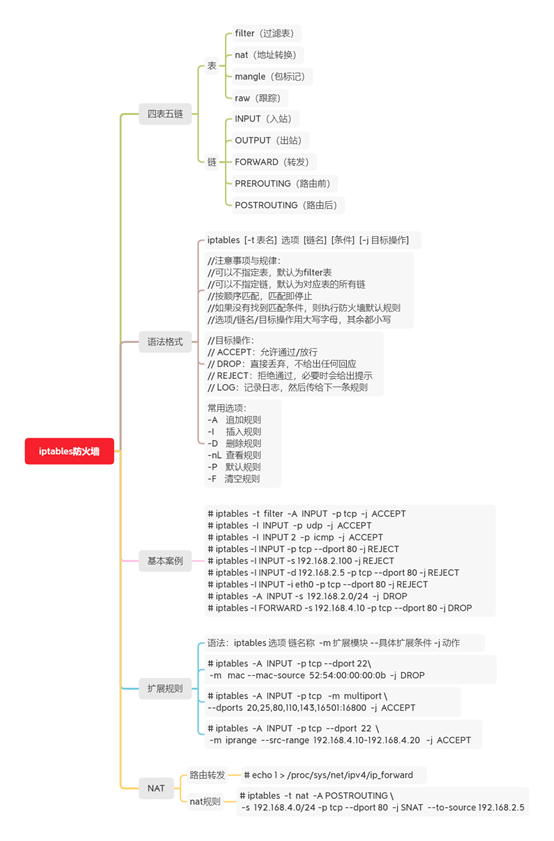
Figure-4
Exercise
1 what are the 4 tables and 5 chains of iptables?
1) Table 4 includes nat table, filter table, raw table and mangle table
2) 5 chain includes: INPUT chain, OUTPUT chain, FORWARD chain, preouting chain and POSTROUTING chain
2 what is the command to view iptables firewall rules?
[root@svr7 ~]# iptables  -nL  INPUT
target     prot opt source               destination
ACCEPT     udp  --  0.0.0.0/0            0.0.0.0/0
ACCEPT     icmp --  0.0.0.0/0            0.0.0.0/0
ACCEPT     tcp  --  0.0.0.0/0            0.0.0.0/0
[root@svr7 ~]# iptables  -L  INPUT  --line-numbers
num  target     prot opt source         destination
1    ACCEPT     udp   --  anywhere     anywhere
2    ACCEPT     icmp --  anywhere     anywhere
3    ACCEPT     tcp  --  anywhere        anywhere
3 what is the command to clear iptables firewall rules?
[root@svr7 ~]# iptables  -D  INPUT  3
[root@svr7 ~]# iptables  -nL  INPUT
Chain INPUT (policy ACCEPT)
target     prot opt source               destination
ACCEPT     udp  --  0.0.0.0/0            0.0.0.0/0
ACCEPT     icmp --  0.0.0.0/0            0.0.0.0/0
[root@svr7 ~]# iptables  -F
[root@svr7 ~]# iptables  -t  nat  -F
[root@svr7 ~]# iptables  -t  mangle  -F
[root@svr7 ~]# iptables  -t  raw  -F
4 how to turn on the routing and forwarding function of Linux?
# echo 'net.ipv4.ip_forward=1' >> /etc/sysctl.conf
perhaps
# echo 1 > /proc/sys/net/ipv4/ip_forward
5 create an iptables firewall rule to realize the command of SNAT source address translation.
[root@proxy ~]# iptables  -t  nat  -A POSTROUTING \
 > -s  192.168.4.0/24  -p tcp –dport 80 -j SNAT  --to-source  192.168.2.5
In case of infringement, please contact the author to delete