1, v-once
The instruction does not need to be followed by any expression
- This instruction indicates that elements and components are rendered only once and will not change with the change of data
Example:
<div id="app">
  <h2 v-once>{{message}}</h2>
</div>
<script src="../js/vue.js"></script>
<script>
  const app= new Vue({
    el: '#app',
    data: {
      message: 'hello'
    }
  })
</script>
2, v-html
- In some cases, the data we request from the server itself is an HTML code. If we directly output it with {}}, we will output the HTML code together
- However, if we want to parse according to the meaning of HTML and display the corresponding content, we can use the v-html instruction
– this instruction is often followed by a string type
– it parses the string HTML and renders it
Example:
<div id="app">
  <h2 v-html="url"></h2>
</div>
<script src="../js/vue.js"></script>
<script>
  const app= new Vue({
    el: '#app',
    data: {
      url: '<a href="http://www.baidu. Com "> Baidu < / a > '
    }
  })
</script>
3, v-pre
- v-pre is used to skip the compilation of this element and its child elements and to display the original Mustache syntax
- For example, the following code:
– the contents of the first h2 element will be parsed to display hello
– the second h2 element displays {{message}} directly
<div id="app">
  <h2>{{message}}</h2>
  <h2 v-pre>{{message}}</h2>
</div>
<script src="../js/vue.js"></script>
<script>
  const app= new Vue({
    el: '#app',
    data: {
      message: 'hello'
    }
  })
</script>
4, v-cloak
- In some cases, the browser may directly display the uncompiled Mustache tag, which can be avoided by setting the hidden property of v-claok
Example:
<!DOCTYPE html>
<html>
<head lang="en">
  <meta charset="UTF-8">
  <title></title>
  <style>
    [v-cloak] {
      display: none;
    }
  </style>
</head>
<body>
<div id="app">
  <h2 v-cloak>{{message}}</h2>
</div>
<script src="../js/vue.js"></script>
<script>
  setTimeout(function (){
    const app= new Vue({
      el: '#app',
      data: {
        message: 'hello'
      }
    })
  },1000);
</script>
</body>
</html>
5, v-bind
- v-bind is used to bind one or more attribute values or pass props values to another component
- The corresponding abbreviation of v-bind is:
Example:
<div id="app">
  <a v-bind:href="url">use Baidu Search</a>
</div>

<script src="../js/vue.js"></script>
<script>
  const app= new Vue({
    el: '#app',
    data: {
      url: 'http://www.baidu.com'
    }
  })
</script>
(1) v-bind dynamic binding class (object syntax {class name: value})
The {key: value} in class represents the object:
<div id="app">
  <h2 :class="{active:isActive, line:isLine}">{{message}}</h2>
</div>

<script src="../js/vue.js"></script>
<script>
  const app= new Vue({
    el: '#app',
    data: {
      message: 'hello',
      isActive: true,
      isLine: true
    }
  })
</script>
(2) v-bind dynamic binding class (array syntax) - (less used)
['string','string'] in class represents an array. Generally, this method is rarely used because it is written dead and cannot be changed dynamically:
<div id="app">
  <h2 :class="['active', 'line']">{{message}}</h2>
</div>

<script src="../js/vue.js"></script>
<script>
  const app= new Vue({
    el: '#app',
    data: {
      message: 'hello'
    }
  })
</script>
(3) v-bind dynamic binding style (object syntax {css attribute name: value})
<div id="app">
  <h2 :style="{fontSize: size, color: col}">{{message}}</h2>
</div>
<script src="../js/vue.js"></script>
<script>
  const app= new Vue({
    el: '#app',
    data: {
      message: 'hello',
      size: '100px',
      col: 'red'
    }
  })
</script>
You can also implement style binding in the form of method calls:
<div id="app">
  <h2 :style="getStyles()">{{message}}</h2>
</div>
<script src="../js/vue.js"></script>
<script>
  const app= new Vue({
    el: '#app',
    data: {
      message: 'hello',
      size: '100px',
      col: 'red'
    },
    methods: {
      getStyles: function() {
        return {
          fontSize: this.size,
          color: this.col
        }
      }
    }
  })
</script>
6, Calculated attribute - calculated
(1) Basic use
<div id="app">
  <h2>{{firstName + ' ' + lastName}}</h2>
  <h2>{{firstName}} {{lastName}}</h2>
  <h2>{{getFullName()}}</h2>
  <h2>{{fullName}}</h2>
</div>
<script src="../js/vue.js"></script>
<script>
  const app= new Vue({
    el: '#app',
    data: {
      firstName: 'chen',
      lastName: 'wei'
    },
    //computed: calculated attribute ()
    computed: {
      fullName: function() {
        return this.firstName + ' ' + this.lastName
      }
    },
    methods: {
      getFullName: function(){
        return this.firstName + ' ' + this.lastName
      }
    }
  })
</script>
(2) Complex use
<div id="app">
  {{totalPrice}}
</div>
<script src="../js/vue.js"></script>
<script>
  const app= new Vue({
    el: '#app',
    data: {
      books: [
        {id: 001, name: 'Andersen's Fairy Tales', price: 59},
        {id: 001, name: 'October Revolution', price: 119},
        {id: 001, name: 'Complete works of readers', price: 69},
        {id: 001, name: 'William Shakespeare ', price: 79}
      ]
    },
    computed: {
     totalPrice: function(){
       let total = 0;
       for(let i=0;i<this.books.length;i++){
         total += this.books[i].price;
       }
       for(let i in this.books){
         console.log(i);  //Print 0-3
       }
       for(let i in this.books){
         console.log(i); //Print 0-3
       }
       return total;
     }
    }
  })
</script>
(3) Calculation of setter and getter properties
<div id="app">
  <h2>{{fullName}}</h2>
</div>
<script src="../js/vue.js"></script>
<script>
  const app= new Vue({
    el: '#app',
    data: {
      message: 'hello'
    },
    computed: {
      fullName: {
        set: function(newValue) {

        },
        get: function() {
          return 'abc';
        }
      }
    }
  })
</script>
In the running interface, you can see that the result is displayed as: abc. Generally, only get() method is used to calculate attributes, while set() is generally deleted without writing. Both computed and methods can calculate attributes, but it is recommended to use computed, because in the case of multiple calls, the methods in computed are executed only once and then cache the results (they are executed again when the attribute value changes), and methods will be re executed every time they are called.
·
7, Block level scope
- When var is used to declare a variable in ES5, the scope of the variable is mainly related to the definition of the function.
- There is no scope for other block definitions, such as if/for, which often causes some problems in our development.
- ES6 defines variables through let, which has block level scope of if/for.
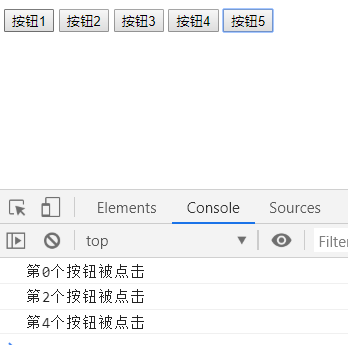
(1) The first case is the problem caused when there is no block level scope
<body>
<button>Button 1</button>
<button>Button 2</button>
<button>Button 3</button>
<button>Button 4</button>
<button>Button 5</button>
<script src="../js/vue.js"></script>
<script>
  var btns = document.getElementsByTagName('button');
  for(var i=0; i<btns.length; i++) {
    btns[i].addEventListener('click', function() {
      console.log('The first' + i + 'A button was clicked');
    })
  }
</script>
</body>
When var is used to define variables, no matter which button is clicked, only the fourth button will be printed. Because there is no block level scope, the value of variable i is modified by the for loop:
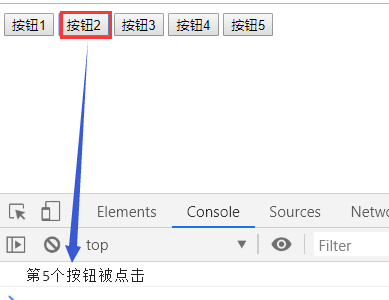
(2) Closed closure is introduced to solve this problem
<body>
<button>Button 1</button>
<button>Button 2</button>
<button>Button 3</button>
<button>Button 4</button>
<button>Button 5</button>
<script src="../js/vue.js"></script>
<script>
  var btns = document.getElementsByTagName('button');
  for(var i=0; i<btns.length; i++) {
    (function (i) {
      btns[i].addEventListener('click', function() {
        console.log('The first' + i + 'A button was clicked');
      })
    })(i)
  }
</script>
</body>
Why can closures solve this problem? The reason is that the function is a scope. When the value of i is transferred to the function in the form of function parameters instead of variable i, i will not be changed elsewhere:
8, Event listening: v-on (binding event listening)
- Function: binding event listening
- Abbreviation:@
(1) v-on parameter transfer problem
-
Case 1: if the called function does not require additional parameters, the () after the method may not be added.
- but note: if there is a parameter in the method itself and () is omitted during the method call, the native event will be passed in as a parameter by default -
Case 2: if you need to pass in parameters and event, you can pass in events through $event.
(2) v-on modifier
- . stop calls event Stoppropagation() to prevent bubbling.
- . prevent calls event Preventdefault() prevents the original event from happening.
- . {keyCode | keyAlias} the callback is triggered only when the event is triggered from a specific key.
- . native listens for native events of the component root element.
- . once supports triggering a callback.
9, v-if and v-show
- v-if when the condition is false, the element containing the v-if instruction will not exist in the dom at all.
- v-if when the condition is false, v-show just adds an inline style to our element - > Display: none.
Usage scenario:
- Use v-show when you need to switch between show and hide frequently
- When there is only one switch, v-if
10, v-for traversal array
-
If you do not need to use index values during traversal
– v-for="movie in movies"
– remove movies from movies once. And in the content of the element, we can use Mustache syntax to use movie -
If in the traversal process, we need to get the index value of the element in the array
– v-for="(item,iindex) in items"
– the index indicates the index value of the retrieved item in the original array
(1) Official recommendation: when using v-for, add a: key attribute to the corresponding element or component. Key is mainly used to update the virtual DOM efficiently.
11, Which methods in the array are responsive
- push(): inserts one or more elements at the end of the array
- pop(): deletes the last element in the array
- shift(): deletes the first element of the array
- unshift(): inserts one or more elements at the front of the array
- splice(): delete / replace / insert elements
- sort(): sort
- reverse(): reverse
12, Filter
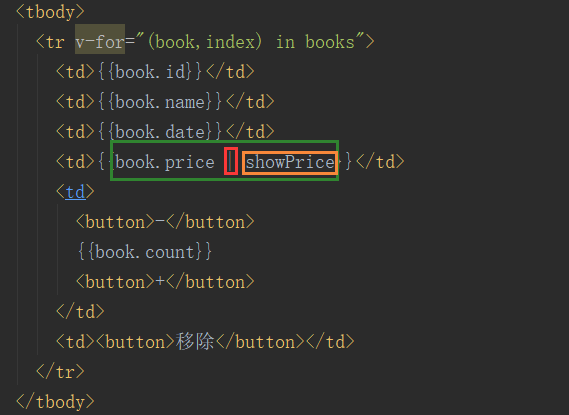
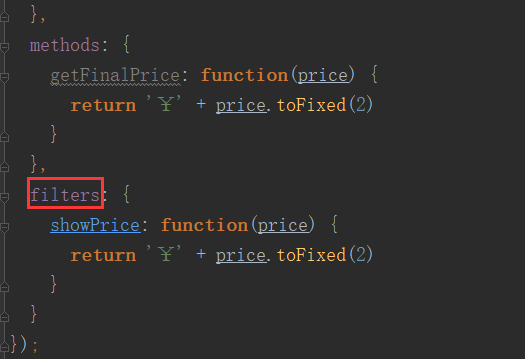
After filtering the price display, it is: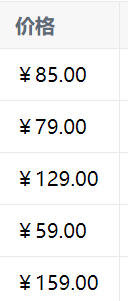
13, JavaScript higher order functions
(1) filter function: the boolean value returned by the callback function determines whether n is returned to the new array
The callback function n is to traverse the array elements of the array nums
<script>
  //The callback function in filter has a requirement: it must return a boolean value
  //When the return is true: the n of this callback will be added to the new array inside the function
  //When the return value is true: n will be filtered out inside the function
  const nums = [10, 20, 30, 40, 50, 60, 70, 80, 90];
  let newNums = nums.filter(function(n) {
    if(n<50) {
      return true;
    }else {
      return false;
    }
  });
  console.log(newNums);
</script>
Print results: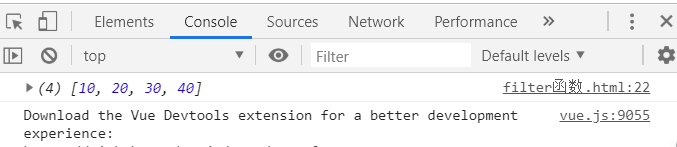
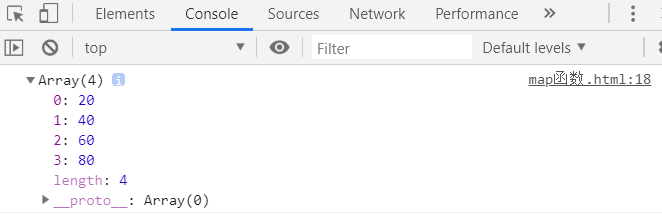
(2) map function: the value returned by the callback function is used as the value of the new array
<script>
  const nums = [10, 20, 30, 40];
  let newNums = nums.map(function(n) {
    return n * 2;
  });
  console.log(newNums);
</script>
Print results:
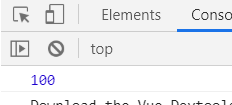
(3) reduce function: summarize all contents of the array
<script>
  // Reduce (parameter 1, parameter 2)
  // Parameter 1 represents the return value of the last callback function
  const nums = [10, 20, 30, 40];
  let newNums = nums.reduce(function(preValue, n) {
    return preValue + n;
  }, 0);
  console.log(newNums);
</script>
Print results:
14, Form binding v-model
Different from the one-way binding of v-bind, v-model realizes the two-way binding of data (that is, after the two-way binding, one of the values in the input box or the variables in data changes, and the other also changes)
<div id="app">
  <input type="text" v-model="message">
</div>
<script src="../js/vue.js"></script>
<script>
  const app= new Vue({
    el: '#app',
    data: {
      message: 'hello'
    }
  })
</script>
(1)v-model combined with checkbox
<div id="app">
  <label for="agree-visa">
    <input type="checkbox" id="agree-visa" value="true" v-model="isAgree">Consent agreement
  </label>
  <h2>You have chosen:{{isAgree}}</h2>
  <button :disabled="!isAgree">next step</button>
  <br><br>

  <input type="checkbox" value="Basketball" v-model="hobbies">Basketball
  <input type="checkbox" value="Football" v-model="hobbies">Football
  <input type="checkbox" value="Volleyball" v-model="hobbies">Volleyball
  <input type="checkbox" value="badminton" v-model="hobbies">badminton
  <h2>What is your hobby:{{hobbies}}</h2>
  </label>
</div>
<script src="../js/vue.js"></script>
<script>
  const app= new Vue({
    el: '#app',
    data: {
      isAgree: false,
      hobbies: []
    }
  })
</script>
(2)v-model combined with radio
<div id="app">
  <label for="male">
    <input type="radio" id="male" v-model="sex" name="sex" value="male">male
  </label>
  <label for="female">
    <input type="radio" id="female" v-model="sex" name="sex" value="female">female
  </label>
  <br>
  {{sex}}
</div>
<script src="../js/vue.js"></script>
<script>
  const app= new Vue({
    el: '#app',
    data: {
      sex: ''
    }
  })
</script>
(3)v-model combined with select
<div id="app">
  <h2>Radio list</h2>
  <select name="fruitList" v-model="fruit">
    <option value="Apple">Apple</option>
    <option value="Peach">Peach</option>
    <option value="watermelon">watermelon</option>
    <option value="Banana">Banana</option>
    <option value="Grapefruit">Grapefruit</option>
  </select>
  <h2>The fruit you selected is:{{fruit}}</h2>
  <br><br>
  <h2>Multiple selection list(Press ctrl/shift)</h2>
  <select name="fruitList" v-model="fruits" multiple>
    <option value="Apple">Apple</option>
    <option value="Peach">Peach</option>
    <option value="watermelon">watermelon</option>
    <option value="Banana">Banana</option>
    <option value="Grapefruit">Grapefruit</option>
  </select>
  <h2>The fruit you selected is:{{fruits}}</h2>
</div>
<script src="../js/vue.js"></script>
<script>
  const app= new Vue({
    el: '#app',
    data: {
      fruit: 'Apple',
      fruits: []
    }
  })
</script>


(4)v-model combined with input box
<div id="app">
  <label v-for="item in originHobbies" :for="item">
    <input type="checkbox" :value="item" :id="item" v-model="hobbies1">{{item}}
  </label>
  <h2>What are your qualifications:{{hobbies1}}</h2>
</div>
<script src="../js/vue.js"></script>
<script>
  const app= new Vue({
    el: '#app',
    data: {
      originHobbies: ['kindergarten','primary school','junior high school','high school','university'],
      hobbies1: []
    }
  })
</script>
(5) Use of V-model modifier
- lazy modifier:
– by default, v-model synchronizes the data of the input box in the input event;
– that is, once the data changes, the data in the corresponding data will change automatically;
– the lazy modifier allows the data to be updated only when the focus is lost or the carriage returns; - number modifier:
– by default, whether we enter letters or numbers in the input box, it will be treated as a string type;
– but at that time, if we want to deal with digital types, we'd better deal with the content directly as digital;
– the number modifier can automatically convert the content entered in the input box to a number type; - trim modifier:
– if there are many spaces at the beginning of the input content, we usually want to remove them;
– trim modifier can filter the left and right spaces of the content;
<div id="app">
  <!--1.Modifier: lazy-->
  <input type="text" v-model.lazy="message">
  <h2>{{message}}</h2>

  <!--2.Modifier: number-->
  <input type="number" v-model.number="number">
  <h2>{{number}}-{{typeof number}}</h2>

  <!--3.Modifier: trim-->
  <input type="text" v-model.trim="str">
  <h2>{{str}}</h2>
</div>
<script src="../js/vue.js"></script>
<script>
  const app= new Vue({
    el: '#app',
    data: {
      message: 'hello',
      number: 0,
      str: ''
    }
  })
</script>
15, Componentization
1. How people deal with complex problems
- Anyone's logical ability to process information is limited;
- Therefore, when facing a very complex problem, we are unlikely to handle a lot of content at one time;
- However, we have a natural ability to disassemble problems;
- If you divide a complex problem into many small problems that can be handled, and then put it into the whole, you will find that the big problems will be solved easily;
2. Componentization is a similar idea
- If we put all the processing logic in a page together, the processing will become very complex and is not conducive to subsequent management and expansion;
- However, if we split a page into small function blocks, and each function block completes its own independent functions, then the management and maintenance of the whole page will become very easy;
3. Componentization is Vue Important ideas in JS
- It provides an abstraction so that we can develop independent reusable small components to construct our applications;
- Any application will be abstracted into a component tree;
- Application of componentization idea:
– with the idea of componentization, we should make full use of it in future development;
– split the page into small and reusable components as much as possible;
– this makes our code easier to organize and manage, and more extensible;
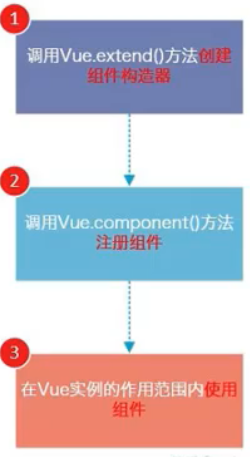
4. The use of components is divided into three steps:
- Create a component constructor;
- Register components;
- Use components;
Global registration:
<div id="app">
  <!-- 3. Use components -->
  <my-cpn></my-cpn>
  <my-cpn></my-cpn>
</div>
<script src="../js/vue.js"></script>
<script>
  //1. Create a component constructor
  const cpnC = Vue.extend({
    template: '<div><h2>I'm the title</h2><p>111111</p><p>222222</p></div>'
  });
  //2. Register components
  Vue.component('my-cpn', cpnC);
  const app= new Vue({
    el: '#app'
  })
</script>
Partial registration:
<div id="app">
  <!-- 3. Use components -->
  <cpn></cpn>
  <cpn></cpn>
</div>
<script src="../js/vue.js"></script>
<script>
  //1. Create a component constructor
  const cpnC = Vue.extend({
    template: '<div><h2>I'm the title</h2><p>111111</p><p>222222</p></div>'
  });
  const app= new Vue({
    el: '#app',
    components: {
      cpn: cpnC //Local registration component
    }
  })
</script>
5. Distinction between parent and child components
<div id="app">
  <cpn></cpn>
</div>
<script src="../js/vue.js"></script>
<script>
  // Create subcomponent constructor
  const cpnC1 = Vue.extend({
    template: '<div><h2>I am a subcomponent</h2><p>Zizi Zizi</p></div>'
  });
  // Create parent component constructor
  const cpnC2 = Vue.extend({
    template: '<div><h2>I am the parent component</h2><p>Father father father</p><cpn1></cpn1></div>',
    components: {
      cpn1: cpnC1 //Locally register component 1 as a sub component of component 2
    }
  });
  const app= new Vue({
    el: '#app',
    components: {
      cpn: cpnC2 //Local registration parent component
    }
  })
</script>
6. Grammar sugar
Global syntax sugar
<div id="app">
  <!-- 3. Use components -->
  <cpn></cpn>
</div>
<script src="../js/vue.js"></script>
<script>
  //Global syntax sugar
  Vue.component('cpn', {
    template: '<div><h2>I'm the title</h2><p>111111</p><p>222222</p></div>'
  });
  const app= new Vue({
    el: '#app'
  })
</script>
Local grammar sugar
<div id="app">
  <cpn></cpn>
</div>
<script src="../js/vue.js"></script>
<script>
  const app= new Vue({
    el: '#app',
    components: {
      'cpn': {  //Local grammar sugar
        template: '<div><h2>I'm the title</h2><p>111111</p><p>222222</p></div>'
      }
    }
  })
</script>
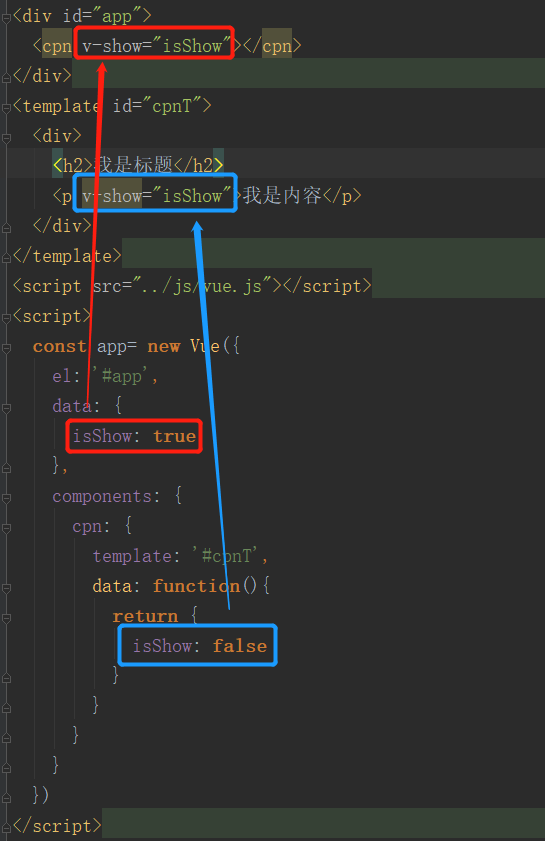
7. Component last shift withdrawal writing method
Mode 1:
<div id="app">
  <cpn></cpn>
</div>
<script src="../js/vue.js"></script>
<!-- Formwork extraction method I -->
<script type="text/x-template" id="cpnT">
  <div>
    <h2>I'm the title</h2>
    <p>111111</p>
    <p>222222</p>
  </div>
</script>
<script>
  Vue.component('cpn' ,{
    template: '#cpnT'
  });
  const app= new Vue({
    el: '#app'
  })
</script>
Mode 2:
<script src="../js/vue.js"></script>
<!-- Formwork extraction mode II -->
<template id="cpnT">
  <div>
    <h2>I'm the title</h2>
    <p>aaaaaa</p>
  </div>
</template>
<script>
  Vue.component('cpn' ,{
    template: '#cpnT'
  });
  const app= new Vue({
    el: '#app'
  })
</script>
8. Why must component data be a function
- A component is a package of a single functional module:
– this module has its own HTML template and its own data; - Components cannot directly access data in Vue instances
- Where is the component's own data stored?
– the component object also has a data attribute (or methods and other attributes);
- only the data attribute must be a function;
- and this function returns an object, which holds data;
<template id="cpnT">
  <div>
    <h2>Current count:{{counter}}</h2>
    <button @click="increment">+</button>
    <button @click="decrement">-</button>
  </div>
</template>
<div id="app">
  <cpn></cpn>
  <cpn></cpn>
  <cpn></cpn>
</div>
<script src="../js/vue.js"></script>
<script>
  Vue.component('cpn', {
    template: '#cpnT',
    data: function () {
      return {
        counter:0
      }
    },
    methods: {
      increment: function(){
        this.counter++;
      },
      decrement: function(){
        this.counter--;
      }
    }
  });
  const app= new Vue({
    el: '#app'
  })
</script>
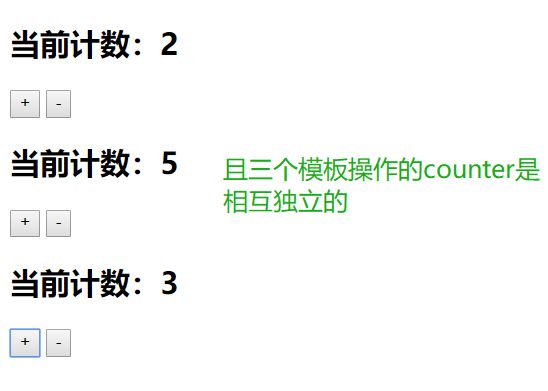
This shows the advantage that data is a function rather than an attribute, that is, the data addresses of different object operations are different.
9. Parent child component communication props
(1) Parent component communicates with child component
Pass data to subcomponents through props
- Method 1: string array. The string in the array is the name when passing;
Array:
<div id="app">
  <cpn :cmovies="movies" :cmessage="message"></cpn> <!-- v-bind Realize parent-child communication -->
</div>
<template id="cpnT">  <!--As Vue app Sub components of-->
  <div>
    <h2>{{cmovies}}</h2>
    <ul>
      <li v-for="item in cmovies">{{item}}</li>
    </ul>
    <h2>{{cmessage}}</h2>
  </div>
</template>
<script src="../js/vue.js"></script>
<script>
  // Father to son: props
  const cpn = {
    template: '#cpnT',
    props: ['cmovies','cmessage'],  //Communication to sub component cpnT
    data: function(){
      return {}
    },
    methods: {

    }
  };
  const app= new Vue({
    el: '#app',
    data: {
      message: 'hello',
      movies: ['Gourd baby','Ultraman','Transformers','One Piece']
    },
    components: {
      cpn: cpn  //Component registration
    }
  })
</script>
- Method 2: object. The object can set the type during transmission, or set the default value, etc;
Objects: props can use objects in addition to arrays. The advantage of objects is that props can be type verified
The supported authentication types are: String, Number, Boolean, Array, Object, Date, Function, Symbol.
When we have a custom constructor, validation also supports custom types.
<div id="app">
  <cpn :cmovies="movies" :cmessage="message"></cpn> <!-- v-bind Realize parent-child communication -->
</div>
<template id="cpnT">  <!--As Vue app Sub components of-->
  <div>
    <h2>{{cmovies}}</h2>
    <ul>
      <li v-for="item in cmovies">{{item}}</li>
    </ul>
    <h2>{{cmessage}}</h2>
  </div>
</template>
<script src="../js/vue.js"></script>
<script>
  // Father to son: props
  const cpn = {
    template: '#cpnT',
    props: {
      //Type restrictions
      //cmovies: Array,
      cmovies: {
        type: Array,
        default: function(){
          return []
        }
      },
      cmessage: {
        type: String,
        default: 'aaaaa',  //When the value is empty, the default value is used
        required: true  //Indicates that others must pass this parameter with this tag
      }
    },
    data: function(){
      return {}
    },
    methods: {

    }
  };
  const app= new Vue({
    el: '#app',
    data: {
      //message: 'hello',
      movies: ['Gourd baby','Ultraman','Transformers','One Piece']
    },
    components: {
      cpn: cpn  //Component registration
    }
  })
</script>
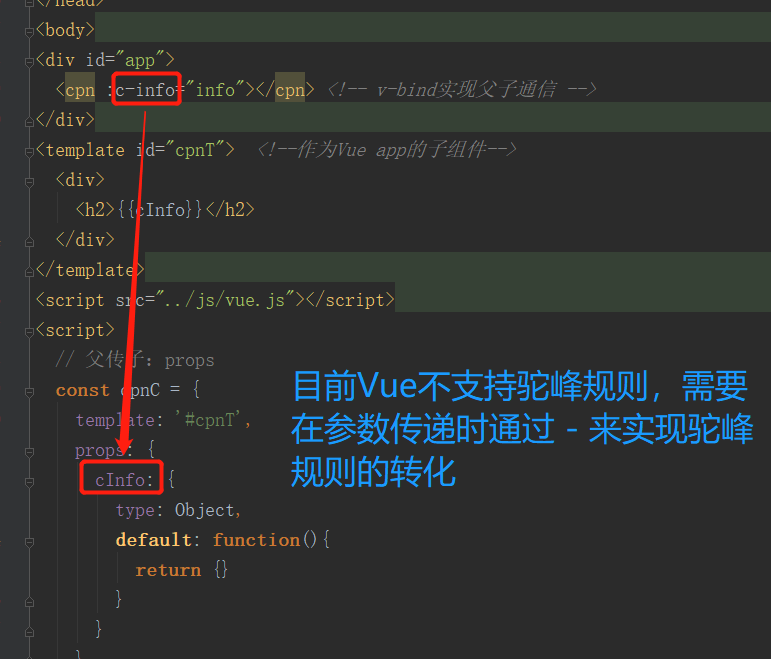
(2) Parent child component communication props hump representation
(3) Parent child component communication - child to parent (custom event)
Custom event functions:
this.$emit('item-click',id);
Example:
<div id="app">  <!--Parent component template-->
  <cpn v-on:item-click="handleChildEvent"></cpn>
</div>

<template id="cpnT">  <!--Subcomponent template-->
  <div>
    <button v-for="item in categories" style="margin-left: 10px" @click="btnClick(item.id)">{{item.name}}</button>
  </div>
</template>
<script src="../js/vue.js"></script>
<script>
  //1. Sub assembly
  const cpnC = {
    template: '#cpnT',
    data: function () {
      return {
        categories: [
          {id: '1001',name: 'clothing'},
          {id: '1002',name: 'an electric appliance'},
          {id: '1003',name: 'Shoe bag'},
          {id: '1004',name: 'Car products'},
          {id: '1005',name: 'food'}
        ]
      }
    },
    methods: {
      btnClick: function(id){
        //console.log(id);
        this.$emit('item-click',id);  //Child components communicate with parent components through custom events
      }
    }
  };
  const app= new Vue({
    el: '#app',
    data: {
    },
    components: {
      cpn: cpnC
    },
    methods :{
      handleChildEvent: function(id){
        console.log("The parent component receives and processes the information, id=" + id);  //The parameters can be omitted from the event, and the system will pass the parameters passed by the sub component definition event by default
      }
    }
  })
</script>
10. Access mode of parent-child components
Sometimes we need the parent component to directly access the child component, the child component to directly access the parent component, or the child component to access the root component.
- Parent component accesses child component: use $children or $references (Reference)
- Child component accessing parent component: use $parent
(1) Parent child: $children
- this.$children is an array type, which contains all sub component objects;
- The message status of all sub components can be retrieved through traversal;
- $refs = > object type is mainly used in development. It is an empty object by default;
<div id="app">
  <cpn ref="a"></cpn>
  <cpn ref="b"></cpn>
  <cpn ref="c"></cpn>
  <button @click="btnClick">Button</button>
</div>
<template id="cpnT">
  <div>I am a subcomponent</div>
</template>
<script src="../js/vue.js"></script>
<script>
  const app= new Vue({
    el: '#app',
    data: {
    },
    components: {
      cpn: {
        template: '#cpnT',
        data: function(){
          return {
            name: 'xiaoming'
          }
        },
        methods: {
          showMessage: function(){
            console.log('showMessage');
          }
        }
      }
    },
    methods: {
      btnClick: function(){
//        console.log(this.$children);
//        for(let c of this.$children)  {
//          console.log(c.name);
//          c.showMessage();
//        }
        console.log(this.$refs)
      }
    }
  })
</script>
(2) Child access parent: this$ parent
<div id="app">
  <cpn></cpn>
</div>
<template id="cpnT">
  <div>
    <h2>I am cpn assembly</h2>
    <ccpn></ccpn>
  </div>
</template>
<template id="ccpnT">
  <div>
    <h3>I am ccpn assembly</h3>
    <button @click="btnClick">Button</button>
  </div>
</template>
<script src="../js/vue.js"></script>
<script>
  const app= new Vue({
    el: '#app',
    data: {
    },
    components: {
      cpn: {
        template: '#cpnT',
        data: function(){
          return {
            name: 'I am cpn of name'
          }
        },
        components: {
          ccpn: {
            template: '#ccpnT',
            methods: {
              btnClick: function () {
                // 1. Access parent component
                console.log(this.$parent);
                // 2. Access the name of the parent component
                console.log(this.$parent.name);
                // 3. Access the root component
                console.log(this.$root);
              }
            }
          }
        }
      }
    }
  })
</script>

16, Component advanced
1. Why use slot
Slots for components:
- The purpose of component slots is to make our encapsulated components more scalable;
- Users can decide what to show some contents inside the component;

Chestnut: navigation bar in mobile website
- In mobile development, almost every page has a navigation bar;
- The navigation bar must be encapsulated into a plug-in, such as nav bar component;
- Once we have this component, we can reuse it in multiple pages;
How to encapsulate such components? slot
- They have many differences, but they also have many commonalities;
- If we encapsulate a component separately, it is obviously inappropriate: for example, every page returns, and we have to encapsulate this part repeatedly.
- However, if we package it into one, it seems unreasonable; Some on the left are menus, some are back, some in the middle are search, some are text, and so on;
How to package properly? Extract commonalities and retain differences
- The best packaging method is to extract commonalities into components, which is unreasonable and exposed as slots;
- Once we reserve the slot, users can decide what content to insert into the slot according to their own needs;
- Whether it is a search box, text or menu is decided by the caller;
After knowing why to use slot, let's talk about how to use slot
- In the sub component, a slot can be opened for the sub component by using the special element < slot >;
- What is inserted into the slot depends on how the parent component is used;
<div id="app">
  <cpn><button>search</button></cpn>
  <cpn>
    <button>written words</button>
    <div>abcde</div>
  </cpn>
  <cpn></cpn> <!-- If it is not transmitted, the default mode will be used -->
</div>
<template id="cpnT">
  <div>
    <h2>I am the component title</h2>
    <p>I am the component content</p>
    <slot><button>default</button></slot>
  </div>
</template>
<script src="../js/vue.js"></script>
<script>
  const app= new Vue({
    el: '#app',
    data: {
    },
    components: {
      cpn: {
        template: '#cpnT'
      }
    }
  })
</script>
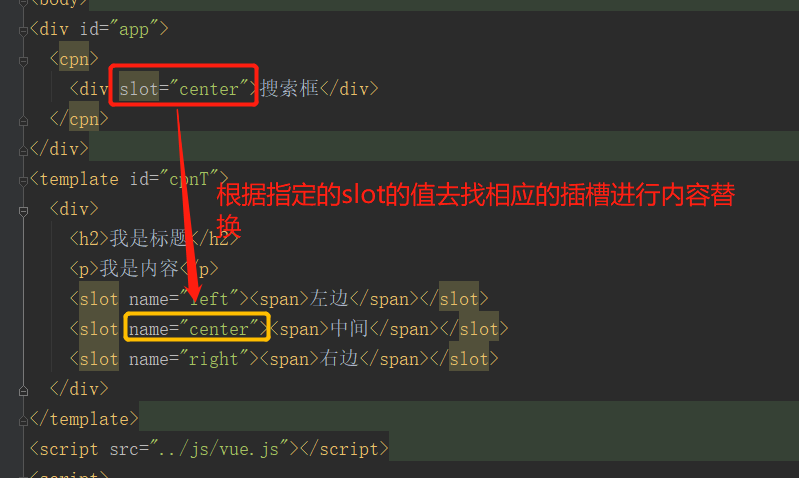
2. Named slot
3. Compile scope
- Everything in the parent component template will be compiled in the parent scope;
- Everything in the subcomponent template will be compiled in the child scope;
4. Use of scope slots
- The parent component replaces the label of the slot, but the content is provided by the child component;
<div id="app">
  <cpn>
    <template slot-scope="slot">
      <!--<span v-for="item in slot.data">{{item}} — </span>-->
      <span>{{slot.data.join(' — ')}}</span>
    </template>
  </cpn>
</div>
<template id="cpnT">
  <div>
    <slot :data="pLanguages">
      <ul>
        <li v-for="item in pLanguages">{{item}}</li>
      </ul>
    </slot>
  </div>
</template>
<script src="../js/vue.js"></script>
<script>
  const app= new Vue({
    el: '#app',
    data: {
    },
    components: {
      cpn: {
        template: '#cpnT',
        data: function(){
          return {
            pLanguages: ['Java','JavaScript','C','C++','Python']
          }
        }
      }
    }
  })
</script>
17, Modular development
1. JavaScript raw functionality
-
In the early stage of web page development, js production, as a script language, did some simple form verification or animation implementation
– how was the code written at that time? Write the code directly in the < script > tag; -
With the emergence of ajax asynchronous requests, the separation of front and back ends is gradually formed
– the client needs to complete more and more things, and the amount of code is increasing day by day;
– in order to cope with the sharp increase in the amount of code, we usually organize the code in multiple js files for maintenance;
– however, this maintenance method still cannot avoid some catastrophic problems (the problem of global variable namesake); -
This code is written in a way that is almost mandatory to rely on js files
– but when there are too many js files, such as dozens, it is difficult to figure out their order;
– and even if you figure out the order, you can't avoid the embarrassing problems above; -
Anonymous function solution
– you can use anonymous functions in js files
(function(){
	var flag = true;
})();
-Use modularity as an outlet
– define an object inside an anonymous function;
– add various attributes and methods to the object that need to be exposed (no direct definition of exposure is required);
- finally, return this object and use a ModuleA to accept it outside;
var ModuleA = (function(){
	// 1. Define an object
	var obj = {};
	// 2. Add variables and methods inside the object
	obj.flag = true;
	obj.myFunc = function(info) {
		console.log(info);
	}
	// 3. Return object
	return obj;
})();
- This is the most basic encapsulation of modularity. In fact, there are many advanced topics about module encapsulation
– but here is to understand why modules are needed and the original prototype of modules;
– fortunately, the front-end modular development has a good specification and implementation scheme; - Common modular specifications:
– CommonJS, AMD, CMD, and ES6 Modules;
2. CommonJS modularity (understand)
- Modularity has two cores: export and import
- Export of CommonJS:
var name = 'xiaoming';
var age = 24;
var flag = true;
function sum(num1, num2) {
  return num1 + num2;
}
//export
module.exports = {
  flag: flag,
  sum: sum
};
- CommonJS import:
// CommonJS module
let {flag,sum} = require('./aaa.js');
// Equivalent to
let aaa = require('./aaa.js');
let flag = aaa.flag;
let sum = aaa.sum;
3. ES6 modularization
- Export:
export {
  flag, sum
}
- Import:
import {flag, sum} from './aaa.js';
- export default
– in some cases, a module contains a function. We don't want to name this function, but let the importer name it himself. At this time, you can use export default;
– export default in the same module, multiple cannot exist at the same time; - import use
– we use the export command to export the interface provided by the module. Next, we can load the corresponding module through the import command;
– first, we need to introduce two js files into the HTML code, and the type needs to be set to module;

– the import instruction is used to import the contents of the module, such as main JS code;

– we want to import all the information in a module. Importing one by one seems a little troublesome. We can import all the export variables in the module through * and usually we need to set an alias for ease of use;
