0x00 overview of ideas
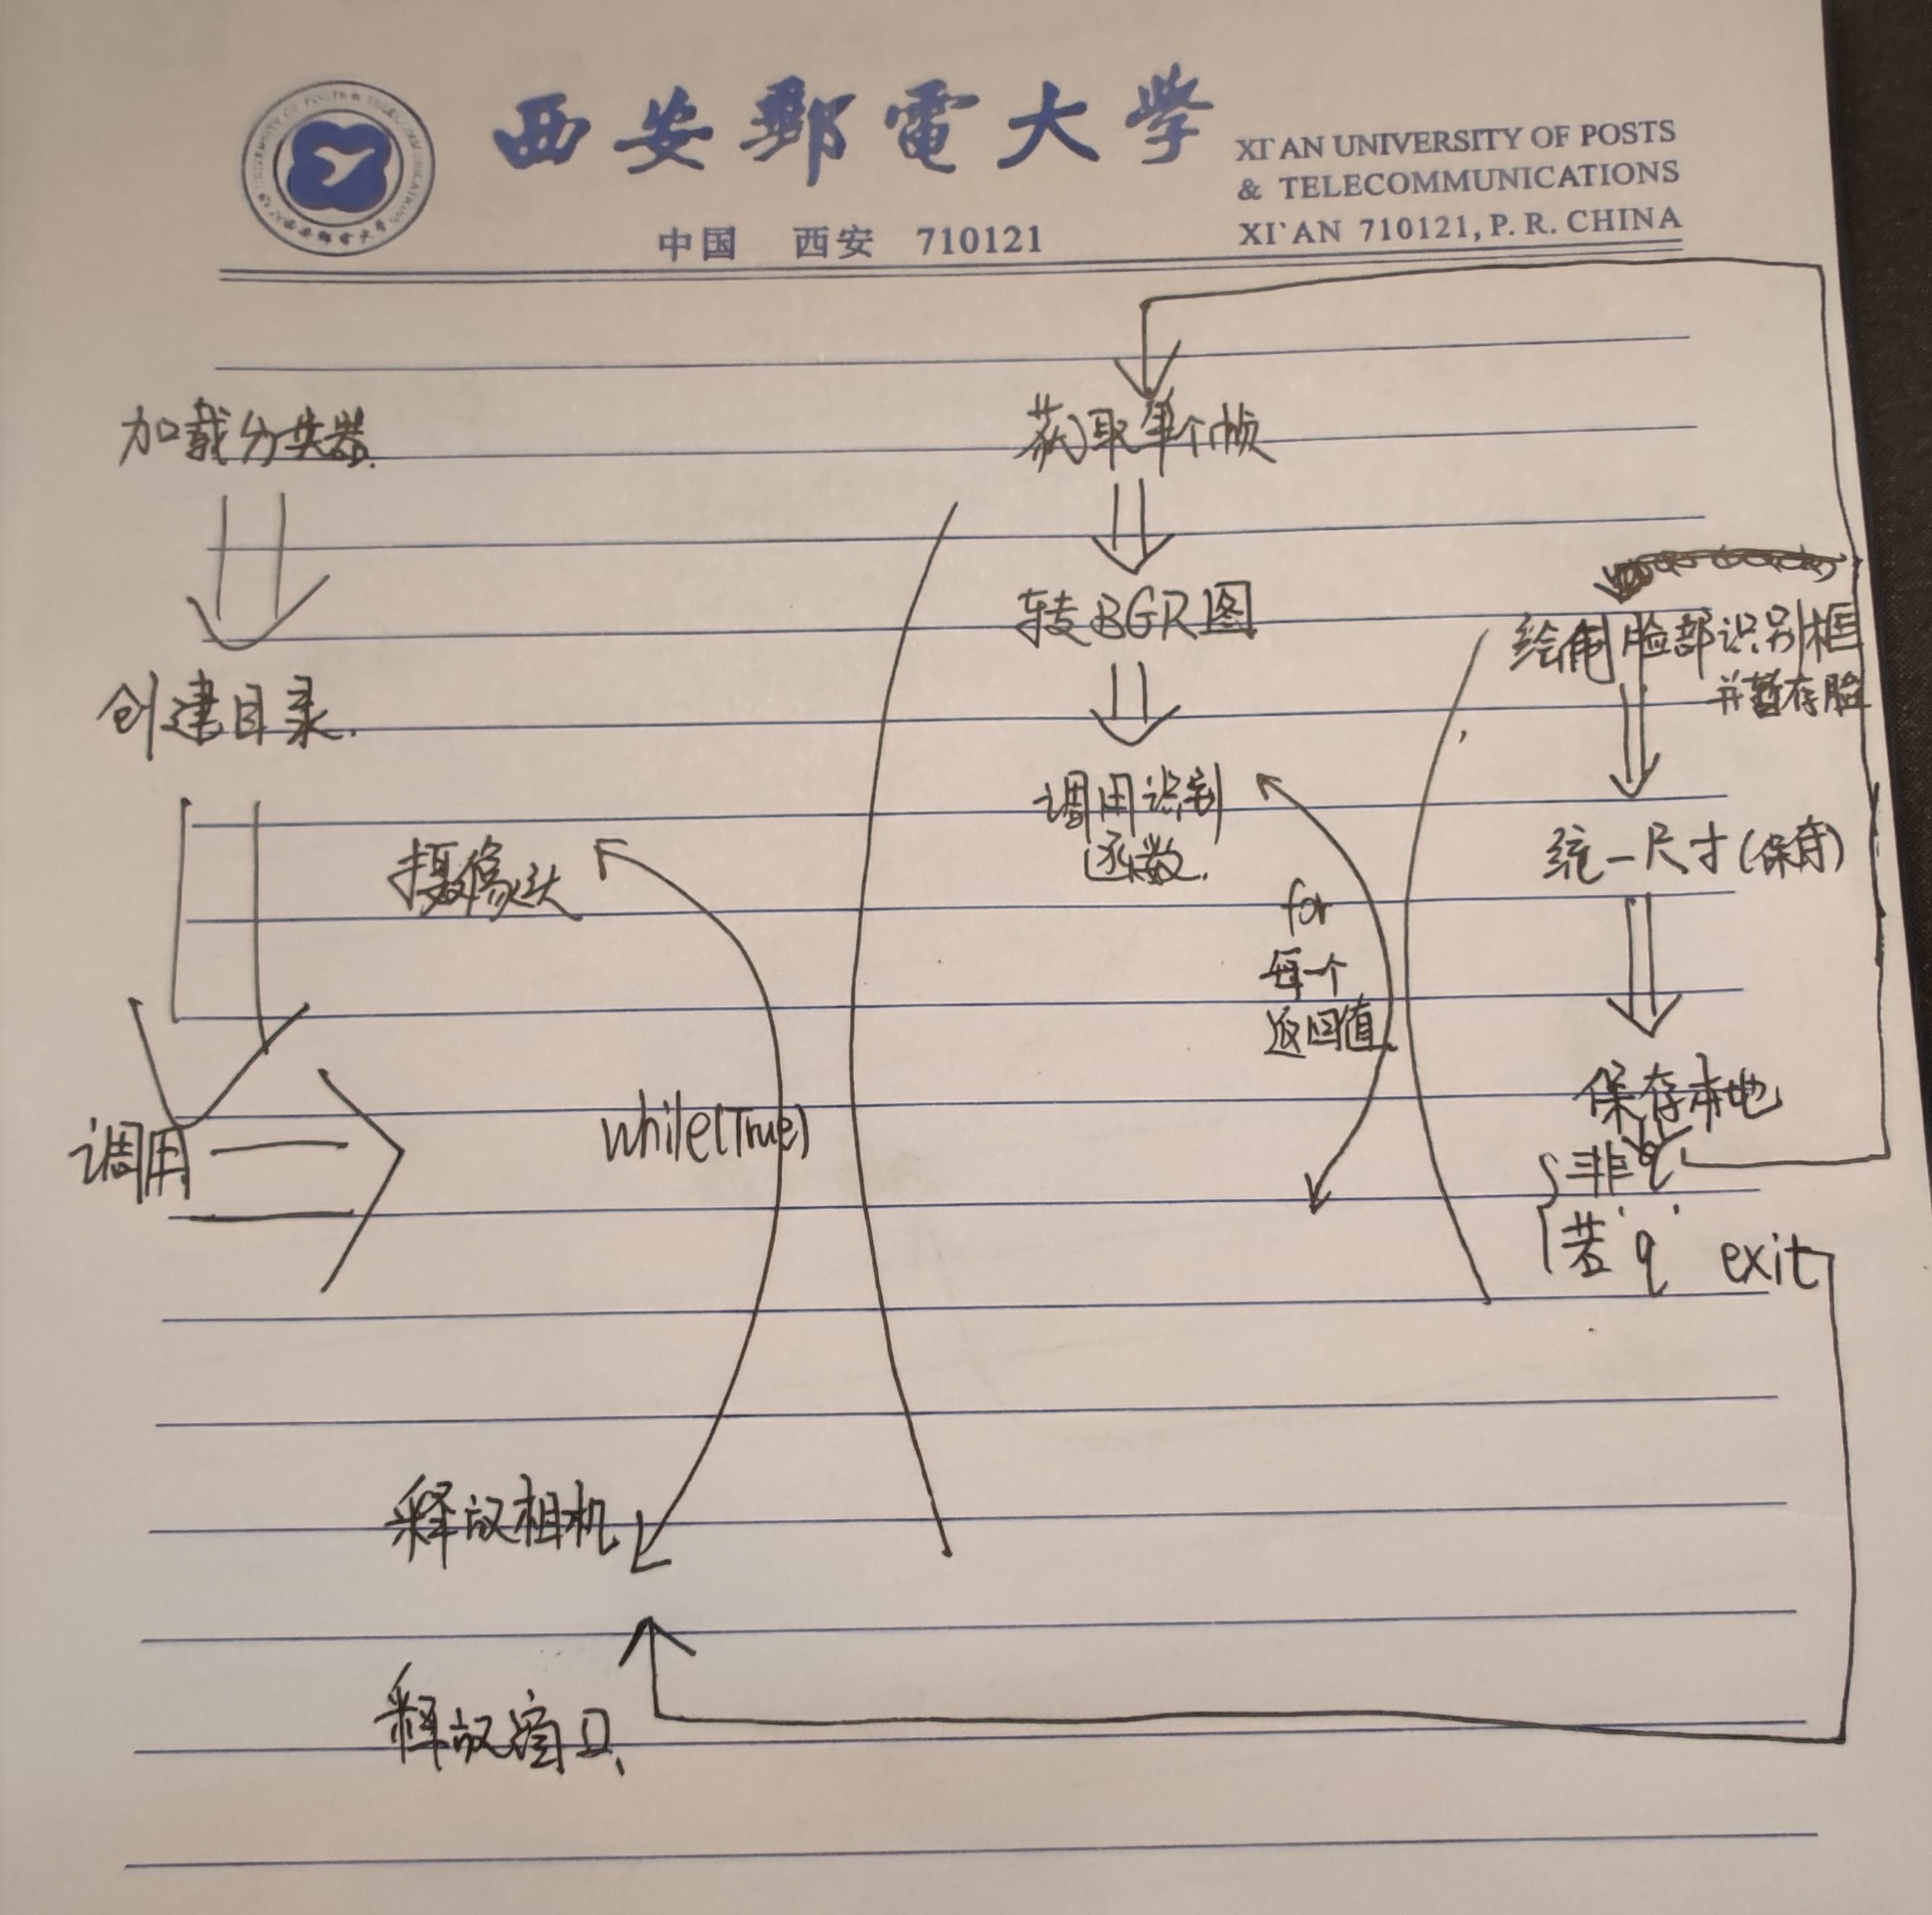
The overall logic of the program is to recognize your face and save count (counter) pictures of your face, then exit, or press q while running.
There are two important cycles
1. Call camera loop continuously ----- while true
2. Process the function of each face recognized by the recognition function ----- for xywh in face
0x01 code overview
What is the classifier------- F&A --2
0x02. Camera logic analysis
Start call
camera = cv2.VideoCapture(0)#Indicates that the built-in camera of the notebook is turned on
Get a single frame
Light start is useless. You need to capture every frame of picture. In terms of programming, what can be refined will be refined as much as possible. It is often too simple to think about things
ret, frame = camera.read()
This ret is used to feed back exceptions. If the frame cannot be intercepted, it will exit
release
camera.release()
0x03. Identification logic analysis
transformation
After obtaining a single frame, opencv reads the BGR when the color channel of the picture is arranged, so it needs to be converted.
(why is BGR widely used instead of RGB in deep learning?)---- F&A 1
gray = cv2.cvtColor(frame, cv2.COLOR_BGR2GRAY)#Convert BGR format to grayscale image
Frame is the carrier of each frame above
The second parameter is the image format. More parameters are as follows
Recognition function
Here, we previously accepted the current frame in BGR format with gray
faces = face_cascade.detectMultiScale(gray, 1.4, 5)
Parameter 1: Image -- image to be detected, which is generally gray image to speed up detection;
Parameter 2: objects -- rectangular box vector group of the detected object;
Parameter 3: scaleFactor -- represents the scale coefficient of the search window in the two successive scans. The default is 1.1, that is, the search window is expanded by 10% each time;
Parameter 4: minNeighbors -- represents the minimum number of adjacent rectangles constituting the detection target (3 by default).
If the sum of the number of small rectangles constituting the detection target is less than min_neighbors - 1 will be excluded.
If min_ If neighbors is 0, the function returns all checked candidate rectangles without any operation,
This setting value is generally used in the user-defined combination program for detection results;
Parameter 5: flags -- use either the default value or CV_HAAR_DO_CANNY_PRUNING, if set to CV_HAAR_DO_CANNY_PRUNING, then the function will use Canny edge detection to exclude areas with too many or too few edges, so these areas are usually not the area where the face is located;
Parameters 6, 7: minSize and maxSize are used to limit the range of the resulting target area.
Return value
The specific function details are not seen for the time being, but according to the analysis of the following code, the rectangular identification angular coordinates of each face will be returned. X, y (lower left corner) w, h is the width and height, plus the corresponding x, y is the upper right corner
Block diagram feedback
img = cv2.rectangle(frame, (x, y), (x + w, y + h), (255, 0, 0), 2)
Rectangle is used to draw a rectangular box. It is usually used on the mark of the picture. Parameters: 1 Processed picture 2.3 coordinates of upper left and lower right corners of rectangle 4 Color 5 Line type
At this point, you can get real-time feedback in front of the computer screen.
Frame is the current frame
0x04. Storage logic
Before the whole program starts, we need to give a path as a parameter. If this path is not a directory, we will generate a directory according to this path
Whether the given parameter is a directory
    if (not os.path.isdir(dirname)):#Determine whether it is a directory
        os.makedirs(dirname)#If not, create a directory
Picture "format"
We want to store photos in the same format
Then we're going to intercept the specified position and zoom here
Following the 3-recognition function, we use gray to store the gray image
f = cv2.resize(gray[y:y + h, x:x + w], (200, 200))
Parameter 1: picture [position], parameter 2: how large is the zoom
write in
cv2.imwrite(dirname + '/%s.pgm' % str(count), f)#Write to file
Named after the iterator count
Save photos
code
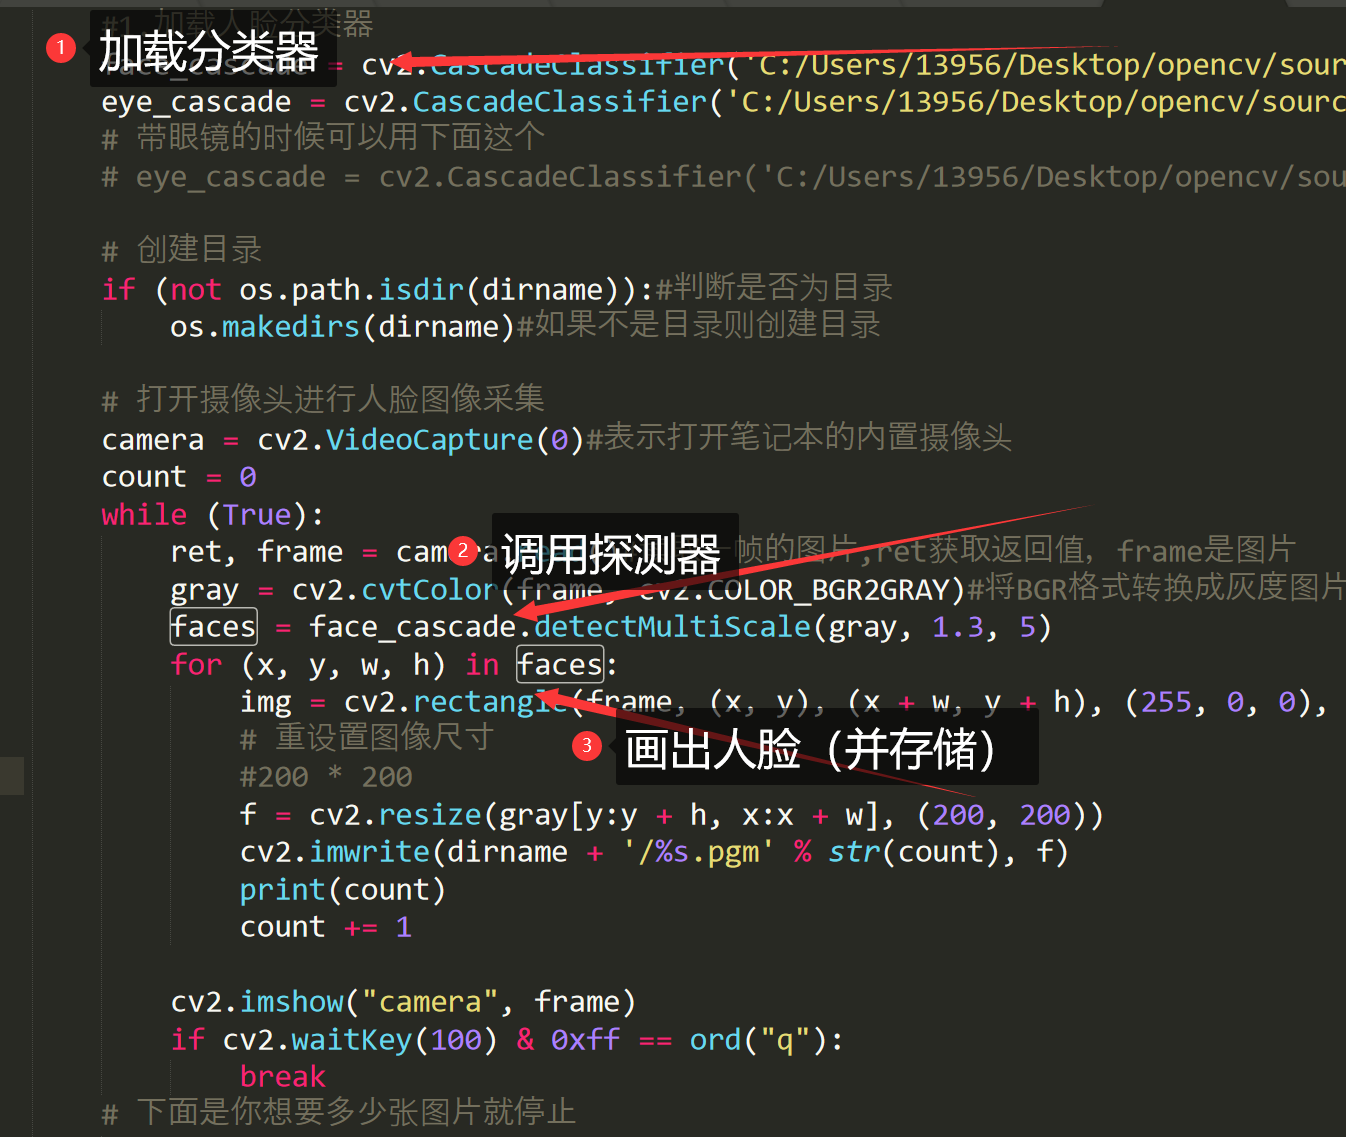
import camera as camera
import cv2
import os


def generate(dirname):
    #1. Load face classifier
    face_cascade = cv2.CascadeClassifier('C:/Users/13956/Desktop/opencv/sources/data/haarcascades/haarcascade_frontalface_default.xml')
    eye_cascade = cv2.CascadeClassifier('C:/Users/13956/Desktop/opencv/sources/data/haarcascades/haarcascade_eye.xml')
    # You can use this when wearing glasses
    # eye_cascade = cv2.CascadeClassifier('C:/Users/13956/Desktop/opencv/sources/data/haarcascades/haarcascade_eye_tree_eyeglasses.xml')

    # Create directory
    if (not os.path.isdir(dirname)):#Determine whether it is a directory
        os.makedirs(dirname)#If not, create a directory

    # Open the camera for face image acquisition
    camera = cv2.VideoCapture(0)#Indicates that the built-in camera of the notebook is turned on
    count = 0
    while (True):
        ret, frame = camera.read()#Read a frame of picture, ret gets the return value, and frame is the picture
        gray = cv2.cvtColor(frame, cv2.COLOR_BGR2GRAY)#Convert BGR format to grayscale image
        faces = face_cascade.detectMultiScale(gray, 1.4, 5)
        #Using the trained data recognition, parameters: input the face target sequence of the image, the proportion of each image reduction, store the minimum true recognition recognition, minimum size and maximum size
        #The last three parameters can reduce the error
        for (x, y, w, h) in faces:#x. Y is the recognized coordinates, W and H are the recognized range width and height
            img = cv2.rectangle(frame, (x, y), (x + w, y + h), (255, 0, 0), 2)
            #Rectangle is used to draw a rectangular box. It is usually used on the mark of the picture. Parameters: 1 Processed picture 2.3 coordinates of upper left and lower right corners of rectangle 4 Color 5 Line type
            # Resize image
            #200 * 200
            f = cv2.resize(gray[y:y + h, x:x + w], (200, 200))
            cv2.imwrite(dirname + '/%s.pgm' % str(count), f)#Write to file
            print(count)
            count += 1#Iterator++

        cv2.imshow("camera", frame)
        if cv2.waitKey(100) & 0xff == ord("q"):
        #The reason why the mask operation is performed is because it has been found that in some cases in Linux (when OpenCV uses GTK as its backend GUI), waitKey() may return more than ASCII keycode s, so this is to prevent bug s in some cases.
            break
    # Here's how many pictures you want to stop
        elif count > 20:
            break


    camera.release()#Release the camera
    cv2.destroyAllWindows()#release window

if __name__ == "__main__":
    #__ name__ Is a built-in class attribute of python and a system variable that identifies the name of the module.
    #If the current module is executed directly (main module)__ name__ Stored is__ main__

    #If the current module is the called module (imported), then__ name__ Stored is the py file name (module name)
    #Before all the code is executed__ name__  Variable value is set to '__ main__'
    generate("C:/Users/13956/Desktop/666") # Place the generated image in your computer and call the function
F&A
1. Why is BGR widely used instead of RGB in deep learning?
"Because caffe, as the representative of the earliest and most popular libraries, uses opencv, and the default channel of OpenCV is bgr. This is one of the entry pits of OpenCV. bgr is a problem left over from history. In order to be compatible with some early hardware.
In fact, you can use rgb for your own training, and the new library is basically gone. The problem of bgr or rgb is to switch the next order. But if you want to use some old trained models, you have to be compatible with the bgr of the old models.
Author: HexUp
Link: https://www.zhihu.com/question/264044792/answer/277369496
2. Classifier
Haar feature classifier is an XML file that describes the Haar feature values of various parts of the human body. Including face, eyes, lips, etc.
Haar feature classifier storage directory: under the \ data\ haarcascades directory in the OpenCV installation directory, OpenCV2 Haar feature classifier in version 4.9 is as follows:
haarcascade_eye.xml
haarcascade_eye_tree_eyeglasses.xml
haarcascade_frontalface_alt.xml
haarcascade_frontalface_alt_tree.xml
haarcascade_frontalface_alt2.xml
haarcascade_frontalface_default.xml
haarcascade_fullbody.xml
haarcascade_lefteye_2splits.xml
haarcascade_lowerbody.xml
haarcascade_mcs_eyepair_big.xml
haarcascade_mcs_eyepair_small.xml
haarcascade_mcs_leftear.xml
haarcascade_mcs_lefteye.xml
haarcascade_mcs_mouth.xml
haarcascade_mcs_nose.xml
haarcascade_mcs_rightear.xml
haarcascade_mcs_righteye.xml
haarcascade_mcs_upperbody.xml
haarcascade_profileface.xml
haarcascade_righteye_2splits.xml
haarcascade_smile.xml
haarcascade_upperbody.xml
Here we use
haarcascade_frontalface_default.xml eigenvalue file
The data in xml is the data trained by in-depth learning. You need to see the content related to in-depth learning