Premise statement:
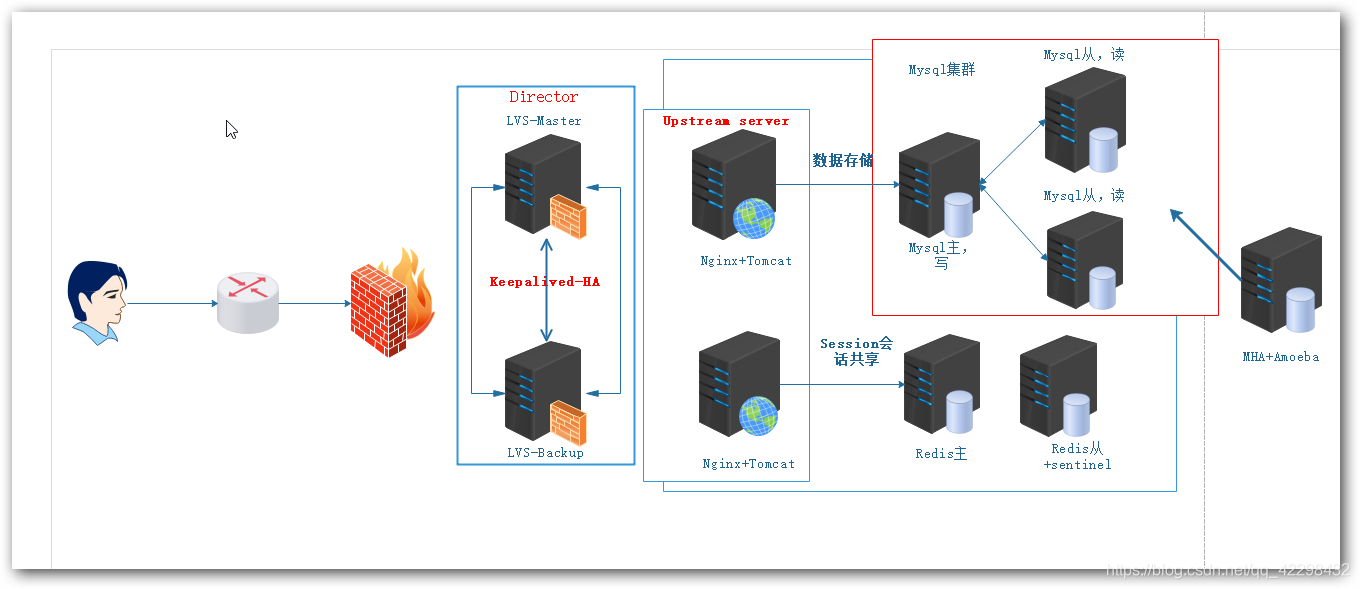
In the enterprise, with the growth of users, the amount of data accessed is also increasing. The previous environment is not enough to support daily work, and then there are various application bottlenecks. Since the problems arise, we have to find ways to solve them. In the general website environment, Web servers such as LAMP, LNMP or Tomcat are used, and for the optimization of our website environment, In addition to source code optimization, configuration tuning, Sql index creation, increasing memory and read-write speed, we can also optimize and expand the environment architecture.
Therefore, we use LVS as a proxy server for load balancing, and Nginx separates the dynamic and static of the site to speed up the access speed of the website.
After the introduction of load balancing technology, there is such a problem. First of all, the HTTP protocol is stateless. When a customer makes two requests to a server at the same time, the server does not know that the two requests come from the same client. We may think of using keepalive to maintain a long connection, Maintaining a long connection means that the client can initiate multiple requests within this time period after establishing a connection with the server. It does not mean establishing two connections, but many times, the server needs to track user information. For example, after you log in to a certain website, you need to log in to the user again every time you refresh it. In this case, the client experience is very bad, but we can use the httpd cookie on the server to solve this problem.
A cookie means that when each client accesses the resources of our server, if it has accessed our server before, the client will have a token to access the server before, (as long as it is not deleted), it doesn't matter. If it is the first access, the server will generate a token. Therefore, each client should have a unique id, that is, a cookie.
This cookie should be attached to the request message every time the client accesses the server, so that the server can track the user's identity. However, after this user accesses the resources of the server, the server can force you to generate these previously accessed resources or information locally, so that the next time you visit, the server can view what you have accessed in me before. But there are some software with security names on our computers, such as what security satellite TV and what housekeeper. They have the supreme right. When you scan the files, you can find the resources of some websites you have visited before. These are very unsafe. They will push a large number of advertisements for these things according to some things you have visited before. Cause privacy disclosure. It's not safe. (except for your keywords on the search engine).
But there is another solution. For example, when you visit some things in a certain East, a certain East will also track the information accessed by users, but the tracking results are not saved locally on the client, but on the server. He will add a k to each user's cookie and keep a file to record the user's various browsing behaviors. This behavior is usually called session on the server. User's session.
After web server clustering and hot standby, we are not afraid of web server failure, but we should know that a lot of website data is stored in the database, such as registered members, articles, shopping orders and so on. Of course, we can back up the database, but if we do a backup at 00:00 every day, if the data is lost at 23:59, the data of the day will be lost. Is there a way to realize real-time backup, that is, backup immediately when there is data? The answer should be yes, that is, Mysql master-slave replication. Mysql read-write separation is to improve the concurrent load capacity of the database and the efficiency of data reading and writing.
Don't say so much. Let's configure it with me next
First, the architecture environment is introduced:
| The server | Operating system version | Required installation package | Installed services | IP address |
|---|---|---|---|---|
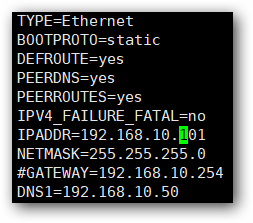
| Lvs-master | CentOS Linux release 7.3.1611 (Core) | keepalived.x86_64 0:1.2.13-8.el7 ipvsadm.x86_64 0:1.27-7.el7 | Keepalived,ipvsadm.x86_64 | 192.168.10.101 |
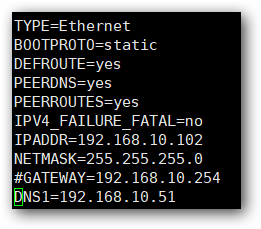
| Lvs-Backup | CentOS Linux release 7.3.1611 (Core) | keepalived.x86_64 0:1.2.13-8.el7 ipvsadm.x86_64 0:1.27-7.el7 | Keepalived,ipvsadm.x86_64 | 192.168.10.102 |
| NT-1 | CentOS Linux release 7.3.1611 (Core) | nginx.x86_64 1:1.12.2-2.el7 apache-tomcat-9.0.8.tar phpredis-4.3.0 | Nginx Tomcat DNS | 192.168.10.103 |
| NT-2 | CentOS Linux release 7.3.1611 (Core) | nginx.x86_64 1:1.12.2-2.el7 apache-tomcat-9.0.8.tar phpredis-4.3.0 | Nginx Tomcat DNS | 192.168.10.104 |
| Mysql-master | CentOS Linux release 7.3.1611 (Core) | mysql-5.6.36.tar mha4mysql-node-0.57.tar | Mysql | 192.168.10.105 |
| Mysql-slave1 | CentOS Linux release 7.3.1611 (Core) | mysql-5.6.36.tar mha4mysql-node-0.57.tar | Mysql | 192.168.10.106 |
| Mysql-slave2 | CentOS Linux release 7.3.1611 (Core) | mysql-5.6.36.tar mha4mysql-node-0.57.tar | Mysql | 192.168.10.107 |
| Reids-master | CentOS Linux release 7.3.1611 (Core) | redis-5.0.5.tar Redis | 192.168.10.108 | |
| Reids-Slave | CentOS Linux release 7.3.1611 (Core) | redis-5.0.5.tar tomcat-redis-session-manager | Redis | 192.168.10.109 |
| MHA-Amoeba | CentOS Linux release 7.3.1611 (Core) | amoeba-mysql-binary-2.2.0.tar mha4mysql-manager-0.57.tar | MHA Amoeba | 192.168.10.110 |
| Gateway-server | CentOS Linux release 7.3.1611 (Core) | Iptables | Iptables | 192.168.10.111 |
In this experiment: the front end uses two servers to configure LVS + kept to realize high availability load balancing and dynamic and static separation; The back-end php dynamic server is built using lnmp and Tomcat services, which is responsible for parsing php dynamic resources and Java developed web pages; Using redis sentinel or cluster, mysql is implemented using mha master-slave replication and read-write separation architecture. Use software firewall IPtables as gateway server for security protection.
Configuration process: before starting, SSH secret free login shall be set up on each host, which will be used for MHA later
1, In the initial configuration before configuration, configure the ip address of each host, close the firewall and selinux, and build a DNS server (communication between hosts); in this step, all hosts operate, and I only operate one host here.
[root@Nginx-Tomcat1 /] systemctl stop firewalld
[root@Nginx-Tomcat1 /] setenforce 0
[root@Nginx-Tomcat1 /] systemctl disable firewalld
Think of a server as a time server
yum -y install ntp
 If you can access the Internet directly, synchronize the third-party time server
ntpdate time.windows.com
ntpdate ntp1.aliyun.com
 You can also set up your own time server
vim /etc/ntp.conf
#restrict 192.168.11.0 mask 255.255.255.0 nomodify notrap #Allowed network segments
server 127.127.1.0 #Add native as server
fudge 127.127.1.0 stratum 10 #Change priority to highest

#Add scheduled tasks in crontab
crontab -e
0,30 * * * * ntpdate 192.168.10.101

#Start service
systemctl start ntpd
systemctl enable ntpd
2: Configure Nginx+Tomcat server to realize dynamic request resolution (the operation of two NT hosts is the same. Here is a demonstration)
1. Install the software packages required by Nginx and Tomcat. jdk must be installed before deploying tomcat, because jdk is the necessary environment for Tomcat to run. The installation of jdk is relatively simple. There are many versions. Here we can choose the rpm version! Open the official website of oracle, JDK installation and download There will be a large version of 172 on this page. Select one of the installation packages according to the computer hardware configuration used, as shown in the figure. To select a Linux based 64 bit rpm version, you must select Accept License Agreement before downloading.

[root@Nginx-Tomcat /] yum -y install nginx php-fpm php-mbstring.x86_64 php-gd.x86_64 php-mysql.x86_64 php gcc*
2. After downloading the installation package, upload it to the server / usr/src / directory system and execute the installation command:
[root@Nginx-Tomcat1 src]# rpm -ivh jdk-8u171-linux-x64.rpm
[root@Nginx-Tomcat1 src]# rpm -qa | grep "jdk*"
[root@Nginx-Tomcat1 src]# rpm -qc jdk1.8
The above shows that the installation is complete, and the JDK installation directory is / usr / Java / jdk1 8.0_ 171-amd64, set the environment variable of JDK, edit the / etc/profile file, and add the following contents:
[root@Nginx-Tomcat1 /] vim /etc/profile
export JAVA_HOME=/usr/java/jdk1.8.0_171-amd64
export CLASSPATH=$JAVA_HOME/lib/tools.jar:$JAVA_HOME/lib/dt.jar
export PATH=$JAVA_HOME/bin:$PATH
Make environment variables effective:
[root@Nginx-Tomcat1 /]# source /etc/profile
[root@Nginx-Tomcat1 src]# tar zxvf apache-tomcat-9.0.8.tar.gz
[root@Nginx-Tomcat1 src]# mv apache-tomcat-9.0.8 /usr/local/tomcat
[root@Nginx-Tomcat1 tomcat]# /usr/local/tomcat/bin/startup.sh
III To configure the Nginx server:
[root@Nginx-Tomcat1 /]# systemctl start nginx
[root@Nginx-Tomcat1 /]# mkdir /data/nginx/html -pv
[root@Nginx-Tomcat1 conf.d]# vim /etc/nginx/conf.d/ityun1.conf
server {
	listen 80 default_server;
	server_name www.ityun1.com;
	#rewrite /(.*)\.jsp$ https://www.ityunn.com/$1.jsp;
	#rewrite /(.*)$ https://www.ityunn.com/$1;
	location / {
		root /data/nginx/html;
		index index.php;
		}
	location ~* \.php$ {
		fastcgi_pass 192.168.10.103:9000;
		fastcgi_index index.php;
		fastcgi_param  SCRIPT_FILENAME        /data/nginx/html/$fastcgi_script_name;
		include fastcgi_params;
		}
	location ~ \.jsp$ {
		proxy_pass http://192.168.10.103:8080;
		}
	location ^~ /nginx_status {
		stub_status;
		auth_basic 'This is web status';
		auth_basic_user_file '/etc/nginx/.yonghu';
		}
	#location ~* \.(png|jpeg|swf)$ {
	#		valid_referers none block server_names *.ityunn.com ityunn.com www.ityunn.*;
	#		if ($invalid_referer) {
	#			return https://www.ityunn.com/daotu.jpg;
	#		}
	#	}
	error_page 404 /notfound.html;
			location ^~ /notfound.html {
			root /data/nginx/html;
		}
}
[root@Nginx-Tomcat1 /]# vim /etc/php-fpm.d/www.conf
 12 listen = 0.0.0.0:9000 The open listening address is arbitrary.
 24 ;listen.allowed_clients = 127.0.0.1 Comment this line
[root@Nginx-Tomcat1 /]# systemctl restart php-fpm
[root@Nginx-Tomcat1 /]# systemctl restart nginx
# Put a web page source code into the website directory.
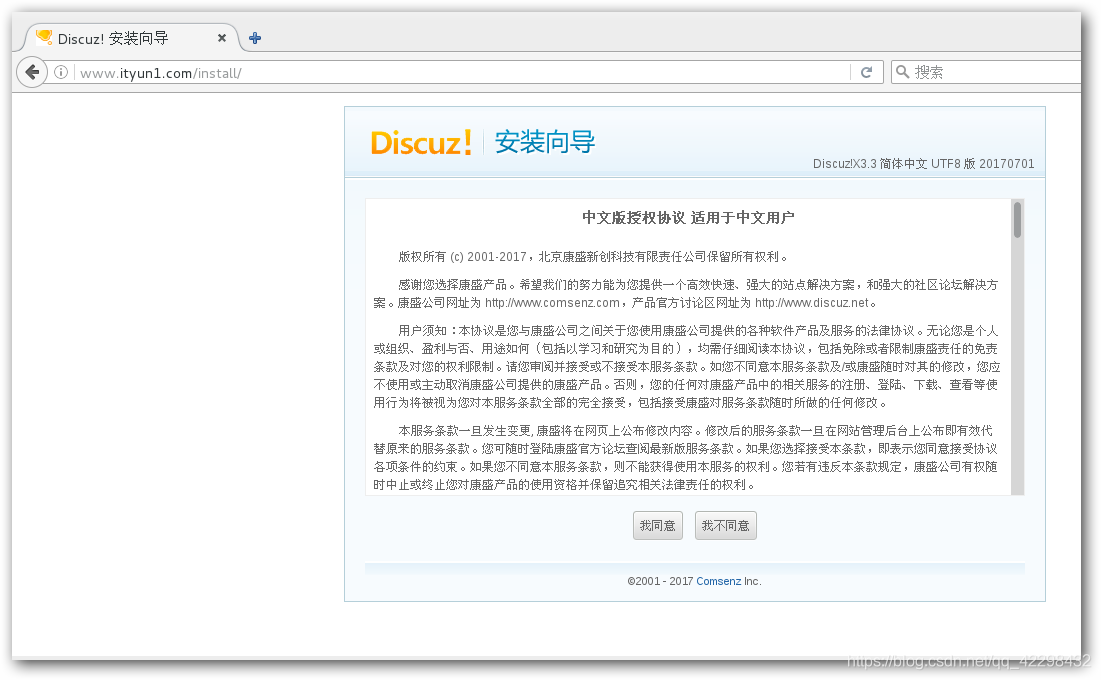
Use the client to specify the DNS server and browser access http://www.ityun1.com Verify that Nginx and PHP FPM work together normally
III Configure Tomcat server:
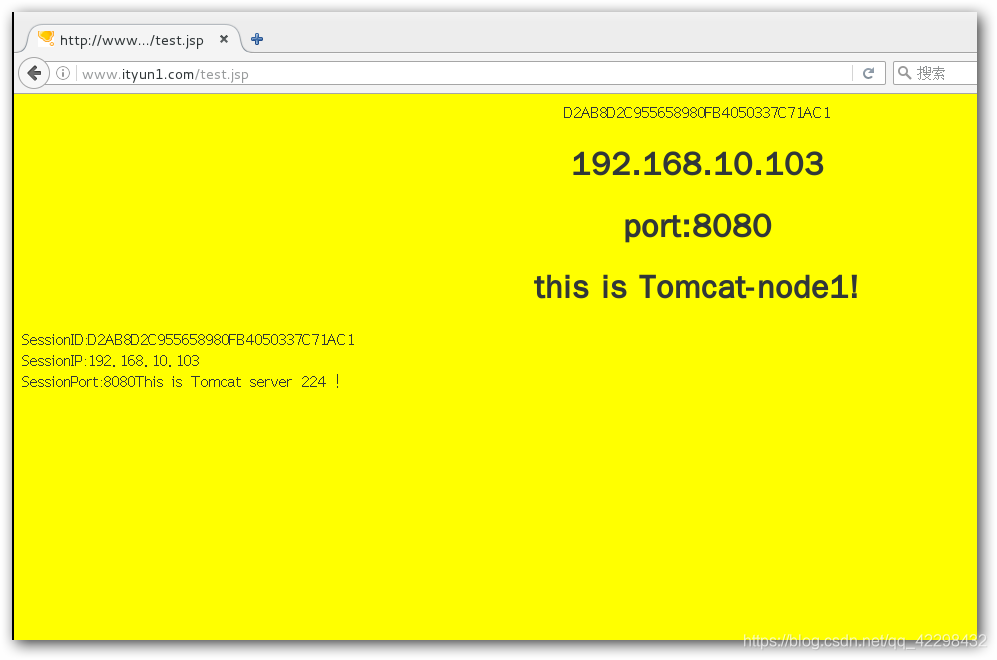
[root@Nginx-Tomcat1 ROOT]# cd /usr/local/tomcat/webapps/ROOT/
[root@Nginx-Tomcat1 ROOT]# vim test.jsp
<html>
    <body bgcolor="yellow">
    <center>
    <%=  request.getSession().getId()  %>
    <h1>192.168.10.103</h1>
    <h1>port:8080</h1>
    <h1>this is Tomcat-node1! </h1>
    </center>
    </body></html>
 <%@ page contentType="text/html;charset=UTF-8" isELIgnored="false"%>
SessionID:<%=session.getId()%><BR>
SessionIP:<%=request.getServerName()%> <BR>
SessionPort:<%=request.getServerPort()%><%     out.println("This is Tomcat server 224 !");     %>
[root@Nginx-Tomcat1 /]# /usr/local/tomcat/bin/startup.sh
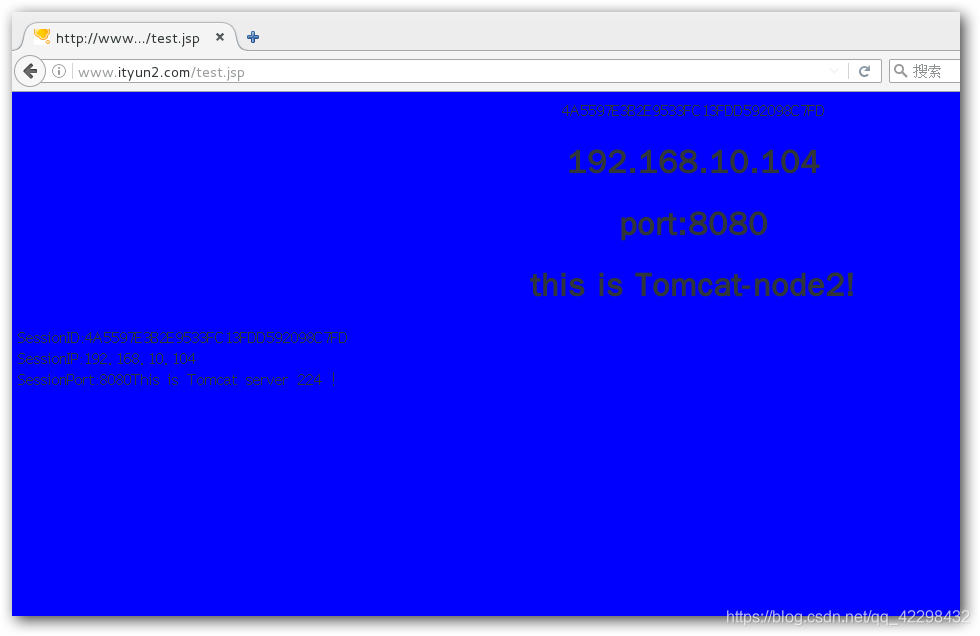
4. Another dynamic server uses the same steps to install nginx + PHP FPM + Tomcat service and test whether it works normally
LVS proxy server configuration
LVS master configuration:
1. Install LVS service software and Keepalived software package
[root@LVS-master1 /]# yum -y install keepalived.x86_64 ipvsadm.x86_64
2. Modify the Keepalived master configuration file and set load balancing and high availability (dual master model)
[root@LVS-master1 /]# vim /etc/keepalived/keepalived.conf
! Configuration File for keepalived

global_defs {
   notification_email {
    2229088784@qq.com
   }
   notification_email_from Keepalived@admin.com
   smtp_server 127.0.0.1
   smtp_connect_timeout 30
   router_id LVS_1
}

vrrp_instance VI_1 {
    state MASTER
    interface eth0
    virtual_router_id 50
    priority 150
    advert_int 1
    authentication {
        auth_type PASS
        auth_pass 1111
    }
    virtual_ipaddress {
      192.168.10.50/24
    }
	notify_master "/etc/keepalived/notify.sh master"
	notify_backup "/etc/keepalived/notify.sh backup"
	notify_fault "/etc/keepalived/notify.sh fault"
}

virtual_server 192.168.10.50 80 {
    delay_loop 6
    lb_algo rr
    lb_kind DR
    nat_mask 255.255.255.0
    protocol TCP

    real_server 192.168.10.103 80 {
        weight 1
        TCP_CHECK {
        connect_timeout 8
        nb_get_retry 3
        delay_before_retry 3
        connect_port 80
        }
    }

    real_server 192.168.10.104 80 {
        weight 1
        TCP_CHECK {
        connect_timeout 8
        nb_get_retry 3
        delay_before_retry 3
        connect_port 80
        }
    }
}
#virtual_server 192.168.10.88 443 {
#    delay_loop 6
#    lb_algo rr
#    lb_kind DR
#    nat_mask 255.255.255.0
#    protocol TCP
#
#    real_server 192.168.10.103 443 {
#        weight 1
#        TCP_CHECK {
#        connect_timeout 8
#        nb_get_retry 3
#        delay_before_retry 3
#        connect_port 80
#        }
#    }
#
#    real_server 192.168.10.104 443 {
#        weight 1
#        TCP_CHECK {
#        connect_timeout 8
#        nb_get_retry 3
#        delay_before_retry 3
#        connect_port 80
#        }
#    }
#}

virtual_server 192.168.10.50 53 {
    delay_loop 3
    lb_algo rr
    lb_kind DR
    protocol UDP

    real_server 192.168.10.103 53 {
        weight 1
	MISC_CHECK {
	connect_timeout 8
        nb_get_retry 3
        delay_before_retry 3
        connect_port 53
        misc_path"/etc/keepalived/udp_check53.sh 192.168.10.103 53"
	}
	}
    real_server 192.168.10.104 53 {
        weight 1
	MISC_CHECK {
	connect_timeout 8
        nb_get_retry 3
        delay_before_retry 3
        connect_port 53
        misc_path"/etc/keepalived/udp_check53.sh 192.168.10.104 53"
		}

	}
}
vrrp_instance VI_2 {
    state BACKUP
    interface eth0
    virtual_router_id 51
    priority 100
    advert_int 1
    authentication {
        auth_type PASS
        auth_pass 1111
    }
    virtual_ipaddress {
      192.168.10.51/24
    }
	notify_master "/etc/keepalived/notify.sh master"
	notify_backup "/etc/keepalived/notify.sh backup"
	notify_fault "/etc/keepalived/notify.sh fault"
}

virtual_server 192.168.10.51 80 {
    delay_loop 6
    lb_algo rr
    lb_kind DR
    nat_mask 255.255.255.0
    protocol TCP

    real_server 192.168.10.103 80 {
        weight 1
        TCP_CHECK {
        connect_timeout 8
        nb_get_retry 3
        delay_before_retry 3
        connect_port 80
        }
    }

    real_server 192.168.10.104 80 {
        weight 1
        TCP_CHECK {
        connect_timeout 8
        nb_get_retry 3
        delay_before_retry 3
        connect_port 80
        }
    }
}
#virtual_server 192.168.10.89 443 {
#    delay_loop 6
#    lb_algo rr
#    lb_kind DR
#    nat_mask 255.255.255.0
#    protocol TCP
#
#    real_server 192.168.10.103 443 {
#        weight 1
#        TCP_CHECK {
#        connect_timeout 8
#        nb_get_retry 3
#        delay_before_retry 3
#        connect_port 80
#        }
#    }
#
#    real_server 192.168.10.104 443 {
#        weight 1
#        TCP_CHECK {
#        connect_timeout 8
#        nb_get_retry 3
#        delay_before_retry 3
#        connect_port 80
#        }
#    }
#}

virtual_server 192.168.10.89 53 {
    delay_loop 3
    lb_algo rr
    lb_kind DR
    protocol UDP

    real_server 192.168.10.103 53 {
        weight 1
	MISC_CHECK {
	connect_timeout 8
        nb_get_retry 3
        delay_before_retry 3
        connect_port 53
        misc_path"/etc/keepalived/udp_check53.sh 192.168.10.103 53"
	}
	}
    real_server 192.168.10.104 53 {
        weight 1
	MISC_CHECK {
	connect_timeout 8
        nb_get_retry 3
        delay_before_retry 3
        connect_port 53
        misc_path"/etc/keepalived/udp_check53.sh 192.168.10.104 53"
		}

	}
}
[root@LVS-master1 keepalived]# vim /etc/keepalived/notifi.sh
#!/bin/bash
				#
				contact='root@localhost'

				notify() {
					local mailsubject="$(hostname) to be $1, vip floating"
					local mailbody="$(date +'%F %T'): vrrp transition, $(hostname) changed to be $1"
					echo "$mailbody" | mail -s "$mailsubject" $contact
				}

				case $1 in
				master)
					notify master
					;;
				backup)
					notify backup
					;;
				fault)
					notify fault
					;;
				*)
					echo "Usage: $(basename $0) {master|backup|fault}"
					exit 1
					;;
				esac
[root@LVS-master1 keepalived]# vim /etc/keepalived/udp_check53.sh
#!/bin/bash
nc -u -w 1 $1 $2  < /dev/null
exit $?
~
LVS slave configuration:
1. Install LVS service software and Keepalived software package
[root@LVS-master1 /]# yum -y install keepalived.x86_64 ipvsadm.x86_64
2. Modify the Keepalived master configuration file and set load balancing and high availability (dual master model)
[root@LVS-master1 /]# vim /etc/keepalived/keepalived.conf
! Configuration File for keepalived

global_defs {
   notification_email {
    2229088784@qq.com
   }
   notification_email_from Keepalived@admin.com
   smtp_server 127.0.0.1
   smtp_connect_timeout 30
   router_id LVS_1
}

vrrp_instance VI_1 {
    state BACKUP
    interface eth0
    virtual_router_id 50
    priority 100
    advert_int 1
    authentication {
        auth_type PASS
        auth_pass 1111
    }
    virtual_ipaddress {
      192.168.10.50/24
    }
	notify_master "/etc/keepalived/notify.sh master"
	notify_backup "/etc/keepalived/notify.sh backup"
	notify_fault "/etc/keepalived/notify.sh fault"
}

virtual_server 192.168.10.50 80 {
    delay_loop 6
    lb_algo rr
    lb_kind DR
    nat_mask 255.255.255.0
    protocol TCP

    real_server 192.168.10.103 80 {
        weight 1
        TCP_CHECK {
        connect_timeout 8
        nb_get_retry 3
        delay_before_retry 3
        connect_port 80
        }
    }

    real_server 192.168.10.104 80 {
        weight 1
        TCP_CHECK {
        connect_timeout 8
        nb_get_retry 3
        delay_before_retry 3
        connect_port 80
        }
    }
}
#virtual_server 192.168.10.50 443 {
#    delay_loop 6
#    lb_algo rr
#    lb_kind DR
#    nat_mask 255.255.255.0
#    protocol TCP
#
#    real_server 192.168.10.103 443 {
#        weight 1
#        TCP_CHECK {
#        connect_timeout 8
#        nb_get_retry 3
#        delay_before_retry 3
#        connect_port 80
#        }
#    }
#
#    real_server 192.168.10.104 443 {
#        weight 1
#        TCP_CHECK {
#        connect_timeout 8
#        nb_get_retry 3
#        delay_before_retry 3
#        connect_port 80
#        }
#    }
#}

virtual_server 192.168.10.50 53 {
    delay_loop 3
    lb_algo rr
    lb_kind DR
    protocol UDP

    real_server 192.168.10.103 53 {
        weight 1
	MISC_CHECK {
	connect_timeout 8
        nb_get_retry 3
        delay_before_retry 3
        connect_port 53
        misc_path"/etc/keepalived/udp_check53.sh 192.168.10.103 53"
	}
	}
    real_server 192.168.10.104 53 {
        weight 1
	MISC_CHECK {
	connect_timeout 8
        nb_get_retry 3
        delay_before_retry 3
        connect_port 53
        misc_path"/etc/keepalived/udp_check53.sh 192.168.10.104 53"
		}

	}
}
vrrp_instance VI_2 {
    state MASTER
    interface eth0
    virtual_router_id 51
    priority 150
    advert_int 1
    authentication {
        auth_type PASS
        auth_pass 1111
    }
    virtual_ipaddress {
      192.168.10.51/24
    }
	notify_master "/etc/keepalived/notify.sh master"
	notify_backup "/etc/keepalived/notify.sh backup"
	notify_fault "/etc/keepalived/notify.sh fault"
}

virtual_server 192.168.10.51 80 {
    delay_loop 6
    lb_algo rr
    lb_kind DR
    nat_mask 255.255.255.0
    protocol TCP

    real_server 192.168.10.103 80 {
        weight 1
        TCP_CHECK {
        connect_timeout 8
        nb_get_retry 3
        delay_before_retry 3
        connect_port 80
        }
    }

    real_server 192.168.10.104 80 {
        weight 1
        TCP_CHECK {
        connect_timeout 8
        nb_get_retry 3
        delay_before_retry 3
        connect_port 80
        }
    }
}
#virtual_server 192.168.10.51 443 {
#    delay_loop 6
#    lb_algo rr
#    lb_kind DR
#    nat_mask 255.255.255.0
#    protocol TCP
#
#    real_server 192.168.10.103 443 {
#        weight 1
#        TCP_CHECK {
#        connect_timeout 8
#        nb_get_retry 3
#        delay_before_retry 3
#        connect_port 80
#        }
#    }
#
#    real_server 192.168.10.104 443 {
#        weight 1
#        TCP_CHECK {
#        connect_timeout 8
#        nb_get_retry 3
#        delay_before_retry 3
#        connect_port 80
#        }
#    }
#}

virtual_server 192.168.10.51 53 {
    delay_loop 3
    lb_algo rr
    lb_kind DR
    protocol UDP

    real_server 192.168.10.103 53 {
        weight 1
	MISC_CHECK {
	connect_timeout 8
        nb_get_retry 3
        delay_before_retry 3
        connect_port 53
        misc_path"/etc/keepalived/udp_check53.sh 192.168.10.103 53"
	}
	}
    real_server 192.168.10.104 53 {
        weight 1
	MISC_CHECK {
	connect_timeout 8
        nb_get_retry 3
        delay_before_retry 3
        connect_port 53
        misc_path"/etc/keepalived/udp_check53.sh 192.168.10.104 53"
		}

	}
}
3. Add the Keepalived service to the boot auto start and start the service. Check whether the vip configuration is successful through the ip addr command
[root@LVS-master1 ~]# systemctl start keepalived
[root@LVS-master1 ~]# systemctl enable keepalived

4. Modify the DNS addresses of LVS master and LVS slave to their own VIP.
Nginx server configuration:
1. Write Shell script, automatically close ARP notification and ARP response, and specify the loopback interface as the VIP address of LVS to respond to customer calls.
[root@Nginx-Tomcat1 /]#chmod +x lvs_dr.sh
[root@Nginx-Tomcat1 /]# sh lvs_dr.sh start
#!/bin/bash
                                #
                                vip=192.168.10.50
                                mask='255.255.255.255'

                                case $1 in
                                start)
                                        echo 1 > /proc/sys/net/ipv4/conf/all/arp_ignore
                                        echo 1 > /proc/sys/net/ipv4/conf/lo/arp_ignore
                                        echo 2 > /proc/sys/net/ipv4/conf/all/arp_announce
                                        echo 2 > /proc/sys/net/ipv4/conf/lo/arp_announce

                                        ifconfig lo:0 $vip netmask $mask broadcast $vip up
                                        route add -host $vip dev lo:0
                                        ;;
                                stop)
                                        ifconfig lo:0 down

                                        echo 0 > /proc/sys/net/ipv4/conf/all/arp_ignore
                                        echo 0 > /proc/sys/net/ipv4/conf/lo/arp_ignore
                                        echo 0 > /proc/sys/net/ipv4/conf/all/arp_announce
                                        echo 0 > /proc/sys/net/ipv4/conf/lo/arp_announce

                                        ;;
                                *)
                                        echo "Usage $(basename $0) start|stop"
                                        exit 1
                                        ;;
                                esac
2. Start the script on two Nginx servers at the same time.
MySQL master configuration:
Master slave replication
1. I won't compile and install Mysql database because of time. I will install a mariadb database using yum. (excuse me)
[root@localhost /]# yum -y install mariadb-server.x86_64 gcc*
[root@mysql-master /]# vim /etc/my.cnf

stay mysqld Add content to the area:
server-id=1
log-bin=mysql-bin-master
log-slave-updates=1
2. Then restart the mariadb server
[root@mysql-master /]# systemctl restart mariadb
3. Modify the MySQL password, log in to MySQL, create a synchronization user, and monitor the root user
[root@mysql-master /]# mysqladmin -uroot password '123'

[root@mysql-master /]# mysqladmin -uroot -p123

MariaDB [(none)]> show master status;

MariaDB [(none)]> grant replication slave on . to 'zhangsan'@'%' identified by '123';

MariaDB [(none)]> grant all on . to 'root'@'%' identified by '123';

MariaDB [(none)]> flush privileges;
MySQL slave configuration:
[root@localhost /]# yum -y install mariadb-server.x86_64 gcc*
[root@mysql-slave /]# vim /etc/my.cnf

stay mysqld Add content to the area:
server-id=2
log-bin=mysql-bin-slave
log-slave-updates=1
2. Then restart the mariadb server
[root@mysql-master /]# systemctl restart mariadb
3. Modify the MySQL password and log in to the MySQL synchronization master log
[root@mysql-master /]# mysqladmin -uroot password '123'

[root@mysql-master /]# mysqladmin -uroot -p123

MariaDB [(none)]> change master to master_host='192.168.10.105',master_user='zhangsan',master_password='123',master_log_file='mysql-bin-master.000002',master_log_pos=1277;

MariaDB [(none)]> start slave;
MariaDB [(none)]> show slave status\G

If you see something in it Slave_IO_Running: Yes
                              Slave_SQL_Running: Yes (This indicates that the slave master has succeeded and can be synchronized)+
4. Another slave server specifies the same operation
MHA amoeba host configuration:
Read write separation
First, deploy the JAVA environment on this host. The software package and steps are written above
[root@localhost src]# mkdir /usr/local/amoeba
[root@localhost src]# tar zxvf amoeba-mysql-binary-2.2.0.tar.gz -C /usr/local/amoeba/
root@localhost src]# chmod -R 755 /usr/local/amoeba/
report errors:
The stack size specified is too small, Specify at least 228k
Error: Could not create the Java Virtual Machine.
Error: A fatal exception has occurred. Program will exit.
resolvent:
cd /usr/local/amoeba/bin/
cp amoeba{,.bak}
vim amoeba
#Modification
58 DEFAULT_OPTS="-server -Xms1024m -Xmx1024m -Xss256k"
/usr/local/amoeba/bin/amoeba
amoeba start|stop
#The display above indicates OK
[root@MHA-Amoeba conf]# vim /usr/local/amoeba/conf/amoeba.xml
30                                         <property name="user">amoeba</property>
31
32                                         <property name="password">123456</property>
...
115                 <property name="defaultPool">master</property>
116
117
118                 <property name="writePool">master</property>
119                 <property name="readPool">slaves</property>
[root@MHA-Amoeba conf]# vim /usr/local/amoeba/conf/dbServers.xml
30                                         <property name="user">amoeba</property>
 31
 32                                         <property name="password">123456</property>
...
115                 <property name="defaultPool">master</property>
116
117
118                 <property name="writePool">master</property>
119                 <property name="readPool">slaves</property>


vim dbServers.xml
 25                         <!-- mysql user -->
 26                         <property name="user">zhangsan</property> Zhang San was a user in MySQL Users created above the master
 27
 28                         <!--  mysql password -->
 29                         <property name="password">123</property>
...
 45         <dbServer name="master"  parent="abstractServer">
 46                 <factoryConfig>
 47                         <!-- mysql ip -->
 48                         <property name="ipAddress">192.168.10.105</property>
 49                 </factoryConfig>
 50         </dbServer>
 51
 52         <dbServer name="slave1"  parent="abstractServer">
 53                 <factoryConfig>
 54                         <!-- mysql ip -->
 55                         <property name="ipAddress">192.168.10.106</property>
 56                 </factoryConfig>
 57         </dbServer>
 58         <dbServer name="slave2"  parent="abstractServer">
 59                 <factoryConfig>
 60                         <!-- mysql ip -->
 61                         <property name="ipAddress">192.168.10.107</property>
 62                 </factoryConfig>
 63         </dbServer>
 64
 65         <dbServer name="slaves" virtual="true">
 66                 <poolConfig class="com.meidusa.amoeba.server.MultipleServerPool">
 67                         <!-- Load balancing strategy: 1=ROUNDROBIN , 2=WEIGHTBASED , 3=HA-->
 68                         <property name="loadbalance">1</property>
 69
 70                         <!-- Separated by commas,such as: server1,server2,server1 -->
 71                         <property name="poolNames">slave1,slave2</property>
 72                 </poolConfig>
If there is any above, modify it and if there is no, add it.
Two in dual master mode master Then you must write two main words IP Address, otherwise the port cannot be opened.
Start Amoeba and run it in the background
[root@MHA-Amoeba /]# nohup /usr/local/amoeba/bin/amoeba start &
[root@MHA-Amoeba /]# ss -tnl
MHA amoeba host configuration:
Configure MHA for high availability of MySQL Cluster
1. Configure mutual password free login and build a primary and secondary Mysql Cluster, which has been built above.
cp .ssh/id_rsa.pub .ssh/authorized_keys
2. Dependencies to be installed on MySQL master, slave and MHA amoeba hosts
yum -y localinstall /rpm/*.rpm
#Or prepare epel source
#yum -y install perl-DBD-MySQL perl-Config-Tiny perl-Log-Dispatch perl-Parallel-ForkManager perl-ExtUtils-CBuilder perl-ExtUtils-MakeMaker perl-CPAN

[root@mysql-master src]# tar zxvf mha4mysql-node-0.57.tar.gz

[root@mysql-master mha4mysql-node-0.57]# perl Makefile.PL && make && make install
3. Dependency package installed on MHA amoeba host
[root@MHA-Amoeba src]# tar zxvf mha4mysql-manager-0.57.tar.gz

[root@MHA-Amoeba src]# cd mha4mysql-manager-0.57/

[root@MHA-Amoeba mha4mysql-manager-0.57]# perl Makefile.PL && make && make install
Configure MHA
1. Create configuration file directory
[root@MHA-Amoeba /]# mkdir -p /etc/masterha

[root@MHA-Amoeba /]# mkdir -pv /var/log/masterha/app1

[root@MHA-Amoeba /]# cp -ra /usr/src/mha4mysql-manager-0.57/samples/scripts/ /usr/local/bin/
2. Create the configuration file / etc / masterha / app1 CNF, as follows:
[server default]
manager_log=/var/log/masterha/app1/manager.log
manager_workdir=/var/log/masterha/app1.log
master_binlog_dir=/var/lib/mysql/
master_ip_failover_script=/usr/local/bin/master_ip_failover
master_ip_online_change_script=/usr/local/bin/master_ip_online_change
password=123
ping_interval=1
remote_workdir=/tmp
repl_password=123
repl_user=zhangsan
secondary_check_script=/usr/local/bin/masterha_secondary_check -s 192.168.10.105 -s 192.168.10.106 --user=root --master_host=mysql-master --master_ip=192.168.10.105 --master_port=3306
shutdown_script=""
ssh_user=root
user=root

[server1]
hostname=192.168.10.105
port=3306

[server2]
candidate_master=1
check_repl_delay=0
hostname=192.168.10.106
port=3306

[server3]
hostname=192.168.10.107
port=3306
The server default section is some basic configuration parameters of the manager. server1, server2 and server3 correspond to the master, the first slave and the second slave in the replication respectively. The syntax of the file is strict, and there should be no redundant spaces after the variable value. The main configuration items are described below.
manager_log: sets the log file of the manager.
manager_workdir: set the working directory of manager.
master_binlog_dir: set the location where the master saves binlog so that MHA can find the master log, which is the mysql data directory.
master_ip_failover_script: set the switching script during automatic failover.
master_ip_online_change_script: sets the switching script for manual switching.
Password: set the password of root user in mysql.
ping_interval: set the time interval between monitoring the main database and sending Ping packets. The default is 3 seconds. When there is no response after three attempts, it will be automatically railover.
remote_workdir: set the save location of binlog when remote mysql switches.
repl_password: sets the password of the copy user.
repl_user: sets the replication user name in the replication environment
secondary_check_script: once there is a problem between MHA and hdp4 monitoring, MHA Manager will try to log in from hdp3 to hdp4.
shutdown_script: set the script to close the failed host after the failure occurs. The main role of the script is to shut down the host and put it in the event of brain fissure, which is not used here.
ssh_user: sets the login user name of SSH.
User: set the monitoring user to root.
candidate_master: set as candidate master. After setting this parameter, the slave database will be promoted to the master database after the master-slave switch occurs, even if the master database is not the latest slave in the cluster.
check_repl_delay: by default, if a slave lags behind the master's 100m relay logs, MHA will not select the slave as a new one
Master, because the recovery of this slave takes a long time, set check_repl_delay=0, MHA triggers the switch. When selecting a new master, the replication delay will be ignored. This parameter is set to candidate_ The host with master = 1 is very useful because the candidate master must be a new master in the process of switching.
3. Set the relay of Slave in replication_ log_ Purge parameter
Execute with mysql user on two slave computers
[root@mysql-slave1 /]# mysql -uroot -p123 -e 'set global relay_log_purge=0'
Note that in the process of MHA switching, the recovery from the database depends on the relevant information of the relay log. Therefore, set the automatic clearing of the relay log to OFF and manually clear the relay log. By default, the relay log on the slave server is automatically after the SQL thread is executed
+Delete. However, in the MHA environment, these relay logs may be used when recovering other slave servers, so the automatic deletion function of relay logs needs to be disabled. The problem of replication delay should be considered when clearing relay logs regularly. Under ext3 file system, deleting large files takes a certain time, which will lead to serious replication delay. In order to avoid replication delay, you need to create a hard link for the relay log temporarily, because it is very fast to delete large files through hard link in linux system. (in mysql database, hard links are usually used to delete large tables.)
4. Create an automatic failover script
Create / usr / local / bin / master on the MHA amoeba host_ ip_ Failover file, as follows:
#!/usr/bin/env perl
use strict;
use warnings FATAL => 'all';
use Getopt::Long;
my (
    $command,          $ssh_user,        $orig_master_host, $orig_master_ip,
    $orig_master_port, $new_master_host, $new_master_ip,    $new_master_port
);
my $vip = '192.168.10.66';   #VIP drift address
my $key = '1';
my $ssh_start_vip = "/sbin/ifconfig eth0:$key $vip";
my $ssh_stop_vip = "/sbin/ifconfig eth0:$key down";
GetOptions(
    'command=s'          => \$command,
    'ssh_user=s'         => \$ssh_user,
    'orig_master_host=s' => \$orig_master_host,
    'orig_master_ip=s'   => \$orig_master_ip,
    'orig_master_port=i' => \$orig_master_port,
    'new_master_host=s'  => \$new_master_host,
    'new_master_ip=s'    => \$new_master_ip,
    'new_master_port=i'  => \$new_master_port,
);
exit &main();
sub main {
    print "\n\nIN SCRIPT TEST====$ssh_stop_vip==$ssh_start_vip===\n\n";
    if ( $command eq "stop" || $command eq "stopssh" ) {
        my $exit_code = 1;
        eval {
            print "Disabling the VIP on old master: $orig_master_host \n";
            &stop_vip();
            $exit_code = 0;
        };
        if ($@) {
            warn "Got Error: $@\n";
            exit $exit_code;
        }
        exit $exit_code;
    }
    elsif ( $command eq "start" ) {
        my $exit_code = 10;
        eval {
            print "Enabling the VIP - $vip on the new master - $new_master_host \n";
            &start_vip();
            $exit_code = 0;
        };
        if ($@) {
            warn $@;
            exit $exit_code;
        }
        exit $exit_code;
    }
    elsif ( $command eq "status" ) {
        print "Checking the Status of the script.. OK \n";
        exit 0;
    }
    else {
        &usage();
        exit 1;
    }
}
sub start_vip() {
    `ssh $ssh_user\@$new_master_host \" $ssh_start_vip \"`;
}
sub stop_vip() {
     return 0  unless  ($ssh_user);
    `ssh $ssh_user\@$orig_master_host \" $ssh_stop_vip \"`;
}
sub usage {
    print
    "Usage: master_ip_failover --command=start|stop|stopssh|status --orig_master_host=host --orig_master_ip=ip --orig_master_port=port --new_master_host=host --new_master_ip=ip --new_master_port=port\n";
Notice the VIP drift in the script
5. Create manual failover script
Create / usr / local / bin / master on the MHA amoeba host_ ip_ Failover file, as follows:
#!/usr/bin/env perl

#  Copyright (C) 2011 DeNA Co.,Ltd.
#
#  This program is free software; you can redistribute it and/or modify
#  it under the terms of the GNU General Public License as published by
#  the Free Software Foundation; either version 2 of the License, or
#  (at your option) any later version.
#
#  This program is distributed in the hope that it will be useful,
#  but WITHOUT ANY WARRANTY; without even the implied warranty of
#  MERCHANTABILITY or FITNESS FOR A PARTICULAR PURPOSE.  See the
#  GNU General Public License for more details.
#
#  You should have received a copy of the GNU General Public License
#   along with this program; if not, write to the Free Software
#  Foundation, Inc.,
#  51 Franklin Street, Fifth Floor, Boston, MA  02110-1301  USA

## Note: This is a sample script and is not complete. Modify the script based on your environment.

use strict;
use warnings FATAL => 'all';

use Getopt::Long;
use MHA::DBHelper;
use MHA::NodeUtil;
use Time::HiRes qw( sleep gettimeofday tv_interval );
use Data::Dumper;

my $_tstart;
my $_running_interval = 0.1;
my (
  $command,              $orig_master_is_new_slave, $orig_master_host,
  $orig_master_ip,       $orig_master_port,         $orig_master_user,
  $orig_master_password, $orig_master_ssh_user,     $new_master_host,
  $new_master_ip,        $new_master_port,          $new_master_user,
  $new_master_password,  $new_master_ssh_user,
);

my $vip = '192.168.10.66';
my $key = "1";
my $ssh_start_vip = "/sbin/ifconfig eth0:$key $vip";
my $ssh_stop_vip = "/sbin/ifconfig eth0:$key down";
my $ssh_user = "root";
#my $new_master_password = "123";
#my $orig_master_password = "123";

GetOptions(
  'command=s'                => \$command,
  'orig_master_is_new_slave' => \$orig_master_is_new_slave,
  'orig_master_host=s'       => \$orig_master_host,
  'orig_master_ip=s'         => \$orig_master_ip,
  'orig_master_port=i'       => \$orig_master_port,
  'orig_master_user=s'       => \$orig_master_user,
  'orig_master_password=s'   => \$orig_master_password,
  'orig_master_ssh_user=s'   => \$orig_master_ssh_user,
  'new_master_host=s'        => \$new_master_host,
  'new_master_ip=s'          => \$new_master_ip,
  'new_master_port=i'        => \$new_master_port,
  'new_master_user=s'        => \$new_master_user,
  'new_master_password=s'    => \$new_master_password,
  'new_master_ssh_user=s'    => \$new_master_ssh_user,
);

exit &main();

sub current_time_us {
  my ( $sec, $microsec ) = gettimeofday();
  my $curdate = localtime($sec);
  return $curdate . " " . sprintf( "%06d", $microsec );
}

sub sleep_until {
  my $elapsed = tv_interval($_tstart);
  if ( $_running_interval > $elapsed ) {
    sleep( $_running_interval - $elapsed );
  }
}

sub get_threads_util {
  my $dbh                    = shift;
  my $my_connection_id       = shift;
  my $running_time_threshold = shift;
  my $type                   = shift;
  $running_time_threshold = 0 unless ($running_time_threshold);
  $type                   = 0 unless ($type);
  my @threads;

  my $sth = $dbh->prepare("SHOW PROCESSLIST");
  $sth->execute();

  while ( my $ref = $sth->fetchrow_hashref() ) {
    my $id         = $ref->{Id};
    my $user       = $ref->{User};
    my $host       = $ref->{Host};
    my $command    = $ref->{Command};
    my $state      = $ref->{State};
    my $query_time = $ref->{Time};
    my $info       = $ref->{Info};
    $info =~ s/^\s*(.*?)\s*$/$1/ if defined($info);
    next if ( $my_connection_id == $id );
    next if ( defined($query_time) && $query_time < $running_time_threshold );
    next if ( defined($command)    && $command eq "Binlog Dump" );
    next if ( defined($user)       && $user eq "system user" );
    next
      if ( defined($command)
      && $command eq "Sleep"
      && defined($query_time)
      && $query_time >= 1 );

    if ( $type >= 1 ) {
      next if ( defined($command) && $command eq "Sleep" );
      next if ( defined($command) && $command eq "Connect" );
    }

    if ( $type >= 2 ) {
      next if ( defined($info) && $info =~ m/^select/i );
      next if ( defined($info) && $info =~ m/^show/i );
    }

    push @threads, $ref;
  }
  return @threads;
}

sub main {
  if ( $command eq "stop" ) {
    ## Gracefully killing connections on the current master
    # 1. Set read_only= 1 on the new master
    # 2. DROP USER so that no app user can establish new connections
    # 3. Set read_only= 1 on the current master
    # 4. Kill current queries
    # * Any database access failure will result in script die.
    my $exit_code = 1;
    eval {
      ## Setting read_only=1 on the new master (to avoid accident)
      my $new_master_handler = new MHA::DBHelper();

      # args: hostname, port, user, password, raise_error(die_on_error)_or_not
      $new_master_handler->connect( $new_master_ip, $new_master_port,
        $new_master_user, $new_master_password, 1 );
      print current_time_us() . " Set read_only on the new master.. ";
      $new_master_handler->enable_read_only();
      if ( $new_master_handler->is_read_only() ) {
        print "ok.\n";
      }
      else {
        die "Failed!\n";
      }
      $new_master_handler->disconnect();

      # Connecting to the orig master, die if any database error happens
      my $orig_master_handler = new MHA::DBHelper();
      $orig_master_handler->connect( $orig_master_ip, $orig_master_port,
        $orig_master_user, $orig_master_password, 1 );

      ## Drop application user so that nobody can connect. Disabling per-session binlog beforehand
      $orig_master_handler->disable_log_bin_local();
      print current_time_us() . " Drpping app user on the orig master..\n";
      #FIXME_xxx_drop_app_user($orig_master_handler);

      ## Waiting for N * 100 milliseconds so that current connections can exit
      my $time_until_read_only = 15;
      $_tstart = [gettimeofday];
      my @threads = get_threads_util( $orig_master_handler->{dbh},
        $orig_master_handler->{connection_id} );
      while ( $time_until_read_only > 0 && $#threads >= 0 ) {
        if ( $time_until_read_only % 5 == 0 ) {
          printf
"%s Waiting all running %d threads are disconnected.. (max %d milliseconds)\n",
            current_time_us(), $#threads + 1, $time_until_read_only * 100;
          if ( $#threads < 5 ) {
            print Data::Dumper->new( [$_] )->Indent(0)->Terse(1)->Dump . "\n"
              foreach (@threads);
          }
        }
        sleep_until();
        $_tstart = [gettimeofday];
        $time_until_read_only--;
        @threads = get_threads_util( $orig_master_handler->{dbh},
          $orig_master_handler->{connection_id} );
      }

      ## Setting read_only=1 on the current master so that nobody(except SUPER) can write
      print current_time_us() . " Set read_only=1 on the orig master.. ";
      $orig_master_handler->enable_read_only();
      if ( $orig_master_handler->is_read_only() ) {
        print "ok.\n";
      }
      else {
        die "Failed!\n";
      }

      ## Waiting for M * 100 milliseconds so that current update queries can complete
      my $time_until_kill_threads = 5;
      @threads = get_threads_util( $orig_master_handler->{dbh},
        $orig_master_handler->{connection_id} );
      while ( $time_until_kill_threads > 0 && $#threads >= 0 ) {
        if ( $time_until_kill_threads % 5 == 0 ) {
          printf
"%s Waiting all running %d queries are disconnected.. (max %d milliseconds)\n",
            current_time_us(), $#threads + 1, $time_until_kill_threads * 100;
          if ( $#threads < 5 ) {
            print Data::Dumper->new( [$_] )->Indent(0)->Terse(1)->Dump . "\n"
              foreach (@threads);
          }
        }
        sleep_until();
        $_tstart = [gettimeofday];
        $time_until_kill_threads--;
        @threads = get_threads_util( $orig_master_handler->{dbh},
          $orig_master_handler->{connection_id} );
      }

      ## Terminating all threads
      print current_time_us() . " Killing all application threads..\n";
      $orig_master_handler->kill_threads(@threads) if ( $#threads >= 0 );
      print current_time_us() . " done.\n";
      $orig_master_handler->enable_log_bin_local();
      $orig_master_handler->disconnect();

      ## After finishing the script, MHA executes FLUSH TABLES WITH READ LOCK
      $exit_code = 0;
    };
    if ($@) {
      warn "Got Error: $@\n";
      exit $exit_code;
    }
    exit $exit_code;
  }
  elsif ( $command eq "start" ) {
    ## Activating master ip on the new master
    # 1. Create app user with write privileges
    # 2. Moving backup script if needed
    # 3. Register new master's ip to the catalog database

# We don't return error even though activating updatable accounts/ip failed so that we don't interrupt slaves' recovery.
# If exit code is 0 or 10, MHA does not abort
    my $exit_code = 10;
    eval {
      my $new_master_handler = new MHA::DBHelper();

      # args: hostname, port, user, password, raise_error_or_not
      $new_master_handler->connect( $new_master_ip, $new_master_port,
        $new_master_user, $new_master_password, 1 );

      ## Set read_only=0 on the new master
      $new_master_handler->disable_log_bin_local();
      print current_time_us() . " Set read_only=0 on the new master.\n";
      $new_master_handler->disable_read_only();

      ## Creating an app user on the new master
      print current_time_us() . " Creating app user on the new master..\n";
      FIXME_xxx_create_app_user($new_master_handler);
      $new_master_handler->enable_log_bin_local();
      $new_master_handler->disconnect();

      ## Update master ip on the catalog database, etc
      $exit_code = 0;
    };
    if ($@) {
      warn "Got Error: $@\n";
      exit $exit_code;
    }
    exit $exit_code;
  }
  elsif ( $command eq "status" ) {

    # do nothing
    exit 0;
  }
  else {
    &usage();
    exit 1;
  }
}

sub usage {
  print
"Usage: master_ip_online_change --command=start|stop|status --orig_master_host=host --orig_master_ip=ip --orig_master_port=port --new_master_host=host --new_master_ip=ip --new_master_port=port\n";
  die;
}
Check MHA configuration
1. Detect SSH configuration
Operate with root on MHA amoeba
[root@MHA-Amoeba /]# masterha_check_ssh --conf=/etc/masterha/app1.cnf
2. Check the status of the entire replication environment
[root@MHA-Amoeba bin]# masterha_check_repl --conf=/etc/masterha/app1.cnf
3. View the status of MHA Manager
[root@MHA-Amoeba /]# nohup masterha_manager --conf=/etc/masterha/app1.cnf --remove_dead_master_conf --ignore_last_failover < /dev/null > /var/log/masterha/app1/manager.log 2>&1 &

[root@MHA-Amoeba /]# masterha_check_status --conf=/etc/masterha/app1.cnf
app1 (pid:43694) is running(0:PING_OK), master:192.168.10.105
functional testing
1. Initial binding VIP
On the MySQL master host, execute with root:
[root@mysql-master /]# ip addr add 192.168.10.66 dev eth0 label eth0:1
There are three test methods. I'll use automatic switching to simulate it.
1. Stop the slave IO thread on slave1 (192.168.10.106) to simulate the master-slave delay:
[root@mysql-slave1 /]# mysql -uroot -p123 -e 'stop slave io_thread'
2. Install sysbench in the master library (192.168.10.105), generate sysbench data, and generate sbtest table in the sbtest library, with a total of 10w records.
# Install sysbench with root
yum install sysbench -y

# Establishing sbtest database with mysql user
mysql -uroot -p123 -e "create database sbtest;"

# Using mysql user to execute sysbench to generate data
sysbench /usr/share/sysbench/tests/include/oltp_legacy/oltp.lua --mysql-host=127.0.0.1 --mysql-port=3306 --mysql-user=root --mysql-password=123 --oltp-test-mode=complex --oltp-tables-count=10 --oltp-table-size=10000 --threads=10 --time=120 --report-interval=10 --db-driver=mysql prepare
3. Use the root user to stop the mysql service of the master.
[root@mysql-master /]# systemctl stop mariadb
4. Verify VIP drift
This time VIP It should drift to 192.168.10.106 You should also have the data previously created on the host, and view the data pointing to the host from the other host IP It's already another one from,
[root@MHA-Amoeba /]# masterha_check_status --conf=/etc/masterha/app1.cnf
app1 (pid:47513) is running(0:PING_OK), master:192.168.10.106
Redis master-slave + sentinel + kept
Principle of implementation
Install sentinel and keepalived on the master and backup servers respectively. The priority of the master is 100 and the priority of backup is 99. Configure VRRP on the save server_ Script checks the script rules and the current role status of the slave. Once the redis role status of the slave is master, the priority of the slave is increased by 2 to 101, so that it can obtain the permission of vip;
When the redis service of the master is down, the sentinel will promote the slave to the new master. When the slave checks that the role status is master, the priority will be increased by 2 to obtain the vip. When the redis service of the original master is up, the sentinel will add it to the master-slave replication as a slave
When the redis service on the slave node that becomes the master hangs up, the Sentry will set the redis master to the original master node, VRRP_ When script checks that its redis is not a master, it reduces the priority by 2 to 99. The original master has a higher priority than the slave, and the original master obtains vip permission
The following steps are the same as those of the master-slave server. It is only installed once.
1: Install Redis and sentinel services
1. Download the redis server software package to the server, decompress it, compile and install it. Note that the gcc compiler needs to be installed (the master-slave steps are the same, and it is only installed once here)
[root@database /]\# wget
[root@database /]\# tar xzvf redis-5.0.5.tar.gz
[root@database /]\# cd redis-5.0.5/
[root@database redis-5.0.5]\# make && make install
[root@database redis-5.0.5]\# ./utils/install_server.sh
Welcome to the redis service installer
This script will help you easily set up a running redis server

Please select the redis port for this instance: [6379]             ##Enter the port to listen on (6379 by default)
Selecting default: 6379
Please select the redis config file name [/etc/redis/6379.conf]     ##Specify profile path
Selected default - /etc/redis/6379.conf
Please select the redis log file name [/var/log/redis_6379.log]     ##Specify log storage path
Selected default - /var/log/redis_6379.log
Please select the data directory for this instance [/var/lib/redis/6379]     ##Specify data persistence directory
Selected default - /var/lib/redis/6379
Please select the redis executable path [/usr/local/bin/redis-server]         ##Specify the storage path of the service executable
Selected config:
Port           : 6379
Config file    : /etc/redis/6379.conf
Log file       : /var/log/redis_6379.log
Data dir       : /var/lib/redis/6379
Executable     : /usr/local/bin/redis-server
Cli Executable : /usr/local/bin/redis-cli
Is this ok? Then press ENTER to go on or Ctrl-C to abort.
Copied /tmp/6379.conf => /etc/init.d/redis_6379
Installing service...
Successfully added to chkconfig!
Successfully added to runlevels 345!
Starting Redis server...
Installation successful!
2. Modify the redis configuration file, modify the background operation, listen to all addresses (other parameters are modified as required), and restart the redis service.
[root@database /]\# vim /etc/redis/6379.conf
-----------------------------------------------------
bind 0.0.0.0
daemonize yes
3. Start the redis service and check the port listening
[root@database /]\# /etc/init.d/redis_6379 start
[root@database /]\# netstat -anpt | grep redis
tcp        0      0 0.0.0.0:6379            0.0.0.0:*               LISTEN      11718/redis-server
4. Copy the sentry configuration file and startup file to the redis installation directory
[root@localhost /]\# cp redis-5.0.5/sentinel.conf /etc/redis/
[root@localhost /]\# cp redis-5.0.5/src/redis-sentinel /etc/redis/
2: Set up redis master-slave replication and configure sentinel monitoring
1. Log in to the slave redis server and set the master to 192.168 ten point one zero nine
root@slave /]# redis-cli
127.0.0.1:6379> SLAVEOF 192.168.10.109 6379  ##Set the master to 10.109
127.0.0.1:6379> INFO Replication
2. Modify the sentinel of the master and slave servers Conf configuration file (master and slave configurations are consistent)
##Modify the sentinel file of master
[root@master /]# cd /etc/redis/
[root@master /]# vim /etc/redis/sentinel.conf
port 26379
dir "/tmp"
sentinel monitor mymaster 192.168.10.109 6379 1 #(specify the master address and port number for monitoring. 1 means that master-slave switching can be performed only when multiple sentinel s agree)
sentinel down-after-milliseconds mymaster 4000 #(if you cannot connect to the master for more than milliseconds, it is considered that the master is dead)
sentinel failover-timeout mymaster 18000 #(it is considered that the master-slave handover fails after the master-slave handover)
daemonize yes    #(running in the background)
logfile "/var/log/redis_sentinel.log"  #(log file save path)
[root@master redis]\# ./redis-sentinel sentinel.conf #
Start sentinel service
[root@master redis]\# tail -f /var/log/redis_sentinel.log	 #View run log
Note: there can be more than one sentinel, but the number of servers cannot be even, otherwise the viewing log will be printed all the time
3: Configure keepalived for high availability
1. Install the keepalived package using yum or up2date (both master and slave are installed)
[root@localhost /]# yum -y install keepalived
2. Modify the keepalived configuration file
Master Profile content
! Configuration File for keepalived

global_defs {
   notification_email {
        2229088784@qq.com
   }
   notification_email_from Alexandre.Cassen@firewall.loc
   smtp_server 127.0.0.1
   smtp_connect_timeout 30
   router_id redis-109  ##Equipment name
}

vrrp_instance VI_redis {
    state MASTER  ##The current device is master
    interface eth0 ##vip bound network card
    virtual_router_id 50  ##Backup group id, the same backup group should be consistent
    priority 100  ##Priority. The higher priority becomes the master
    advert_int 3  ##How many seconds does the health check-up take place
    authentication {
        auth_type PASS
        auth_pass redis
    }
    virtual_ipaddress {
        192.168.10.222 dev eth0 label eth0:1  ##vip address and set a network card alias
    }
}
BACKUP profile content
! Configuration File for keepalived

global_defs {
   notification_email {
        2229088784@qq.com
   }
   notification_email_from Alexandre.Cassen@firewall.loc
   smtp_server 127.0.0.1
   smtp_connect_timeout 30
   router_id redis-110
}
vrrp_script chkmaster {
        script "/etc/keepalived/chkmaster.sh" #Check whether the current redis is a master
        interval 3 #Check every 3 seconds
        weight 2 #When the local machine returns 1 for the master test result, increase the priority by 2
        fall 2  ##How many times does the test fail before it is considered a real failure
        rise 1 ##If the test is successful, 1 is considered to be successful
        }

vrrp_instance VI_redis {
    state BACKUP
    interface eth0
    virtual_router_id 50
    priority 99
    advert_int 3
    authentication {
        auth_type PASS
        auth_pass redis
    }
    virtual_ipaddress {
        192.168.10.222 dev eth0 label eth0:1
    }
        track_script { ##Call status check
                chkmaster
        }
}
Status check script content
#!/bin/bash
STATUS=`/usr/local/bin/redis-cli info | grep role:master | wc -l`
echo $STATUS
if [ "$STATUS" -eq 0 ];then
    exit 1
else
    exit 0
fi
Verification results:
-
Close the redis service program of the master, check the vip and redis master servers, and switch to slave
-
Open the redis service program of the master and add the redis service to the slave server as a slave
-
Turn off the redis service of the slave server, check the vip and redis master server, and switch to the master server
-
Open the redis service program of the slave. The redis service is added to the master server as a slave
Encountered a pit where the master and slave do not switch
Stop master slave switchover log prompt error:
 terms of settlement:
1) If the redis instance is not configured
protected-mode yes
bind 192.168.10.109
Then add
protected-mode no
that will do
2) If the redis instance is configured
protected-mode yes
bind 192.168.10.109
Then add
protected-mode yes
bind 192.168.10.109
I changed "protected mode no" in both redis configuration file and sentinel configuration file to no, and restarted the service to solve the problem
Finally, specify the Redis server in Nginx and Tomcat to complete session sharing
This step is the same for two Tomcat servers. Upload the three jar packages of the corresponding versions to the server / usr/src directory, then copy them to the lib directory under the root directory of tomcat, and modify the context under Tomcat XML configuration file, add redis configuration item
[root@localhost /]\# cp commons-pool2-2.3.jar /usr/local/tomcat/lib/
[root@localhost /]\# cp tomcat-redis-session-manager-master-2.0.0.jar /usr/local/tomcat/lib/
[root@localhost /]\# cp jedis-2.7.3.jar /usr/local/tomcat/lib/
2. The tomcat node configuration uses sentinels. Change the information in the single node tomcat configuration file to the following content and restart the tomcat service (both tomcat nodes operate)
[root@tomcat-node2 /]# egrep -v "^#|^$" /usr/local/tomcat/conf/context.xml
<?xml version="1.0" encoding="UTF-8"?>
<Context>
    <WatchedResource>WEB-INF/web.xml</WatchedResource>
    <WatchedResource>${catalina.base}/conf/web.xml</WatchedResource>
    <Valve className="com.naritech.nicole.gump.RedisSessionHandlerValve" />
    <Manager className="com.naritech.nicole.gump.RedisSessionManager"
     sentinels="192.168.10.109:26379"
     sentinelMaster="mymaster"
     maxInactiveInterval="60"
     />
</Context>
\#Sentinels sets the ip and port that sentinels listen to. There can be multiple, separated by commas
\#sentinelMaster sets the name of the master set in the sentinel configuration file
\#Effective duration of maxinactivitinterval session cache to redis
Note: when using sentinel, change protected mode yes in redis configuration file and protected mode yes in sentinel configuration file to no; Otherwise, access tomcat item prompt 404; I don't know why
Install the PHP redis extension (installed on the nginx Tomcat dynamic server, both)
Configure the php dynamic server and modify the session cache settings (the default session exists in the php local disk file)
① Download the PHP redis extension package to the local directory of httpd+php dynamic server
[root@Nginx-tomat1/]# wget https://pecl.php.net/get/redis-4.3.0.tgz
② To install php redis, first unzip the package, switch to the unzipped directory, use phpize (provided by the php package, if not, please install php) tool to generate the configure file, compile and compile the installation (the installation completed module is in the / usr/lib64/php/modules directory), (please install gcc and php devel for configuration errors)
[root@localhost /]# tar zxvf phpredis-4.3.0.tgz
[root@localhost /]# cd /redis-4.3.0/
[root@localhost redis-4.3.0]# phpize
Configuring for:
PHP Api Version: 20100412
Zend Module Api No: 20100525
Zend Extension Api No: 220100525
[root@localhost redis-4.3.0]# ./configure --with-php-config=/usr/bin/php-config
[root@localhost redis-4.3.0]# make && make install
③ Modify the configuration information of PHP FPM and PHP to support redis module, and specify the address of session to redis service
[root@localhost /]# vim /etc/php.ini
--------------------------------Add and modify the following--------------------------------
extension_dir="/usr/lib64/php/modules/" ##By default, it is not added in the appropriate place
extension=redis.so ##By default, it is not added in the appropriate place
session.save_handler = redis ##By default, the search is modified to redis
session.save_path = "tcp://192.168. 2.226:6379 "## by default, it can be found and modified to redis server address and port number

[root@localhost /]# vim /etc/php-fpm.d/www.conf
php_value[session.save_handler] = redis (In the last two lines)
php_value[session.save_path] = tcp://192.168.10.109:6379
④ Restart the PHP FPM service, and access the info. Of the host separately On the PHP page, check whether the redis module is loaded successfully and whether the session save address is configured successfully
[root@localhost /]# systemctl restart php-fpm
Configure gateway server
1. Install Iptables, configure rules, and filter rules
yum -y install iptables-services.x86_64
2. Generate rules
[root@GATEWAY-iptables /]# iptables -t nat -I PREROUTING -d 172.16.10.10 -p udp --dport=53 -j DNAT --to-destination 192.168.10.50:53
[root@GATEWAY-iptables /]# iptables -t nat -I PREROUTING -d 172.16.10.10 -p tcp --dport=80 -j DNAT --to-destination 192.168.10.50:80
[root@GATEWAY-iptables /]# iptables -I INPUT -i eth0 -j REJECT
All intranet gateways must point to the DIP of the gateway server
View the results of validation

Verification of comprehensive experimental results:
Verify client request load balancing
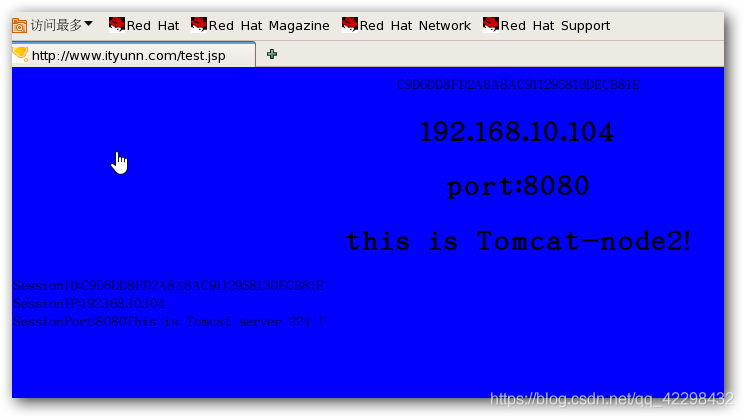
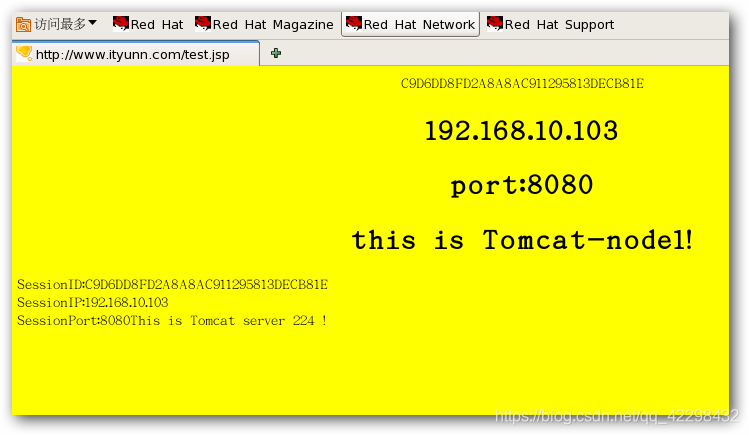
① The client keeps refreshing access http://www.ityunn.com/test.jsp You will be prompted to request tomcat-node1 for processing for the first time and tomcat-node2 for processing for the second time
Verify that the LVS proxy server is highly available
① Turn off the nginx service of the nginx master, and the client can access it http://www.ityunn.com/test.jsp During normal access, vip floats onto nginx slave
② Start the nginx service of the nginx master, and the client can access it http://www.ityunn.com/test.jsp After normal access, vip returns to nginx master
Verify that the tomcat node is highly available
< ① close any one of the two tomcat servers to access the client http://www.ityunn.com/test.jsp Can access the site normally
Verify that the session is cached to redis
① Client access http://www.ityunn.com/test.jsp , the displayed session can be queried in redis database
Verify redis master-slave replication and high availability failover
① set data in redis master and query data in redis slave
② Close the redis service of the redis master, and the client can access it normally http://www.ityunncom/test.jsp , sentinel promoted redis slave to a new master
③ Open the redis service of the redis master, add it as a new slave, synchronize the data of the master, and then close the redis service of the redis slave for client access http://www.ityunn.com/test.jsp It can be accessed normally. sentinel promotes the redis master to a new master
Ideas for building environment:
first:
1. Build the back-end Nginx Tomcat server and use the PHP FPM module to make Nginx support dynamic PHP web pages. And build a DNS master-slave server.
2. Then install Keepalived and LVS software on the front end, high availability Nginx and load balancing Nginx and DNS. Use LVS-DR mode.
3. On the back end, use the script written above to specify its own loopback address to respond to customer calls and prohibit ARP broadcasting and announcements.
4. Build Mysql master-slave replication on the back end, separate reading and writing, and use MHA for high availability,
5. Set up Redis master-slave + sentinel + keepalived for high availability.
6. The gateway of all intranet addresses points to the DIP address of the gateway server And install Iptable filtering rules on the gateway server. Turn on routing forwarding.
7. The client points to the Internet address of the gateway server for verification.