1. Why use Volumes volumes?
The files in the container are temporarily stored on the disk. Once the container is deleted, the files in the container will be deleted, which brings some problems to the special applications running in the container. Specifically, first, when the container crashes, kubelet will restart the container, and the files in the container will be lost, because the container will be rebuilt in a clean state; Second, when multiple containers are running simultaneously in a Pod, it is often necessary to share files between these containers.
It cannot be solved according to the previous idea. Now K8s abstracts the concept of Volume to solve these two problems.
The Kubernetes volume has a clear lifecycle, the same as the Pod that wraps it. Therefore, the volume has a longer lifetime than any container running in the Pod, and the data is retained when the container restarts. Of course, when a Pod no longer exists, the volume will no longer exist. Perhaps more importantly, Kubernetes can support many types of volumes, and Pod can use any number of volumes at the same time.
Note that a volume cannot be mounted to or hard linked to other volumes. Each container in the Pod must independently specify the mount location of each volume.
Kubernetes supports the following types of volumes:
awsElasticBlockStore ,azureDisk,azureFile,cephfs,cinder,configMap,csi
downwardAPI,emptyDir,fc (fibre channel),flexVolume,flocker
gcePersistentDisk,gitRepo (deprecated),glusterfs,hostPath,iscsi,local,
nfs,persistentVolumeClaim,projected,portworxVolume,quobyte,rbd
scaleIO,secret,storageos,vsphereVolume
2. emptyDir volume
When the Pod is assigned to a node, an emptyDir volume is created first, and the volume will always exist as long as the Pod runs on the node. As its name indicates, the volume is initially empty. Although the containers in the Pod may have the same or different paths to mount the emptyDir volume, these containers can read and write the same files in the emptyDir volume. When the Pod is deleted from the node for some reason, the data in the emptyDir volume will also be permanently deleted.
Common usage scenarios of emptyDir:
(1) Cache space, such as disk based merge sort.
(2) Checkpoints are provided for long-time computing tasks, so that tasks can easily recover from the pre crash state.
(3) When the Web server container service data, save the file obtained by the content manager container.
By default, the emptyDir volume is stored on the media used to support the node; This media can be disk or SSD or networked storage, depending on your environment. However, you can put emptyDir Set the media field to "Memory" to tell Kubernetes to install tmpfs (Memory based file system) for you. Although tmpfs is very fast, it should be noted that it is different from disk. tmpfs will be cleared when the node restarts, and all files you write are accounted for the Memory consumption of the capacity, which is constrained by the capacity Memory limit.
Create the directory volumes,

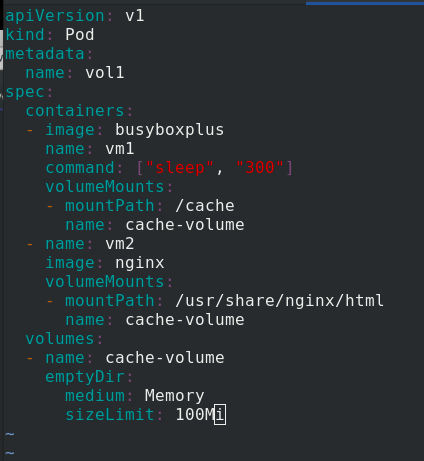
Edit Vol1 Yaml file
apiVersion: v1
kind: Pod
metadata:
  name: vol1
spec:
  containers:			%One pod Create two container shares in volumes
  - image: busyboxplus
    name: vm1
    command: ["sleep", "300"]
    volumeMounts:
    - mountPath: /cache			%vm1 The volume in is mounted in the container/cache
      name: cache-volume
  - name: vm2
    image: nginx
    volumeMounts:
    - mountPath: /usr/share/nginx/html	%vm2 The volume in is mounted in the container/usr/share/nginx/html
      name: cache-volume
  volumes:
  - name: cache-volume
    emptyDir:
      medium: Memory			%Using memory media
      sizeLimit: 100Mi			%You can use 100 M Memory
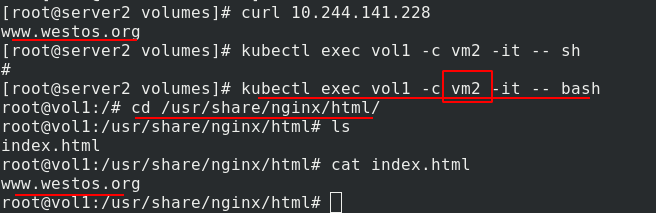
kubectl apply -f vol1.yaml creates a pod, kubectl get pod -o wide view the pod, Vol1's ip is 10.244.141.228, access error 403 is because there is no published content. Enter the vm1 container of Vol1 and write the published content in / cache

Visit the test again and there is content. After entering the vm2 container of vol1, you can see that the published content is the same as that in vm1 in / usr/share/nginx/html, indicating that vm1 and vm2 share volume resources
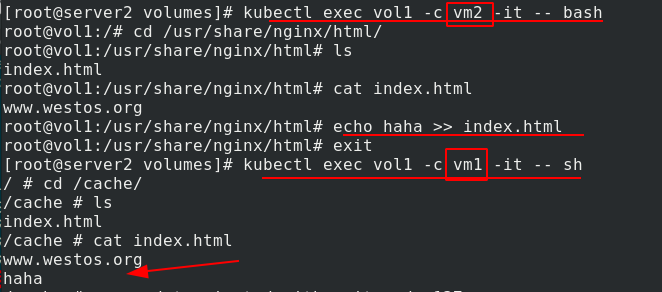
Enter the vm2 container of vol1, add the published content on the basis of the original content, return to the vm1 container of vol1, see the added content, and further prove that the two containers vm1 and vm2 in the same pod share volume resources
If a 200M file is written and exceeds the limit of 100M, the pod will be broken
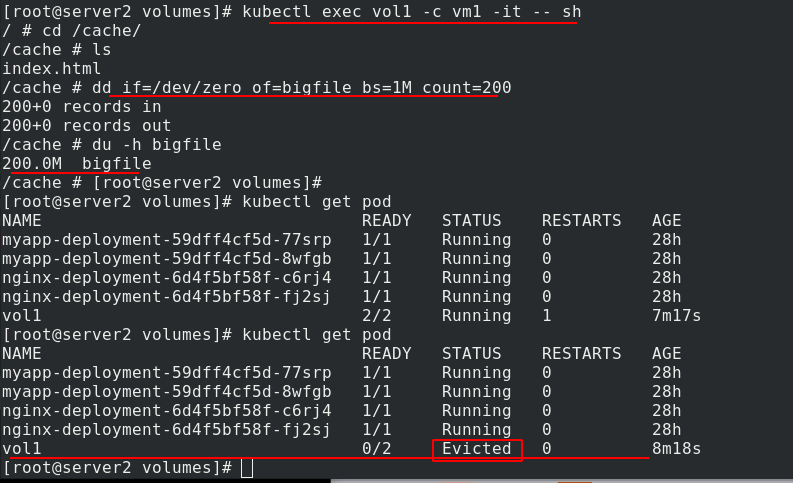
You can see that if the file exceeds the limit, it will be dropped by kubelet evict in 1-2 minutes. The reason why kubelet is not evict "immediately" is that kubelet is checked regularly, and there will be a time difference. This exposes some disadvantages of emptydir:
(1) Users cannot be prevented from using memory in time. Although kubelet will squeeze out the Pod after 1-2 minutes, the node may be damaged during this time;
(2) kubernetes scheduling is affected because empty dir does not involve node resources, which will cause Pod to "secretly" use node memory, but the scheduler does not know;
(3) The user cannot perceive that the memory is unavailable in time
3. hostPath volume
The hostPath volume can mount files or directories on the file system of the host node into your Pod. Although this is not what most pods need, it provides a powerful escape Pod for some applications.
The main usage of hostPath is:
(1) Run a container that needs to access the internal mechanism of the Docker engine and mount the / var/lib/docker path.
(2) Mount / sys as hostPath when you run the coadvisor in the container.
(3) Allow Pod to specify whether a given hostPath should exist before running Pod, whether it should be created, and how it should exist.
(1) Mount the directory in the host to the pod
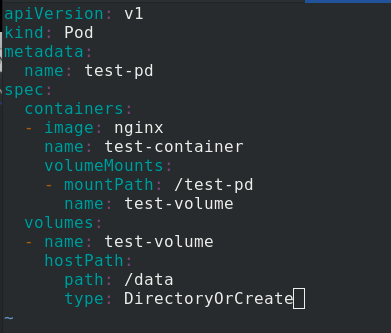
Create host Yaml file
apiVersion: v1
kind: Pod
metadata:
name: test-pd
spec:
containers:
- image: nginx
name: test-container
volumeMounts:
- mountPath: /test-pd %To mount a roll into a container/test-pd
name: test-volume
volumes:
- name: test-volume
hostPath:
path: /data %The path to the volume is/data
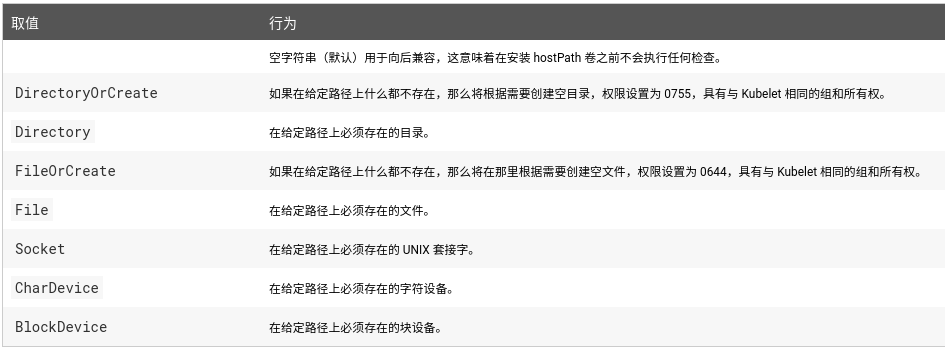
type: DirectoryOrCreate %If it does not exist on the specified path, create an empty directory as needed, with the permission of 0755 and the same as kubelet Same group and ownership
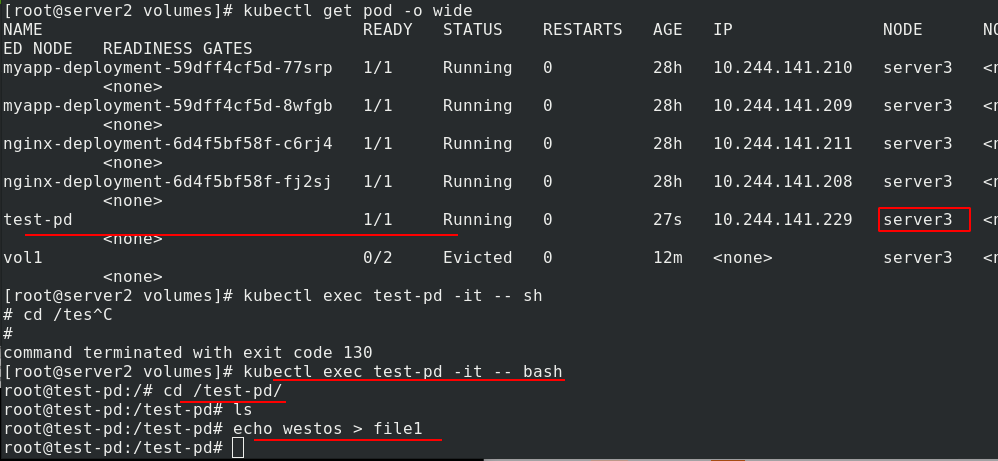
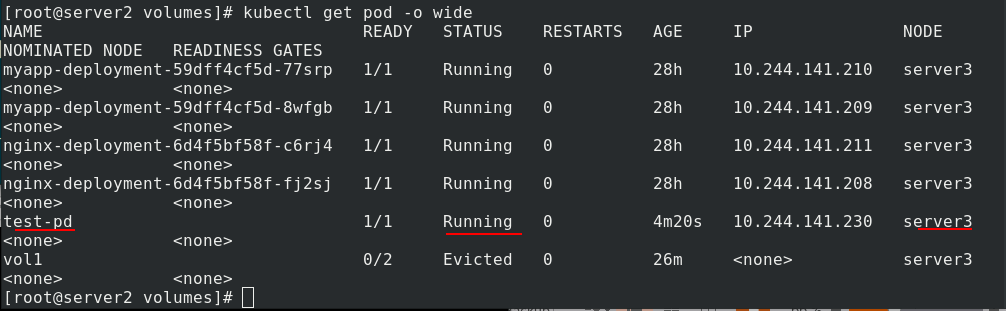
Create test PD, check that it is dispatched to server3, enter test PD, and write the file in / test PD
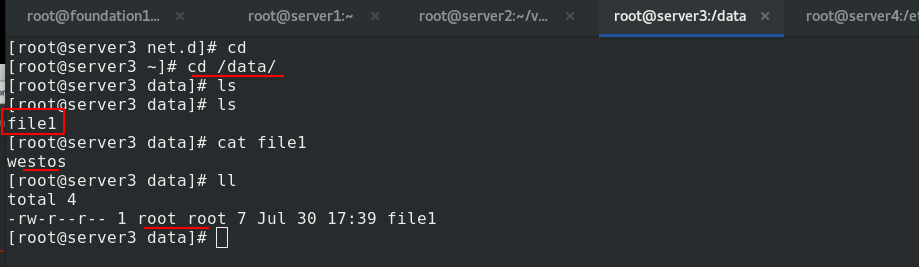
Go to the real node and check that there is file1 in / data, and the owner and owning group are root
In addition to the DirectoryOrCreate used above, users can optionally specify more type s for the hostPath volume
Be careful when using this type of volume because:
(1) Multiple pods with the same configuration (for example, created from a podTemplate) will behave differently on different nodes due to different files on the nodes.
(2) When Kubernetes adds resource aware scheduling according to the plan, such scheduling mechanism will not consider the resources used by hostPath.
(3) Files or directories created on the underlying host can only be written by root. You need to run the process as root in the privilege container or modify the file permissions on the host so that you can write to the hostPath volume.
(2) Mount nfs in the host to the pod
Generally speaking, file storage is independent of k8s cluster, so nfs and warehouse are placed in server1.
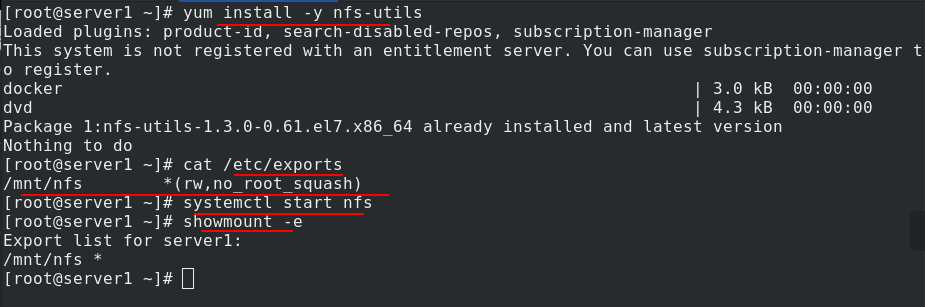
Install nfs first
vim /etc/exports		%Edit the content as shown in the figure
systemctl start nfs		%open nfs
showmount -e			%Whether the test is normal
All nodes in the cluster also need to install nfs file system and turn on nfs. showmount -e 172.25.11.1 can be tested to be normal

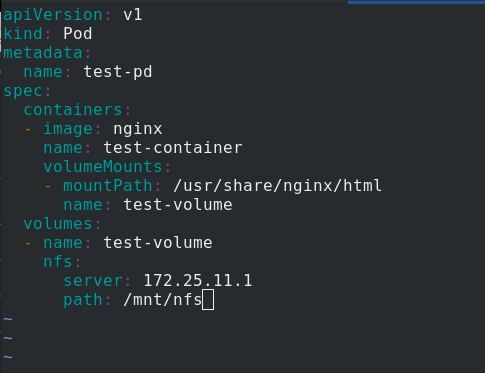
In server2, edit NFS Yaml file
apiVersion: v1
kind: Pod
metadata:
  name: test-pd
spec:
  containers:
  - image: nginx
    name: test-container
    volumeMounts:
    - mountPath: /usr/share/nginx/html	%Mount the volume to test-pd In container/usr/share/nginx/html
      name: test-volume
  volumes:
  - name: test-volume
    nfs:
      server: 172.25.11.1		%The path to the volume is 172.25.11.1/mnt/nfs
      path: /mnt/nfs
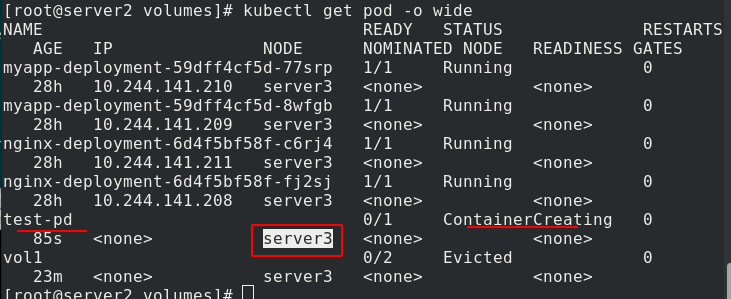
kubectl apply -f nfs.yaml creates a pod and checks the node. The pod is not created successfully because the pod is scheduled to server 3, but server 3 does not install or enable NFS.
Install nfs on server3
Check again, normal operation
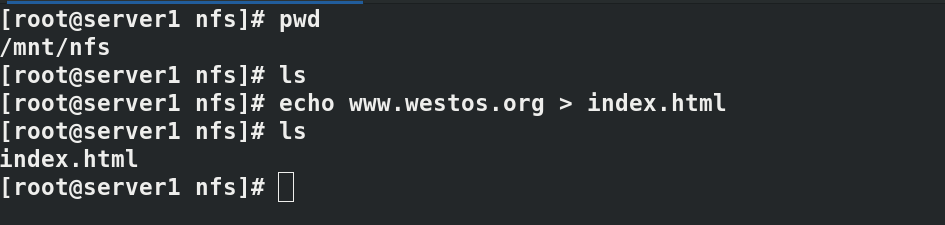
Now you are ready to test whether it is synchronized. In server1, create the publication
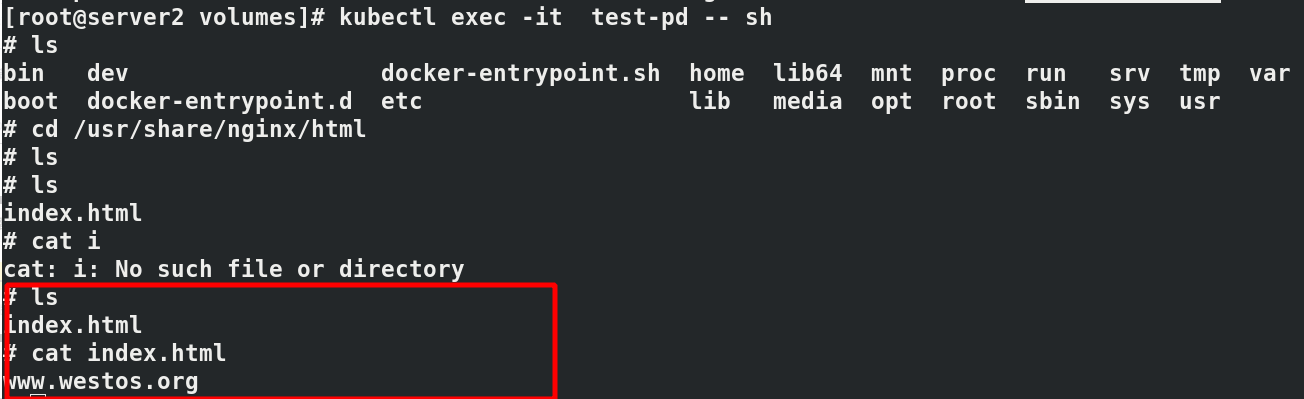
Kubectl exec test PD - it bash enters the pod to check the published content. The nfs + cluster succeeds
4. PersistentVolume persistent volume
(1) What is a persistent volume?
Persistent volume (PV) is a part of the network storage provided by the administrator in the cluster. Like the nodes in the cluster, PV is also a resource in the cluster. Like volume, it is a volume plug-in, but its life cycle is independent of the Pod using it. PV is an API object that captures the implementation details of NFS, ISCSI, or other cloud storage systems.
Persistent volume claim (PVC) is a storage request of users. It is similar to pod. Pod consumes Node resources, while PVC consumes PV resources. Pod can request specific resources (such as CPU and memory). PVC can request the specified size and access mode (which can be mapped to one read-write or multiple read-only).
There are two ways PV is provided: static and dynamic.
(1) Static PV: the Cluster Administrator creates multiple PVS, which carry the details of real storage, which is available to cluster users. They exist in the Kubernetes API and can be used for storage.
(2) Dynamic PV: when the static PV created by the administrator does not match the user's PVC, the cluster may try to supply volume specifically to the PVC. This provisioning is based on StorageClass.
The binding of PVC and PV is a one-to-one mapping. If no matching PV is found, the PVC will be unbound and unbound indefinitely.
-
When in use:
The cluster checks the PVC, finds the bound PV, and maps the PV to the Pod. For PVS that support multiple access modes, users can specify the mode they want to use. Once the user has a PVC and the PVC is bound, the PV will always belong to the user as long as the user still needs it. The user schedules the Pod and accesses the PV by including PVC in the volume block of the Pod. -
On release:
After users use PV, they can delete PVC objects through the API. When the PVC is deleted, the corresponding PV is considered to be "released", but it can not be used for another PVC. The ownership of the previous PVC still exists in the PV and must be disposed of according to the policy. -
When recycling:
The PV recycling strategy tells the cluster how to deal with the PV after it is released. Currently, PV can be Retained, Recycled, or Deleted. Reservations allow resources to be declared again manually. For PV volumes that support deletion, the deletion will remove the PV object from Kubernetes and the corresponding external storage (such as AWS EBS, GCE PD, Azure Disk, or Cinder volume). Dynamically provisioned volumes are always Deleted.
(2) Static PV
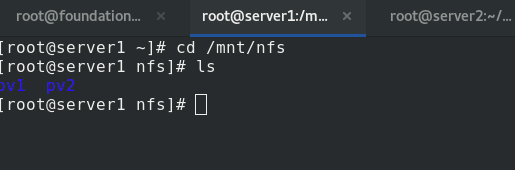
Write the publication file in the nfs system

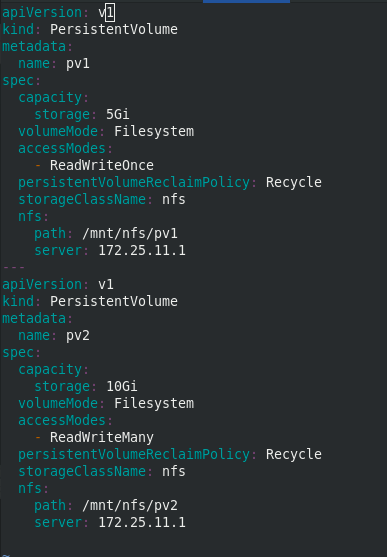
Edit PV Yaml file
apiVersion: v1
kind: PersistentVolume
metadata:
  name: pv1
spec:
  capacity:
    storage: 5Gi
  volumeMode: Filesystem
  accessModes:
    - ReadWriteOnce			%The policy is one-time reading and writing
  persistentVolumeReclaimPolicy: Recycle
  storageClassName: nfs
  nfs:
    path: /mnt/nfs/pv1		%nfs The path is 172.25.11.1/mnt/nfs/pv1
    server: 172.25.11.1
---
apiVersion: v1
kind: PersistentVolume
metadata:
  name: pv2
spec:
  capacity:
    storage: 10Gi
  volumeMode: Filesystem
  accessModes:
    - ReadWriteMany			%The policy is multiple reads and writes
  persistentVolumeReclaimPolicy: Recycle
  storageClassName: nfs
  nfs:
    path: /mnt/nfs/pv2		%nfs The path is 172.25.11.1/mnt/nfs/pv2
    server: 172.25.11.1
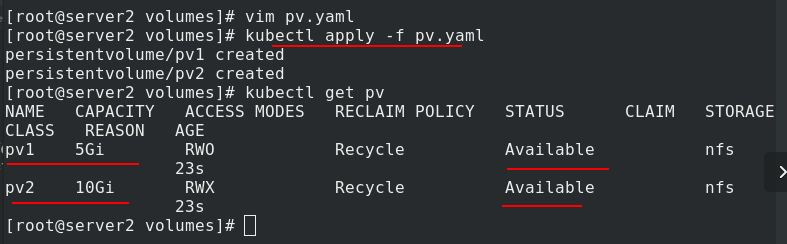
Create two persistent volumes pv1 and pv2. View that the status is Available mode
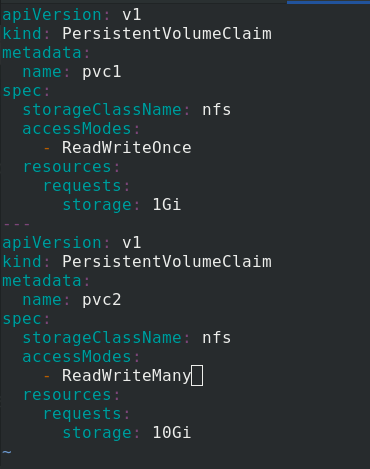
Edit PVC Yaml file
apiVersion: v1
kind: PersistentVolumeClaim
metadata:
  name: pvc1
spec:
  storageClassName: nfs
  accessModes:
    - ReadWriteOnce
  resources:
    requests:		%The minimum requirement is 1 G
      storage: 1Gi
---
apiVersion: v1
kind: PersistentVolumeClaim
metadata:
  name: pvc2
spec:
  storageClassName: nfs
  accessModes:
    - ReadWriteMany
  resources:
    requests:
      storage: 10Gi		%%The minimum requirement is 10 G
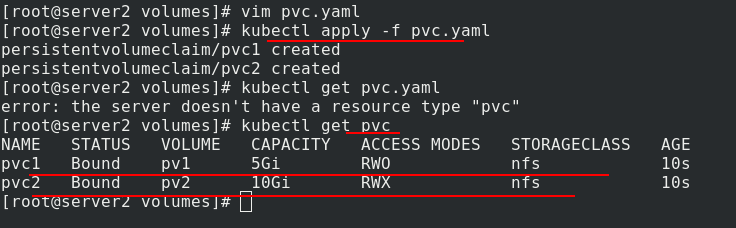
Create two pvc, pvc 1 and pvc 2
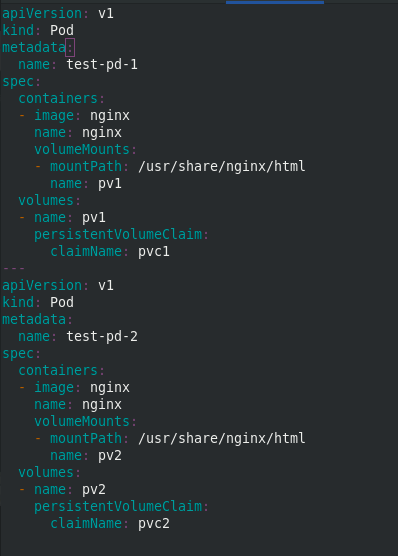
Create pod yaml
apiVersion: v1
kind: Pod
metadata:
  name: test-pd-1
spec:
  containers:
  - image: nginx
    name: nginx
    volumeMounts:
    - mountPath: /usr/share/nginx/html
      name: pv1
  volumes:
  - name: pv1
    persistentVolumeClaim:
      claimName: pvc1		%test-pd-1 use pvc1
---
apiVersion: v1
kind: Pod
metadata:
  name: test-pd-2
spec:
  containers:
  - image: nginx
    name: nginx
    volumeMounts:
    - mountPath: /usr/share/nginx/html
      name: pv2
  volumes:
  - name: pv2
    persistentVolumeClaim:
      claimName: pvc2		%test-pd-2 use pvc2
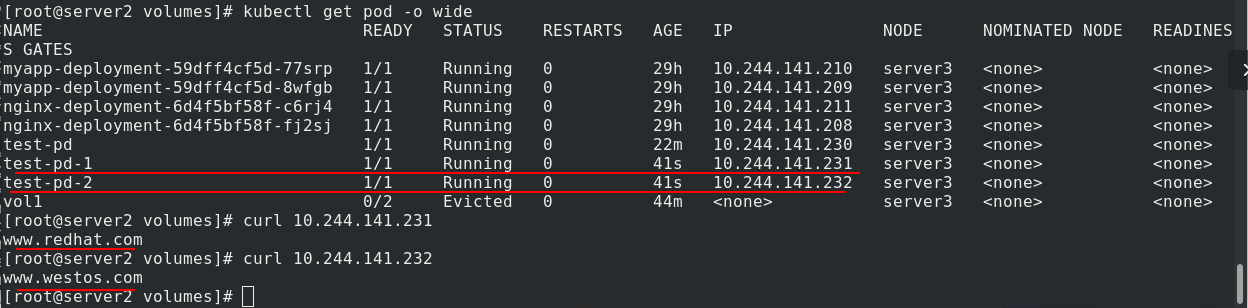
Create two pod s, test-pd-1 and test-pd-2, and check that the status is running

Check the ip addresses of the two pods and access the test. Different pods can get different published content
After deleting the pod, you can see that the binding relationship between pvc and pv is still in progress
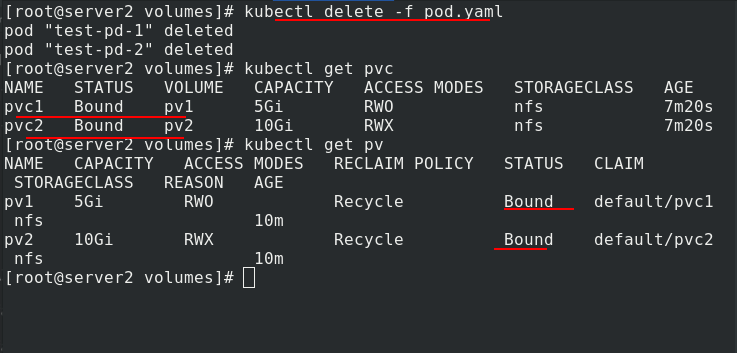
After deleting pvc, you can still see the binding relationship between pvc and pv, which can not be used by others. This is one of the disadvantages of static pv.

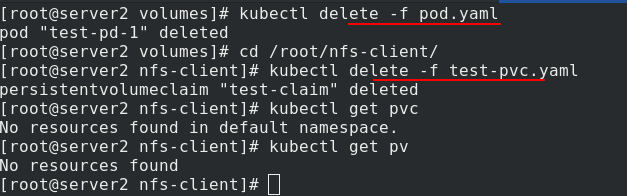
When deleting, pay attention to the deletion order. First delete pod, then delete pvc, and finally delete pv
Static volumes need to be created in advance, but in the actual production environment, administrators may not be able to create them in advance, so the following uses dynamic volumes, which can be created automatically
(3) Dynamic PV
StorageClass provides a way to describe storage classes. Different classes may be mapped to different quality of service levels, backup policies or other policies. Each StorageClass contains the provisioner, parameters and reclaimPolicy fields, which will be used when the StorageClass needs to dynamically allocate the PersistentVolume.
The attributes of StorageClass are:
(1) Provisioner: used to determine which volume plug-in is used to allocate PV. This field must be specified. You can specify an internal allocator or an external allocator. The code address of the external allocator is kubernetes initiator / external storage, including NFS and Ceph.
(2) Reclaim Policy: specify the Reclaim Policy of the created Persistent Volume through the reclaimPolicy field. The Reclaim Policy includes Delete or Retain. If not specified, it defaults to Delete.
View more properties: https://kubernetes.io/zh/docs/concepts/storage/storage-classes/
NFS Client Provisioner is an automatic provisioner. It uses NFS as storage to automatically create PV and corresponding PVC. It does not provide NFS storage itself. It requires a set of external NFS storage services.
PV is provided in the naming format of ${namespace}-${pvcName}-${pvName} (on NFS server)
PV recycling is in the format of archived - ${namespace} - ${pvcname} - ${pvname} (on NFS server)
NFS client provider source code address: https://github.com/kubernetes-incubator/external-storage/tree/master/nfs-client
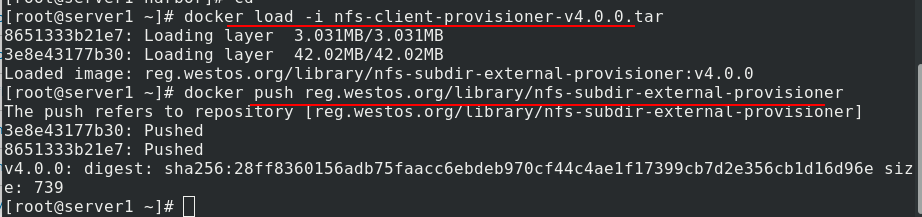
First, pull the image from the Internet, import the image, and upload it to the warehouse for later use.
Create directory, create ns
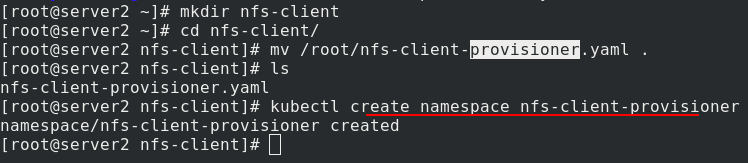
Edit NFS client provider Yaml file (download from the official website)
apiVersion: v1
kind: ServiceAccount
metadata:
  name: nfs-client-provisioner
  # replace with namespace where provisioner is deployed
  namespace: nfs-client-provisioner
---
kind: ClusterRole
apiVersion: rbac.authorization.k8s.io/v1
metadata:
  name: nfs-client-provisioner-runner
rules:
  - apiGroups: [""]
    resources: ["nodes"]
    verbs: ["get", "list", "watch"]
  - apiGroups: [""]
    resources: ["persistentvolumes"]
    verbs: ["get", "list", "watch", "create", "delete"]
  - apiGroups: [""]
    resources: ["persistentvolumeclaims"]
    verbs: ["get", "list", "watch", "update"]
  - apiGroups: ["storage.k8s.io"]
    resources: ["storageclasses"]
    verbs: ["get", "list", "watch"]
  - apiGroups: [""]
    resources: ["events"]
    verbs: ["create", "update", "patch"]
---
kind: ClusterRoleBinding
apiVersion: rbac.authorization.k8s.io/v1
metadata:
  name: run-nfs-client-provisioner
subjects:
  - kind: ServiceAccount
    name: nfs-client-provisioner
    # replace with namespace where provisioner is deployed
    namespace: nfs-client-provisioner
roleRef:
  kind: ClusterRole
  name: nfs-client-provisioner-runner
  apiGroup: rbac.authorization.k8s.io
---
kind: Role
apiVersion: rbac.authorization.k8s.io/v1
metadata:
  name: leader-locking-nfs-client-provisioner
  # replace with namespace where provisioner is deployed
  namespace: nfs-client-provisioner
rules:
  - apiGroups: [""]
    resources: ["endpoints"]
    verbs: ["get", "list", "watch", "create", "update", "patch"]
---
kind: RoleBinding
apiVersion: rbac.authorization.k8s.io/v1
metadata:
  name: leader-locking-nfs-client-provisioner
  # replace with namespace where provisioner is deployed
  namespace: nfs-client-provisioner
subjects:
  - kind: ServiceAccount
    name: nfs-client-provisioner
    # replace with namespace where provisioner is deployed
    namespace: nfs-client-provisioner
roleRef:
  kind: Role
  name: leader-locking-nfs-client-provisioner
  apiGroup: rbac.authorization.k8s.io
---
apiVersion: apps/v1
kind: Deployment
metadata:
  name: nfs-client-provisioner
  labels:
    app: nfs-client-provisioner
  # replace with namespace where provisioner is deployed
  namespace: nfs-client-provisioner
spec:
  replicas: 1
  strategy:
    type: Recreate
  selector:
    matchLabels:
      app: nfs-client-provisioner
  template:
    metadata:
      labels:
        app: nfs-client-provisioner
    spec:
      serviceAccountName: nfs-client-provisioner
      containers:
        - name: nfs-client-provisioner
          image: nfs-subdir-external-provisioner:v4.0.0
          volumeMounts:
            - name: nfs-client-root
              mountPath: /persistentvolumes
          env:
            - name: PROVISIONER_NAME
              value: westos.org/nfs
            - name: NFS_SERVER
              value: 172.25.11.1
            - name: NFS_PATH
              value: /mnt/nfs
      volumes:
        - name: nfs-client-root
          nfs:
            server: 172.25.11.1
            path: /mnt/nfs
---
apiVersion: storage.k8s.io/v1
kind: StorageClass
metadata:
  name: managed-nfs-storage
provisioner: westos.org/nfs
parameters:
  archiveOnDelete: "true"		%true Indicates deletion pvc After, the catalog is packaged
  								%false Indicates deletion pvc After, the directory is deleted directly
Apply NFS client provider Yaml file

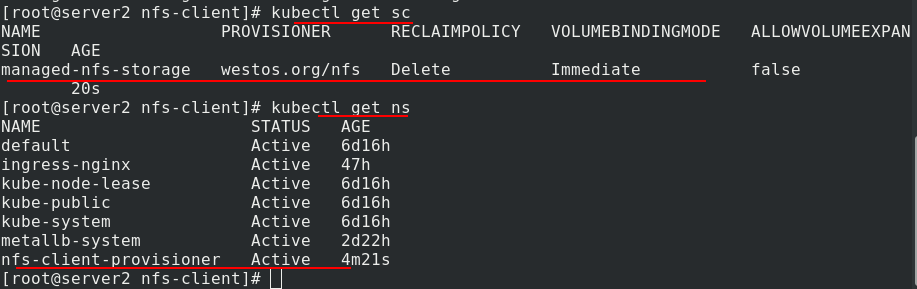
View the created sc and ns
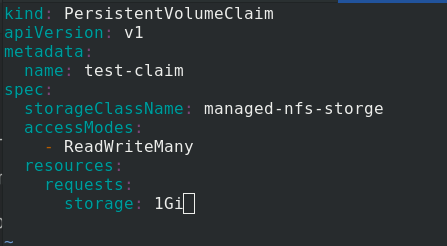
Edit test PVC Yaml file
kind: PersistentVolumeClaim
apiVersion: v1
metadata:
  name: test-claim
spec:
  storageClassName: managed-nfs-storage		%statement managed-nfs-storage this sc
  accessModes:
    - ReadWriteMany
  resources:
    requests:
      storage: 1Gi
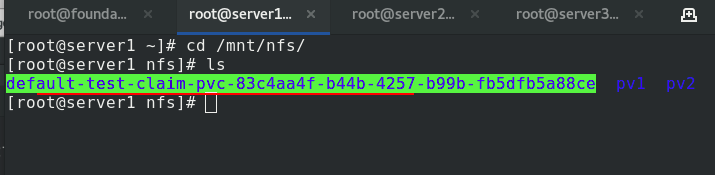
Create pvc, view pv and pvc. Once pvc is created, pv is automatically created

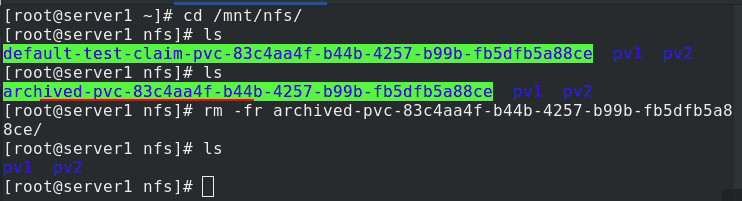
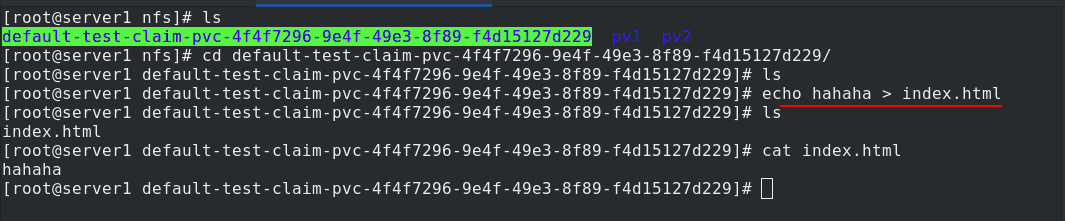
In server1, you can see that subdirectories are automatically generated
If no recycling policy is specified, the default value is Delete. After deleting pvc, pv will be recycled automatically.
After recycling, change the name of the original subdirectory on the server1 side and pack the backup
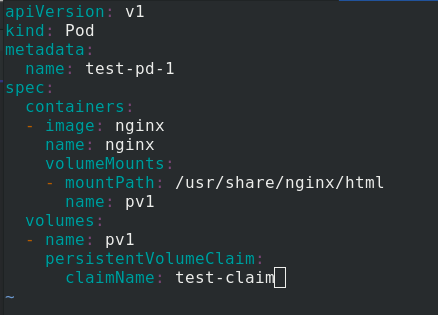
Edit pod Yaml file
apiVersion: v1
kind: Pod
metadata:
  name: test-pd-1
spec:
  containers:
  - image: nginx
    name: nginx
    volumeMounts:
    - mountPath: /usr/share/nginx/html
      name: pv1
  volumes:
  - name: pv1
    persistentVolumeClaim:
      claimName: test-claim
Apply test PVC Yaml file and pod Yaml file
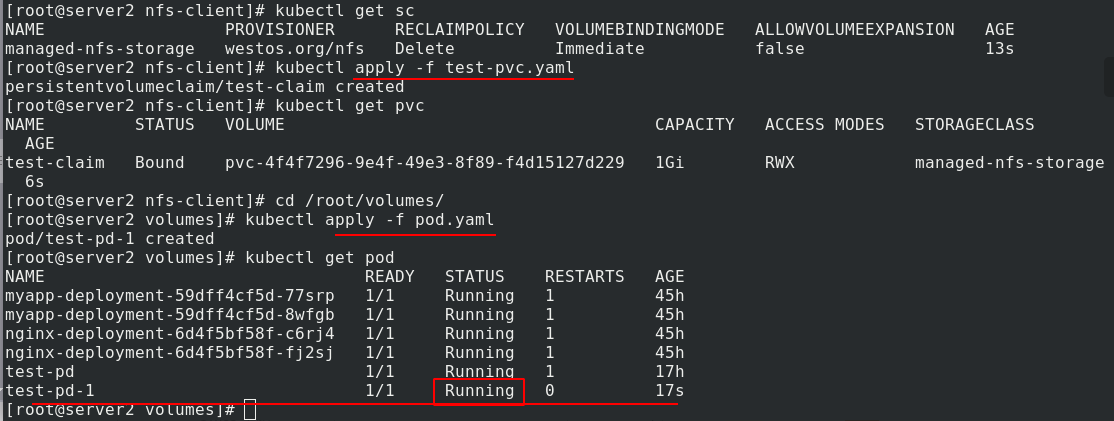
Check the ip address of test-pd-1, and 403 error is reported when accessing. The reason is that there is no default release file
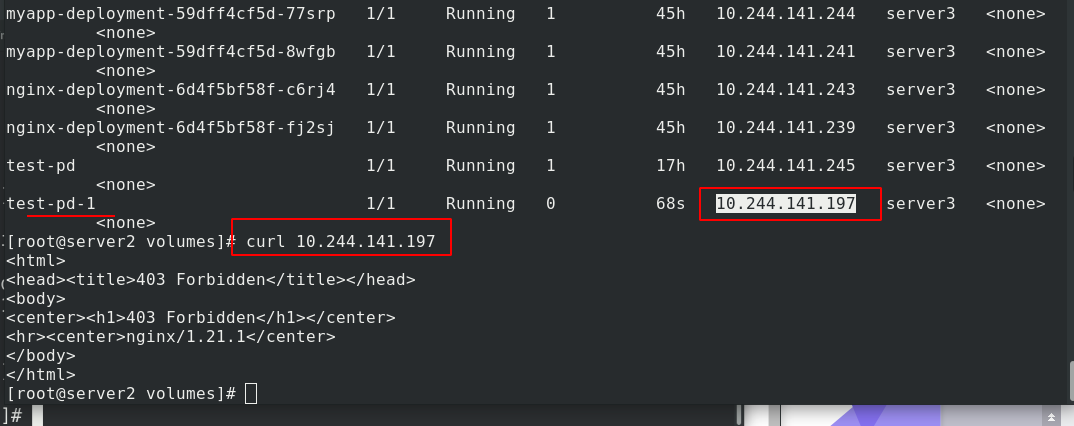
Write default publish file
Access successful

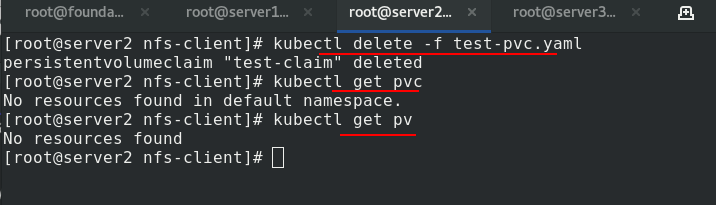
Empty the experimental environment
nfs has no dynamic volumes
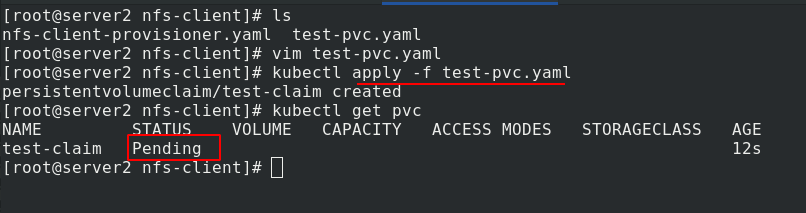
If test PVC Specify sc in yaml file to comment out,
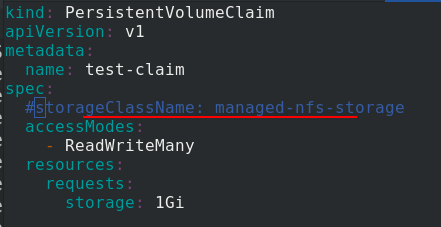
After pulling up pvc, the pending status will be displayed because it is not told sc
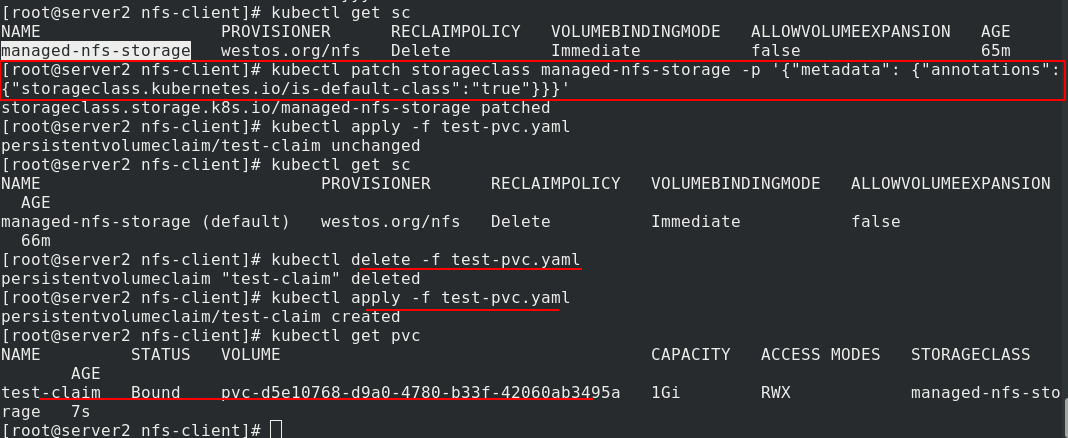
In addition to specifying sc, there is another way to set managed NFS storage as the default sc. Now delete the previous pvc and re create pvc. It's normal
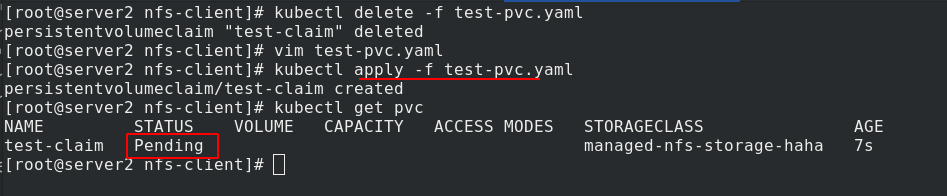
But if test PVC The designation of sc in yaml file does not exist, such as managed NFS storage haha here
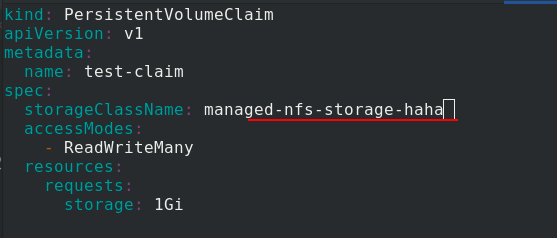
After application, there is still a problem. The status is pending
5. StatefulSet controller
StatefulSet abstracts the application state into two conditions:
(1) Topology status: application instances must be started in a certain order. The newly created Pod must be consistent with the network ID of the original Pod (stable state)
(2) Storage status: multiple instances of the application are bound with different storage data (dynamic data volumes)
statefulset numbers all pods. The numbering rules are $(statefullset name) - $(serial number), starting from 0. When creating, one is created successfully, and then the next is created. When recycling, delete one by one. You can't delete directly (it will be deleted at the same time, disordered and out of order). The way to delete is to change the number of copies in the file to 0. If you apply it again, it will be deleted. Those created later will be deleted first, one by one
After the Pod is deleted and rebuilt, the network identity of the reconstructed Pod will not change. The topology state of the Pod is fixed according to the "name + number" of the Pod, and a fixed and unique access entry is provided for each Pod, that is, the DNS record corresponding to the Pod. The number of replicas becomes 0, the container is deleted, but the data volume is still. When we create three replica pods again, web-0, web-1 and web-2 still correspond to the previously existing data volumes, which will not be disordered.
Create directory
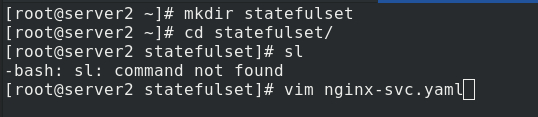
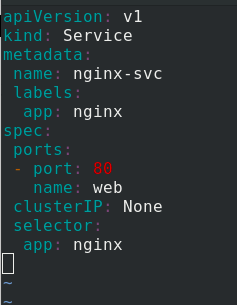
Edit nginx SVC Yaml file
apiVersion: v1
kind: Service
metadata:
 name: nginx-svc
 labels:
  app: nginx
spec:
 ports:
 - port: 80
   name: web
 clusterIP: None
 selector:
  app: nginx
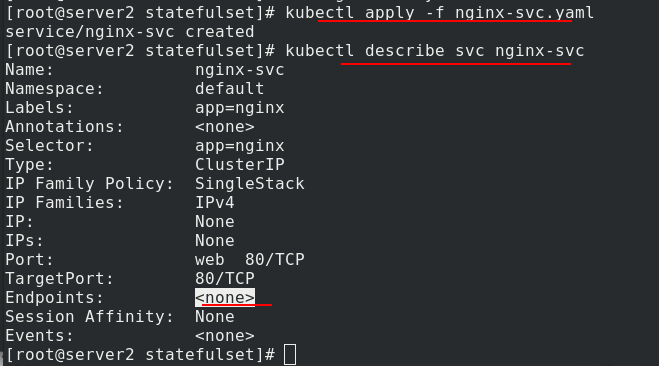
Apply nginx SVC Yaml file, check the details, there is no back end, because we haven't opened it yet
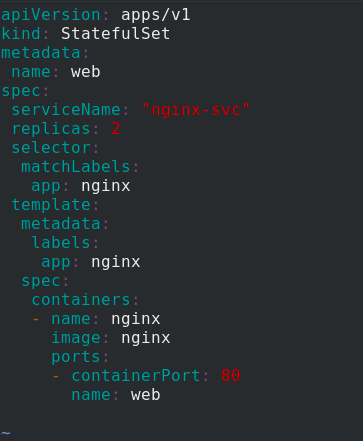
Edit statefullset Yaml file, using StatefulSet controller to generate pod
apiVersion: apps/v1
kind: StatefulSet
metadata:
 name: web
spec:
 serviceName: "nginx-svc"
 replicas: 2
 selector:
  matchLabels:
   app: nginx
 template:
  metadata:
   labels:
    app: nginx
  spec:
   containers:
   - name: nginx
     image: nginx
     ports:
     - containerPort: 80
       name: web
Apply statefullset Generating pod from yaml file
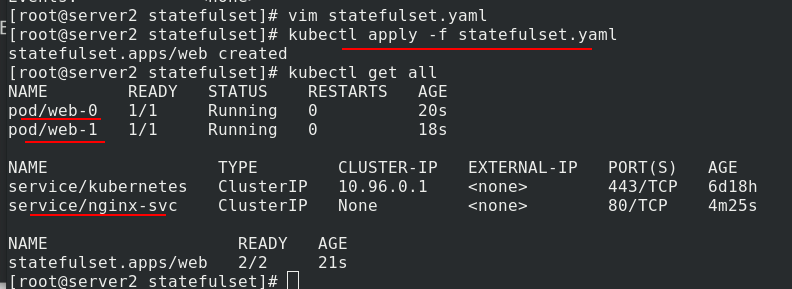
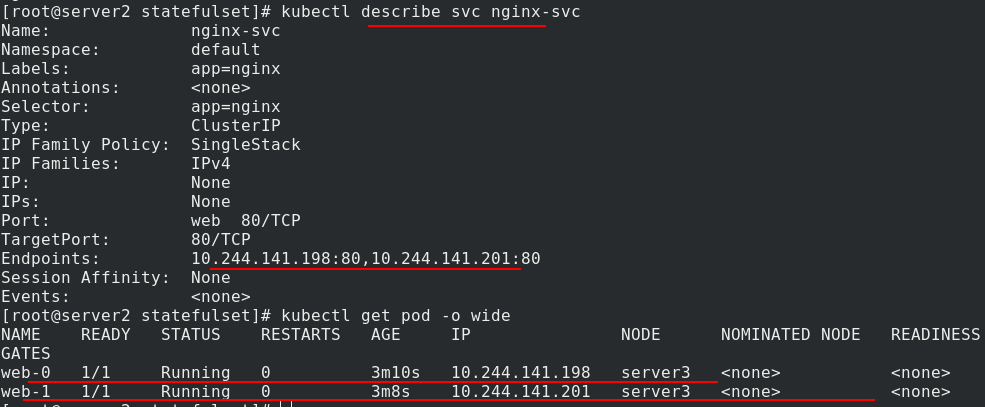
Now look at the service again and you can see the back end
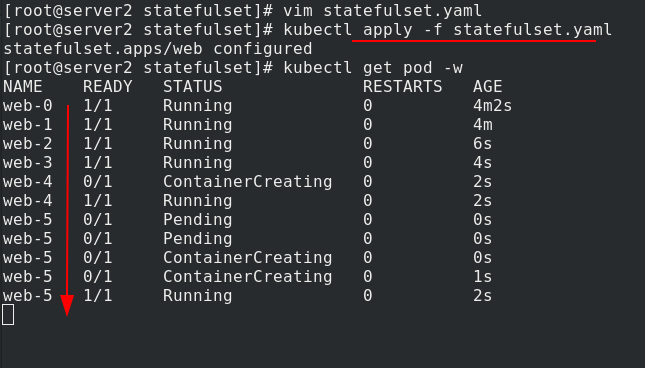
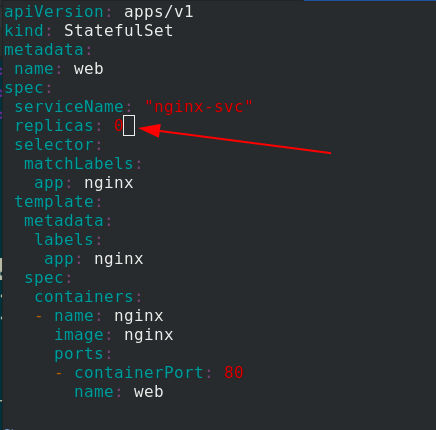
During capacity expansion, modify statefullset Yaml file, number of copies increased to 6
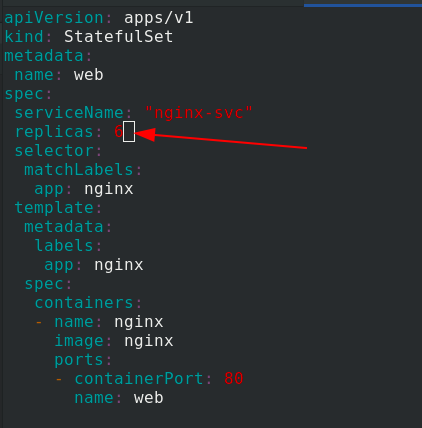
Apply statefullset Yaml file, you can see that the copies are generated one by one and orderly
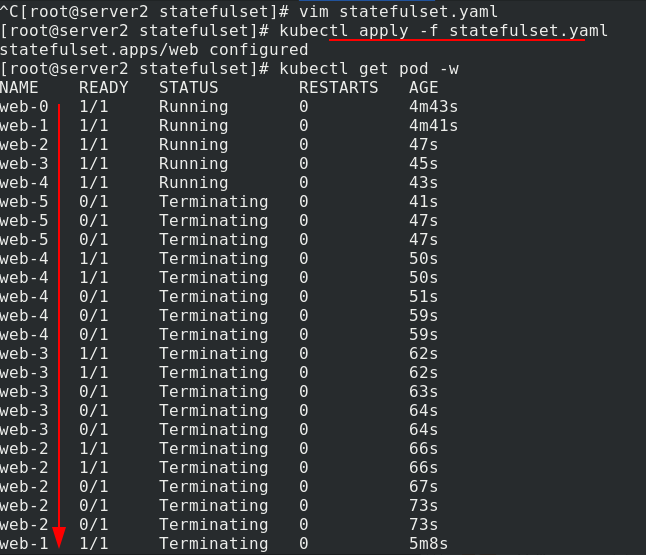
When deleting, modify statefullset Yaml file, number of copies reduced to 0
Apply statefullset Yaml file, you can see that it is deleted one by one, and the new pod is deleted first, and then the old pod is deleted
The test uses three copies and restores the number of copies to 3
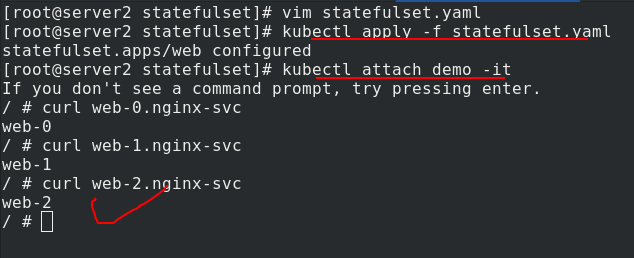
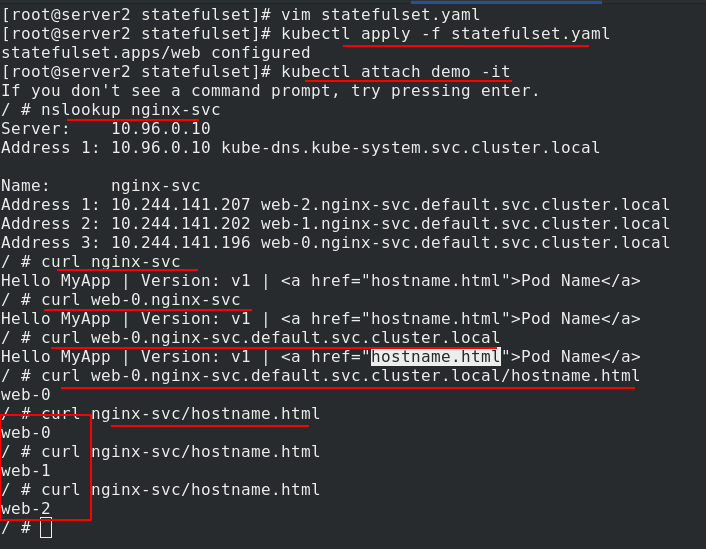
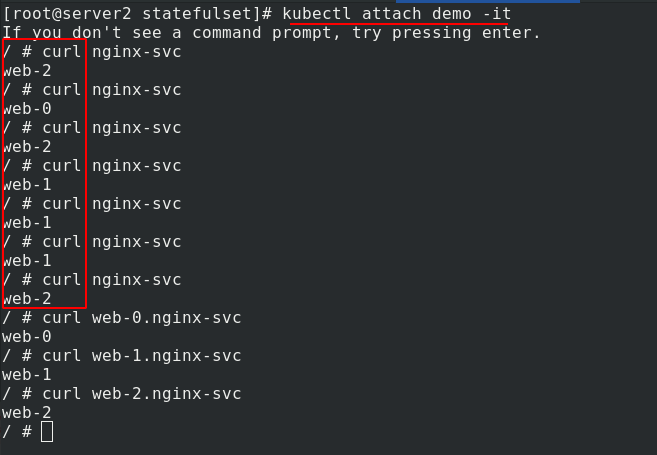
Connect a demo and enter the view. It can be parsed and load balanced.
The design of PV and PVC makes it possible for StatefulSet to manage the storage state
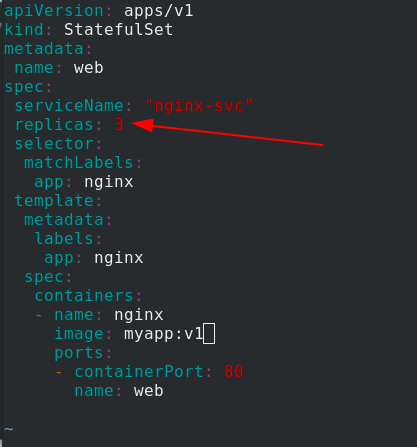
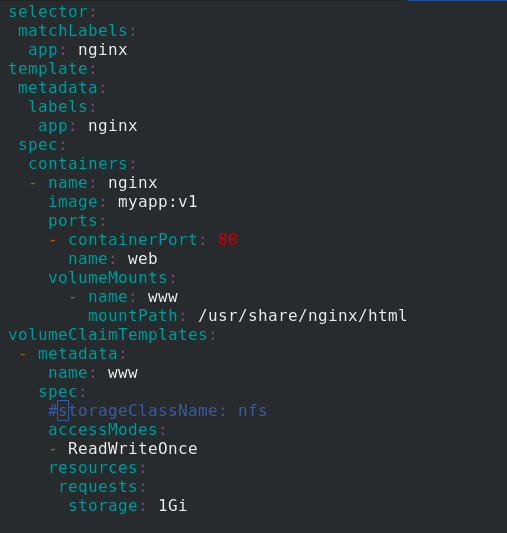
Edit statefullset Yaml file
apiVersion: apps/v1
kind: StatefulSet
metadata:
 name: web
spec:
 serviceName: "nginx-svc"
 replicas: 3
 selector:
  matchLabels:
   app: nginx
 template:
  metadata:
   labels:
    app: nginx
  spec:
   containers:
   - name: nginx
     image: myapp:v1
     ports:
     - containerPort: 80
       name: web
     volumeMounts:
       - name: www
         mountPath: /usr/share/nginx/html
 volumeClaimTemplates:
  - metadata:
     name: www
    spec:
     #storageClassName: nfs
     accessModes:
     - ReadWriteOnce
     resources:
      requests:
       storage: 1Gi
Apply statefullset Yaml file, the status is normal
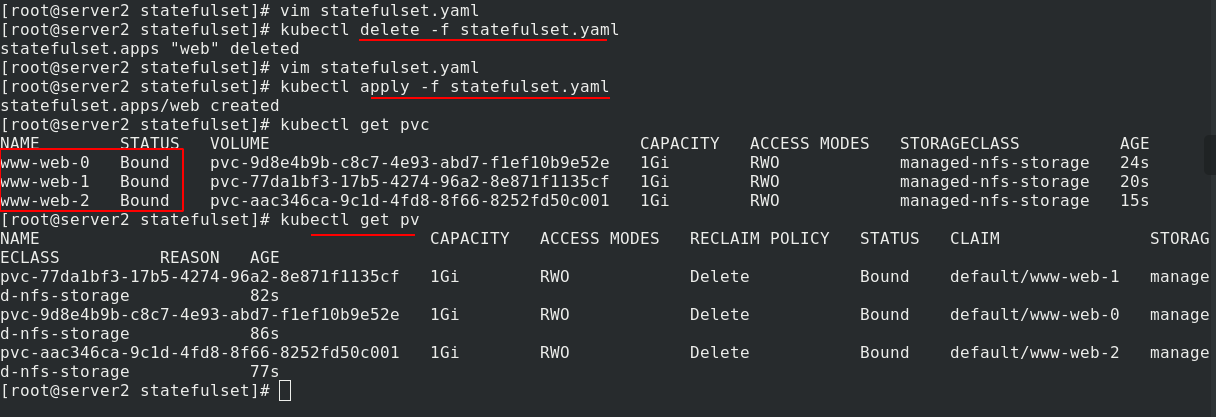
To test the effect, the nfs side writes different publications to each volume
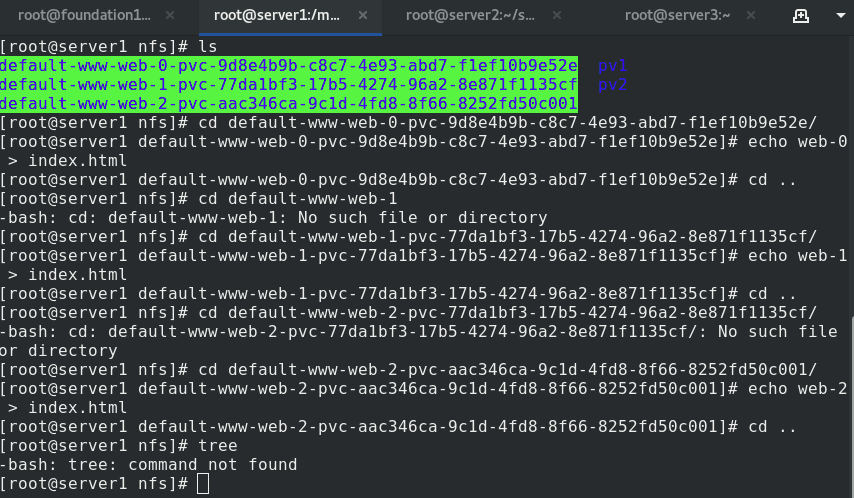
The structure is as follows
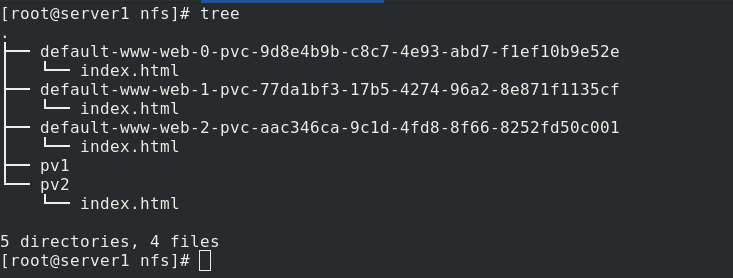
server2 enters the demo, curl + service name, and the test is load balanced
The following tests whether the original data still exists after the copy is deleted and re established?
First put statefullset The number of copies in the yaml file becomes 0,
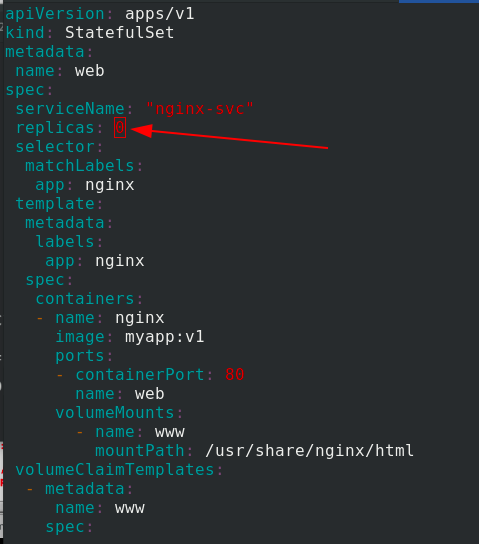
After application, set statefulset The number of copies in the yaml file becomes 3,
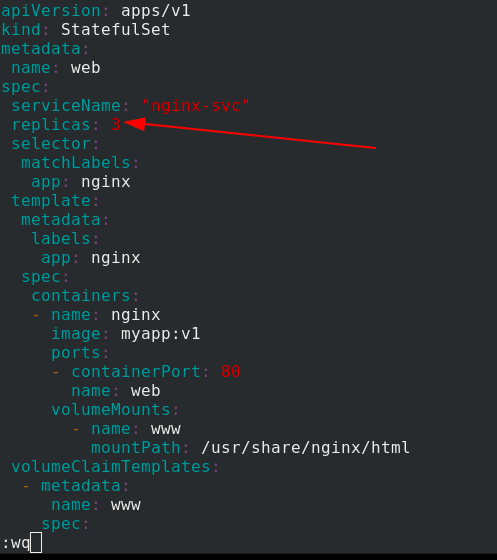
Create the pod again and enter the demo test. The data is still there