spring_cloud has strong ecological support. Its own distributed configuration center can effectively solve the problem of inconsistent configuration in distributed environment and provide a centralized configuration center. And rely on its spring_bus (rabbitMq provides subscription) and webhook (hook function) of github or gitlab can push the modified configuration to the remote git address, and then push the changes of the configuration center to each cluster server by accessing the endPoints interface address of the configuration server.
Spring Cloud Config is used to provide centralized external configuration support for infrastructure and microservice applications in distributed systems. It is divided into two parts: server and client. The server is also called distributed configuration center. It is an independent micro service application, which is used to connect the configuration warehouse and provide access interfaces for the client to obtain configuration information, encryption / decryption information and so on; The client is each micro service application or infrastructure in the micro service architecture. They manage the application resources and business-related configuration content through the specified configuration center, and obtain and load the configuration information from the configuration center at startup. Spring Cloud Config implements the abstract mapping of environment variables and attribute configurations in the server and client, so it can also be used in applications running in any other language in addition to applications built by spring. Since the configuration center implemented by Spring Cloud Config uses Git to store configuration information by default, the configuration server built by Spring Cloud Config naturally supports version management of micro service application configuration information, and can easily manage and access configuration content through Git client tools. Of course, it also provides support for other storage methods, such as SVN warehouse and localized file system.
Without much to say, let's look at the code:
First, the spring used this time_ The cloud version is Finchley RELEASE. spring_ The boot version is 2.0.3 Release, lower version of spring_cloud does not have the endpoint interface address of actor / bus refresh, so you should pay attention to it when using it
The first is to configure the central server, which requires the following four References:
        <dependency>
            <groupId>org.springframework.cloud</groupId>
            <artifactId>spring-cloud-config-server</artifactId>
        </dependency>

        <dependency>
            <groupId>org.springframework.cloud</groupId>
            <artifactId>spring-cloud-starter-netflix-eureka-client</artifactId>
        </dependency>

        <dependency>
            <groupId>org.springframework.cloud</groupId>
            <artifactId>spring-cloud-bus</artifactId>
        </dependency>

        <dependency>
            <groupId>org.springframework.cloud</groupId>
            <artifactId>spring-cloud-stream-binder-rabbit</artifactId>
        </dependency>
The second is the configuration file:
server.port=20000
#git warehouse address of the service
spring.cloud.config.server.git.uri=https://github.com/narutoform/springCloudConfig
#Directory where the configuration file is located
spring.cloud.config.server.git.search-paths=/**
#Branch where the configuration file is located
spring.cloud.config.label=master
#User name of git repository
spring.cloud.config.username=narutoform
#Password of git warehouse
spring.cloud.config.password=*****
spring.application.name=springCloudConfigService
eureka.client.service-url.defaultZone=http://localhost:10000/eureka
eureka.instance.preferIpAddress=true
#rabbitmq
spring.rabbitmq.host=192.168.210.130
spring.rabbitmq.port=5672
spring.rabbitmq.username=guest
spring.rabbitmq.password=guest
spring.rabbitmq.publisher-confirms=true
management.endpoints.web.exposure.include=bus-refresh
Note that the bus refresh interface should be turned on, and the user name and password are only required to access the items requiring permission, such as gitlab, but not github. In addition, if the configuration of rabbitMq does not need to be configured, the hot update does not need to be written
Startup class:
package cn.chinotan;

import org.springframework.boot.SpringApplication;
import org.springframework.boot.autoconfigure.SpringBootApplication;
import org.springframework.boot.web.servlet.ServletComponentScan;
import org.springframework.cloud.config.server.EnableConfigServer;
import org.springframework.cloud.netflix.eureka.EnableEurekaClient;

@SpringBootApplication
@EnableConfigServer
@EnableEurekaClient
@ServletComponentScan
public class StartConfigServerEureka {

    public static void main(String[] args) {
        SpringApplication.run(StartConfigServerEureka.class, args);
    }

}
You need to register this configuration center with euerka
The next step is the client configuration of the configuration center. This time, two clients are prepared to form a cluster for demonstration
The references required by the client are:
        <dependency>
            <groupId>org.springframework.cloud</groupId>
            <artifactId>spring-cloud-starter-config</artifactId>
        </dependency>

        <dependency>
            <groupId>org.springframework.boot</groupId>
            <artifactId>spring-boot-starter-web</artifactId>
        </dependency>

        <dependency>
            <groupId>org.springframework.cloud</groupId>
            <artifactId>spring-cloud-starter-netflix-eureka-client</artifactId>
        </dependency>

        <dependency>
            <groupId>org.springframework.boot</groupId>
            <artifactId>spring-boot-starter-actuator</artifactId>
        </dependency>

        <dependency>
            <groupId>org.springframework.cloud</groupId>
            <artifactId>spring-cloud-bus</artifactId>
        </dependency>

        <dependency>
            <groupId>org.springframework.cloud</groupId>
            <artifactId>spring-cloud-stream-binder-rabbit</artifactId>
        </dependency>
The configuration file is: bootstrap yml
#Enable configuration service discovery
spring.cloud.config.discovery.enabled: true
spring.cloud.config.enabled: true
#Configure service instance name
spring.cloud.config.discovery.service-id: springCloudConfigService
#Branch of configuration file
spring.cloud.config.label: master
spring.cloud.config.profile: prod
#Configure Service Center
spring.cloud.config.uri: http://localhost:20000/
eureka.client.service-url.defaultZone: http://localhost:10000/eureka
eureka.instance.preferIpAddress: true
management.endpoints.web.exposure.include: bus-refresh
Note that the configuration center must write to bootstrap YML, because bootstrap YML should precede application YML read
Here is application YML configuration
server.port: 40000
spring.application.name: springCloudConfigClientOne
#rabbitmq
spring.rabbitmq.host: 192.168.210.130
spring.rabbitmq.port: 5672
spring.rabbitmq.username: guest
spring.rabbitmq.password: guest
spring.rabbitmq.publisher-confirms: true
Note that if the client wants hot update, it also needs to introduce spring_ For bus related configuration and rabbitmq related configuration, open the bus refresh interface. The client does not need to input the address of the remote git, but only needs to read from the newly configured server. When connecting, configure the serverId of the erruka of the configuration server. In this paper, it is springCloudConfigService. In addition, label (Branch) and profile (environment) can be specified
After the configuration center server is started, you can start the client to read the configuration obtained by the server
The client starts as follows:

You can see that when the client starts, it will configure the central server to get the configuration from the remote git warehouse
Add the following code to the client to directly read the configuration of the remote configuration center
package cn.chinotan.controller;

import org.springframework.beans.factory.annotation.Value;
import org.springframework.cloud.context.config.annotation.RefreshScope;
import org.springframework.web.bind.annotation.GetMapping;
import org.springframework.web.bind.annotation.RestController;

@RestController
@RefreshScope
public class ConfigClientController {

    @Value("${key}")
    private String key;

    @GetMapping("/key")
    public String getProfile() {
        return this.key;
    }
}
The structure of the remote configuration center is:

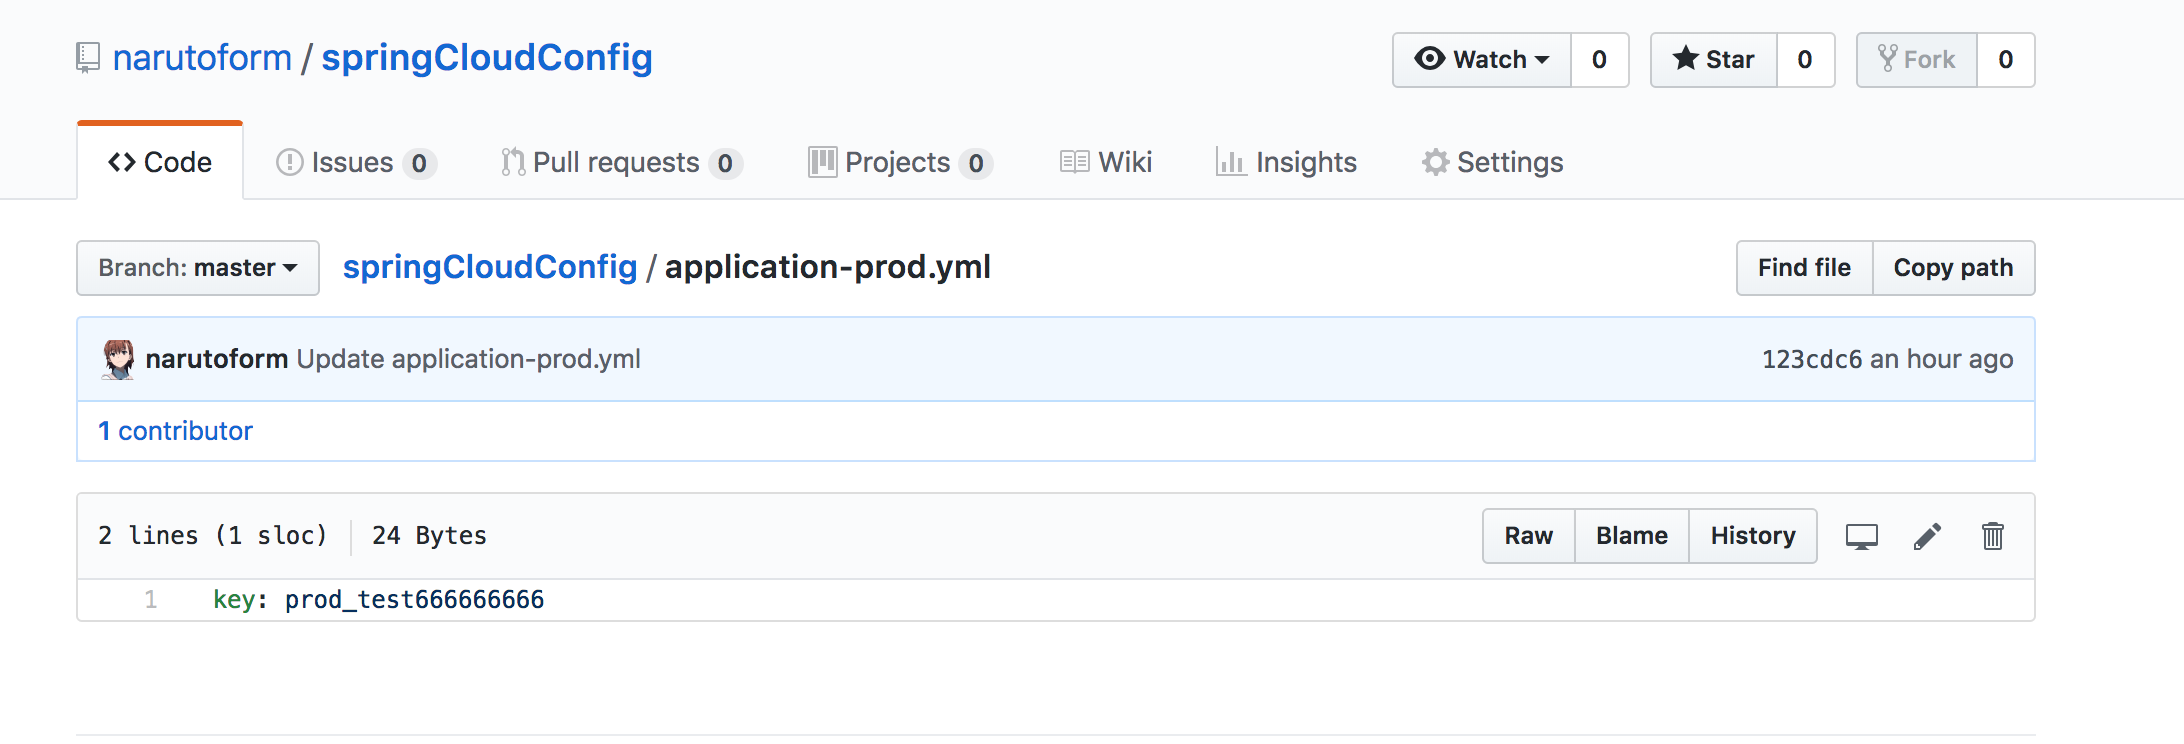
Note that the client needs to add @ RefreshScope to the configuration you want to change before it can hot update the configuration. Otherwise, the subscribed client does not know which configuration to update
In addition, the address accessed by the client can also be accessed directly by get, so as to judge whether the configuration center server starts normally
Through access http://localhost:20000/springCloudConfig/default Just the interface
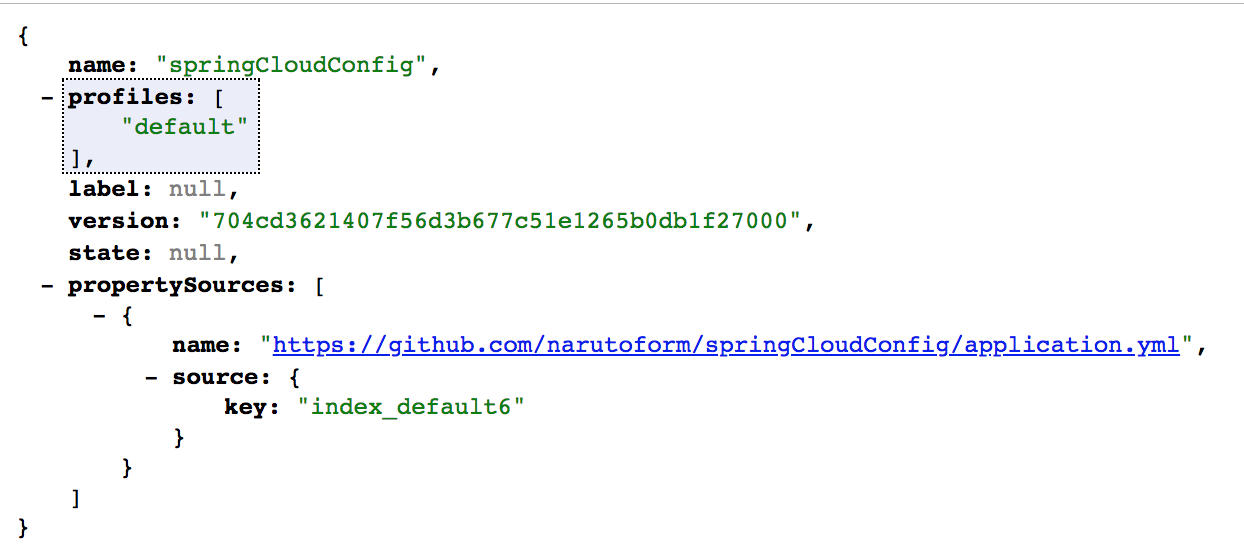
Prove that the configuration service center can obtain configuration information from the remote program.
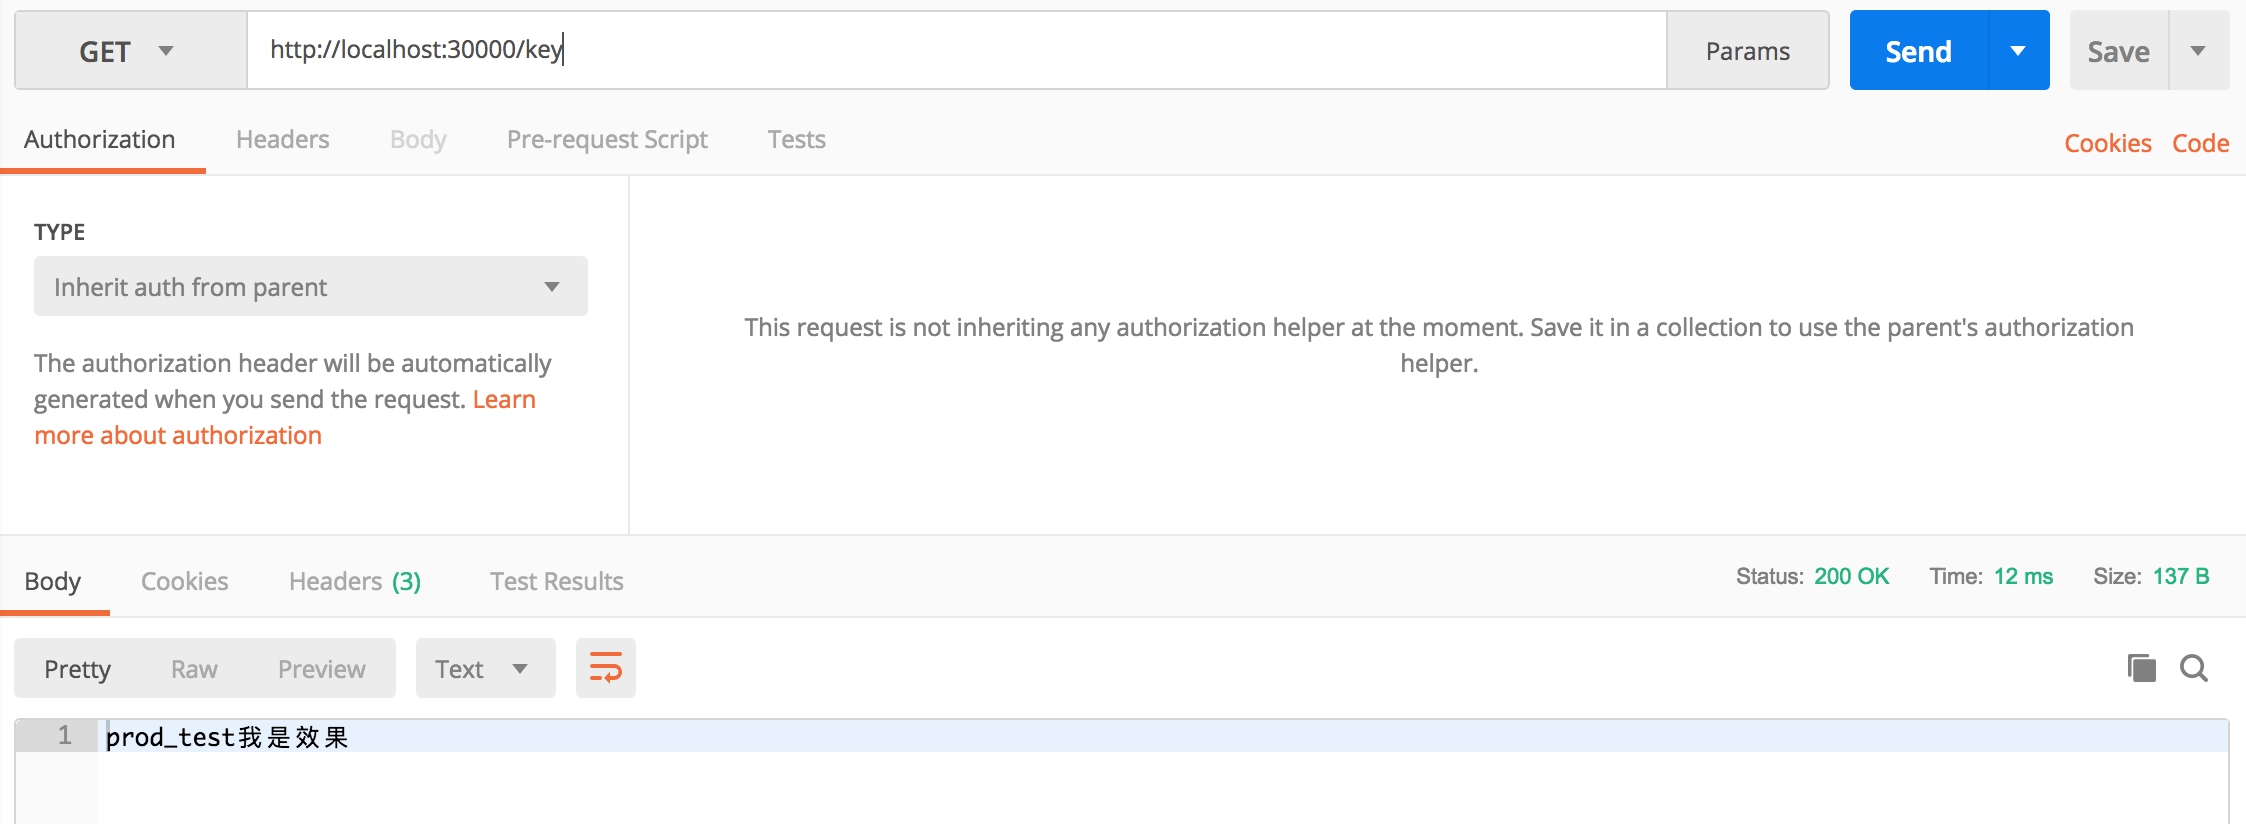
The http request address and resource file are mapped as follows:
/{application}/{profile}[/{label}] /{application}-{profile}.yml /{label}/{application}-{profile}.yml /{application}-{profile}.properties /{label}/{application}-{profile}.properties Now let's access the controller written before on the client to get the configuration in the configuration file
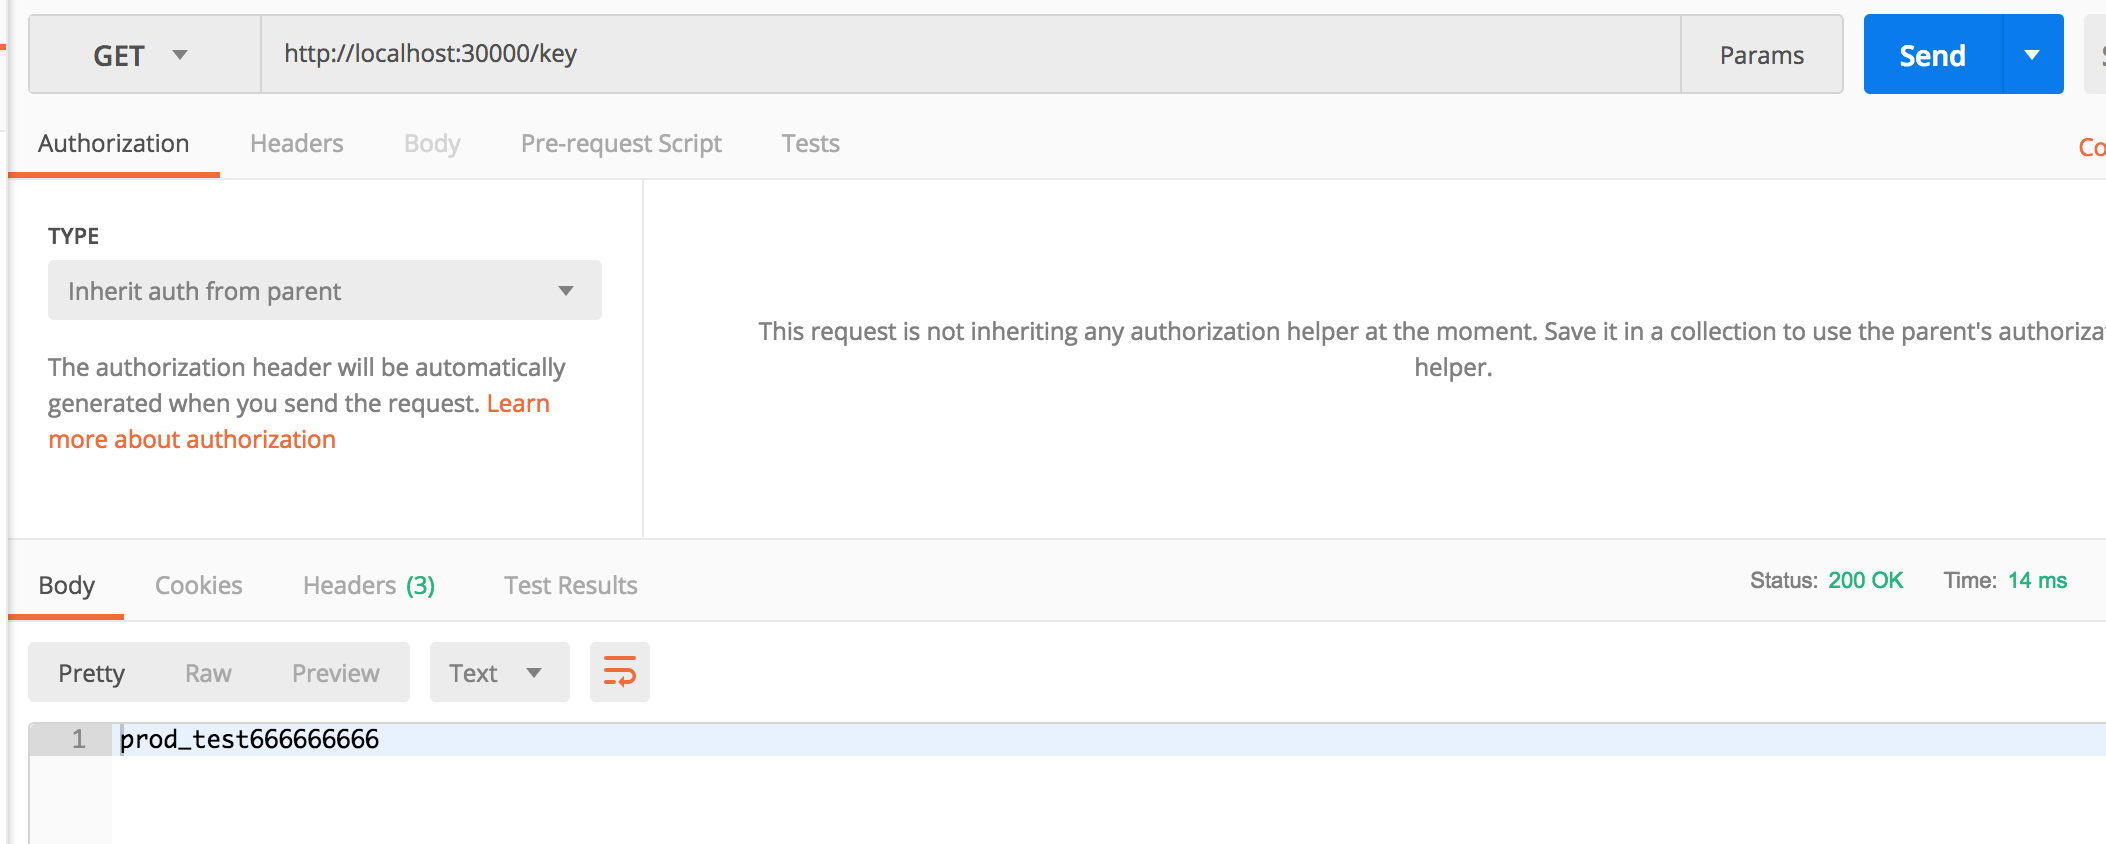
It can be seen that the client can get the information in the remote configuration file from the server
In fact, the client will start through spring_ The restTemplate of boot initiates a GET request to GET the information of the server. The source code is as follows:
private Environment getRemoteEnvironment(RestTemplate restTemplate,
			ConfigClientProperties properties, String label, String state) {
		String path = "/{name}/{profile}";
		String name = properties.getName();
		String profile = properties.getProfile();
		String token = properties.getToken();
		int noOfUrls = properties.getUri().length;
		if (noOfUrls > 1) {
			logger.info("Multiple Config Server Urls found listed.");
		}

		Object[] args = new String[] { name, profile };
		if (StringUtils.hasText(label)) {
			if (label.contains("/")) {
				label = label.replace("/", "(_)");
			}
			args = new String[] { name, profile, label };
			path = path + "/{label}";
		}
		ResponseEntity<Environment> response = null;

		for (int i = 0; i < noOfUrls; i++) {
			Credentials credentials = properties.getCredentials(i);
			String uri = credentials.getUri();
			String username = credentials.getUsername();
			String password = credentials.getPassword();

			logger.info("Fetching config from server at : " + uri);

			try {
				HttpHeaders headers = new HttpHeaders();
				addAuthorizationToken(properties, headers, username, password);
				if (StringUtils.hasText(token)) {
					headers.add(TOKEN_HEADER, token);
				}
				if (StringUtils.hasText(state) && properties.isSendState()) {
					headers.add(STATE_HEADER, state);
				}

				final HttpEntity<Void> entity = new HttpEntity<>((Void) null, headers);
				response = restTemplate.exchange(uri + path, HttpMethod.GET, entity,
						Environment.class, args);
			}
			catch (HttpClientErrorException e) {
				if (e.getStatusCode() != HttpStatus.NOT_FOUND) {
					throw e;
				}
			}
			catch (ResourceAccessException e) {
				logger.info("Connect Timeout Exception on Url - " + uri
						+ ". Will be trying the next url if available");
				if (i == noOfUrls - 1)
					throw e;
				else
					continue;
			}

			if (response == null || response.getStatusCode() != HttpStatus.OK) {
				return null;
			}

			Environment result = response.getBody();
			return result;
		}

		return null;
	}
After that, let's try the hot update of the configuration file
When we start the server and client, we will find that rabbitMq has one more switch and several queues, spring_bus pushes the notification of configuration change through this topic switch. The effect is as follows:


After changing the remote configuration file, call the configuration server. http://localhost:20000/actuator/bus -After the refresh interface:
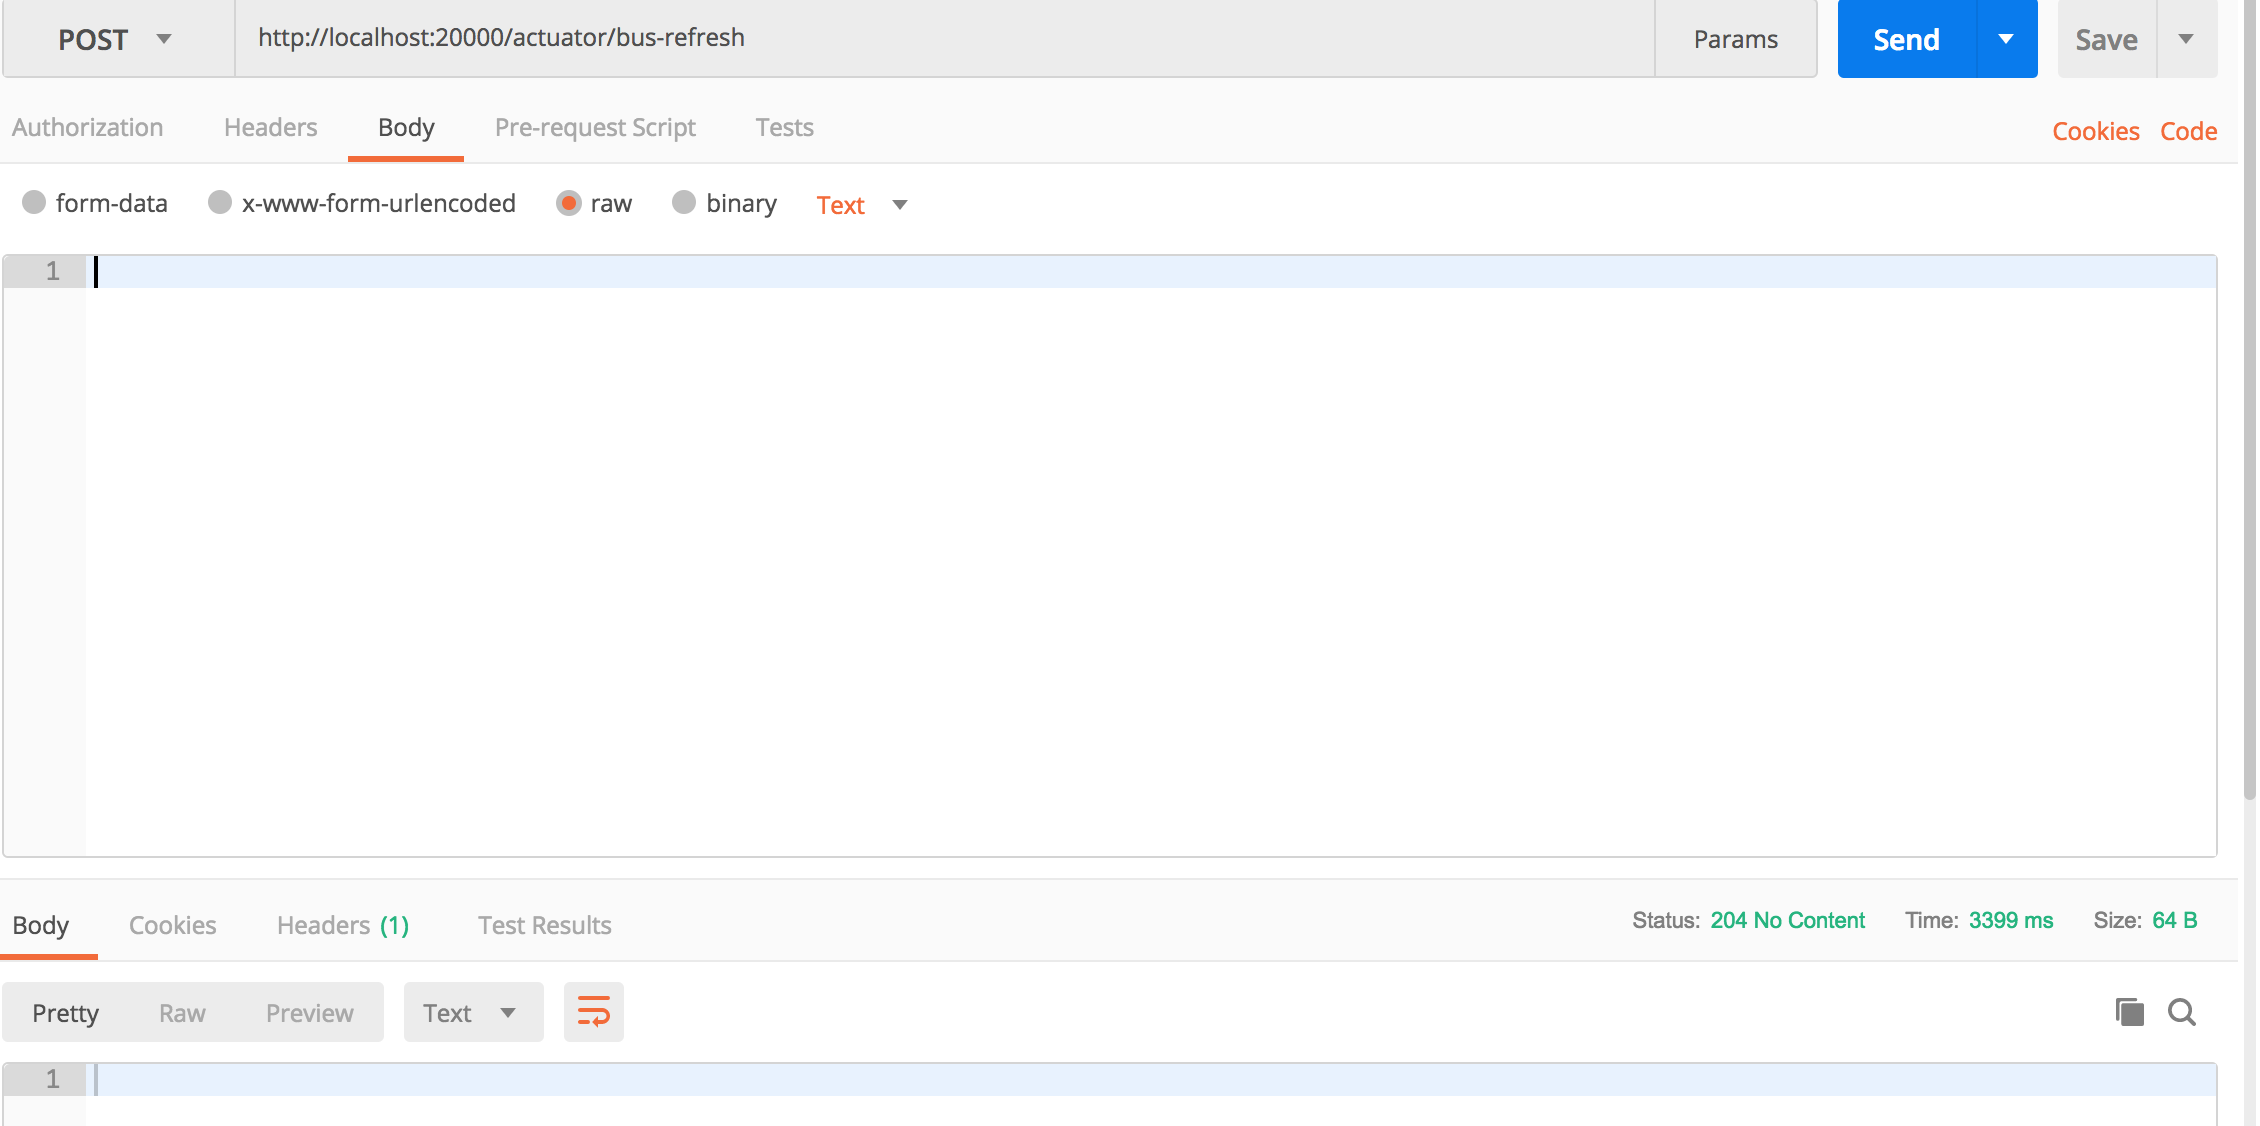

As you can see, the message is delivered and the change results are pushed

Which calls http://localhost:20000/actuator/bus-refresh is because the server exposes this interface at startup

You can see that this is a POST request, and its interface returns nothing after the call, and the lower version of spring_ There is no such interface in cloud
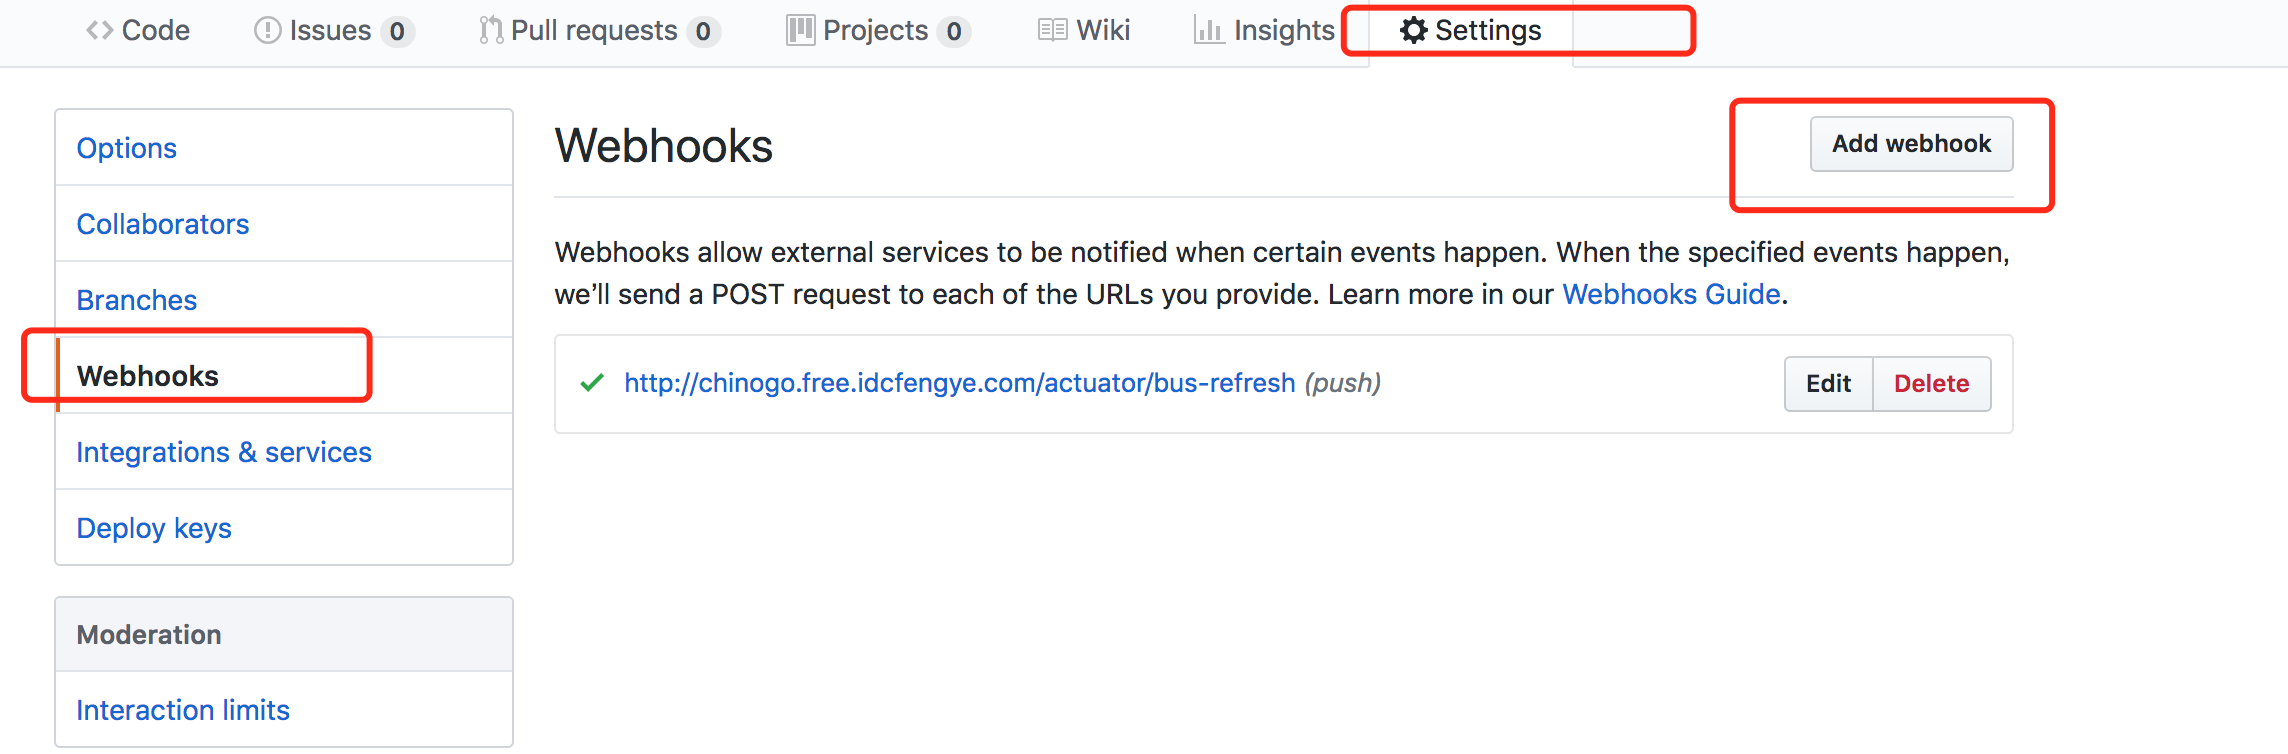
In this way, the hot update configuration file of the client cluster can be realized, but it can also be called manually http://localhost:20000/actuator/bus-refresh interface, is there any way to automatically push to the client after the remote configuration warehouse file is changed? The answer is through GitHub or gitlab's webhook (hook function). Open the GitHub management interface to see the following information. Click add webhook to add a hook function

Because I don't have a public network address, I can only map ports through intranet penetration, using ngrok

So you can pass http://chinogo.free.idcfengye.com This public domain name has accessed my local service
But is that ok? It's still too young
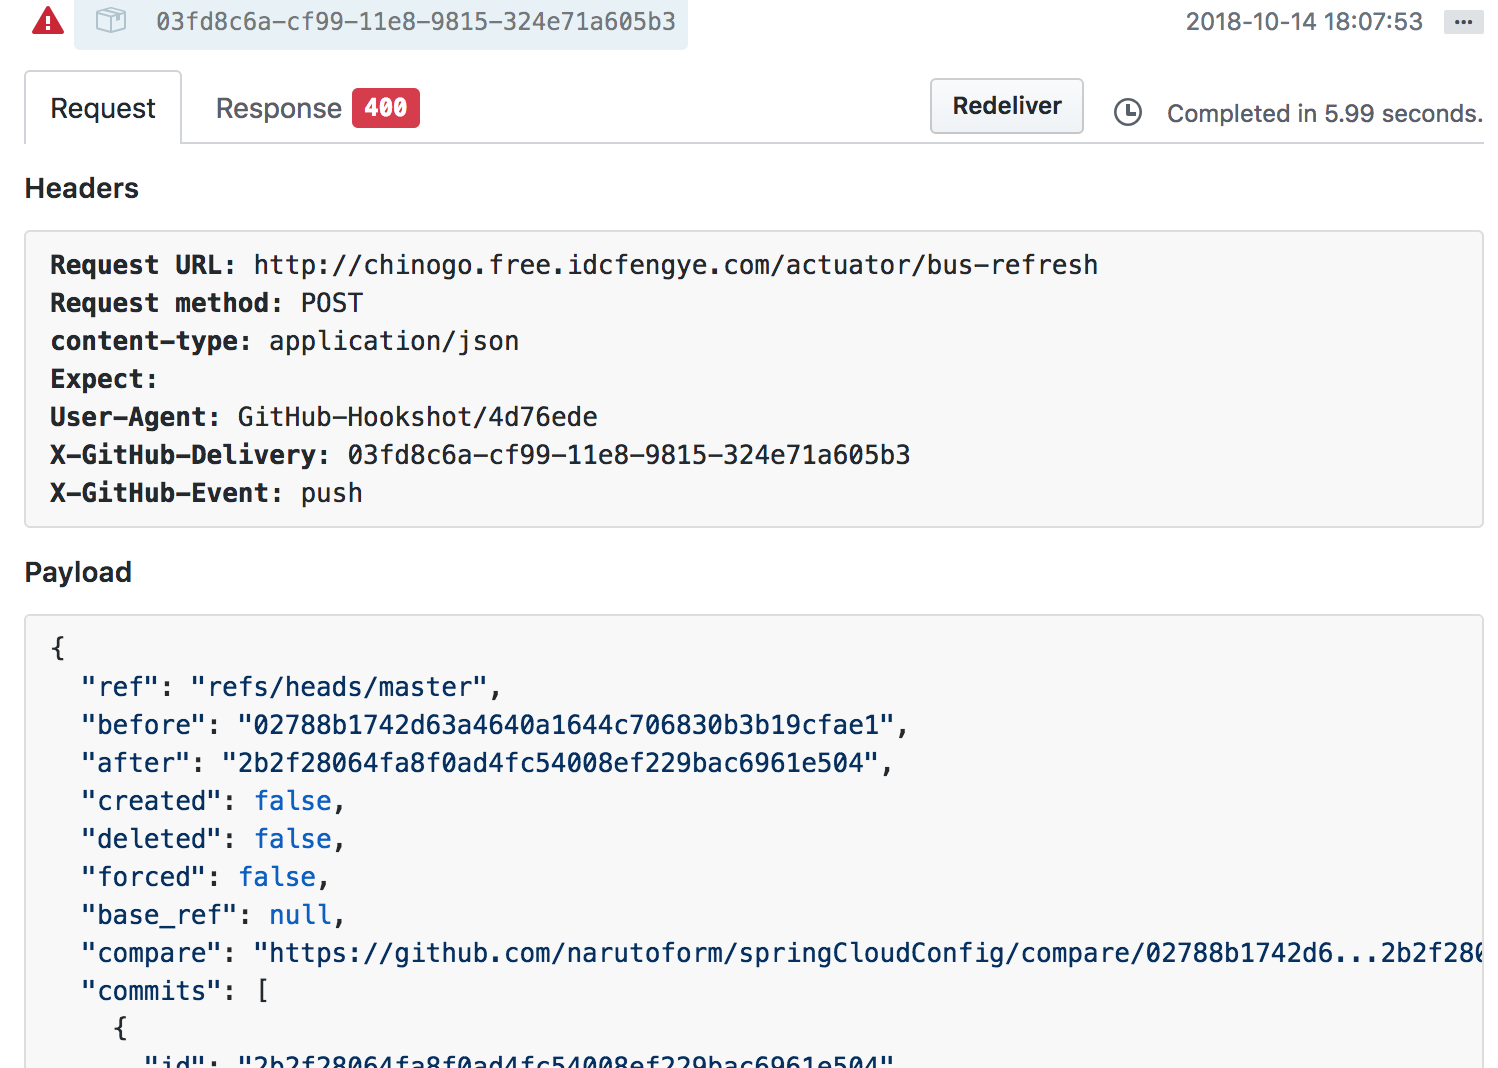
You can see that GitHub will add such a string of payloads to the body by default when making a post request
The function of sending payload has not been canceled, so our spring boot reported 400 error because it failed to deserialize this string of payload normally:
Failed to read HTTP message: org.springframework.http.converter.HttpMessageNotReadableException: JSON parse error: Cannot deserialize instance of `java.lang.String` out of START_ARRAY token; nested exception is com.fasterxml.jackson.databind.exc.MismatchedInputException: Cannot deserialize instance of `java.lang.String` out of START_ARRAY token
Naturally, I thought of changing the body to be empty to avoid json conversion exceptions. I started to modify the body, so I went to HttpServletRequest to find the setInputStream method. The servlet actually provided us with a wrapper class of HttpServletRequestMapper, We can modify the body content in the request by inheriting this class and overriding the getInputStream method to return the self constructed ServletInputStream. Here, in order to avoid complications, I directly return an empty body. Custom wrapper class
package cn.chinotan.config;

import javax.servlet.ReadListener;
import javax.servlet.ServletInputStream;
import javax.servlet.http.HttpServletRequest;
import javax.servlet.http.HttpServletRequestWrapper;
import java.io.ByteArrayInputStream;
import java.io.IOException;

/**
 * @program: test
 * @description: Filter webhooks and empty the body
 * @author: xingcheng
 * @create: 2018-10-14 17:56
 **/
public class CustometRequestWrapper extends HttpServletRequestWrapper {

    public CustometRequestWrapper(HttpServletRequest request) {
        super(request);
    }

    @Override
    public ServletInputStream getInputStream() throws IOException {
        byte[] bytes = new byte[0];
        ByteArrayInputStream byteArrayInputStream = new ByteArrayInputStream(bytes);

        return new ServletInputStream() {
            @Override
            public boolean isFinished() {
                return byteArrayInputStream.read() == -1 ? true:false;
            }

            @Override
            public boolean isReady() {
                return false;
            }

            @Override
            public void setReadListener(ReadListener readListener) {

            }

            @Override
            public int read() throws IOException {
                return byteArrayInputStream.read();
            }
        };
    }
}
Implementation filter
package cn.chinotan.config;

import org.springframework.core.annotation.Order;

import javax.servlet.*;
import javax.servlet.annotation.WebFilter;
import javax.servlet.http.HttpServletRequest;
import javax.servlet.http.HttpServletResponse;
import java.io.IOException;

/**
 * @program: test
 * @description: filter
 * @author: xingcheng
 * @create: 2018-10-14 17:59
 **/
@WebFilter(filterName = "bodyFilter", urlPatterns = "/*")
@Order(1)
public class MyFilter implements Filter {

    @Override
    public void init(FilterConfig filterConfig) throws ServletException {

    }

    @Override
    public void doFilter(ServletRequest servletRequest, ServletResponse servletResponse, FilterChain filterChain) throws IOException, ServletException {
        HttpServletRequest httpServletRequest = (HttpServletRequest)servletRequest;

        String url = new String(httpServletRequest.getRequestURI());

        //Filter only / Actor / bus refresh requests
        if (!url.endsWith("/bus-refresh")) {
            filterChain.doFilter(servletRequest, servletResponse);
            return;
        }

        //Wrap the original request with HttpServletRequest to modify the body content in the post request
        CustometRequestWrapper requestWrapper = new CustometRequestWrapper(httpServletRequest);

        filterChain.doFilter(requestWrapper, servletResponse);
    }

    @Override
    public void destroy() {

    }
}
Don't forget to add this annotation to the startup class:
@ServletComponentScan
In this way, the configuration file can be modified remotely without starting the client for hot loading
