1. Upgrade the website operation platform
1.1 problems
The specific configuration is as follows:
- Clear current configuration
- Deploy LNMP
- Test configuration
1.2 steps
To implement this case, you need to follow the following steps.
Step 1: clear the current configuration
1) Stop Web Service
[root@web33 ~]# /usr/local/tomcat/bin/shutdown.sh
[root@web33 ~]# vim  /etc/rc.local
#/usr/local/tomcat/bin/startup.sh
:wq
2) Unmount shared storage
[root@web33 ~]# umount /usr/local/tomcat/webapps/ROOT / / uninstall the current mount
[root@web33 ~]# vim /etc/fstab / / clear boot mount
#192.168.4.30:/sitedir    /usr/local/tomcat/webapps/ROOT  nfs  defaults   0   0
:wq
Step 2: deploy LNMP
1) Install software
[root@web33 ~]# Yum - y install GCC zlib devel PCRE devel / / install source code Nginx dependent software
 already installed:
  gcc.x86_64 0:4.8.5-28.el7                          pcre-devel.x86_64 0:8.32-17.el7                          zlib-devel.x86_64 0:1.2.7-17.el7
Installed as a dependency:
  cpp.x86_64 0:4.8.5-28.el7 glibc-devel.x86_64 0:2.17-222.el7 glibc-headers.x86_64 0:2.17-222.el7 kernel-headers.x86_64 0:3.10.0-862.el7 libmpc.x86_64 0:1.0.1-3.el7
  mpfr.x86_64 0:3.1.1-4.el7
 complete!
[root@web33 ~]#
[root@web33 ~]# tar -zxvf nginx-1.12.2.tar.gz / / unzip
[root@web33 ~]# cd nginx-1.12.2 / / enter the source directory
[root@web33 nginx-1.12.2]# . / configure / / configure
......
Configuration summary
  + using system PCRE library
  + OpenSSL library is not used
  + using system zlib library
  nginx path prefix: "/usr/local/nginx"
  nginx binary file: "/usr/local/nginx/sbin/nginx"
  nginx modules path: "/usr/local/nginx/modules"
  nginx configuration prefix: "/usr/local/nginx/conf"
  nginx configuration file: "/usr/local/nginx/conf/nginx.conf"
  nginx pid file: "/usr/local/nginx/logs/nginx.pid"
  nginx error log file: "/usr/local/nginx/logs/error.log"
  nginx http access log file: "/usr/local/nginx/logs/access.log"
  nginx http client request body temporary files: "client_body_temp"
  nginx http proxy temporary files: "proxy_temp"
  nginx http fastcgi temporary files: "fastcgi_temp"
  nginx http uwsgi temporary files: "uwsgi_temp"
  nginx http scgi temporary files: "scgi_temp"
[root@web33 nginx-1.12.2]# make / / compile
......
......
sed -e "s|%%PREFIX%%|/usr/local/nginx|" \
    -e "s|%%PID_PATH%%|/usr/local/nginx/logs/nginx.pid|" \
    -e "s|%%CONF_PATH%%|/usr/local/nginx/conf/nginx.conf|" \
    -e "s|%%ERROR_LOG_PATH%%|/usr/local/nginx/logs/error.log|" \
    < man/nginx.8 > objs/nginx.8
make[1]: Leave directory“/root/nginx-1.12.2"
[root@web33 nginx-1.12.2]#
[root@web33 nginx-1.12.2]# make install / / install
......
......
cp conf/nginx.conf '/usr/local/nginx/conf/nginx.conf.default'
test -d '/usr/local/nginx/logs' \
    || mkdir -p '/usr/local/nginx/logs'
test -d '/usr/local/nginx/logs' \
    || mkdir -p '/usr/local/nginx/logs'
test -d '/usr/local/nginx/html' \
    || cp -R html '/usr/local/nginx'
test -d '/usr/local/nginx/logs' \
    || mkdir -p '/usr/local/nginx/logs'
make[1]: Leave directory“/root/nginx-1.12.2"
[root@web33 nginx-1.12.2]#
[root@web33 nginx-1.12.2]# ls /usr/local/nginx / / view the installation directory
conf  html  logs  sbin
[root@web33 nginx-1.12.2]#
[root@web33 ~]# Yum - y install PHP FPM / / install PHP FPM software
......
......
already installed:
  php-fpm.x86_64 0:5.4.16-45.el7
Installed as a dependency:
  libzip.x86_64 0:0.10.1-8.el7                                                    php-common.x86_64 0:5.4.16-45.el7
complete!
[root@web33 ~]# Yum - y install php MySQL / / install php and php MySQL software
......
......
already installed:
  php.x86_64 0:5.4.16-45.el7                                                      php-mysql.x86_64 0:5.4.16-45.el7
Installed as a dependency:
  mariadb-libs.x86_64 1:5.5.56-2.el7                        php-cli.x86_64 0:5.4.16-45.el7                        php-pdo.x86_64 0:5.4.16-45.el7
complete!
[root@web33 ~]#
2) Mount shared storage
[root@web33 ~]# vim /etc/fstab / / boot and mount
192.168.4.30:/sitedir    /usr/local/nginx/html  nfs  defaults   0   0
:wq
[root@web33 ~]# Mount - A / / mount the device
[root@web33 ~]# Mount | grep "/ usr / local / nginx / HTML" / / view mount
192.168.4.30:/sitedir on /usr/local/nginx/html type nfs4 (rw,relatime,vers=4.1,rsize=262144,wsize=262144,namlen=255,hard,proto=tcp,port=0,timeo=600,retrans=2,sec=sys,clientaddr=192.168.4.33,local_lock=none,addr=192.168.4.30)
[root@web33 ~]#
3) Start service
[root@web33 ~]# vim +65 /usr/local/nginx/conf/nginx.conf / / modify the main configuration file
location ~ \.php$ {
            root           html;
            fastcgi_pass   127.0.0.1:9000;
            fastcgi_index  index.php;
           #fastcgi_param  SCRIPT_FILENAME  /scripts$fastcgi_script_name;
            include        fastcgi.conf;
        }
:wq
[root@web33 ~]# /usr/local/nginx/sbin/nginx / / start the service
[root@web33 ~]#
[root@web33 ~]# Netstat - utnlp | grep: 80 / / view port
tcp        0      0 0.0.0.0:80              0.0.0.0:*               LISTEN      26335/nginx: master
[root@web33 ~]#
[root@web33 ~]# systemctl  start php-fpm
[root@web33 ~]#
[root@web33 ~]# netstat -utnlp  | grep :9000
tcp        0      0 127.0.0.1:9000          0.0.0.0:*               LISTEN      26345/php-fpm: mast
[root@web33 ~]#
Step 3: test configuration
1) Writing PHP scripts
[root@nfs30 ~]# vim /sitedir/linkdb2.php / / write php script files in the nfs30 shared directory
<?php
$conn=mysql_connect("192.168.4.11","yaya99","123qqq...A");
mysql_select_db("gamedb");
$sql = 'insert into user (name) values ("PLJ")';
mysql_query($sql);
mysql_close();
echo "save data ok";
?>
:wq
2) Access script
[root@client50 ~]# curl   http://192.168.4.33/linkdb2.php //Access web33 server
save data ok
[root@client50 ~]#
3) View data
[root@mysql11 ~]# mysql –uyaya99 -p123qqq...A -e 'select  * from gamedb.user where name="PLJ" '/ / view data on the database server
mysql: [Warning] Using a password on the command line interface can be insecure.
+------+
| name |
+------+
| PLJ  |
+------+
[root@mysql11 ~]#
2. Deploy memory storage service
2.1 problems
The specific operations are as follows:
- Deploy redis server
- Create redis cluster
- Configure web server
- Test configuration
2.2 scheme
The configuration requirements for cloning 7 virtual machines are shown in figure-1.
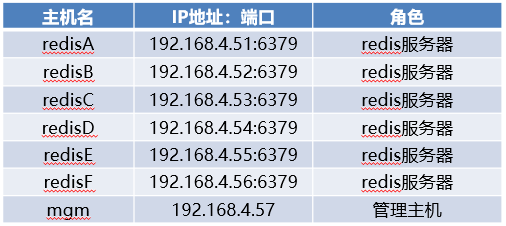
Figure-1
2.3 steps
To implement this case, you need to follow the following steps.
Step 1: deploy redis server (all 6 servers need to be configured)
1) Set up redis server
[root@redisA ~]# RPM - Q GCC | Yum - y install GCC / / install compiler
[root@redisA ~]# tar -zxvf redis-4.0.8.tar.gz / / unzip
[root@redisA ~]# cd redis-4.0.8 / / enter the source directory
[root@redisA redis-4.0.8]# make install / / install the software
......
......
INSTALL install
    INSTALL install
    INSTALL install
    INSTALL install
    INSTALL install
make[1]: Leave directory“/root/redis-4.0.8/src"
[root@redisA redis-4.0.8]#
[root@redisA redis-4.0.8]# ./utils/install_server.sh / / initialize configuration
Welcome to the redis service installer
This script will help you easily set up a running redis server
Please select the redis port for this instance: [6379] //Port number
Selecting default: 6379
Please select the redis config file name [/etc/redis/6379.conf] //Master profile
Selected default - /etc/redis/6379.conf
Please select the redis log file name [/var/log/redis_6379.log] //log file
Selected default - /var/log/redis_6379.log
Please select the data directory for this instance [/var/lib/redis/6379] //Database directory
Selected default - /var/lib/redis/6379
Please select the redis executable path [/usr/local/bin/redis-server] //Service initiator
Selected config: //Configuration summary
Port           : 6379
Config file    : /etc/redis/6379.conf
Log file       : /var/log/redis_6379.log
Data dir       : /var/lib/redis/6379
Executable     : /usr/local/bin/redis-server
Cli Executable : /usr/local/bin/redis-cli
Is this ok? Then press ENTER to go on or Ctrl-C to abort.
Copied /tmp/6379.conf => /etc/init.d/redis_6379
Installing service...
Successfully added to chkconfig!
Successfully added to runlevels 345!
Starting Redis server...   //Service startup prompt
Installation successful!   //Installation completion prompt
[root@redisA redis-4.0.8]#
[root@redisA redis-4.0.8]# /etc/init. d/redis_ 6379 stop / / stop the service
Stopping ...
Redis stopped
[root@redisA redis-4.0.8]#
[root@redisA redis-4.0.8]# vim /etc/redis/6379.conf / / modify the configuration file to enable cluster configuration
70 bind 192.168.4.51
815 cluster-enabled yes
823 cluster-config-file nodes-6379.conf
829 cluster-node-timeout 5000
:wq
[root@redisA redis-4.0.8]# /etc/init. d/redis_ 6379 start / / start the service
Starting Redis server...
[root@redisA redis-4.0.8]# Netstat - utnlp | grep redis server / / view ports
tcp        0      0 192.168.4.51:6379       0.0.0.0:*               LISTEN      29720/redis-server   //redis service port
tcp        0      0 192.168.4.51:16379      0.0.0.0:*               LISTEN      29720/redis-server  //Cluster port
[root@redisB ~]# RPM - Q GCC | Yum - y install GCC / / install compiler
[root@redisB ~]# tar -zxvf redis-4.0.8.tar.gz / / unzip
[root@redisB ~]# cd redis-4.0.8 / / enter the source directory
[root@redisB redis-4.0.8]# make install / / install the software
......
......
INSTALL install
    INSTALL install
    INSTALL install
    INSTALL install
    INSTALL install
make[1]: Leave directory“/root/redis-4.0.8/src"
[root@redisB redis-4.0.8]#
[root@redisB redis-4.0.8]# ./utils/install_server.sh / / initialize configuration
Welcome to the redis service installer
This script will help you easily set up a running redis server
Please select the redis port for this instance: [6379] //Port number
Selecting default: 6379
Please select the redis config file name [/etc/redis/6379.conf] //Master profile
Selected default - /etc/redis/6379.conf
Please select the redis log file name [/var/log/redis_6379.log] //log file
Selected default - /var/log/redis_6379.log
Please select the data directory for this instance [/var/lib/redis/6379] //Database directory
Selected default - /var/lib/redis/6379
Please select the redis executable path [/usr/local/bin/redis-server] //Service initiator
Selected config: //Configuration summary
Port           : 6379
Config file    : /etc/redis/6379.conf
Log file       : /var/log/redis_6379.log
Data dir       : /var/lib/redis/6379
Executable     : /usr/local/bin/redis-server
Cli Executable : /usr/local/bin/redis-cli
Is this ok? Then press ENTER to go on or Ctrl-C to abort.
Copied /tmp/6379.conf => /etc/init.d/redis_6379
Installing service...
Successfully added to chkconfig!
Successfully added to runlevels 345!
Starting Redis server...   //Service startup prompt
Installation successful!   //Installation completion prompt
[root@redisB redis-4.0.8]#
[root@redisB redis-4.0.8]# /etc/init. d/redis_ 6379 stop / / stop the service
Stopping ...
Redis stopped
[root@redisB redis-4.0.8]#
[root@redisB redis-4.0.8]# vim /etc/redis/6379.conf / / modify the configuration file to enable cluster configuration
70 bind 192.168.4.52
815 cluster-enabled yes
823 cluster-config-file nodes-6379.conf
829 cluster-node-timeout 5000
:wq
[root@redisB redis-4.0.8]# /etc/init. d/redis_ 6379 start / / start the service
Starting Redis server...
[root@redisB redis-4.0.8]# Netstat - utnlp | grep redis server / / view ports
tcp        0      0 192.168.4.52:6379       0.0.0.0:*               LISTEN      29720/redis-server   //redis service port
tcp        0      0 192.168.4.52:16379      0.0.0.0:*               LISTEN      29720/redis-server  //Cluster port
[root@redisC ~]# RPM - Q GCC | Yum - y install GCC / / install compiler
[root@redisC ~]# tar -zxvf redis-4.0.8.tar.gz / / unzip
[root@redisC ~]# cd redis-4.0.8 / / enter the source directory
[root@redisC redis-4.0.8]# make install / / install the software
......
......
INSTALL install
    INSTALL install
    INSTALL install
    INSTALL install
    INSTALL install
make[1]: Leave directory“/root/redis-4.0.8/src"
[root@redisC redis-4.0.8]#
[root@redisC redis-4.0.8]# ./utils/install_server.sh / / initialize configuration
Welcome to the redis service installer
This script will help you easily set up a running redis server
Please select the redis port for this instance: [6379] //Port number
Selecting default: 6379
Please select the redis config file name [/etc/redis/6379.conf] //Master profile
Selected default - /etc/redis/6379.conf
Please select the redis log file name [/var/log/redis_6379.log] //log file
Selected default - /var/log/redis_6379.log
Please select the data directory for this instance [/var/lib/redis/6379] //Database directory
Selected default - /var/lib/redis/6379
Please select the redis executable path [/usr/local/bin/redis-server] //Service initiator
Selected config: //Configuration summary
Port           : 6379
Config file    : /etc/redis/6379.conf
Log file       : /var/log/redis_6379.log
Data dir       : /var/lib/redis/6379
Executable     : /usr/local/bin/redis-server
Cli Executable : /usr/local/bin/redis-cli
Is this ok? Then press ENTER to go on or Ctrl-C to abort.
Copied /tmp/6379.conf => /etc/init.d/redis_6379
Installing service...
Successfully added to chkconfig!
Successfully added to runlevels 345!
Starting Redis server...   //Service startup prompt
Installation successful!   //Installation completion prompt
[root@redisC redis-4.0.8]#
[root@redisC redis-4.0.8]# /etc/init. d/redis_ 6379 stop / / stop the service
Stopping ...
Redis stopped
[root@redisC redis-4.0.8]#
[root@redisC redis-4.0.8]# vim /etc/redis/6379.conf / / modify the configuration file to enable cluster configuration
70 bind 192.168.4.53
815 cluster-enabled yes
823 cluster-config-file nodes-6379.conf
829 cluster-node-timeout 5000
:wq
[root@redisC redis-4.0.8]# /etc/init. d/redis_ 6379 start / / start the service
Starting Redis server...
[root@redisC redis-4.0.8]# Netstat - utnlp | grep redis server / / view ports
tcp        0      0 192.168.4.53:6379       0.0.0.0:*               LISTEN      29720/redis-server   //redis service port
tcp        0      0 192.168.4.53:16379      0.0.0.0:*               LISTEN      29720/redis-server  //Cluster port
[root@redisD ~]# RPM - Q GCC | Yum - y install GCC / / install compiler
[root@redisD ~]# tar -zxvf redis-4.0.8.tar.gz / / unzip
[root@redisD ~]# cd redis-4.0.8 / / enter the source directory
[root@redisD redis-4.0.8]# make install / / install the software
......
......
INSTALL install
    INSTALL install
    INSTALL install
    INSTALL install
    INSTALL install
make[1]: Leave directory“/root/redis-4.0.8/src"
[root@redisD redis-4.0.8]#
[root@redisD redis-4.0.8]# ./utils/install_server.sh / / initialize configuration
Welcome to the redis service installer
This script will help you easily set up a running redis server
Please select the redis port for this instance: [6379] //Port number
Selecting default: 6379
Please select the redis config file name [/etc/redis/6379.conf] //Master profile
Selected default - /etc/redis/6379.conf
Please select the redis log file name [/var/log/redis_6379.log] //log file
Selected default - /var/log/redis_6379.log
Please select the data directory for this instance [/var/lib/redis/6379] //Database directory
Selected default - /var/lib/redis/6379
Please select the redis executable path [/usr/local/bin/redis-server] //Service initiator
Selected config: //Configuration summary
Port           : 6379
Config file    : /etc/redis/6379.conf
Log file       : /var/log/redis_6379.log
Data dir       : /var/lib/redis/6379
Executable     : /usr/local/bin/redis-server
Cli Executable : /usr/local/bin/redis-cli
Is this ok? Then press ENTER to go on or Ctrl-C to abort.
Copied /tmp/6379.conf => /etc/init.d/redis_6379
Installing service...
Successfully added to chkconfig!
Successfully added to runlevels 345!
Starting Redis server...   //Service startup prompt
Installation successful!   //Installation completion prompt
[root@redisD redis-4.0.8]#
[root@redisD redis-4.0.8]# /etc/init. d/redis_ 6379 stop / / stop the service
Stopping ...
Redis stopped
[root@redisD redis-4.0.8]#
[root@redisD redis-4.0.8]# vim /etc/redis/6379.conf / / modify the configuration file to enable cluster configuration
70 bind 192.168.4.54
815 cluster-enabled yes
823 cluster-config-file nodes-6379.conf
829 cluster-node-timeout 5000
:wq
[root@redisD redis-4.0.8]# /etc/init. d/redis_ 6379 start / / start the service
Starting Redis server...
[root@redisD redis-4.0.8]# Netstat - utnlp | grep redis server / / view ports
tcp        0      0 192.168.4.54:6379       0.0.0.0:*               LISTEN      29720/redis-server   //redis service port
tcp        0      0 192.168.4.54:16379      0.0.0.0:*               LISTEN      29720/redis-server  //Cluster port
[root@redisE ~]# RPM - Q GCC | Yum - y install GCC / / install compiler
[root@redisE ~]# tar -zxvf redis-4.0.8.tar.gz / / unzip
[root@redisE ~]# cd redis-4.0.8 / / enter the source directory
[root@redisE redis-4.0.8]# make install / / install the software
......
......
INSTALL install
    INSTALL install
    INSTALL install
    INSTALL install
    INSTALL install
make[1]: Leave directory“/root/redis-4.0.8/src"
[root@redisE redis-4.0.8]#
[root@redisE redis-4.0.8]# ./utils/install_server.sh / / initialize configuration
Welcome to the redis service installer
This script will help you easily set up a running redis server
Please select the redis port for this instance: [6379] //Port number
Selecting default: 6379
Please select the redis config file name [/etc/redis/6379.conf] //Master profile
Selected default - /etc/redis/6379.conf
Please select the redis log file name [/var/log/redis_6379.log] //log file
Selected default - /var/log/redis_6379.log
Please select the data directory for this instance [/var/lib/redis/6379] //Database directory
Selected default - /var/lib/redis/6379
Please select the redis executable path [/usr/local/bin/redis-server] //Service initiator
Selected config: //Configuration summary
Port           : 6379
Config file    : /etc/redis/6379.conf
Log file       : /var/log/redis_6379.log
Data dir       : /var/lib/redis/6379
Executable     : /usr/local/bin/redis-server
Cli Executable : /usr/local/bin/redis-cli
Is this ok? Then press ENTER to go on or Ctrl-C to abort.
Copied /tmp/6379.conf => /etc/init.d/redis_6379
Installing service...
Successfully added to chkconfig!
Successfully added to runlevels 345!
Starting Redis server...   //Service startup prompt
Installation successful!   //Installation completion prompt
[root@redisE redis-4.0.8]#
[root@redisE redis-4.0.8]# /etc/init. d/redis_ 6379 stop / / stop the service
Stopping ...
Redis stopped
[root@redisE redis-4.0.8]#
[root@redisE redis-4.0.8]# vim /etc/redis/6379.conf / / modify the configuration file to enable cluster configuration
70 bind 192.168.4.55
815 cluster-enabled yes
823 cluster-config-file nodes-6379.conf
829 cluster-node-timeout 5000
:wq
[root@redisE redis-4.0.8]# /etc/init. d/redis_ 6379 start / / start the service
Starting Redis server...
[root@redisE redis-4.0.8]# Netstat - utnlp | grep redis server / / view ports
tcp        0      0 192.168.4.55:6379       0.0.0.0:*               LISTEN      29720/redis-server   //redis service port
tcp        0      0 192.168.4.55:16379      0.0.0.0:*               LISTEN      29720/redis-server  //Cluster port
[root@redisF ~]# RPM - Q GCC | Yum - y install GCC / / install compiler
[root@redisF ~]# tar -zxvf redis-4.0.8.tar.gz / / unzip
[root@redisF ~]# cd redis-4.0.8 / / enter the source directory
[root@redisF redis-4.0.8]# make install / / install the software
......
......
INSTALL install
    INSTALL install
    INSTALL install
    INSTALL install
    INSTALL install
make[1]: Leave directory“/root/redis-4.0.8/src"
[root@redisF redis-4.0.8]#
[root@redisF redis-4.0.8]# ./utils/install_server.sh / / initialize configuration
Welcome to the redis service installer
This script will help you easily set up a running redis server
Please select the redis port for this instance: [6379] //Port number
Selecting default: 6379
Please select the redis config file name [/etc/redis/6379.conf] //Master profile
Selected default - /etc/redis/6379.conf
Please select the redis log file name [/var/log/redis_6379.log] //log file
Selected default - /var/log/redis_6379.log
Please select the data directory for this instance [/var/lib/redis/6379] //Database directory
Selected default - /var/lib/redis/6379
Please select the redis executable path [/usr/local/bin/redis-server] //Service initiator
Selected config: //Configuration summary
Port           : 6379
Config file    : /etc/redis/6379.conf
Log file       : /var/log/redis_6379.log
Data dir       : /var/lib/redis/6379
Executable     : /usr/local/bin/redis-server
Cli Executable : /usr/local/bin/redis-cli
Is this ok? Then press ENTER to go on or Ctrl-C to abort.
Copied /tmp/6379.conf => /etc/init.d/redis_6379
Installing service...
Successfully added to chkconfig!
Successfully added to runlevels 345!
Starting Redis server...   //Service startup prompt
Installation successful!   //Installation completion prompt
[root@redisF redis-4.0.8]#
[root@redisF redis-4.0.8]# /etc/init. d/redis_ 6379 stop / / stop the service
Stopping ...
Redis stopped
[root@redisF redis-4.0.8]#
[root@redisF redis-4.0.8]# vim /etc/redis/6379.conf / / modify the configuration file to enable cluster configuration
70 bind 192.168.4.56
815 cluster-enabled yes
823 cluster-config-file nodes-6379.conf
829 cluster-node-timeout 5000
:wq
[root@redisF redis-4.0.8]# /etc/init. d/redis_ 6379 start / / start the service
Starting Redis server...
[root@redisF redis-4.0.8]# Netstat - utnlp | grep redis server / / view ports
tcp        0      0 192.168.4.56:6379       0.0.0.0:*               LISTEN      29720/redis-server   //redis service port
tcp        0      0 192.168.4.56:16379      0.0.0.0:*               LISTEN      29720/redis-server  //Cluster port
Step 2: create a redis cluster
1) Configuration management host
[root@mgm ~]# Yum - y install ruby rubygems / / install dependencies
......
......
already installed:
  ruby.x86_64 0:2.0.0.648-33.el7_4                                                 rubygems.noarch 0:2.0.14.1-33.el7_4
Installed as a dependency:
  libyaml.x86_64 0:0.1.4-11.el7_0             ruby-irb.noarch 0:2.0.0.648-33.el7_4  ruby-libs.x86_64 0:2.0.0.648-33.el7_4  rubygem-bigdecimal.x86_64 0:1.2.0-33.el7_4
  rubygem-io-console.x86_64 0:0.4.2-33.el7_4  rubygem-json.x86_64 0:1.7.7-33.el7_4  rubygem-psych.x86_64 0:2.0.0-33.el7_4  rubygem-rdoc.noarch 0:4.0.0-33.el7_4
complete!
[root@mgm ~]#
[root@mgm ~]# gem install redis-3.2.1.gem / / install the dependent software gem program
Successfully installed redis-3.2.1
Parsing documentation for redis-3.2.1
Installing ri documentation for redis-3.2.1
1 gem installed
[root@mgm ~]# mkdir /root/bin
[root@mgm ~]# tar -zxvf redis-4.0.8.tar.gz
[root@mgm ~]# cp  redis-4.0.8/src/redis-trib. Rb / root / bin / / / copy script
[root@mgm ~]#
[root@mgm ~]# chmod  +x /root/bin/redis-trib.rb / / ensure that the script has execution permission
[root@mgm ~]#
[root@mgm ~]# redis-trib.rb help / / view help
Usage: redis-trib <command> <options> <arguments ...>
  create          host1:port1 ... hostN:portN
                  --replicas <arg>
  check           host:port
  info            host:port
  fix             host:port
                  --timeout <arg>
  reshard         host:port
                  --from <arg>
                  --to <arg>
                  --slots <arg>
                  --yes
                  --timeout <arg>
                  --pipeline <arg>
  rebalance       host:port
                  --weight <arg>
                  --auto-weights
                  --use-empty-masters
                  --timeout <arg>
                  --simulate
                  --pipeline <arg>
                  --threshold <arg>
  add-node        new_host:new_port existing_host:existing_port
                  --slave
                  --master-id <arg>
  del-node        host:port node_id
  set-timeout     host:port milliseconds
  call            host:port command arg arg .. arg
  import          host:port
                  --from <arg>
                  --copy
                  --replace
  help            (show this help)
For check, fix, reshard, del-node, set-timeout you can specify the host and port of any working node in the cluster.
[root@mgm ~]#
2) Create cluster
]# redis-trib.rb  create  --replicas  1   \
192.168.4.51:6379    192.168.4.52:6379    192.168.4.53:6379  \  192.168.4.54:6379   192.168.4.55:6379     192.168.4.56:6379
>>> Performing hash slots allocation on 6 nodes...
Using 3 masters:
192.168.4.51:6379
192.168.4.52:6379
192.168.4.53:6379
Adding replica 192.168.4.56:6379 to 192.168.4.51:6379
Adding replica 192.168.4.55:6379 to 192.168.4.52:6379
Adding replica 192.168.4.54:6379 to 192.168.4.53:6379
M: d9f8fe6d6d9dd391be8e7904501db1535e4d17cb 192.168.4.51:6379
   slots:0-5460 (5461 slots) master
M: 324e05df3f143ef97e50d09be0328a695e655986 192.168.4.52:6379
   slots:5461-10922 (5462 slots) master
M: 9e44139cffb8ebd7ed746aabbf4bcea9bf207645 192.168.4.53:6379
   slots:10923-16383 (5461 slots) master
S: d9634ba0aa5c1a07193da4a013da6051c1515922 192.168.4.54:6379
   replicates 9e44139cffb8ebd7ed746aabbf4bcea9bf207645
S: 2d343a9df48f6f6e207949e980ef498466a44dad 192.168.4.56:6379
   replicates d9f8fe6d6d9dd391be8e7904501db1535e4d17cb
S: 894dd0008053f6fb65e9e4a36b755d9351607500 192.168.4.55:6379
   replicates 324e05df3f143ef97e50d09be0328a695e655986
Can I set the above configuration? (type 'yes' to accept): yes //Agree with the above configuration
>>> Nodes configuration updated
>>> Assign a different config epoch to each node
>>> Sending CLUSTER MEET messages to join the cluster
Waiting for the cluster to join...
>>> Performing Cluster Check (using node 192.168.4.51:6379)
M: d9f8fe6d6d9dd391be8e7904501db1535e4d17cb 192.168.4.51:6379
   slots:0-5460 (5461 slots) master
   1 additional replica(s)
S: d9634ba0aa5c1a07193da4a013da6051c1515922 192.168.4.54:6379
   slots: (0 slots) slave
   replicates 9e44139cffb8ebd7ed746aabbf4bcea9bf207645
S: 894dd0008053f6fb65e9e4a36b755d9351607500 192.168.4.56:6379
   slots: (0 slots) slave
   replicates 324e05df3f143ef97e50d09be0328a695e655986
M: 324e05df3f143ef97e50d09be0328a695e655986 192.168.4.52:6379
   slots:5461-10922 (5462 slots) master
   1 additional replica(s)
M: 9e44139cffb8ebd7ed746aabbf4bcea9bf207645 192.168.4.53:6379
   slots:10923-16383 (5461 slots) master
   1 additional replica(s)
S: 2d343a9df48f6f6e207949e980ef498466a44dad 192.168.4.57:6379
   slots: (0 slots) slave
   replicates d9f8fe6d6d9dd391be8e7904501db1535e4d17cb
[OK] All nodes agree about slots configuration.
>>> Check for open slots...
>>> Check slots coverage...
[OK] All 16384 slots covered.  //It indicates that 16384 slots have been allocated
[root@mgm ~]#
3) View cluster information
[root@mgm ~]# redis-trib.rb info 192.168.4.51:6379 / / view cluster information
192.168.4.51:6379 (d9f8fe6d...) -> 0 keys | 5461 slots | 1 slaves.
192.168.4.52:6379 (324e05df...) -> 0 keys | 5462 slots | 1 slaves.
192.168.4.53:6379 (9e44139c...) -> 0 keys | 5461 slots | 1 slaves.
[OK] 0 keys in 3 masters.
keys per slot on average
[root@mgm ~]# redis-trib.rb check 192.168.4.51:6379. / / cluster detection

\>>> Performing Cluster Check (using node 192.168.4.51:6379)

M: d9f8fe6d6d9dd391be8e7904501db1535e4d17cb 192.168.4.51:6379

slots:0-5460 (5461 slots) master

1 additional replica(s)

S: d9634ba0aa5c1a07193da4a013da6051c1515922 192.168.4.54:6379

slots: (0 slots) slave

replicates 9e44139cffb8ebd7ed746aabbf4bcea9bf207645

S: 894dd0008053f6fb65e9e4a36b755d9351607500 192.168.4.55:6379

slots: (0 slots) slave

replicates 324e05df3f143ef97e50d09be0328a695e655986

M: 324e05df3f143ef97e50d09be0328a695e655986 192.168.4.52:6379

slots:5461-10922 (5462 slots) master

1 additional replica(s)

M: 9e44139cffb8ebd7ed746aabbf4bcea9bf207645 192.168.4.53:6379

slots:10923-16383 (5461 slots) master

1 additional replica(s)

S: 2d343a9df48f6f6e207949e980ef498466a44dad 192.168.4.56:6379

slots: (0 slots) slave

replicates d9f8fe6d6d9dd391be8e7904501db1535e4d17cb

[OK] All nodes agree about slots configuration.

\>>> Check for open slots...

\>>> Check slots coverage...

[OK] All 16384 slots covered.
4) Test configuration (access data from any server in the client connection cluster)
[root@client50 ~]# Redis cli - C - H 192.168.4.51 - P 6379 / / connect to server 51
192.168.4.51:6379>
192.168.4.51:6379> set x 100  //storage
-> Redirected to slot [16287] located at 192.168.4.53:6379  //The prompt is stored on the host
OK
192.168.4.53:6379> keys *
1) "x"
192.168.4.53:6379>
192.168.4.53:6379> set y 200
OK
192.168.4.53:6379> keys *
1) "y"
2) "x"
192.168.4.53:6379> set z 300 //storage
-> Redirected to slot [8157] located at 192.168.4.52:6379 //The prompt is stored on the 52 host
OK
192.168.4.52:6379> keys *  //When viewing data on the 52 host, there is only variable z
1) "z"
192.168.4.52:6379> get x
-> Redirected to slot [16287] located at 192.168.4.53:6379 //Connect 53 host to get data
"100"
192.168.4.53:6379> keys *
1) "y"
2) "x"
192.168.4.53:6379> get z
-> Redirected to slot [8157] located at 192.168.4.52:6379
"300"
192.168.4.52:6379> set i 400
-> Redirected to slot [15759] located at 192.168.4.53:6379
OK
192.168.4.53:6379> set j 500
-> Redirected to slot [3564] located at 192.168.4.51:6379
OK
192.168.4.51:6379>
Step 3: configure the web server
[root@web33 ~ ]# Yum - y install PHP devel / / install dependencies
......
......
already installed:
  php-devel.x86_64 0:5.4.16-45.el7
Installed as a dependency:
  autoconf.noarch 0:2.69-11.el7 automake.noarch 0:1.13.4-3.el7 m4.x86_64 0:1.4.16-10.el7 perl-Test-Harness.noarch 0:3.28-3.el7 perl-Thread-Queue.noarch 0:3.02-2.el7
 complete!
[root@web33 ~]#
[root@web33 ~]# tar -zxvf redis-cluster-4.3.0.tgz / / unzip
[root@web33 ~]# cd redis-4.3.0 / / enter the source directory
[root@web33 redis-4.3.0]# phpize / / create the configure command and configuration information file / usr / bin / PHP config
Configuring for:
PHP Api Version:         20100412
Zend Module Api No:      20100525
Zend Extension Api No:   220100525
[root@web33 redis-4.3.0]#
[root@web33 redis-4.3.0]# ./configure --with-php-config=/usr/bin/php-config
......
......
configure: creating ./config.status
config.status: creating config.h
config.status: config.h is unchanged
config.status: executing libtool commands
[root@web33 redis-4.3.0]#
[root@web33 redis-4.3.0]# make / / compile
......
......
Build complete.
Don't forget to run 'make test'.
[root@web33 redis-4.3.0]#
[root@web33 redis-4.3.0]# make install / / install
Installing shared extensions:     /usr/lib64/php/modules/   //Prompt module installation directory
[root@web33 redis-4.3.0]#
[root@web33 redis-4.3.0]# ls /usr/lib64/php/modules / / / view the directory list
curl.so  fileinfo.so  json.so  mysqli.so  mysql.so  pdo_mysql.so  pdo.so  pdo_sqlite.so  phar.so  redis.so  sqlite3.so  zip.so
[root@web33 redis-4.3.0]#
Modify profile
[root@web33 redis-4.3.0]# vim /etc/php.ini
728 extension_dir = "/usr/lib64/php/modules/"   //Module directory
730 extension = "redis.so"   //Module name
:wq
[root@web33 redis-4.3.0]# Systemctl restart PHP FPM / / restart PHP FPM service
[root@web33 redis-4.3.0]# PHP - M | grep - I redis / / view module
redis
[root@web33 redis-4.3.0]#
Step 4: test configuration
1) In the shared directory of the storage server, create a PHP script to connect to the cluster
nfs30~ ]# vim  /sitedir/set_data.php / / script for storing data
<?php
$redis_list = ['192.168.4.51:6379','192.168.4.52:6379','192.168.4.53:6379','192.168.4.54:6379','192.168.4.55:6379','192.168.4.56:6379'];  //Define redis server list
$client = new RedisCluster(NUll,$redis_list); //Define the connection redis server variable
$client->set("i","tarenaA "); //Storage data variable name i
$client->set("j","tarenaB ");  //Storage data variable name j
$client->set("k","tarenaC ");  //Storage data variable name k
?>
:wq
nfs30~ ]# vim   /sitedir/get_data.php / / get data script
<?php
$redis_list = ['192.168.4.51:6379','192.168.4.52:6379','192.168.4.53:6379','192.168.4.54:6379','192.168.4.55:6379','192.168.4.56:6379']; //Define redis server list
$client = new RedisCluster(NUll,$redis_list); //Define the connection redis server variable
echo $client->get("i");  //Get the data of variable i
echo $client->get("j");  //Get data of variable j
echo $client->get("k");  //Get the data of Variable k
?>
:wq
nfs30~ ]#  vim   /sitedir/test3.php / / save / retrieve data script
<?php
$redis_list = ['192.168.4.51:6379','192.168.4.52:6379','192.168.4.53:6379','192.168.4.54:6379','192.168.4.55:6379','192.168.4.56:6379'];
$client = new RedisCluster(NUll,$redis_list);
$client->set("name","panglijing");  //Save data
echo $client->get("name");  //Fetch data
?>
:wq
2) Access the website and execute the script (you can access the website server on any host)
]# curl  http://192.168.4.33/set_data.php
]# curl  http://192.168.4.33/get_data.php
]# curl  http://192.168.4.33/test3.php
3) Connect to any redis server on the command line to view data (you can connect to any redis server on any host)
]# redis-cli  -c  -h  192.168.4.51  -p  6379
192.168.4.51:6379> keys  *
1) i
192.168.4.51:6379> exit
]# redis-cli  -c  -h  192.168.4.52  -p  6379
192.168.4.52:6379> keys  *
1) j
192.168.4.52:6379> exit
]# redis-cli  -c  -h  192.168.4.53  -p  6379
192.168.4.52:6379> keys  *
1) k
192.168.4.52:6379> exit
3. Data migration
3.1 problems
The requirements are as follows:
- Configure slave server
- Configure the first PXC server
- Configure the second PXC server
- Configure the third PXC server
- Public configuration
- Test configuration
3.2 scheme
Create three new virtual machines. The specific configuration requirements are shown in figure-2.
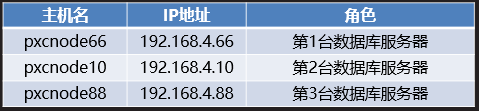
Figure-2
3.3 steps
To implement this case, you need to follow the following steps.
Step 1: configure the slave server (configure the host 192.168.4.66 as the slave server of 192.168.4.11)
1) Install the database service software on the 192.168.4.66 host and start the mysqld service
[root@pxcnode66 ~]# tar -xvf mysql-5.7.17.tar / / unpacking
./mysql-community-client-5.7.17-1.el7.x86_64.rpm
./mysql-community-common-5.7.17-1.el7.x86_64.rpm
./mysql-community-devel-5.7.17-1.el7.x86_64.rpm
./mysql-community-embedded-5.7.17-1.el7.x86_64.rpm
./mysql-community-embedded-compat-5.7.17-1.el7.x86_64.rpm
./mysql-community-embedded-devel-5.7.17-1.el7.x86_64.rpm
./mysql-community-libs-5.7.17-1.el7.x86_64.rpm
./mysql-community-libs-compat-5.7.17-1.el7.x86_64.rpm
./mysql-community-minimal-debuginfo-5.7.17-1.el7.x86_64.rpm
./mysql-community-server-5.7.17-1.el7.x86_64.rpm
./mysql-community-test-5.7.17-1.el7.x86_64.rpm
[root@pxcnode66 ~]#
[root@pxcnode66 ~]# ls *.rpm / / view the software list
mysql-community-client-5.7.17-1.el7.x86_64.rpm
mysql-community-common-5.7.17-1.el7.x86_64.rpm
mysql-community-devel-5.7.17-1.el7.x86_64.rpm
mysql-community-embedded-5.7.17-1.el7.x86_64.rpm
mysql-community-embedded-compat-5.7.17-1.el7.x86_64.rpm
mysql-community-embedded-devel-5.7.17-1.el7.x86_64.rpm
mysql-community-libs-5.7.17-1.el7.x86_64.rpm
mysql-community-libs-compat-5.7.17-1.el7.x86_64.rpm
mysql-community-minimal-debuginfo-5.7.17-1.el7.x86_64.rpm
mysql-community-server-5.7.17-1.el7.x86_64.rpm
mysql-community-test-5.7.17-1.el7.x86_64.rpm
[root@pxcnode66 ~]#
[root@pxcnode66 ~]# yum -y  install mysql-community-*.rpm / / install software
 Plug in loaded: fastestmirror
 Checking mysql-community-client-5.7.17-1.el7.x86_64.rpm: mysql-community-client-5.7.17-1.el7.x86_64
mysql-community-client-5.7.17-1.el7.x86_64.rpm Will be installed
......
......
already installed:
  mysql-community-client.x86_64 0:5.7.17-1.el7                             mysql-community-common.x86_64 0:5.7.17-1.el7
  mysql-community-devel.x86_64 0:5.7.17-1.el7                              mysql-community-embedded.x86_64 0:5.7.17-1.el7
  mysql-community-embedded-compat.x86_64 0:5.7.17-1.el7                    mysql-community-embedded-devel.x86_64 0:5.7.17-1.el7
  mysql-community-libs.x86_64 0:5.7.17-1.el7                               mysql-community-libs-compat.x86_64 0:5.7.17-1.el7
  mysql-community-minimal-debuginfo.x86_64 0:5.7.17-1.el7                  mysql-community-server.x86_64 0:5.7.17-1.el7
  mysql-community-test.x86_64 0:5.7.17-1.el7
 Installed as a dependency:
  perl-Data-Dumper.x86_64 0:2.145-3.el7                                      perl-JSON.noarch 0:2.59-2.el7
 complete!
[root@pxcnode66 ~]#
[root@pxcnode66 ~]# Systemctl start mysqld / / start the service
[root@pxcnode66 ~]# ls /var/lib/mysql / / view the list of database files
auto.cnf    client-cert.pem  ibdata1      ibtmp1      mysql.sock.lock     public_key.pem   sys
ca-key.pem  client-key.pem   ib_logfile0  mysql       performance_schema  server-cert.pem
ca.pem      ib_buffer_pool   ib_logfile1  mysql.sock  private_key.pem     server-key.pem
[root@pxcnode66 ~]# Systemctl enable mysqld / / set the service to start running
[root@pxcnode66 ~]# Netstat - utnlp | grep: 3306 / / view port
tcp6       0      0 :::3306                 :::*                    LISTEN      1531/mysqld
[root@pxcnode66 ~]#
[root@pxcnode66 ~]# grep password  /var/log/mysqld.log / / view the initial password
2019-07-05T01:56:51.895852Z 1 [Note] A temporary password is generated for root@localhost: bB0*uCmu:.Kj
[root@pxcnode66 ~]# mysql -uroot -p'bB0*uCmu:.Kj '/ / initial password login
mysql: [Warning] Using a password on the command line interface can be insecure.
Welcome to the MySQL monitor.  Commands end with ; or \g.
Your MySQL connection id is 3
Server version: 5.7.17
Copyright (c) 2000, 2016, Oracle and/or its affiliates. All rights reserved.
Oracle is a registered trademark of Oracle Corporation and/or its
affiliates. Other names may be trademarks of their respective
owners.
Type 'help;' or '\h' for help. Type '\c' to clear the current input statement.
mysql>
mysql> alter user root@"localhost" identified by "123qqq...A";//Modify login password
Query OK, 0 rows affected (0.01 sec)
mysql>
mysql> exit //Disconnect
Bye
[root@pxcnode66 ~]# mysql -uroot -p123qqq...A / / log in with a new password
mysql: [Warning] Using a password on the command line interface can be insecure.
Welcome to the MySQL monitor.  Commands end with ; or \g.
Your MySQL connection id is 4
Server version: 5.7.17 MySQL Community Server (GPL)
Copyright (c) 2000, 2016, Oracle and/or its affiliates. All rights reserved.
Oracle is a registered trademark of Oracle Corporation and/or its
affiliates. Other names may be trademarks of their respective
owners.
Type 'help;' or '\h' for help. Type '\c' to clear the current input statement.
mysql> show  databases; //view the database
+--------------------+
| Database           |
+--------------------+
| information_schema |
| mysql              |
| performance_schema |
| sys                |
+--------------------+
4 rows in set (0.00 sec)
Mysql>
2) Modify service master profile
[root@pxcnode66 ~]# vim /etc/my.cnf
[mysqld]
server_id=66  //Specify server_id
:wq
[root@pxcnode66 ~]# Systemctl restart mysqld / / restart the service
[root@pxcnode66 ~]#
3) Ensure data consistency (pxcnode66 host uses full backup of mysql11 host to restore data to ensure data consistency)
[root@mysql11 ~]# rpm -ivh libev-4.15-1.el6.rf.x86_64.rpm / / install dependent software
[root@mysql11 ~]# yum -y  install percona-xtrabackup-24-2.4.7-1.el7.x86_64.rpm / / install online hot standby software
[root@mysql11 ~]# innobackupex  --user root --password 123qqq... A -- slave info / allbak -- no timestamp / / back up all data and record the binlog log name corresponding to the backed up data
[root@mysql11 ~]# scp -r /allbak   root@192.168.4.66 : / root / / send the backup file to the pxcnode66 host
[root@pxcnode66 ~]# rpm -ivh libev-4.15-1.el6.rf.x86_64.rpm / / install dependent software
[root@pxcnode66 ~]# yum -y install  percona-xtrabackup-24-2.4.13-1.el7.x86_64.rpm / / install online hot standby software
[root@pxcnode66 ~]# Systemctl stop mysqld / / stop the service
[root@pxcnode66 ~]# RM - RF / var / lib / MySQL / * / / clear the database directory
[root@pxcnode66 ~]# Innobackupex -- apply log / root / allbak / / prepare to recover data
[root@pxcnode66 ~]# Innobackupex -- copy back / root / allbak / / recover data
[root@pxcnode66 ~]# chown -R mysql:mysql /var/lib/mysql / / modify owner
[root@pxcnode66 ~]# Systemctl start mysqld / / start the service
4) Specify primary server
[root@pxcnode66 ~]# cat /root/allbak/xtrabackup_ Info | grep master11 / / query binlog
binlog_pos = filename 'master11.000001', position '7700'
[root@pxcnode66 ~]# mysql -uroot -p123qqq...A / / the administrator logs in to the specified primary server
mysql> change master to
master_host="192.168.4.11", //Primary server ip address
master_user="repluser", //Primary server authorized user
master_password="123qqq...A", //Authorization password
master_log_file="master11.000001",  //binlog log name
master_log_pos=7700; //Log offset
Query OK, 0 rows affected, 2 warnings (0.31 sec)
mysql> start slave ;  //Start the slave program
Query OK, 0 rows affected (0.09 sec)
mysql> exit  //Disconnect
Bye
[root@pxcnode66 ~]#
[root@pxcnode66 ~]# mysql -uroot -p123qqq...A -e "show slave status\G" | grep -i 192.168.4.11 / / view the primary server address
mysql: [Warning] Using a password on the command line interface can be insecure.
                  Master_Host: 192.168.4.11 //Primary server ip address
[root@pxcnode66 ~]# mysql -uroot -p123qqq...A -e "show slave status\G" | grep -i "yes" / / view status information
mysql: [Warning] Using a password on the command line interface can be insecure.
             Slave_IO_Running: Yes  //IO thread OK
            Slave_SQL_Running: Yes  //SQL thread OK
[root@pxcnode66 ~]#
Step 2: configure the first PXC server (192.168.4.66)
1) Stop mysqld service and uninstall mysqld service software
[root@pxcnode66 ~]# Systemctl stop mysqld / / stop the service
[root@pxnode66 ~]# RPM - QA | grep - I MySQL / / view the installed MySQL service software
mysql-community-server-5.7.17-1.el7.x86_64
mysql-community-embedded-compat-5.7.17-1.el7.x86_64
mysql-community-common-5.7.17-1.el7.x86_64
mysql-community-client-5.7.17-1.el7.x86_64
mysql-community-devel-5.7.17-1.el7.x86_64
mysql-community-test-5.7.17-1.el7.x86_64
mysql-community-libs-compat-5.7.17-1.el7.x86_64
mysql-community-minimal-debuginfo-5.7.17-1.el7.x86_64
perl-DBD-MySQL-4.023-6.el7.x86_64
mysql-community-libs-5.7.17-1.el7.x86_64
mysql-community-embedded-5.7.17-1.el7.x86_64
mysql-community-embedded-devel-5.7.17-1.el7.x86_64
[root@pxcnode66 ~]#
[root@pxcnode66 ~]# rpm -e --nodeps mysql-community-server mysql-community-embedded-compat mysql-community-common mysql-community-client mysql-community-devel \
> mysql-community-test mysql-community-libs-compat mysql-community-minimal-debuginfo mysql-community-libs mysql-community-embedded mysql-community-embedded-devel  //Uninstall all MySQL service software
 Warning:/etc/my.cnf Saved as /etc/my.cnf.rpmsave
[root@pxcnode66 ~]#
2) Install PXC software, modify configuration file, and start mysql service
[root@pxcnode66 ~]# cd PXC / / enter the software directory
[root@pxcnode66 PXC]# rpm -ivh qpress-1.1-14.11.x86_64.rpm / / installation dependency
 Warning: qpress-1.1-14.11.x86_64.rpm: head V3 DSA/SHA1 Signature, secret key ID 6cb7b81f: NOKEY
 In preparation...                          ################################# [100%]
Upgrading/install...
   1:qpress-1.1-14.11                 ################################# [100%]
[root@pxcnode66 PXC]#
[root@pxcnode66 PXC]# tar -xvf Percona-XtraDB-Cluster-5.7.25-31.35-r463-el7-x86_64-bundle.tar / / unzip the PXC package
Percona-XtraDB-Cluster-57-5.7.25-31.35.1.el7.x86_64.rpm
Percona-XtraDB-Cluster-57-debuginfo-5.7.25-31.35.1.el7.x86_64.rpm
Percona-XtraDB-Cluster-client-57-5.7.25-31.35.1.el7.x86_64.rpm
Percona-XtraDB-Cluster-devel-57-5.7.25-31.35.1.el7.x86_64.rpm
Percona-XtraDB-Cluster-full-57-5.7.25-31.35.1.el7.x86_64.rpm
Percona-XtraDB-Cluster-garbd-57-5.7.25-31.35.1.el7.x86_64.rpm
Percona-XtraDB-Cluster-server-57-5.7.25-31.35.1.el7.x86_64.rpm
Percona-XtraDB-Cluster-shared-57-5.7.25-31.35.1.el7.x86_64.rpm
Percona-XtraDB-Cluster-shared-compat-57-5.7.25-31.35.1.el7.x86_64.rpm
Percona-XtraDB-Cluster-test-57-5.7.25-31.35.1.el7.x86_64.rpm
[root@pxcnode66 PXC]#
[root@pxcnode66 PXC]# yum -y  install Percona-XtraDB-Cluster-*.rpm / / install software
 already installed:
  Percona-XtraDB-Cluster-57.x86_64 0:5.7.25-31.35.1.el7                                Percona-XtraDB-Cluster-57-debuginfo.x86_64 0:5.7.25-31.35.1.el7
  Percona-XtraDB-Cluster-client-57.x86_64 0:5.7.25-31.35.1.el7                         Percona-XtraDB-Cluster-devel-57.x86_64 0:5.7.25-31.35.1.el7
  Percona-XtraDB-Cluster-full-57.x86_64 0:5.7.25-31.35.1.el7                           Percona-XtraDB-Cluster-garbd-57.x86_64 0:5.7.25-31.35.1.el7
  Percona-XtraDB-Cluster-server-57.x86_64 0:5.7.25-31.35.1.el7                         Percona-XtraDB-Cluster-shared-57.x86_64 0:5.7.25-31.35.1.el7
  Percona-XtraDB-Cluster-shared-compat-57.x86_64 0:5.7.25-31.35.1.el7                  Percona-XtraDB-Cluster-test-57.x86_64 0:5.7.25-31.35.1.el7
Installed as a dependency:
  keyutils-libs-devel.x86_64 0:1.5.8-3.el7   krb5-devel.x86_64 0:1.15.1-18.el7     libcom_err-devel.x86_64 0:1.42.9-11.el7   libkadm5.x86_64 0:1.15.1-18.el7
  libselinux-devel.x86_64 0:2.5-12.el7       libsepol-devel.x86_64 0:2.5-8.1.el7   libverto-devel.x86_64 0:0.2.5-4.el7       openssl-devel.x86_64 1:1.0.2k-12.el7
  pcre-devel.x86_64 0:8.32-17.el7            perl-Env.noarch 0:1.04-2.el7          perl-Test-Harness.noarch 0:3.28-3.el7     perl-Test-Simple.noarch 0:0.98-243.el7
  zlib-devel.x86_64 0:1.2.7-17.el7
complete!
[root@pxcnode66 PXC]#
[root@pxcnode66 PXC]# vim /etc/percona-xtradb-cluster.conf.d/mysqld.cnf / / modify the database service configuration file
[mysqld]
server-id=66 //Specify server_id
:wq
[root@pxcnode66 PXC]#
[root@pxcnode66 PXC]# vim /etc/percona-xtradb-cluster.conf.d/wsrep.cnf / / modify the cluster service configuration file
wsrep_cluster_address=gcomm://       No need to write ip address
wsrep_node_address=192.168.4.66   //Specify native Ip address
wsrep_cluster_name=pxc-cluster  //Specify the cluster name (the cluster names of the other two should be the same)
wsrep_node_name=pxcnode66  //Specify the native host name
wsrep_sst_auth="sstuser:123qqq...A" //Authorized user and password for full data synchronization
:wq
[root@pxcnode66 PXC]#
[root@pxcnode66 PXC]# Systemctl start mysql. / / start the service
[root@pxcnode66 PXC]# Netstat - utnlp | grep: 3306 / / view the MySQL service port
tcp6       0      0 :::3306                 :::*                    LISTEN      24482/mysqld
[root@pxcnode66 PXC]# Netstat - utnlp | grep: 4567 / / view the cluster communication port
tcp        0      0 0.0.0.0:4567            0.0.0.0:*               LISTEN      24472/mysqld
[root@pxcnode66 PXC]# Systemctl enable mysql. / / set the service to start running
[root@pxcnode66 PXC]#
3) Database administrator login, user authorization, view status information
[root@pxcnode66 PXC]# mysql -uroot -p123qqq...A / / administrator login
mysql> grant all on *.* to sstuser@"localhost" identified by "123qqq...A"; //User authorization
Query OK, 0 rows affected, 1 warning (0.10 sec)
mysql> show status like "%wsrep%"; //View cluster status information
| wsrep_incoming_addresses         | 192.168.4.66:3306                    |
| wsrep_cluster_weight             | 1                                    |
| wsrep_desync_count               | 0                                    |
| wsrep_evs_delayed                |                                      |
| wsrep_evs_evict_list             |                                      |
| wsrep_evs_repl_latency           | 0/0/0/0/0                            |
| wsrep_evs_state                  | OPERATIONAL                          |
| wsrep_gcomm_uuid                 | 73809cc5-cf00-11e9-aac3-b223959fecdf |
| wsrep_cluster_conf_id            | 1                                    |
| wsrep_cluster_size               | 1                                    |
| wsrep_cluster_state_uuid         | 73848b1a-cf00-11e9-9058-36c1ac1e1359 |
| wsrep_cluster_status             | Primary                              |
| wsrep_connected                  | ON                                   |
| wsrep_local_bf_aborts            | 0                                    |
| wsrep_local_index                | 0                                    |
| wsrep_provider_name              | Galera                               |
| wsrep_provider_vendor            | Codership Oy <info@codership.com>    |
| wsrep_provider_version           | 3.35(rddf9876)                       |
| wsrep_ready                      | ON                                   |
+----------------------------------+--------------------------------------+
71 rows in set (0.00 sec)
mysql> exit ;
[root@pxcnode66 ~]#
[root@pxcnode66 ~]# mysql -uroot -p123qqq...A -e "show slave status\G" | grep -i "yes" / / view the status information of the slave server that is still 192.168.4.11
mysql: [Warning] Using a password on the command line interface can be insecure.
             Slave_IO_Running: Yes  //IO thread OK
            Slave_SQL_Running: Yes  //SQL thread OK
[root@pxcnode66 ~]#
Step 3: configure the second PXC server (192.168.4.10)
1) Install PXC software
[root@pxcnode10 ~]# cd PXC / / enter the software directory
[root@pxcnode10 PXC]# rpm -ivh qpress-1.1-14.11.x86_64.rpm / / installation dependency
 Warning: qpress-1.1-14.11.x86_64.rpm: head V3 DSA/SHA1 Signature, secret key ID 6cb7b81f: NOKEY
 In preparation...                          ################################# [100%]
Upgrading/install...
   1:qpress-1.1-14.11                 ################################# [100%]
[root@pxcnode10 PXC]#
[root@pxcnode10 PXC]# tar -xvf Percona-XtraDB-Cluster-5.7.25-31.35-r463-el7-x86_64-bundle.tar / / unzip the PXC package
Percona-XtraDB-Cluster-57-5.7.25-31.35.1.el7.x86_64.rpm
Percona-XtraDB-Cluster-57-debuginfo-5.7.25-31.35.1.el7.x86_64.rpm
Percona-XtraDB-Cluster-client-57-5.7.25-31.35.1.el7.x86_64.rpm
Percona-XtraDB-Cluster-devel-57-5.7.25-31.35.1.el7.x86_64.rpm
Percona-XtraDB-Cluster-full-57-5.7.25-31.35.1.el7.x86_64.rpm
Percona-XtraDB-Cluster-garbd-57-5.7.25-31.35.1.el7.x86_64.rpm
Percona-XtraDB-Cluster-server-57-5.7.25-31.35.1.el7.x86_64.rpm
Percona-XtraDB-Cluster-shared-57-5.7.25-31.35.1.el7.x86_64.rpm
Percona-XtraDB-Cluster-shared-compat-57-5.7.25-31.35.1.el7.x86_64.rpm
Percona-XtraDB-Cluster-test-57-5.7.25-31.35.1.el7.x86_64.rpm
[root@pxcnode10 PXC]#
[root@pxcnode10 PXC]# yum -y  install Percona-XtraDB-Cluster-*.rpm / / install software
 already installed:
  Percona-XtraDB-Cluster-57.x86_64 0:5.7.25-31.35.1.el7                                Percona-XtraDB-Cluster-57-debuginfo.x86_64 0:5.7.25-31.35.1.el7
  Percona-XtraDB-Cluster-client-57.x86_64 0:5.7.25-31.35.1.el7                         Percona-XtraDB-Cluster-devel-57.x86_64 0:5.7.25-31.35.1.el7
  Percona-XtraDB-Cluster-full-57.x86_64 0:5.7.25-31.35.1.el7                           Percona-XtraDB-Cluster-garbd-57.x86_64 0:5.7.25-31.35.1.el7
  Percona-XtraDB-Cluster-server-57.x86_64 0:5.7.25-31.35.1.el7                         Percona-XtraDB-Cluster-shared-57.x86_64 0:5.7.25-31.35.1.el7
  Percona-XtraDB-Cluster-shared-compat-57.x86_64 0:5.7.25-31.35.1.el7                  Percona-XtraDB-Cluster-test-57.x86_64 0:5.7.25-31.35.1.el7
Installed as a dependency:
  keyutils-libs-devel.x86_64 0:1.5.8-3.el7   krb5-devel.x86_64 0:1.15.1-18.el7     libcom_err-devel.x86_64 0:1.42.9-11.el7   libkadm5.x86_64 0:1.15.1-18.el7
  libselinux-devel.x86_64 0:2.5-12.el7       libsepol-devel.x86_64 0:2.5-8.1.el7   libverto-devel.x86_64 0:0.2.5-4.el7       openssl-devel.x86_64 1:1.0.2k-12.el7
  pcre-devel.x86_64 0:8.32-17.el7            perl-Env.noarch 0:1.04-2.el7          perl-Test-Harness.noarch 0:3.28-3.el7     perl-Test-Simple.noarch 0:0.98-243.el7
  zlib-devel.x86_64 0:1.2.7-17.el7
complete!
[root@pxcnode10 PXC]#
2) Modify profile
[root@pxcnode10 PXC]# vim /etc/percona-xtradb-cluster.conf.d/mysqld.cnf / / modify the database service configuration
[mysqld]
server-id=10 //Specify server_id
:wq
[root@pxcnode10 PXC]#
[root@pxcnode10 PXC]# vim /etc/percona-xtradb-cluster.conf.d/wsrep.cnf / / modify the cluster service configuration file
wsrep_cluster_address=gcomm://192.168.4.66192.168.4.10 / / cluster member list
wsrep_node_address=192.168.4.10   //Specify native Ip address
wsrep_cluster_name=pxc-cluster  //Specify the cluster name (the cluster names of the other two should be the same)
wsrep_node_name=pxcnode10  //Specify the native host name
wsrep_sst_auth="sstuser:123qqq...A" //Authorized user and password for full data synchronization
:wq
[root@pxcnode10 PXC]#
3) Start mysql service
[root@pxcnode10 PXC]# Systemctl start mysql. / / start the service
[root@pxcnode10 PXC]# Systemctl enable mysql. / / the service is started and running
[root@pxcnode10 PXC]# Netstat - utnlp | grep: 3306 / / view the MySQL service port
tcp6       0      0 :::3306                 :::*                    LISTEN      24482/mysqld
[root@pxcnode10 PXC]# Netstat - utnlp | grep: 4567 / / view cluster ports
tcp6       0      0 :::4567                 :::*                    LISTEN      24489/mysqld
[root@pxcnode10 PXC]#
mysql> show status like "%wsrep%"; //View cluster status information
| wsrep_incoming_addresses         | 192.168.4.66:3306,192.168.4.10:3306|
| wsrep_cluster_weight             | 1                                    |
| wsrep_desync_count               | 0                                    |
| wsrep_evs_delayed                |                                      |
| wsrep_evs_evict_list             |                                      |
| wsrep_evs_repl_latency           | 0/0/0/0/0                            |
| wsrep_evs_state                  | OPERATIONAL                          |
| wsrep_gcomm_uuid                 | 73809cc5-cf00-11e9-aac3-b223959fecdf |
| wsrep_cluster_conf_id            | 1                                    |
| wsrep_cluster_size               | 1                                    |
| wsrep_cluster_state_uuid         | 73848b1a-cf00-11e9-9058-36c1ac1e1359 |
| wsrep_cluster_status             | Primary                              |
| wsrep_connected                  | ON                                   |
| wsrep_local_bf_aborts            | 0                                    |
| wsrep_local_index                | 0                                    |
| wsrep_provider_name              | Galera                               |
| wsrep_provider_vendor            | Codership Oy <info@codership.com>    |
| wsrep_provider_version           | 3.35(rddf9876)                       |
| wsrep_ready                      | ON                                   |
+----------------------------------+--------------------------------------+
71 rows in set (0.00 sec)
mysql> exit ;
    [root@pxcnode10 ~]#
Step 4: configure the third PXC server (192.168.4.88)
1) Install PXC software
[root@pxcnode88 ~]# cd PXC / / enter the software directory
[root@pxcnode88 PXC]# rpm -ivh qpress-1.1-14.11.x86_64.rpm / / installation dependency
 Warning: qpress-1.1-14.11.x86_64.rpm: head V3 DSA/SHA1 Signature, secret key ID 6cb7b81f: NOKEY
 In preparation...                          ################################# [100%]
Upgrading/install...
   1:qpress-1.1-14.11                 ################################# [100%]
[root@pxcnode88 PXC]#
[root@pxcnode88 PXC]# tar -xvf Percona-XtraDB-Cluster-5.7.25-31.35-r463-el7-x86_64-bundle.tar / / unzip the PXC package
Percona-XtraDB-Cluster-57-5.7.25-31.35.1.el7.x86_64.rpm
Percona-XtraDB-Cluster-57-debuginfo-5.7.25-31.35.1.el7.x86_64.rpm
Percona-XtraDB-Cluster-client-57-5.7.25-31.35.1.el7.x86_64.rpm
Percona-XtraDB-Cluster-devel-57-5.7.25-31.35.1.el7.x86_64.rpm
Percona-XtraDB-Cluster-full-57-5.7.25-31.35.1.el7.x86_64.rpm
Percona-XtraDB-Cluster-garbd-57-5.7.25-31.35.1.el7.x86_64.rpm
Percona-XtraDB-Cluster-server-57-5.7.25-31.35.1.el7.x86_64.rpm
Percona-XtraDB-Cluster-shared-57-5.7.25-31.35.1.el7.x86_64.rpm
Percona-XtraDB-Cluster-shared-compat-57-5.7.25-31.35.1.el7.x86_64.rpm
Percona-XtraDB-Cluster-test-57-5.7.25-31.35.1.el7.x86_64.rpm
[root@pxcnode88 PXC]#
[root@pxcnode88 PXC]# yum -y  install Percona-XtraDB-Cluster-*.rpm / / install software
 already installed:
  Percona-XtraDB-Cluster-57.x86_64 0:5.7.25-31.35.1.el7                                Percona-XtraDB-Cluster-57-debuginfo.x86_64 0:5.7.25-31.35.1.el7
  Percona-XtraDB-Cluster-client-57.x86_64 0:5.7.25-31.35.1.el7                         Percona-XtraDB-Cluster-devel-57.x86_64 0:5.7.25-31.35.1.el7
  Percona-XtraDB-Cluster-full-57.x86_64 0:5.7.25-31.35.1.el7                           Percona-XtraDB-Cluster-garbd-57.x86_64 0:5.7.25-31.35.1.el7
  Percona-XtraDB-Cluster-server-57.x86_64 0:5.7.25-31.35.1.el7                         Percona-XtraDB-Cluster-shared-57.x86_64 0:5.7.25-31.35.1.el7
  Percona-XtraDB-Cluster-shared-compat-57.x86_64 0:5.7.25-31.35.1.el7                  Percona-XtraDB-Cluster-test-57.x86_64 0:5.7.25-31.35.1.el7
Installed as a dependency:
  keyutils-libs-devel.x86_64 0:1.5.8-3.el7   krb5-devel.x86_64 0:1.15.1-18.el7     libcom_err-devel.x86_64 0:1.42.9-11.el7   libkadm5.x86_64 0:1.15.1-18.el7
  libselinux-devel.x86_64 0:2.5-12.el7       libsepol-devel.x86_64 0:2.5-8.1.el7   libverto-devel.x86_64 0:0.2.5-4.el7       openssl-devel.x86_64 1:1.0.2k-12.el7
  pcre-devel.x86_64 0:8.32-17.el7            perl-Env.noarch 0:1.04-2.el7          perl-Test-Harness.noarch 0:3.28-3.el7     perl-Test-Simple.noarch 0:0.98-243.el7
  zlib-devel.x86_64 0:1.2.7-17.el7
complete!
[root@pxcnode88 PXC]#
2) Modify profile
[root@pxcnode88 PXC]# vim /etc/percona-xtradb-cluster.conf.d/mysqld.cnf / / modify the database service configuration
[mysqld]
server-id=88 //Specify server_id
:wq
[root@pxcnode88 PXC]#
[root@pxcnode88 PXC]# vim /etc/percona-xtradb-cluster.conf.d/wsrep.cnf / / modify the cluster service configuration file
wsrep_cluster_address=gcomm://192.168.4.66 / / ip addresses of cluster members
wsrep_node_address=192.168.4.88   //Specify native Ip address
wsrep_cluster_name=pxc-cluster  //Specify the cluster name (the cluster names of the other two should be the same)
wsrep_node_name=pxcnode88  //Specify the native host name
wsrep_sst_auth="sstuser:123qqq...A" //Authorized user and password for full data synchronization
:wq
[root@pxcnode88 PXC]#
3) Start mysql service
[root@pxcnode88 PXC]# Systemctl start mysql. / / start the service
[root@pxcnode88 PXC]# Systemctl enable mysql. / / the service is started and running
[root@pxcnode88 PXC]# Netstat - utnlp | grep: 3306 / / view the MySQL service port
tcp6       0      0 :::3306                 :::*                    LISTEN      24472/mysqld
[root@pxcnode88 PXC]# Netstat - utnlp | grep: 4567 / / view cluster ports
tcp6       0      0 :::4567                 :::*                    LISTEN      24486/mysqld
[root@pxcnode88 PXC]#
Step 5: common configuration (192.168.4.88, 192.168.4.10, 192.168.4.66)
1) Modify the cluster configuration file of 192.168.4.88 host
[root@pxcnode88 ~]# vim /etc/percona-xtradb-cluster.conf.d/wsrep.cnf
wsrep_cluster_address=gcomm://192.168.4.66192.168.4.10192.168.4.88 / / specify the cluster member list
:wq
[root@pxcnode88 ~]#
2) Modify the cluster configuration file of 192.168.4.10 host
[root@pxcnode10 ~]# vim /etc/percona-xtradb-cluster.conf.d/wsrep.cnf
wsrep_cluster_address=gcomm://192.168.4.66192.168.4.88192.168.4.10 / / specify the cluster member list
:wq
[root@pxcnode10 ~]#
3) Modify the cluster configuration file of 192.168.4.66 host
[root@pxcnode66 ~]# vim /etc/percona-xtradb-cluster.conf.d/wsrep.cnf
wsrep_cluster_address=gcomm://192.168.4.66192.168.4.88192.168.4.10 / / specify the cluster member list
:wq
[root@pxcnode66 ~]#
Step 6: test configuration: connect the PXC cluster host on the website server to access data:
1) Store data: connect the PXC cluster host on the website server to store data
[root@web33 ~]# mysql  -h192.168.4.66  -uyaya99  -p123qqq...A  gamedb
Mysql> insert  into  gamedb.user values ("pljA");
Mysql> exit ;
[root@web33 ~]# mysql  -h192.168.4.10  -uyaya99  -p123qqq...A  gamedb
Mysql> insert  into  gamedb.user values ("pljB");
Mysql> exit ;
[root@web33 ~]# mysql  -h192.168.4.88  -uyaya99  -p123qqq...A  gamedb
Mysql> insert  into  gamedb.user values ("pljC");
Mysql> exit ;
2) Query data: connect the PXC cluster host on the website server to query data
[root@web44 ~]# mysql  -h192.168.4.66  -uyaya99  -p123qqq...A  gamedb
Mysql> select  *  from   gamedb.user;
+------+
|  name|
+------+
|  pljA|
|  pljB|
|  pljC|
+------+
Mysql> exit ;
[root@web44 ~]# mysql  -h192.168.4.10  -uyaya99  -p123qqq...A  gamedb
Mysql> select  *  from   gamedb.user;
+------+
|  name|
+------+
|  pljA|
|  pljB|
|  pljC|
+------+
Mysql> exit ;Mysql> exit ;
[root@web44 ~]# mysql  -h192.168.4.88  -uyaya99  -p123qqq...A  gamedb
Mysql> select  *  from   gamedb.user;
+------+
|  name|
+------+
|  pljA|
|  pljB|
|  pljC|
+------+
Mysql> exit ;Mysql> exit ;
4. Deploy LB cluster
4.1 problems
The configuration steps are as follows:
- Install software
- Modify profile
- Start service
- Test configuration
4.2 scheme
The topology is shown in figure-3. Create a new virtual machine, configure ip address eth0 192.168.4.99, host name haproxy99; Run the haproxy service to accept the connection request from the client to access the database and distribute the request to three PXC cluster hosts on average.
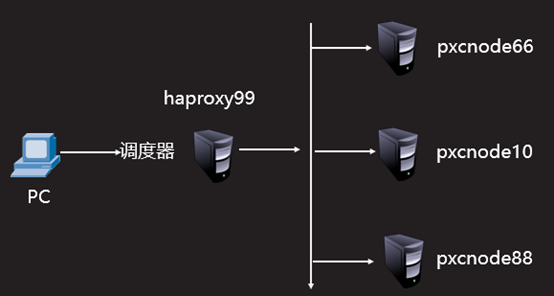
Figure-3
4.3 steps
To implement this case, you need to follow the following steps.
Step 1: install the software: install the haproxy software on the haproxy99 host
[root@haproxy99 ~]# yum -y install haproxy
    ......
Running transaction
  Installing    : haproxy-1.5.18-7.el7.x86_64                                                                          1/1
  Verification in progress      : haproxy-1.5.18-7.el7.x86_64                                                                          1/1
already installed:
  haproxy.x86_64 0:1.5.18-7.el7
complete!
[root@haproxy99 ~]#
Step 2: modify the configuration file
[root@haproxy99 ~]# vim  /etc/haproxy/haproxy.cfg
Global   //Global configuration is OK by default
    log         127.0.0.1 local2
    chroot      /var/lib/haproxy
    pidfile     /var/run/haproxy.pid
    maxconn     4000
    user        haproxy
    group       haproxy
    daemon
    stats socket /var/lib/haproxy/stats
defaults //Default configuration (no modification required)
    mode                    http
    log                     global
    option                  httplog
    option                  dontlognull
    option http-server-close
    option forwardfor       except 127.0.0.0/8
    option                  redispatch
    retries                 3
    timeout http-request    10s
    timeout queue           1m
    timeout connect         10s
    timeout client          1m
    timeout server          1m
    timeout http-keep-alive 10s
    timeout check           10s
    maxconn                 3000
listen status  //Define monitoring page
        mode http   //The mode is http
        bind *:80   //Port 80
        stats enable //Enable configuration
        stats uri /admin  //Access directory name
        stats auth admin:admin  //Login user and password
listen mysql_3306 *:3306 //Define the haproxy service name and port number
    mode    tcp        //mysql service must use tcp protocol
    option  tcpka      //Use long connection
    balance roundrobin //scheduling algorithm
    server  mysql_01 192.168.4.66:3306 check  //1st database server
    server  mysql_02 192.168.4.10:3306 check  //2nd database server
    server  mysql_03 192.168.4.88:3306 check  //3rd database server
:wq
[root@haproxy99 haproxy]#
Step 3: start the service
[root@haproxy99 ~]# Systemctl start haproxy / / start the service
[root@haproxy99 ~]# Systemctl enable haproxy / / start running
Created symlink from /etc/systemd/system/multi-user.target.wants/haproxy.service to /usr/lib/systemd/system/haproxy.service.
[root@haproxy99 ~]# Netstat - utnlp | grep: 3306 / / view port
tcp6       0      0 :::3306                 :::*                    LISTEN      29768/haproxy
[root@haproxy99 ~]#
Step 4: test configuration: connect the haproxy99 host on the website server to access data
[root@web33 ~]# mysql –h192.168.4.99 –uyaya99 –p123qqq...A -e  'select @@hostname'
mysql: [Warning] Using a password on the command line interface can be insecure.
+------------+
| @@hostname |
+------------+
| pxcnode66  |   //1st connection
+------------+
[root@web33 ~]#
[root@web33 ~]# mysql –h192.168.4.99 –uyaya99 –p123qqq...A -e  'select @@hostname'
mysql: [Warning] Using a password on the command line interface can be insecure.
+------------+
| @@hostname |
+------------+
| pxcnode10  |   //Second connection
+------------+
[root@web33 ~]#
[root@web33 ~]# mysql –h192.168.4.99 –uyaya99 –p123qqq...A -e  'select @@hostname'
mysql: [Warning] Using a password on the command line interface can be insecure.
+------------+
| @@hostname |
+------------+
| pxcnode88  |   //3rd connection
+------------+
[root@web33 ~]#
5 case 5: deploying HA clusters
5.1 problems
The specific configuration is as follows:
- Prepare standby scheduler host
- Install software
- Modify profile
- Start service
- Test configuration
5.2 scheme
The topology is shown in figure-4. Create a new virtual machine and configure the ip address 192.168.4.98 on the eth0 interface as the standby scheduler.
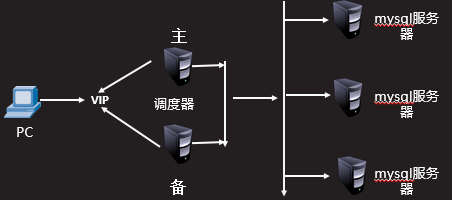
Figure-4
5.3 steps
To implement this case, you need to follow the following steps.
Step 1: prepare standby scheduler host
[root@haproxy98 ~]# yum -y  install haproxy
 Installing    : haproxy-1.5.18-7.el7.x86_64                                                                          1/1
  Verification in progress      : haproxy-1.5.18-7.el7.x86_64                                                                          1/1
already installed:
  haproxy.x86_64 0:1.5.18-7.el7
complete!
[root@haproxy98 ~]#
2) Modify haproxy98 host haproxy Conf file (you can also directly copy the configuration file of the haproxy99 host)
[root@haproxy98 ~]# scp  root@192.168.4.99:/etc/haproxy/haproxy.cfg /etc/haproxy/
Warning: Permanently added '192.168.4.99' (ECDSA) to the list of known hosts.
root@192.168.4.99's password: //Enter the password for the haproxy99 host
haproxy.cfg                                                                            100% 3142     6.0MB/s   00:00
[root@haproxy98 ~]#
3) Start haproxy service
[root@haproxy98 ~]# Systemctl start haproxy / / start the service
[root@haproxy98 ~]# Systemctl enable haproxy / / the service starts running
Created symlink from /etc/systemd/system/multi-user.target.wants/haproxy.service to /usr/lib/systemd/system/haproxy.service.
[root@haproxy98 ~]# Netstat - utnlp | grep: 3306 / / view port
tcp6       0      0 :::3306                 :::*                    LISTEN      29768/haproxy
Step 2: install the software
1) Install the keepalived software on the host of haproxy99
[root@haproxy99 ~]# yum -y  install keepalived.x86_64
 already installed:
  keepalived.x86_64 0:1.3.5-6.el7
Installed as a dependency:
  lm_sensors-libs.x86_64 0:3.4.0-4.20160601gitf9185e5.el7            net-snmp-agent-libs.x86_64 1:5.7.2-32.el7
  net-snmp-libs.x86_64 1:5.7.2-32.el7
[root@haproxy99 ~]#
2) Install the keepalived software on the host of haproxy98
[root@haproxy98 ~]# yum -y  install keepalived.x86_64
 already installed:
  keepalived.x86_64 0:1.3.5-6.el7
Installed as a dependency:
  lm_sensors-libs.x86_64 0:3.4.0-4.20160601gitf9185e5.el7            net-snmp-agent-libs.x86_64 1:5.7.2-32.el7
  net-snmp-libs.x86_64 1:5.7.2-32.el7
[root@haproxy98 ~]#
complete!
[root@haproxy98 ~]#
Step 3: modify the configuration file
1) Modify the configuration file of haproxy99 host
[root@haproxy99 ~]# sed -i  '36,$d' /etc/keepalived/keepalived.conf / / delete irrelevant configuration lines
[root@haproxy99 ~]#vim  /etc/keepalived/keepalived.conf
global_defs {
......
......
vrrp_iptables   //Disable iptables
}
vrrp_instance VI_1 {
    state MASTER   //Primary server ID
    interface eth0
    virtual_router_id 51
    priority 150      //haproxy99 host is the master server, and its priority is higher than that of haproxy88 host
    advert_int 1
    authentication {
        auth_type PASS  //Connection mode of primary and standby servers
        auth_pass 1111   //Connection password
    }
    virtual_ipaddress {
        192.168.4.100   //Define vip address
    }
}
[root@haproxy99 ~]# scp  /etc/keepalived/keepalived.conf  root@192.168.4.98: /etc/keepalived/
root@192.168.4.98's password:  //Enter the password for the haproxy98 host
2) Modify the configuration file of haproxy98 host
[root@haproxy98 ~]#vim  /etc/keepalived/keepalived.conf
global_defs {
......
......
vrrp_iptables   //Disable iptables
}
vrrp_instance VI_1 {
    state BACKUP   //Alternate server ID
    interface eth0
    virtual_router_id 51
    priority 100      //Priority is lower than haproxy99
    advert_int 1
    authentication {
        auth_type PASS
        auth_pass 1111
    }
    virtual_ipaddress {
        192.168.4.100   //Define vip address
    }
}
[root@haproxy98 ~]#
Step 4: start the service
1) Start the keepalived service on the haproxy99 host
[root@haproxy99 ~]# systemctl  start keepalived.service / / start the service
[root@haproxy99 ~]#
[root@haproxy99 ~]# IP addr show | grep 192.168.4.100 / / view the vip address
    inet 192.168.4.100/32 scope global eth0
[root@haproxy99 ~]#
2) Start the keepalived service on the haproxy98 host
[root@haproxy98 ~]# systemctl  start keepalived.service / / start the service
[root@haproxy98 ~]#
[root@haproxy98 ~]# IP addr show | grep 192.168.4.100 / / no vip can be viewed
[root@haproxy98 ~]#
Step 5: test configuration
1) The client connects to the vip address and accesses the database service
[root@web33 ~]# mysql -h192.168.4.100 –uyaya99 –p123qqq...A -e 'select @@hostname'
mysql: [Warning] Using a password on the command line interface can be insecure.
+------------+
| @@hostname |
+------------+
| pxcnode66  |
+------------+
[root@web33 ~]#
[root@web33 ~]# mysql -h192.168.4.100 –uyaya99 –p123qqq...A -e 'select @@hostname'
mysql: [Warning] Using a password on the command line interface can be insecure.
+------------+
| @@hostname |
+------------+
| pxcnode10  |
+------------+
[root@web33 ~]# mysql -h192.168.4.100 –uyaya99 –p123qqq...A -e 'select @@hostname'
mysql: [Warning] Using a password on the command line interface can be insecure.
+------------+
| @@hostname |
+------------+
| pxcnode88  |
+------------+
[root@web33 ~]#
2) Test high availability
[root@haproxy99 ~]# IP addr show | grep 192.168.4.100 / / view the VIP address on host haproxy99
    inet 192.168.4.100/32 scope global eth0
[root@haproxy99 ~]#
[root@haproxy99 ~]# systemctl  stop keepalived.service / / stop the keepalived service
[root@haproxy99 ~]#
[root@haproxy99 ~]#
[root@haproxy99 ~]# IP addr show | grep 192.168.4.100. / / the vip address cannot be viewed
[root@haproxy99 ~]#
[root@haproxy98 ~]# IP addr show | grep 192.168.4.100 / / view the address on the standby haproxy98 host
    inet 192.168.4.100/32 scope global eth0
[root@haproxy98 ~]#
//The client connects to the vip address to access the database service
[root@web33 ~]# mysql -h192.168.4.100 –uyaya99 –p123qqq...A -e 'select @@hostname'
mysql: [Warning] Using a password on the command line interface can be insecure.
+------------+
| @@hostname |
+------------+
| pxcnode66  |
+------------+
[root@web33 ~]#
[root@web33 ~]# mysql -h192.168.4.100 –uyaya99 –p123qqq...A -e 'select @@hostname'
mysql: [Warning] Using a password on the command line interface can be insecure.
+------------+
| @@hostname |
+------------+
| pxcnode10  |
+------------+
[root@web33 ~]# mysql -h192.168.4.100 –uyaya99 –p123qqq...A -e 'select @@hostname'
mysql: [Warning] Using a password on the command line interface can be insecure.
+------------+
| @@hostname |
+------------+
| pxcnode88  |
+------------+
[root@web33 ~]#
In case of infringement, please contact the author to delete