preface
Spring is certainly no stranger to everyone. It is a barrier that every java developer can't get around. Spring framework provides a complete set of solutions for Java based enterprise applications, which facilitates developers to quickly carry out business development on the basis of the framework.
On the official website, we found that one of its core technologies: Dependency Injection, or DI for short, translates into Dependency Injection. Today we'll set it up.

In this article, we will delve into the story behind the Spring framework DI, including Spring inversion of control, DI and ApplicationContext interfaces. Based on these basic concepts, we will study how to create Spring applications using java based and XML based configurations. Finally, we will explore some common problems encountered when creating Spring applications, including} bean conflicts and circular dependencies.
Inversion of control
Before learning DI, let's first learn IoC (control inversion). The next paragraph may make you feel wordy, but it is very important to carefully understand the intention of each change and our solutions for understanding control inversion.
First, let's understand how we usually instantiate an object. In normal times, we use the new keyword to instantiate an object. For example, if there is a Car class, we can instantiate an object Car using the following methods
Car car = new Car();
Because the Car is composed of many parts, we define the engine interface to simulate the Car engine, and then put the engine object as a member variable in the Car class
public interface Engine {
     void turnOn();
}

public class Car {

    private Engine engine;

    public Car() {}

    public void start() {

        engine.turnOn();

    }

}
Now, can we call the start() method? Obviously, it doesn't work. It can be seen at a glance that NullPointerException (NPE) will be reported because we didn't initialize engine in the constructor of Car. Generally, the solution we adopt is to use which implementation of the engine interface in the constructor of Car, and directly assign the implementation to the engine field;
Now, let's first create the implementation class of the Engine interface
public class ElectricEngine implements Engine {
    @Override
    public void turnOn() {
        System.out.println("Electric engine start");
    }
}

public class CombustionEngine implements Engine {
    @Override
    public void turnOn() {
        System.out.println("Fuel engine start");
    }
}
We modify the constructor of Car, implement it with ElectricEngine, and assign our engine field to an instantiated ElectricEngine object
public class Car {

    private Engine engine;

    public Car() {
        this.engine = new ElectricEngine();
    }

    public void start() {

        engine.turnOn();

    }

    public static void main(String[] args) {
        Car car = new Car();
        car.start();
    }
}
Now we execute the start() method, and we will see the following output:
Electric engine start
Fuel engine start
It's done. We successfully solved the NPE (null pointer) problem, but did we win? Hahaha, obviously not!
While solving the problem, we introduce another problem. Although we are responsible for the business logic of different types of engines by abstracting the engine interface and then implementing different engine classes, it is indeed a good design strategy. However, careful partners may have found that the constructor of our Car class declares engine as CombustionEngine, which will result in all cars having a fuel engine. If we now want to create a different Car object, it has an electric engine, we will have to change our design. The more common method is to create two independent classes and perform their respective duties, assigning engine to different implementations of the engine interface in their constructors;
For example:
public class CombustionCar {

    private Engine engine;

    public CombustionCar() {
        this.engine = new CombustionEngine();
    }

    public void start() {
        engine.turnOn();
    }

}

public class ElectricCar {
    private Engine engine;

    public ElectricCar() {
        this.engine = new ElectricEngine();
    }

    public void start() {
        engine.turnOn();
    }

}
Through the above operation, we successfully solved the problem of our engine. If it is a daily requirement, we can successfully hand over the project. But this is obviously not the purpose of my writing this article.
From a design point of view, the current code is bad for the following two reasons:
- There are duplicate start() methods in two different classes;
- We need to create a new class for each new Engine implementation class;
In particular, the latter problem is more difficult to solve, because we do not control the implementation of Engine. This problem will worsen as developers continue to create their own implementation classes;
With the above questions, we continue to think
We can create a parent class Car and extract the public code into the parent class, which can easily solve the first problem. Since the Engine field is private, we receive the Engine object in the constructor of the parent class Car and assign a value.
public class Car {

    private Engine engine;

    public Car(Engine engine) {
        this.engine = engine;
    }

    public void start() {
        engine.turnOn();
    }
}

public class CombustionCar extends Car{

    public CombustionCar() {
        super(new CombustionEngine());
    }

}

public class ElectricCar extends Car {

    public ElectricCar() {
        super(new ElectricEngine());
    }

}
Through this method, we have successfully solved the problem of code duplication. Let's test:
public class Car {

    private Engine engine;

    public Car(Engine engine) {
        this.engine = engine;
    }

    public void start() {
        engine.turnOn();
    }

    public static void main(String[] args) {

        CombustionCar combustionCar1 = new CombustionCar();
        combustionCar1.start();
        ElectricCar electricCar1 = new ElectricCar();
        electricCar1.start();
    }
}
Electric engine start
Fuel engine start
So how can we solve our second problem?
In fact, we can look at this problem from another angle: why do we pay attention to CombustionCar and ElectricCar? Now we return our attention to our Car. We have allowed the client to pass in the Engine object as the parameter of the constructor when instantiating the Car object, which has actually eliminated the problem of creating a new Car for each Engine object. Because the Car class now depends on the Engine interface and does not know the implementation of any Engine;
Through the constructor with the Engine parameter, we have changed the decision of which Engine to implement from the Car class itself (originally determined by the CombustionEngine) to the client instantiating the Car class. This reversal of the decision-making process is called the IoC principle. Now, the client controls which implementation to use, not the Car class itself.
It's a little windy. Let's consider it carefully in combination with the following example code
public class Car {

    private Engine engine;

    public Car(Engine engine) {
        this.engine = engine;
    }

    public void start() {
        engine.turnOn();
    }

    public static void main(String[] args) {

        /**
         * old method
         * Create a class for each type of transmitter's vehicle, then implement the parent class car, then import the constructor into your engine, then call start().
         */
        CombustionCar combustionCar1 = new CombustionCar();
        combustionCar1.start();
        ElectricCar electricCar1 = new ElectricCar();
        electricCar1.start();

        /**
         * Control reversal thought
         * Think of yourself as the client of instantiating car. What engine is needed to directly pass in related objects
         */
        CombustionEngine combustionEngine = new CombustionEngine();
        Car combustionCar = new Car(combustionEngine);
        combustionCar.start();
        ElectricEngine electricEngine = new ElectricEngine();
        Car electricCar = new Car(electricEngine);
        electricCar.start();
    }
}
By executing the above code, we find that we can get the results we want:
Electric engine start
Fuel engine start
From the above example, we can see that the client instantiating the Car class can control the Engine implementation used, and the behavior of the Car object changes greatly depending on which Engine implementation is passed to the Car constructor. Why do you say that? Look below
II. Dependency injection
In the above knowledge points of control inversion, we have solved the problem of who decides which Engine to implement, but inevitably, we have also changed the steps of instantiating a Car object;
At first, we don't need parameters to instantiate Car, because the new Engine object has been created for us in its constructor. After using the IoC method, we need to create an Engine object and pass it to the Car construction object as a parameter before instantiating a Car. In other words, initially, we instantiate the Car object first, and then the Engine object. However, after using IoC, we first instantiate the Engine object and then the Car object;
Therefore, we created a dependency in the above process. However, this dependency does not refer to the dependency of the Car class on the Engine interface at compile time. On the contrary, we introduce a runtime dependency. At runtime, the Engine object must be instantiated before the Car object is instantiated.
2.1 dependency tree
A specific dependent object can be understood as a bean in Spring. For two dependent beans, the dependent bean is called a dependent object
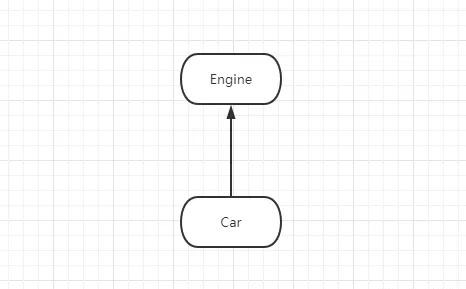
Let's look at the dependencies between them in a graphical way, where the nodes of the graph represent objects and the arrows represent dependencies (the arrows point to dependent objects). For our Car class, the dependency tree is very simple:
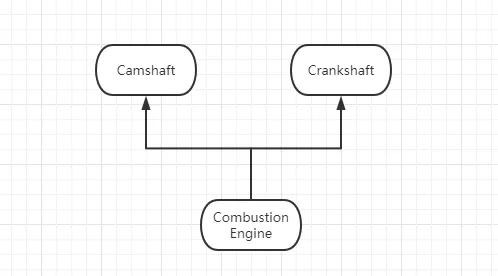
If the terminal node of the dependency tree has its own additional dependencies, the dependency tree will become more complex. Now let's look at the above example. If the CombustionEngine has other dependent objects, we first need to create the dependent object of the CombustionEngine, and then we can instantiate a CombustionEngine object. In this way, when creating the Car object, the CombustionEngine can be passed to the constructor of the Car;
//Camshaft
public class Camshaft {}
//Shaft
public class Crankshaft {}

public class CombustionEngine implements Engine {

  //Camshaft
  private Camshaft camshaft;

  //Shaft
  private Crankshaft crankshaft;

  public CombustionEngine(Camshaft camshaft, Crankshaft crankshaft) {

      this.camshaft = camshaft;

      this.crankshaft = crankshaft;
  }

  @Override

  public void turnOn() {

      System.out.println("Fuel engine start");

  }

}
After our transformation, our dependency tree now looks like the following
2.2 dependency injection framework
This complexity will continue to grow as we continue to introduce more dependencies. In order to solve this complex problem, we need to extract the object creation process based on dependency tree. This is the dependency injection framework.
Generally speaking, we can divide this process into three parts:
- Declare which dependent objects are required for the object to be created
- Register the classes needed to create these dependent objects
- Provides a mechanism for creating objects using 1 and 2 ideas
Through reflection, we can look at the constructor of the Car class and know that it requires an Engine parameter. Therefore, in order to create a Car object, we must create at least one implementation class of the Engine interface as a dependency. Here, we create a CombustionEngine object (for convenience, it is temporarily regarded as only one implementation class, and the bean conflict problem will be discussed later) to declare that it is used as a dependency to meet the requirements of Car object creation
In fact, this process is recursive because CombustionEngine depends on other objects. We need to repeat the first process until all dependent objects are declared, and then register the classes required to create these dependent objects.
The third point is to put the first two ideas into practice, so as to form a mechanism for creating objects
For example, if we need a Car object, we must traverse the dependency tree and check whether there is at least one qualified class to satisfy all dependencies. For example, declaring the CombustionEngine class meets the requirements of the Engine node. If such a dependency exists, we will instantiate it and move to the next node.
If more than one class satisfies the required dependency, we must show which dependency should be selected for the declaration. We'll talk about how Spring does this later.
Once we have determined that all dependencies are ready, we can create dependency objects from the end node. For car objects, we first instantiate Camshaft and Crankshaft because these objects have no dependencies, and then pass these objects to the CombustionEngine constructor to instantiate the CombustionEngine object. Finally, we pass the CombustionEngine object to the car constructor to instantiate the required Car object.
After understanding the basic principles of DI, we can now continue to discuss how Spring performs DI.
2.3 dependency injection in spring
The core of Spring is a DI framework, which can convert DI configurations into Java applications.
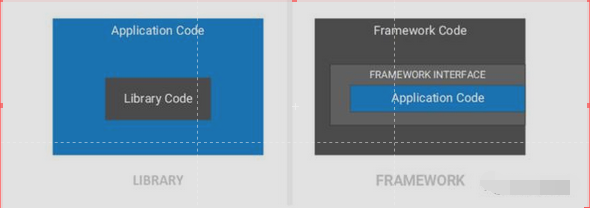
Here we want to explain a problem: that is the difference between Library and framework. Libraries are just collections of class definitions. The reason behind this is simply code reuse, that is, getting code that other developers have written. These classes and methods typically define specific operations in domain specific areas. For example, there are math libraries that allow developers to call only functions without having to redo the implementation of how the algorithm works.
A framework is usually considered a skeleton in which we insert code to create an application. Many frameworks retain application specific parts and require our developers to provide code suitable for the framework. In practice, this means writing the implementation of the interface and then registering the implementation in the framework.
yua
2.4 ApplicationContext
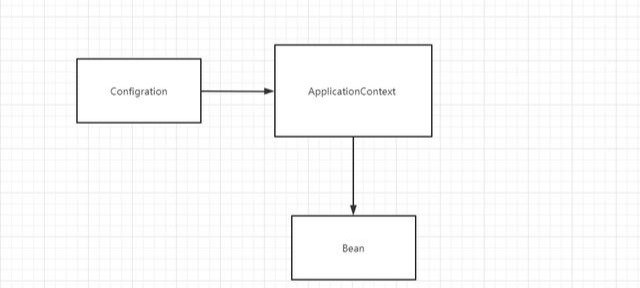
In Spring, the framework implements the three DI responsibilities outlined in the previous section around the ApplicationContext interface. Typically, this interface represents a context. Therefore, we register appropriate classes with ApplicationContext through java based or xml based configuration and request to create bean objects from ApplicationContext. Then ApplicationContext builds a dependency tree and traverses it to create the required bean objects
The logic contained in the ApplicationContext is often referred to as the Spring container. Generally, a Spring application can have multiple ApplicationContext, and each ApplicationContext can have a separate configuration. For example, one ApplicationContext may be configured to use CombustionEngine as its engine implementation, while another container may be configured to use ElectricEngine as its implementation.
In this article, we will focus on a single ApplicationContext for each application, but the concepts described below apply even when an application has multiple ApplicationContext instances.
III. java based configuration
Spring provides us with two java based configuration methods
- Basic configuration
- Auto configuration
3.1 basic configuration based on java
The core of java based basic configuration is actually the following two annotations:
- @Configuration: define configuration classes
- @Bean: create a bean
For example, given the Car, CombustionEngine, Camshaft, and Crankshaft classes we defined earlier, we can create the following configuration classes:
/**
 * @author milogenius
 * @date 2020/5/17 20:52
 */
@Configuration
public class AnnotationConfig {

    @Bean
    public Car car(Engine engine) {
        return new Car(engine);
    }

    @Bean
    public Engine engine(Camshaft camshaft, Crankshaft crankshaft) {
        return new CombustionEngine(camshaft, crankshaft);
    }

    @Bean
    public Camshaft camshaft() {
        return new Camshaft();
    }

    @Bean
    public Crankshaft crankshaft() {
        return new Crankshaft();
    }
}
Next, we create an ApplicationContext object, obtain a car object from the ApplicationContext object, and then call the start method on the created Car object:
ApplicationContext context =

    new AnnotationConfigApplicationContext(AnnotationConfig.class);

Car car = context.getBean(Car.class);

car.start();
The results are as follows:
Started combustion engine
Although the combination of @ Configuration and @ bean annotations provides Spring with enough information to perform dependency injection, we still need to manually define each bean to be injected and explicitly declare their dependencies. In order to reduce the overhead of configuring the DI framework, Spring provides java based automatic Configuration.
3.2 automatic configuration based on java
In order to support automatic configuration based on java, Spring provides additional annotations. Although we may have added many annotations of this type at ordinary times, there are three basic annotations:
- @Component: registered as a Spring managed class
- @Autowired: instructs Spring to inject a dependent object
- @ComponentScan: indicates where Spring finds classes with @ Component annotation
3.2.1 constructor injection
@The Autowired annotation is used to guide Spring. We intend to inject a dependent object where the annotation is used. For example, in the Car constructor, we expect to inject an Engine object, so we add the @ Autowired annotation to the Car constructor. Transform our Car class by using @ Component and @ Autowired annotations, as follows:
@Component
public class Car {

  private Engine engine;


  @Autowired

  public Car(Engine engine) {

      this.engine = engine;
  }

  public void start() {

      engine.turnOn();

  }

}
We can repeat this process in other classes:
@Component

public class Camshaft {}

@Component
public class Crankshaft {}


@Component

public class CombustionEngine implements Engine {


 private Camshaft camshaft;

 private Crankshaft crankshaft;


 @Autowired

 public CombustionEngine(Camshaft camshaft, Crankshaft crankshaft) {

     this.camshaft = camshaft;

     this.crankshaft = crankshaft;

 }


 @Override

 public void turnOn() {

     System.out.println("Started combustion engine");

 }

}
After transforming the relevant classes, we need to create a @ Configuration class to guide Spring on how to automatically configure our application. For the basic java based Configuration, we explicitly instruct Spring how to create each bean using the @ bean annotation, but in the automatic Configuration, we have provided enough information through the @ Component and @ Autowired annotations to explain how to create all the required beans. The only missing information is where Spring should look for our @ Component annotated class and register it as the corresponding bean.
@The Componentscan annotation contains a parameter basePackages, which allows us to specify the package name as a String. Spring will find the @ Component class through recursive search. In our example, the package is com milo. Domain, so the configuration class we get is:
@Configuration
@ComponentScan(basePackages = "com.milo.domain")
public class AutomatedAnnotationConfig {}
ApplicationContext context = new AnnotationConfigApplicationContext(AutomatedAnnotationConfig.class); Car car = context.getBean(Car.class); car.start();
Execution results:
Started combustion engine
Compared with the basic configuration based on java, we find that the automatic configuration method based on java has two main advantages:
- The required configuration is much simpler
- Annotations are applied directly to the class, not in the configuration class
Therefore, automatic configuration is preferred without special circumstances
3.2.2 field injection
In addition to constructor injection, we can also inject directly through fields. We can do this by applying the @ Autowired annotation to the required fields:
@Component
public class Car {


  @Autowired

  private Engine engine;


  public void start() {

      engine.turnOn();

  }

}
This method greatly reduces our coding pressure, but it also has a disadvantage that we will not be able to check whether the automatically injected object is empty before using the field.
3.2.3 Setter injection
The last alternative to constructor injection is setter injection, where the @ Autowired annotation is applied to the setter associated with the field. For example, we can change the Car class and obtain the Engine object through setter injection. The method is to annotate the setEngine method with @ Autowired:
@Component
public class Car {


  private Engine engine;


  public void start() {

      engine.turnOn();

  }


  public Engine getEngine() {

      return engine;

  }


  @Autowired

  public void setEngine(Engine engine) {

      this.engine = engine;

  }

}
Setter injection is similar to field injection, but it allows us to interact with the injected object. In some cases, setter injection may be particularly useful, for example, with circular dependencies, but setter injection may be the least common of the three injection technologies, giving priority to constructor injection as much as possible.
IV. xml based configuration
Another configuration method is XML based configuration. We define bean s and the relationship between them in the XML configuration file, and then instruct Spring where to find our configuration file.
The first step is to define the bean. We basically follow the same steps as the basic java based configuration, but use the xmlbean element instead. In the case of XML, we must also explicitly declare the beans we intend to inject into other constructors using the constructor Arg element. Combining bean and constructor Arg elements, we get the following XML configuration:
<?xml version="1.0" encoding="UTF-8"?>

<beans xmlns="http://www.springframework.org/schema/beans"

  xmlns:xsi="http://www.w3.org/2001/XMLSchema-instance"

  xmlns:util="http://www.springframework.org/schema/util"

  xsi:schemaLocation="

      http://www.springframework.org/schema/beans

      http://www.springframework.org/schema/beans/spring-beans.xsd

      http://www.springframework.org/schema/util

      http://www.springframework.org/schema/util/spring-util.xsd">


  <bean id="car" class="com.milo.domain.Car">

      <constructor-arg ref="engine" />

  </bean>


  <bean id="engine" class="com.milo.CombustionEngine">

      <constructor-arg ref="camshaft" />

      <constructor-arg ref="crankshaft" />

  </bean>


  <bean id="camshaft" class="com.milo.Camshaft" />

  <bean id="crankshaft" class="com.milo.Crankshaft" />


</beans>
In the bean element, we must specify two attributes:
- ID: the unique ID of the Bean (equivalent to the method name with ` @ Bean 'annotation)
- Class: the full path of the class (including the package name)
For the constructor Arg element, we only need to specify the ref attribute, which is a reference to the existing bean ID. For example, the element constructor < constructor Arg ref = "engine" / > specifies that a bean with ID engine (directly defined under the car bean) should be used as a bean injected into the car bean constructor.
The order of constructor parameters is determined by the order of constructor Arg elements. For example, when defining an engine bean, the first constructor parameter passed to the CombustionEngine constructor is camshaft bean, and the second parameter is crankshaft bean.
To get the ApplicationContext object, we only need to modify the ApplicationContext implementation type. Because we put the XML configuration file on the classpath, we use
ClassPathXmlApplicationContext:
ApplicationContext context =

    new ClassPathXmlApplicationContext("basic-config.xml");

Car car = context.getBean(Car.class);

car.start();
Execution results:
Started combustion engine
Five common problems
Now, we have figured out how the Spring framework DI and correctly inject all dependencies into our applications, but we have to deal with two thorny problems:
- Dependency object conflict
- Circular dependencies exist between dependent objects
5.1 have multiple qualified dependent objects
In the java based and xml based approaches, we have instructed Spring to use only combustion Engine as our Engine implementation. What happens if we register electric Engine as a di compliant part? To test the results, we will modify the java based automatic configuration example and annotate the ElectricEngine class with @ Component:
@Component
public class ElectricEngine implements Engine {


  @Override

  public void turnOn() {

      System.out.println("Started electric engine");

  }

}
If we rerun the java based autoconfiguration application, we will see the following errors:
No qualifying bean of type 'com.dzone.albanoj2.spring.di.domain.Engine' available: expected single matching bean but found 2: combustionEngine,electricEngine
Since we have annotated two classes that implement the Engine interface with @ Component, namely CombustionEngine and ElectricEngine spring, we can't determine which of these two classes should be used to satisfy the Engine dependency when instantiating the Car object. To solve this problem, we must explicitly indicate which of the two bean s spring uses.
5.1.1 @ Qualifier notes
One method is to name our dependent objects and use the @ Qualifier annotation where the @ Autowired annotation is applied to determine which dependent object to inject. Therefore, the @ Qualifier annotation defines the beans that are automatically injected, reducing the number of beans that meet the requirements to one. For example, we can name our CombustionEngine dependency object:
@Component("defaultEngine")
public class CombustionEngine implements Engine {


    // ... Code omitted, unchanged

}
Then we can add the @ Qualifier annotation whose name is consistent with the name of the dependent object we want to inject. In this way, our Engine object is automatically injected in the Car constructor
@Component
public class Car {


  @Autowired

  public Car(@Qualifier("defaultEngine") Engine engine) {

      this.engine = engine;

  }


  // ...existing implementation unchanged...

}
If we re run our application, we will no longer report previous errors:
Started combustion engine
Note that if the class that does not explicitly declare the bean name has a default name, the default name is the lowercase initial of the class name. For example, the default name of our combustionengine class is combustionengine
5.1.2 @ Primary annotation
If we know that we prefer an implementation by default, we can discard the @ Qualifier annotation and directly add the @ Primary annotation to the class. For example, we can change our combustionengine, ElectricEngine, and Car classes to:
@Component
@Primary

public class CombustionEngine implements Engine {


   // ...existing implementation unchanged...

}

@Component
public class ElectricEngine implements Engine {


    // ...existing implementation unchanged...

}


@Component
public class Car {


 @Autowired

 public Car(Engine engine) {

     this.engine = engine;

 }


 // ...existing implementation unchanged...

}
When we re run our application, we will get the following output:
Started combustion engine
This proves that although there are two possibilities to meet the Engine dependency, namely, CombustionEngine and Electricengine, Spring can decide which of the two implementations should be used first according to the @ Primary annotation.
5.2 cyclic dependency
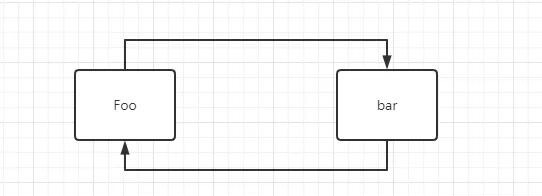
Although we have discussed the basics of Spring DI in depth, there is still a major problem to be solved: what happens if the dependency tree has a circular reference? For example, suppose we create a Foo class whose constructor needs a Bar object, but the Bar constructor needs a Foo object.
We can use code to implement the above problem:
@Component
public class Foo {


  private Bar bar;


  @Autowired

  public Foo(Bar bar) {

      this.bar = bar;

  }

}


@Component
public class Bar {


 private Foo foo;


 @Autowired

 public Bar(Foo foo) {

     this.foo = foo;

 }

}
Then we can define the following configurations:
@Configuration
@ComponentScan(basePackageClasses = Foo.class)
public class Config {}
Finally, we can create our ApplicationContext:
ApplicationContext context =

    new AnnotationConfigApplicationContext(Config.class);

Foo foo = context.getBean(Foo.class);
When we execute this code fragment, we see the following error:
Unsatisfied dependency expressed through constructor parameter 0; nested exception is org.springframework.beans.factory.BeanCurrentlyInCreationException: Error creating bean with name 'bar': Requested bean is currently in creation: Is there an unresolvable circular reference?
First, spring tries to create a Foo object. In the process, spring recognizes the need for a Bar object. To construct a Bar object, you need a Foo object. Since the Foo object is currently under construction (which is why the Bar object was created), spring recognizes that a circular reference may have occurred.
One of the simplest solutions to this problem is to use the @ Lazy annotation on a class and injection point. This instructs Spring to delay the initialization of annotated beans and annotated @ Autowired locations. This allows one of the beans to be successfully initialized, breaking the circular dependency chain. With this in mind, we can change the Foo and Bar classes:
@Component
public class Foo {


  private Bar bar;


  @Autowired

  public Foo(@Lazy Bar bar) {

      this.bar = bar;

  }

}


@Component

@Lazy

public class Bar {


  @Autowired

  public Bar(Foo foo) {}

}
If you rerun the application after using the @ Lazy annotation, no errors are found and reported.
Vi. summary
In this article, we explored the basics of Spring, including IoC, DI and Spring ApplicationContext. Then, we introduced the basic knowledge of using java based configuration and xml based configuration to create Spring applications, and studied some common problems that may be encountered when using Spring DI. Although these concepts may be obscure and disconnected from Spring code at the beginning, we can know Spirng from the base layer. I hope it will be helpful to you. Thank you.