1. Deploy Hadoop
1.1 problems
This case requires the installation of stand-alone Hadoop:
- Hot word analysis:
- Minimum configuration: 2cpu, 2G memory, 10G hard disk
- Virtual machine IP: 192.168.1.50 Hadoop 1
- Installing and deploying hadoop
- Data analysis to find the most frequently occurring words
1.2 steps
To implement this case, you need to follow the following steps.
Step 1: Environmental preparation
1) Configure the host name as Hadoop 1, ip 192.168.1.50, and configure the yum source (system source)
Note: since these have been done in previous cases, they will not be repeated here. Students who do not can refer to previous cases
2) Installing the java environment
[root@hadoop1 ~]# yum -y install java-1.8.0-openjdk-devel
[root@hadoop1 ~]# java -version
openjdk version "1.8.0_131"
OpenJDK Runtime Environment (build 1.8.0_131-b12)
OpenJDK 64-Bit Server VM (build 25.131-b12, mixed mode)
[root@hadoop1 ~]# jps
1235 Jps
3) Installing hadoop
[root@hadoop1 ~]# cd hadoop/
[root@hadoop1 hadoop]# ls
hadoop-2.7.7.tar.gz  kafka_2.12-2.1.0.tgz  zookeeper-3.4.13.tar.gz
[root@hadoop1 hadoop]# tar -xf hadoop-2.7.7.tar.gz
[root@hadoop1 hadoop]# mv hadoop-2.7.7 /usr/local/hadoop
[root@hadoop1 hadoop]# cd /usr/local/hadoop
[root@hadoop1 hadoop]# ls
bin  include  libexec      NOTICE.txt  sbin
etc  lib      LICENSE.txt  README.txt  share
[root@hadoop1 hadoop]# . / bin/hadoop / / an error is reported, JAVA_HOME not found
Error: JAVA_HOME is not set and could not be found.
[root@hadoop1 hadoop]#
4) Solve the problem of error reporting
[root@hadoop1 hadoop]# rpm -ql java-1.8.0-openjdk
[root@hadoop1 hadoop]# cd ./etc/hadoop/
[root@hadoop1 hadoop]# vim hadoop-env.sh
25 export JAVA_HOME="/usr/lib/jvm/java-1.8.0-openjdk-1.8.0.161-2.b14.el7.x86_64    /jre"
33 export HADOOP_CONF_DIR="/usr/local/hadoop/etc/hadoop"
[root@hadoop1 ~]# cd /usr/local/hadoop/
[root@hadoop1 hadoop]# ./bin/hadoop
Usage: hadoop [--config confdir] [COMMAND | CLASSNAME]
  CLASSNAME            run the class named CLASSNAME
 or
  where COMMAND is one of:
  fs                   run a generic filesystem user client
  version              print the version
  jar <jar>            run a jar file
                       note: please use "yarn jar" to launch
                             YARN applications, not this command.
  checknative [-a|-h]  check native hadoop and compression libraries availability
  distcp <srcurl> <desturl> copy file or directories recursively
  archive -archiveName NAME -p <parent path> <src>* <dest> create a hadoop archive
  classpath            prints the class path needed to get the
  credential           interact with credential providers
                       Hadoop jar and the required libraries
  daemonlog            get/set the log level for each daemon
  trace                view and modify Hadoop tracing settings
Most commands print help when invoked w/o parameters.
5) Word frequency statistics
[root@hadoop1 hadoop]# mkdir /usr/local/hadoop/input
[root@hadoop1 hadoop]# ls
bin  etc  include  lib  libexec  LICENSE.txt  NOTICE.txt  input  README.txt  sbin  share
[root@hadoop1 hadoop]# cp *.txt /usr/local/hadoop/input
[root@hadoop1 hadoop]# ./bin/hadoop jar  \
 share/hadoop/mapreduce/hadoop-mapreduce-examples-2.7.7.jar  wordcount input output        //wordcount counts the input folder for the parameter and saves it in the output file (this file cannot exist. If it exists, an error will be reported to prevent data coverage)
[root@hadoop1 hadoop]#  Cat output / part-r- 00000 / / view
2. Prepare the cluster environment
2.1 problems
This case requires:
- Prepare cluster environment
- Minimum configuration: 2CPU, 2G memory, 10G hard disk
- Virtual machine IP:
- 192.168.1.50 hadoop1
- 192.168.1.51 node-0001
- 192.168.1.52 node-0002
- 192.168.1.53 node-0003
- Requirements: disable selinux and firewalld (all hosts)
- Install java-1.8.0-openjdk-devel and configure / etc / hosts (all hosts)
- Set Hadoop 1 to log in to other hosts without entering yes
- Enable all nodes to ping and configure SSH trust relationship
- Node verification
2.2 scheme
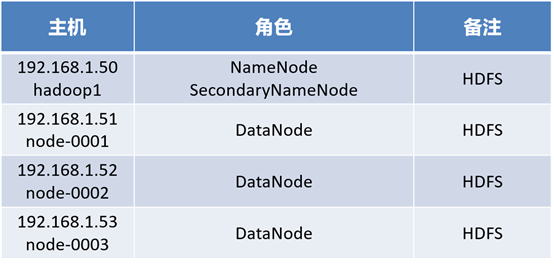
Prepare four virtual machines. Since one virtual machine has been prepared before, you only need to prepare three new virtual machines. Install hadoop so that all nodes can ping and configure SSH trust relationship, as shown in figure-1:

Figure-1
2.3 steps
To implement this case, you need to follow the following steps.
Step 1: Environmental preparation
1) The three machines are configured with host names of node-0001, node-0002 and node-0003, ip address (ip as shown in figure-1) and yum source (system source)
2) Edit / etc/hosts (the four hosts operate similarly, taking Hadoop 1 as an example)
[root@hadoop1 ~]# vim /etc/hosts
192.168.1.50  hadoop1
192.168.1.51  node-0001
192.168.1.52  node-0002
192.168.1.53  node-0003
3) Install the java environment and operate on node-0001, node-0002 and node-0003 (take node-0001 as an example)
[root@node-0001 ~]# yum -y install java-1.8.0-openjdk-devel
4) Arrange SSH trust relationship
[root@hadoop1 ~]# vim /etc/ssh/ssh_config / / you do not need to enter yes for the first login
Host *
        GSSAPIAuthentication yes
        StrictHostKeyChecking no
[root@hadoop1 .ssh]# ssh-keygen
Generating public/private rsa key pair.
Enter file in which to save the key (/root/.ssh/id_rsa):
Enter passphrase (empty for no passphrase):
Enter same passphrase again:
Your identification has been saved in /root/.ssh/id_rsa.
Your public key has been saved in /root/.ssh/id_rsa.pub.
The key fingerprint is:
SHA256:Ucl8OCezw92aArY5+zPtOrJ9ol1ojRE3EAZ1mgndYQM root@hadoop1
The key's randomart image is:
+---[RSA 2048]----+
|        o*E*=.   |
|         +XB+.   |
|        ..=Oo.   |
|        o.+o...  |
|       .S+.. o   |
|        + .=o    |
|         o+oo    |
|        o+=.o    |
|        o==O.    |
+----[SHA256]-----+
[root@hadoop1 .ssh]# for i in 61 62 63 64 ; do  ssh-copy-id  192.168.1.$i; done
//Deploy public keys to Hadoop 1, node-0001, node-0002, node-0003
5) Test trust relationship
[root@hadoop1 .ssh]# ssh node-0001
Last login: Fri Sep  7 16:52:00 2018 from 192.168.1.60
[root@node-0001 ~]# exit
logout
Connection to node-0001 closed.
[root@hadoop1 .ssh]# ssh node-0002
Last login: Fri Sep  7 16:52:05 2018 from 192.168.1.60
[root@node-0002 ~]# exit
logout
Connection to node-0002 closed.
[root@hadoop1 .ssh]# ssh node-0003
Step 2: configure hadoop
1) Modify slave file
[root@hadoop1 ~]# cd  /usr/local/hadoop/etc/hadoop
[root@hadoop1 hadoop]# vim slaves
node-0001
node-0002
node-0003
2) Core site of hadoop
[root@hadoop1 hadoop]# vim core-site.xml
<configuration>
<property>
        <name>fs.defaultFS</name>
        <value>hdfs://hadoop1:9000</value>
    </property>
    <property>
        <name>hadoop.tmp.dir</name>
        <value>/var/hadoop</value>
    </property>
</configuration>
[root@hadoop1 hadoop]# MKDIR / var / Hadoop / / data root directory of Hadoop
3) Configure HDFS site file
[root@hadoop1 hadoop]# vim hdfs-site.xml
<configuration>
 <property>
        <name>dfs.namenode.http-address</name>
        <value>hadoop1:50070</value>
    </property>
    <property>
        <name>dfs.namenode.secondary.http-address</name>
        <value>hadoop1:50090</value>
    </property>
    <property>
        <name>dfs.replication</name>
        <value>2</value>
    </property>
</configuration>
3. Configure Hadoop cluster
3.1 problems
This case requires the completion of hadoop synchronization configuration:
- Complete the configuration of all Hadoop clusters and synchronize them to all hosts
- Environment configuration file: Hadoop env sh
- Core configuration file: core site xml
- HDFS configuration file: HDFS site xml
- Node profile: Slave
3.2 steps
To implement this case, you need to follow the following steps.
Step 1: synchronization
1) Synchronous configuration to node-0001, node-0002, node-0003
 [root@hadoop1 hadoop]# for i in 52 53 54 ; do rsync -aSH --delete /usr/local/hadoop/
\   192.168.1.$i:/usr/local/hadoop/  -e 'ssh' & done
[1] 23260
[2] 23261
[3] 23262
2) Check whether the synchronization is successful
[root@hadoop1 hadoop]# ssh node-0001 ls /usr/local/hadoop/
bin
etc
include
lib
libexec
LICENSE.txt
NOTICE.txt
output
README.txt
sbin
share
input
[root@hadoop1 hadoop]# ssh node-0002 ls /usr/local/hadoop/
bin
etc
include
lib
libexec
LICENSE.txt
NOTICE.txt
output
README.txt
sbin
share
input
[root@hadoop1 hadoop]# ssh node-0003 ls /usr/local/hadoop/
bin
etc
include
lib
libexec
LICENSE.txt
NOTICE.txt
output
README.txt
sbin
share
input
4. Initialize and verify the cluster
4.1 problems
This case requires that the cluster be initialized and verified:
- Hadoop 1 deployment namenode, secondarynamenode
- node-000X deploy datanode
4.2 steps
To implement this case, you need to follow the following steps.
Step 1: format
[root@hadoop1 hadoop]# cd /usr/local/hadoop/
[root@hadoop1 hadoop]# . / bin/hdfs namenode -format / / format namenode
[root@hadoop1 hadoop]# ./sbin/start-dfs.sh / / start
[root@hadoop1 hadoop]# jps / / authentication role
23408 NameNode
23700 Jps
23591 SecondaryNameNode
[root@hadoop1 hadoop]# . / bin/hdfs dfsadmin -report / / check whether the cluster is successfully built
Live datanodes (3):        //Three roles succeeded
Step 2: web page validation
firefox http://hadoop1:50070 (namenode)
firefox http://hadoop1:50090 (secondarynamenode)
firefox http://node-0001:50075 (datanode)
5. mapreduce template case
5.1 problems
This case requires copying the mapreduce template on Hadoop 1:
- Configure the resource management class that uses yarn
- Synchronize configuration to all hosts
5.2 steps
To implement this case, you need to follow the following steps.
Step 1: deploy mapred site
1) Configure mapred site (Hadoop 1)
[root@hadoop1 ~]# cd /usr/local/hadoop/etc/hadoop/
[root@hadoop1 ~]# mv mapred-site.xml.template mapred-site.xml
[root@hadoop1 ~]# vim mapred-site.xml
<configuration>
<property>
        <name>mapreduce.framework.name</name>
        <value>yarn</value>
    </property>
</configuration>
6. Deploy Yarn
6.1 problems
This case requires:
- Deploy Yan on the 4 virtual machines created previously
- Installing and deploying Yan on a virtual machine
- Hadoop 1 deploying resource manager
- node(1,2,3) deploy nodemanager
6.2 scheme
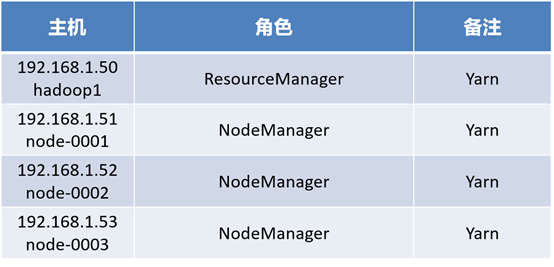
Deploy Yarn on the 4 virtual machines previously created, as shown in figure-1:

Figure-2
6.3 steps
To implement this case, you need to follow the following steps.
Step 1: install and deploy hadoop
1) Configure the yarn site (Hadoop 1)
[root@hadoop1 hadoop]# vim yarn-site.xml
<configuration>
<!-- Site specific YARN configuration properties -->
<property>
        <name>yarn.resourcemanager.hostname</name>
        <value>hadoop1</value>
    </property>
    <property>
        <name>yarn.nodemanager.aux-services</name>
        <value>mapreduce_shuffle</value>
    </property>
</configuration>
2) Synchronization configuration (operation above Hadoop 1)
[root@hadoop1 hadoop]# for i in {52..54}; do rsync -aSH --delete /usr/local/hadoop/ 192.168.1.$i:/usr/local/hadoop/  -e 'ssh' & done
[1] 712
[2] 713
[3] 714
3) Verify the configuration (operation above Hadoop 1)
[root@hadoop1 hadoop]# cd /usr/local/hadoop
[root@hadoop1 hadoop]# ./sbin/start-dfs.sh
Starting namenodes on [hadoop1]
hadoop1: namenode running as process 23408. Stop it first.
node-0001: datanode running as process 22409. Stop it first.
node-0002: datanode running as process 22367. Stop it first.
node-0003: datanode running as process 22356. Stop it first.
Starting secondary namenodes [hadoop1]
hadoop1: secondarynamenode running as process 23591. Stop it first.
[root@hadoop1 hadoop]# ./sbin/start-yarn.sh
starting yarn daemons
starting resourcemanager, logging to /usr/local/hadoop/logs/yarn-root-resourcemanager-hadoop1.out
node-0002: starting nodemanager, logging to /usr/local/hadoop/logs/yarn-root-nodemanager-node-0002.out
node-0003: starting nodemanager, logging to /usr/local/hadoop/logs/yarn-root-nodemanager-node-0003.out
node-0001: starting nodemanager, logging to /usr/local/hadoop/logs/yarn-root-nodemanager-node-0001.out
[root@hadoop1 hadoop]# JPS / / Hadoop 1 view resource manager
23408 NameNode
1043 ResourceManager
1302 Jps
23591 SecondaryNameNode
[root@hadoop1 hadoop]# SSH node-0001 JPS / / node-0001 view NodeManager
25777 Jps
22409 DataNode
25673 NodeManager
[root@hadoop1 hadoop]# SSH node-0002 JPS / / node-0001 view NodeManager
25729 Jps
25625 NodeManager
22367 DataNode
[root@hadoop1 hadoop]# SSH node-0003 JPS / / node-0001 view NodeManager
22356 DataNode
25620 NodeManager
25724 Jps
4) web access hadoop
firefox http://hadoop1:8088 (resourcemanager)
firefox http://node-0001:8042 (nodemanager)
Exercise
1 origin of big data
With the development of computer technology and the popularity of the Internet, the accumulation of information has reached a very huge level, and the growth of information is accelerating. With the acceleration of the construction of the Internet and the Internet of things, information is exploding and growing. It is more and more difficult to collect, retrieve and count these information, and new technologies must be used to solve these problems
2 what is big data
Data refers to massive, high growth rate and diversified information assets that cannot be captured, managed and processed by conventional software tools within a certain time range, and require a new processing mode to have stronger decision-making power, insight and discovery power and process optimization ability
It refers to quickly obtaining valuable information from various types of data
3. Briefly describe the characteristics of big data
Volume: from hundreds of terabytes to hundreds of petabytes, even EB
Variety: big data includes data in various formats and forms
Velocity (timeliness): many big data need to be processed in time within a certain time limit
Veracity: the processing results must be accurate
Value: big data contains a lot of deep value. Big data analysis, mining and utilization will bring huge business value
4. What are the common components and core components of Hadoop
HDFS: Hadoop distributed file system (core component)
MapReduce: distributed computing framework (core component)
Yarn: cluster resource management system (core component)
Zookeeper: distributed collaboration service
Hbase: distributed inventory database
Hive: Hadoop based data warehouse
Sqoop: data synchronization tool
Pig: Hadoop based data flow system
Mahout: Data Mining Algorithm Library
Flume: log collection tool
5 how does Hadoop realize word frequency statistics
[root@nn01 ~]# cd /usr/local/hadoop/
[root@nn01 hadoop]# mkdir /usr/local/hadoop/aa
[root@nn01 hadoop]# ls
bin  etc  include  lib  libexec  LICENSE.txt  NOTICE.txt  aa  README.txt  sbin  share
[root@nn01 hadoop]# cp *.txt /usr/local/hadoop/aa
[root@nn01 hadoop]# ./bin/hadoop jar  \
 share/hadoop/mapreduce/hadoop-mapreduce-examples-2.7.6.jar  wordcount aa bb        //wordcount counts the aa folder for the parameter and saves it in the bb file (this file cannot exist. If it exists, an error will be reported to prevent data coverage)
[root@nn01 hadoop]#  Cat BB / part-r- 00000 / / view
In case of infringement, please contact the author to delete