1. Prepare the virtual machine environment
1.1 problems
This case requires the preparation of virtual machine environment. The specific requirements are as follows:
- Configuring the YUM source server on the springboard
- Prepare virtual machine master experiment environment
- Minimum configuration: 2cpu, 2G memory
- Uninstall firewall firewalld-*
- Disable selinux and swap
- Configure yum warehouse and install kubedm, kubelet, kubectl and docker CE
- Configure docker private image warehouse and cgroup driver (daemon.json)
- Configure kernel parameters (/ etc/sysctl.d/k8s.conf)
1.2 scheme
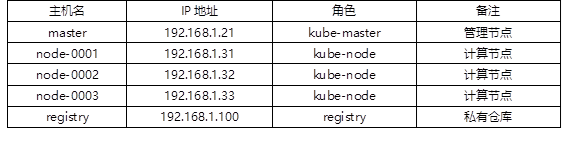
To complete the follow-up courses, we need to prepare the virtual machines for the experiment in advance. The list of experimental virtual machines is shown in TABLE-1.
The hostname and IP of all hosts must be the same as the list!!!
Otherwise, all subsequent tests cannot be completed successfully!!!
TABLE-1
1.3 steps
To implement this case, you need to follow the following steps.
Step 1: configure the YUM source server on the springboard machine (operate on the springboard machine host)
Kubernetes related software has been shared to the cloud disk in advance. You need to download it in advance and transfer it to the springboard host. Cloud disk data is in the fourth stage kubernetes / v1 17.6/k8s-install/directory.
1) Put all software data into the YUM shared directory of the springboard machine.
[root@localhost ~]# rsync -avXSH --delete \
kubernetes/v1.17.6/k8s-install /var/ftp/localrepo/
2) Update YUM shared server data
[root@server ~]# cd /var/ftp/localrepo
[root@server localrepo]# createrepo --update .
Step 2: install the software package required for the management node (operate on the master host)
1) Set yum source
[root@master ~]# vim /etc/yum.repos.d/local.repo
[local_repo]
name=CentOS-$releasever – Localrepo
baseurl=ftp://192.168.1.252/localrepo
enabled=1
gpgcheck=0
[root@master ~]# yum makecache
2) Install software
[root@master ~]# yum install -y kubeadm kubelet kubectl docker-ce
3) Modify the docker configuration and specify the private image warehouse
The private image warehouse has been built in the previous course (on the 192.168.1.100 server)!!!
[root@master ~]# vim /etc/docker/daemon.json
{
    "exec-opts": ["native.cgroupdriver=systemd"],
    "registry-mirrors": ["https://hub-mirror.c.163.com"],
    "insecure-registries":["192.168.1.100:5000", "registry:5000"]
}
4) Modify kernel parameters
[root@master ~]# vim /etc/sysctl.d/k8s.conf      #There is no such file. You need to create a new file
net.bridge.bridge-nf-call-ip6tables = 1          # Enable bridge device kernel monitoring (ipv6)
net.bridge.bridge-nf-call-iptables = 1               # Enable bridge device kernel monitoring (ipv4)
net.ipv4.ip_forward = 1                             # Turn on routing forwarding
[root@master ~]# modprobe br_netfilter             #Load kernel module
[root@master ~]# sysctl --system                    # Load the above k8s Conf configuration file
* Applying /etc/sysctl.d/k8s.conf ...
net.bridge.bridge-nf-call-ip6tables = 1
net.bridge.bridge-nf-call-iptables = 1
net.ipv4.ip_forward = 1
... ...
5) Understanding kubedm commands
kubeadm command
config: Configuration management commands
help:   view help
init:   Initial command
join:   node Join cluster command
reset:  Restore status command
token:  token Voucher management command
version:View version
2. Configure private warehouse
2.1 problems
This case requires uploading images to a private warehouse (192.168.1.100:5000). The list of images to be uploaded is as follows:
- 192.168.1.100:5000/kube-apiserver:v1.17.6
- 192.168.1.100:5000/kube-controller-manager:v1.17.6
- 192.168.1.100:5000/kube-scheduler:v1.17.6
- 192.168.1.100:5000/kube-proxy:v1.17.6
- 192.168.1.100:5000/pause:3.1
- 192.168.1.100:5000/etcd:3.4.3-0
- 192.168.1.100:5000/coredns:1.6.5
2.2 steps
To implement this case, you need to follow the following steps.
Step 1: list the images needed to deploy kubernetes (operate on the master host)
[root@master ~]# kubeadm config image list           #List required mirrors
k8s.gcr.io/kube-apiserver:v1.17.6
k8s.gcr.io/kube-controller-manager:v1.17.6
k8s.gcr.io/kube-scheduler:v1.17.6
k8s.gcr.io/kube-proxy:v1.17.6
k8s.gcr.io/pause:3.1
k8s.gcr.io/etcd:3.4.3-0
k8s.gcr.io/coredns:1.6.5
Step 2: import all required images into the private warehouse (operate on the master or node-0001 host)
All the images required for the experiment have been shared on the cloud disk in advance. You need to download all the images and transfer them to the master host. The image is in the fourth stage of the cloud disk, kubernetes / v1 17.6 / base images directory.
Warning: it is forbidden to modify the name and label of all images. The original name must be retained!!!
[root@master ~]# docker load -i kube-apiserver.tar.gz
#Load Kube apiserver mirror to local
[root@master ~]# docker tag \
k8s.gcr.io/kube-apiserver:v1.17.6 192.168.1.100:5000/kube-apiserver:v1.17.6
#Modify the image label (only modify the IP of the server, not the image name and subsequent versions)
[root@master ~]# docker push 192.168.1.100:5000/kube-apiserver:v1.17.6
#Upload the image to 192.168.1.100 private image warehouse server
[root@master ~]# docker load -i pause.tar.gz
#Load pause image to local
[root@master ~]# docker tag \
k8s.gcr.io/pause:3.1 192.168.1.100:5000/pause:3.1
#Modify the image label (only modify the IP of the server, not the image name and subsequent versions)
[root@master ~]# docker push 192.168.1.100:5000/pause:3.1
#Upload the image to 192.168.1.100 private image warehouse server
[root@master ~]# docker load -i kube-proxy.tar.gz
#Load Kube proxy image to local
[root@master ~]# docker tag \
k8s.gcr.io/kube-proxy:v1.17.6 192.168.1.100:5000/kube-proxy:v1.17.6
#Modify the image label (only modify the IP of the server, not the image name and subsequent versions)
[root@master ~]# docker push 192.168.1.100:5000/kube-proxy:v1.17.6
#Upload the image to 192.168.1.100 private image warehouse server
[root@master ~]# docker load -i kube-controller-manager.tar.gz
#Load Kube controller manager image to local
[root@master ~]# docker tag \
k8s.gcr.io/kube-controller-manager:v1.17.6 192.168.1.100:5000/kube-controller-manager:v1.17.6
#Modify the image label (only modify the IP of the server, not the image name and subsequent versions)
[root@master ~]# docker push 192.168.1.100:5000/kube-controller-manager:v1.17.6
#Upload the image to 192.168.1.100 private image warehouse server
[root@master ~]# docker load -i etcd.tar.gz
#Load etcd image to local
[root@master ~]# docker tag \
k8s.gcr.io/etcd:3.4.3-0 192.168.1.100:5000/etcd:3.4.3-0
#Modify the image label (only modify the IP of the server, not the image name and subsequent versions)
[root@master ~]# docker push 192.168.1.100:5000/etcd:3.4.3-0
#Upload the image to 192.168.1.100 private image warehouse server
[root@master ~]# docker load -i coredns.tar.gz
#Load coredns image to local
[root@master ~]# docker tag \
k8s.gcr.io/coredns:1.6.5 192.168.1.100:5000/coredns:1.6.5
#Modify the image label (only modify the IP of the server, not the image name and subsequent versions)
[root@master ~]# docker push 192.168.1.100:5000/coredns:1.6.5
#Upload the image to 192.168.1.100 private image warehouse server
3. Install the master
3.1 problems
This case requires the installation and deployment of master to achieve the following objectives:
- Set tab key
- Install IPVS mode software packages ipvsadm and ipset
- Deploying kubernetes on the master
3.2 steps
To implement this case, you need to follow the following steps.
Step 1: install and deploy the master management node (operate on the master host)
1) Set Tab replenishment
Kubectl and kubeadm support automatic completion function, which can save a lot of input. Automatic completion script is generated by kubectl and kubeadm, and only needs to be invoked in your shell configuration file.
[root@master ~]# kubectl completion bash >/etc/bash_completion.d/kubectl
[root@master ~]# kubeadm completion bash >/etc/bash_completion.d/kubeadm
[root@master ~]# exit
# Note: after the configuration is completed, you need to exit and log in again before it takes effect
2) Install IPVS agent
[root@master ~]# yum install -y ipvsadm ipset
3) k8s system initialization
[root@master ~]# kubeadm init --dry-run
... ...
Correct several errors according to the prompt information
... ...
--------------------------------------------------------------------
[root@master ~]# kubeadm config print init-defaults >kubeadm-init.yaml
4) Modify profile
The modified configuration file has been shared in the cloud disk. You can directly use the modified configuration file.
The configuration file is in phase 4 kubernetes / v1.0 17.6/config/kubeadm-init. yaml.
[root@master ~]# vim  kubeadm-init.yaml
06:    ttl: 24h0m0s                          # token lifecycle
12:    advertiseAddress: 192.168.1.21        # IP address of apiserver
32:    imageRepository: 192.168.1.100:5000    # Mirror warehouse address
34:    kubernetesVersion: v1.17.6        # Currently installed k8s version
36:    dnsDomain: cluster.local        # Default domain name address
37:    podSubnet: 10.244.0.0/16        # Container address cidr, newly added
38:    serviceSubnet: 10.254.0.0/16        # Service address cidr
#Add the following 4 lines manually at the end of the file
---
apiVersion: kubeproxy.config.k8s.io/v1alpha1
kind: KubeProxyConfiguration
mode: ipvs
5) Install master
[root@master ~]# kubeadm init --config=kubeadm-init.yaml | tee master-init.log
... ...
Your Kubernetes control-plane has initialized successfully!
To start using your cluster, you need to run the following as a regular user:
  mkdir -p $HOME/.kube
  sudo cp -i /etc/kubernetes/admin.conf $HOME/.kube/config
  sudo chown $(id -u):$(id -g) $HOME/.kube/config
... ...
[root@master ~]# mkdir -p /root/.kube
[root@master ~]# cp -i /etc/kubernetes/admin.conf /root/.kube/config
6) Start the service and verify
[root@master ~]# kubectl  get  componentstatuses
NAME                               STATUS          MESSAGE                 ERROR
controller-manager           Healthy                ok
scheduler                         Healthy           ok
etcd-0                         Healthy           {"health":"true"}
[root@master ~]# kubectl version
Client Version: version.Info{Major:"1", Minor:"17", GitVersion:"v1.17.6", GitCommit:"d32... ...", GitTreeState:"clean", BuildDate:"2020-05-20T13:16:24Z", GoVersion:"go1.13.9", Compiler:"gc", Platform:"linux/amd64"}
Server Version: version.Info{Major:"1", Minor:"17", GitVersion:"v1.17.6", GitCommit:"d32... ...", GitTreeState:"clean", BuildDate:"2020-05-20T13:08:34Z", GoVersion:"go1.13.9", Compiler:"gc", Platform:"linux/amd64"}
4. Install the node node and join the master
4.1 problems
In this case, it is required to install the node and join the master. The specific requirements are as follows:
- Minimum configuration of node host: 2cpu, 2G memory
- Initialize the system environment (the same steps as the master)
- Set hostname / etc/hosts
- Create a token on the master
- Install node and join the cluster
4.2 steps
To implement this case, you need to follow the following steps.
!!! Reminder: ansible scripts have been written for all operations in this case, and all the following operation steps can be completed through ansible automation.
You can download the ansible configuration and corresponding materials on the [springboard machine] host, and execute the script to complete all the following operations!
Ansible materials are shared in the cloud disk. The fourth stage is kubernetes / v1 17.6 / node install /.
Download and copy the entire directory to the [springboard machine], and then modify the Token and corresponding Hash value in the script.
If you want to get the Token and the corresponding Hash value, you can refer to step 2 below.
[root@localhost node-install]# vim node_install.yaml           # The script needs to be modified before execution
vars:
    master: '192.168.1.21:6443'
    token: 'fm6kui.mp8rr3akn74a3nyn'       # Set the obtained token
    token_hash: 'sha256:f46dd7ee ... ...'        # Set the obtained token hash
[root@localhost node-install]# ansible-playbook  node_install.yaml    # Execute script
Step 1: initialize node (operate on node-0001 host)
1) Turn off the firewall and SELinux.
[root@node-0001 ~]# vim /etc/selinux/config
... ...
SELINUX=disabled
[root@node-0001 ~]# yum -y remove firewalld-*
... ...
[root@node-0001 ~]# reboot
... ...
[root@node-0001 ~]# sestatus
SELinux status:                 disabled
2) Configure YUM source
[root@node-0001 ~]# vim  /etc/yum.repos.d/local.repo
[local_repo]
name=CentOS-$releasever – Localrepo
baseurl=ftp://192.168.1.252/localrepo
enabled=1
gpgcheck=0
3) If there is a swap swap partition in the system, disable it in / etc/fstab.
4) Install software
[root@node-0001 ~]# yum install -y kubeadm kubelet docker-ce
5) Install IPVS agent
[root@node-0001 ~]# yum install -y ipvsadm ipset
6) Modify the docker configuration and specify the private image warehouse
[root@node-0001 ~]# vim /etc/docker/daemon.json
{
    "exec-opts": ["native.cgroupdriver=systemd"],
    "registry-mirrors": ["https://hub-mirror.c.163.com"],
    "insecure-registries":["192.168.1.100:5000", "registry:5000"]
}
7) Modify kernel parameters
[root@node-0001 ~]# vim /etc/sysctl.d/k8s.conf      #There is no such file. You need to create a new file
net.bridge.bridge-nf-call-ip6tables = 1          # Enable bridge device kernel monitoring (ipv6)
net.bridge.bridge-nf-call-iptables = 1               # Enable bridge device kernel monitoring (ipv4)
net.ipv4.ip_forward = 1                             # Turn on routing forwarding
[root@node-0001 ~]# modprobe br_netfilter          #Load kernel module
[root@node-0001 ~]# sysctl --system                # Load the above k8s Conf configuration file
* Applying /etc/sysctl.d/k8s.conf ...
net.bridge.bridge-nf-call-ip6tables = 1
net.bridge.bridge-nf-call-iptables = 1
net.ipv4.ip_forward = 1
... ...
8) Modify / etc/hosts
[root@node-0001 ~]# vim  /etc/hosts
::1        localhost    localhost.localdomain    localhost6    localhost6.localdomain6
127.0.0.1    localhost    localhost.localdomain    localhost4    localhost4.localdomain4
192.168.1.21    master
192.168.1.31    node-0001
192.168.1.32    node-0002
192.168.1.33    node-0003
192.168.1.34    node-0004
192.168.1.35    node-0005
Step 2: add node to K8s cluster
1) Start the server (operate on the node-0001 host)
[root@node-0001 ~]# systemctl enable --now docker kubelet
2) Check the log to find an example of the following line of installation instructions (operate on the master host)
kubeadm join 192.168.1.21:6443 --token <token> \
--discovery-token-ca-cert-hash   sha256: <token ca hash>
3) How to obtain the Token Hash value (operate on the master host)
[root@master ~]# openssl x509 -pubkey -in /etc/kubernetes/pki/ca.crt |  \
openssl rsa -pubin -outform der |openssl dgst -sha256 -hex
writing RSA key
(stdin)= f46dd7ee29faa3c096cad189b0f9aedf59421d8a881f7623a543065fa6b0088c
4) How to obtain a Token (operate on the master host)
[root@master ~]# kubeadm token list                # List token s
[root@master ~]# kubeadm token delete <token>        # Delete token
[root@master ~]# kubeadm token create                # Create token
[root@master ~]# kubeadm token create --ttl=0 --print-join-command
... ...
kubeadm join 192.168.1.21:6443 --token fm6kui.mp8rr3akn74a3nyn
 --discovery-token-ca-cert-hash
sha256:f46dd7ee29faa3c096cad189b0f9aedf59421d8a881f7623a543065fa6b0088c
5) Install node node (operate on node-0001 host)
Use the token command just generated to complete the node installation. The following token and Hash values cannot be copied.
[root@node-0001 ~]# kubeadm join 192.168.1.21:6443 --token \
fm6kui.mp8rr3akn74a3nyn --discovery-token-ca-cert-hash sha256:f46dd7ee29faa3c096cad189b0f9aedf59421d8a881f7623a543065fa6b0088c
5. Configure the flannel network to complete the cluster
5.1 problems
This case requires configuring the flannel network to complete the cluster. The specific requirements are as follows:
- Import image to private warehouse
- Modify profile
- Start network components
5.2 steps
To implement this case, you need to follow the following steps.
Note: the software required in this case has been shared on the cloud disk. In the fourth stage, kubernetes / v1 17.6 / FLANNEL directory. All students need to download the materials in this directory to the master host in advance.
Step 1: import and upload the image to the 192.168.1.100 private image server (operate on the master host)
Install the software and start the service
[root@master ~]# docker load -i flannel.tar.gz
# Load mirror
[root@master ~]# docker tag \
quay.io/coreos/flannel:v0.12.0-amd64 192.168.1.100:5000/flannel:v0.12.0-amd64
# Modify label
[root@master ~]# docker push 192.168.1.100:5000/flannel:v0.12.0-amd64
# Upload image to 192.168.1.100 server
Step 2: configure the flannel network (master host operation)
1) Modify resource profile
The resource configuration file has been shared in kubernetes / v1.0 in the fourth phase of the cloud disk 17.6 / FLANNEL directory.
[root@master ~]# vim flannel/kube-flannel.yaml
128: "Network": "10.244.0.0/16",
# This address must be the same as the case 3 initialization file kubedm init The podSubnet in yaml is consistent
172: image: 192.168.1.100:5000/flannel:v0.12.0-amd64
186: image: 192.168.1.100:5000/flannel:v0.12.0-amd64
227 Delete everything from the end of the line
2) Create resource
[root@master ~]# kubectl apply -f kube-flannel.yml
podsecuritypolicy.policy/psp.flannel.unprivileged created
clusterrole.rbac.authorization.k8s.io/flannel created
clusterrolebinding.rbac.authorization.k8s.io/flannel created
serviceaccount/flannel created
configmap/kube-flannel-cfg created
daemonset.apps/kube-flannel-ds-amd64 created
3) Verification effect
[root@master ~]# ifconfig
flannel.1: flags=4163 ... ...
... ...
[root@master ~]# kubectl get nodes
NAME              STATUS    ROLES    AGE    VERSION
master            Ready    master    26h    v1.17.6
node-0001    Ready    <none>    152m    v1.17.6
6. Configure all node nodes to complete cluster deployment
6.1 problems
This case requires all other node nodes to join the K8s cluster with reference to case 4. The specific requirements are as follows:
- Add node-0002 to K8S cluster
- Add node-0003 to K8S cluster
6.2 steps
To implement this case, you need to follow the following steps.
Refer to [4] for specific operation steps. We can directly use the prepared ansible script to automatically complete the task of adding node nodes, or we can try our own manual operation.
In case of infringement, please contact the author to delete