01 Preface
Before using maven, we referenced some public jars or API jars. We may use this method to manually import these jars to the classpath path of the project.
With maven, our company may build Maven private warehouses, such as nexus, and then upload these public jars or API jars to nexus private warehouses in POM The coordinates of these jars can be referenced by configuring them with XML.
Today, our topic is to talk about several common methods of packaging and publishing projects to maven's private warehouse
02 steps for publishing to maven private warehouse
01 in maven's settings Configure the user name and password for the < servers > node in XML as follows
<servers>
    <server>
      <id>nexus-releases</id>
      <username>admin</username>
      <password>admin123</password>
    </server>
    <server>
      <id>nexus-snapshots</id>
      <username>admin</username>
      <password>admin123</password>
    </server>
 </servers>
Note: id can be regarded as an identification first. Username and password are the username and password of nexus private warehouse
02 specify the url to publish to nexus private warehouse and publish it
Method 1: POM XML file to add a distributionManagement node
The shape is as follows:
<distributionManagement>
         <!--Official version-->
        <repository>
            <!-- stay settings.xml in<server>of id-->
            <id>nexus-releases</id>
            <url>http://192.168.0.11:8081/nexus/content/repositories/releases/</url>
        </repository>

         <!--Snapshot version-->
        <snapshotRepository>
             <id>nexus-snapshots</id>
             <url>http://192.168.0.11:8081/nexus/content/repositories/snapshots/</url>
        </snapshotRepository>
    </distributionManagement>
Note:
- If there is a parent, you only need to use the POM in the parent If it is not configured in the pom.xml of this project XML configuration is enough
- The < id > under the < repository > node corresponds to the maven configuration file settings The id of the server in the XML file must be consistent
- Whether the official version or the SNAPSHOT version is uploaded to the private warehouse depends on POM Whether the XML file version is SNAPSHOT or RELEASE. For example, your project is configured as follows
<groupId>com.example</groupId>
<artifactId>demo</artifactId>
<version>0.0.1-SNAPSHOT</version>
The snapshot version is uploaded to the private warehouse. Finally, execute maven's deploy command to publish
Method 2: in maven's settings The < profiles > node in XML configures < Properties >, and specifies < altsnapshotdeploymentrepository > and < altreleasedeploymentrepository > in < Properties >
The shape is as follows:
<profiles>
     <profile>
   <id>nexus</id>
     <properties>
         <altSnapshotDeploymentRepository>
             nexus-snapshots::default::http://192.168.0.11:8081/repository/maven-snapshots/
         </altSnapshotDeploymentRepository>
         <altReleaseDeploymentRepository>
            nexus-releases::default::http://192.168.0.11:8081/repository/maven-releases/
         </altReleaseDeploymentRepository>
     </properties>
    </profile>
  </profiles>
  <activeProfiles>
    <activeProfile>nexus</activeProfile>
  </activeProfiles>
Note:
- Nexus snapshots and nexus releases are set in the configuration file of maven The id of the server in the XML file must be consistent
- The properties altSnapshotDeploymentRepository and altReleaseDeploymentRepository were introduced with Maven release plugin version 2.8. Before version 2.8, the following error will be reported when mvn deploy is executed
Deployment failed: repository element was not specified in the POM inside distributionManagement element or in -DaltDeploymentRepository=id::layout::url parameter
The solution is to specify the plug-ins above version 2.8 in the released project, as shown below
<build>
        <plugins>
            <plugin>
                <artifactId>maven-deploy-plugin</artifactId>
                <version>2.8.2</version>
            </plugin>
        </plugins>
    </build>
Finally, execute maven's deploy command to publish
Method 3: specify parameters through mvn deploy
- Method 1: specify altSnapshotDeploymentRepository and altReleaseDeploymentRepository through the - D parameter
The shape is as follows
mvn deploy -DskipTests -DaltSnapshotDeploymentRepository=nexus-snapshots::default::https://YOUR_NEXUS_URL/snapshots
-DaltReleaseDeploymentRepository=nexus-releases::default::https://YOUR_NEXUS_URL/releases
Similarly, to execute the above commands successfully, you must ensure that the deploy plug-in is based on version 2.8 or above
- Method 2: specify the relevant information of the jar to be published and the private warehouse address, private warehouse id, private warehouse id and settings through - D The id of the server in the XML file is consistent
The shape is as follows
mvn deploy:deploy-file -DskipTests -Dfile=jar Package file address,Absolute path -DgroupId=Group name -DartifactId=entry name -Dversion=Version number -Dpackaging=jar -DrepositoryId=Private library id(and setting.xml In file server of id (consistent) -Durl=Private warehouse address
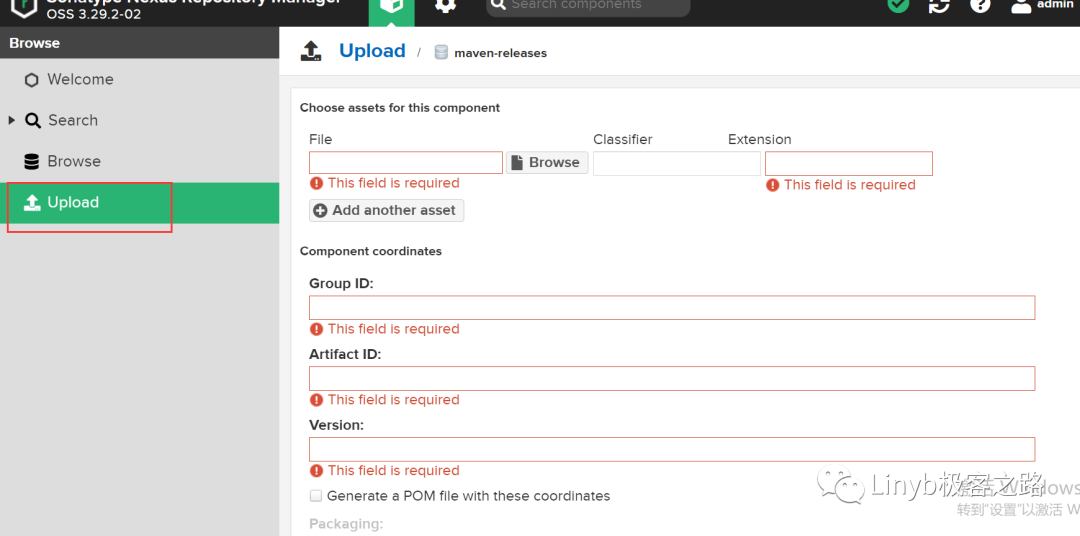
Method 4: upload and publish jar s through the visual interface of nexus As shown below
03 selection of these publishing methods
The first method is to publish through distribution management, which may be the choice of most people. However, if there are many projects to be published, we can consider using mode 2. We can publish by configuring altSnapshotDeploymentRepository and altReleaseDeploymentRepository in the global settings file. All projects can be published only once without specifying them in multiple project POMs
Methods 1 and 2 are more suitable for the company's own internal development projects. For some jar s provided by a third party, it is recommended to use the method of mvn deploy -DrepositoryId = private database id (consistent with the id of the server in the settings.xml file) - Durl = private warehouse address, or directly upload using the nexus visual interface