1. Introduction to swagger
The joint debugging of front-end and back-end is inseparable from API documents, and manually writing API documents is a time-consuming and laborious operation. Swagger is an excellent open source framework based on simplifying the output of API documents. It presents interface information through the specification of OpenAPI to facilitate testing and joint debugging. In this way, if you follow the new development mode, when developing a new version or iterative version, you only need to update the swagger description file, you can automatically generate the interface document and the client server code, so as to achieve the consistency of the calling side code, the server side code and the interface document.
Official address:
https://swagger.io

2.Springboot integrates Swagger2 and common configurations
Step 1: add dependency
<dependency>
    <groupId>io.springfox</groupId>
    <artifactId>springfox-swagger2</artifactId>
    <version>2.9.2</version>
</dependency>
<dependency>
    <groupId>io.springfox</groupId>
    <artifactId>springfox-swagger-ui</artifactId>
    <version>2.9.2</version>
</dependency>
Version 2.9.2 is the most used version. For details, you can directly search maven's official website and find a version with the most usage.
Step 2: Configure
Create a new config package and create SwaggerConfig class
@EnableSwagger2
@Configuration
public class Swagger2Config {
    @Bean
    public Docket createRestApi() {
        return new Docket(DocumentationType.SWAGGER_2)
             .apiInfo(apiInfo())
             .select()
             //Is the current package path, controller class package
             .apis(RequestHandlerSelectors.basePackage("com.fdd.controller"))
            .paths(PathSelectors.any())
             .build();
    }
    //Build api document details function
    private ApiInfo apiInfo() {
        return new ApiInfoBuilder()
            //Page title
           .title("XX platform API Interface documentation")
            //Creator
           .contact(new Contact("test", "http://www.test.cc",
                                "XXX@qq.com"))
           //Version number
          .version("1.0")
           //describe
          .description("system API describe")
          .build();
    }
The configuration here is also relatively simple. There are many options for us to configure. If our project has multiple groups, we only need to create multiple dockets. At this time, the scanned packets are replaced by the packet path of each group.
Step 3: configure in the controller class
Create a new controller package, and then create the HelloController class
@Api("Hello control class")
@RestController
public class HelloController {
    @GetMapping(value = "/user")
    public User getUser(){
        return new User("Yugong wants to move the mountain","123456");
    }
    @ApiOperation("Parameters can be specified API")
    @PostMapping("/param")
    public String hello2(@ApiParam("user name") String name){
        return "hello" + name;
    }
}
Here we can see that this class, method, field and so on can be explained by using annotations. There are many other fields. You will be prompted when using them. You can try it yourself:
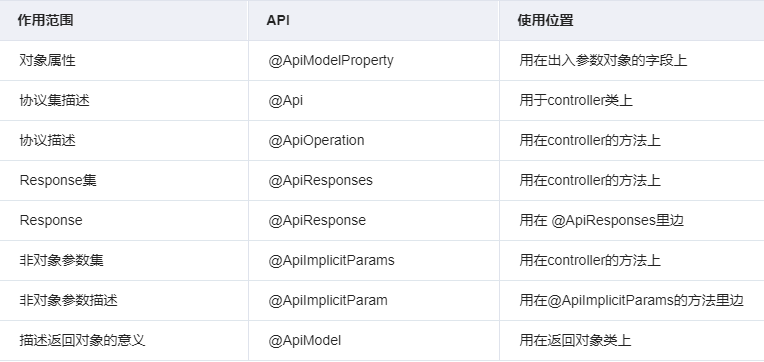
3. Common notes
@Api identifies a java type as a document class, using the class name of the controller class
@ApiModel represents an entity class / model document, which is used on the class name;
@ApiModelProperty acts on a property and adds a property description;
@ApiOperation acts on the method of the interface class and controls the relevant description of the method;
@ApiImplicitParam acts on the interface method, describes the information of a single parameter, and can only act on the method;
@ApiImplicitParams acts on the interface method, @ ApiImplicitParam parameter group;
@ApiParam acts on interface methods and describes single parameter information. Properties are basically the same as @ ApiImplicitParam, but can act on methods, parameters and properties;
The common parameters of each annotation are explained below.
@Api:
value: string, which describes the function of the controller class instead of the original description (outdated). This attribute is generally used;
tags: string array and tag group, which can also describe the role of controller;
@ApiModel
value: string, a short alias of the model, which makes it easy to identify in the navigation of the document;
Description: string, additional description of the model;
@ApiOperation
value: string, function description of the method;
tags: string array and tag group, which can also describe the function of the method;
Response: ClassType, indicating the returned object type; In the response example, the field, example and description of the modified object will be displayed;
Code: response code, 200 by default, generally unchanged;
@ApiModelProperty
value: string, field description;
required: boolean; Specify whether the parameter is required. The default is false;
Example: string, example of parameter value
@ApiImplicitParam
Name: string, parameter name;
value: string, parameter description;
defaultValue: string, parameter default value;
required: boolean, indicating whether the value must be passed. The default is false;
dataType: string, parameter type, which can be a class name or a reference class name of basic data type, such as Integer;
Example: string, parameter value example;
@ApiImplicitParams
value: @ ApiImplicitParam type array. When the method has multiple @ ApiImplicitParam parameters, it needs to be put in the @ ApiImplicitParams annotation
@ApiParam
Name: string, parameter name;
value: string, parameter description;
defaultValue: string, set the default value;
Required: boolean, whether it is required; the default is false;
Example: string, parameter value example;
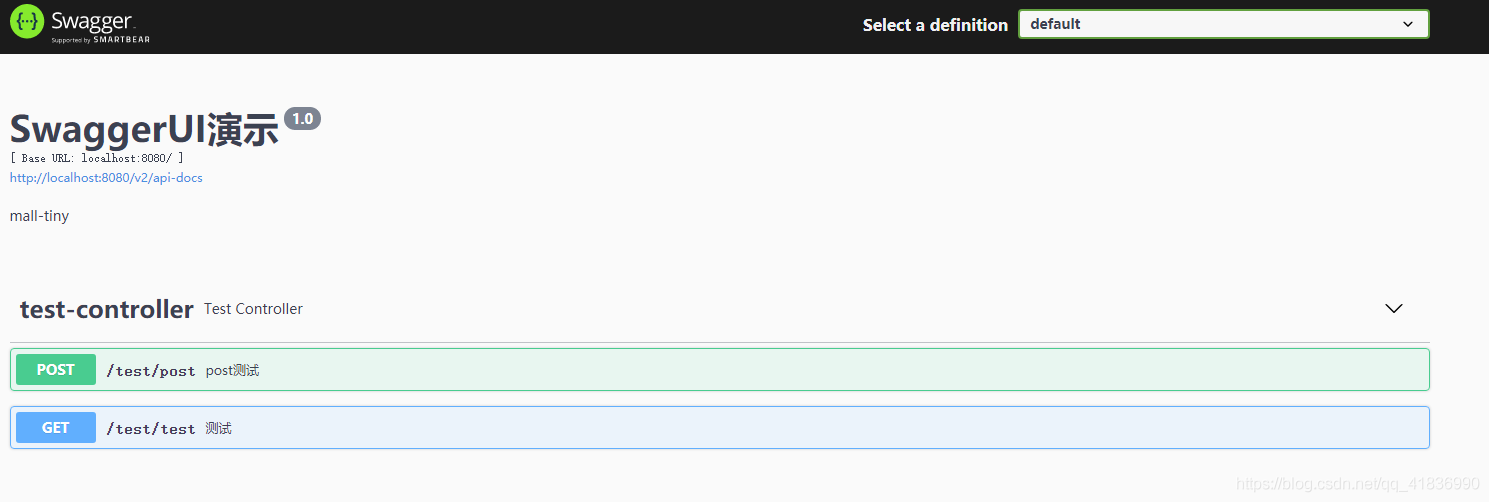
4. Replace the swagger UI and select an artifact - knife4j
First, let's take a look at the comparison of interface functions. The swagger UI interface is as follows:
Access address:
http://localhost:8080/swagger-ui
The knife4j interface is as follows:
Access address:
http://localhost:8080/doc.html
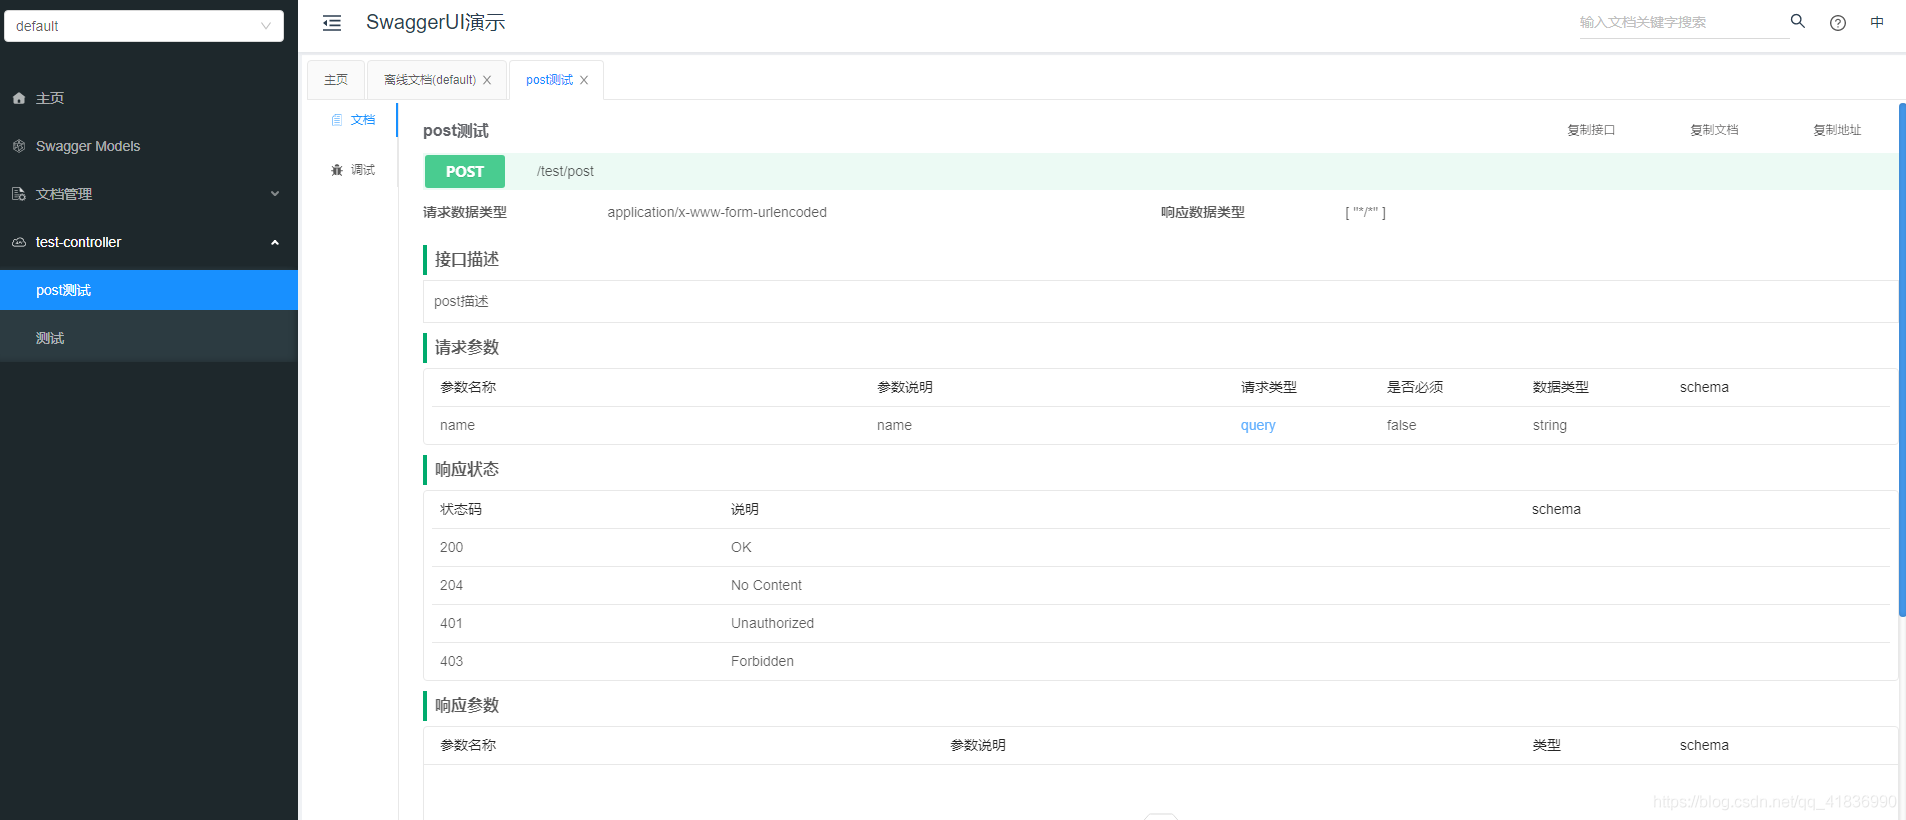
It can be seen from the above that the knife4j interface is more beautiful and more comprehensive than the swagger UI interface. In addition to testing related functions, it also provides corresponding document management, which is very convenient to output API documents in different formats and greatly facilitates the output of interface documents.
5. Use of knife4j
Knife4j is an enhanced solution for integrating Swagger into Java MVC framework to generate Api documents. Its predecessor is Swagger bootstrap UI. The name knife4j hopes that it can be as small, lightweight and powerful as a dagger!
The predecessor of knife4j is swagger bootstrap Ui. In order to fit the development of micro service architecture, the original swagger bootstrap Ui adopts the mixed packaging of back-end Java code and front-end Ui, which is very bloated under the micro service architecture, so the project is officially renamed knife4j
Main focus after renaming
- The front-end and back-end Java codes and front-end Ui modules are separated to make it more flexible to use under the micro service architecture
- Provide an enhanced solution focused on Swagger, which is different from just improving the Ui part of the enhanced front end
5.1 project module
At present, the main modules include:
Module name | explain |
|---|---|
knife4j | Integration of Swagger's enhanced solution for Java MVC framework |
knife4j-admin | The cloud Swagger interface document registration management center integrates the gateway gateway to combine and integrate any microservice documents |
knife4j-extension | The enhanced swagger interface document ui of chrome browser can quickly render swagger resources |
knife4j-service | A series of interface service programs for swagger |
knife4j-front | The pure front-end static version of knife4j spring UI is used to integrate the use of non Java languages |
swagger-bootstrap-ui | The predecessor of knife4j, the last released version is 1.9.6 |
5.2 business scenario
Instead of using enhancements, simply change the front-end skin of swagger
Without using enhancements, simply change the front-end skin of swagger. This is the simplest case. There is no need to change your project structure
You can directly reference the last version of swagger bootstrap UI, 1.9.6, or use knife4j spring UI
Old version reference
<dependency>
    <groupId>com.github.xiaoymin</groupId>
    <artifactId>swagger-bootstrap-ui</artifactId>
    <version>1.9.6</version>
</dependency>
New version reference
<dependency>
    <groupId>com.github.xiaoymin</groupId>
    <artifactId>knife4j-spring-ui</artifactId>
    <version>${lastVersion}</version>
</dependency>
5.3 use and enhancement of single architecture of spring boot project
Under the Spring Boot monomer architecture, knife4j provides a starter for developers to use quickly
<dependency>
    <groupId>com.github.xiaoymin</groupId>
    <artifactId>knife4j-spring-boot-starter</artifactId>
    <version>${knife4j.version}</version>
</dependency>
This package will reference all the resources provided by knife4j, including the jar package of the front-end Ui
5.4 Spring Cloud microservice architecture
Under the microservice architecture of Spring Cloud, each microservice actually does not need to introduce Ui resources at the front end. Therefore, under the Spring Boot project of each microservice, the microservice starter provided by knife4j is introduced
<dependency>
    <groupId>com.github.xiaoymin</groupId>
    <artifactId>knife4j-micro-spring-boot-starter</artifactId>
    <version>${knife4j.version}</version>
</dependency>
Under the gateway aggregation document service, the front-end ui resources can be introduced
<dependency>
    <groupId>com.github.xiaoymin</groupId>
    <artifactId>knife4j-spring-boot-starter</artifactId>
    <version>${knife4j.version}</version>
</dependency>
5.5 additional instructions
Whether it's knife4j or swagger bootstrap UI
The external address is still doc html
visit: http://ip:port/doc.html