
Introduction to Amazon EKS Anywhere
Recently, Amazon cloud technology opened Amazon EKS Anywhere. This project provides a new deployment mode for Amazon EKS, which can easily create and manage Kubernetes clusters using virtual machines in the local data center, and take advantage of Amazon EKS Distro to bring a consistent Kubernetes operation and maintenance management experience to your data center. It can manage multiple Kubernetes clusters in the whole life cycle and flexibly deliver Amazon EKS container services for users.
Amazon EKS can help you automate cluster management, reduce costs and avoid the complicated work of operating Kubernetes clusters with multiple open source or third-party tools. You can also build your own management tools to create Amazon EKS Distro clusters, configure the operating environment, and update software.
Through Amazon EKS Anywhere, you can also obtain the default optimization values of Amazon cloud technology for cluster configuration, machine operating system and third-party integration. These optimizations enable you to focus on business innovation rather than complex component compatibility or deployment compatibility within the enterprise and between cloud environments. In addition, you can use the Amazon EKS console to view all your Kubernetes clusters deployed through Amazon EKS Anywhere.
Amazon EKS Anywhere currently only supports VMware vSphere and will support bare metal deployment in the future.
Introduction to KubeSphere
KubeSphere is a container platform based on Kubernetes. It is completely open source and provides functions such as multi cloud and multi cluster management, DevOps, observability, microservice governance, edge computing and application management through minimal interface interaction. It provides powerful network and storage management capabilities and can help enterprises in public cloud Complete the rapid construction, deployment, operation and maintenance of container architecture on heterogeneous infrastructure such as virtualization and physical machines, and realize the continuous delivery and full life cycle management of applications.

KubeSphere's federated cluster management function can uniformly manage multiple heterogeneous infrastructure Kubernetes, Amazon EKS and product families. When deploying applications, users can distribute multiple copies of applications to multiple different Kubernetes resource pools according to business requirements, and carry out unified operation and maintenance management through KubeSphere to build from the upper layer to realize cross region High availability across clusters.
In January 2021, KubeSphere officially settled in Amazon cloud technology Quick Start, providing users around the world with the ability to deploy Amazon EKS and KubeSphere with one click to deploy cloud native applications, and helping users accelerate the implementation of cloud native applications through KubeSphere's rich application management functions.
What effect will it produce if KubeSphere and Amazon EKS Anywhere are strongly combined? This article will lead you to practice.
This series of articles will be divided into two parts. This article introduces Amazon EKS Anywhere and how to install Amazon EKS Anywhere and KubeSphere; Next, we will introduce how to use KubeSphere to unify Amazon EKS Anywhere and Amazon EKS.
Create an Amazon EKS Anywhere cluster
premise
To run Amazon EKS Anywhere:
- A vSphere 6.7 + environment running vCenter
- Ability to deploy 8-10 virtual machines
- The vSphere environment has a running DHCP service to service the created workload
- A network that can be provided to the cluster in the vSphere environment
- Import the OVA template into vSphere and make it into a template
- Have vCenter administrator privileges
- A management server for executing commands
Management server requirements:
- CPU architecture: amd64
- CPU 4 cores
- Memory 16G
- Disk 100G
- OS Mac OS (10.15) / Ubuntu (20.04.2 LTS)
- vCenter can be accessed via https/443
- The user must be in the docker user group or root user to ensure that he has permission to operate docker
- Have write permission to file
- Can access the following URL:
- public.ecr.aws
- anywhere-assets.eks.amazonaws.com (download binary, configuration manifest and OVA template)
- distro.eks.amazonaws.com (download Amazon EKS Distro)
- d2glxqk2uabbnd.cloudfront.net (as a repository for Amazon EKS Anywhere and Amazon EKS Distro ECR)
- api.github.com (not required if GitOps is not enabled)
An Amazon EKS Anywhere cluster needs to create 6 to 10 virtual machines. The resource requirements of each node are as follows:
- CPU 2 core
- Memory 8G
- Disk 100G
Download OVA image
First, you need to download the OVA image. Select the corresponding OVA image according to different operating systems and different Kubernetes versions:
- Ubuntu with Kubernetes 1.21
- Ubuntu with Kubernetes 1.20
Import template
You can use the vCenter web interface to import templates. I will not describe the template import in vCenter in detail here. Please refer to the document xxx.
After the template is added, you need to create a tag named "os:ubuntu" and a tag named "eksdRelease:kubernetes-1-20-eks-6".

Then check the two created tags and click Assign.
Set up management server
The management server is used to execute various operation commands. You need to install docker and kubelet first.
$ sudo apt update
$ sudo apt install -y docker.io
$ sudo usermod -a -G docker $USER
$ wget https://distro.eks.amazonaws.com/kubernetes-1-19/releases/4/artifacts/kubernetes/v1.19.8/bin/linux/amd64/kubectl
$ mkdir -p $HOME/bin
$ chmod +x kubectl
$ mv kubectl $HOME/bin/
$ echo 'export PATH=$PATH:$HOME/bin' >> ~/.bashrc
*Slide left to see more
After installation, you need to exit and log in to the system again to obtain accurate user group permissions and PATH environment.
Install the latest version of eksctl (the minimum version of eksctl required by Amazon EKS Anywhere is 0.66.0).
$ curl "https://github.com/weaveworks/eksctl/releases/latest/download/eksctl_$(uname -s)_amd64.tar.gz" \
    --silent --location \
    | tar xz -C /tmp
$ sudo mv /tmp/eksctl /usr/local/bin/
*Slide left to see more
Install eksctl anywhere.
$ export Amazon EKSA_RELEASE="0.5.0" OS="$(uname -s | tr A-Z a-z)"
$ curl "https://anywhere-assets.eks.amazonaws.com/releases/eks-a/1/artifacts/eks-a/v${Amazon EKSA_RELEASE}/${OS}/eksctl-anywhere-v${Amazon EKSA_RELEASE}-${OS}-amd64.tar.gz" \
    --silent --location \
    | tar xz ./eksctl-anywhere
$ sudo mv ./eksctl-anywhere /usr/local/bin/
*Slide left to see more
Create an authentication file used by the cluster for ssh login authentication of Amazon EKS Anywhere cluster nodes.
$ ssh-keygen -f eks-a
$ cat eks-a.pub
  ssh-rsa AAAAB3NzxxxxxxxxxxxxxxxxxxxxxxxxxxxxxxxxxoE= root@localhost
*Slide left to see more
Get the sha1 thumbprint of the vCenter authentication file.
#Install} govc
$ wget -c https://github.com/vmware/govmomi/releases/download/v0.25.0/govc_Linux_x86_64.tar.gz -O - | tar -xz
$ chmod +x ./govc
$ mv ./govc /usr/local/bin
$ cd ..
$ rm -rf govc/
$ govc version -l
#Set vCenter} address and administrator's user password
$ export GOVC_URL="xxx"
$ export VSPHERE_USERNAME=xxx
$ export VSPHERE_PASSWORD=xxx
#Get the # thumbprint of # vCenter # authentication file #
$ govc about.cert -k=true -thumbprint
$ xxx.xxx.xxx.xxx aa:bb:cc:xx:xx:xx:xx:cc:bb:aa
*Slide left to see more
Create cluster profile
The cluster name must be lowercase and do not contain uppercase letters or special characters.
$ CLUSTER_NAME=prod
$ eksctl anywhere generate clusterconfig $CLUSTER_NAME \
   --provider vsphere > eksa-cluster.yaml
*Slide left to see more
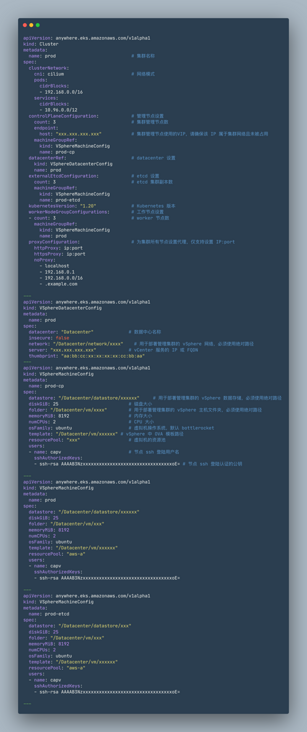
The following is a template reference with comments. Please delete the Chinese comments when using.
Create an Amazon EKS Anywhere cluster
Before creating a cluster, you also need to set the user and password of vSphere.
#Set your vCenter} administrator user password
$ export Amazon EKSA_VSPHERE_USERNAME='<Username>'
$ export Amazon EKSA_VSPHERE_PASSWORD='<Passwd>'
*Slide left to see more
Finally, create a cluster.
$ eks-a create cluster -f ${CLUSTER_NAME}.yaml
*Slide left to see more
During installation, you will see the following output.

During the creation process, Amazon EKS Anywhere will be created in the cluster name directory (for example, $PWD/$CLUSTER_NAME /) kubeconfig file, which you can use to view the cluster status and deployment workload through kubectl.
p$ export KUBECONFIG=${PWD}/${CLUSTER_NAME}/${CLUSTER_NAME}-eks-a-cluster.kubeconfig
$ kubectl get ns
*Slide left to see more
If your cluster is created on the local computer, you can save the KUBECONFIG file to the cluster management server. Similarly, you can save the KUBECONFIG file on the management server to the local computer for cluster management.
Deploy kubesphere v3 two
Preparing persistent storage
Amazon EKS Anywhere cluster uses Amazon cloud technology CSI as the default storage by default. Here, it is replaced with OpenEBS as the default storage.
$ kubectl apply -f https://openebs.github.io/charts/openebs-operator.yaml
*Slide left to see more
View the pods under the OpenEBS namespace and wait for all pods to start.
$ kubectl get pods -n openebs
*Slide left to see more
After the pods under the OpenEBS namespace are started, set OpenEBS as the default storage.
$ kubectl patch storageclass openebs-hostpath -p '{"metadata": {"annotations":{"storageclass.kubernetes.io/is-default-class": "true"}}}'*Slide left to see more
Deploy kubesphere V3 on the Amazon EKS Anywhere cluster two
(1) Execute the following command on eks-a management node / management server to deploy kubesphere v3 two
kubectl apply -f https://github.com/kubesphere/ks-installer/releases/download/v3.2.0/kubesphere-installer.yaml
kubectl apply -f https://github.com/kubesphere/ks-installer/releases/download/v3.2.0/cluster-configuration.yaml
*Slide left to see more
(2) View KubeSphere installation log
$ kubectl logs -n kubesphere-system $(kubectl get pod -n kubesphere-system -l app=ks-install -o jsonpath='{.items[0].metadata.name}') -f*Slide left to see more
(3) When you see "Welcome to KubeSphere!", Indicates that the installation is complete.
#####################################################
###              Welcome to KubeSphere!           ###
#####################################################
*Slide left to see more

Author of this article

Zhang Yuantao
Senior architect of Amazon cloud technology
Responsible for the construction of solutions related to Amazon cloud technology partners and partner ecological cooperation. Work with partners to analyze the challenges and future direction at the technical architecture level according to customer needs, and design and implement the architecture scheme based on Amazon cloud technology platform and partner products. He has worked as a solution architect in well-known foreign enterprises and leading domestic enterprises. He has rich experience in cloud, network and other fields, and has an in-depth understanding of public cloud services and architecture.

Yao Rui
KubeSphere Senior Software Engineer
Responsible for providing solutions, a core member of KubeEye, an open source project.

Yang Chuansheng
KubeSphere preacher
KubeSphere open source community manager

Scan the QR code above to register immediately
