With the continuous innovation of 3D technology, in order to let more users enjoy the beauty of history, more and more museums begin to hold online exhibitions. By simulating different environments, light projection and 360 ° non dead angle enlargement and reduction of the exhibits, the audience can enjoy an immersive experience. In addition, BGM or voice commentary is added to the exhibits to help the audience better understand the detailed background of the exhibits and make the presentation scene more representative.
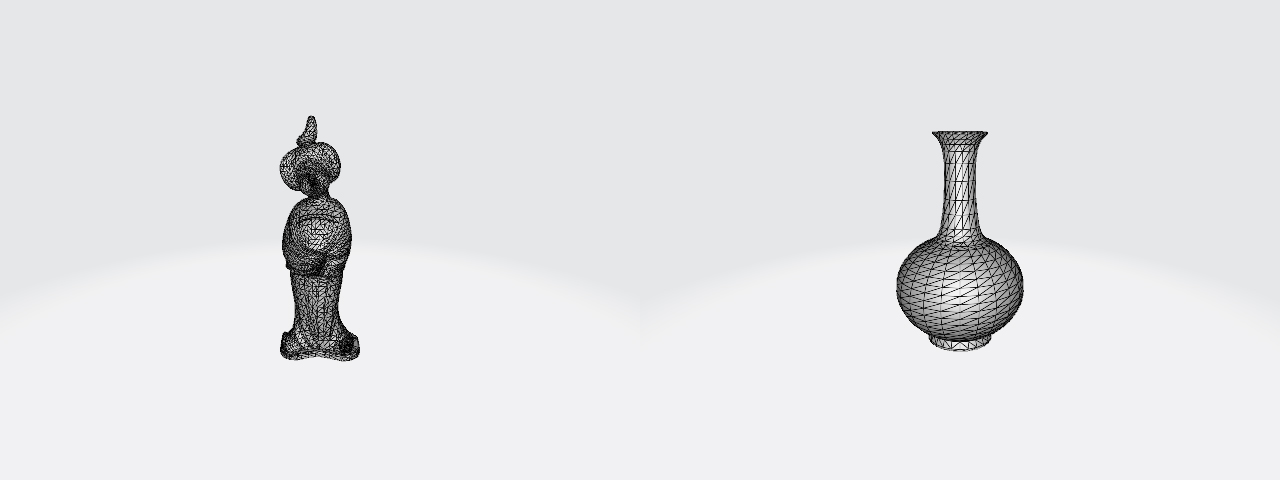
Effect diagram

After watching such a realistic effect display, do you want to know how to achieve it?
Through the Kotlin project of Android Studio, you can realize the functions of 3D scene construction, item display and sound playback.
1, Prepare 3D model
The latest opening of Huawei mobile services 3D object modeling service (3D Modeling Kit) to facilitate easy modeling. We only need to use a mobile camera to automatically generate the 3D geometric model and texture of the object by photographing images from different angles, so as to provide 3D model construction, preview and other capabilities for applications. For specific operation instructions, please refer to< How do I build 3D models of goods in 5 minutes?>
2, Make 3D object view
Next, we will create an interactive 3D object view of the prepared 3D model of the exhibit through the Huawei graphics engine service, as shown in the figure: 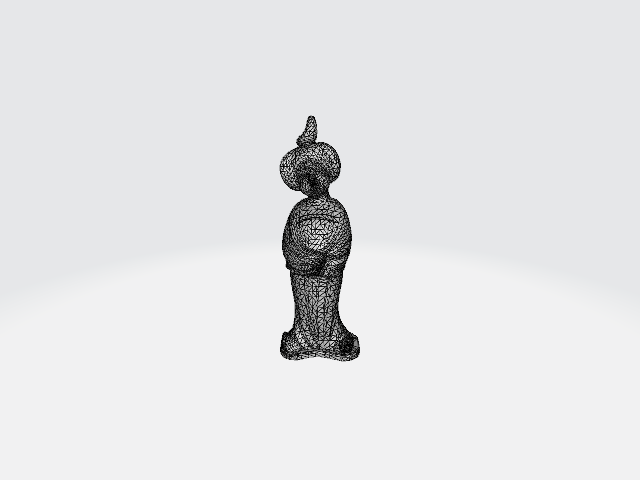
↓↓↓


↓↓↓

Integrated Huawei graphics engine service
Software requirements: jdk1 Version 7 and above
• minSdkVersion: set to 19 or above
• targetSdkVersion: set to 19 or above
• compileSdkVersion: set to 19 or above
• Gradle 3.5 and above
In build Configure the following in the gradle file:
buildscript {
    repositories {
        ...
        maven { url 'https://developer.huawei.com/repo/' }
    }
    ...
}

allprojects {
 repositories {
  ...
  maven { url 'https://developer.huawei.com/repo/' }
 }
}
At the application level, build Configure the following in the gradle file:
dependencies {
    ...
    implementation 'com.huawei.scenekit:full-sdk:5.1.0.300'
}
The example project uses Kotlin of viewBinding This function bypasses the view initialization template code. Available at application level build.gradle Add the following code to the file to enable viewBinding Function:
android {
    ...
    buildFeatures {
        viewBinding true
    }
    ...
}
build. After the gradle file synchronization is completed, the graphics engine service can be used in the project.
In this article, we only need to use this service to display and interact with 3D images of items. If you need to use other functions, see Official document of Huawei graphics engine service.
Create 3D view
The purpose of creating a custom view is very simple to ensure that the first model can be automatically loaded into the view after the view initialization is completed. Manually load the model through the default SceneView, as shown below:
import android.content.Context
import android.util.AttributeSet
import android.view.SurfaceHolder
import com.huawei.hms.scene.sdk.SceneView

class CustomSceneView : SceneView {
    constructor(context: Context?) : super(context)
    constructor(
        context: Context?,
        attributeSet: AttributeSet?
    ) : super(context, attributeSet)

    override fun surfaceCreated(holder: SurfaceHolder) {
        super.surfaceCreated(holder)
        loadScene("qinghuaci/scene.gltf")
        loadSpecularEnvTexture("qinghuaci/specularEnvTexture.dds")
        loadDiffuseEnvTexture("qinghuaci/diffuseEnvTexture.dds")
    }
}
To display items, add relevant model files, open the project folder, create the "assets" folder under the "src/main" path, and save the 3D model files, such as: 
The loadScene(), loadSpecularEnvTexture() and loadDiffuseEnvTexture() methods in surfaceCreated are used to load items. After the surface is created, the first item is loaded into the surface. Next, open the XML file used to display the 3D model view. In this project, it is activity_main.xml. In this file, create the CustomSceneView just constructed. The code below uses an arrow image to switch between different item models.
<?xml version="1.0" encoding="utf-8"?>
<androidx.constraintlayout.widget.ConstraintLayout xmlns:android="http://schemas.android.com/apk/res/android"
    xmlns:app="http://schemas.android.com/apk/res-auto"
    xmlns:tools="http://schemas.android.com/tools"
    android:layout_width="match_parent"
    android:layout_height="match_parent"
    tools:context=".MainActivity">

    <com.example.sceneaudiodemo.CustomSceneView
        android:id="@+id/csv_main"
        android:layout_width="match_parent"
        android:layout_height="match_parent"/>

    <ImageView
        android:id="@+id/iv_rightArrow"
        android:layout_width="32dp"
        android:layout_height="32dp"
        android:layout_margin="12dp"
        android:src="@drawable/ic_arrow"
        android:tint="@color/white"
        app:layout_constraintBottom_toBottomOf="parent"
        app:layout_constraintEnd_toEndOf="parent"
        app:layout_constraintTop_toTopOf="parent" />

    <ImageView
        android:id="@+id/iv_leftArrow"
        android:layout_width="32dp"
        android:layout_height="32dp"
        android:layout_margin="12dp"
        android:rotation="180"
        android:src="@drawable/ic_arrow"
        android:tint="@color/white"
        app:layout_constraintBottom_toBottomOf="parent"
        app:layout_constraintStart_toStartOf="parent"
        app:layout_constraintTop_toTopOf="parent" />

</androidx.constraintlayout.widget.ConstraintLayout>
Everything is ready. After the application is opened, you can see the first exhibit: blue and white porcelain vase.
Add switching function
Now, we can view the 3D models of multiple exhibits by switching functions. In MainActivity, configure the following information:
private lateinit var binding: ActivityMainBinding
private var selectedId = 0
private val modelSceneList = arrayListOf(
    "qinghuaci/scene.gltf",
    "tangyong/scene.gltf",
)
private val modelSpecularList = arrayListOf(
    "qinghuaci/specularEnvTexture.dds",
    "tangyong/specularEnvTexture.dds",
)
private val modelDiffList = arrayListOf(
    "qinghuaci/diffuseEnvTexture.dds",
    "tangyong/diffuseEnvTexture.dds",
)

override fun onCreate(savedInstanceState: Bundle?) {
    super.onCreate(savedInstanceState)
    binding = ActivityMainBinding.inflate(layoutInflater)
    val view = binding.root
    setContentView(view)
    binding.ivRightArrow.setOnClickListener {
        if (modelSceneList.size == 0) return@setOnClickListener
        selectedId = (selectedId + 1) % modelSceneList.size // Ensure that the ID is in the range of the model list.
        loadImage()
    }
    binding.ivLeftArrow.setOnClickListener {
        if (modelSceneList.size == 0) return@setOnClickListener
        if (selectedId == 0) selectedId = modelSceneList.size - 1 // Ensure that the ID is in the range of the model list.
        else selectedId -= 1
        loadImage()
    }
}

private fun loadImage() {
    binding.csvMain.loadScene(modelSceneList[selectedId])
    binding.csvMain.loadSpecularEnvTexture(modelSpecularList[selectedId])
    binding.csvMain.loadDiffuseEnvTexture(modelDiffList[selectedId])
}
In onCreate(), a simple logic is created to view the next / previous model. The item file path is saved in each hard coded list in the form of string. You can modify this logic to make the model more dynamic. Where selectedd represents the ID of the item model being displayed. In this way, the 3D model is displayed by SceneView, and the effects are as follows: 

3, Add explanatory words to the exhibits
When loading different 3D models, we can play the corresponding explanation words of the exhibit through Huawei audio service to provide users with detailed introduction of the exhibit. integrate Huawei audio service
Software requirements:
• JDK version 1.8.211 and above
• minSdkVersion: set to 21
• targetSdkVersion: set to 29
• compileSdkVersion: set to 29
• Gradle 4.6 and above
It can be seen that audio service requires higher requirements than graphics engine service software, so we need to ensure that the use requirements of audio service are met.
First, open the application level build Gradle file to add the relevant configuration of audio service.
dependencies {
    ...
    implementation 'com.huawei.hms:audiokit-player:1.1.0.300'
    ...
}
Before configuring the graphics engine service, the necessary libraries have been added, so the project level build Gradle doesn't need to be changed. In activity_main.xml file, add a simple play button.
<Button
    android:id="@+id/btn_playSound"
    android:layout_width="wrap_content"
    android:layout_height="wrap_content"
    android:text="Play"
    app:layout_constraintBottom_toBottomOf="parent"
    app:layout_constraintEnd_toEndOf="parent"
app:layout_constraintStart_toStartOf="parent" />
This button can be used to play sound for items on display. Then, add the following configuration in MainActivity:
private var mHwAudioManager: HwAudioManager? = null
private var mHwAudioPlayerManager: HwAudioPlayerManager? = null

override fun onCreate(savedInstanceState: Bundle?) {
    ...
    initPlayer(this)
    binding.btnPlaySound.setOnClickListener {
        mHwAudioPlayerManager?.play(selectedId) //Create a playlist instance. Selectedd: parameter of playing track.

    }
    ...
}


private fun initPlayer(context: Context) {
    val hwAudioPlayerConfig = HwAudioPlayerConfig(context)
    HwAudioManagerFactory.createHwAudioManager(hwAudioPlayerConfig,
    object : HwAudioConfigCallBack {
        override fun onSuccess(hwAudioManager: HwAudioManager?) {
            try {
                mHwAudioManager = hwAudioManager
                mHwAudioPlayerManager = hwAudioManager?.playerManager
                mHwAudioPlayerManager?.playList(getPlaylist(), 0, 0)
            } catch (ex: Exception) {
                ex.printStackTrace()
            }
        }

        override fun onError(p0: Int) {
            Log.e("init:onError: ","$p0")
        }
    })
}

fun getPlaylist(): List<HwAudioPlayItem>? {
    val playItemList: MutableList<HwAudioPlayItem> = ArrayList()
    val audioPlayItem1 = HwAudioPlayItem()
    val sound = Uri.parse("android.resource://yourpackagename/raw/soundfilename").toString() // soundfilename does not contain a file extension.
    audioPlayItem1.audioId = "1000"
    audioPlayItem1.singer = "Taoge"
    audioPlayItem1.onlinePath =
        "https://lfmusicservice.hwcloudtest.cn:18084/HMS/audio/Taoge-chengshilvren.mp3 "/ / here the Demo uses the song
    audioPlayItem1.setOnline(1)
    audioPlayItem1.audioTitle = "chengshilvren"
    playItemList.add(audioPlayItem1)
    val audioPlayItem2 = HwAudioPlayItem()
    audioPlayItem2.audioId = "1001"
    audioPlayItem2.singer = "Taoge"
    audioPlayItem2.onlinePath =
        "https://lfmusicservice.hwcloudtest.cn:18084/HMS/audio/Taoge-dayu.mp3 "/ / here the Demo uses the song
    audioPlayItem2.setOnline(1)
    audioPlayItem2.audioTitle = "dayu"
    playItemList.add(audioPlayItem2)
    return playItemList
}
After the above configuration is added, the explanation words can be played for the exhibits. The sound and audio used in the project are online resources. If you need to play local audio, you can Refer to the official website for guidance . In this way, you can import audio files and play sound for items.
At this point, we can create a 360 ° rotatable, zoom in and out exhibition scene with sound effects.
Finally, in addition to 3D cultural relics display and other application scenarios, we can also apply these capabilities to many related industries, such as:
Face cute, video expression package and video virtual background in the field of online social networking; 3D commodity display, home decoration scene rendering and AR fitting in the field of e-commerce shopping; 3D unlocking screensaver / mobile phone theme, 3D special effect rendering and live expression package in the video and audio field; 3D teaching, 3D books and VR distance teaching in the field of education.
For more details, see:
3D object modeling service , DEMO demo
Huawei graphics engine service official website , DEMO demo
Huawei audio service official website , DEMO demo
Huawei HMS Core official forum
Solve integration problems Stack Overflow
Click follow to learn the latest technology of HMS Core for the first time~