User list page development
Project introduction
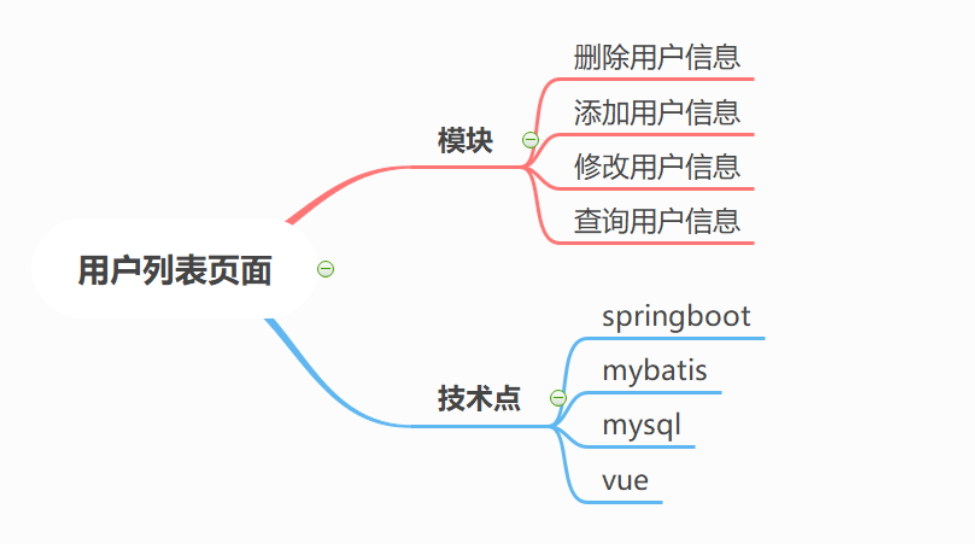
User list page development can realize simple query, deletion, modification, and addition of user information. The front end uses the vue framework, and the back end uses the springboot framework. A simple vue+springboot separates the front and back ends of small projects.
The main modules and technical points of the project are shown in the figure
1. Front end html page writing
Page:
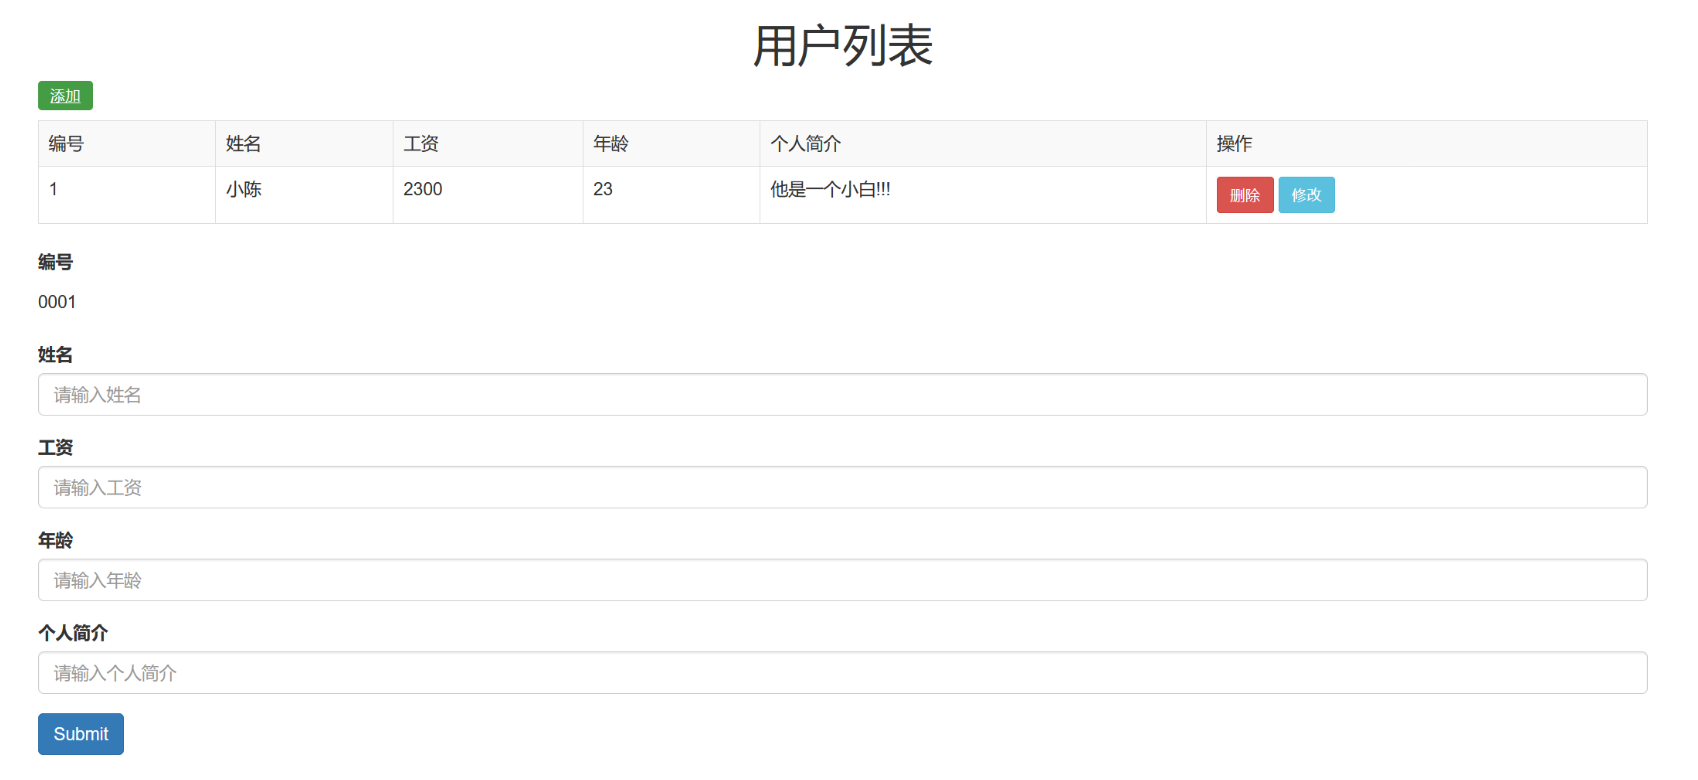
code:
<!DOCTYPE html>
<html lang="en">
<head>
    <meta charset="UTF-8">
    <title>vue Series courses</title>
    <!-- Latest version Bootstrap core CSS file -->
    <link rel="stylesheet" href="https://stackpath.bootstrapcdn.com/bootstrap/3.4.1/css/bootstrap.min.css">
</head>
<body>
    <div id="app">

        <div class="container-fluid">
            <!--Title Line-->
            <div class="row">
                <div class="col-sm-6 col-sm-offset-3"><h1 class="text-center">User list</h1></div>
            </div>
            <!--data row-->
            <div class="row">
                <div class="col-sm-10 col-sm-offset-1">
                    <!--add button-->
                    <a href="" class="btn-success btn-sm">add to</a>
                    <!--list-->
                    <table class="table table-striped table-bordered" style="margin-top: 10px;">
                        <tr>
                            <td>number</td>
                            <td>full name</td>
                            <td>wages</td>
                            <td>Age</td>
                            <td>Personal profile</td>
                            <td>operation</td>
                        </tr>
                        <tr v-for="user in users">
                            <td>{{user.id}}</td>
                            <td>{{user.name}}</td>
                            <td>{{user.salary}}</td>
                            <td>{{user.age}}</td>
                            <td>{{user.description}}</td>
                            <td>
                                <a href="" class="btn btn-danger btn-sm">delete</a>
                                <a href="" class="btn btn-info btn-sm">modify</a>
                            </td>
                        </tr>

                    </table>
                    <!--Add and modify forms-->
                    <form>
                        <div class="form-group">
                            <label class="control-label">number</label>
                            <div >
                                <p class="form-control-static">0001</p>
                            </div>
                        </div>
                        <div class="form-group">
                            <label for="name">full name</label>
                            <input type="text" class="form-control" id="name" placeholder="Please enter your name">
                        </div>
                        <div class="form-group">
                            <label for="salary">wages</label>
                            <input type="text" class="form-control" id="salary" placeholder="Please enter salary">
                        </div>
                        <div class="form-group">
                            <label for="age">Age</label>
                            <input type="text" class="form-control" id="age" placeholder="Please enter age">
                        </div>
                        <div class="form-group">
                            <label for="description">Personal profile</label>
                            <input type="text" class="form-control" id="description" placeholder="Please enter your profile">
                        </div>

                        <button type="submit" class="btn btn-primary">Submit</button>
                    </form>
                </div>
            </div>
        </div>

    </div>
</body>
</html>
<!--introduce axios-->
<script src="js/axios.min.js"></script>
<!--introduce vue-->
<script src="js/vue.js"></script>
<script>
    var app = new Vue({
        el: "#app",
        data:{
            msg:"vue life cycle",
            users:[],
        },
        methods:{

        },
        computed:{

        },
        created(){
            //Send axios request
            /*axios.get("http://localhost:8989/users").then(res=>{
               this.users = res.data;
            });*/
            this.users =[{id:1,name:"Xiao Chen",age:23,salary:2300,description:"He is a little white!!!"}]
        },
    });
</script>
We put the html page in the following location:
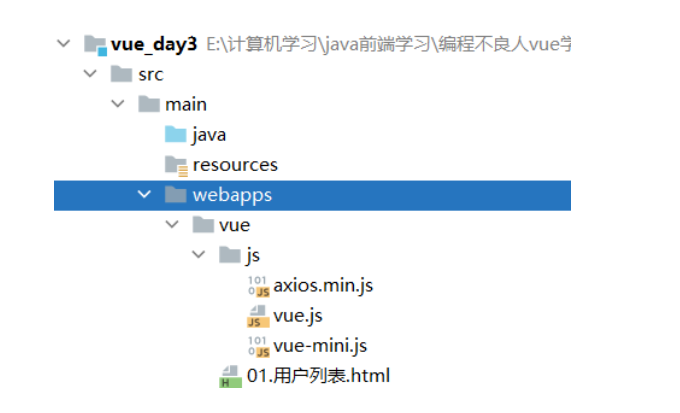
The vue and axios resource files are stored in the js directory.
2. Spring boot framework construction
2.1 project creation
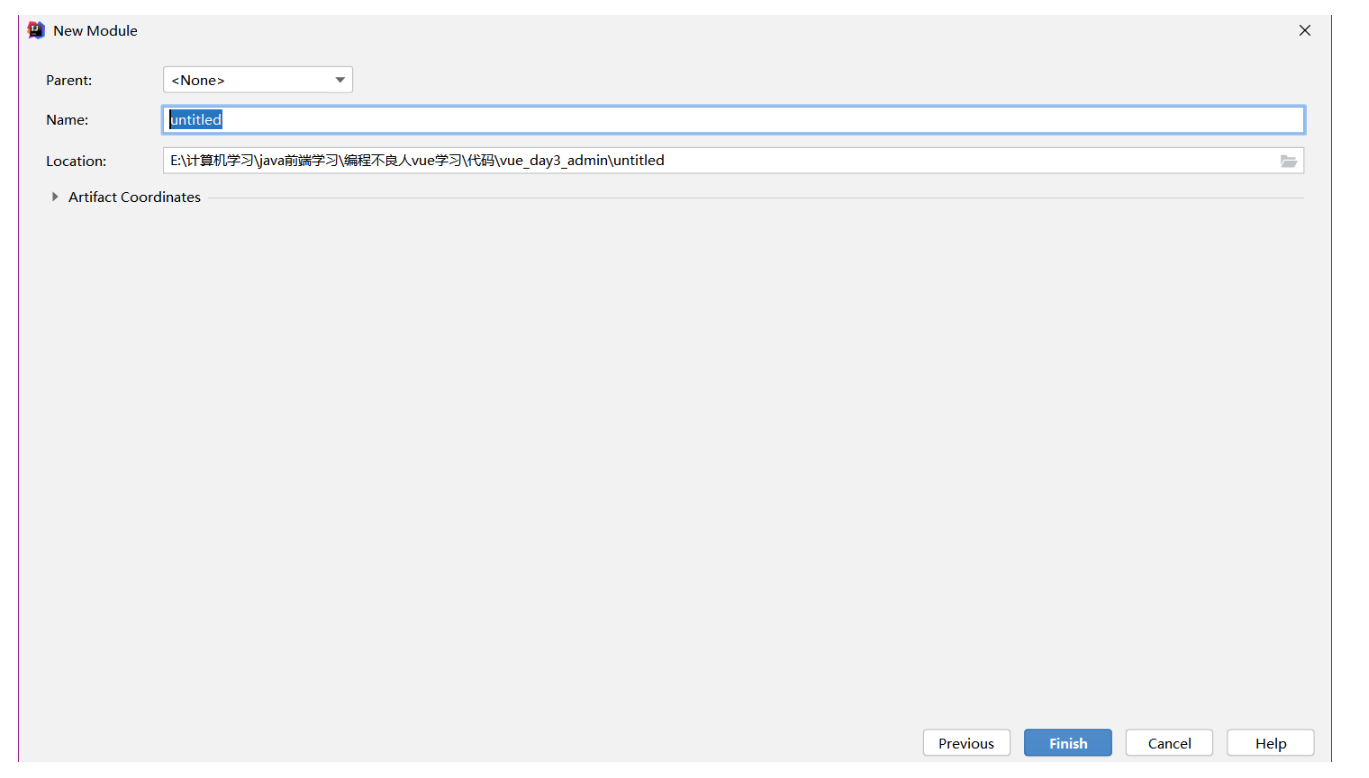
1. Create a new maven project named vue_day3_admin
2. Introducing springboot web dependency
<dependencies>
    <!--introduce springboot-web rely on-->
    <dependency>
        <groupId>org.springframework.boot</groupId>
        <artifactId>spring-boot-starter-web</artifactId>
    </dependency>
</dependencies>
3. Write startup class AdminApplication
package com.xiao;

import org.springframework.boot.SpringApplication;
import org.springframework.boot.autoconfigure.SpringBootApplication;

@SpringBootApplication
public class AdminApplication {
    public static void main(String[] args) {
        SpringApplication.run(AdminApplication.class,args);
    }
}
4. Testing

2.2. Connect to the database
1. Create vue_day3 database
CREATE TABLE t_user(
	id INT(6) PRIMARY KEY AUTO_INCREMENT,
	NAME VARCHAR(40),
	salary DOUBLE(7,2),
	age INT(3),
	des VARCHAR(200)
);
2. Introduce database dependency
<!--integration mybatis Introduce dependency-->
<dependency>
    <groupId>org.mybatis.spring.boot</groupId>
    <artifactId>mybatis-spring-boot-starter</artifactId>
    <version>2.1.3</version>
</dependency>
<!--mysql-->
<dependency>
    <groupId>mysql</groupId>
    <artifactId>mysql-connector-java</artifactId>
    <scope>5.1.38</scope>
</dependency>
<!--druid-->
<dependency>
    <groupId>com.alibaba</groupId>
    <artifactId>druid</artifactId>
    <version>1.2.1</version>
</dependency>
</dependencies>
3,application.properties configuration file writing
server.port=8990

# Integrate mybatis

spring.datasource.type=com.alibaba.druid.pool.DruidDataSource
spring.datasource.driver-class-name=com.mysql.jdbc.Driver
spring.datasource.url=jdbc:mysql://localhost:3306/vue_day3?characterEncoding=utf-8
spring.datasource.username=root
spring.datasource.password=root

# Specifies where the mapper appears
mybatis.mapper-locations=classpath:com/xiao/mapper/*.xml
mybatis.type-aliases-package=com.xiao.entity

# Show sql statements during execution
logging.level.com.xiao.dao=debug
4. Spring boot connects to mysql database
- 4.1. Open data sources and receivers, enter the database user and password, and select the database to be connected.
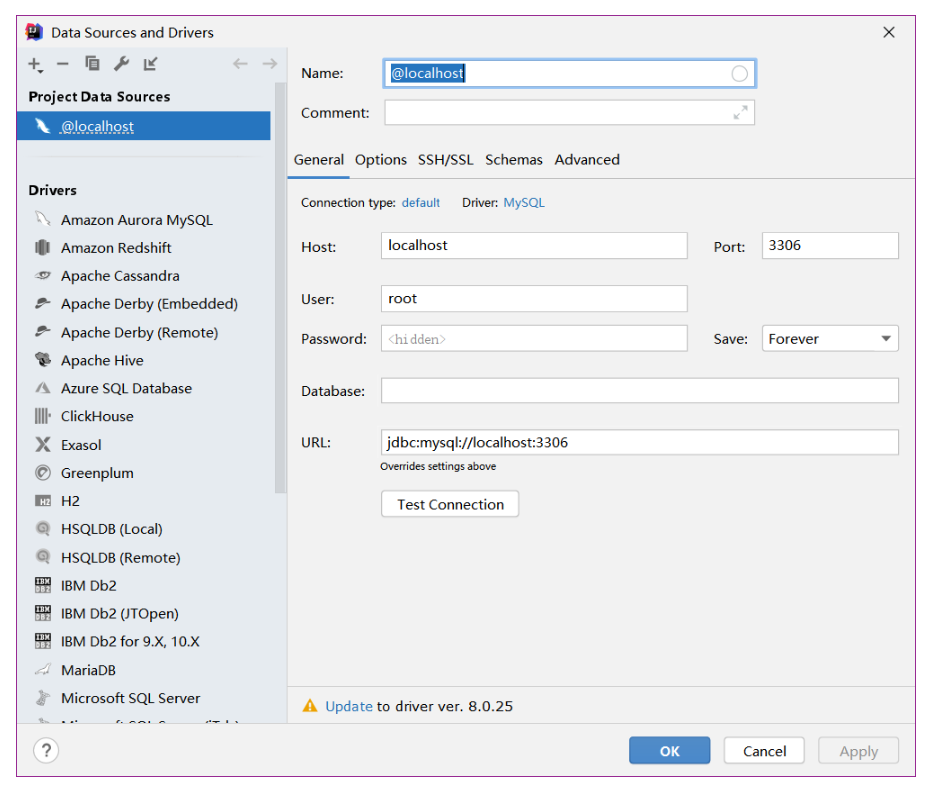
-
4.2. Set the time zone to UTC
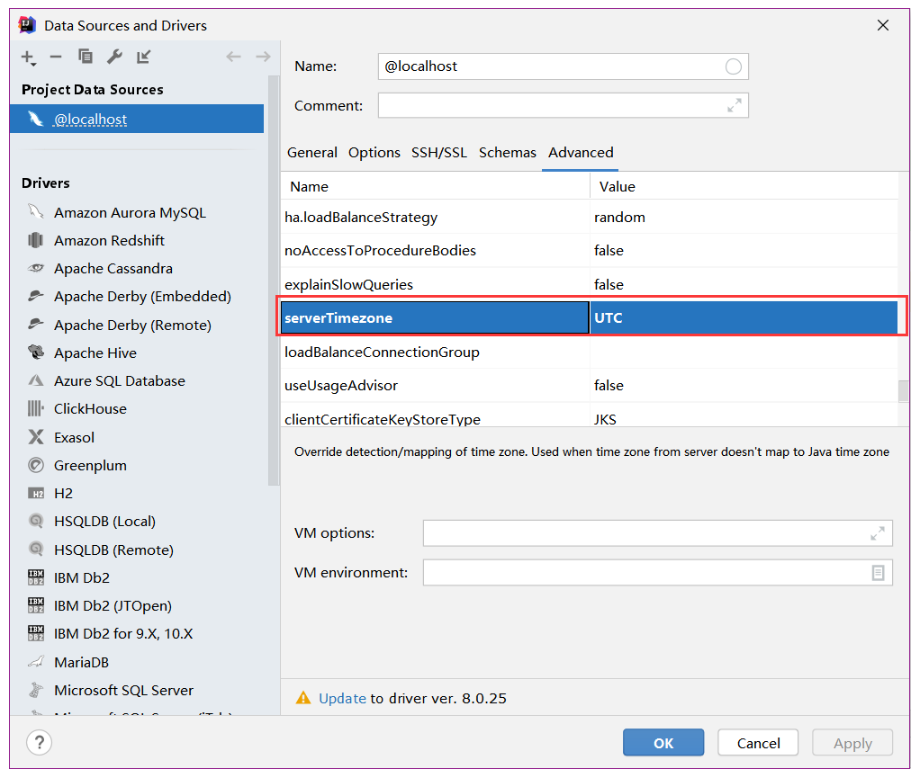
5. Start the test

No problem.
2.3 project integrity dependency
<?xml version="1.0" encoding="UTF-8"?>
<project xmlns="http://maven.apache.org/POM/4.0.0"
         xmlns:xsi="http://www.w3.org/2001/XMLSchema-instance"
         xsi:schemaLocation="http://maven.apache.org/POM/4.0.0 http://maven.apache.org/xsd/maven-4.0.0.xsd">
    <modelVersion>4.0.0</modelVersion>

    <groupId>org.example</groupId>
    <artifactId>vue_day3_admin</artifactId>
    <version>1.0-SNAPSHOT</version>

    <!--inherit springboot Parent project-->
    <parent>
        <groupId>org.springframework.boot</groupId>
        <artifactId>spring-boot-starter-parent</artifactId>
        <version>2.5.0</version>
    </parent>
    <dependencies>
        <!--introduce springboot-web rely on-->
        <dependency>
            <groupId>org.springframework.boot</groupId>
            <artifactId>spring-boot-starter-web</artifactId>
        </dependency>
        <!--integration mybatis Introduce dependency-->
        <dependency>
            <groupId>org.mybatis.spring.boot</groupId>
            <artifactId>mybatis-spring-boot-starter</artifactId>
            <version>2.1.3</version>
        </dependency>
        <!--mysql-->
        <dependency>
            <groupId>mysql</groupId>
            <artifactId>mysql-connector-java</artifactId>
            <scope>5.1.38</scope>
        </dependency>
        <!--druid-->
        <dependency>
            <groupId>com.alibaba</groupId>
            <artifactId>druid</artifactId>
            <version>1.2.1</version>
        </dependency>
        <!--Local test-->
        <dependency>
            <groupId>org.springframework.boot</groupId>
            <artifactId>spring-boot-starter-test</artifactId>
            <version>1.5.12.RELEASE</version>
            <scope>test</scope>
        </dependency>
    </dependencies>
</project>
3. Write entity layer
Create user entity class
package com.xiao.entity;

public class User {
    private Integer id;
    private String name;
    private Double salary;
    private Integer age;
    private String des;

    public User() {
    }

    public User(Integer id, String name, Double salary, Integer age, String des) {
        this.id = id;
        this.name = name;
        this.salary = salary;
        this.age = age;
        this.des = des;
    }

    public Integer getId() {
        return id;
    }

    public void setId(Integer id) {
        this.id = id;
    }

    public String getName() {
        return name;
    }

    public void setName(String name) {
        this.name = name;
    }

    public Double getSalary() {
        return salary;
    }

    public void setSalary(Double salary) {
        this.salary = salary;
    }

    public Integer getAge() {
        return age;
    }

    public void setAge(Integer age) {
        this.age = age;
    }

    public String getDes() {
        return des;
    }

    public void setDes(String des) {
        this.des = des;
    }

    @Override
    public String toString() {
        return "User{" +
                "id=" + id +
                ", name='" + name + '\'' +
                ", salary=" + salary +
                ", age=" + age +
                ", des='" + des + '\'' +
                '}';
    }
}
4. Query user information
4.1. Back end code writing
1. Written by UserDAO
package com.xiao.dao;

import com.xiao.entity.User;

import java.util.List;

public interface UserDAO {

    //Query all user information
    List<User> findAll();
}
2,UserDAOMapper.xml writing
Create the following directory under resources
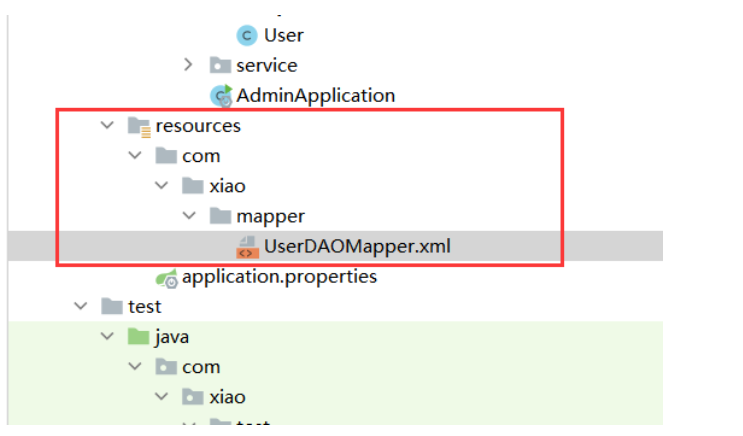
code:
<?xml version="1.0" encoding="UTF-8" ?>
<!DOCTYPE mapper
        PUBLIC "-//mybatis.org//DTD Mapper 3.0//EN"
        "http://mybatis.org/dtd/mybatis-3-mapper.dtd">
<mapper namespace="com.xiao.dao.UserDAO">
    <!--findAll-->
    <select id="findAll" resultType="User">
        select id,name,salary,age,des from t_user;
    </select>
</mapper>
3. service layer writing
UserService interface
package com.xiao.service;

import com.xiao.entity.User;
import java.util.List;

public interface UserService {
    //Query all user methods
    List<User> findAll();
}
UserServiceImpl implementation class
package com.xiao.service;

import com.xiao.dao.UserDAO;
import com.xiao.entity.User;
import org.springframework.beans.factory.annotation.Autowired;
import org.springframework.stereotype.Service;
import org.springframework.transaction.annotation.Propagation;
import org.springframework.transaction.annotation.Transactional;

import java.util.List;

@Service //This is a business layer component, which is used to create a userServiceImpl object in the spring factory
@Transactional //Represents adding transaction control to all methods in the class
public class UserServiceImpl implements UserService{

    @Autowired
    private UserDAO userDAO;

    @Override
    @Transactional(propagation = Propagation.SUPPORTS) //Declare transaction annotations on Methods
    public List<User> findAll() {
        return userDAO.findAll();
    }
}
4. Conduct test
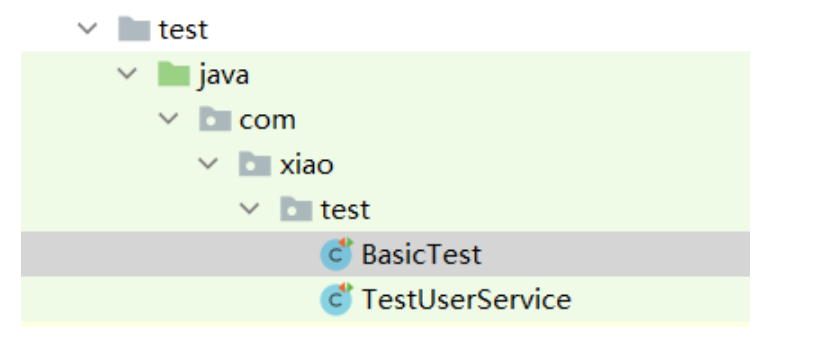
BasicTest class
package com.xiao.test;import com.xiao.AdminApplication;import org.junit.runner.RunWith;import org.springframework.boot.test.context.SpringBootTest;import org.springframework.test.context.junit4.SpringRunner;@SpringBootTest(classes = AdminApplication.class) //Specify the entry class @ RunWith(SpringRunner.class) / / start the factory public class BasicTest {}
TestUserService class
package com.xiao.test;import com.xiao.service.UserService;import org.junit.Test;import org.springframework.beans.factory.annotation.Autowired;public class TestUserService extends BasicTest { @Autowired private UserService userService; @Test public void findAll(){ userService.findAll().forEach(user -> System.out.println(user)); }}
Test successful!!!

4.2 front end code writing
1. Add the axios request in the created() function
# Lifecycle hooks: lifecycle functions
            Initialization phase
            1.beforeCreate vue Instance itself event lifecycle initialization
            2.created Complete customization data methods computed Injection and verification    recommend
            3.beforeMount take el point html Compile as template,Template injection has not been completed
            4.Mounted Data injection of compiled template,The injection completion template is formed into a virtual template dom replace el Point to original dom
code:
var app = new Vue({
    el: "#app",
    data:{
        msg:"vue life cycle",
        users:[], //Define an empty array of users to store the information of all users
    },
    methods:{

    },
    computed:{

    },
    created(){ //Execute data methods computed to complete injection and verification
        //Send axios request
        axios.get("http://localhost:8990/users").then(res=>{
            console.log(res.data);
            this.users = res.data;
        }); //es6 arrow function note: the arrow function does not have its own this. Simplify function() {} / / its own this exists
    },
});
2. Testing
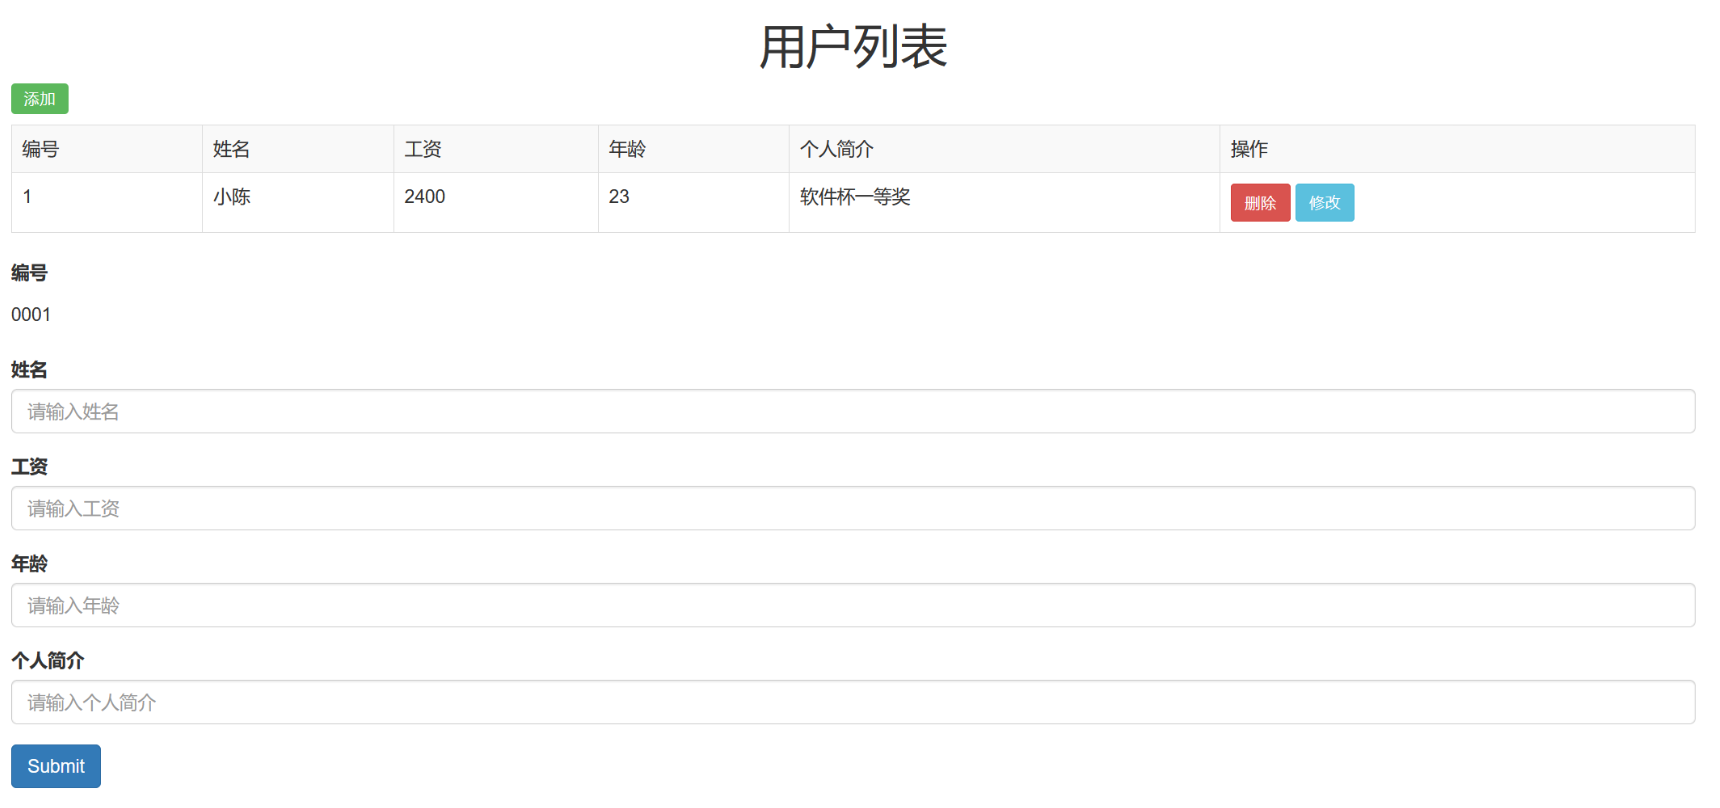
Test successful!!!
5. Add user information
5.1 back end code writing
1. UserDAO interface layer
//Query all user information
List<User> findAll();
2,UserDAOMapper.xml
<!--save-->
<insert id="save" parameterType="User" useGeneratedKeys="true" keyProperty="id">
    insert into t_user values (#{id},#{name},#{salary},#{age},#{des})
</insert>
How do I get the primary key when I insert a new piece of data using mysql self growth sequence?
Add the following attributes:
useGeneratedKeys="true" keyProperty="id"
The value range of useGeneratedKeys is true and false. The default value is false. Meaning: set whether to use the getgeneratedkeys method of JDBC to obtain the primary key and assign it to the domain model property set by keyProperty.
keyProperty takes the key value of id, which is mainly used when the primary key is self increasing. After successful addition, the primary key value can be used directly. The value of keyProperty is the property value of the object, not the field name in the database table.
3. service layer writing
UserService class
//Save user information
void save(User user);
UserServiceImpl class
@Override
public void save(User user) {
    userDAO.save(user);
}
4. UserController control class
//Add employee information interface
@PostMapping("saveOrUpdate")
public void saveOrUpdate(@RequestBody User user){
    System.out.println(user);
    userService.save(user);
}
5.2 front end code writing
1. Add v-model bidirectional binding to form
</div>
<div class="form-group">
    <label for="name">full name</label>
    <input type="text" class="form-control" v-model="user.name" id="name" placeholder="Please enter your name">
</div>
<div class="form-group">
    <label for="salary">wages</label>
    <input type="text" class="form-control" v-model="user.salary" id="salary" placeholder="Please enter salary">
</div>
<div class="form-group">
    <label for="age">Age</label>
    <input type="text" class="form-control" v-model="user.age" id="age" placeholder="Please enter age">
</div>
<div class="form-group">
    <label for="description">Personal profile</label>
    <input type="text" class="form-control" v-model="user.des" id="description" placeholder="Please enter your profile">
</div>
<button type="button" class="btn btn-primary btn-block" @click="saveOrUpdate">Submit</button>
2. Bind the saveOrUpdate method to the submit button
    var app = new Vue({
        el: "#app",
        data:{
            msg:"vue life cycle",
            users:[], //Define an empty array of users to store the information of all users
            user:{},  //An empty json object is defined
        },
        methods:{
            saveOrUpdate(){ //Save or modify method
                //Send add request
                console.log(this.user);
                axios.post("http://localhost:8990/saveOrUpdate",this.user).then(res=>{
                    this.user={}; //Successfully added, clear the data
                    alert('User information updated successfully!');
                    //Update the data of the original list
                    this.findAll(); //Call query all
                }).catch(err=>{
                    alert('User information update failed!')
                });
            },
            findAll(){
                //Send axios request
                axios.get("http://localhost:8990/users").then(res=>{
                    console.log(res.data);
                    this.users = res.data;
                }); //es6 arrow function note: the arrow function does not have its own this. Simplify function() {} / / its own this exists
            }
        },
3. Test it
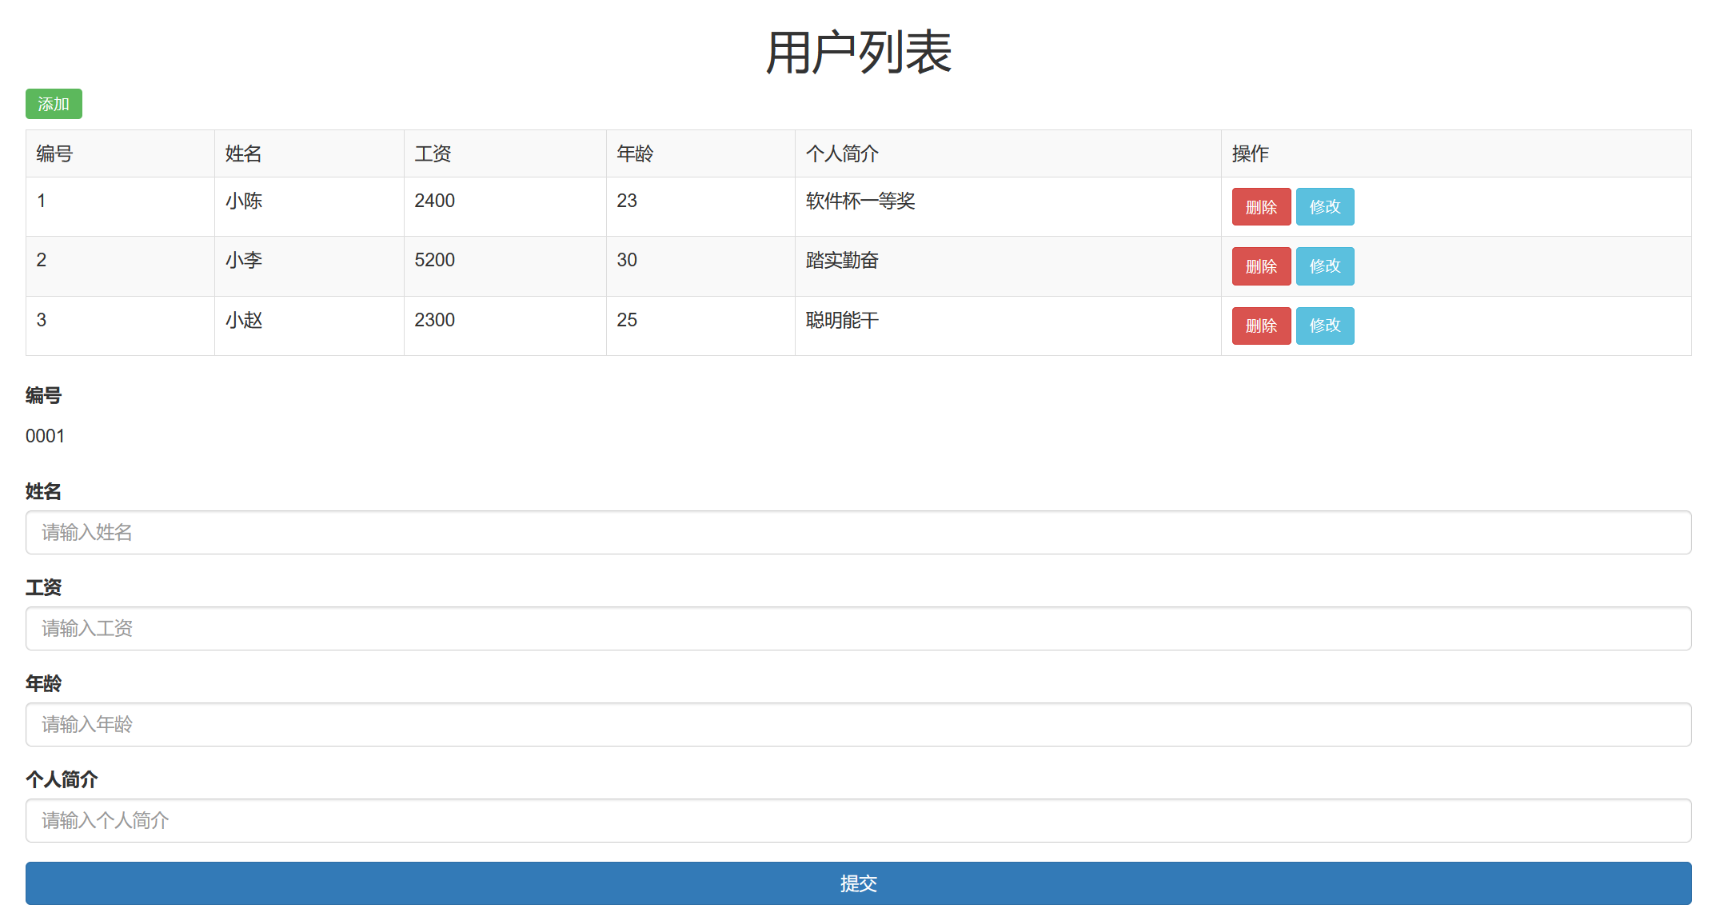
Test successful!!!
6. Modify user information
6.1 back end code
1. UserDAO class
//Update user information
void update(User user);

//Query user information based on id
User findById(Integer id);
2,UserDAOMapper.xml
<!--update-->
<update id="update" parameterType="User">
    update t_user
    set
    name = #{name},
    age = #{age},
    salary = #{salary},
    des = #{des}
    where id = #{id}
</update>

<!--findById-->
<select id="findById" parameterType="Integer" resultType="User">
    select
    id,name,age,salary,des
    from t_user
    where id = #{id}
</select>
3. service layer
UserService class
//Modify user information
void update(User user);

//Query user information based on id
User findById(Integer id);
UserServiceImpl implementation class
@Override
public void update(User user) {
    userDAO.update(user);
}

@Override
@Transactional(propagation = Propagation.SUPPORTS) //The transaction annotation Propagation: transaction Propagation attribute is declared on the method to support transactions
public User findById(Integer id) {
    return userDAO.findById(id);
}
4. control layer
Here, we will judge according to the parameters requested by the front end. If the id in the parameters requested by the front end is empty, it indicates that it is an add operation, otherwise it is an update operation, and we execute the corresponding code.
//Add employee information interface
@PostMapping("saveOrUpdate")
public void saveOrUpdate(@RequestBody User user){
    log.info("Received business logic:{}",user);
    //Determine whether id exists
    //Existing: update operation does not exist id: add operation
    if(StringUtils.isEmpty(user.getId())){ //If empty
        log.info("Add business logic......");
        userService.save(user);  //add to
    }else{
        log.info("Update business logic......");
        userService.update(user);
    }

}
6.2 front end code
We click the Modify button to display the user information.
1. Let's first add the event of querying user information according to id to the Modify button
<a href="" class="btn btn-info btn-sm" @click.prevent="userEditDetail(user.id)">modify</a>
2,userEditDetail(id)
userEditDetail(id){  //Used to echo the currently clicked user information in the form
    axios.get("http://localhost:8990/user/"+id).then(res=>{
        this.user = res.data;  //Complete data echo
    });
},
3. Bind modify or add user information events to the submit button
<button type="button" class="btn btn-primary btn-block" @click="saveOrUpdate">Submit</button>
4,saveOrUpdate()
saveOrUpdate(){ //Save or modify method
    if(!this.user.name){
        alert("Name cannot be empty!");
        return ;
    }
    console.log(this.user);
    axios.post("http://localhost:8990/saveOrUpdate",this.user).then(res=>{
        this.user={}; //Successfully added, clear the data
        alert('User information updated successfully!');
        //Update the data of the original list
        this.findAll(); //Call query all
    }).catch(err=>{
        alert('User information update failed!')
    });
},
},
findAll(){
    //Send axios request
    axios.get("http://localhost:8990/users").then(res=>{
        console.log(res.data);
        this.users = res.data;
    }); //es6 arrow function note: the arrow function does not have its own this. Simplify function() {} / / its own this exists
},
5. Test it
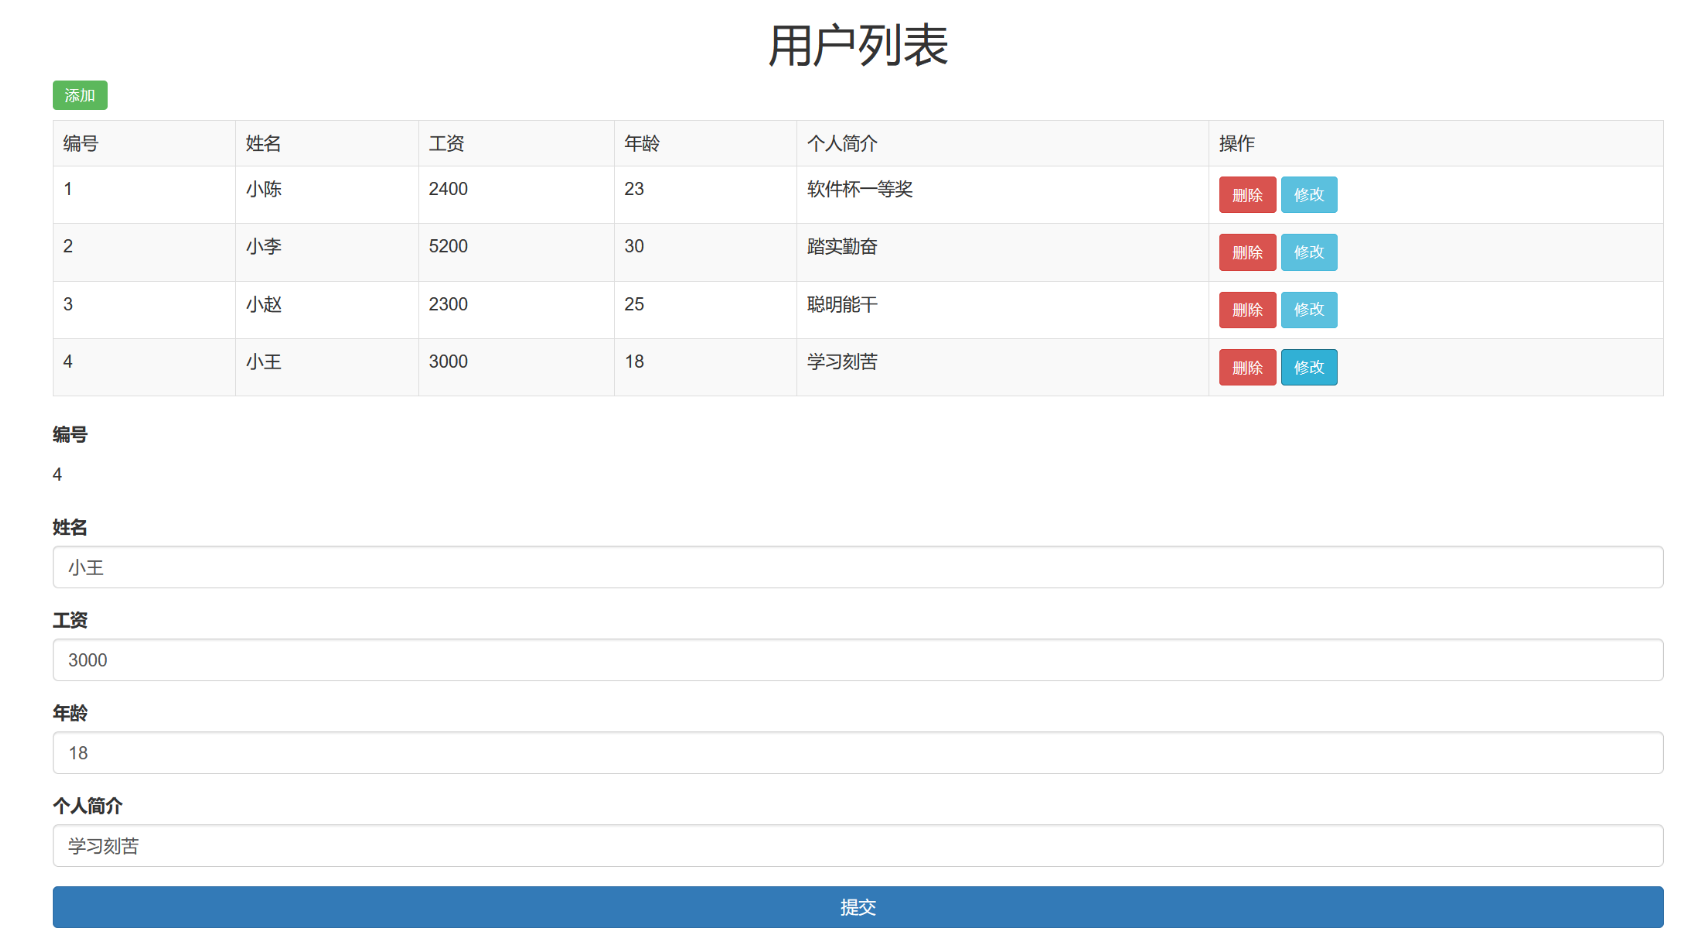
Test successful!!!
7. Delete user information
7.1 back end code
1. UserDAO interface
//Delete user information based on id
void delete(Integer id);
2,UserDAOMapper.xml
<!--delete-->
<delete id="delete" parameterType="Integer">
    delete from t_user where id = #{id}
</delete>
3. service layer
UserService class
//Delete user information according to id
void delete(Integer id);
UserServiceImpl class
@Override
public void delete(Integer id) {
    userDAO.delete(id);
}
4. controller class
//Interface for deleting user information according to id
@DeleteMapping("delete/{id}")
public void delete(@PathVariable Integer id){
    userService.delete(id);
}
7.2 front end code
1. Bind delete event to delete button
<a href="javascript:;" class="btn btn-danger btn-sm" @click="delUser(user.id)">delete</a>
2. delUser(id) delete user method
delUser(id){ //Delete user method
    //Friendly reminder deletion
    if(window.confirm("Are you sure you want to delete this record?")){
        axios.delete("http://localhost:8990/delete/"+id).then(res=>{
            alert("User information deleted successfully!");
            this.findAll(); Call query all
        }).catch(err=>{
            alert("Failed to delete user information!");
        });
    }
}
3. Test it
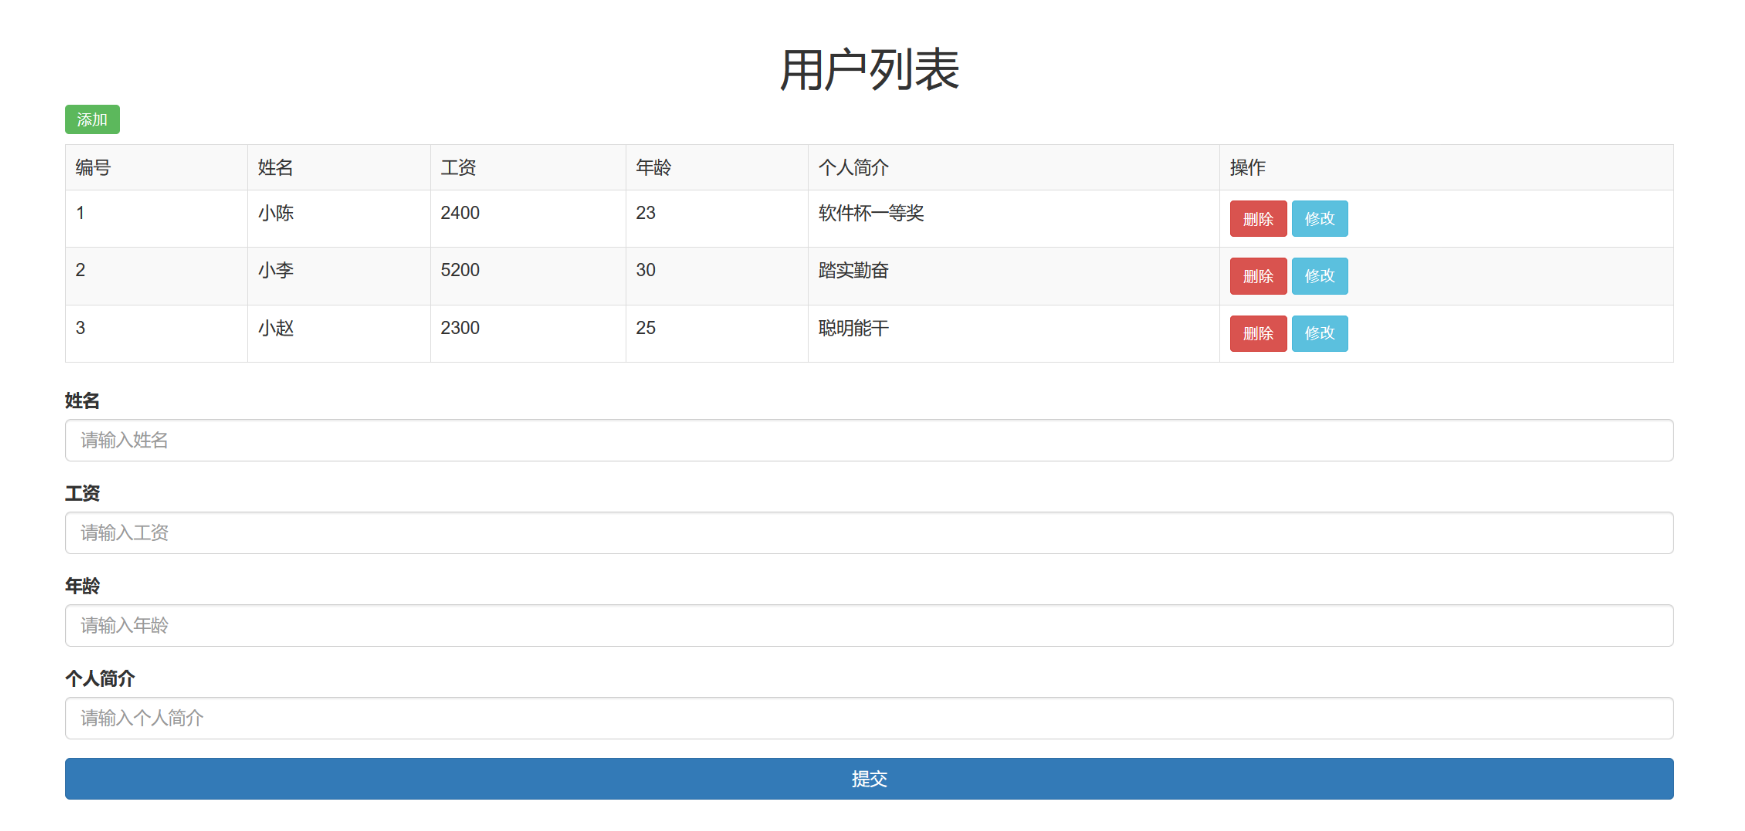
Delete information successfully!!!
So far, we have completed a simple front-end and back-end separation project. Those who need source code and notes can confide in me.
