Reading guide
Today, we will prepare for the summer vacation project. We have been making a summary of Python classes recently, so let's start our project from python. Students who like java should not be discouraged. Later, we will write a java class project accordingly. Students who like can pay attention to one wave, knock one after another in the summer vacation, or collect one wave first and practice when they are free. OK, let's get to the main topic, Shout the slogan "not fat body, fat knowledge"

Emphasis: if you don't understand or have problems with the content of the article, you can leave a message. In addition, I'm just a basic introduction. I suggest you take a look at the resources sent at the end of my article to learn more.
Why flash

The flusk framework itself only implements the most basic functions, so flusk is called the microFramework (microFramework), which is true in terms of the amount of code. But from the engineering point of view, this so-called "small" has brought more convenience. In large projects, flash is much more convenient than django. Large means that you need to customize the admin system (for example, the administrator is hierarchical, and each administrator can customize the management group), complex database operations, many cross entity form operations and verification, etc.
Rich third-party library resources make you feel like a duck to water when writing almost any type of program. Use flash Sqlalchemy for database operation, flash WTF for verification form, flash login for login management, and flash mail for mail Therefore, compared with the brother framework Django, another point of Flask is obvious: flexibility. You can choose any third-party extension you like
Install flash
pip install flask
However, if the installation is a little slow, it is recommended to move to Tsinghua source or Douban source
pip install flask -i https://pypi.tuna.tsinghua.edu.cn/simple
In addition, it should be mentioned that we'd better use the virtual environment when writing the project, so as to prevent the conflict of some python packages. In addition, for students who don't know how to establish the virtual environment, I will recommend a Book below, which will have a detailed tutorial.
Start flash
from flask import Flask

app=Flask(__name__)#Create an instance so that the following is devoted to this

@app.route('/') #The function of. Route is to create a route from the instance and tell flag what kind of URL can trigger our function
def hello(): #Simply create a function
    return 'Hello'

if __name__=='__main__':
    app.run(debug=True)# . run is the statement that flash starts running. There are also many parameters in it. It is generally recommended to use debug=True. The built-in debugging is better than your own
    app.run(host='192.168.1.2',port=3308)# Add or not. This is the specific host and port settings, depending on whether your default port is occupied
See debugger operation for details: Portal
The use of name in flash
From the above program, we can see that there is a name in flash, which is specially set up to start the template. If you use a single module (as in the above example), you should use name, because the name of the module will vary depending on whether it is started as a separate application or imported as a module (that is, 'main' or actual import name). This is necessary so that flash can know where to find templates, static files, etc. in addition:
static_folder:Static address, default to static folder
static_url_path:Static web address
template_folder:Template folder, default to templates folder
If you don't understand it here, it doesn't matter. The final book will give a detailed explanation so that you can develop the project yourself. You can also look at the official documents first Portal
Converter and variable rules
To add a variable part to the URL, you can mark these special fields as < variable_ Name >, this part will be passed to your function as a named parameter. Rules can use < converter: variable_ Name > specify an optional converter. The converter mainly takes the value after the page as a standard to get another page. This is used as the encryption string we often see
from flask import Flask

app = Flask(__name__)


@app.route('/user/<username>')#Define converter
def show_user_profile(username):#Pass converter into function
    # show the user profile for that user
    return 'User %s' % username


@app.route('/post/<int:post_id>')
def show_post(post_id):
    # show the post with the given id, the id is an integer
    return 'Post %d' % post_id


if __name__ == '__main__':
    app.run()
Flask Default converter for: DEFAULT_CONVERTERS = {
'default': UnicodeConverter,
'string': UnicodeConverter,
'any': AnyConverter,
'path': PathConverter,
'int': IntegerConverter,
'float': FloatConverter,
'uuid': UUIDConverter,}
Here's how you define the converter
class rc(BaseConverter):
 # Override the properties of the parent class and define the conversion rules
    def __init__(self,url_map):
        super(rc,self).__init__(url_map)
        #Verify the regular expression of QQ mailbox
        self.regex ='[0-9a-zA-Z_]{0,19}@qq.com'
    #Defines the return value under the view function
    def to_python(self,value):
        val=value
        return val
    def to_url(self,value):#Return url
        return value
app.url_map.converters['em'] = rc #Add a custom converter to the converter list
@app.route('/emm/<em:email>') #Add a new converter
def email(email):
    return 'email is:%s' % email #Return email
redirect
Redirection is also very important in web development. It can jump from one web page to another, which is equivalent to the operation after refresh. For flash, it mainly involves two modules (redirect, url_for)
First establish a route as an example to be described later
@app.route('/1')
def fg():
    return '1122'
from flask import redirect,url_for
@app.route('/refer')
def refer():
    return redirect('/1')#Create another route
In this way, you can jump directly to the function in the route ('/ 1') and display the return value.
We can first access the routing function and then jump to the corresponding content page. This method is called indirect jump
@app.route('/ref')
def ref():
    return redirect(url_for('fg')) #Jump so that you can directly access the ref sub page and jump to the corresponding page
Set error page
As we all know, 404 and other errors cannot be avoided in web page loading. Flash has two ways: one is to use the system's abort direct assignment, and the other is to use the user-defined errorhandler function
- With abort(), you can redirect users to other places with the redirect() function. Abandon the request and return the error code, using the abort() function. Here is an example of how they are used:
from flask import abort, redirect, url_for

@app.route('/')
def index():
    return redirect(url_for('login'))

@app.route('/login')
def login():
    abort(401)#401 means no access
    this_is_never_executed()
- By default, the error code displays a black-and-white error page. If you want to customize the error page, you can use the errorhandler() decorator:
from flask import render_template

@app.errorhandler(404)
def page_not_found(error):
    return render_template('page_not_found.html'), 404
Pay attention to render_ 404 after the template() call. This tells Flask that the error code of the page is 404, that is, it is not found. The default is 200, which means everything is normal.
json data reading
As a general data transmission format, json has high practicability. As a web framework, flash also has certain processing capacity for it. At present, jsonify is used
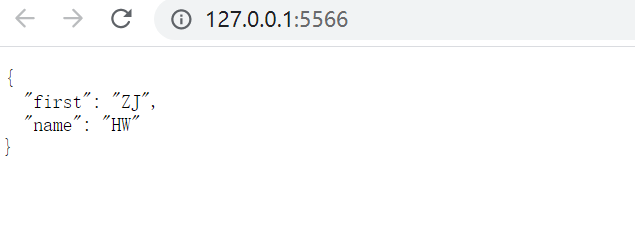
@app.route('/json1')
def json1():
    data={'name':'HW','first':'ZJ'}
    return jsonify(data)


@app.route('/json2')
def json2():
    return jsonify(hour=12,second=21)
Cookies and session s
The session content is reserved in the session. It exists in cookie s. Through it, we can directly log in to some logged in systems. To operate a session, we need to introduce a specially prepared session module and configure a security key to use the session
Let's talk about the operation of cookie s first
cookie Settings for
set_cookie(key, value='', max_age=None, expires=None,path='/', domain=None, secure=False, httponly=False,samesite=None)

key:key
value:value
max_age:Set expiration time (seconds)
expires:Set the expiration time in the form of timestamp (1970 from now)
path:Current primary domain name
domain:Subdomain name
#Set cookie s and headers
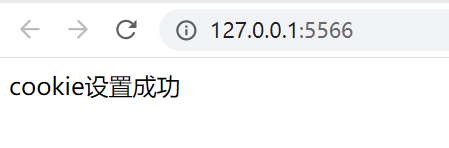
@app.route('/set_cookie')
def set_cookie():
response=make_response('cookie Set successfully')
#The cookie can be valid for 30 days or hour second minute
time=datetime.datetime.today()+datetime.timedelta(days=30)#Set the effective length of the cookie
response.set_cookie('user','admin',expires=time) #Set cookie for user name
response.set_cookie('pass','123456',expires=time) #Set password cookie
response.headers['X-Something']='mything' #Chinese is not allowed here
response.headers['Server']='feixue' #Server name
return response
Acquisition and deletion of cookie s
You need to add a request module to get cookie s. It's not a crawler's requests
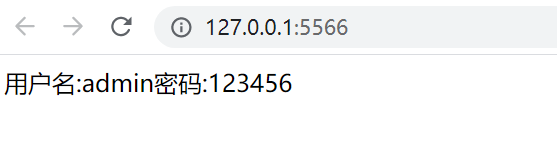
@app.route('/get_cookie')
def get_cookie():
    name="user name:"+request.cookies.get('user')+"password:"+request.cookies.get('pass')
    return name
There are two ways to delete cookie s
1. The cookie can be deleted by setting the expiration time to 0
@app.route('/del_cookie1')
def del_cookie1():
    response=make_response('delete cookie 1')
    response.set_cookie('user','',expires=0)
    response.set_cookie('pass','',expires=0)
    return response
2. Delete cookie s directly
@app.route('/del_cookie2')
def del_cookie2():
    response=make_response('delete cookie 2')
    response.delete_cookie('user')
    response.delete_cookie('pass')
    return response
When using cookie based sessions, note that Flask will serialize the values you put into the session object into Cookies. If you find that some values do not persist between requests, but Cookies are enabled, but you do not get a clear error message. At this time, please check the size of Cookies in your page response and compare it with the size supported by your Web browser.
session operation
Set session
Configure security key
The problem with randomness is that it is difficult to judge what is true randomness. A key should be random enough. Your operating system can generate beautiful random values based on a key random generator, which can be used as keys:
app.config['SECRET_KEY']=os.urandom(30)
Set session dictionary
session['user']='fei'
session['pass']='xue'
Set session expiration method
session.parmanent=True #Expires after 31 days by default
#session expires in two hours
app.config['PERMANENT_SESSION_LIFETIME']= timedelta(hour=2)
Together
@app.route('/session1')
def session1():
    session['user']='fei'
    session['pass']='xue'
    session.parmanent=True #Expires after 31 days by default
    return 'login success'
Get session
Get() retrieval and index retrieval. The index retrieval is not stable. It is recommended to use the get method
@app.route('/session')
def session2():
    us=session.get("user")
    pa=session.get("pass")
    return 'hello %s %s'%(us,pa)
Delete session
Delete one by one
@app.route('/session')
def session3():
    session.pop('user',None)
    session.pop('pass',None)
    return 'delete successful!'
Delete all
@app.route('/session4')
def session4():
    session.clear()
    return 'delete successful!'
Use of request
Request is mentioned in getting cookie s above. Let's talk about the use of request. This is a module specially used to operate web page requests.
get request for request
You can set its methods Parameter to specify the request method.

@app.route('/get', methods = ['GET','POST'])
def get():
    if request.method == 'GET':
        return 'This is a GET request'
    else:
        return 'This is another request'
post request
@app.route('/post', methods = ['POST','GET'])
def post():
    if request.method == 'POST':
        return 'This is a POST request'
    else:
        return 'This is another request'
args of request
record get The query parameters in the request are generally used to query and search the web address

https://www.kugou. com/yy/html/search. HTML #searchtype = song & searchkeyword = your name
It will return get Parameters in the request, such as those above the request url,Its request parameters are:

searchType=song&searchKeyWord=Your Name
usage method:

request.args['keyword']
request.args.get('keyword')
request form
Record the form data in the request, which is generally used for form submission. For example, we often need to submit forms when registering a website.
We can use to get the contents of the form:

request.form['keyword']
request.form.get('keyword')
request headers
Return the header information of the requested web page and return a list.

request.headers['keyword']
request.headers.get('keyword')
Necessary for blueprint development
This knowledge can be seen at a glance
The storage file of the following program is called Fei py
from flask import Flask
app=Flask(__name__)
@app.route('/kj')
def df():
    return 'hello world'
@app.route('/index')
def lk():
    return 'efhsfj'
So there is
from flask import Flask,request
from fei import *
@app.route('/')
def login():
    return request.url
if __name__ == '__main__':
    app.run(debug=True)
See, the essence of calling the function blueprint in this file from the master file is nothing more than introducing multiple modules into one master module, which is equivalent to writing modules and using them as blueprints. If there are the same methods in multiple blueprints, the blueprint view function can be used to distinguish their respective methods.
view
Views can be understood by everyone. For example, views in mysql database are interconnected. There will not be much difference, but the functions are different. The way to create views is also very simple. They all inherit from the views class of flash.
View of class
from flask.views import View
def ff():
    return 'ok'
class st(View):
    def dispatch_request(self): #This method must be implemented
        return "Wayward post-90s boy"
# Class view through add_url_rule method and URL are mapped
app.add_url_rule(rule='/ff',view_func=st.as_view('tt'))
Methodical
from flask.views import MethodView
def gg():
    return 'ok'
class login(MethodView):
    #The function executed when the client accesses through the get method
    def get(self):
        return 'get'
    # The function executed when the client accesses through the post method
    def post(self):
        email = request.form.get("user")
        password = request.form.get("pass")
        if user== 'gffsadff' and pass== '4fsaferwf':
            return "Login succeeded"
        else:
            return "Login failed"

# Via add_url_rule adds the mapping of class view and URL, and in as_ Specify the name of the URL in the view method to facilitate the url_for function call
app.add_url_rule('/gg',view_func=login.as_view('lg'))
Resource sharing
Like the last MySQL article, in order to let you learn better, we also found some resources for you. Flash web development is based on python. If you want to learn, you can go to my home page to find resources. Of course, you can also write to me privately. Finally, I'd like to share with you my favorite pictures recently. Welcome to the third consecutive support