Foreword
Azexplosion, a particle crushing effect component based on Android platform( https://github.com/Xieyupeng520/AZExplosion ), the functional migration and reconstruction of Hongmeng are realized. The code has been open source to( https://gitee.com/isrc_ohos/azexplosion_ohos ), welcome all developers to download and use and put forward valuable opinions!
background
Azexplosion_ohos is a component to realize the animation effect of particle breakage. Users can click the broken object on the mobile phone screen (generally refers to the picture or text displayed on the mobile phone screen) to achieve the effect of breaking the object. This component can set whether the object on the mobile phone screen has the crushing effect, and can also change the broken object and the background of the broken object. Azexplosion_ohos component has outstanding visual effect, easy to use and strong scalability, which is similar to the dynamic effect when Xiaomi mobile phone deletes APP.
Component effect display
The component application only contains a main interface, in which there are two broken objects: picture and text. When a finger touches a picture (or text), the picture (or text) presents a broken effect visually, and the color of the broken particles corresponds to the color of the original picture (or text), as shown in Figure 1. The effect looks very decompressed and easy to use~
Fig. 1 display of crushing effect
Sample parsing
Azexplosion_ The core functions of ohos components are mainly encapsulated in the Library. The function implementation of Sample is very simple. You only need to build the overall layout and call the monitoring interface provided by the Library to set monitoring for the overall display layout, so as to realize the crushing effect of the object executed. The specific implementation steps are as follows:
Step 1 Create a layout.
Step 2 Set the overall display layout.
Step 3 Import related classes and instantiate objects.
Step 4 Set listening for the overall display layout.
Next, let's look at the detailed operations involved in each step.
(1) Create layout
First, create a DirectionalLayout layout in the XML file. The width and height are adjusted with the change of the parent control. Then add the required broken objects in the DirectionalLayout, which can be pictures or text, as shown in Figure 1, and the code is as follows.
<DirectionalLayout xmlns:ohos="http://schemas.huawei.com/res/ohos"
              ohos:id="$+id:root"
              ohos:width="match_parent"
              ohos:height="match_parent"
              ohos:orientation="vertical">
    <Text
            ohos:width="match_content"     //Text fragmentation object
            ohos:text="Crushing effect"
            ohos:text_size="60vp"
            ohos:top_margin="10vp"
            ohos:left_margin="20vp"
            ohos:bottom_margin="15vp"
            ohos:right_padding="10vp"
            ohos:left_padding="40vp"
            ohos:height="match_content"/>

    <DirectionalLayout ohos:id="$+id:group1"
            ohos:width="match_parent"
            ohos:height="100vp"
            ohos:top_margin="10vp"
            ohos:orientation="horizontal">

        <Image                           //Picture broken object
            ohos:id="$+id:qq"
            ohos:width="match_content"
            ohos:height="match_content"
            ohos:image_src="$media:qq"
            ohos:left_margin="25vp"
            ohos:right_margin="25vp"
            ohos:top_margin="15vp"/>
        ......
(2) Set overall display layout
In the onStart() method of the MainAbility file, set the overall display layout for the application through setUIContent, and set the layout in step (1) as the main interface layout of the application. In order to display beautiful, you can set the background color of the main interface through setBackground.
//directionalLayout points to the layout in step (1)
DirectionalLayout directionalLayout = (DirectionalLayout) LayoutScatter.getInstance(this).parse(ResourceTable.Layout_mian_activity, null, false);
ShapeElement element = new ShapeElement();
element.setRgbColor(new RgbColor(255,239,213));
directionalLayout.setBackground(element);      //Background color settings
super.setUIContent(directionalLayout);      //Set display layout
(3) Import related classes and instantiate objects
In MainAbility, import the ExplosionField class in the Library through the import keyword, and instantiate the ExplosionField class object in the onStart() method.
ExplosionField explosionField = new ExplosionField(this);
4) Set listening for overall display layout
Call the internal method addListener of the ExplosionField class object to set listening for the overall display layout. After the overall display layout is monitored, the user clicks a component in the layout, and the component will be broken.
explosionField.addListener((ComponentContainer)findComponentById(ResourceTable.Id_root));
Library resolution
In Sample, it is introduced that after listening is set for the overall display layout, click the components in the layout to break. In this section, we will talk about the detailed principle of component breakage.
Let's look at azexplosion first_ The Library structure of ohos component is shown in Figure 2. This part is mainly composed of three classes: ExplosionAnimator, ExplosionField and particle. ExplosionAnimator is mainly used to generate particles and execute particle fragmentation animation to change the particle state at different times; ExplosionField is mainly responsible for the canvas display of particle sets; Particle class is mainly used to describe the color, transparency and other attributes of particles.

Figure 2 Library project structure
Next, we introduce the execution steps of the internal logic of the Library. After the user clicks the broken object, the Library is responsible for generating the matrix image (PixelMap) corresponding to the broken object, then decomposing the matrix image into several particles, and finally moving the particles to form the broken animation. The specific process is shown in Figure 3.
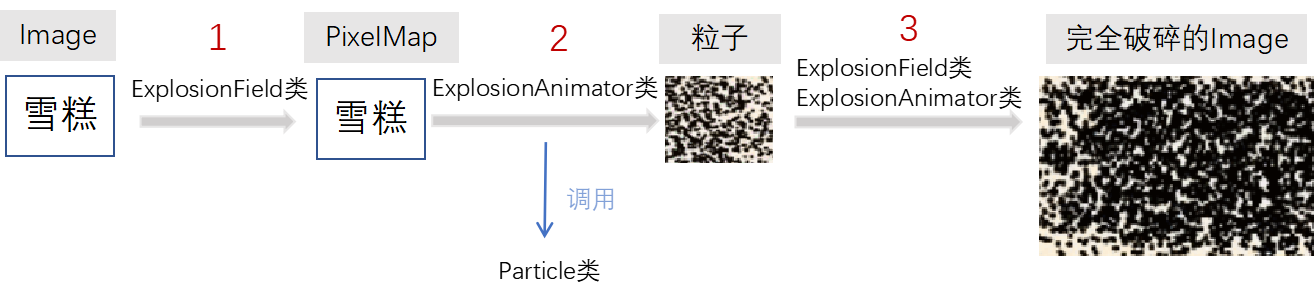
Figure 3 execution steps of Library Internal Logic
1. Convert image or text to PixelMap
After adding a listener to the overall display layout, click listening will be added to the components in each layout through the for loop. In the getOnClickListener() method, the ExplosionField class createBitmapFromView() method will continue to be called, and the createBitmapFromView() method is the key method to complete the conversion of images or text into PixelMap (bitmap).
In the createBitmapFromView() method, a 100 * 100 empty PixelMap will be created first. If the broken object is a picture, the PixelMap of the Image will be obtained by calling the getPixelMap() method of the ExplosionField class; If the broken object is text, an empty PixelMap will be returned directly. At this time, the PixelMap of the picture comes with the original pixel information of the picture. Because the PixelMap obtained from the text is empty, the black fragmentation effect is displayed by default.
//Add click listening for components in each layout
public void addListener(Component view) {
    if (view instanceof ComponentContainer) {
        ComponentContainer viewGroup = (ComponentContainer) view;
        int count = viewGroup.getChildCount();
        // Take out the broken objects in the layout one by one
        for (int i = 0 ; i < count; i++) {
            addListener(viewGroup.getComponentAt(i));
        }
    } else {
        //Set click listening for each broken object
        view.setClickable(true);
        view.setClickedListener(getOnClickListener());
    }
}

//Convert each broken object to a PixelMap
 private PixelMap createBitmapFromView(Component view) {
    //PixelMap parameter initialization operation
    PixelMap.InitializationOptions options = new PixelMap.InitializationOptions();
    options.size = new Size(100,100);
    //Create bitmap object
    PixelMap   = PixelMap.create(options);
    if(view.getName().equals("Id_qq")){
        bitmap =getPixelMap(ResourceTable.Media_qq);   //PixelMap for qq
    }
    if(view.getName().equals("Id_qzone"))
        bitmap =getPixelMap(ResourceTable.Media_qzone);  //PixelMap for qzone
    if(view.getName().equals("Id_vx"))
        bitmap =getPixelMap(ResourceTable.Media_vx);    //PixelMap of wechat
        ......
    return bitmap;  //Returns the obtained PixelMap
}
2. Generate broken particles
Generating broken particles is one of the functions of the ExplosionAnimator, which mainly processes the PixelMap from the ExplosionField class. First, calculate the number of horizontal and vertical particles according to the width and height of the PixelMap. Then calculate the color of the Particle's location. Then call the generateParticle() method of Particle class to generate particles. The generated broken particles are shown in Figure 4.
  //Generate particles
    private Particle[][] generateParticles(PixelMap bitmap, Rect bound) {
        int w = bound.getWidth();  //Width of PixelMap
        int h = bound.getHeight(); // PixelMap height
        int partW_Count = w / Particle.PART_WH; //Number of transverse particles
        int partH_Count = h / Particle.PART_WH; //Number of vertical particles
        //Particle width
        int bitmap_part_w = bitmap.getImageInfo().size.width / partW_Count;
        //Particle height
        int bitmap_part_h = bitmap.getImageInfo().size.height / partH_Count;
        //Particle matrix
        Particle[][] particles = new Particle[partH_Count][partW_Count];
        Point point = null;
        for (int row = 0; row < partH_Count; row ++) { //that 's ok
            for (int column = 0; column < partW_Count; column ++) { //column
                //Gets the color of the current particle's location
                int color = bitmap.readPixel(new Position(column* bitmap_part_w, row * bitmap_part_h));
                point = new Point(column, row); //x is a column and y is a row
                particles[row][column] = Particle.generateParticle(color, bound, point);
            }
        }
        return particles;   //Returns the particle matrix
    }

Fig. 4 effect drawing of broken particles
3. Perform a shatter animation
Next, we need to animate the particles to make them move and achieve a complete dynamic effect. The implementation of animation effects depends on the ExplosionAnimator class, which inherits from the AnimatorValue class and can be used to draw animation. Let's analyze how the animation effect is realized.
(1) Create an ExplosionAnimator class object
In the process of creating the ExplosionAnimator class object, pass in the PixelMap of the clicked broken object as a parameter to obtain that the member variable of the ExplosionAnimator class object contains the particle set generated by the above PixelMap.
//Create a list of arrays whose elements are objects of the ExplosionAnimator class
private ArrayList<ExplosionAnimator> explosionAnimators;
explosionAnimators = new ArrayList<ExplosionAnimator>();
//Create an ExplosionAnimator class object
final ExplosionAnimator animator = new ExplosionAnimator(this, createBitmapFromView(view), rect);
//The ExplosionAnimator class object is added to the list
explosionAnimators.add(animator);
(2)onDraw()
In the onDraw() method, first save the drawing state of the canvas and correct the dislocation caused by the status bar, and then call the draw() method of ExplosionAnimator repeatedly.
public void onDraw(Component component, Canvas canvas) {
    canvas.save(); // Save the painting state of the canvas
    canvas.translate(0,positions[1]); //Fixed misalignment due to status bar
    for (ExplosionAnimator animator : explosionAnimators) {
        animator.draw(canvas);
    }
    canvas.restore();
}
(3)draw()
In the draw method, the advance() method is called once each time you paint, so that the particles "move forward" (gradually spread down), then set the new attributes of the brush and paint again.
public void draw(Canvas canvas) {
        //Stop at the end of the animation
        if(!isRunning()) {
            return;
        }
        for (Particle[] particle : mParticles) {
            for (Particle p : particle) {
                p.advance(myvalue);
                mPaint.setColor(new Color(p.color));
                //Just set this way, the transparent color will be displayed as black
                mPaint.setAlpha((int) (p.alpha));
                canvas.drawCircle(p.cx, p.cy, p.radius, mPaint);
            }
        }
        mContainer.invalidate();
    }
Finally, we summarize how the overall animation process is realized. First, the start() method of ExplosionAnimator is invoked in ExplosionField to open the animation. The invalidate() method will be invoked in the start() method to redraw ExplosionField (calling onDraw method).
The onDraw method calls the draw method. In the draw method, invalidate is also used to force the ExplosionField to redraw (call the onDraw method). Each cycle completes redrawing. In this way, the two call each other and refresh continuously until all particles are drawn, and the refresh stops. The animation drawing process is shown in Figure 5.
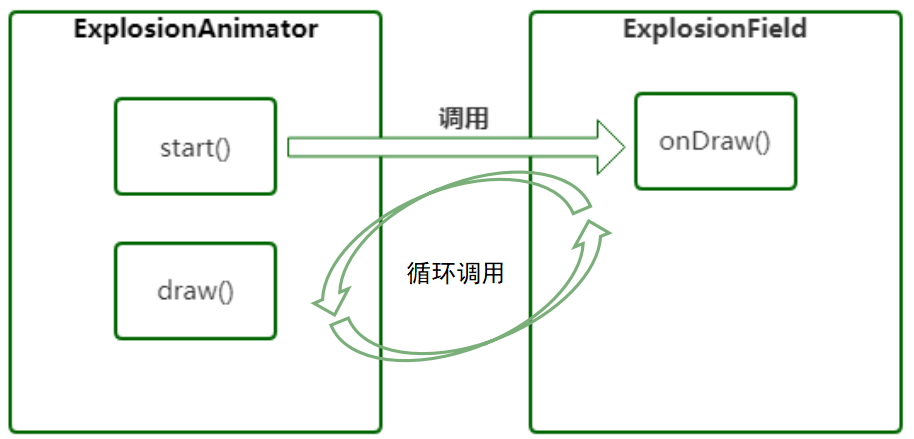
Figure 5 animation drawing process
Project contributors
Hu Pengda, Zheng Senwen, Zhu Wei, Chen Meiru, Cai Zhijie, Li Ke