Vue3 learning journey – falling in love with vue3 – vue3 basic grammar (II) – template grammar
Continued:
Vue3 learning journey – meet vue3 - learn about vue3
Vue3 learning journey – meet vue3 - know vue3 (II)
conditional rendering
In some cases, we need to decide whether to render some elements or components according to the current conditions. At this time, we need to make conditional judgment.
Vue provides the following instructions to judge conditions:
- v-if
- v-else
- v-else-if
- v-show
Now let's start learning one by one.
v-if,v-else,v-else-if
v-if, v-else and v-else-if are used to render the contents of a block according to conditions:
-
These contents will be rendered only when the condition is true;
-
These three instructions are similar to the conditional statements if, else and else if of JavaScript;
<template id="my-app">
    <h2 v-if="score > 90">excellent</h2>
    <!-- Judge if the first condition is not satisfied v-else-if Are the conditions met -->
    <h2 v-else-if="score > 80">good</h2>
    <!-- If none of the above conditions are met, rendering is performed v-else Label where -->
    <h2 v-else>fail,</h2>
  </template>
Rendering principle of v-if:
-
v-if is inert
-
When the condition is false, the judged content will not be rendered or destroyed at all
-
When the condition is true, the content in the condition block will be rendered
<template id="my-app">
      <!-- v-if If the use condition is true( true) The label is rendered, otherwise it will not be rendered -->
      <h2 v-if="isShow">{{message}}</h2>
      <button @click="isShow = !isShow">Toggle whether to display</button>
    </template>
template element
Because v-if is an instruction, it must be added to an element:
But what if we want to switch between multiple elements?
At this point, we render the div, but we don't want the div element to be rendered;
At this time, we can choose to use template;
The template element can be used as an invisible package element on v-if, but the template will not be rendered in the end:
It is a bit similar to the block in the applet
<template id="my-app">
<div v-if="isShow">
    <!-- When we want to render selectively according to conditions
        When one of the following two pieces of data,
        We can add one on the outside of those labels div,Then write the judgment conditions in div Up,
        At this time, it can also meet our requirements, but there is an unnecessary error when rendering data div  -->
        <h2>{{message}}</h2>
        <h2>{{message}}</h2>
        <h2>{{message}}</h2>
      </div>
      <div v-else>
        <h2>ha-ha</h2>
        <h2>ha-ha</h2>
        <h2>ha-ha</h2>
      </div>
</template>
v-show
The usage of v-show and v-if seems to be the same. It also determines whether to display elements or components according to a condition:
<template id="my-app">
	<h1 v-show="isShow
                ">
        {{message}}
    </h1>
</template>
The difference between v-show and v-if
First, the differences in usage:
- v-show does not support template
- v-show cannot be used with v-else
Secondly, essential differences:
- Whether the v-show element needs to be displayed on the browser or not, its DOM is actually rendered, and it is only switched through the display attribute of CSS
- v-if when the condition is false, the corresponding element will not be rendered to the DOM at all;
How to choose in development?
- If our elements need to switch frequently between display and hide, use v-show
- If switching does not occur frequently, use v-if
<template id="my-app">
      <!-- When we want to render selectively according to conditions
        When one of the following two pieces of data,
        We can add one on the outside of those labels div,Then write the judgment conditions in div Up,
        At this time, it can also meet our requirements, but there is an unnecessary error when rendering data div  -->
      <div v-if="isShow">
        <h2>{{message}}</h2>
        <h2>{{message}}</h2>
        <h2>{{message}}</h2>
      </div>
      <div v-else>
        <h2>ha-ha</h2>
        <h2>ha-ha</h2>
        <h2>ha-ha</h2>
      </div>
      <!-- So there is one more solution div We can use template Package with labels -->
      <!-- use template The advantage of tags is that when rendering, template When the tag is rendered to the browser, it will not be rendered to the page -->
      <template v-if="!isShow">
        <h2>{{message}}</h2>
        <h2>{{message}}</h2>
        <h2>{{message}}</h2>
      </template>
      <template v-else>
        <h2>ha-ha</h2>
        <h2>ha-ha</h2>
        <h2>ha-ha</h2>
      </template>
    </template>
<template id="my-app">
    <!-- v-show Use and of labels v-if Similarly, whether to render the label is determined according to the conditions -->
    <!-- But there are also differences between the two:
      1. When the conditions are not satisfied:
        v-if The label is removed directly,
        v-show The tag is just hidden display:none
          In fact, the tag still exists and has been parsed by the browser
      2. In usage:
        v-show I won't support it template label
        v-show Not with v-else Use together
      3. Essential difference:
        v-show The tag is parsed and rendered by the browser regardless of whether the condition is true or not css To toggle display and hide
        v-if If the condition is not satisfied, the label will not be rendered at all DOM upper

      How to choose between the two: (a good choice can improve performance)
        Frequently toggle show and hide: Using v-show
        Infrequent use v-if
    -->
    <h2 v-show="isShow">{{message}} v-show label</h2>
    <h2 v-if="isShow">{{message}} v-if label</h2>
  </template>
List rendering
In real development, we often get a set of data from the server and need to render it.
At this time, we can use v-for to complete; v-for is similar to JavaScript's for loop and can be used to traverse a set of data
v-for basic use
The basic format of v-for is "item in array":
- Arrays are usually from data or prop, or in other ways
- item is an alias we give to each element, which can be defined by ourselves
We know that when traversing an array, we often need to get the index of the array:
- If we need an index, we can use the format: "(item, index) in array"
- Note the above order: the array element item item is in the front, and the index item index is in the back;
<ul>
      <!-- v-for="element in array" -->
      <li v-for="movie in movies">{{movie}}</li>
    </ul>
    <ul>
      <!-- If you want to get the index of the element, v-for="(item,index) in arr" -->
      <li v-for="(movie,index) in movies">{{movie}} --- {{index}}</li>
    </ul>
Types supported by v-for
v-for also supports traversal of objects, and supports one, two or three parameters:
- A parameter: "value in object";
- Two parameters: "(value, key) in object";
- Three parameters: "(value, key, index) in object"
<!-- v-for Of course, traversal can also be an object -->
    <ol>
      <!-- When traversing an object, you get the object's attribute value and attribute name,You can also get the index(In fact, it is the order of getting attributes) -->
      <!-- When there is only one parameter, you get the attribute value of the object, the two parameters get the attribute value and attribute name, and the index is the third parameter -->
      <li v-for="(value,key,index) in info">{{value}} --- {{key}} --- {{index}}</li>
    </ol>
v-for also supports numeric traversal:
Every item is a number
<!-- Traversal number -->
    <h2>Traversal number</h2>
    <ul>
      <li v-for="(item ,index) in 10">{{item}} ---> {{index}}</li>
    </ul>
<div id="app"></div>
  <template id="my-app">
    <!-- v-for Basic use of -->
    <ul>
      <!-- v-for="element in array" -->
      <li v-for="movie in movies">{{movie}}</li>
    </ul>
    <ul>
      <!-- If you want to get the index of the element, v-for="(item,index) in arr" -->
      <li v-for="(movie,index) in movies">{{movie}} --- {{index}}</li>
    </ul>
    <!-- v-for Of course, traversal can also be an object -->
    <ol>
      <!-- When traversing an object, you get the object's attribute value and attribute name,You can also get the index(In fact, it is the order of getting attributes) -->
      <!-- When there is only one parameter, you get the attribute value of the object, the two parameters get the attribute value and attribute name, and the index is the third parameter -->
      <li v-for="(value,key,index) in info">{{value}} --- {{key}} --- {{index}}</li>
    </ol>

    <!-- Traversal number -->
    <h2>Traversal number</h2>
    <ul>
      <li v-for="(item ,index) in 10">{{item}} ---> {{index}}</li>
    </ul>
  </template>
  <script src="../../vue3/vue3.js"></script>
  <script>
    Vue.createApp({
      template: '#my-app',
      data() {
        return {
          message: 'hello Vue3!',
          movies: ["One Piece", "Naruto", "Detective Conan", "Beaming with Joy"],
          info: {
            name: 'Zhang San',
            age: 22,
            gender: 'male'
          }
        }
      }
    }).mount('#app')
  </script>
template element
Similar to v-if, you can use the template element to loop render a piece of content containing multiple elements:
We use template to wrap multiple elements instead of div
<div id="app"></div>
  <template id="my-app">
    <!-- v-for and template Combined use of labels -->
    <!-- Exhibition info Each attribute and value in the object is divided by a split line -->
    <ul>
      <!-- Why not div? First, use div It will waste performance and render more labels on the page,
        Secondly, in html5 In terms of development specifications, it is not recommended to ul Inside use div,Don't be ul perhaps li Use other labels inside
      -->
      <template v-for="(value,key) in info">
        <li>{{key}}</li>
        <li>{{value}}</li>
        <li>Gorgeous dividing line</li>
      </template>
    </ul>

  </template>
  <script src="../../vue3/vue3.js"></script>
  <script>
    Vue.createApp({
      template: '#my-app',
      data() {
        return {
          message: 'hello Vue3!',
          info: {
            name: 'Maomao',
            age: 21,
            gender: 'male'
          }
        }
      }
    }).mount('#app')
  </script>
Array update detection
Vue wraps the change method of the array being listened on, so they will also trigger view updates. These wrapped methods include:
- push()
- pop()
- shift()
- unshift()
- splice()
- sort()
- reverse()
Method of replacing array
The above method will directly modify the original array, but some methods will not replace the original array, but will generate new arrays, such as filter(), concat(), slice()
<div id="app"></div>
  <template id="my-app">
    <button @click="addArr">push</button>
    <button @click="delArr">pop</button>
    <button @click="delArrFirst">shift</button>
    <button @click="addArrFirst">unshift</button>
    <button @click="spliceArr">splice</button>
    <button @click="sortArr">sort</button>
    <button @click="reverseArr">reverse</button>
    <ul>
      <li v-for="(value,index) in arr">{{value}} --- > {{index}}</li>
    </ul>
  </template>
  <script src="../../vue3/vue3.js"></script>
  <script>
    Vue.createApp({
      template: '#my-app',
      data() {
        return {
          message: 'hello Vue3!',
          arr: ["Zhang San", "Li Si", "Wang Wu", "Zhao Liu"]
        }
      },
      methods: {
        /*
          Vue The listening array change method is wrapped, so they will also trigger the update of the view.
          The methods of these packages are:
            1. push()
            2. pop()
            3. shift() Remove the first element of the array
            4. unshift() Insert element in array header
            5. splice() Slice of array
            6. sort() sort
            7. reverse() reversal

          // The concat, slice and filter do not change the original array,
              Instead, a new array is generated, so it is not responsive. As long as the generated array is re assigned to the original array, the view can be updated

        */
        addArr() {
          this.arr.push("Xiao Qi")
        },
        delArr() {
          this.arr.pop()
        },
        delArrFirst() {
          this.arr.shift()
        },
        addArrFirst() {
          this.arr.unshift("penis")
        },
        spliceArr() {
          this.arr.splice(1, 1)
        },
        // Sort by the length of the element
        sortArr() {
          this.arr.sort((first, second) => {
            return first.length - second.length
          })
        },
        reverseArr() {
          this.arr.reverse()
        }
      },
    }).mount('#app')
  </script>
What is the role of key in v-for?
When using v-for for list rendering, we usually bind a key attribute to an element or component.
What is the function of this key attribute? Let's first look at the official explanation:
- The key attribute is mainly used in Vue's virtual DOM algorithm to identify VNodes when comparing old and new nodes;
- If you do not use key s, Vue will use an algorithm that minimizes dynamic elements and tries to modify / reuse elements of the same type in place as much as possible
- When using key, it rearranges the element order based on the change of key, and removes / destroys the elements that do not exist in the key
The official explanation is not easy for beginners to understand, such as the following questions:
- What are old and new nodes and VNode?
- How do I try to modify and reuse a key when there is no key?
- When there are keys, how to rearrange them based on the keys?
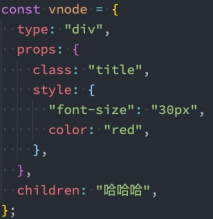
Know VNode
Let's first explain the concept of VNode:
At present, we do not have a relatively complete concept of learning components, so we first understand the VNode created by HTML elements;
The full name of VNode is Virtual Node, that is, Virtual Node;
In fact, both components and elements are finally represented in Vue as vnodes;
The essence of VNode is a JavaScript object;


Virtual DOM
If we are not just a simple div, but have a lot of elements, they should form a VNode Tree:
Insert case of F
Let's take a look at a case: this case is that when I click the button, an f will be inserted in the middle;
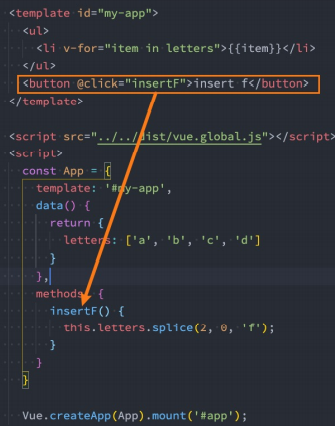
We can be sure that this update does not need to be updated for ul and button. What needs to be updated is our list of li
In Vue, the entire list is not re rendered for child element nodes of the same parent element;
Because there is no change for a, b, c and d in the list; When operating the real DOM, we only need to insert a li of f in the middle;
So how does Vue update the list?
- Vue actually calls two different methods with and without key s;
- If there is a key, use the patchKeyedChildren method;
- Without a key, the patchUnkeyedChildren method has been used for so long;
Vue source code judgment on key

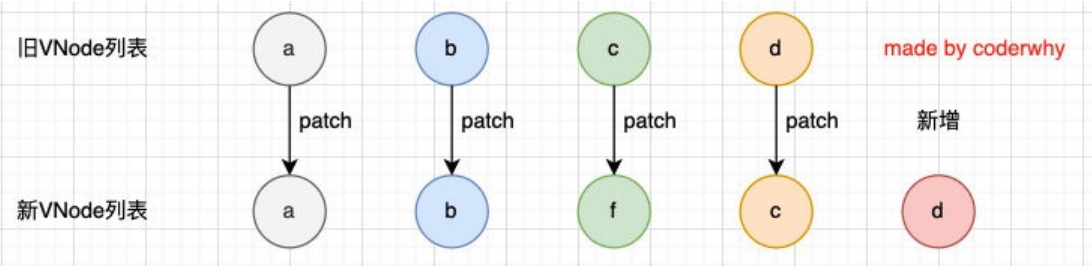
Operation without key (source code)

The process without a key is as follows
We will find that the above diff algorithm is not efficient:
c and d, in fact, they do not need any changes;
However, because our c is used by f, all subsequent contents must be changed at once and added at last;
There is a key to perform operations (source code)
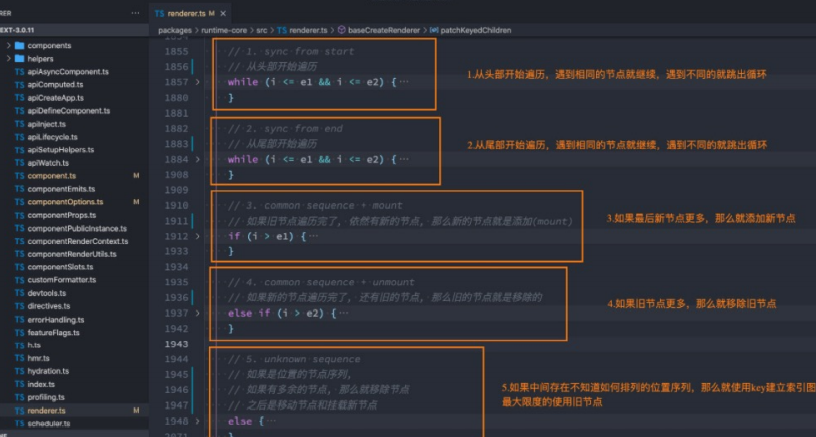
The diff algorithm with key is as follows
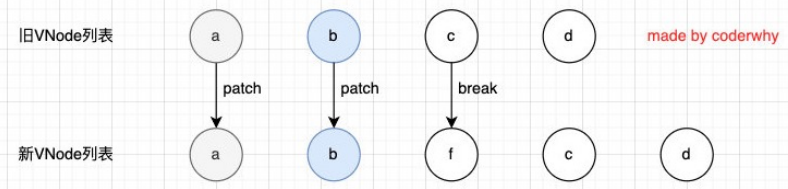
The first step is to traverse and compare from the beginning:
- a and b are consistent and will continue to be compared;
- c and f will break out of the loop because the key s are inconsistent;
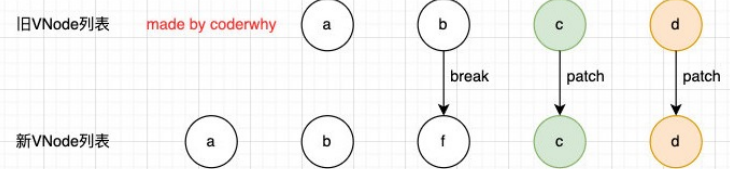
The second step is to traverse and compare from the tail:
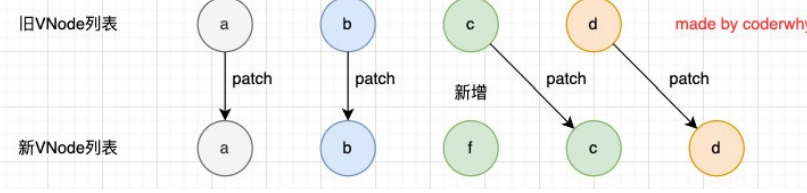
The third step is to add a new node if the old node is traversed but there are still new nodes:
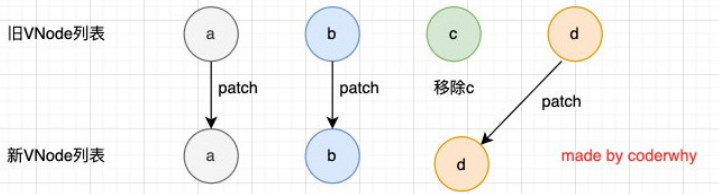
The fourth step is to remove the old node if the new node is traversed but there are still old nodes:
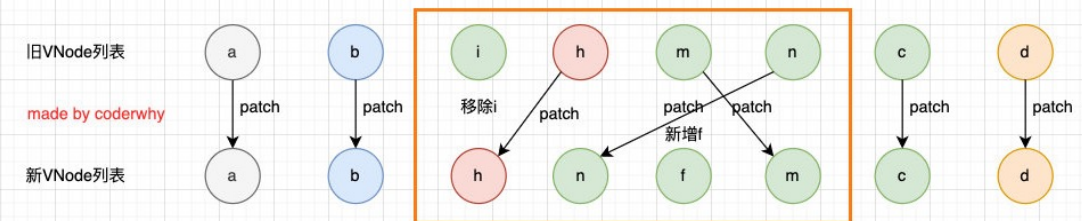
The fifth step is the most characteristic case, in which there are many unknown or disordered nodes:
Therefore, we can find that Vue will try to use our key to optimize the diff algorithm:
When there is no key, our efficiency is very inefficient;
When inserting or resetting the order, keeping the same key can make the diff algorithm more efficient;