This content is original, please indicate the source for reprint.
environment
Ubuntu18.04 or Window 10
python 3.8.5
pyqt 5.9.2
Qt Remote Object, referred to as QtRO for short, can be used to communicate between different processes using signal slots.
No more, just do it.
I will use Qt and Python to create client and server respectively, and connect in turn.
The article is a little long. If you don't have the patience to see the guy paper, you can download the code directly. I uploaded it to Baidu online disk.
Link: https://pan.baidu.com/s/1uEetEpMG-aEfzfccBCTEwQ
Extraction code: m0ss
Step 1: create a path
Because I intend to write QT and python server and client respectively, there will be several files, so I will build several more folders to separate them.
The Reps folder will be placed Rep files are set up in a separate folder because Qt servers and clients must reference the same rep file, which is more convenient to mention outside the project.
The Python folder contains two py files for the client and server respectively.
The other two folders are Qt's server and client projects.

Step 2: create Qt server
First, let's write a commoninterface The rep file is placed in the Reps folder, where a signal and a slot function are written.
For other types of functions, please refer to Qt's official documents: https://doc.qt.io/qt-5/qtremoteobjects-repc.html
#include <QtCore>

class CommonInterface
{
    SIGNAL(sigMessage(QString msg));
    SLOT(void onMessage(QString msg));
};
Then we create a Qt project of qml, named RemoteObjectServer.
We open remoteobjectserver Pro file, add the Remote module first, and then introduce commoninterface Rep file.
QT += remoteobjects
REPC_SOURCE += \
    ../Reps/CommonInterface.rep
OK, then we build and run the project. After running successfully, we will get a rep in the build directory_ CommonInterface_ source. H header file, which is automatically generated by Qt.
We copy this header file to the server project, which is convenient for reference.
Now let's create a signal slot class for the server to receive and send signals.
Create a c++ class and enter the class name CommonInterface, so we get the file CommonInterface H and CommonInterface CPP, start writing code.
commoninterface. In H:
#ifndef COMMONINTERFACE_H
#define COMMONINTERFACE_H

#include <QObject>
#include "rep_CommonInterface_source.h"

class CommonInterface : public CommonInterfaceSource
{
    Q_OBJECT
public:
    CommonInterface(QObject * parent = nullptr);
    virtual void onMessage(QString msg);
    void sendMsg(const QString &msg);
signals:
    void sigReceiveMsg(const QString &msg);
};

#endif // COMMONINTERFACE_H
commoninterface. In CPP:
#include "commoninterface.h"


CommonInterface::CommonInterface(QObject *parent): CommonInterfaceSource(parent)
{

}

/**
 * @brief CommonInterface::onMessage
 * @param msg
 * Receive messages from clients
 */
void CommonInterface::onMessage(QString msg)
{
    emit sigReceiveMsg(msg);
}

/**
 * @brief CommonInterface::sendMsg
 * @param msg
 * Send message to client
 */
void CommonInterface::sendMsg(const QString &msg)
{
    emit sigMessage(msg);
}
Isn't it familiar? sigMessage and onMessage are the signals and slots we wrote in the rep file. If you are interested, go to the rep automatically generated by Qt_ CommonInterface_ source. H files, you can also see their shadow.
In fact, at this stage, we can receive and send messages in Qt, but I'd better finish the whole project.
Let's create a new class to communicate with qml. Widgets are also OK, but I prefer qml.
Create a c++ class and enter the class name MyQmlFunction, so we get the file MyQmlFunction H and MyQmlFunction CPP, start writing code.
MyQmlFunction. In H:
#ifndef MYQMLFUNCTION_H
#define MYQMLFUNCTION_H

#include <QObject>
#include <QDebug>
#include <QRemoteObjectHost>
#include "commoninterface.h"

class MyQmlFunction : public QObject
{
    Q_OBJECT
public:
    explicit MyQmlFunction(QObject *parent = nullptr);
    Q_INVOKABLE void sendToClient(QString information);

private:
    CommonInterface *remoteObj = nullptr;
    QRemoteObjectHost *remoteHost = nullptr;

signals:
    Q_INVOKABLE void recvMessage(QString message);

public slots:
};

#endif // MYQMLFUNCTION_H
MyQmlFunction. In CPP:
#include "MyQmlFunction.h"

MyQmlFunction::MyQmlFunction(QObject *parent) : QObject(parent)
{
    remoteHost = new QRemoteObjectHost(this);
    remoteHost->setHostUrl(QUrl("local:interfaces"));
    remoteObj = new CommonInterface(this);
    remoteHost->enableRemoting(remoteObj, "CommonInterfaceSource");
    connect(remoteObj, SIGNAL(sigReceiveMsg(QString)), this, SIGNAL(recvMessage(QString)));
}

void MyQmlFunction::sendToClient(QString information)
{
    remoteObj->sendMsg(information);
}
To interface with QML, add Q when defining a function_ I won't say more about these. I'll say a few lines of code to create the server.

In a few simple sentences, it should be noted that "local:interfaces" must be consistent with the client, otherwise the server will not be found.
In addition, when enableremoving, you can not specify the name "CommonInterfaceSource", but if you do not specify it, you can only connect with Qt clients, not python. This will also be mentioned later. Please continue to look.
Set the connection between MyQmlFunction and qml.
main.cpp:
#include <QGuiApplication>
#include <QQmlApplicationEngine>
#include <QQmlContext>
#include "MyQmlFunction.h"

int main(int argc, char *argv[])
{
    QGuiApplication app(argc, argv);
    QQmlApplicationEngine engine;
    MyQmlFunction demo;
    engine.rootContext()->setContextProperty("QML",&demo);
    engine.load(QUrl(QStringLiteral("qrc:/main.qml")));
    if (engine.rootObjects().isEmpty())
        return -1;
    return app.exec();
}
We then write qml files to make the interface.
main.qml:
import QtQuick 2.6
import QtQuick.Controls 1.4
import QtQuick.Window 2.2

Window {
    visible: true
    width: 640
    height: 480
    title: qsTr("Qt Remote Server")

    Rectangle{
        anchors.fill: parent
        TextArea{
            id: textArea
            width: parent.width - 4
            height: parent.height - 46
            anchors.horizontalCenter: parent.horizontalCenter
            y: 2
            readOnly: true
            selectByMouse: true
        }
        TextField{
            id: inforText
            anchors.bottom: parent.bottom
            anchors.bottomMargin: 2
            x: 2
            width: parent.width-86
            height: 40
        }
        Button{
            anchors.bottom: parent.bottom
            anchors.bottomMargin: 2
            width: 80
            height: 40
            anchors.right: parent.right
            anchors.rightMargin: 2
            text: qsTr("send out")
            onClicked: {
                if(inforText.text !== "") QML.sendToClient(inforText.text)
            }
        }
    }

    Connections{
        target: QML
        onRecvMessage:{
            textArea.append(message)
        }
    }
}
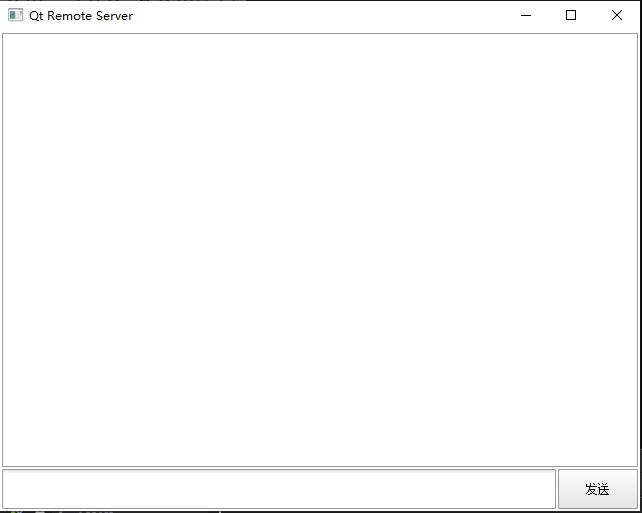
Run it to see the interface.
Step 3 Qt create client
In the last step, we have created a server, but we can't see the effect without a client. Now let's try to be a client.
The rep file is still the commoninterface rep.
Similarly, we use Qt to create a qml project named RemoteObjectClient.
Open pro file write:
QT += remoteobjects
REPC_REPLICA += \
    ../Reps/CommonInterface.rep
Note that REPC is used here_ Replica is different from the server. Don't blame me if you write it wrong and can't find the header file.
Compile and run, so that we can get a Qt automatically generated header file rep under the build directory_ CommonInterface_ replica. h. Copy it to the bottom of the project.
The client does not need to create a special class to receive and send information like the server. We directly create a class connected to qml, named MyQmlFunction, and start writing code.
MyQmlFunction. In H:
#ifndef MYQMLFUNCTION_H
#define MYQMLFUNCTION_H

#include <QObject>
#include <QRemoteObjectNode>
#include "rep_CommonInterface_replica.h"

class MyQmlFunction : public QObject
{
    Q_OBJECT
public:
    explicit MyQmlFunction(QObject *parent = nullptr);
    Q_INVOKABLE void sendToServer(QString information);

private:
    QRemoteObjectNode remoteNode;
    CommonInterfaceReplica *remoteObj = nullptr;

signals:
    Q_INVOKABLE void recvMessage(QString message);

public slots:
};

#endif // MYQMLFUNCTION_H
MyQmlFunction. In CPP:
#include "MyQmlFunction.h"


MyQmlFunction::MyQmlFunction(QObject *parent) : QObject(parent)
{
    remoteNode.connectToNode(QUrl("local:interfaces"));
    remoteObj = remoteNode.acquire<CommonInterfaceReplica>("CommonInterfaceSource");
    connect(remoteObj, SIGNAL(sigMessage(QString)), this, SIGNAL(recvMessage(QString)));
}

void MyQmlFunction::sendToServer(QString information)
{
    remoteObj->onMessage(information); //Call the slot to send a message to the server
}
Let me talk about the code to connect to the server.

When connecting to the tonode server, the following QUrl must be consistent with the server, otherwise it will not be connected.
remoteNode. Acquire < > () CommonInterfaceReplica in angle brackets is the class in the header file automatically generated by Qt, and "CommonInterfaceSource" in parentheses is the resource name, which should also be consistent with the server.
Write the code to connect to QML. In fact, this part is the same as the server.
main.cpp:
#include <QGuiApplication>
#include <QQmlApplicationEngine>
#include <QQmlContext>
#include "MyQmlFunction.h"

int main(int argc, char *argv[])
{
    QGuiApplication app(argc, argv);
    QQmlApplicationEngine engine;
    MyQmlFunction demo;
    engine.rootContext()->setContextProperty("QML",&demo);
    engine.load(QUrl(QStringLiteral("qrc:/main.qml")));
    if (engine.rootObjects().isEmpty())
        return -1;
    return app.exec();
}
main.qml:
import QtQuick 2.6
import QtQuick.Controls 1.4
import QtQuick.Window 2.2

Window {
    visible: true
    width: 640
    height: 480
    title: qsTr("Qt Remote Client")

    Rectangle{
        anchors.fill: parent
        TextArea{
            id: textArea
            width: parent.width - 4
            height: parent.height - 46
            anchors.horizontalCenter: parent.horizontalCenter
            y: 2
            readOnly: true
            selectByMouse: true
        }
        TextField{
            id: inforText
            anchors.bottom: parent.bottom
            anchors.bottomMargin: 2
            x: 2
            width: parent.width-86
            height: 40
        }
        Button{
            anchors.bottom: parent.bottom
            anchors.bottomMargin: 2
            width: 80
            height: 40
            anchors.right: parent.right
            anchors.rightMargin: 2
            text: qsTr("send out")
            onClicked: {
                if(inforText.text !== "") QML.sendToServer(inforText.text)
            }
        }
    }

    Connections{
        target: QML
        onRecvMessage:{
            textArea.append(message)
        }
    }
}
OK, let's run the server first, then run the client, and send information to each other.
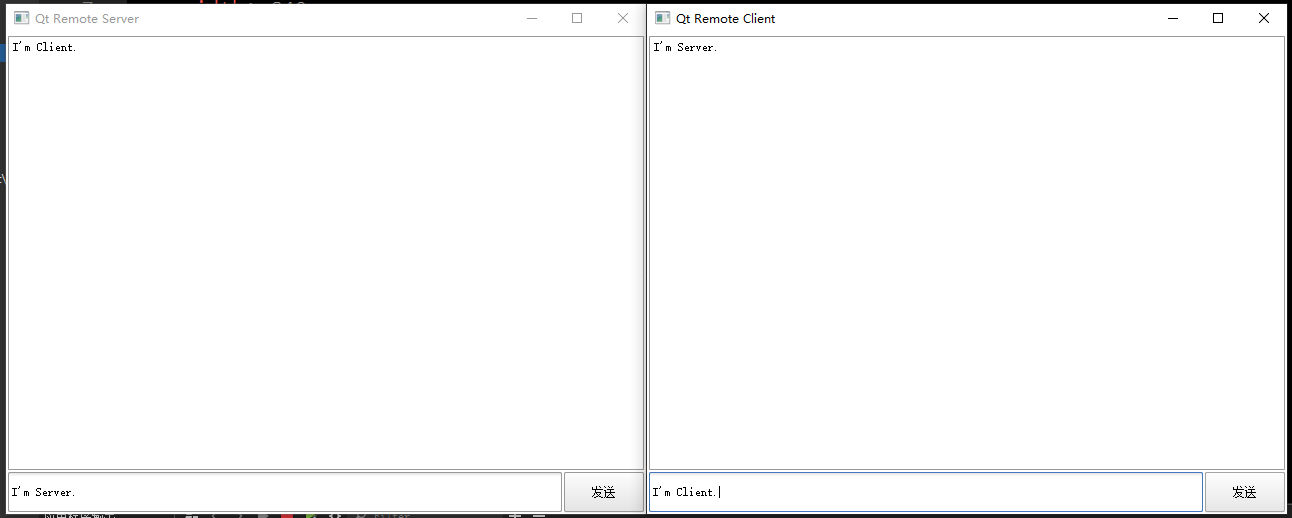
Is it successful? The message sent by the server can be successfully received and displayed by the client. The message sent by the client can also be successfully received and displayed by the server.
Step 4 create Python client
OK, let's create a client in Python to connect to Qt's server.
Create a client Py file, write code:
import sys
from PyQt5.QtCore import QUrl, QTimer, QObject, pyqtSlot, pyqtSignal
from PyQt5.QtWidgets import QApplication
from PyQt5.QtRemoteObjects import QRemoteObjectNode


class DynamicClient(QObject):
    def __init__(self, remoteObj, parent=None):
        super().__init__(parent)
        self._remoteObj = remoteObj
        self._remoteObj.initialized.connect(self.initConnection)    # It is not useful until initialized is successfully initialized.

        self.timerCount = 0
        self.timer = QTimer(self)
        self.timer.timeout.connect(self.slotTimeOut)
        self.timer.start(1000)

    sendMessage = pyqtSignal(str, name="sigMessage")    # Create a signal named sigMessage to send information to the server

    @pyqtSlot()
    def initConnection(self):
        self._remoteObj.sigMessage.connect(self.slotRecvMessage)
        self.sendMessage.connect(self._remoteObj.onMessage)

    @pyqtSlot(str)
    def slotRecvMessage(self, msg):     # Create a slot function to receive the information sent by the server
        print("python get message:", msg)

    @pyqtSlot()
    def slotTimeOut(self):
        self.timerCount += 1
        self.sendMessage.emit("client start times: " + str(self.timerCount))


def main():
    app = QApplication(sys.argv)
    remoteNode = QRemoteObjectNode()
    remoteNode.connectToNode(QUrl("local:interfaces"))
    remoteObj = remoteNode.acquireDynamic('CommonInterfaceSource')
    dy = DynamicClient(remoteObj=remoteObj)
    return app.exec()


if __name__ == "__main__":
    main()
Let me talk about it a little bit. pyqt is roughly the same as Qt syntax, and the way to open the client is also the same, but it should be noted that remotenode acquireDynamic(‘CommonInterfaceSource’).
The syntax of QT is remotenode acquire< CommonInterfaceReplica >(“CommonInterfaceSource”); Remember, there is no acquire method in python. python only has acquireddynamic, so you must enter a name here. If we don't specify a name when we create the server in QT, it certainly won't work here in python.
In addition, I passed RemoteObject as a parameter into the DynamicClient class. When calling the DynamicClient class, you must remember to export an object, dy = DynamicClient(remoteObj=remoteObj). You can call anything else instead of dy, but remember to have such a parameter, otherwise it can't be used. Don't ask me why I know.
Don't mention that QUrl is consistent. It is consistent with Qt client. In addition, let's look at the signal and slot function.
The signal sigMessage and slot function onMessage must be consistent with Qt, otherwise the message will not be received. Although python does not need the rep file and header file, the signals and slots defined here actually play the same role.
It should also be noted that because acquireddynamic is used in python, the connection slot function must be initialized before it is useful. Because I didn't make an interface in python, I opened a timer QTimer to send messages to the server regularly.
Let's run it, open the Qt server and client, and then open the python client.
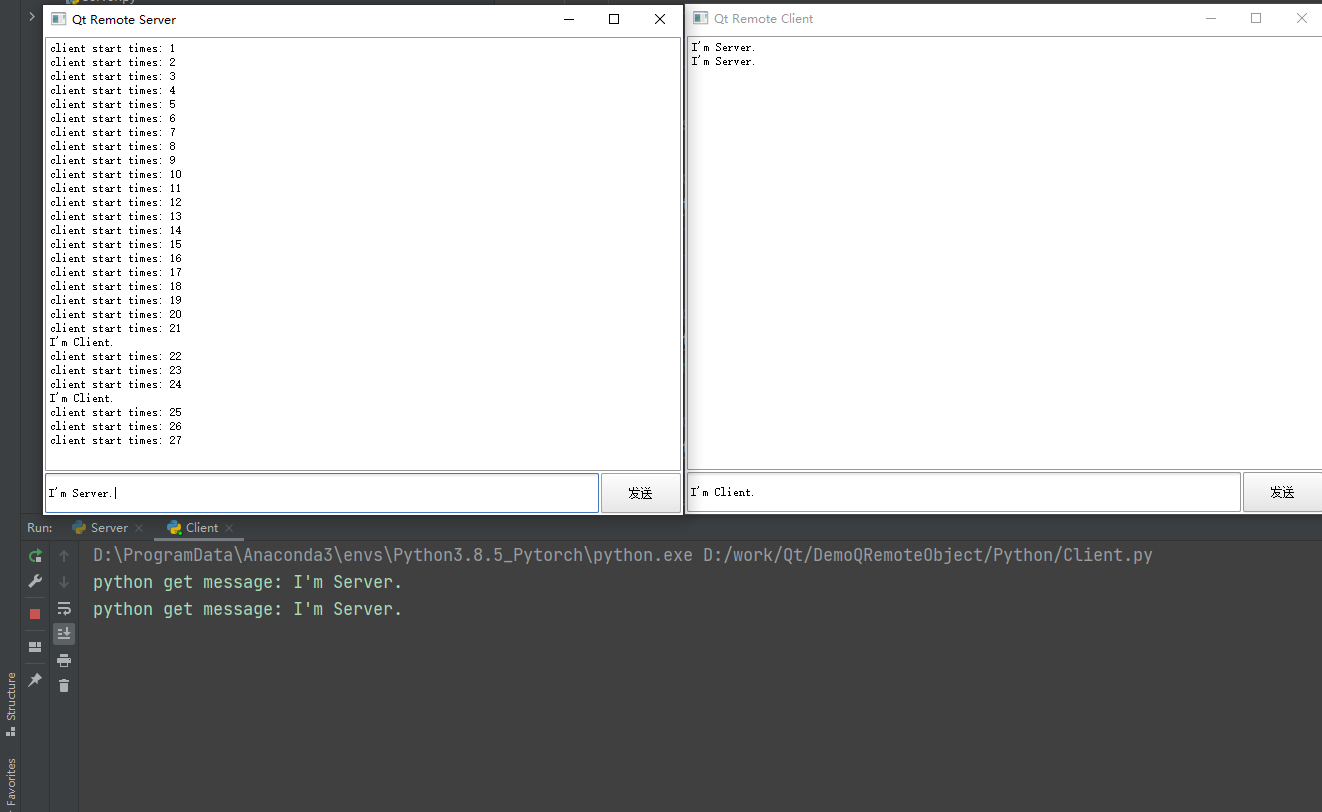
See, the message sent regularly by Python has been received by the Qt server, and the message sent by the Qt server has been received by both the Qt client and the python client.
Step 5 create a Python server
Finally, we use Python to create a server, and try connecting Python client and Qt client at the same time.
Create a file server Py, write code:
import sys
from PyQt5.QtCore import QUrl, QTimer, QObject, pyqtSlot, pyqtSignal
from PyQt5.QtWidgets import QApplication
from PyQt5.QtRemoteObjects import QRemoteObjectHost, QRemoteObjectNode, QRemoteObjectDynamicReplica


class MyServerRemote(QObject):
    def __init__(self, parent=None):
        super().__init__(parent)
        self.timerCount = 0
        self.timer = QTimer()

    sendMessage = pyqtSignal(str, name="sigMessage")

    @pyqtSlot(str)
    def onMessage(self, msg):
        print("server get message:", msg)


    def startTimer(self):
        self.timer.timeout.connect(self.slotTimeOut)
        self.timer.start(1000)

    @pyqtSlot()
    def slotTimeOut(self):
        self.timerCount += 1
        self.sendMessage.emit("server start times: " + str(self.timerCount))


def main():
    app = QApplication(sys.argv)
    serverRemote = MyServerRemote()
    remoteHost = QRemoteObjectHost(QUrl('local:interfaces'))
    remoteHost.enableRemoting(serverRemote, "CommonInterfaceSource")
    serverRemote.startTimer()
    return app.exec()


if __name__ == "__main__":
    main()
There's nothing to say about creating a server. It's the same as Qt server. You also need to write a separate class for the server to send and receive signals. On the python side, I wrote a MyServerRemote. The signals and slots are created the same way. I also opened a timer to send messages regularly.
There's nothing to say. Run it directly.
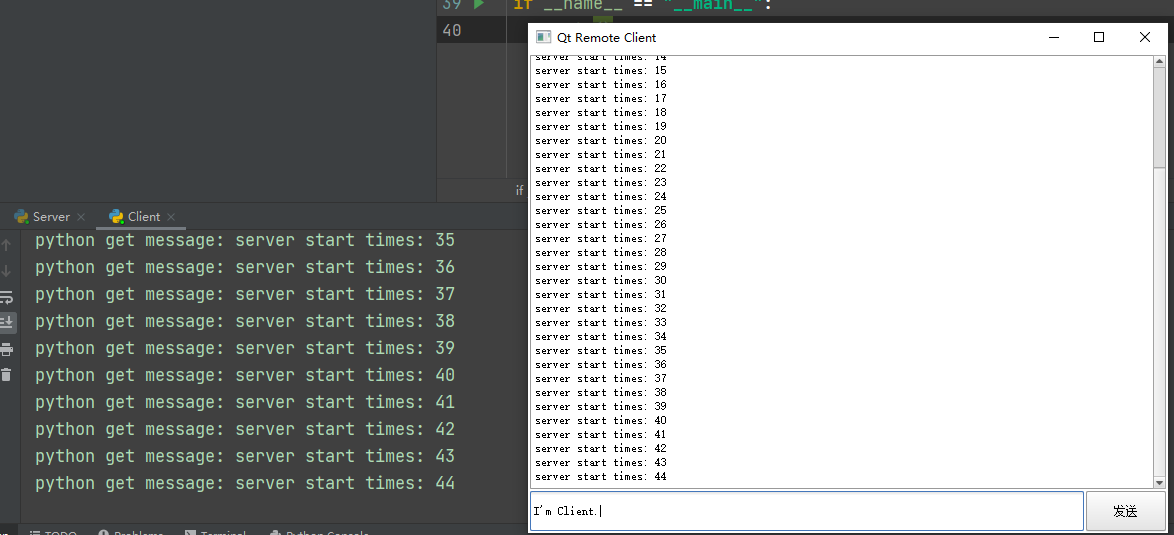
It can be seen that both Python clients and qt clients can receive messages sent regularly from the python server. Let's take a look at the python server.

The python server can also receive timing messages from the python client and messages sent by clicking the button from the Qt client.
Isn't it great!