catalogue
I Installing and configuring redis
III Spring boot integrates Redis
IV Using fastjason to realize the mutual conversion of String and List (Redis stores Java objects)
VII Master slave copy (read / write separation) Master: Slave
VIII Cache expiration processing and memory obsolescence strategy
Xi Cache penetration and cache avalanche
XII multiGet and pipeline batch query optimization
I Installing and configuring redis
#gcc environment
yum install gcc-c++
#decompression
tar -zxvf redis-6.2.1.tar.gz
#Enter the decompression directory
cd redis-6.2.1/
#Compile and install
make
make install
Configuration (this configuration method can be started automatically by script to cooperate with production, or it can be started manually by redis.server directly)
#Create a directory to store redis related configurations and data
mkdir /usr/local/redis
#Create a directory for data persistence
mkdir /usr/local/redis/working
#Copy the configuration file to the newly created folder for subsequent management
cp redis.conf /usr/local/redis
#Enter folder
cd /usr/local/redis
#Modify profile
vim redis.conf
The configuration to be modified is as follows
#yes stands for background startup
daemonize yes
#Specify the workspace, and you can perform persistence operations
dir /usr/local/redis/working
#Allow external access
bind 0.0.0.0
#Unlock the notes of the following configuration (about line 879) and configure the login password of redis
requirepass yourpassword
Continue configuration
#Copy the script file to the following folder
cp /home/software/redis-6.2.1/utils/redis_init_script /etc/init.d/
#Enter folder
cd /etc/init.d/
#Increase the execution permission of the file
chmod 777 redis_init_script
#Modify script file
vim redis_init_script
The configuration to be modified is as follows
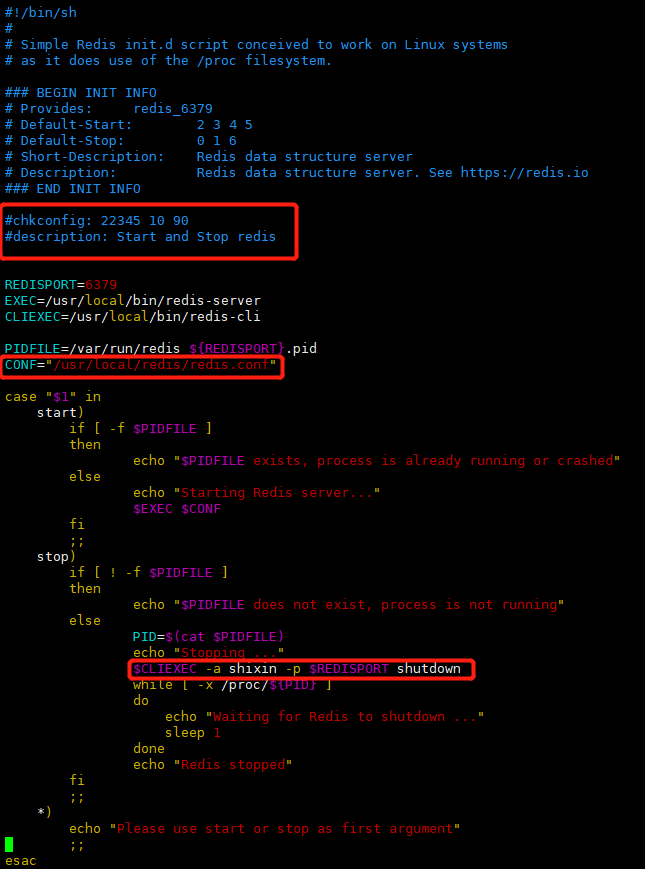
#The following two lines of comments should be added for startup and self startup
#chkconfig: 22345 10 90
#description: Start and Stop redis

#Specify core profile startup
CONF="/usr/local/redis/redis.conf"

#Find the corresponding location, add - a "yourpassword" and give the "stop" command the permission to close
REDISPORT ....
.....$CLIEXEC -a "yourpsssword" -p $REDISPORT shutdown
.........
redis_ init_ The screenshot of the script file is as follows
Here are some common commands
#Start redis
./redis_init_script start
#Turn off redis
./redis_init_script stop
Startup self startup
#Execute the command to register self startup. Restart the server through reboot, and then execute ps -ef | grep redis to check whether redis has been started
cd /etc/init.d/
chkconfig redis_init_script on
#Enter the client under Linux and directly execute redis cli - a yourpassword to avoid the "auth" yourpassword step
redis-cli
127.0.0.1:6379> auth yourpassword
#Ctrl + c} to exit
II Five data types
Command reference document:
http://redisdoc.com/string/index.html
String: set get
Hash: hset hmset hget hkeys hvals hdel hgetall ...
List: lpush lrange rpush lpop rpop llen lindex lset lrem ltrim
Set: sadd , scard , srem smembers , spop srandmember smove , sdiff (difference set) sinter (intersection)
ZSet: zadd zrange zrank zscore zcard zcount zrangebyscore zrem
III Spring boot integrates Redis
Integration is equivalent to connecting the Java side to redis cli.
1. Introduce dependency. Go directly to maven warehouse to search redis. You can view the released versions. If the parent tag is provided, you don't need to write the version
<dependency>
    <groupId>org.springframework.boot</groupId>
    <artifactId>spring-boot-starter-data-redis</artifactId>
    <version>2.4.0</version>
</dependency>
2. Modify the configuration file
spring:
  redis:
    database: 0
    host: 127.0.0.1
    port: 6379
    password: yourpassword
3. use
Baidu can package good methods on the Internet
private final StringRedisTemplate redisTemplate;
IV Using fastjason to realize the mutual conversion of String and list < T > (Redis stores Java objects)
This method can be used to initialize the data in the database to redis, and realize the mutual conversion of objects and data (strings) in redis
1. Add dependency package
<dependency>
    <groupId>com.alibaba</groupId>
    <artifactId>fastjson</artifactId>
    <version>1.2.76</version>
</dependency>
2. Use
This is a process of serialization and deserialization. T needs to support serialization and deserialization, and needs a default parameterless constructor
List<T> list = ....
String jsonStr = JSONObject.toJSONString(list);
redisTemplate.set("list",jsonStr);
list = JSONObject.parseArray(redisTemplate.get("list"),T.class);
V Publish and sub scribe
Generally, redis only needs to cache. Such publish and subscribe messages can be sent to MQ. Here is just a record that redis has this function
1#>>subscribe pig dog snake
2#>>subscribe pig dog cat duck
3#>>psubscribe p*
4 #> > publish pig "~ ~" #123 all subscribers can receive it
Vi Persistence
Official persistence introduction:
https://redis.io/topics/persistence
Execute the command / usr / local / redis / redis Conf modify configuration file
#Set the folder for the backup data store
dir /usr/local/redis/working
RDB(Redis Database)
The principle is to save the current snapshot to the specified file after each time point meets the conditions
Excellent: this method is very suitable for file backup to save the versions of data in different time periods.
Moreover, compared with AOF, RDB is more suitable for the restart of large data sets.
Lack of: data for a period of time before downtime may be lost (data integrity cannot be well guaranteed)
The persistence operation requires sub threads to persist the entire data set. If the data set is large, it will affect the CPU performance
#Set the file name of the RDB backup data store
dbfilename dump.rdb

# It means that there is at least one modification in 3600s and one backup. Multiple conditions can be set
save 3600 1
save 300 100
save 60 10000

#Stop saving if an error occurs during saving. Using no may cause a crash
stop-writes-on-bgsave-error yes
AOF(
Append Only File
)
The principle is to realize persistence by recording operation logs. When executing BGREWRITEAOF command, the shortest instruction to rebuild the current data set will be written, and subsequent operations will be appended to this new file.
Excellent: generally, it is added once every second. Even if the machine goes down, the data of one second will be lost at most, which better maintains the integrity of the data.
AOF stores log operation records. Even if the flush command is executed, as long as the log is not rewritten, the data can be recovered by deleting the latest command and then restarting Redis
Lack: the file saved by AOP is usually larger than that of RDB, and AOF's method of adding commands to the file has lower resistance to error rate than that of RDB's method of re creating the overall data snapshot.
#Turn on AOF
appendonly yes
#Set the file name of AOF data store
appendfilename "appendonly.aof"
#Set backup policy
appendfsync everysec
Generally, in the production environment, both backup methods will be enabled. RDB focuses on file backup, while AOF focuses on data integrity. In the process of redis restart, if RDB and AOF are enabled at the same time, AOF will be given priority to recover data.
VII Master slave copy (read / write separation) Master: Slave
However, when the business volume reaches the server hardware bottleneck, this mode can be adopted to reduce the pressure on Redis. To use this function, RM must enable the data persistence function. The common mode is one master and two slaves (only one master and one slave due to limited server resources). One server is responsible for providing write data operations, and the other is responsible for providing read data operations.
1. Principle
First, a started Redis service is required to act as the Master and enable data persistence. Then, a Redis Slave server is prepared. After it is started, it is configured to ping the Redis Master, and then the data will be copied. The first outgoing RM will write the RDB file to the disk and transmit it to the RS through the intranet. This part is a full transmission, or initialization process, After that, RM will transmit the command to RS as long as there is write data.
2. Construction
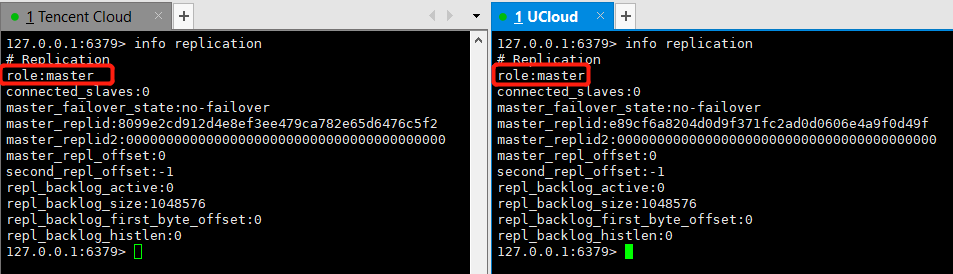
#The two servers first enter redis cli to view the information
cd /etc/init.d/
redis-cli -a yourpassword
127.0.0.1:6379> info replication
You can see that both servers are master nodes
#The following operations are slave server operations. I use Tencent Cloud as a slave
cd /usr/local/redis
vim redis.conf
# Replicaof < masterip > < masterport > configure the ip and port number of the master node
replicaof 192.168.1.171 6379
# Masterauth < master password > configure the password of the master node
masterauth yourpassword
#Other configuration resolution (the following configurations do not need to be changed, but are extracted for resolution)
#Indicates that the slave node is read-only and cannot be written
replica-read-only yes
#Restart redis
cd /etc/init.d/
./redis_init_script stop
./redis_init_script start
#Enter redis cli
redis-cli -a yourpassword
127.0.0.1:6379> info replication
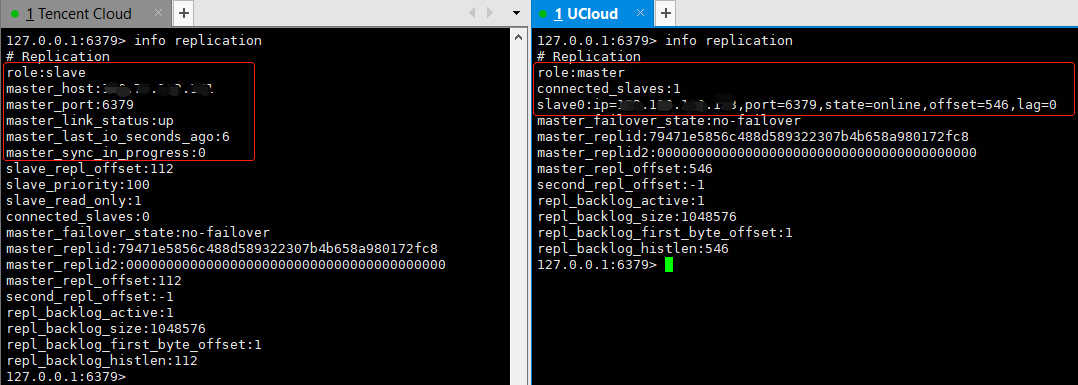
The master-slave replication (read-write separation) has been configured here. It should be noted that after the master-slave replication is configured, the slave node can no longer write data, and the write operation of the master node will be synchronized to the slave node. If multiple slave nodes are required, just follow the above configuration. Remember to turn on the data persistence function of the slave node.
3. Diskless replication (if the disk can meet the requirements, it is not necessary to use this)
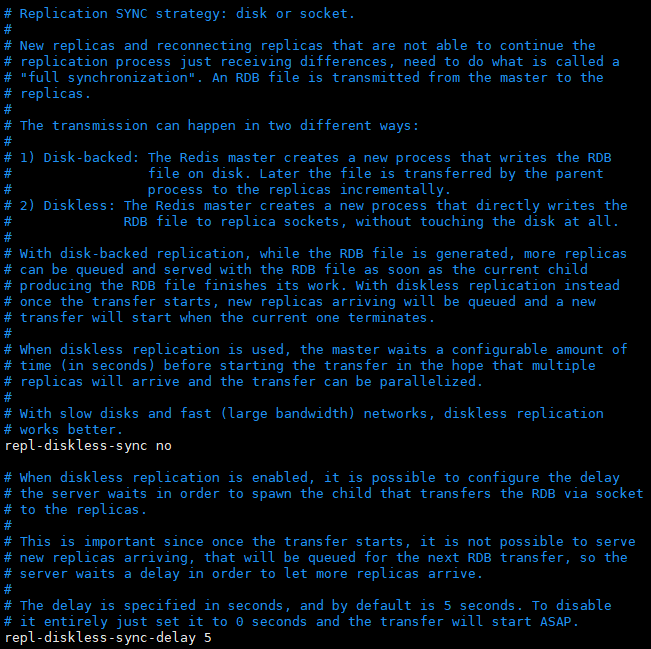
Through the above configuration, the function is basically realized. However, when the master-slave replication starts the first transmission, the master node will save the RDB file to the disk and then transmit it to the slave node. The following describes a diskless replication method, which directly copies the RDB file from the master memory to the slave memory (Socket mode). (there are many types of hard disks. If the read-write speed (IO) of the machine's hard disk is very low, it will be very time-consuming when the data set is large, so the diskless replication method is extended, but this method requires high bandwidth)
#Modify profile
repl-diskless-sync yes
The related principle is shown in the figure below. A new thread will be started to transfer the rdb file through the socket
VIII Cache expiration processing and memory obsolescence strategy
1. Cache expiration processing
The computer memory is limited. The larger the computer memory, the more expensive it is. The high concurrency and high performance of redis are based on memory. If the key cache with expire is set to expire, the memory of the server will still be occupied. This is because redis # deletes the cache based on two deletion strategies:
-
(active) regular deletion: regularly spot check random key s. If they are expired, they will be cleared and deleted. You can customize the detection rules by configuring hz. The default value is hz 10, which means 10 detection times per second
-
(passive) lazy deletion: when the client requests an expired key, redis will check whether the key has expired. If it has expired, redis will delete it and return a nil. This strategy is friendly to the CPU and will not cause too much loss, but the memory occupation will be high, because in extreme cases, a lot of memory will not be accessed again.
2. Memory elimination mechanism
In our server, there is more than one redis service, and in extreme cases, the cache expiration processing can not effectively meet the requirements by cleaning the cache, so a better elimination mechanism is needed.
#Specify the maximum memory for triggering elimination: 1073741824 = 125m
# maxmemory <bytes>
# 1G 1024MB 1048576KB 1073741824Bytes 8589934592Bit
maxmemory 1,073,741,824

#Elimination strategy: allkeys lfu# delete the cache that is least frequently used
# maxmemory-policy noeviction
maxmemory-policy allkeys-lfu
Other strategies:
# Maxmemory policy enumeration of memory obsolescence policy values:
volatile-lru: in use expire With expiration time set key In, delete the least recently used cache, and then save the new cache
allkeys-lru: Delete the least recently used cache, and then save the new cache (recommended)
volatile-lfu: in use expire With expiration time set key In, delete the least frequently used cache, and then save the new cache
allkeys-lfu: Delete the least frequently used cache, and then save the new cache (recommended)
volatile-random: in use expire With expiration time set key Delete one at random key
allkeys-random: At all key Delete one at random key
volatile-ttl: in use expire With expiration time set key Delete the most expired key,Delete TTL least key
noeviction: No data is deleted, and write operation exceptions are reported (default value)
Difference between LRU and LFU
* LRU: (By time Least Recently Used,That is, the least recently used page replacement algorithm eliminates the data with the earliest access time
* LFU: (By number) Lease Frequently Used,That is, the least frequently used page replacement algorithm sorts the data according to the access frequency, and eliminates the data with the lowest access frequency
IX Sentinel mechanism
In the Master-Slave replication (read-write separation) mode, the pressure of a single Redis is greatly reduced. However, if there is a problem with the Master, no matter how many there are, the Slave cannot be used. In order to enhance the availability of Redis, the sentinel mechanism can be used to solve this problem.
1. Important functions of sentinel mechanism:
-
Cluster monitoring to monitor whether the Master and Slave processes work normally
-
Notification: when a monitored node has a problem, it can send a notification to the administrator or other applications through the API
-
Automatic failover. If there is a problem with the Master, Sentinal will modify the configuration file of the value node and upgrade it to the Master node
2. Failover mechanism:
-
Each sentinel will regularly send messages to other sentinels (Master and Slave) to confirm whether the other is working normally. If it does not respond within the specified time, the node will be temporarily determined as subjective downtime (sdown)
-
If most sentinels in the cluster think that the node is down, the node will be judged to be down. At this time, a slave node will be upgraded to master through the election algorithm
-
When the original master returns to normal, it will become the slave node under the new master
3. Election algorithm:
-
Four points need to be paid attention to: disconnection link, slave priority, duplicate offset and runid
-
① If the disconnection time between the slave node and the master node has exceeded ten times that of the down after millseconds and the downtime of the dmaster, the slave will be deemed unsuitable for being elected as the master
-
② First sort according to the slave priority. The higher the slave priority, the higher the ranking
-
③ Sort according to the copied offset. The more data copied, the higher the sorting
-
④ If the above two conditions are the same, upgrade the slave with smaller run # id to master directly
4. Configuration:
cp sentinel.conf /usr/local/redis
cd /usr/local/redis
vim sentinel.conf
#There are two modes, one is open to the specified ip, and the other is disable the protection mode, which can be accessed by any ip
protected-mode no
#Start the sentry
daemonize yes
#Run log
logfile /usr/local/redis/sentinel/redis-sentinel.log
#working space
dir /usr/local/redis/sentinel
#Ucloud Amster is a nickname, followed by its own ip and port. The last two represent that if more than two sentinel s judge that the current server is offline subjectively, they will be marked as offline objectively and start failover
sentinel monitor ucloud-master 192.168.1.171 6379 2
#Configure the account and password. Ucloud master is the nickname,
sentinel auth-pass ucloud-master yourpassword
#If the sentinel does not receive the correct return message from the master after more than 10000ms, it will judge that the node is subjective offline. When the sentinel who meets the conditions thinks that the number of subjective offline of the master node meets the setting, it will turn to objective offline and start failover
sentinel down-after-milliseconds ucloud-master 10000
#Synchronize the data of the original master to the slave in parallel. If the configuration is 1, it means that only one slave can be synchronized at a time. If the slave node is used to provide queries, set a smaller number as far as possible, so as not to cause no slave node to provide services.
sentinel parallel-syncs ucloud-master 1
#Various uses,
sentinel failover-timeout ucloud-master 180000
#Because it is a cluster, the cluster of the configuration file is basically the same, so the file is directly transferred to other child nodes through the remote copy command
scp sentinel.conf root@192.168.1.172:/usr/local/redis/
....
cd /usr/local/redis
mkdir sentinel
#Start sentry through configuration file
redis-sentinel sentinel.conf
#Start other child nodes in the same way
Note: due to the limited server resources, two Sentinel servers (two Sentinel services) were used for testing, but it didn't work all the time. Later, after consulting the official documents, we learned that at least three Sentinel services are required to be used as the Sentinel mechanism.
5.SpringBoot integrated Redis sentry
Modify the configuration file (delete or comment the original configuration)
spring:
  redis:
    database: 0
    password: yourpassword
    sentinel:
        #It corresponds to the nickname of sentinel monitor ucloud master 192.168.1.171 6379 2 in the master node configuration file
        master: ucloud-master
        #Configure the ip and port numbers of slave nodes. Multiple slave nodes are separated by commas
        nodes: 192.168.1.172:26379,192.168.1.173:26379
X Cluster building (horizontal expansion) (limited machines, three single node Redis are used to build clusters)
The master-slave replication (read-write separation) of Redis can increase the concurrency performance, but the memory of a single master is limited. When the amount of data is very large, the server performance will reach the bottleneck. Cluster can be used to solve this problem.
1. Configuration
#Since there are not enough servers, redis the original slave node first The main node information configuration note of conf is changed to be at the same level as the master. If there are enough servers as slave nodes, ignore this step
#replicaof 192.168.1.171 6379
#masterauth yourpassword
Do the following for all nodes of the cluster
#Unlock the following notes
cluster-enabled yes
cluster-config-file nodes-6379.conf
cluster-node-timeout 5000
#Enter the working directory and delete it aof and If the rdb file is not deleted, an error will be reported when building the cluster, and the content can be emptied
cd working
rm appendonly.aof dump.rdb
In earlier versions, the ruby script: / home / software / redis-6.2.1/src/redis-trib.com is needed to build redis clusters RB, the new version uses the redis cli command, which is configured as follows (operate on machine 192.168.1.171)
#You can use this command to view the help document first
redis-cli --cluster help
#Start to build (note that the redis cluster needs at least three nodes). Note that ip:port needs to fill in all nodes. If redis is also deployed on this machine, it also needs to be filled in. After execution, enter yes to confirm the build
redis-cli -a yourpassword --cluster create 192.168.1.171:6379 192.168.1.172:6379 192.168.1.173:6379
yes
#Note that the cluster without slave is deployed here, so you can execute the above command. An error may be reported because the persistent file is not deleted. Remember to delete it
#If slave is also configured under master, the first action to change slave to master does not need to be done. Use the following command. The last number "1" represents slave/master, that is, one master corresponds to one slave
#Suppose 171 (Master) 172 (Master) 137 (Slave) 174 (Slave)
#redis-cli -a yourpassword --cluster create 192.168.1.171:6379 192.168.1.172:6379 192.168.1.173:6379 192.168.1.174:6379   --cluster-replicas 1
#Use the following command to check nodes (no matter which node is checked, the status of all nodes in the cluster will be listed)
redis-cli -a yourpassword --cluster check 192.168.1.171:6379
#Use the following command to enter the cluster to view information. You can enter any node
redis-cli -c -a yourpassword -h 192.168.1.171 -p 6379
192.168.1.171:6379> cluster info
192.168.1.171:6379> cluster nodes
How to deploy a cluster without deleting it?
How to add nodes in cluster operation?
2. Slot node
After the cluster is built, you can see that redis has allocated 16438 slot nodes. Each master node will be allocated to a certain number of slot nodes, and the space allocated to each master node is the same.
Slot: similar to memory slots, a host can have multiple memory slots, which are shared by the host.
Assuming that there is a request to get(key), it will calculate which slot the data is stored in according to hash(key)/16438, so as to fetch the data from the corresponding node.
After the cluster is configured, the data stored in redis cli on machine 171 may not be stored in 171, but will be stored in the node corresponding to the calculated slot (a bit similar to the corresponding node found by the consistency hash algorithm). As follows:
192.168.1.171:6379> keys *
1) "171"
192.168.1.171:6379> set name shixin
-> Redirected to slot [5368] localted at 192.168.1.172:6379
OK
192.168.1.172:6379> keys *
1) "name"
192.168.1.172:6379> get name
-> Redirected to slot [5368] localted at 192.168.1.171:6379
"shixin"
192.168.1.171:6379>
3.SoringBoot integrated Redis cluster
redis:
  password: shixin
  cluster:
    #Configure the ip and port of all nodes
    nodes: 192.168.1.171:6379,192.168.1.172:6379,192.168.1.173:6379
Xi Cache penetration and cache avalanche
1. Cache penetration
Some requests that should have accessed redis will access the database because there is no corresponding data in redis. However, there is no data in the database, so the data cannot be stored in the cache in this step, resulting in always accessing the database. This is cache penetration.
In some methods, it is possible to determine whether to fetch from the database or directly use the data in the cache by judging whether there is data in the cache. However, there is a risk that the data in the database will be empty. Therefore, it can be set that the data should be saved to the cache regardless of whether the database is empty or not, and a certain expiration time should be set, This can prevent malicious users from attacking the database through cache penetration.
Solution:
if (StringUtils.isBlank(redisStr)){
    list = myService.getList(id);
    if (CollectionUtils.isEmpty(list)){
        redisOperator.set("key:"+id,JSONObject.toJSONString(list),5*60);
    }else {
        redisOperator.set("key:"+id,JSONObject.toJSONString(list));
    }
}else {
    list = JSONObject.parseArray(redisStr);
}
2. Cache avalanche
In the cache, we will set the expiration time for many keys. If the expiration time of these keys happens to be concentrated for a period of time, that is, the cache fails in a large area, and our website happens to have a lot of traffic during this period, then all requests will hit the database at this time, and the database will face great pressure or even downtime. (if it has been down, it can be solved slowly by constantly restarting the database. During the restart process, some of the requested data have been stored in the cache). The cache avalanche cannot be completely solved, and certain protective measures can only be taken in advance.
Precautions:
①. Never expire
Some hotspot data can not be expired
②. Staggered expiration time
Some caches with expiration dates set during system initialization can artificially stagger their expiration times.
③. Multi cache combination
Multiple caches can be used, such as redis - > mencache - > mysql
④. Purchasing third party Redis
XII multiGet and pipeline batch query optimization
If you need to obtain the values of multiple key s at one time, using the for loop get will make redis constantly create and close links. You can use the following methods:
multiGet batch query optimization string keys;
List<String> redisValues = redisTemplate.opsForValue().multiGet(Arrays.asList(keys));
Pipeline , pipeline, similar to nginx's keeplives, maintains constant link access:
This method will maintain a pipeline access. The link will not be closed until all commands in the method are executed, and all the obtained data will be returned to the Object. This method can not only optimize the query, but also perform diversified operations
Result data format: ["value1","value2","value3","value4"]
List<Object> result = redisTemplate.executePipelined(new RedisCallback<String>() {
    @Override
    public String doInRedis(RedisConnection redisConnection) throws DataAccessException {
        StringRedisConnection src = (StringRedisConnection)redisConnection;
        for (String k : keys){
            src.get(k);
        }
        return null;
    }
});
XIII Distributed lock
//Write again when you have time