1. Hype-V virtual machine installation openEuler
There are many virtual machine platforms, such as vmware, Hype-V, VirtualBox, etc. Considering the compatibility with wsl2, Hype-V is selected here to install the x86 architecture openEuler
Turn on the hype-v virtual machine

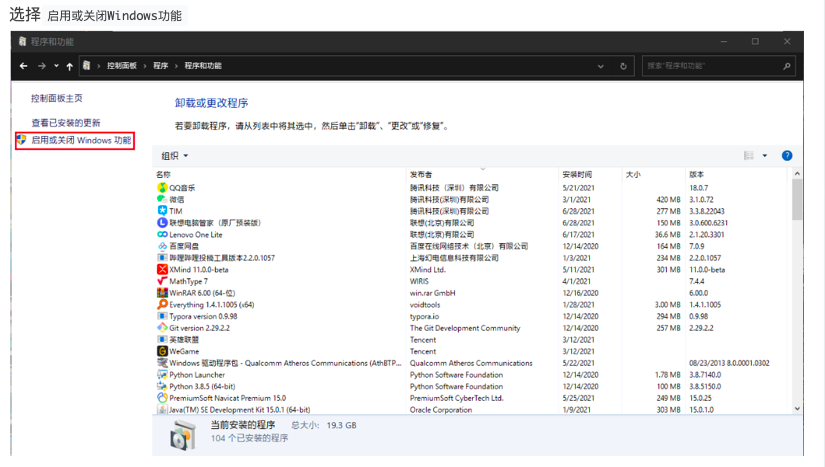
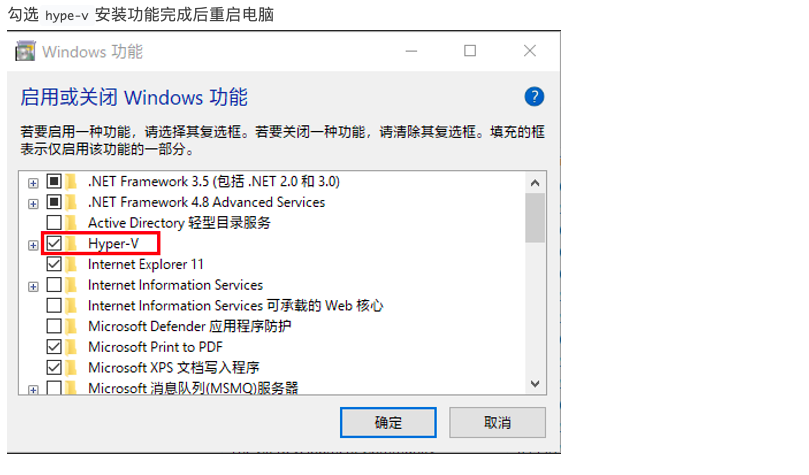
Download the x86 architecture openEuler image
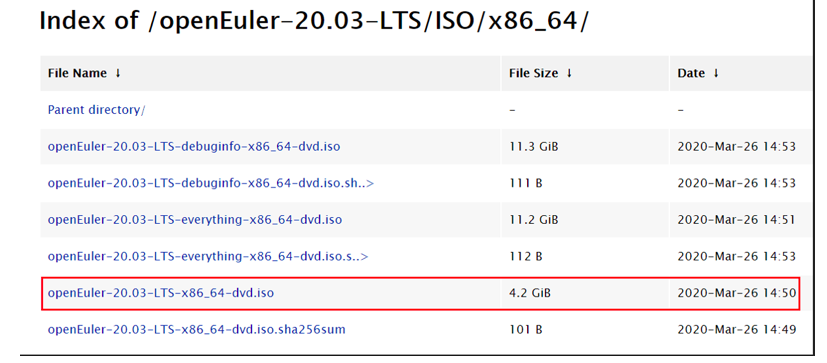
Open the openEuler official website. We plan to use the openEuler-20.03-LTS long-term support version here
Open openEuler-20.03-LTS-ISO-x86-64 and select openEuler-20.03-LTS-x86_64-dvd.iso)
Open Hyper-V, where the image configuration process is no longer cumbersome

After the configuration is completed, you can enter the page of installing the system. Select Install openEuler here
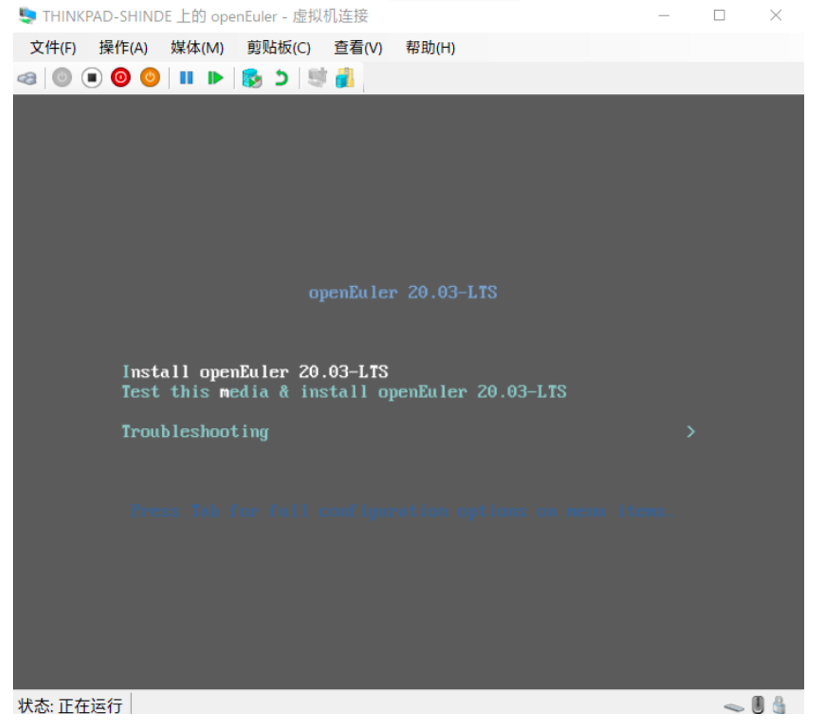
Here, go to the installation page similar to centOS that we are very familiar with. Just follow the steps to install it
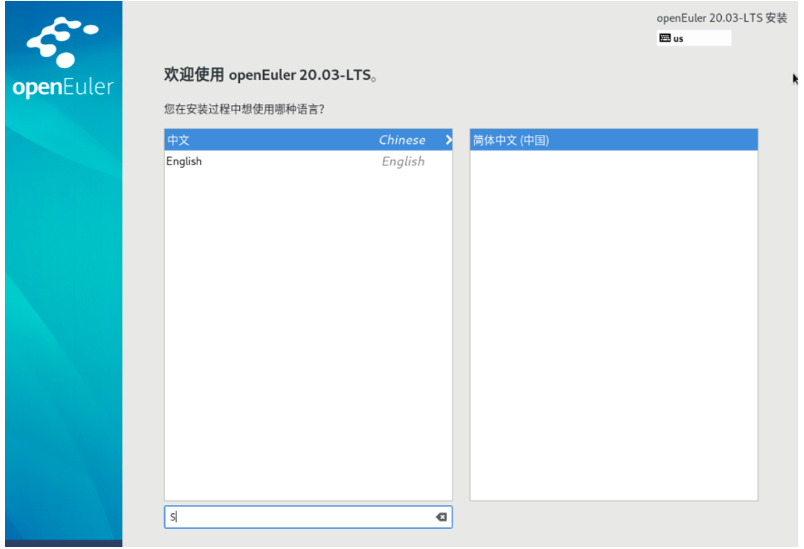
Here, we intend to log in directly with the root user and set the root password. There is no need to create a user. Here, just wait for the installation. After the installation is completed, you will be prompted to restart. Here, the key is first, unplug the image (the DVD driver is set to none and will not enter the installation page) and start it
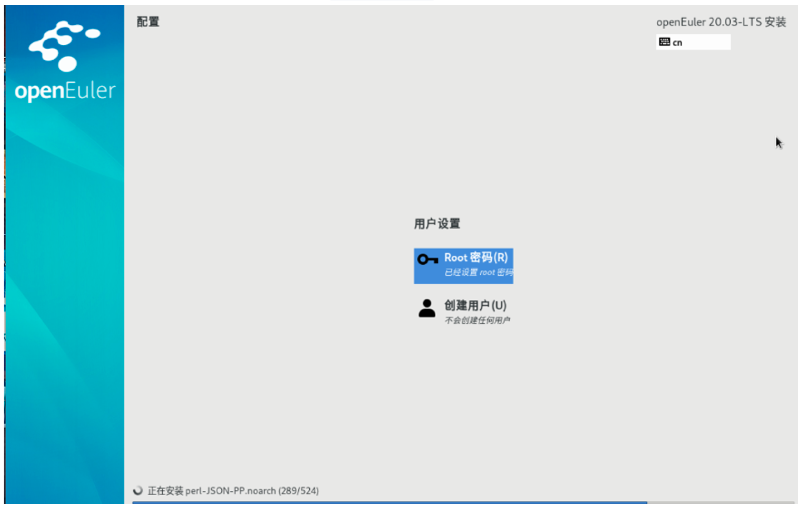
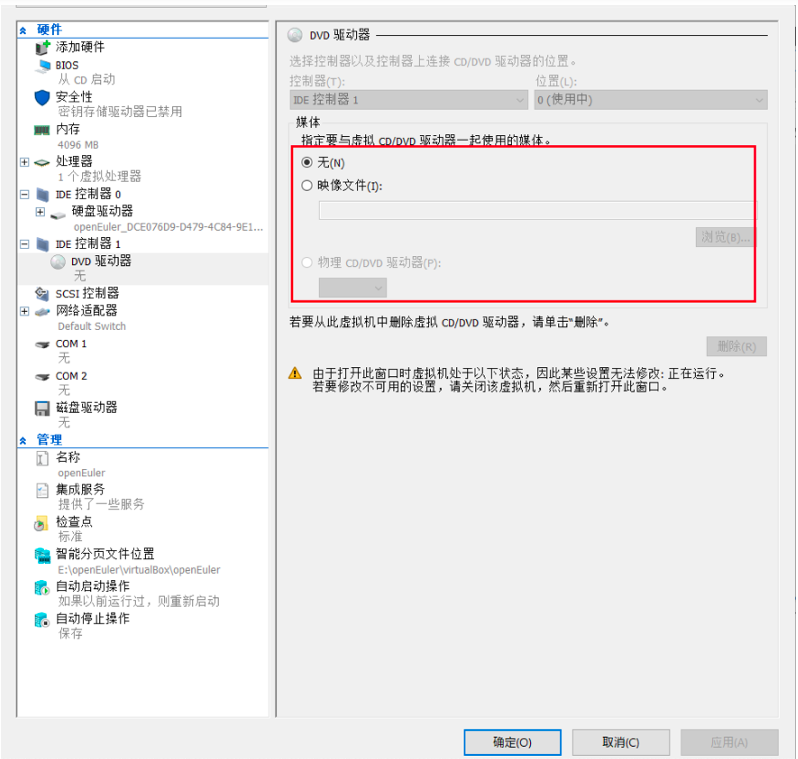
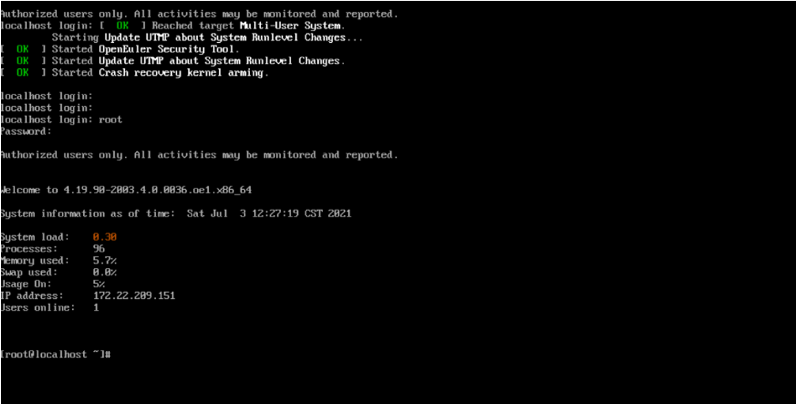
OK, it starts successfully here. Enter the root account and password to successfully enter the openEuler page. There is no image drawing page here, only the command line (the simplified openEuler system should be liked by most people, but it is not recommended to install the image drawing page)
2. Configuration of openEuler virtual system (graphical support)
1. First, add the software source. The official openEuler image (version 20.03) does not have its own software source. There is nothing in yum -install here
step1: cd /etc/yum.repos.d/
step2: sudo vi openEuler_x86_64.repo
step3: add the following code at the bottom
[base]
name=base
baseurl=https://repo.openeuler.org/openEuler-20.03-LTS/OS/x86_64/
enabled=1
gpgcheck=0
step4: exit vim and type the following command line by line
yum repolist all
sudo yum-config-manager --enable base

If your openEuler version or platform is different, you can make corresponding changes. By now, yum should have been used normally.
2. Connect hype-v with windows powershell and close the firewall
typing
yum install -y net-tools
yum install -y vim
Then check the ip, ifconfig
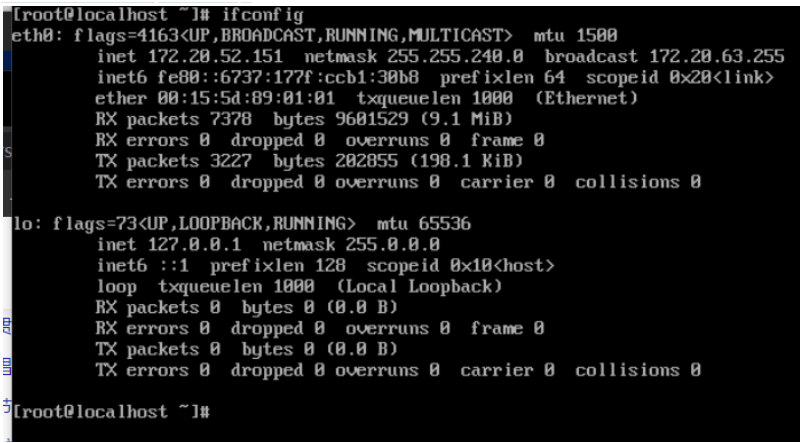
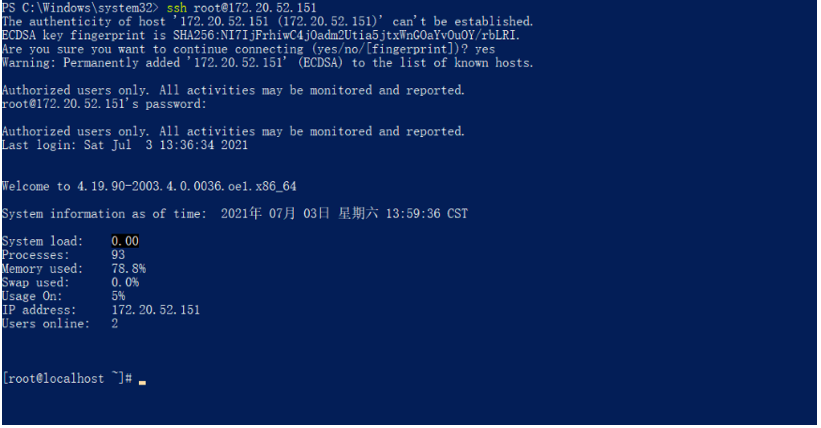
We can open Windows powershell as follows
Command ssh root @ (address of ifconfig network card) just enter the password. Here, you can also configure the key for secret free connection. No more details. Here, you can also use tools such as xshell to connect. It's ok if you don't connect. How convenient is it
Next, we turn off the virtual machine firewall for the convenience of opening subsequent ports, but it is not recommended on the server
systemctl stop firewalld.service
systemctl disable firewalld.service
as follows

Here you can also open the graphical page of openGauss. The specific operations are as follows. It doesn't work here, but it should be more friendly to small partners who are not familiar with the command line
yum install ukui

yum groupinstall fonts -y

systemctl set-default graphical.target

reboot

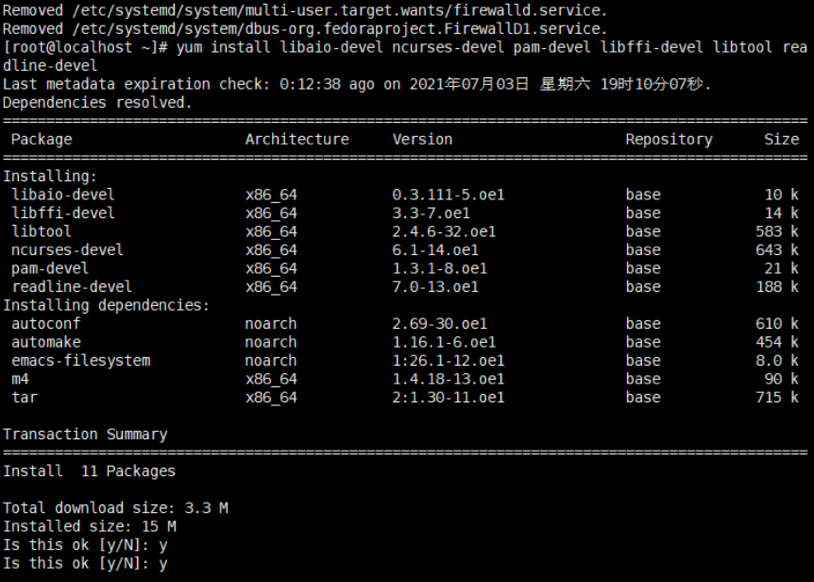
3. Next, we prepare the openGauss installation dependency, and type the following command
yum install libaio-devel ncurses-devel pam-devel libffi-devel libtool readline-devel
zlib-devel python3-devel autoconf flex gcc gcc-c++ patch byacc bison -y
4. Modify the python version,
Let's first look at the python version

Please point the default version of Python to Python 3 x. The specific operations are as follows:
rm -rf /usr/bin/python
ln -s /usr/bin/python3.7 /usr/bin/python
Next, take a look at the python version, as follows

5. Set character set and environment variables
Enter the following commands in sequence
cat >>/etc/profile<<EOF
export LANG=en_US.UTF‐8
EOF
-------------------------------------------Command split line
cat >>/etc/profile<<EOF
export packagePath=/opt/software/openGauss
EOF
-------------------------------------------Command split line
source /etc/profile
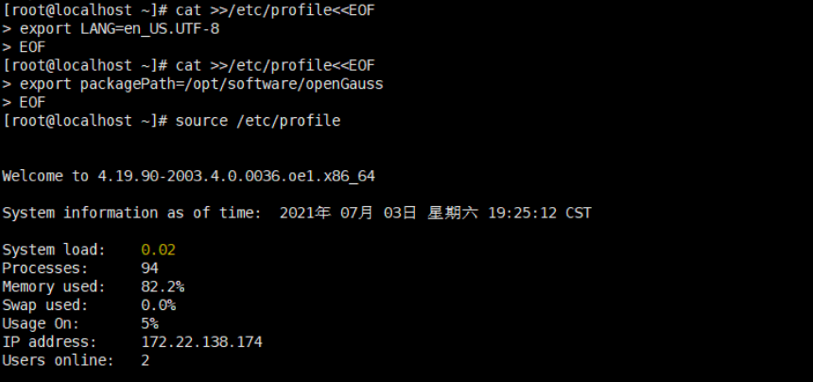
Then it is as follows
cat >>/etc/profile<<EOF
export LD_LIBRARY_PATH=$packagePath/script/gspylib/clib:$LD_LIBRARY_PATH
EOF
----------------------------------------Command split line
source /etc/profile
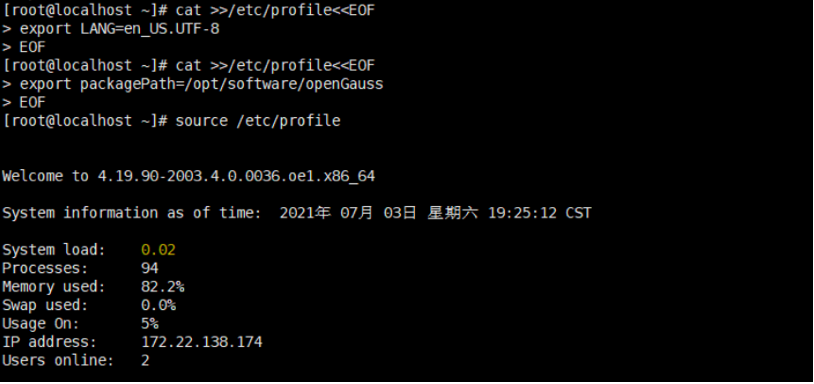
You can verify whether the result is correct
echo $LD_LIBRARY_PATH
If it is as follows, the result is no problem

6. Setting of swap partition
linux The system will do a lot with memory buffer and cache,Therefore, we often see that the memory is used up. In fact, only a small part of it may be used by the program. When the memory is insufficient, the system has two options: one is to reduce the amount of cache, and the other is to change the memory used by some programs to swap Yes. If it is openGauss Memory used is transferred to swap It will have a great impact on the performance, so it should be maintained as much as possible openGauss The used part is not transferred out of memory.
Generally, you can use memlock to start mysql. MySQL is maintained in memory by mysqld. However, using this option requires running the server as root, which has not been used on openGuass.
You can also turn off swap and use swap off or umount partition. However, when the memory is not large enough (for example, only 1G), the system is unstable, which may lead to an error when openGauss is out of memory.
You can also set the system variable VM Swappiness, modify / etc / sysctl Conf add VM Swappiness = 0 and execute sysctl -p or sysctl - W VM swappiness=0. The range of this variable is 0 to 100, and the default value is 60. When the memory is insufficient, if the value of this variable is small, the system tends to reduce the cache, otherwise the program memory is transferred to swap. But even if it is set to 0, it is still possible for the system to use swap.
Generally speaking, databases and programs that can have their own cache do not want the system to replace memory pages. The simplest policy to "block" swap is to modify system parameters. Refer to:
sysctl -w vm.swappiness=0

echo 1>/proc/sys/vm/drop_caches

The first statement is to advise the system not to use swap,

The second statement is to let the system clean up cache,To free up more memory. But article 1 cannot absolutely prevent swap(Because it's just a suggestion).
Here we use the most rough and simple method, close swap Swap memory
[root@db1 ~]# swapoff -a
7. Next, we adjust the system parameters
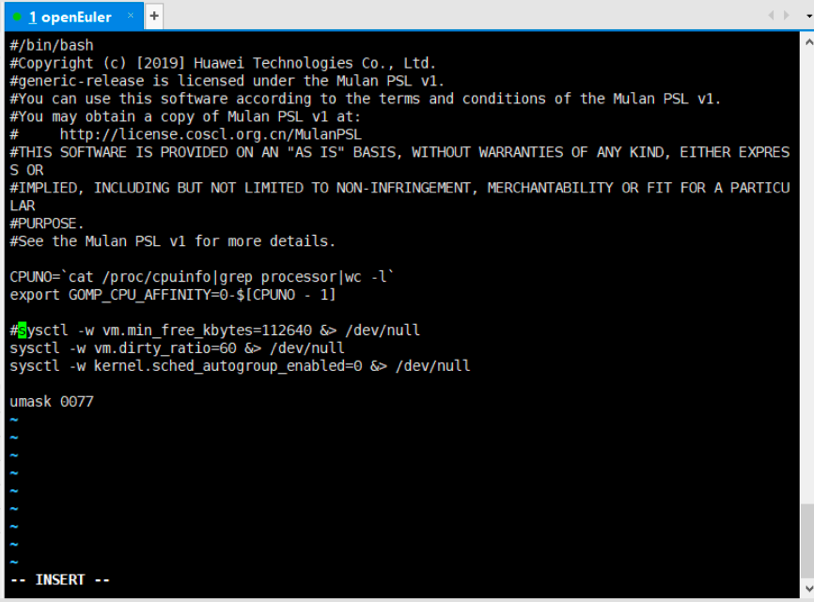
[root@db1 ~]# vi /etc/profile.d/performance.sh
As shown in the figure, press i to enter the editing mode and # comment out sysctl - W VM min_ free_ Kbytes = 112640 & > / dev / null, press Esc: wq save and exit.
8. Next, download the source to / etc / yum.com repos. d/openEuler_ x86_ 64.repo
Enter command
curl -o /etc/yum.repos.d/openEuler_x86_64.repo https://mirrors.huaweicloud.com/repository/conf/openeuler_x86_64.repo

Re input
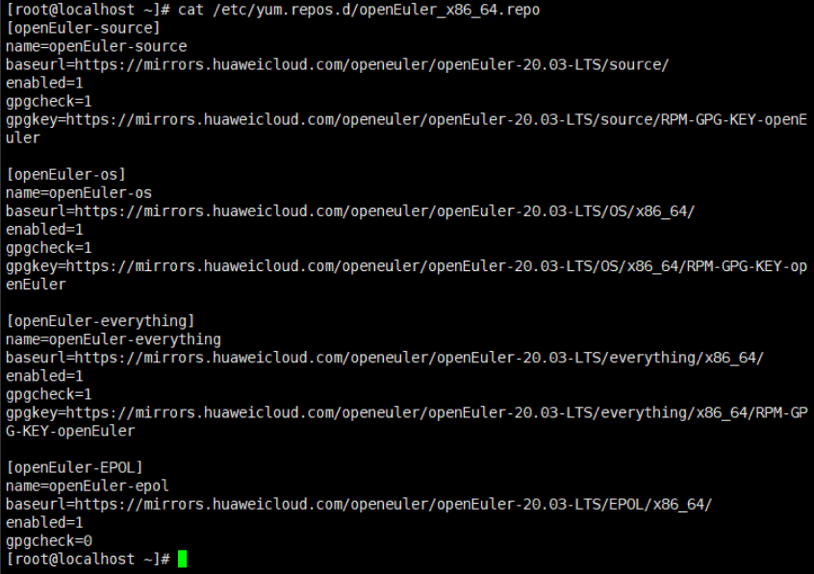
cat /etc/yum.repos.d/openEuler_x86_64.repo
The following results are correct
Then install dependencies
yum install libaio* -y
yum install libnsl* -y
3. openEuler virtual machine installation openGauss
Here, opengauss: version 1.0.1 is used for configuration and installation. The download address is as follows. You can download it, transfer it to openEuler, or download it directly through wget
https://gitee.com/opengauss/openGauss-server/repository/archive/v1.0.1
https://gitee.com/opengauss/openGauss-server/repository/archive/v1.0.1
You also need to download gcc-8.2.0. The lower version of opengauss does not support gcc-7*
http://mirror.koddos.net/gcc/releases/gcc-8.2.0/gcc-8.2.0.tar.gz
After downloading, put them all into the / root / directory, i.e. cd /root / as follows

Installation dependency
yum install zlib-devel python3-devel autoconf flex gcc gcc-c++ patch byacc bison -y
Copy GCC to / root / opengauss third_ party/buildtools/gcc/
cp gcc-releases-gcc-8.2.0.tar.gz /root/openGauss-third_party/buildtools/gcc/
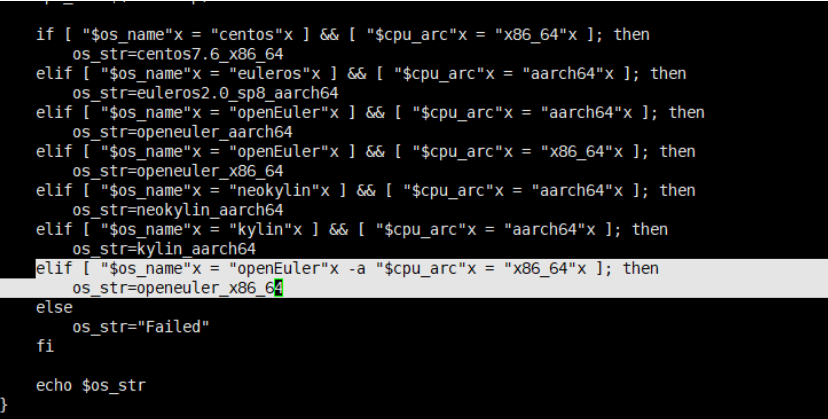
At present, openGauss officially supports the openEuler of ARM architecture. Here, the openEuler supporting x86 architecture needs to be modified_ PlatForm_ Str.sh file.
  cd /root/openGauss-third_party/build/
vi get_PlatForm_str.sh
Add such a line
  elif [ "$os_name"x = "openEuler"x -a "$cpu_arc"x = "x86_64"x ]; then
        os_str=openeuler_x86_64
Save exit
Start compiling third-party software
sh build_all.sh

If an error is reported: You should download gcc-8.2.0.tar.gz or gcc-8.2.0.zip and put it <span class="hljs-keyword">in</span> /root/openGauss-third_party/build/../buildtools/gcc/Solve as follows

<span class="hljs-built_in">cd</span> /root/openGauss-third_party/buildtools/
mv gcc-releases-gcc-8.2.0.tar.gz gcc-8.2.0.tar.gz
<span class="hljs-built_in">cd</span> /root/openGauss-third_party/build/
Re execute the command
After executing the above commands, the user can automatically generate the open source third-party software required for database compilation. If you want to generate an open source third-party software separately, you can enter the corresponding directory and execute build SH script, such as / root / opengauss third_ party/dependency/. The final compiled results will be stored in opengauss third_ binarylibs directory at the same level of party. These files will be used later when compiling opengauss server.
PS: this step takes a long time. I've fainted in the toilet
After compilation, as shown in the figure
Next, we set the environment variable
cd/root/
vi bashrc
Add the following at the bottom. Don't be wrong. A mistake will become eternal hatred
export CODE_BASE=/root/openGauss-server    # Path of the openGauss-server file
export BINARYLIBS=$CODE_BASE/../binarylibs    # Path of the binarylibs file
export GAUSSHOME=/opt/opengauss/
export GCC_PATH=$BINARYLIBS/buildtools/openeuler_x86_64/gcc8.2
export CC=$GCC_PATH/gcc/bin/gcc
export CXX=$GCC_PATH/gcc/bin/g++
export LD_LIBRARY_PATH=$GAUSSHOME/lib:$GCC_PATH/gcc/lib64:$GCC_PATH/isl/lib:$GCC_PATH/mpc/lib/:$GCC_PATH/mpfr/lib/:$GCC_PATH/gmp/lib/:$LD_LIBRARY_PATH
export PATH=$GAUSSHOME/bin:$GCC_PATH/gcc/bin:$PATH
Finally, update the environment variables
source bashrc
Set Makefile
At present, openGauss officially supports openEuler of ARM architecture. Here, openEuler supporting x86 architecture needs to modify the Makefile file.
  cd openGauss-server
vi ./src/gausskernel/Makefile
The modified content is as shown in the following figure. Insert the green part into the following content
  else ifeq( $(PLAT_FORM_STR), openeuler_x86_64)
	cp '$(LIBCURL_LIB PATH)/libcurl.so.4.6.0' '$(DESTDIR)$(libdir)/libcurl.so.4.6.0'

Select the Release version for configuration
./configure --gcc-version=8.2.0 CC=g++ CFLAGS="-O2 -g3" --prefix=$GAUSSHOME --3rd=$BINARYLIBS --enable-thread-safety --enable-thread-safety
Start compilation
make -j

Seeing the results in the above screenshot shows that the compilation was successful.
The last step is make install

The software installation path is: $Gaussian
Binary placement path: $Gaussian / bin
In this way, openGauss can be used in the x86 openEuler virtual machine
Start openGauss service and use it directly
gs_om -t start
Connecting to the database using
sudo gsql
After connecting to the database, you can modify the port number, user and password of the database
4. Use, writing and connection of JDBC
- Download the JDK.
https://www.oracle.com/java/technologies/javase/javase-jdk8-downloads.html
The open source version of JDK-8 installed here is acceptable
- Configuring jdk environment variables
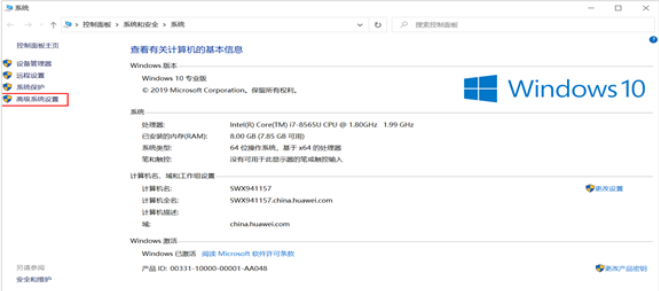
Right click "this computer", select "properties", and click "advanced system settings".
 ,
,
Click "environment variable", create a new system variable "JAVA_HOME", and enter the JDK installation directory.

Click "environment variable", create a new system variable "JAVA_HOME", and enter the JDK installation directory
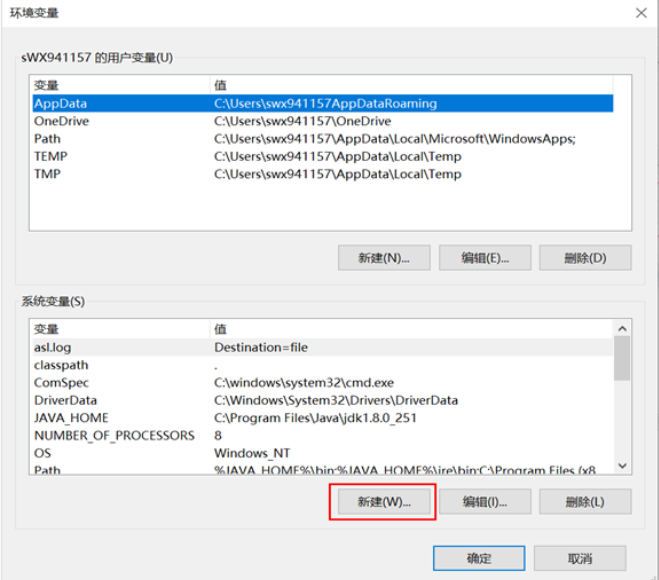
Fill the jdk installation directory with variable values

Edit the system variable "path".

Enter% Java at the end of the variable value_ HOME%\bin;% JAVA_ HOME%\jre\bin;
Create a new system variable "CLASSPATH" and enter "." Just.

Then, open windows powershell and enter java --version. If the output is as follows, the installation is successful

2. Preparation of JDBC connection
Here, using the 'idea' tool to insert and connect to the database is no longer cumbersome. Look at the main code of jdbcimport java.sql.*;
public class GaussDBMySQLDemo {
static final String JDBC_DRIVER = "org.postgresql.Driver";
static final String DB_URL = "jdbc:postgresql://IP address of your virtual machine: port number occupied by your database / database to be connected ";
// The user name and password of the database need to be set according to your own settings
static final String USER = "root";
static final String PASS = "123456";
public static void main(String[] args) {
Connection conn = null;
Statement stmt = null;
try{
// Register JDBC Driver
Class.forName(JDBC_DRIVER);
// Open link
System.out.println("connecting...");
conn = DriverManager.getConnection(DB_URL,USER,PASS);
//Instantiate object
stmt = conn.createStatement();
// Execute query
String sql;
sql = "SELECT id, name, url FROM websites";
ResultSet rs = stmt.executeQuery(sql);
// Create table
sql = "CREATE TABLE COMPANY1 " +
"(ID INT PRIMARY KEY NOT NULL," +
" NAME TEXT NOT NULL, " +
" AGE INT NOT NULL, " +
" ADDRESS CHAR(50), " +
" SALARY REAL)";
rs = stmt.executeQuery(sql);
Close script file
stmt.close();
// End connection
c.close();
} catch ( Exception e ) {
System.err.println( e.getClass().getName()+": "+ e.getMessage() );
System.exit(0);
}
System.out.println("Table created successfully");
}
}