Object advanced
Object creation mode
Object constructor mode
First create an empty Object object, and then dynamically add properties / methods
  var p = new Object()
  p = {}
  p.name = 'Tom'
  p.age = 12
  p.setName = function (name) {
    this.name = name
  }
  console.log(p.name, p.age)
  p.setName('Bob')
  console.log(p.name, p.age)
Object literal mode
Create an object with {} and specify properties / methods.
 var p = {
    name: 'Tom',
    age: 12,
    setName: function (name) {
      this.name = name
    }
  }
  console.log(p.name, p.age)
  p.setName('JACK')
  console.log(p.name, p.age)
The codes of the first two methods are relatively simple and easy to understand and used more, but the code repetition rate is relatively high.
Factory mode
Create objects dynamically through factory functions and return
  function createPerson(name, age) {
    var obj = {
      name: name,
      age: age,
      setName: function (name) {
        this.name = name
      }
    }
    return obj
  }
  var p1 = createPerson('Tom', 12)
  var p2 = createPerson('Bob', 13)
This method creates a big problem. The created objects are of Object type, so there is no way to distinguish them.
  function createStudent(name, price) {
    var obj = {
      name: name,
      price: price
    }
    return obj
  }
  var s = createStudent('Zhang San', 12000)
  // s, p1 and p2 are Object types.
Custom constructor mode
Customize the constructor and create objects through new. This method can solve the typeless problem caused by factory mode.
  function Person(name, age) {
    this.name = name
    this.age = age
    this.setName = function (name) {
      this.name = name
    }
  }
  var p1 = new Person('Tom', 12)
  p1.setName('Jack')
  console.log(p1.name, p1.age)
  console.log(p1 instanceof Person)  // true

  function Student (name, price) {
    this.name = name
    this.price = price
  }
  var s = new Student('Bob', 13000)
  console.log(s instanceof Student) // true
Combined mode of constructor + prototype
For objects, the properties of each object are private, but all methods of a class are the same. All the above construction methods will make each object define a method. If there are many objects, it will greatly consume memory and cannot realize inheritance relationship. According to the previous knowledge of prototype chain, you can write the method in the prototype of the object. Make all objects common.
  function Person(name, age) { //Only general functions are initialized in the constructor
    this.name = name
    this.age = age
  }

  Person.prototype.setName = function (name) {
    this.name = name
  }

  var p1 = new Person('Tom', 23)
  var p2 = new Person('Jack', 24)
  console.log(p1, p2)
Inheritance mode
Prototype chain inheritance
- Define a parent type constructor
- Add a method to the prototype of the parent type
- Defines the constructor for the subtype
- Create an object of the parent type and assign it to the prototype of the child type
- Set the construction property of the subtype prototype to subtype
- Adding methods to subtype prototypes
- Create sub type objects: you can call methods of the parent type
Sample code
  //Parent type
  function Supper() {
    this.supProp = 'Supper property'
  }
  Supper.prototype.showSupperProp = function () {
    console.log(this.supProp)
  }

  //Subtype
  function Sub() {
    this.subProp = 'Sub property'
  }

  // The prototype of the subtype is an instance object of the parent type
  Sub.prototype = new Supper()
  // Let the constructor of the prototype of the subtype point to the subtype
  Sub.prototype.constructor = Sub
  Sub.prototype.showSubProp = function () {
    console.log(this.subProp)
  }

  var sub = new Sub()
  sub.showSupperProp()
  // sub.toString()
  sub.showSubProp()

  console.log(sub)  // Sub
The key here is the step of Sub.prototype = new supplier (). Let the prototype of the subclass point to the object of a parent class, according to the principle of prototype chain learned before. Of Sub objects__ proto__ Points to the prototype object of the Sub constructor object, and the prototype object of the supplier object__ proto__ Point to the prototype object of the supplier constructor object. After this operation, the Sub object can find the methods on the supplier prototype along the prototype chain. Then inheritance is realized. The memory structure is shown in the figure below:
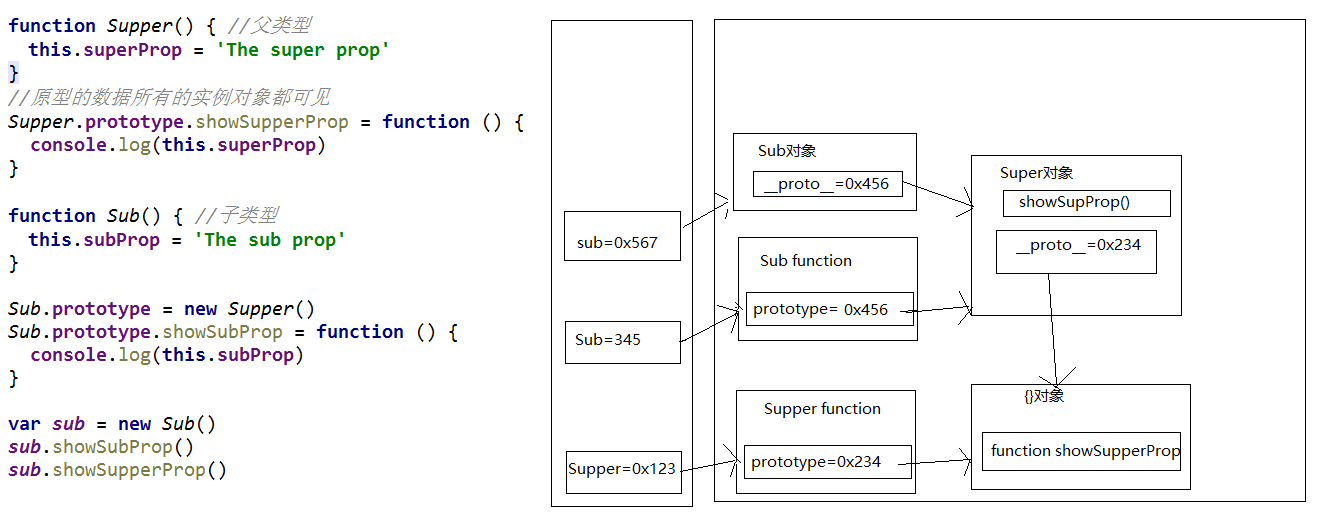
Note that although inheritance is implemented in this way, there is no constructor attribute on the supplier object. If the constructor attribute is used, it will find the supplier prototype object according to the prototype chain, and its constructor attribute points to the supplier constructor object, which is obviously inconsistent. Therefore, it is necessary to add a sub.prototype Constructor = sub to complete the entire inheritance relationship.
Borrowing constructor inheritance
- Define a parent type constructor
- Define subtype constructor
- Calling parent type constructor in subtype constructor
The key is to call the parent type constructor in the generic call() in the subtype constructor (described earlier)
function Person(name, age) {
  this.name = name
  this.age = age
}
function Student(name, age, price) {
  Person.call(this, name, age) //Call the Person constructor and pass in your own this
  this.price = price
}

var s = new Student('Tom', 20, 14000)
console.log(s.name, s.age, s.price)
Combined inheritance of prototype chain + borrowing constructor
- Using prototype chain to realize method inheritance of parent type object
- Use super() to borrow the parent type to build the function to initialize the same attribute
function Person(name, age) {
  this.name = name
  this.age = age
}
Person.prototype.setName = function (name) {
  this.name = name
}

function Student(name, age, price) {
  Person.call(this, name, age)  // To get properties
  this.price = price
}
Student.prototype = new Person() // In order to see the methods of the parent type
Student.prototype.constructor = Student //Fix constructor property
Student.prototype.setPrice = function (price) {
  this.price = price
}

var s = new Student('Tom', 24, 15000)
s.setName('Bob')
s.setPrice(16000)
console.log(s.name, s.age, s.price)
ES6 mode
ES6 provides a writing method closer to the traditional language, and introduces the concept of Class as a pair
Like a template. You can define a class by using the class keyword. Basically, the class of ES6 can be regarded as just a syntax sugar. ES5 can do most of its functions. The new class writing method only makes the writing method of object prototype clearer and more like the syntax of object-oriented programming.
In addition, ES6 also supports object-oriented functions such as method rewriting static methods:
//Parent class
class Person {
 //Construction method
 constructor(name, age) {
  this.name = name
  this.age = age
 }
 //Object method
  setName(name) {
    this.name = name
  }
}
//Subclass
class Student extends Person {
 constructor(name, age, price, screen, pixel) {
 	super(name, age, price);
 	this.price = price;
 }
 //Method rewrite
 setPrice(price) {
    this.price = price
 }
 //Method rewrite
 setName(name) {
    this.name = "student" + name
  }
 //Static method
 static run(){
 console.log('I can learn')
 }
}
//Instantiate object
 const s = new Student('Tom', 24, 15000)
 s.setName('Bob')
 s.setPrice(16000)
 console.log(s.name, s.age, s.price)
 Student.run() //Static method
Browser kernel and event loop model (js asynchronous mechanism)
Browser kernel
classification
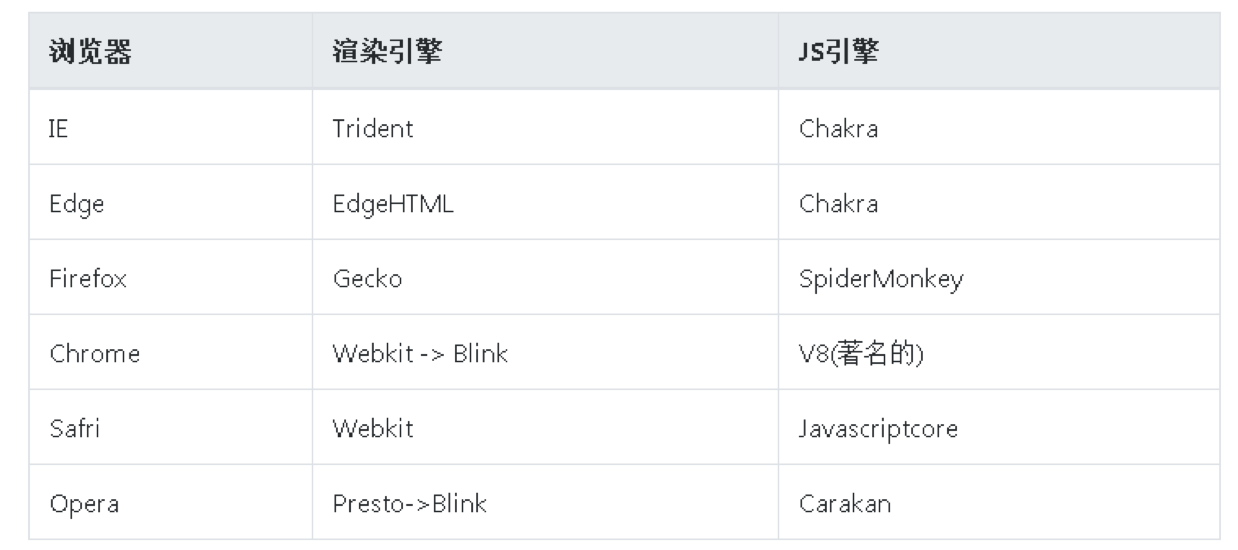
In addition, domestic browsers generally use Trident (bank) + webkit dual core.
Kernel module
Main thread
html,css document parsing module: responsible for page text parsing
dom/css module: responsible for dom/css processing in memory
Layout and rendering module: responsible for page layout and rendering
Layout and rendering module: responsible for page layout and rendering
...
Sub thread
Timer module: responsible for timer management
Network request module: responsible for server requests (regular / Ajax)
Event response module: responsible for event management
Browser render pass
Basic process
1. Parsing HTML to build DOM tree
The browser cannot recognize the html file and needs to parse the html into a DOM tree. The parsing process is a deep traversal process. The next sibling node will be parsed only when all child nodes under a node are traversed.
2.CSS parsing: execute synchronously with the parsing process of HTML. The browser will recognize all CSS style information and build a CSSOM tree.
3. Combination of style and structure
CSSOM tree and DOM tree are merged to form Render Tree. During the process of forming the Render Tree, the browser will filter out all visible nodes (the element of visibility: hidden is in the Render Tree) and match the CSS rules of its CSSOM tree species for the visible nodes.
4. Layout stage
The layout stage is mainly to traverse the rendering tree and write the element nesting relationship into the document stream in the form of box model. In this stage, the space that each tree node should occupy and its position in the view are calculated. The offset caused by some layout styles such as float, absolute and fixed will take effect in this stage.
5. Rendering stage this stage will convert our rendering tree into pixels and decode all media files.
Reflow and redraw
backflow
When our operation causes changes in the geometric dimensions of DOM (such as modifying the width, height or hidden elements of elements), the browser needs to recalculate the geometric attributes of elements (the geometric attributes and positions of other elements will also be affected), and then draw the calculation results. This process is rearrangement (also known as reflux).
Repaint
When we modify the DOM to change the style without affecting its geometric properties (such as changing the color or background color), the browser does not need to recalculate the geometric properties of the element and directly draw a new style for the element (skipping the reflow link shown in the above figure). This process is called redrawing.
This section is selected from the blog“ Browser render pass ", please refer to this blog for more details.
Event loop model (JS asynchronous)
Why should js use single thread mode instead of multi thread mode?
- The single thread of JavaScript is related to its purpose.
- As a browser scripting language, JavaScript is mainly used to interact with users and manipulate DOM.
- This determines that it can only be a single thread, otherwise it will bring very complex synchronization problems
The basic process of executing code by js engine
- Execute initialization code first: contains some special code callback functions (asynchronous execution)
- set timer
- Binding event listening
- Send ajax request
- The callback code will be executed at a later time
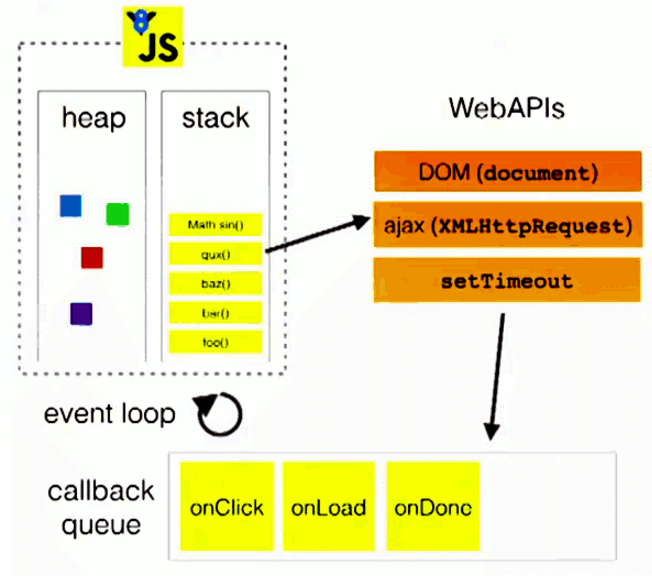
In the above figure, stack is the stack of program execution, WebAPIs is the event management module (i.e. asynchronous processing module), and callback queue is the call queue, which is responsible for temporarily storing the code returned by the event management module and executing the code in the queue in turn after the main program is executed (event loop refers to this).
Let's illustrate with a piece of code:
function fn1() {
  console.log('fn1()')
}
fn1()
document.getElementById('btn').onclick = function () {
  console.log('Click btn')
}
setTimeout(function () {
  console.log('The timer is running')
}, 2000)
function fn2() {
  console.log('fn2()')
}
fn2()
1. Due to function promotion, all function definitions will be advanced. After the definition is completed, execute fn1() and print fn1().
2. Since DOM operation does not belong to the main thread, document getElementById(‘btn’). onclick will be added to the event response module, which will bind the corresponding event and code, and the main thread will continue to execute.
3. When setTimeout is executed, the timer operation is also not the main thread, so it will be handed over to the timer module for timing, and the main program will continue to execute.
4. Execute to fn2(), continue to execute the code and print fn2().
5. When the timer time is up, the timer module will put the code into the callback queue. Because this code is in the opposite line and the main program has been executed, the code in the timer can be executed and the print timer is executed.
6. When the user clicks the button to trigger an event, the event response module will also put the code into the callback queue, wait for the code in front of the queue to execute after execution, and print the clicked btn.