concept
- Problems encountered in service governance
- In a microservice project, each service runs independently
- It is impossible to manually deploy each project, which involves automatic operation and maintenance
Continuous integration
- Continuous integration (CI)
- Continuous integration refers to the frequent (multiple times a day) integration of code into the backbone. There are two advantages:
- Fast error discovery: every time a little update is completed, it is integrated into the trunk to quickly find and locate errors
- Prevent branches from deviating greatly from the theme: if they are not integrated frequently and the trunk is constantly updated, it will make it more difficult or even difficult to integrate in the future
- Continuous integration emphasizes that after the developer submits the new code, it will immediately build (unit) test, and determine whether the new code and the original code can be integrated according to the test results
- Concepts related to integration include continuous delivery and continuous deployment
Continuous integration using GitLab
- GitLab8. After 0, GitLab CI has been integrated in GitL, just add one in the project gitlab-ci.yml file, and then add a Runner for continuous integration
- Pipeline
- Pipeline: pipeline. A pipeline is equivalent to a construction task. It can include multiple processes: installing dependencies, running tests, compiling, deploying test servers, deploying production servers, etc
- Any submission or Merge Request can trigger Pipeline
- Stages
- Stages refers to the construction stage, that is, the above process. Multiple stages can be built in a Pipeline. The characteristics of these stages are as follows:
- All Stages will run in sequence: that is, when one Stage is completed, the next Stage will start
- The pipeline will not succeed until all Stages are completed
- If any Stage fails, subsequent Stages will not be executed and the pipeline fails
- Stages refers to the construction stage, that is, the above process. Multiple stages can be built in a Pipeline. The characteristics of these stages are as follows:
- Jobs
- Jobs refers to the construction work and the work performed in a Stage. Multiple jobs can be defined in Stages. These jobs have the following characteristics:
- Jobs in the same Stage will be executed in parallel
- Only when all Jobs in the same Stage are executed successfully can the Stage be executed successfully
- If any Job fails, the Stage fails, that is, the pipeline fails
- Jobs refers to the construction work and the work performed in a Stage. Multiple jobs can be defined in Stages. These jobs have the following characteristics:
Continuous delivery
- Continuous delivery:
- Frequently deliver new versions of software to the quality team or users for review
- After passing the review, the code enters the production stage
- Continuous delivery is the next step of continuous integration. It emphasizes that no matter how updated, software can be delivered anytime, anywhere
- Continuous delivery is to deploy the integrated code to a production like environment closer to the real running environment on the basis of continuous integration
Continuous deployment
- Continuous deployment is the next step of continuous delivery, which means that the code is automatically deployed to the production environment after passing the review
- Objective of continuous deployment: the code can be deployed at any time and can enter the production stage
- Premise of continuous deployment: complete the test, build, deployment and other steps automatically
GitLab Runner
GitLab CI
- Generally speaking, the construction task will occupy a lot of system resources (when compiling the code). Since GitLab CI is a part of GitLab, the performance of GitLab will be greatly reduced when the construction task is run by GitLab CI
- The greatest function of GitLab CI is to manage the construction status of each project
GitLab Runner
- GitLab Runner can be installed on different machines and will not affect the performance of GitL during the running of the construction task
- Installing GitLab Runner Based on Docker:
1.Create working directory: /usr/local/docker/runner
2.Create build directory: /usr/local/docker/runner/environment
3.download jdk-8u152-linux-x64.tar.gz Copy to/usr/local/docker/runner/environment
4.download apache-maven-3.5.3-bin.tar.gz Copy to/usr/local/docker/runner/environment


daemon.json
1.stay/usr/local/docker/runner/environment Create under directory daemon.json,Used to configure accelerator and warehouse address
-------------------------------------------------------------------------------------------------------------------------------------------------------------------------------------------------------------------
{
	"registry-mirrors":[
		"https://registry.docker-cn.com"
	],
	"insecure-registries":[
		"127.0.0.1:5000"
	]
}
----------------------------------------------------------------------------------------------------------------------------------------------------------------------------------------------


Dockerfile
1.stay /usr/local/docker/runner/environment Create under directory Dockerfile
---------------------------------------------------------------------------------------------------------------------------------------------------------------------------------
FROM gitlab/gitlab-runner
MAINTAINER Lusifer <topsale@vip.qq.com>
# Modify software source
RUN echo 'deb http://mirrors.aliyun.com/ubuntu/ xenial main restricted universe multiverse' > /etc/apt/sources.list && \
    echo 'deb http://mirrors.aliyun.com/ubuntu/ xenial-security main restricted universe multiverse' >> /etc/apt/sources.list && \
    echo 'deb http://mirrors.aliyun.com/ubuntu/ xenial-updates main restricted universe multiverse' >> /etc/apt/sources.list && \
    echo 'deb http://mirrors.aliyun.com/ubuntu/ xenial-backports main restricted universe multiverse' >> /etc/apt/sources.list && \
    apt-get update -y && \
    apt-get clean
# Install Docker
RUN apt-get -y install apt-transport-https ca-certificates curl software-properties-common && \
    curl -fsSL http://mirrors.aliyun.com/docker-ce/linux/ubuntu/gpg | apt-key add - && \
    add-apt-repository "deb [arch=amd64] http://mirrors.aliyun.com/docker-ce/linux/ubuntu $(lsb_release -cs) stable" && \
    apt-get update -y && \
    apt-get install -y docker-ce
COPY daemon.json /etc/docker/daemon.json
# Install Docker Compose
WORKDIR /usr/local/bin
RUN wget https://raw.githubusercontent.com/topsale/resources/master/docker/docker-compose
RUN chmod +x docker-compose
# Install Java
RUN mkdir -p /usr/local/java
WORKDIR /usr/local/java
COPY jdk-8u152-linux-x64.tar.gz /usr/local/java
RUN tar -zxvf jdk-8u152-linux-x64.tar.gz && \
    rm -fr jdk-8u152-linux-x64.tar.gz
# Install Maven
RUN mkdir -p /usr/local/maven
WORKDIR /usr/local/maven
# RUN wget https://raw.githubusercontent.com/topsale/resources/master/maven/apache-maven-3.5.3-bin.tar.gz
COPY apache-maven-3.5.3-bin.tar.gz /usr/local/maven
RUN tar -zxvf apache-maven-3.5.3-bin.tar.gz && \
    rm -fr apache-maven-3.5.3-bin.tar.gz
# COPY settings.xml /usr/local/maven/apache-maven-3.5.3/conf/settings.xml
# Configure environment variables
ENV JAVA_HOME /usr/local/java/jdk1.8.0_152
ENV MAVEN_HOME /usr/local/maven/apache-maven-3.5.3
ENV PATH $PATH:$JAVA_HOME/bin:$MAVEN_HOME/bin

WORKDIR /
--------------------------------------------------------------------------------------------------------------------------------------------------------------------------------------

docker-compose.yml
 stay /usr/local/docker/runner Create under directory docker-compose.yml
---------------------------------------------------------------------------------------------------------------------------------------------------------------------------
# Means to find Dockerfile from the environment directory, that is, install Docker in Docker
version: '3.1'
services:
  gitlab-runner:
    build: environment
    restart: always
    container_name: gitlab-runner
    privileged: true
    volumes:
      - ./config:/etc/gitlab-runner
      - /var/run/docker.sock:/var/run/docker.sock
------------------------------------------------------------------------------------------------------------------------------------------------------------------------------------------------------
Build image and start
- Execute in / usr/local/docker/runner Directory:
docker-compose build
Register Runner
- Start the container by executing the command in the / usr/local/docker/runner Directory:
docker-compose up
- Enter the container to automatically execute the registration process and execute it in the / usr/local/docker/runner directory (the script command when gitlab runner register follows):
docker exec -it gitlab-runner gitlab-runner register
- Open GitLab and enter the continuous integration setting interface
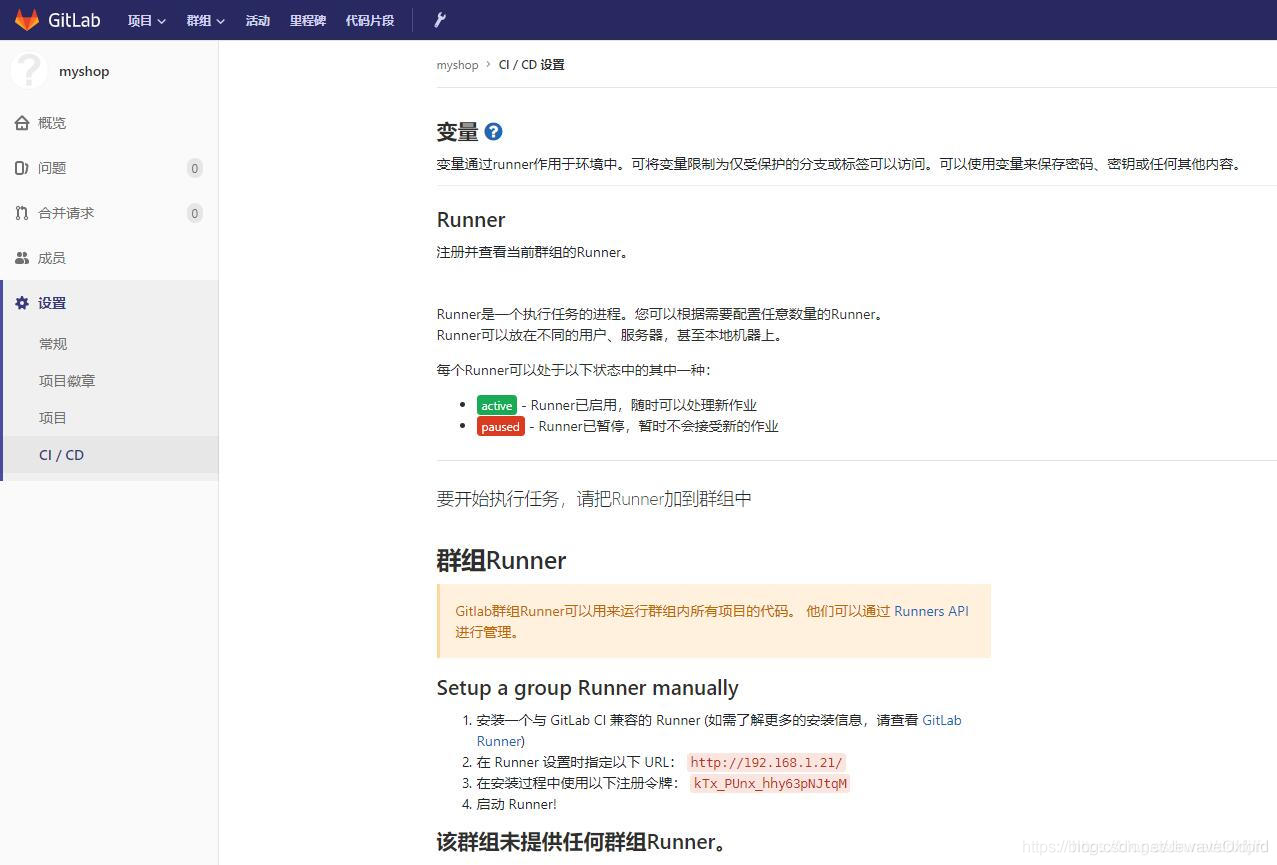
- Fill in the URL and token provided by Git Lab in the interactive terminal
Please enter the gitlab-ci coordinator URL (e.g. https://gitlab.com/):
http://192.168.1.21/
Please enter the gitlab-ci token for this runner:
kTx_PUnx_hhy63pNJtqM
Please enter the gitlab-ci description for this runner:
[c77b5e39a2a6]:
Please enter the gitlab-ci tags for this runner (comma separated):

Registering runner... succeeded                     runner=kTx_PUnx
Please enter the executor: docker, shell, ssh, docker-ssh+machine, docker+machine,     kubernetes, docker-windows, docker-ssh, parallels, virtualbox:
shell
Runner registered successfully. Feel free to start it, but if it's running already the config   should be automatically reloaded!
 docker exec -it gitlab-runner gitlab-runner register

 # Interactive configuration description:

 # Enter GitLab address
 Please enter the gitlab-ci coordinator URL(e.g. https://gitlab.com/)
 http://192.168.32.255/

 # Enter GitLab Token
 Please enter the gitlab-ci token for this runner:
 kTx_PUnx_hhy63pNJtqM

 # Enter a description for the Runner
 Please enter the gitlab-ci description for this runner:
 Can be left blank

 # Set tag to specify that ci will be triggered when the specified tag is built. If it is not set, ci will be triggered every time by default
 Please enter the gitlab-ci tags for this runner (comma separate):
 deploy

 # Select true here to execute the code directly after uploading
 Whether to run utagged builds [true/false]:
 true

 # Select false here to enter directly. The default is false
 Whether to lock Runner to current project [true/false]:
 false

 # Select the runner executor, and here select the shell
 Please enter the executor: virtualbox,docker+machine,parallels,shell,ssh,docker-ssh+machine,kubernetes,docker,docker-ssh:
 shell
Using Runner
Prepare documents under project engineering:
stages:
 - install_deps
 - test
 - build
 - deploy_test
 - deploy_production

cache:
 key: ${CI_BUILD_REF_NAME}
 paths:
  - node_modules/
  - dist/

# Installation dependency
install_deps:
 stage: install_deps
 only:
  - develop
  - master
 script:
  - npm install

# Run test cases
test:
 stage: test
 only:
  - develop
  - master
 script:
  - npm run test

# compile
build:
 stage: build
 only:
  - develop
  - master
 script:
  - npm run clean
  - npm run build:client
  - npm run build:server

# Deploy test server
deploy_test:
 stage: deploy_test
 only:
  - develop
 script:
  - pm2 delete app || true
  - pm2 start app.js --name app

# Deploy production server
deploy_production:
 stage: deploy_production
 only:
  - master
 script:
  - bash scripts/deploy/deploy.sh
After the project is submitted, the Runner is executed
- Create docker folder and Dockerfile under the project
FROM openjdk:8-jre

MAINTAINER Chova

# environment variable
ENV APP_VERSION 1.0.0-SNAPSHOT
# Docker plug-in is used to detect dependencies. It can only be started when dependencies are started
ENV DOCKERIZE_VERSION v0.6.1

RUN wget https://github.com/jwilder/dockerize/release/download/$DOCKERIZE_VERSION/dockerize-linux-amd64-$DOCKERIZE_VERSION.tar.gz \
	&& tar -C /usr/local/bin -xzvf dockerize-linux-amd64-$DOCKERIZE_VERSION.tar.gz \
	&& rm dockerize-linux-amd64-$DOCKERIZE_VERSION.tar.gz

RUN mkdir /app

COPY myshop-service-user-provider-$APP_VERSION.jar /app/app.jar
ENTRYPOINT ["dockerize", "-timeout", "5m", "-wait", "tcp://192.168.32.255.131:3306", "java", "-Djava.security.egd=file:/dev/./urandom", "-jar", "/app/app.jar"]

EXPOSE 8501
- Dockerfile:
---------------------------------------------------------------------------------------------------------------------------------------------------------------------------------------------------------------------
FROM openjdk:8-jdk-alpine
VOLUME /tmp
ARG JAR_FILE
COPY ${JAR_FILE} app.jar
ENTRYPOINT ["java","-jar","/app.jar"]
---------------------------------------------------------------------------------------------------------------------------------------------------------------------------------------------------------------------

1.FROM: This is the introduction of a parent image,On this basis, add a read-only layer.A mirror image can be understood as a layer of read-only layers,
		FORM The following command,Understandably, it is in the existing read-only layer,Add read-only layer.FORM There can be more than one,But the top must be FROM command

2.VOLUME: Configure a directory with persistence,host /var/lib/docker A temporary file was created in the directory,And linked to the container/tmp.This step can be omitted
		  By default,The container does not use any volume,here,The data of the container is stored in the container,It exists only for the lifetime of the container,Will be deleted as the container is deleted
		  If you don't want to delete the container,The data of the container is also deleted,Then you can specify a persistent directory.It is designed to hold data regardless of the lifecycle of the container.therefore,When you delete a container,Docker One is not automatically deleted volume

3.ARG:Set the parameters added when compiling the image,Can be omitted

4.COPY:Only copying local files to containers is supported,There's another one ADD More powerful but more complex

5.ENTRYPOINT:Commands executed when the container starts- Delete all mirrors for
docker rmi $(docker images -q -f dangling=true)
- At docker compose YML is configured to use the existing network by default
version: '3.1'
services:
  myshop-service-user-provider:
    image: 192.168.32.255:5000/myshop-service-user-provider:v1.0.0
    container_name: myshop-service-user-provider
    ports:
      - 8501:8501
      - 22222:22222
      - 20881:20881
    # Configure the network to which the container is connected
networks:
  default:
    external:
      name: dubbo