1, Design project structure
Because we implement todo as a functional component, the basic design idea is:
1. Create a todo folder in components and a new index JSX is a todo component. This folder contains some todo widgets
2. On app Import todo from 'is introduced into JSX/ Components / todo 'and render in render:
import React, { Component } from 'react';
import Todo from './components/Todo';

export default class APP extends Component {
  render() {
    return (
      <div id="root">
        <Todo />
      </div>
    );
  }
}
2, Split components to realize static pages
1. We split the todo component into four parts: Header, List, Item and Footer
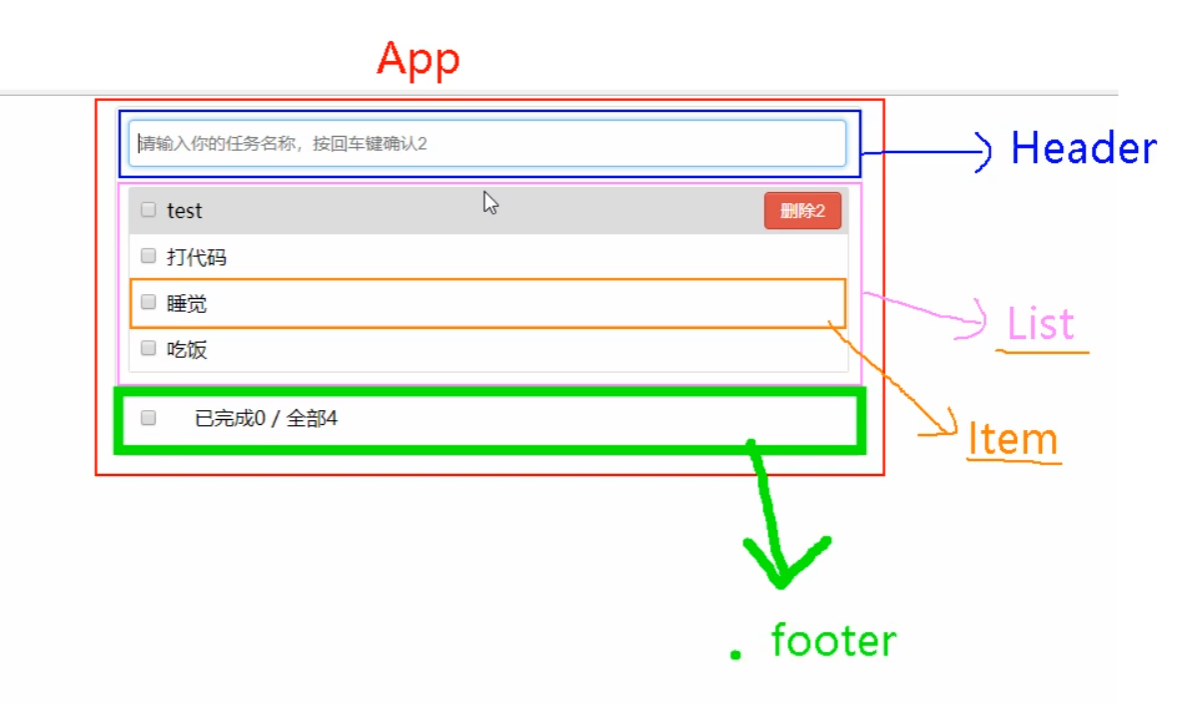
2. In todo folder, create four folders: Header, List, Item and Footer, and create index JSX and index css

3. Fill the static resources into jsx and css respectively
Todo folder
/*Todo/index.jsx*/
import React, { Component } from 'react';
import './index.css'
import Footer from './Footer';
import Header from './Header';
import List from './List';

export default class Todo extends Component {
  render() {
    return (
      <div id="root">
        <div className="todo-container">
          <div className="todo-wrap">
            <Header />
            <List />
            <Footer />
          </div>
        </div>
      </div>
    );
  }
}
/*Todo/index.css--Common style*/
body {
    background: #fff;
  }

  .btn {
    display: inline-block;
    padding: 4px 12px;
    margin-bottom: 0;
    font-size: 14px;
    line-height: 20px;
    text-align: center;
    vertical-align: middle;
    cursor: pointer;
    box-shadow: inset 0 1px 0 rgba(255, 255, 255, 0.2), 0 1px 2px rgba(0, 0, 0, 0.05);
    border-radius: 4px;
  }

  .btn-danger {
    color: #fff;
    background-color: #da4f49;
    border: 1px solid #bd362f;
  }

  .btn-danger:hover {
    color: #fff;
    background-color: #bd362f;
  }

  .btn:focus {
    outline: none;
  }

  .todo-container {
    width: 600px;
    margin: 0 auto;
  }
  .todo-container .todo-wrap {
    padding: 10px;
    border: 1px solid #ddd;
    border-radius: 5px;
  }
Header folder
/*Header/index.jsx*/

import React, { Component } from 'react';
import './index.css'

export default class Header extends Component {
  render() {
    return (
      <div className="todo-header">
        <input type="text" placeholder="Please enter your task name and press enter to confirm" />
      </div>
    )
  }
}
/*header/index.css*/
.todo-header input {
    width: 560px;
    height: 28px;
    font-size: 14px;
    border: 1px solid #ccc;
    border-radius: 4px;
    padding: 4px 7px;
}

.todo-header input:focus {
    outline: none;
    border-color: rgba(82, 168, 236, 0.8);
    box-shadow: inset 0 1px 1px rgba(0, 0, 0, 0.075), 0 0 8px rgba(82, 168, 236, 0.6);
}
List folder
/*List/index.jsx*/
import React, { Component } from 'react';
import Item from '../Item';
import './index.css'

export default class List extends Component {
  render() {
    return (
      <ul className="todo-main">
        <Item />
      </ul>
    );
  }
}
/*List/index.css*/
.todo-main {
    margin-left: 0px;
    border: 1px solid #ddd;
    border-radius: 2px;
    padding: 0px;
}

.todo-empty {
    height: 40px;
    line-height: 40px;
    border: 1px solid #ddd;
    border-radius: 2px;
    padding-left: 5px;
    margin-top: 10px;
}
Item Folder
/*Item/index.jsx*/
import React, { Component } from 'react';
import './index.css'

export default class Item extends Component {
  render() {
    return (
      <div>
        <li>
          <label>
            <input type="checkbox" />
            <span></span>
          </label>
          <button className="btn btn-danger" style={{ display: 'none' }}>delete</button>
        </li>
      </div>
    );
  }
}
/*Item/index.css*/
li {
  list-style: none;
  height: 36px;
  line-height: 36px;
  padding: 0 5px;
  border-bottom: 1px solid #ddd;
}

li label {
  float: left;
  cursor: pointer;
}

li label li input {
  vertical-align: middle;
  margin-right: 6px;
  position: relative;
  top: -1px;
}

li button {
  float: right;
  display: none;
  margin-top: 3px;
}

li:before {
  content: initial;
}

li:last-child {
  border-bottom: none;
}
Footer folder
/*Footer/index.jsx*/
import React, { Component } from 'react';
import './index.css'

export default class Footer extends Component {
  render() {
    return (
      <div className="todo-footer">
        <label>
          <input type="checkbox" />
        </label>
        <span>
          <span>Completed 0</span> / All 2
        </span>
        <button className="btn btn-danger">Clear completed tasks</button>
      </div>
    );
  }
}
/*Footer/index.css*/
.todo-footer {
    height: 40px;
    line-height: 40px;
    padding-left: 6px;
    margin-top: 5px;
}

.todo-footer label {
    display: inline-block;
    margin-right: 20px;
    cursor: pointer;
}

.todo-footer label input {
    position: relative;
    top: -1px;
    vertical-align: middle;
    margin-right: 5px;
}

.todo-footer button {
    float: right;
    margin-top: 5px;
}
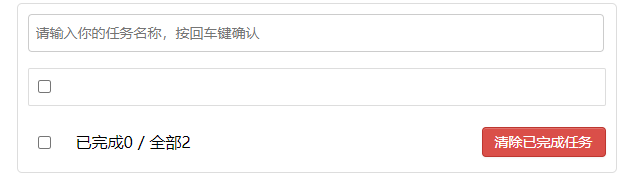
3, Function 1_ Add task information to the first line
Because the value transfer between sibling components is involved, we need to pass the Props value transfer method with the parent component
1. First, set the analog number in the parent component (Todo/index.jsx) and transfer it to the child component List
/*Todo/index.jsx*/
import React, { Component } from 'react';
import './index.css'
import Footer from './Footer';
import Header from './Header';
import List from './List';

export default class APP extends Component {
  state = {
    todos: [{
      id: '001',
      name: 'having dinner',
      done: true
    }, {
      id: '002',
      name: 'sleep',
      done: true
    }]
  }
  render() {
    const { todos } = this.state
    return (
      <div id="root">
        <div className="todo-container">
          <div className="todo-wrap">
            <Header />
            <List todos={todos} />
            <Footer />
          </div>
        </div>
      </div>
    );
  }
}
2. The List component receives the Props from the parent component Todo, and transmits the value to the sub component Item of the List for display
/*List/index.jsx*/
import React, { Component } from 'react';
import Item from '../Item';
import './index.css'

export default class List extends Component {
  render() {
    const { todos } = this.props;
    return (
      <ul className="todo-main">
        {
          todos.map((item) => {
            return <Item key={item.id} {...item} />
          })
        }
      </ul>
    );
  }
}
3. The Item component receives the Props from the parent component List and displays them
import React, { Component } from 'react';
import Item from '../Item';
import './index.css'

export default class List extends Component {
  render() {
    const { todos } = this.props;
    return (
      <ul className="todo-main">
        {
          todos.map((item) => {
            return <Item key={item.id} {...item} />
          })
        }
      </ul>
    );
  }
}
4. The parent component Todo obtains the data added to the child component Header by means of Props transfer function (addTodo)
import React, { Component } from 'react';
import './index.css'
import Footer from './Footer';
import Header from './Header';
import List from './List';

export default class APP extends Component {
  state = {
    todos: [{
      id: '001',
      name: 'having dinner',
      done: true
    }, {
      id: '002',
      name: 'sleep',
      done: true
    }]
  }
  //It is used to add a todo. The parameter is todo object
  addTodo = (todoObj) => {
    let { todos } = this.state;
    //Put the input first in the array
    todos.unshift(todoObj);
    //modify state
    this.setState(todos)
  }
  render() {
    const { todos } = this.state
    return (
      <div id="root">
        <div className="todo-container">
          <div className="todo-wrap">
            <Header addTodo={this.addTodo} />
            <List todos={todos} />
            <Footer />
          </div>
        </div>
      </div>
    );
  }
}
5. The Header component executes the function passed from the parent component Todo by listening to the "Enter" key to update the status
nanoid is used to generate unique values, mainly to assign values to the key s of elements
import React, { Component } from 'react';
//Similar to uuid, a unique id is generated
import { nanoid } from 'nanoid';
import './index.css'

export default class Header extends Component {
  handleKeyUp = (event) => {
    const { keyCode, target } = event;
    if (keyCode === 13) {
      //Here, you also need to judge various cases of spaces (regular)
      if (target.value !== "") {
        const newTodo = { id: nanoid(), name: target.value, done: false };
        this.props.addTodo(newTodo);
        //Clear the input
        target.value = ""
      }
    }
  }
  render() {
    return (
      <div className="todo-header">
        <input type="text" placeholder="Please enter your task name and press enter to confirm" onKeyUp={this.handleKeyUp} />
      </div>
    )
  }
}

4, Function 2_ Moving the mouse over the list will highlight and display the "delete" button
This function is mainly judged by the move in and move out events of the mouse. The highlighted function can be realized through: hover in css. This case uses the method in React
1. Define component status
state = { mouseType: false }
2. Define mouse move in and move out events. true indicates move in and false indicates move out; And the backgroundColor and display are rendered according to the mouseType value in the state. (the Coriolis method of higher-order function is used here)
import React, { Component } from 'react';
import './index.css'

export default class Item extends Component {
  state = { mouseType: false }
  //Mouse in and out event
  handleMouse = (mouseType) => {
    return () => {
      this.setState({ mouseType })
    }
  }
  render() {
    const { name, done } = this.props
    return (
      <div>
        <li style={{ backgroundColor: this.state.mouseType ? '#ddd' : 'white' }} onMouseEnter={this.handleMouse(true)} onMouseLeave={this.handleMouse(false)}>
          <label>
            <input type="checkbox" defaultChecked={done} />
            <span>{name}</span>
          </label>
          <button className="btn btn-danger" style={{ display: this.state.mouseType ? 'block' : 'none' }}>delete</button>
        </li>
      </div>
    );
  }
}
5, Function 3_ Change done in state by clicking the check box
1. Because to modify the state in the parent component Todo of the parent component List by the child component Item, you need to define the updateTodo function in the parent component Todo and pass it to the Item component through props
/*Todo/index.jsx*/
//Used to update todo. The parameter is id
  updateTodo = (id, done) => {
    const { todos } = this.state;
    let newTodos = todos.map((item) => {
      if (item.id === id) {
        return { ...item, done }
      } else {
        return item
      }
    })
    this.setState({ todos: newTodos })
  }
<List todos={todos} updateTodo={this.updateTodo} />
List/index.jsx
<Item key={item.id} {...item} updateTodo={updateTodo} />
2. In the Item component, add an onChange event to the check box, and pass the id of todo corresponding to the currently selected check box as a parameter to handleCheck
<input type="checkbox" defaultChecked={done} onChange={this.handleCheck(id)} />
3. In the handleCheck function, execute the id and checked of the current check box as parameters of updateTodo
//Check or uncheck
handleCheck = (id) => {
  return (event) => {
    this.props.updateTodo(id, event.target.checked)
  }
}
4. The prop types library is introduced to limit the props of each component (see the following for the usage method: npm.com prop-types)
  /*With item / index JSX as an example*/
  //Limit props
  static propTypes = {
    updateTodo: PropTypes.func.isRequired,
    done: PropTypes.bool.isRequired
  }

6, Function 4_ Delete a todo
1. The logic is the same as modifying done. First, bind onClick to the delete button in the Item component
<button onClick={this.handleDel(id)} className="btn btn-danger" style={{ display: this.state.mouseType ? 'block' : 'none' }}>delete</button>
2. Define the handleDel function and execute the deleteTodo function passed from the Todo component
  //Delete a todo
  handleDel = (id) => {
    return () => {
      this.props.deleteTodo(id)
    }
  }
3. The deleteTodo function is defined in the Todo component and passed to the sub component List, and then passed to the sub component Item through the List component
Todo/index.jsx
//Deletes the specified todo object
  deleteTodo = (id) => {
    const { todos } = this.state;
    const newTodos = todos.filter(item => {
      return item.id !== id
    })
    this.setState({ todos: newTodos })
  }
<List todos={todos} updateTodo={this.updateTodo} deleteTodo={this.deleteTodo} />
List/index.jsx
<Item key={item.id} {...item} updateTodo={updateTodo} deleteTodo={deleteTodo} />
7, Function 5_ Realize the function of selecting all and clearing at the bottom
1. First, the statistics of completed data and all data are realized
Footer/index.jsx
const { todos } = this.props
//Completed
const doneCount = todos.reduce((pre, current) => {
  return current.done === true ? ++pre : pre
}, 0)
<span>
  <span>Completed{doneCount}</span> / whole{todos.length}
</span>
2. Realize the function of selecting all
Footer/index.jsx
<input type="checkbox" checked={doneCount === todos.length && todos.length !== 0 ? true : false} onChange={this.handleCheckAll} />
//Select all
handleCheckAll = (event) => {
	this.props.checkAllTodo(event.target.checked)
}
3. Because the data state needs to be changed, the function should be defined in the parent component Todo and passed through props
Todo/index.jsx
//Select all
checkAllTodo = (done) => {
    const { todos } = this.state;
    let newTodos = todos.map(item => {
      return { ...item, done: done }
    })
    this.setState({ todos: newTodos })
}
<Footer todos={todos} checkAllTodo={this.checkAllTodo} />
4. Realize the function of clearing completed
Footer/index.jsx
<button className="btn btn-danger" onClick={this.handleClear}>Clear completed tasks</button>
//Clear completed tasks
handleClear = () => {
	this.props.clearAllDone()
}
5. Because the data state needs to be changed, the function should be defined in the parent component Todo and passed through props
Todo/index.jsx
//Clear all completed
clearAllDone = () => {
    const { todos } = this.state;
    const newTodos = todos.filter(item => {
      return item.done === false
    })
    this.setState({ todos: newTodos })
}
<Footer todos={todos} checkAllTodo={this.checkAllTodo} clearAllDone={this.clearAllDone} />
8, Case summary
1. Split components and implement static components. Note: the writing of className and style
2. How to dynamically initialize the list and determine which component's state to put the data in
Use of a component: put it in its own state
Some components use: put them in their common parent component state (officially called state promotion)
3. About communication between father and son:
(1) the [parent component] transfers data to the [child component] through props
(2) data transfer from [sub component] to [parent component]: transfer through props, requiring [parent component] to transfer a function to [sub component] in advance
4. Note the difference between deafaultChecked and Checked. Similarly, there are defaultValue and Value
5. Where the state is, the method of operating the state is
Source address: https://gitee.com/daiwanghao/react-family-bucket.git
For the above content of todo produced by React, please pay attention to the column of React family bucket.
I will share with you the common problems in my usual projects and the knowledge of written examination and interview at CSDN to make progress and come on.