System environment:
Centos7.4. Alicloud downloads the dvd version and installs the basic setting server version. It's relatively clean. You can find some holes
Enable virtual machine virtualization
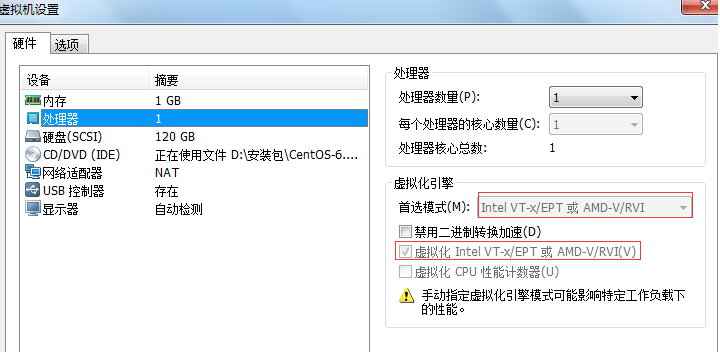
Check virtual machine support CPU VT Function. If the return value is not 0, it means it is supported.
egrep --color 'vmx|svm' /proc/cpuinfo | wc -l
To facilitate testing, turn off the firewall
systemctl stop NetworkManager
systemctl disable NetworkManager
systemctl stop firewalld
systemctl disable firewalld
/usr/sbin/setenforce 0 //SELinux must be turned off (optional)
Software environment:
yum install epel-release
yum install -y python-pip
yum install -y git
Formal commencement:
1. Download devstack
git clone https://git.openstack.org/openstack-dev/devstack
cd devstack
#If the download is too slow, you can change it to
git clone http://git.trystack.cn/openstack-dev/devstack
#############The following is optional. I selected a stable branch. I used the latest one for the first time master Branch, so it will step on a lot of holes###########
git checkout remotes/origin/stable/queens
git checkout -b queens
2. Create stack user
Method 1: use the script provided by devstack to create
./tools/create-stack-user.sh
cd ..
mv devstack /opt/stack
chown -R stack:stack /opt/stack/devstack
Method 2: create it manually
sudo useradd -s /bin/bash -d /opt/stack -m stack
echo "stack ALL=(ALL) NOPASSWD: ALL" | sudo tee /etc/sudoers.d/stack
3. Create local conf
su stack
cd /opt/stack/devstack
cp samples/local.conf ./
vim local.conf
[[local|localrc]]
#The passwords are set the same here for the convenience of testing
ADMIN_PASSWORD=password
SERVICE_TOKEN=$ADMIN_PASSWORD
DATABASE_PASSWORD=$ADMIN_PASSWORD
RABBIT_PASSWORD=$ADMIN_PASSWORD
SERVICE_PASSWORD=$ADMIN_PASSWORD
4. Solve the problem of slow domestic network (optional, can be skipped)
Mirror source modification: https://my.oschina.net/haitaohu/blog/3084004 , I use Ali's
pip source modification: https://my.oschina.net/haitaohu/blog/3084043 , used by Ali, Zhongke Sometimes errors are caused by the lack of a source. Pay attention to self verification
The DevStack and OpenStack source codes can be replaced with TryStack images and added to the local. XML in step 3 Conf configuration file
# use TryStack git mirror
GIT_BASE=http://git.trystack.cn
NOVNC_REPO=http://git.trystack.cn/kanaka/noVNC.git
SPICE_REPO=http://git.trystack.cn/git/spice/spice-html5.git
dns add
/etc/resolv.conf
#Add 8.8.8.8
#restart
service network restart
5. Installation deployment
./stack.sh
The execution time here is relatively long. Wait patiently
6. Test after installation
source devstack/openrc admin admin keystone endpoint-list nova service-list neutron agent-list
http://**/dashboard
The user name is admin and the password is local Conf file
openstack installed successfully.
Possible problems:
1.Unable to datermine DISTRO, can not continue.
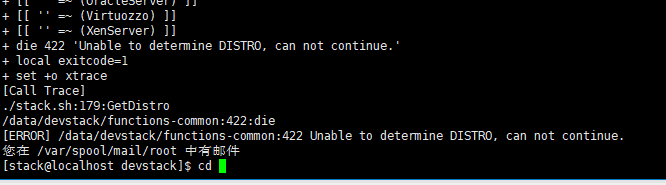
terms of settlement:
yum install redhat-lsb-core -y
2.Invalid path permissions: check whether the stack user sudo permission is given. If yes, check whether the second step is operated. If not, give the permission to the / opt directory
chmod -R 777 /opt
#Because it will be installed in the / opt directory by default
3.pip version problem
Solution: pip install --upgrade pip. Remember to confirm pip -V after success
If you encounter a problem, the PIP version is lower than 9.0, but after upgrading pip19, execute stack SH went back to the problem
The reason is that the version will be checked during installation. If it is not within the specified range, it will be reinstalled. Later, the latest version is required, resulting in an infinite cycle
vi /opt/stack/devstack/tools/cap-pip.txt
Show PIP= 8, < 10, delete < 10.
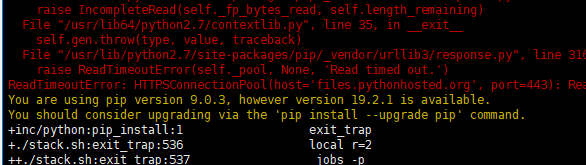
4.pip download timeout
ReadTimeoutError: HTTPSConnectionPool(host='files.pythonhosted.org', port=443): Read timed out.
terms of settlement:
Method 1:Set the domestic download image address
 Reference address: https://my.oschina.net/haitaohu/blog/3084043
 Method 2:Increase timeout
pip --default-timeout=100 install -U pip
 Method 3: after manual download, through pip install
pip install (path)/virtualenv-16.7.2-py2.py3-none-any.whl
5.cannot load glue library

Solution: yum install -y libibverbs
6.RTNETLINK answers: Permission denied
terms of settlement:
vi /etc/sysctl.conf
modify disable_ipv6 All becomes 0
 then/sbin/sysctl -p[Effective immediately]
7.[ERROR] /opt/stack/devstack/functions-common:216 Failure creating NET_ID for private
Solution: local Add in conf
Q_PLUGIN=ml2
ENABLE_TENANT_VLANS=True
ML2_VLAN_RANGES=physnet1:1000:2000
8. Error installing EPEL repo, cannot continue
terms of settlement
yum-config-manager --enable epel
9.Failed to start Devstack devstack@etcd.service.
Solution: local Conf add
disable_service etcd3
Note: if you encounter a problem, you need to modify local Conf, you need to clean up the last wrong configuration/ unstack.sh and clean SH, and then execute/ stack.sh configuration
Suggestion: if you are not looking for abuse and practice, just experience, a stable version of clone, not the latest master of Clone Or you'll find out what the f
Outer part:
Earlier, we deployed a simplified version of OpenStack environment using DevStack, which contains only a few core components. Other OpenStack services are installed in the form of plug-ins. The list of all plug-ins supported by DevStack can be referred to DevStack Plugin Registry As of February 2017, DevStack had 132 installed plug-ins. This includes:
- trove: database service.
- sahara: big data service.
- ironic: bare metal service.
- magnum: container orchestration service.
- manila: file sharing service.
- cloudkitty: billing service.
- ...
To enable and deploy a service, you only need to use enable_ The plugin configuration specifies the corresponding plug-in. The syntax of this configuration item is:
enable_plugin plugin_name [code repo]
Where plugin_name is the plug-in name, which can be found in the plug-in list. code repo is the code warehouse address. The default address is used without configuration.
For example, we need to start the Sahara service, just in local Conf add the following configuration items:
enable_plugin sahara https://github.com/openstack/sahara.git
enable_plugin sahara-dashboard https://github.com/openstack/sahara-dashboard.git
Note that we have opened two plug-ins related to Sahara at the same time. The former is the Sahara plug-in and the latter is the Sahara plug-in of dashboard. If this plug-in is not configured, the Sahara panel will not be visible in dashboard.
reference material: