The author developed a navigation website in the early stage and always wanted to reconstruct it. He was lazy for several years. Finally, after learning about the micro front-end method, he made up his mind. Because he had no chance to practice at work, he had no choice but to try his own website and think about it. The broken navigation website with the highest number of visits was this one, Therefore, we completed the reconstruction of basic functions in the fastest time, and then prepared to expand the functions of the website through the micro front end, such as weather, to-do, notes, stopwatch timing, etc. these functions belong to additional functions, which may be more and more, so they can not be strongly coupled with the navigation itself. We need to be able to develop and go online independently, So it's perfect to use a micro front end.
In addition, because some functions may be very simple, such as stopwatch timing, it is unnecessary to create a project alone, but you don't want to write it directly in the navigation code. It's best to develop it directly through Vue single file, and then load and render dynamically on the page, so you will try dynamic components in addition to the micro front-end method.
All of the projects in this article were created using Vue CLI, and Vue uses 3.0 In version x, the routing uses hash mode
Applet registration
In order to be tall, I call it an applet to expand the function. The first thing to realize is the registration function of an applet. In detail, it is:
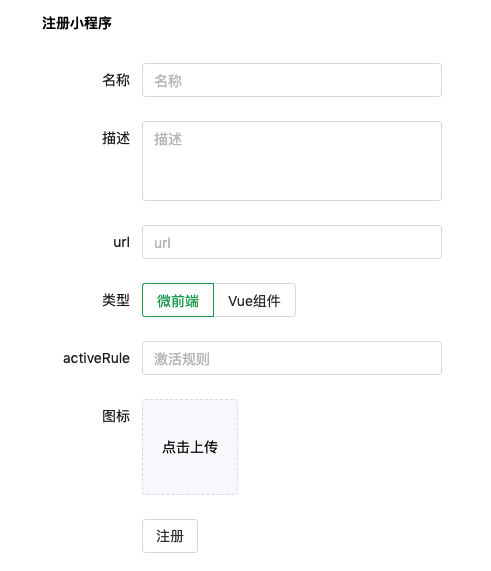
1. Provide a form to input the applet name, description, icon, url and type (the micro front-end mode also needs to configure the activation rules, and the component mode needs to configure the url of the style file), as follows:
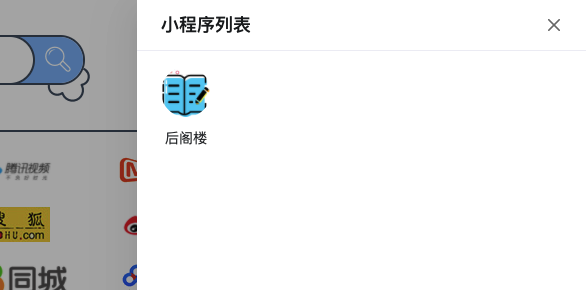
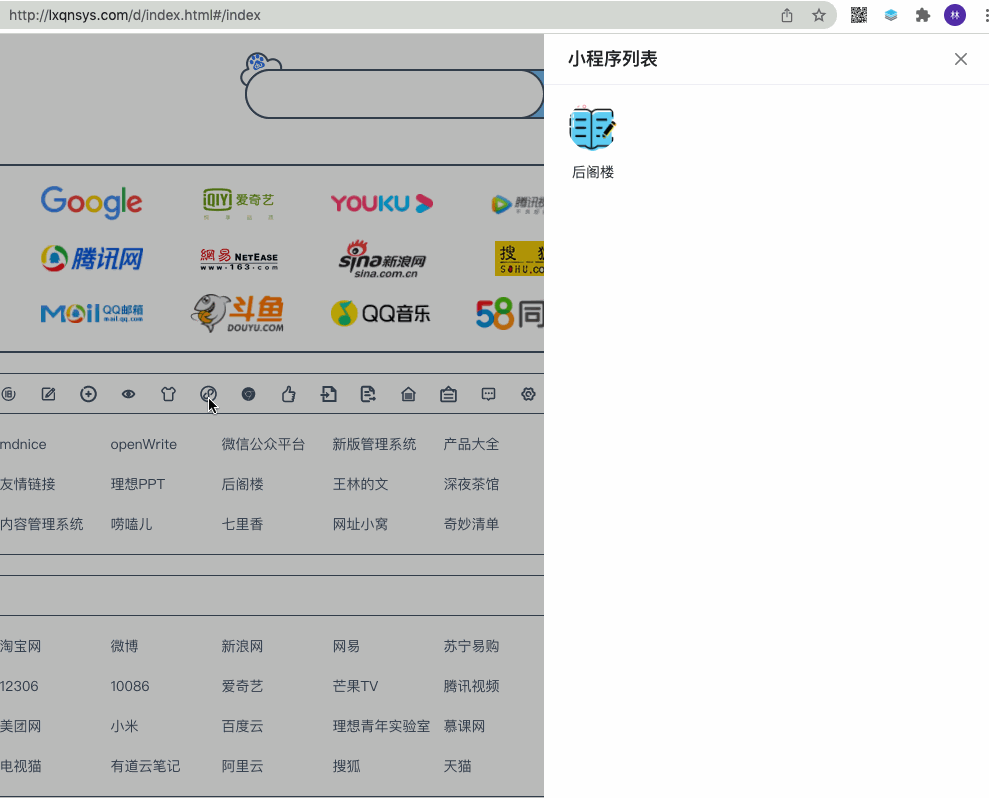
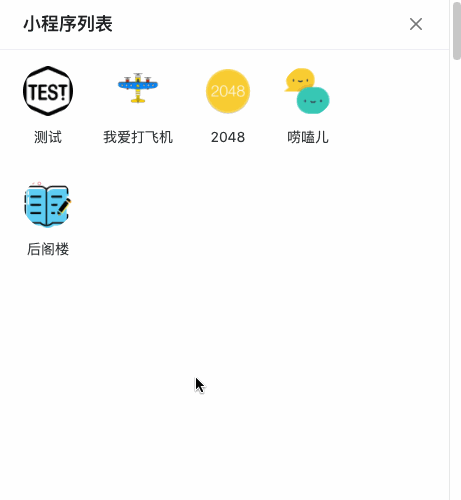
2. The list of registered applets is displayed on the navigation page. Click to render the corresponding applets:
Micro front end mode
Let's take a look at the implementation of the micro front end. The author chooses qiankun Frame.
Main application
The main application is the navigation website. First install qiankun:
npm i qiankun -S
What the main application needs to do is very simple. Register and start the micro application, then provide a container to mount the micro application, and finally open the specified url.
Because the micro application lists are stored in the database, you need to obtain them first and then register them to create Qiankun JS file:
// qiankun.js
import { registerMicroApps, start } from 'qiankun'
import api from '@/api';

// Registration and startup
const registerAndStart = (appList) => {
  // Register micro applications
  registerMicroApps(appList)

  // Start qiankun
  start()
}

// Determine whether to activate the micro application
const getActiveRule = (hash) => (location) => location.hash.startsWith(hash);

// Initialize applet
export const initMicroApp = async () => {
  try {
    // Request applet list data
    let { data } = await api.getAppletList()
    // Filter out micro applications
    let appList = data.data.filter((item) => {
      return item.type === 'microApp';
    }).map((item) => {
      return {
        container: '#appletContainer',
        name: item.name,
        entry: item.url,
        activeRule: getActiveRule(item.activeRule)
      };
    })
    // Register and start micro application
    registerAndStart(appList)
  } catch (e) {
    console.log(e);
  }
}
An example of data for a micro application is as follows:
{
container: '#appletContainer',
name: 'Back attic',
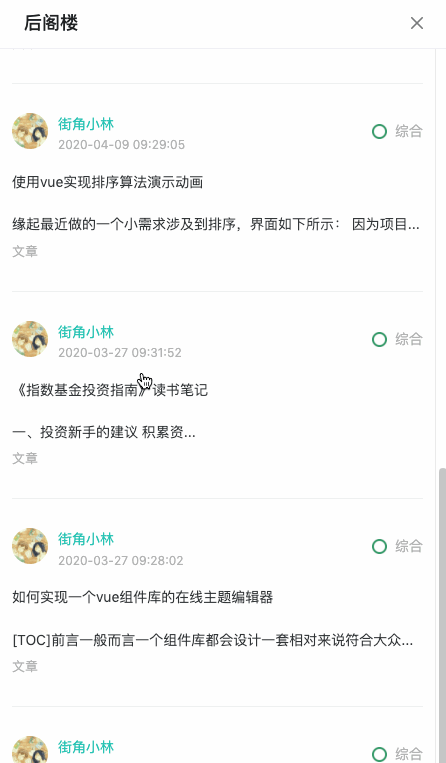
entry: 'http://lxqnsys.com/applets/hougelou/',
activeRule: getActiveRule('#/index/applet/hougelou')
}You can see that the container provided for micro application mounting is #appletContainer, and the access url of micro application is http://lxqnsys.com/applets/hougelou/ Note that the last / cannot be omitted, otherwise the resource path of the micro application may be wrong.
In addition, explain the activation rule activeRule. The url of the navigation website is: http://lxqnsys.com/d/#/index , the routing rule of the micro application is: applet/:appletId, so the activation rule of a micro application is the hash part of the page url. However, the activeRule does not directly use the string: # / index / Applet / hougelou. This is because the author's navigation website is not deployed in the root path, but in the / D directory, so the rule # / index / Applet / hougelou cannot be matched http://lxqnsys.com/d/#/index/applet/hougelou This url needs to be like this: / D / # / index / Applet / hougelou, but the deployment path may change and it is not convenient to write directly to the activeRule of the micro application. Therefore, here we use the function to judge whether it matches, that is, according to the location of the page Whether the hash starts with activeRule is judged. If yes, it means that it is matched.
Micro application
Micro application is our small program project, according to the introduction of official documents Vue micro application First, you need to add a public - path in the src directory js:
// public-path.js
if (window.__POWERED_BY_QIANKUN__) {
  __webpack_public_path__ = window.__INJECTED_PUBLIC_PATH_BY_QIANKUN__;
}
Then modify main JS, add qiankun's life cycle function:
// main.js
import './public-path';
import { createApp } from 'vue'
import App from './App.vue'
import router from './router'

let app = null
const render = (props = {}) => {
    // When using micro applications, the mounted elements need to be found under the scope of the container
    const { container } = props;
    app = createApp(App)
    app.use(router)
    app.mount(container ? container.querySelector('#app') : '#app')
}

// Independent runtime direct initialization
if (!window.__POWERED_BY_QIANKUN__) {
    render();
}

// Three life cycle functions
export async function bootstrap() {
    console.log('[Back attic] start-up');
}
export async function mount(props) {
    console.log('[Back attic] mount ');
    render(props);
}
export async function unmount() {
    console.log('[Back attic] uninstall');
    app.unmount();
    app = null;
}
Next, modify the packaging configuration Vue config. js:
module.exports = {
    // ...
    configureWebpack: {
        devServer: {
            // The main application needs to request micro application resources, so it needs to allow cross domain access
            headers: {
                'Access-Control-Allow-Origin': '*'
            }
        },
        output: {
            // Package in umd format
            library: `hougelou`,
            libraryTarget: 'umd'
        }
    }
}
Finally, you need to modify the routing configuration in two ways:
1. Set base
import { createRouter, createWebHashHistory } from 'vue-router';

let routes = routes = [
    { path: '/', name: 'List', component: List },
    { path: '/detail/:id', name: 'Detail', component: Detail },
]

const router = createRouter({
    history: createWebHashHistory(window.__POWERED_BY_QIANKUN__ ? '/d/#/index/applet/hougelou/' : '/'),
    routes
})

export default router
The disadvantage of this method is that the deployment path of the main application is written in the base, which is not very elegant.
2. Use sub routing
import { createRouter, createWebHashHistory } from 'vue-router';
import List from '@/pages/List';
import Detail from '@/pages/Detail';
import Home from '@/pages/Home';

let routes = []

if (window.__POWERED_BY_QIANKUN__) {
    routes = [{
        path: '/index/applet/hougelou/',
        name: 'Home',
        component: Home,
        children: [
            { path: '', name: 'List', component: List },
            { path: 'detail/:id', name: 'Detail', component: Detail },
        ],
    }]
} else {
    routes = [
        { path: '/', name: 'List', component: List },
        { path: '/detail/:id', name: 'Detail', component: Detail },
    ]
}

const router = createRouter({
    history: createWebHashHistory(),
    routes
})

export default router
In the micro front-end environment, all routes are regarded as sub routes of / index/applet/hougelou /.
The effects are as follows:
optimization
1. Return button
As shown in the above effect, if you want to return to the previous page after the internal page of the micro application jumps, you can only use the return button of the browser. Obviously, it is not very convenient. You can add a return button on the title bar:
<div class="backBtn" v-if="isMicroApp" @click="back">
  <span class="iconfont icon-fanhui"></span>
</div>
const back = () => {
  router.go(-1);
};
In this way, when the applet is a micro application, a return button will be displayed. However, there is a problem. Obviously, this return button is not required when it is on the front page of the micro application. We can judge whether the current route is consistent with the activeRule of the micro application. If it is the same, the return button will not be displayed if it is on the front page of the micro application:
<div class="backBtn" v-if="isMicroApp && isInHome" @click="back">
  <span class="iconfont icon-fanhui"></span>
</div>
router.afterEach(() => {
  if (!isMicroApp.value) {
    return;
  }
  let reg = new RegExp("^#" + route.fullPath + "?$");
  isInHome.value = reg.test(payload.value.activeRule);
});
2. Scroll position recovery during micro application page switching
As shown in the figure above, when you enter from the list page to the details page and then return to the list, the list returns to the top. This experience is very bad. We need to remember the scrolling position and restore it.
You can associate the url with the scroll position and record it in router Get the current scroll position before each, and then associate it with the current url and store it when router After each, obtain the stored data according to the current url and restore the scrolling position:
const scrollTopCache = {};
let scrollTop = 0;

// Monitor container roll position
appletContainer.value.addEventListener("scroll", () => {
  scrollTop = appletContainer.value.scrollTop;
});

router.beforeEach(() => {
  // Cache scroll position
  scrollTopCache[route.fullPath] = scrollTop;
});

router.afterEach(() => {
  if (!isMicroApp.value) {
    return;
  }
  // ...
  // Restore scroll position
  appletContainer.value.scrollTop = scrollTopCache[route.fullPath];
});
3. The initial url is the applet url
Normally, when the applet is closed, the route of the page will be restored to the original route of the page, but for example, when I directly refresh the page when I open the applet, because the url meets the activation rules of the applet, qiankun will load the corresponding micro application. However, there may be no container for the micro application on the page, so an error will be reported, To solve this problem, you can determine whether the initial route is the route of the applet after the page is loaded. If so, restore it, and then register the micro application:
if (/\/index\/applet\//.test(route.fullPath)) {
  router.replace("/index");
}
initMicroApp();
Vue component mode
Next, let's look at the way to use Vue components. The author's idea is to directly use Vue single file to develop. After the development is completed, package it into a js file, and then request the js file on the navigation website and render it as a dynamic component.
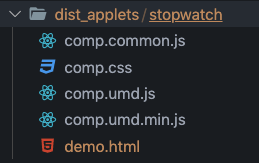
For simplicity, we can directly create a folder under the navigation project as the directory of the applet. In this way, we can directly use the packaging tool of the project to add a stopwatch test component. The current directory structure is as follows:
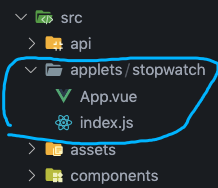
Component app Vue contents are as follows:
<template>
  <div class="countContainer">
    <div class="count">{{ count }}</div>
    <button @click="start">start</button>
  </div>
</template>

<script setup>
import { ref } from "vue";

const count = ref(0);
const start = () => {
  setInterval(() => {
    count.value++;
  }, 1000);
};
</script>

<style lang="less" scoped>
.countContainer {
  text-align: center;

  .count {
    color: red;
  }
}
</style>
index.js is used to export components:
import App from './App.vue';

export default App

// Configuration data
const config = {
    width: 450
}

export {
    config
}
For personalization, it also supports exporting its configuration data.
Next, we need to package the components. We directly use Vue cli. Vue cli supports specifying different construction objectives. The default is the application mode. npm run build, which is usually run in the project package, actually runs the Vue cli service build command. You can modify the packaging behavior through options:
vue-cli-service build --target lib --dest dist_applets/stopwatch --name stopwatch --entry src/applets/stopwatch/index.js
The above configuration can package our stopwatch component. The meaning of the options is as follows:
--target      app | lib | wc | wc-async (Default to app Application mode, we use lib Package as library mode)
--dest        Specify output directory (Default output to dist Catalog, let's change it to dist_applets Directory)
--name        Library or Web Components Name in mode (Default: package.json Medium "name" Field or entry file name, we change it to component name)
--entry       Specify the entry of packaging, which can be.js or.vue File (i.e. of component) index.js (path)
More detailed information can be found in the official documents: Construction goal,CLI service.
However, our components are uncertain, and the number may be more and more, so it will be very troublesome to directly enter commands on the command line for packaging. We can complete it through scripts and add build. In the / applets / directory js:
// build.js
const { exec } = require('child_process');
const path = require('path')
const fs = require('fs')

// Get component list
const getComps = () => {
    let res = []
    let files = fs.readdirSync(__dirname)
    files.forEach((filename) => {
        // Is it a directory
        let dir = path.join(__dirname, filename)
        let isDir = fs.statSync(dir).isDirectory
        // Does the entry file exist
        let entryFile = path.join(dir, 'index.js')
        let entryExist = fs.existsSync(entryFile)
        if (isDir && entryExist) {
            res.push(filename)
        }
    })
    return res
}
let compList = getComps()
// Create a packaged task
let taskList = compList.map((comp) => {
    return new Promise((resolve, reject) => {
        exec(`vue-cli-service build --target lib --dest dist_applets/${comp} --name ${comp} --entry src/applets/${comp}/index.js`, (error, stdout, stderr) => {
            if (error) {
                reject(error)
            } else {
                resolve()
            }
        })
    });
})
Promise.all(taskList)
    .then(() => {
        console.log('Package succeeded');
    })
    .catch((e) => {
        console.error('Packaging failed');
        console.error(e);
    })
Then go to package JSON adds the following command:
{
  "scripts": {
    "buildApplets": "node ./src/applets/build.js"
  }
}
Run the command npm run buildApplets, and you can see the packaging results as follows:
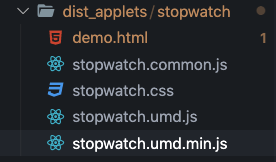
We use css file and UMD type js file to open umd.js file:
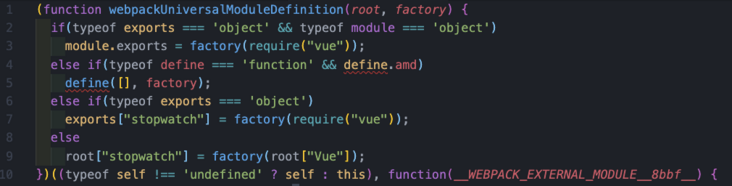
The result returned by the execution of the factory function is the component index In addition to the data exported in JS, you can see the code of importing Vue, which indicates that Vue is not included in the packaged file, which is deliberately done by Vue cli. It is very convenient to use the packaged library through the construction tool, but we need to dynamically import components directly when running on the page without being processed by the packaging tool, so exports There are no objects or methods such as module, define and require. It doesn't matter. We can inject them manually. We use the second else if, that is, we need to manually provide the exports object and require function.
When we click the Vue component type applet, we use axios to request the js file of the component, obtain the js string, and then use the new Function to execute js, inject the exports object and the require function provided by us, then we can obtain the data exported by the component through the exports object, and finally use the dynamic component to render the component, At the same time, if there is a style file, it should also be loaded dynamically.
<template>
  <component v-if="comp" :is="comp"></component>
</template>
import * as Vue from 'vue';

const comp = ref(null);
const load = async () => {
    try {
      // Load style file
      if (payload.value.styleUrl) {
        loadStyle(payload.value.styleUrl)
      }
      // Request component js resources
      let { data } = await axios.get(payload.value.url);
      // Execute component js
      let run = new Function('exports', 'require', `return ${data}`)
      // Manually provide the exports object and the require function
      const exports = {}
      const require = () => {
        return Vue;
      }
      // Execution function
      run(exports, require)
      // Get the component option object and throw it to the dynamic component for rendering
      comp.value = exports.stopwatch.default
    } catch (error) {
      console.error(error);
    }
};
After executing the js of the component, the exports object we injected is as follows:
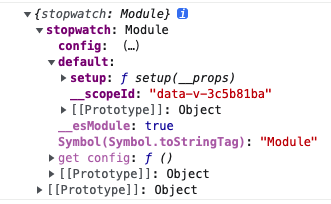
So through exports stopwatch. By default, you can get the option object of the component and pass it to the dynamic component for rendering. The effect is as follows:
It's done. Finally, we'll modify it a little, because through exports stopwatch. Default to get the exported content of the component. We also need to know the packaging name of the component stopwatch, which is obviously a little troublesome. We can change it to a fixed name, such as comp, and modify the packaging command:
// build.js

// ...
exec(`vue-cli-service build --target lib --dest dist_applets/${comp} --name comp --entry src/applets/${comp}/index.js`, (error, stdout, stderr) => {
  if (error) {
    reject(error)
  } else {
    resolve()
  }
})
// ...
Change the -- name parameter from ${name} to write comp. The packaging results are as follows:
The exports object structure becomes as follows:

Then we can deal with any component by the comp name value = exports. comp. default.
Of course, don't forget to delete the added style node when the applet is closed.
summary
This article simply tries to expand the functions of two websites. If you have a better way, you can comment, share messages, and online effect demonstration address http://lxqnsys.com/d/.