Hashmap
Underlying data structure: jdk1 7 hash table (array + linked list), jdk1 8 array + linked list / red black tree. Here I'll introduce it in detail. Of course, if you want to understand the evolution of the tree, you can see my next article. Let's start with the data structure:
Underlying data structure
Hash table
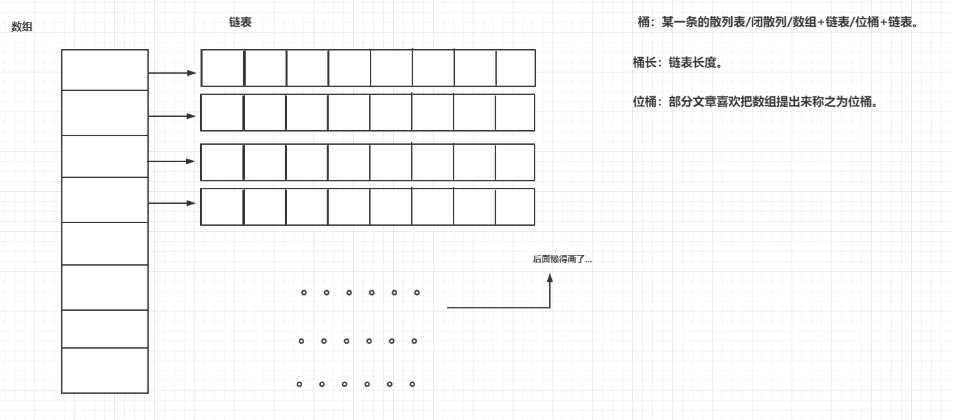
Let's take a look at the hash table. The hash table is array + linked list:
- When the data enters, the hash value of the element will be given to the array first, and then the data with the same hash value will enter the array. There are two methods for hash collision (zipper method and open addressing method).
- Zipper method: when an element is stored in a hash table, it will first calculate the hash value and then put it into the array. If the next element is the same as its hash value, it will be placed in the same linked list.
- Open addressing: when an element is stored in a hash table, it will first calculate the hash value and then put it into the array. If the next element is the same as its hash value, it will be placed in the next array of this element (so this method does not match the figure below, so don't look).
Red black tree
hashmap is nothing more than array + linked list (JDK1.7) or array + linked list / red black tree (JDK1.8) hash table. Now let's talk about red black tree. It may be a little difficult to get started. If you don't understand it, you can read my article evolution of tree first:
First, the red and black trees write down five characteristics:
- Each node is either black or red.
- The root node is black.
- Each leaf node (NIL) is black. [Note: the leaf node here refers to the leaf node that is empty (nil or null!]
- If a node is red, its child nodes must be black.
- All paths from a node to its descendants contain the same number of black nodes.
be careful:
-
The leaf node in attribute (3) is a node that is only empty (NIL or null).
-
Feature (5) to ensure that no path is twice as long as other paths. Therefore, the red black tree is a binary tree that is relatively close to equilibrium.
Here, explain what Nil, Nil, NULL, NSNull are (case insensitive):
nil: A null pointer to an object,yes objective c id Object null value.
Nil: Null pointer to a class,Indicates that the class is null.
NULL: Point to other types (e.g. basic type C Null pointer to type), Used to assign a null value to a non object pointer.
NSNull: In a collection object, an object that represents a null value.
Here are the red and black trees drawn according to the five characteristics: sorry for the bad painting...

Any data structure used for storage, the most important thing is to add and delete. After adding or deleting the red black tree, the rotation method will be used. Why? The reason is very simple. After adding or deleting nodes in the red black tree, the red black tree changes. It may not meet the five properties of the red black tree, so it is no longer a red black tree, but an ordinary tree. By rotating, the tree can become a red black tree again. Simply put, the purpose of rotation is to keep the characteristics of red and black trees.
There are two kinds of rotation: left rotation and right rotation. They are introduced below.
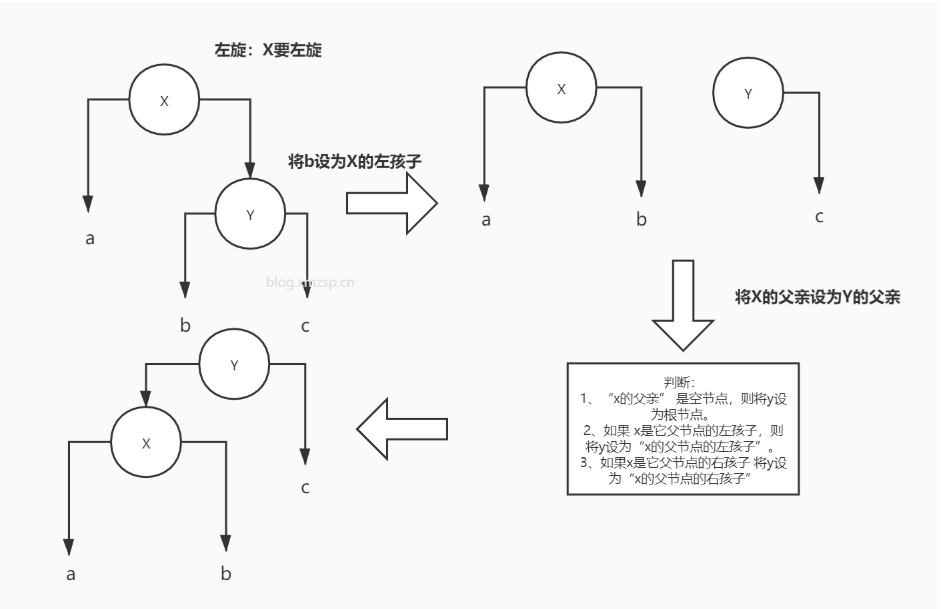
Sinistral
The steps are as follows: (rotate the left subtree, change the left subtree, and become the left subtree)
- First give the {left} subtree of Y to X.
- Give X father to Y. at this time, there are three situations, as shown in the figure.
- Finally, left rotation was completed.
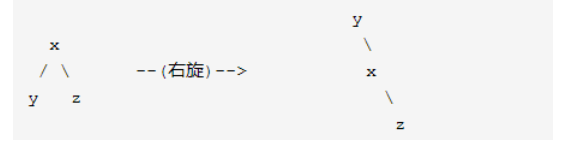
Dextral
The steps are as follows: (right rotation, change the right subtree, and become the right subtree)
- First give the {right} subtree of X to Y.
- Give Y father to X. there are three situations, as shown in the figure.
- Finally completed the right rotation.

If you are careful enough, you will find that the left-right rotation is symmetrical, that is, after left rotation and then right rotation, you can return to the original appearance.
-
The left rotation is carried to the right subtree of the rotation target to turn itself into a right subtree.
-
The right rotation is carried to the left subtree of the rotation target to turn itself into a left subtree.
For example, the following all take X as the rotation target:

If you want to see the code, you can see my chapter "evolution of trees", which will tell you all the codes related to tree operations in detail.
add to
When talking about adding, let's talk about what should be done to insert elements:
Step 1: treat the red black tree as a binary lookup tree and insert the node.
The red black tree itself is a binary lookup tree. After inserting nodes, the tree is still a binary lookup tree. That means that the key values of the tree are still ordered. In addition, whether it is left-handed or right-handed, if the tree is a binary lookup tree before rotation, it must still be a binary lookup tree after rotation. This means that any rotation and recolor operation will not change the fact that it is still a binary lookup tree.
ok Next, we'll try our best to rotate and re color the tree to make it a red black tree again!
Step 2: shade the inserted node as "red".
Why is it colored red instead of black? Why? Before answering, we need to review the characteristics of red black tree:
(1) Each node is either black or red.
(2) The root node is black.
(3) Each leaf node is black. [Note: leaf nodes here refer to empty leaf nodes!]
(4) If a node is red, its child nodes must be black.
(5) All paths from a node to its descendants contain the same number of black nodes.
Coloring the inserted node red will not violate the "property (5)"! Fewer violations of a feature mean fewer situations we need to deal with. Next, we should strive to make the tree meet other properties; If satisfied, it will be a red and black tree again. o(∩) o... Ha ha
Step 3: make it a red black tree again through a series of operations such as rotation or coloring.
In the second step, after shading the inserted node to red, the property (5) is not violated. What characteristics does it violate?
For "characteristic (1)", it is obvious that it will not be violated. Because we have painted it red.
For "characteristic (2)", it is obvious that it will not be violated. In the first step, we treat the red black tree as a binary lookup tree, and then perform the insertion operation. According to the characteristics of binary search number, the insertion operation will not change the root node. Therefore, the root node is still black.
For "characteristic (3)", it is obvious that it will not be violated. Leaf nodes here refer to empty leaf nodes. Inserting non empty nodes will not affect them.
For "feature (4)", it may be violated!
Next, find a way to "meet feature (4)" and reconstruct the tree into a red black tree.
It may be a little difficult to go down this part. Let's follow the car. First take a look at this part of the pseudo code. Here we want to insert z, and then insert it under node Y. I divide the inserting data into two steps: inserting and coloring:
-
Insert: here, it is assumed that there is a Y node, which can be divided into three cases
- If Y is an empty node, the inserted Z becomes the only node, the root
- Z < y, set Z as the left child.
- Z> Y, set Z as the right child.
Finally, the left and right children of the inserted node are set to be empty, and the inserted node is colored. This part is relatively simple, so the graph is not given.
RB-INSERT(T, z)
  y ← nil[T]                        // Create a new node "y" and set y as an empty node.
  x ← root[T]                       // Set the root node of "red black tree T" to "x"
  while x ≠ nil[T]                  // Find the position "y" of the node "z" to be inserted in the binary tree T
      do y ← x
         if key[z] < key[x]
            then x ← left[x]
            else x ← right[x]
  p[z] ← y                          // Set "father of z" to "y"
  if y = nil[T]
     then root[T] ← z               // Case 1: if y is an empty node, set z as the root
     else if key[z] < key[y]
             then left[y] ← z   // Case 2: if "value contained in z" < "value contained in y", set z to "left child of y"
             else right[y] ← z  // Case 3: ("value contained in z" > = "value contained in y") set z to "right child of y"
  left[z] ← nil[T]              // The left child of z is set to null
  right[z] ← nil[T]             // The right child of z is set to null. At this point, you have finished inserting node z into the binary tree.
  color[z] ← RED                // Shade z to red
  RB-INSERT-FIXUP(T, z)         // Through RB-INSERT-FIXUP, modify the color and rotate the nodes of the red black tree, so that the tree T is still a red black tree
- Dyeing: there are three cases
- If the inserted element is the root node, it is inserted directly and dyed black.
- The parent node of the inserted node is black, because the inserted node is red, which meets the five characteristics, so there is no need to dye.
- The parent node of the inserted node is red., Because it is inconsistent with the characteristics, it can be handled in the following three cases:
RB-INSERT-FIXUP(T, z)
while color[p[z]] = RED                   // If "parent node of current node (z) is red", perform the following processing.
    do if p[z] = left[p[p[z]]]     // If "parent node of z" is "left child of grandfather node of z", perform the following processing.
          then y ← right[p[p[z]]]  // Set y to "z's uncle node (the right child of z's grandfather node)"
               if color[y] = RED   // The parent node of Case1 is red, and the uncle node (the brother node of the parent node) is red.
                  then color[p[z]] ← BLACK         Case 1//(01) set "parent node" to black.
                       color[y] ← BLACK            Case 1//(02) set "Uncle node" to black.
                       color[p[p[z]]] ← RED        Case 1//(03) set "grandfather node" to "red".
                       z ← p[p[z]]                 Case 1//(04) set "grandfather node" to "current node" (red node)
                  else if z = right[p[z]]          // Uncle Case 2 is black, and the current node is the right child
                          then z ← p[z]            Case 2//(01) set "parent node" as "new current node".
                               LEFT-ROTATE(T, z)   Situation 2//(02) rotate left with "new current node" as the fulcrum.
                          color[p[z]] ← BLACK      // Uncle Case 3 is black, and the current node is the left child. (01) set "parent node" to "black".
                          color[p[p[z]]] ← RED     Case 3//(02) set "grandfather node" to "red".
                          RIGHT-ROTATE(T, p[p[z]]) Case 3//(03) carry out right rotation with the "grandfather node" as the fulcrum.
       else (same as then clause with "right" and "left" exchanged)   // If the "parent node of z" is the "right child of the grandfather node of z", swap the "right" and "left" positions in the above operations, and then execute them in turn.
color[root[T]] ← BLACK
Three scenarios are illustrated:
- The parent node is red, the uncle node (the brother node of the parent node) is red, and the following figure shows the left and right children.
- Dye the parent node and uncle node black and the grandfather node red.
[external chain picture transfer failed. The source station may have anti-theft chain mechanism. It is recommended to save the picture and upload it directly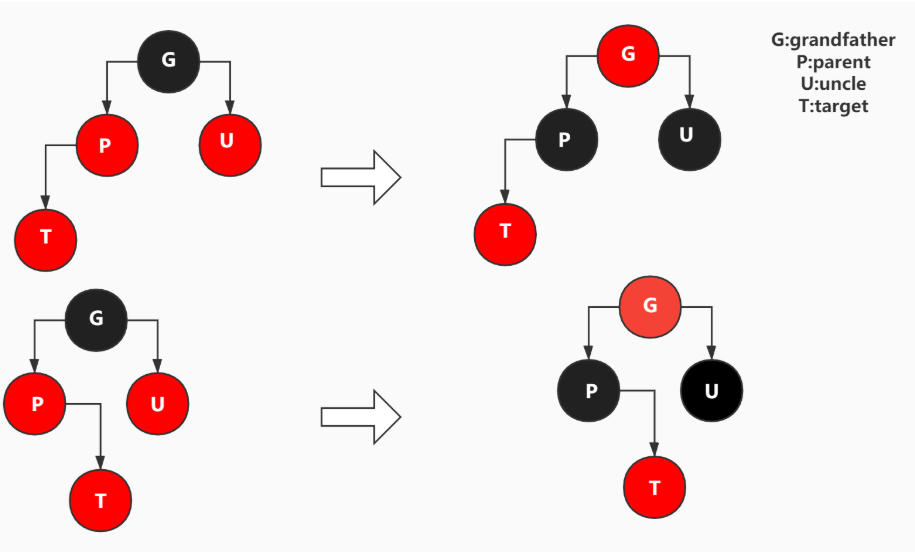
- The parent node is red, the uncle node is black, and the added node is the left child of the parent node.
- First, dye the parent node black;
- Dye the grandfather node red;
- Rotate the parent node to the right;
[external chain picture transfer failed. The source station may have anti-theft chain mechanism. It is recommended to save the picture and upload it directly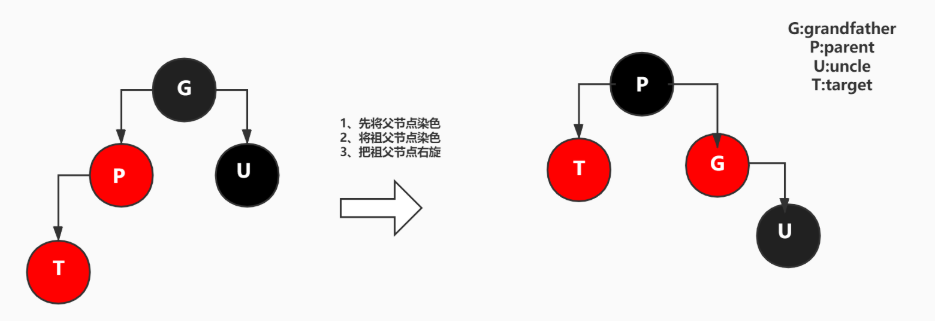
- The parent node is red, the uncle node is black, and the added node is the right child of the parent node.
- Rotate the parent node to the left first
- Dye the child nodes first
- Coloring grandfather nodes
- Turn the grandfather node to the right
[external chain picture transfer failed. The source station may have anti-theft chain mechanism. It is recommended to save the picture and upload it directly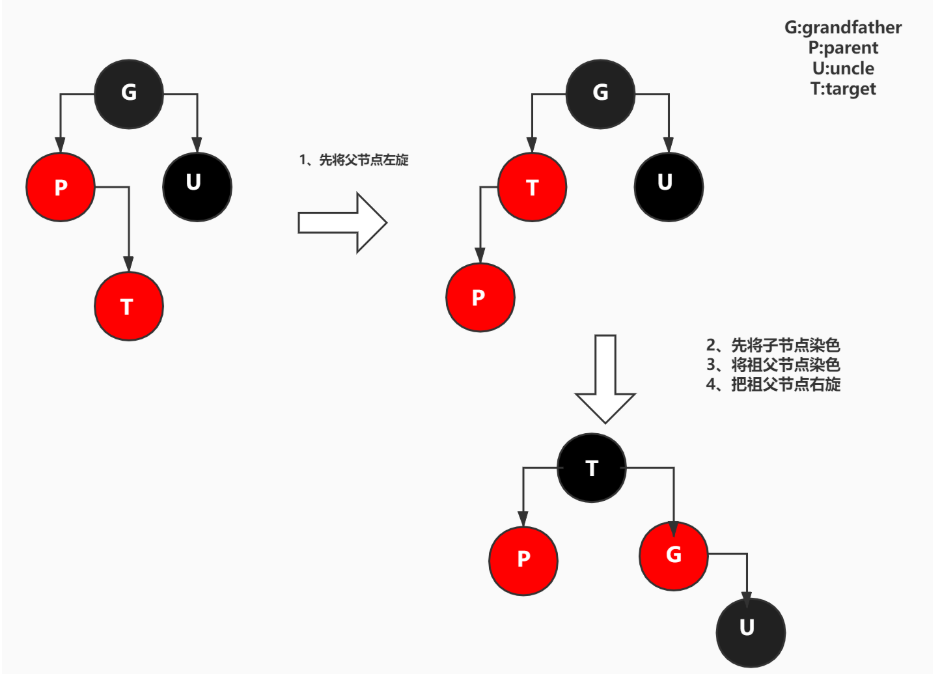
So far, the addition operation has been completed. Of course, the most difficult operation is not the addition operation, but the deletion operation, because the deletion operation must meet not only the five point principle, but also the balanced binary tree.
delete
Here, let's briefly introduce the idea of deleting binary tree nodes. If you need to see more details, you can see my next article "evolution of trees".
Idea of node deletion in binary tree
- If the node to be deleted happens to be a leaf node, you can delete it directly;
- If the node to be deleted has child nodes, you need to establish the relationship between parent nodes and child nodes:
- If there are only left or right children, just move the child up to the position to be deleted;
- If you have two children, you need to select an appropriate child node as the new root node, which is called the inheritance node. (the new node should be larger than all the left subtrees and smaller than the right subtree. We can select the largest node in the left subtree or the smallest node in the right subtree.)
Idea of red black tree node deletion
We need to consider adjusting the deleted tree based on the idea of deleting the binary tree. The balance of binary tree is divided into two dots or three dots, and the binary tree needs to be adjusted accordingly, which is too heavy for us, so we combine these things together.
-
First line binary tree deletion can be divided into three cases:
- If the deleted node has no children, it indicates that it is A leaf and can be deleted directly. (step A)
- If the deleted node has only one child, replace it with the only son. (step B)
- If the deleted node has two children, two steps are required:
- If you have two children, you need to select an appropriate child node as the new root node, which is called the inheritance node. Select the largest node in the left subtree (the rightmost node in the left subtree) or the smallest node in the right subtree (the leftmost node in the right subtree) as the inheritance node.
- Then repeat step A or step B for the child node of the selected inherited node. (don't consider the situation of two children, because if there are children, it can't be the leftmost or rightmost of the subtree).
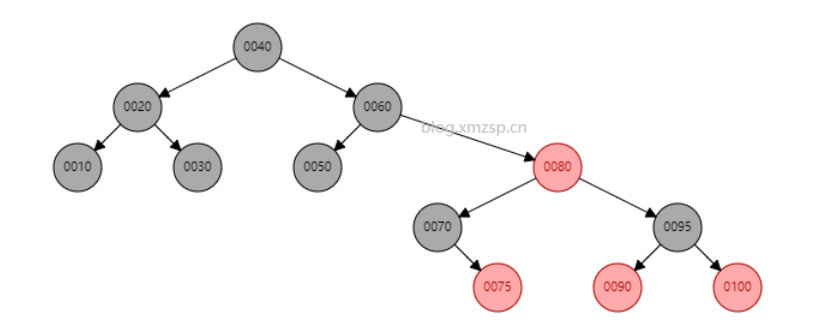
As shown in the figure below, the element 80 is deleted. If you can deduce that 75 or 90 can become the inheritance node, it indicates that it is OK. (ignore color)

Because dyeing needs to compare whether the five properties have been changed, here are five properties:
* Each node is either black or red.
* The root node is black.
* Each leaf node( NIL)It's black. [Note: the leaf node here is empty(NIL or NULL)Leaf node!]
* If a node is red, its child nodes must be black.
* All paths from a node to its descendants contain the same number of black nodes.
-
Delfixup: dyeing, or adjustment, can be divided into two cases:
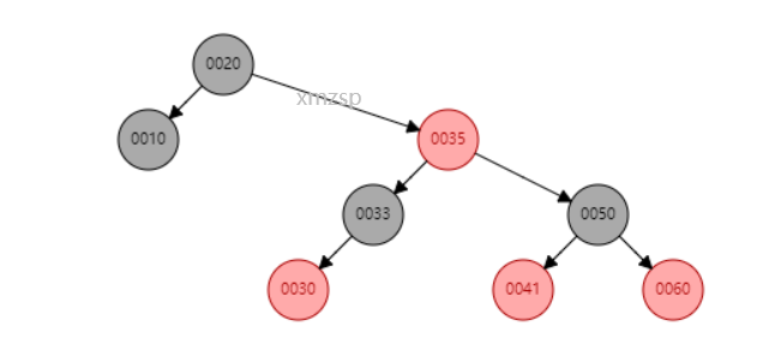
- Deleting the red node will not destroy the original nature of the red black tree, so just assign the node to be adjusted to the deleted node, and then delete the original node. Here we delete 40 as an attempt. We will find that after 35 is superior, only the original 35 is deleted.

-
Deleting black nodes is divided into four parts: deleting black nodes will destroy the five properties of red black trees
- The sibling node is black, and its child nodes are black: dye the sibling node (this only solves the five properties of the current part), and then recurse the parent node of the target node as a new target node until x is red or X is the root node, and then change x to black when exiting.
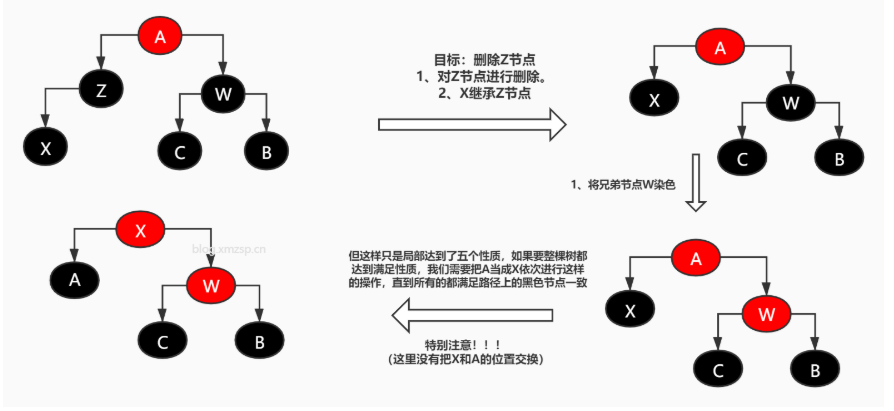
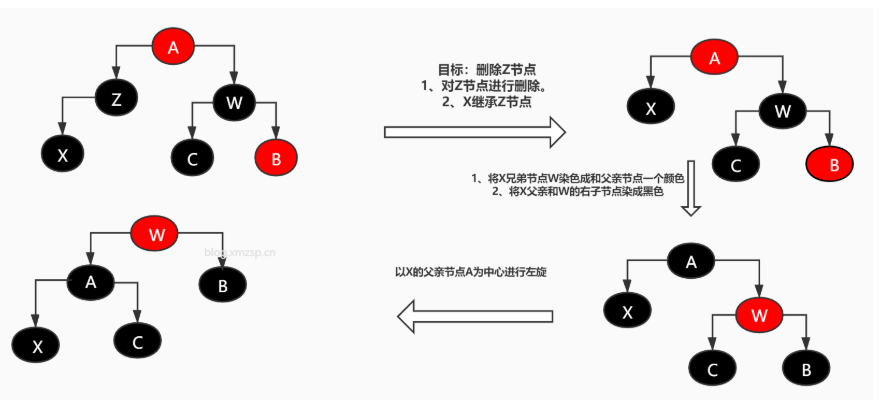
- The sibling node is black, and its right child node is red:
- Error correction: (1. Dye the X brother node W in the same color as the parent node ----- > 1. Dye W in red)
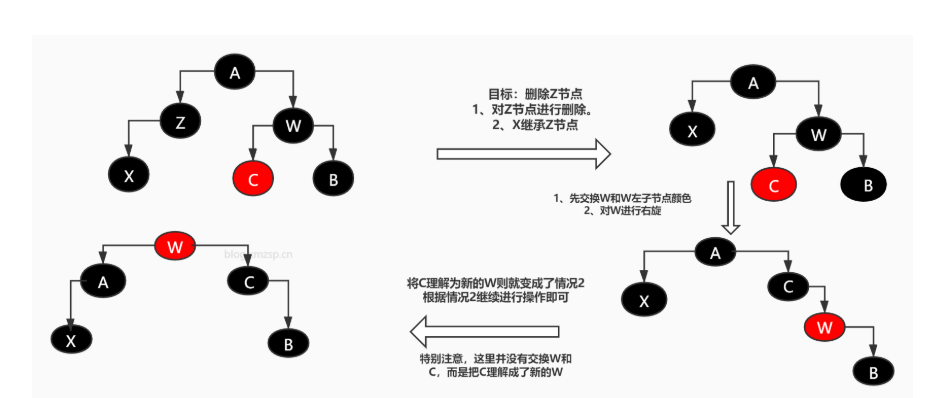
- The sibling node is black, and its child nodes are red on the left and black on the right
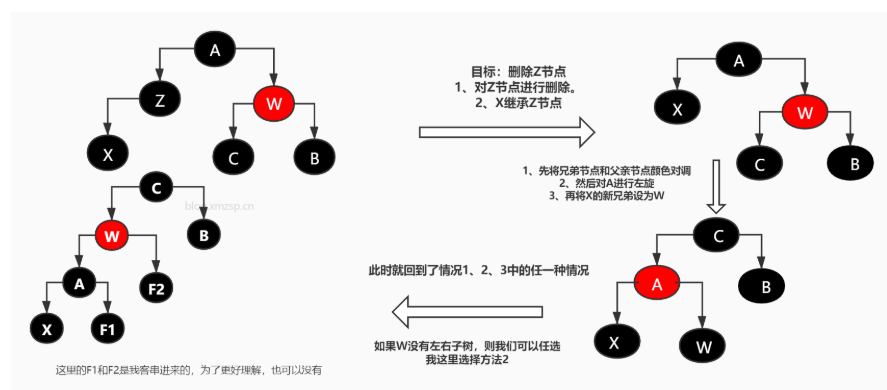
- Brother node is red
So far, after introducing the data structure of red black tree, we can start talking about Hashmap. This part is a little long. I'm wondering whether to extract it separately and put it in the data structure... (it's made by hand here. I drew the picture myself. Please give me a name when quoting. Please, woo woo ~ ~)
Terminology: first explain the terminology to prevent you from not understanding it
Let's talk about buckets. Most blogs on the Internet have different opinions. Some call arrays buckets, and some call the entire array and linked list buckets. In my humble opinion, buckets should be the linked list corresponding to a single array, which is called buckets:
- Bucket: that's it. Look at the picture. It's an element in an array and a corresponding linked list. The two together are called buckets.
- Bucket length: is the length of the linked list corresponding to an element in this array.
- Bit bucket: this array.

Parameter introduction
- DEFAULT_INITIAL_CAPACITY: initialization capacity, or the number of initialization bit buckets.
- 1 < < 4: bit operation means shifting 4 bits left, that is, 2 ^ 4.
- MAXIMUM_ Capability: the maximum capacity cannot exceed 2 ^ 30.
- DEFAULT_LOAD_FACTOR: initialization factor, which is a multiplication variable used as the basis of capacity expansion.
- TREEIFY_THRESHOLD: the maximum capacity conversion capacity of the linked list. When the linked list is to become a red black tree, the number of bits stored must be greater than 64 and the bucket length must be greater than 8. Why 8? After calculation, the probability of 8 hashes with the same hash value is only 0.00000006, so the tree change will not occur repeatedly.
- UNTREEIFY_THRESHOLD: the threshold at which the red black tree degenerates into a linked list. Why 6? If it is set to 7, the tree will be disassembled repeatedly, which will consume a lot of memory.
- MIN_ TREEIFY_ Capability: minimize the number of tree storage. It should be 4 * Tree threshold, i.e. 64.
static final int DEFAULT_INITIAL_CAPACITY = 1 << 4; //The initialization capacity is 16 bit buckets. The English annotation says that it must be a multiple of 2
static final int MAXIMUM_CAPACITY = 1 << 30;
static final float DEFAULT_LOAD_FACTOR = 0.75f;
static final int TREEIFY_THRESHOLD = 8;
static final int UNTREEIFY_THRESHOLD = 6;
static final int MIN_TREEIFY_CAPACITY = 64;
Put method
- Go directly to the put method and explain the parameters:
- hash(key): hash the key value
- Key, value: key value pair
- false is the value of onlyIfAbsent: the following entry method will say.
- True is the value of evict: other constructors call the put method after creating a map, and this parameter is true, indicating that it is not in the creator mode.
    public V put(K key, V value) {
        return putVal(hash(key), key, value, false, true);
    }
-
Enter the hash method to see what happened:
- h > > > 16, h > > > 16 is used to fetch the high 16 bits of h (> > is unsigned right shift).
- h = key.hashCode(): the hash value of the key.
- (H = key. Hashcode()) ^ (H > > > 16): it is used to XOR the hash value with the upper 16 bits in order to make the hash result more random.
Why use the high 16 bits? Because the high 16 bits are rarely used in our daily use, in most cases, the value of the low 16 bits within 65536 is enough for us to use.
    static final int hash(Object key) {
        int h;
        return (key == null) ? 0 : (h = key.hashCode()) ^ (h >>> 16);
    }
- Next, enter putVal, which is simpler than remove.
- onlyIfAbsent: indicates whether the new value replaces the old value in case of hash conflict. false indicates replacement. (can be used here)
- evict: indicates the creator mode. It is false only when calling the construction parameters of the map, indicating that it is enabled. Other times are true and not enabled.
- Table: indicates the current hash table. It is initialized to 0. It is a node array. After reading the notes, you can see that each expansion is also an exponential power of 2.
- n: Used to store the length after expansion.
- p: Represents the node addressed to the same hash.
- Tab [i = (n - 1) & hash]: obtain the addressing result through modular operation. That is, the storage location of the passed in key value pair in the array.
- treeifyBin: it means tree, which will be described later.
- Threshold: in the official document annotation, it represents the capacity expansion threshold, which is initialized to 0, but it is specified that even if it is 0, it also represents the current maximum capacity * load factor. (The next size value at which to resize (capacity * load factor))
- resize(): capacity expansion method, which will be described below.
- treeifyBin(tab, hash): tree method, which will be described below.
final V putVal(int hash, K key, V value, boolean onlyIfAbsent,
               boolean evict) {
    Node<K,V>[] tab; Node<K,V> p; int n, i;					//Create an array of nodes, a p node, and constants n and i
    if ((tab = table) == null || (n = tab.length) == 0)
        n = (tab = resize()).length; //If the table is uninitialized or the array length is 0, the expansion operation will be performed and the expanded array length will be returned
    if ((p = tab[i = (n - 1) & hash]) == null)//If it is null, it means that there is no storage element here. Wrap the key value as Node and set it at i
        tab[i] = newNode(hash, key, value, null);
    else { 	   //else indicates that there are elements stored in the addressing result i, and the hash conflicts
        Node<K,V> e; K k;	//Two temporary variables, node and key
        if (p.hash == hash &&  //It means that the key you want to insert is exactly the same as the key in the original position. Here, assign p to e to facilitate the replacement operation later
            ((k = p.key) == key || (key != null && key.equals(k))))
            e = p;
        else if (p instanceof TreeNode)     //At this point, it indicates that p has been trealized, and the red black tree method is called to add it to the specified location
            e = ((TreeNode<K,V>)p).putTreeVal(this, tab, hash, key, value);
        else {//This explains that the hash addressing conflicts, and it is different from the key at the addressing result i, and it is not a tree. It indicates that it is necessary to operate on the linked list at this time
            	//Find the tail node of the linked list and insert a new node
            for (int binCount = 0; ; ++binCount) {
                if ((e = p.next) == null) {  //Find tail node
                    p.next = newNode(hash, key, value, null);
                    if (binCount >= TREEIFY_THRESHOLD - 1) //If the bucket length is greater than or equal to 7, it indicates that it should be trealized
                        treeifyBin(tab, hash);
                    break;
                }
                if (e.hash == hash &&//At this time, when looking for the tail node in the linked list, the key that is exactly the same as the newly inserted node is found, so record, jump out and replace later
                    ((k = e.key) == key || (key != null && key.equals(k))))
                    break;
                p = e; //Use p to record the conflicting nodes,
            }
        }
        if (e != null) { // Replace operation, if e= Null, indicating that e the conflicting nodes are recorded
            V oldValue = e.value; //Record the old value of the conflicting node
            if (!onlyIfAbsent || oldValue == null)
                e.value = value; //If it is not the creation mode, the value of e will be equal to the new value for replacement.
            afterNodeAccess(e);
            return oldValue;  //Returns the replaced old value
        }
    }
    ++modCount; //Like this collection, it records the number of add and remove operations
    if (++size > threshold)	  //If the inserted element exceeds the capacity expansion threshold, the capacity expansion operation will be performed
        resize();
    afterNodeInsertion(evict);
    return null;
}
-
Enter the resize method to learn how hashmap is expanded:
Let's take a look at the notes on capacity expansion: generally, this method will initialize or double capacity expansion. The capacity is expanded according to the threshold of the character. If the threshold is 0, it is initialized. The initialization capacity is the default capacity of the container 16. Otherwise, the quadratic power expansion is used.
     * Initializes or doubles table size.  If null, allocates in
     * accord with initial capacity target held in field threshold.
     * Otherwise, because we are using power-of-two expansion, the
     * elements from each bin must either stay at same index, or move
     * with a power of two offset in the new table.
- From the source code comments above, we can see that capacity expansion can be divided into two major cases:
- Initialize the capacity. The original container is 0. (oldCap > 0)
- For the expansion container, the original container has a threshold, which is expanded according to the exponential power of 2.
final Node<K,V>[] resize() {
        Node<K,V>[] oldTab = table; //Reference the hash table before capacity expansion
        int oldCap = (oldTab == null) ? 0 : oldTab.length; //Whether the old capacity is empty. If it is empty, it is 0. Otherwise, the value will be assigned
        int oldThr = threshold;//Indicates the capacity expansion threshold before capacity expansion and the threshold that triggers this capacity expansion
        int newCap, newThr = 0;//Create two variables as new capacity and new threshold
        if (oldCap > 0) { //If the old capacity is greater than 0, it means that the capacity is not initialized, but needs to be expanded
            if (oldCap >= MAXIMUM_CAPACITY) { //If the old capacity is greater than the maximum capacity, the capacity cannot be expanded
                threshold = Integer.MAX_VALUE; //Change the threshold value to the maximum value
                return oldTab; //Return old array
            }
                      //The new capacity is equal to the old capacity, shifted one bit to the left, and less than the maximum capacity of
            else if ((newCap = oldCap << 1) < MAXIMUM_CAPACITY &&
                     oldCap >= DEFAULT_INITIAL_CAPACITY)
          			  //And the old capacity is greater than or equal to the initialization capacity
                newThr = oldThr << 1; // double threshold (capacity expansion threshold, shifted left by one bit, equal to multiply by 2)
        }
        else if (oldThr > 0)
            // If the old threshold is greater than 0, you will wonder why the container has no capacity and the old threshold
            //Because call 1. newHashMap(initCap,loadFactor) 2. newHashMap(initCap)
            //3. The three methods, newHashMap(map), call the tableSizeFor() method at the bottom and return the threshold
            newCap = oldThr;  //The new container will equal the old threshold
        else { // Zero initial threshold signals using defaults
            newCap = DEFAULT_INITIAL_CAPACITY; //The default capacity for the new capacity is 16
            newThr = (int)(DEFAULT_LOAD_FACTOR * DEFAULT_INITIAL_CAPACITY);
            //The new threshold is equal to the load factor * initialization capacity = 0.75 * 16
        }
        if (newThr == 0) { //The new threshold is 0
            float ft = (float)newCap * loadFactor;//ft equals new capacity * load factor
            newThr = (newCap < MAXIMUM_CAPACITY && ft < (float)MAXIMUM_CAPACITY ?
                      (int)ft : Integer.MAX_VALUE);
            //The new threshold is equal to ft (the new capacity is less than the maximum capacity and the resulting ft is less than the maximum capacity) or the maximum capacity
        }
        threshold = newThr; //The threshold of internal storage will be equal to the new threshold after capacity expansion
---------------------------The above code does two things: get a new threshold and get a new capacity-------------------

    @SuppressWarnings({"rawtypes","unchecked"})
            Node<K,V>[] newTab = (Node<K,V>[])new Node[newCap];//Use the new capacity to get a new hash table
        table = newTab;Current table becomes //Change an old watch into a new one
            //If the old table temporarily stored is not empty (indicating that it is not initialized, the following operations are not necessary for initialization)
        if (oldTab != null) {
            for (int j = 0; j < oldCap; ++j) { //Traverse old table
                Node<K,V> e;  //Temporary node e
                if ((e = oldTab[j]) != null) { //e is equal to the node of the old list and is not empty
                    oldTab[j] = null;//Empty the old list node to facilitate GC. GC will say in JVM garbage collection mechanism
                     //The first case: the bucket has only one element and no hash collision has occurred
                    if (e.next == null)
                        newTab[e.hash & (newCap - 1)] = e;//Calculate the hash value and copy this element in the new array
                     //The second case: bucket location has been trealized
                    else if (e instanceof TreeNode)
                        //Call the tree method, talk about the evolution of trees
                        ((TreeNode<K,V>)e).split(this, newTab, j, oldCap);
          //The third case: bucket chaining, some operations on the linked list. Here, first look at my introduction below, and then come back to the above
                    else { // preserve order
                        //Here, I hope you can first understand the linked list expansion operation in the following article, and then implement it in detail
						//The linked list is divided into high and low linked lists according to a bit of the hash value, and the head and tail nodes are recorded respectively
                        Node<K,V> loHead = null, loTail = null;
                        Node<K,V> hiHead = null, hiTail = null;
                        Node<K,V> next;
                         //Circular insertion
                        do {
                            next = e.next;
                              //Assign to the low linked list and insert it into the lo linked list
                            if ((e.hash & oldCap) == 0) {
                                //The hash and capacity occurrence and operation of E is 0, indicating that e is the header node
                                if (loTail == null)//
                                {  loHead = e;}  //The head of the low chain is e
                                else  //If it is not 0, it means that the head of the low chain is not e
                                {loTail.next = e;} //The next node of the low chain is e
                                loTail = e;	//The low chain becomes e, which is convenient for secondary cycle operation
                            }
                            //Assign to the high-level linked list and insert it into the high-level linked list
                            else {
                                if (hiTail == null)
                                    hiHead = e;//Determine whether it is a header node
                                else //Otherwise, insert into the next node
                                    hiTail.next = e;  //The next node of the low chain is e
                                hiTail = e; //The high chain becomes e, which is convenient for secondary cycle operation
                            }
                        } while ((e = next) != null);
                        //The above circular operation forms two linked lists, but it has not been connected to the bucket array
						//Connect the linked list to the bucket array
                        if (loTail != null) {//If the low chain is not empty
                            loTail.next = null;
                            newTab[j] = loHead; //New table insert low chain
                        }
                        if (hiTail != null) {///If the high chain is not empty
                            hiTail.next = null;
                             //Or suppose the new capacity is 32
                            //Because the high and low linked lists are generated, the high linked list has 16 bits more than the low linked list
                            //Therefore, j+16 represents the bucket position of the high-level linked list and connects the high-level linked list with the bucket
                            newTab[j + oldCap] = hiHead;//New table insert high chain
                        }
                    }
                }
            }
        }
        return newTab;
    }
Supplement the knowledge blind area
-
First, pre knowledge: addressing mode in bucket: I = (n - 1) & hash
- N represents the length, which is an integer power of 2. Assuming n=16 before capacity expansion, the binary addressing result of the element stored at i=15 is i=1111. Because it is an and operation, the lowest four bits of the hash value are 1:xxxxxx1111, so that the hash & (n-1) result can be i=1111
[the external chain image transfer fails. The source station may have an anti-theft chain mechanism. It is recommended to save the image and upload it directly (img-of3nomhu-1624594388724) (container source code / 2021040410521249-1624588770356.png)]
-
The last four bits of the hash value of the same bucket bit must be the same. Continue to determine the bucket position according to the n=32 After capacity expansion above, so the five bit bits determine the bucket position. The long linked list before capacity expansion is divided into high and low linked lists according to the penultimate bit
-
Suppose the penultimate digit is 1: xxxx11111, and the oldCap in e.hash & oldCap is 16 (binary bit): 10000, so the result is xxxx10000, which is stored in the bucket 16
-
Suppose the penultimate digit is 0: xxx01111, and the oldCap in e.hash & oldCap is 16 (binary bit): 10000, so the result is xxx00000, which is stored in bucket 0.
In this way, there is an oldCap difference between the high and low linked list storage locations.


After reading here, you can go back and continue to look at the source code.
-
Now let's enter the treeifyBin source code. Let's talk about the tree function, that is, the linked list to red black tree.
- tab: the array of nodes to be trealized.
- Hash: the hash value of the key in the new key value pair
- e: It is used to save the location of the node stored in the linked list corresponding to the addressing in the bucket.
- n: Node array length
- treeify: a tree function that turns a linked list into a tree.
    final void treeifyBin(Node<K,V>[] tab, int hash) {
        int n, index; Node<K,V> e;
        //1. No conversion, capacity expansion only
        //If the node array is empty or less than the default tree capacity of 64
        if (tab == null || (n = tab.length) < MIN_TREEIFY_CAPACITY)
            resize(); //Capacity expansion is enough. It is mentioned above and will not be repeated
        //2. Conversion
        //The node of linked list storage corresponding to bucket addressing is not empty
        else if ((e = tab[index = (n - 1) & hash]) != null) {
            TreeNode<K,V> hd = null, tl = null;//Initialize two temporary variables, the head node and the tail node
            do {//Convert node e to tree node
                TreeNode<K,V> p = replacementTreeNode(e, null);
                if (tl == null)//If the tail node is empty, it means that p is the first node, and p is given to the head node
                    hd = p;
                else { //The tail node is not empty, indicating that the original table has nodes
                    p.prev = tl;//Give the leading pointer of p to the last trailing node
                    tl.next = p;//Give the post pointer of the last tail node to p
                }
                tl = p;  //The tail node becomes p
            } while ((e = e.next) != null); //Traverse the linked list
            if ((tab[index] = hd) != null)
	//hd is not empty, indicating that p is the first node. If p is the first tree node, it means that it is not a tree, so we continue to tree
                hd.treeify(tab);
        }
    }
- Let's enter the treeify method again. I hope this method is the last tree method
- dir: indicates the direction, - 1 indicates the left and 1 indicates the right
        final void treeify(Node<K,V>[] tab) {
            TreeNode<K,V> root = null;  //The root node of the initialization tree is empty
            // Traverse the linked list. x points to the current node and next points to the next node
            for (TreeNode<K,V> x = this, next; x != null; x = next) {
                next = (TreeNode<K,V>)x.next;//After the node is treelized, mark the next
                x.left = x.right = null;//Set the left and right of the current node to be empty
                if (root == null) { //Case 1: if the root node is empty
                    x.parent = null; //Because it is the root node, set the parent node to null
                    x.red = false;//The root node must be red
                    root = x; //Set x as root node
                }
                else { //Case 2: if the root node is not empty, insert the following node
                    K k = x.key; //Generic, take out the key of x
                    int h = x.hash;  //Get the hash value of x
                    Class<?> kc = null;   // Define the Class to which the key belongs
                    for (TreeNode<K,V> p = root;;) { //Traversing the tree, infinite loop, can only jump out internally
                        int dir, ph;   // dir identifies the direction (left and right), ph identifies the hash value of the current tree node
                        K pk = p.key; //Retrieve the key of the current tree node
                        if ((ph = p.hash) > h)//If the hash value of the current tree node is greater than the hash value of the current linked list node
                            dir = -1; //Put it on the left
                        else if (ph < h)//If the hash value of the current tree node is less than the hash value of the current linked list node
                            dir = 1;//Put it on the right

                 //If the hash values of the key s of the two nodes are equal, they should be compared in other ways
                 //If the key of the current linked list node implements the comparable interface, and the current tree node and the linked list node are the same Class
                 //Then compare the two in a comparable way.
                 //If it is still equal, compare it again through tiebreakhorder

                        else if ((kc == null &&
                                  (kc = comparableClassFor(k)) == null) ||
                                 (dir = compareComparables(kc, k, pk)) == 0)
                            dir = tieBreakOrder(k, pk);

                        TreeNode<K,V> xp = p; //  Save current tree node

               // If dir is less than or equal to 0, the current linked list node must be placed on the left side of the current tree node, but not necessarily the tree node 				//	 The left child may also be the right child of the left child or a deeper node.
               //If dir is greater than 0: the current linked list node must be placed on the right side of the current tree node, but not necessarily on the right side of the tree node 			   // The child may also be the left child of the right child or a deeper node.
               //If the current tree node is not a leaf node, the left child or right child of the current tree node will eventually be the starting node 			   // Then start from GOTO1 to find the location of yourself (the current linked list node)
               //If the current tree node is a leaf node, the current linked list node can be attached to the current tree node according to the value of dir 				   // Left or right of.
               //After mounting, you need to rebalance the tree. After balancing, you can process the next linked list node.
                        if ((p = (dir <= 0) ? p.left : p.right) == null) {
                            x.parent = xp;
                            if (dir <= 0)
                                xp.left = x;
                            else
                                xp.right = x;
                            root = balanceInsertion(root, x); //The balance of trees, let's see my article the evolution of trees
                            break;
                        }
                    }
                }
            }
            moveRootToFront(tab, root);
        }