Principle introduction
I came across an article, Original link
Suddenly, I have a great interest in face recognition, so I have deeply studied the methods used in this article. The principle is roughly based on the OpenCV library and 68 feature points on the face to mark and display the monitored marker points
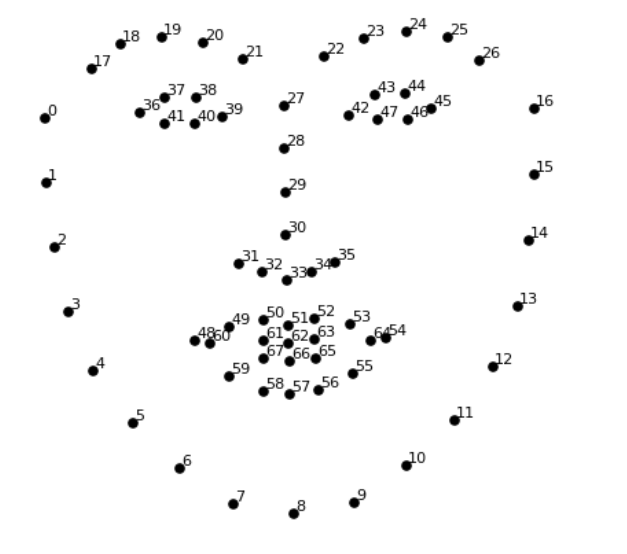
Jaw point = 0 – 16
Right eyebrow point = 17 – 21
Left eyebrow point = 22 – 26
Nose point = 27 – 35
Right eye point = 36 – 41
Left eye point = 42 – 47
Quarrel = 48 – 60
Lip score = 61 – 67
resources
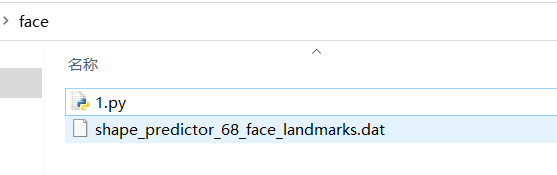
Shape required_ predictor_ 68_ face_ landmarks. Dat resources have been uploaded to Baidu cloud
Link: https://pan.baidu.com/s/1qowI0Xf49s_luqozFeWGww
Extraction code: qwer
python installs dlib library and OpenCV Library
The installation of dlib library is troublesome, mainly because of its ten C + + open source packages. The author installed them through vs2019. For detailed tutorials, please refer to This blog
Of course, you can also enter
https://pypi.org/project/dlib/19.6.0/#files Download Dlib Library
pip install dlib-19.6.0-cp36-cp36m-win_amd64.whl
Implementation code
When you put the data file and code file in the same folder and there is no error when running, you can start playing
Compared with monitoring pictures, I prefer real-time monitoring. The code of monitoring pictures can also be posted and viewed in the original text
import cv2
import numpy as np
import dlib
# Load the detector
detector = dlib.get_frontal_face_detector()
# Load the predictor
predictor = dlib.shape_predictor("shape_predictor_68_face_landmarks.dat")
# read the image
img = cv2.imread("face.jpg")
# Convert image into grayscale
gray = cv2.cvtColor(src=img, code=cv2.COLOR_BGR2GRAY)
# Use detector to find landmarks
faces = detector(gray)
for face in faces:
    x1 = face.left() # left point
    y1 = face.top() # top point
    x2 = face.right() # right point
    y2 = face.bottom() # bottom point
    # Create landmark object
    landmarks = predictor(image=gray, box=face)
    # Loop through all the points
    for n in range(0, 68):
        x = landmarks.part(n).x
        y = landmarks.part(n).y
        # Draw a circle
        cv2.circle(img=img, center=(x, y), radius=3, color=(0, 255, 0), thickness=-1)
# show the image
cv2.imshow(winname="Face", mat=img)
# Delay between every fram
cv2.waitKey(delay=0)
# Close all windows
cv2.destroyAllWindows()
Real time monitoring face script, here I made some changes to make some points connected into line segments, and the operation effect is more consistent with that in the original text
import cv2
import dlib
from math import sqrt
# Load the detector
detector = dlib.get_frontal_face_detector()

# Load the predictor
predictor = dlib.shape_predictor("shape_predictor_68_face_landmarks.dat")

# read the image
cap = cv2.VideoCapture(0)

while True:
    _, frame = cap.read()
    # Convert image into grayscale
    gray = cv2.cvtColor(src=frame, code=cv2.COLOR_BGR2GRAY)

    # Use detector to find landmarks
    faces = detector(gray)

    for face in faces:
        x1 = face.left()  # left point
        y1 = face.top()  # top point
        x2 = face.right()  # right point
        y2 = face.bottom()  # bottom point

        landmarks = predictor(image=gray, box=face)

        # Loop through all the points
        #for n in range(0, 68):
        x67 = landmarks.part(67).x
        y67 = landmarks.part(67).y
        for n in range(0, 67):
            x = landmarks.part(n).x
            y = landmarks.part(n).y
            x2 = landmarks.part(n+1).x
            y2 = landmarks.part(n+1).y
            ptStart=(x,y)
            ptEnd=(x2,y2)
            point_color=(0,255,0)
            thickness=1
            lineType=4
            cv2.circle(img=frame, center=(x, y), radius=2, color=(0, 255, 0), thickness=-1)
            if(n==16 or n==26 or n==35 or n==41 or n==47):
                continue
            cv2.line(frame, ptStart, ptEnd, point_color, thickness, lineType)

    cv2.imshow(winname="human face test", mat=frame)

    if cv2.waitKey(delay=1) == 27:
        break

cap.release()

cv2.destroyAllWindows()
The operation effect is more consistent with that in the original text, which is not covered up here
**Tips: * * take off the glasses and the recognition accuracy will be further improved
Postscript
By recording the distance between each two groups of points and setting the error, the results of face recognition can be output more accurately, which realizes the retention and monitoring of different face records. You can also try it yourself
If you have any questions, please comment