Contents of this chapter
- Fine grained auto configuration bean s
- Apply configuration properties to application components
- Using spring profile
I outline
1. The automatic configuration of spring boot can greatly simplify the development of spring applications.
2.Spring boot provides a method to configure properties. In fact, configuration properties are just properties of bean s in spring application context. They can be set through multiple sources, including JVM system properties, command line parameters and environment variables.
1.1 fine grained automatic configuration
1. Understand Spring environment abstraction
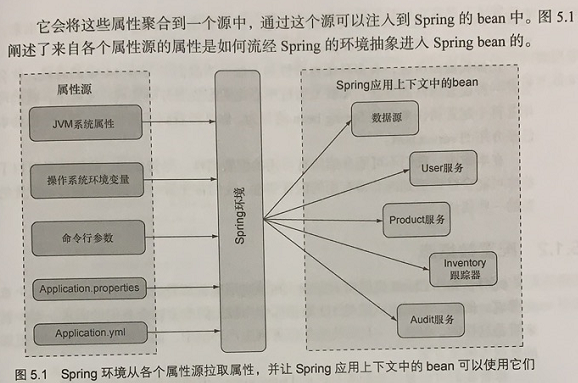
Spring's environment abstraction is a one-stop service for various configuration properties. It extracts the original properties so that beans that need these properties can get them from spring itself. The spring environment will pull multiple attribute sources, including the following. It aggregates these properties into a source that can be injected into spring beans.
- JVM system properties
- Operating system environment variables
- Command line parameters
- Apply property profile

2. In the future, we will see another method of setting properties, that is, through the centralized configuration server.
1.2 configuring data sources
1. Although we can explicitly configure our own DataSource, it is usually unnecessary to do so. On the contrary, it is easier to set the database URL and credential information by configuring properties. For example, in application Add the following configuration properties to properties to use Mysql:
#Problems encountered: 1 Use the latest mysql connection driver; 2. The time zone cannot be recognized when accessing the database (Asia/Shanghai or Asia / Hong Kong can be selected in China, and UTC will be 8 hours earlier than Chinese time)
spring.datasource.driver-class-name=com.mysql.cj.jdbc.Driver
spring.datasource.url=jdbc:mysql://127.0.0.1:3306/taco_cloud?useUnicode=true&characterEncoding=utf-8&serverTimezone=Asia/Shanghai
spring.datasource.username=root
spring.datasource.password=root
2.==Spring boot will use this connection when automatically configuring the DataSource bean. If Tomcat's JDBC connection pool exists in the classpath, DataSource will use the connection pool. Otherwise, Spring boot will try to find and use the following connection pool implementation under the classpath: = = there are only these connection pools that can be supported by automatic configuration, but you are welcome to explicitly configure DataSource beans at any time, so that you can use any preferred connection pool implementation.
- HikariCP
- Commons DBCP 2
1.3 configure Embedded Server
1. Use server Port attribute to configure the port of the servlet container. If we will server If the port property is explicitly set to 0, the server will not really start on port 0. Instead, it selects any available port.
2. One of our common settings for the underlying container is to let it handle HTTPS requests:
We need to be in application Properties to enable HTTPS in the embedded server.
1.4 configuration log
See spring boot2 for details X log configuration
1. To set the log level, we can create a log Level as the prefix attribute, followed by the logger we want to set the log level. Suppose we want to set root logging to WARN level, but we want to set the log level of Spring Security to DEBUG. Then in application Add the following to properties:
logging.level.root=WARN
logging.level.org.springframework.security=DEBUG
1.5 use specific attribute values
When setting properties, we do not have to set their values to hard coded strings or values. We can also derive values from other configuration properties. For example, we want to set up a named meeting The attribute of welcome, whose value comes from spring application. Another attribute of name, we can use the ${} placeholder tag.
spring.application.name=taco_cloud
greeting.welcome=You are using ${spring.application.name}
II Create your own configuration properties
In order to support the injection of configuration properties, Spring Boot provides the @ ConfigurationProperties annotation. After it is placed on the Spring Bean, it will assign values to those properties in the bean that can inject values according to the Spring environment.
2.1 write a simple page first (you can also use mybatis one to many here)
		<!-- to configure Mabatis Paging plug-in PageHelper -->
		<dependency>
			<groupId>com.github.pagehelper</groupId>
			<artifactId>pagehelper-spring-boot-starter</artifactId>
			<version>1.2.3</version>
		</dependency>
    /**
     * Show all orders! (pagination display)
     */
    @GetMapping
    public String ordersForAll(Model model) {
        //paging
        PageHelper.startPage(0, 1);
        List<Order> allOrders = orderService.findAllOrders();
        PageInfo<Order> userOrderPage = new PageInfo<>(allOrders);
        model.addAttribute("orders", userOrderPage.getList());
        return "orderList";
    }
    public List<Order> findAllOrders() {
        List<Order> orders = orderMapper.findAllOrders();
        orders.forEach(order -> {
            order.setTacos(tacoMapper.getTacosByOrderId(order.getId()));
        });
        return orders;
    }
2.2 @ConfigurationProperties annotation usage
We can set the number of pages per page to a custom configuration attribute instead of hard coding it into the code@ In fact, ConfigurationProperties are usually placed in a specific type of bean whose purpose is to hold configuration data. In this way, specific configuration details can be extracted, and multiple beans can more easily share some common configurations.
<dependency>
    <groupId>org.springframework.boot</groupId>
    <artifactId>spring-boot-configuration-processor</artifactId>
    <optional>true</optional>
</dependency>
@ConfigurationProperties(prefix = "taco.orders")
@Component
public class OrderProps {
    private int pageSize = 20;
    public int getPageSize() {
        return pageSize;
    }
    public void setPageSize(int pageSize) {
        this.pageSize = pageSize;
    }
}
@Controller
@RequestMapping("/orders")
@SessionAttributes("order")
public class OrderController {
	...ellipsis

    @Autowired
    private OrderProps orderProps;

    @GetMapping
    public String ordersForAll(Model model) {
        //paging
        //PageHelper.startPage(0, 1);
        PageHelper.startPage(0, orderProps.getPageSize());
        List<Order> allOrders = orderService.findAllOrders();
        PageInfo<Order> userOrderPage = new PageInfo<>(allOrders);
        model.addAttribute("orders", userOrderPage.getList());
        return "orderList";
    }
}
2.3 configuration using profile
1. When an application is deployed to different operating environments (production environment / development environment, etc.), some configuration details are usually different. profile is a conditional configuration. At run time, different bean s, configuration classes and configuration properties can be used or ignored according to which profiles are active.
2. One way to define attributes related to a specific profile is to create another YAML or attribute file. The file name should follow the following Convention: application - {profile} YML or application - {profile} properties. For example, we create a new file named application-prod.properties and a file named application-dev.properties.
3. Activate profile
To activate a profile, all you need to do is assign a list of profile names to spring profiles. Active property. For example, in application Properties can be set as follows:
spring.profiles.active=prod
4. Create bean s using profile conditionalization
Suppose we want some bean s to be created only if a specific profile is activated. Slightly