This tutorial is a VC + + big job based on Visual Studio 2019.
Most of the book tutorials on the market are created with Microsoft Visual C + + tools, and there are few VS tutorials on the whole network.
Therefore, this tutorial is for beginners, taking single document application as an example
MFC application of Visual Studio
Complete the creation of single document application, and create new dialog boxes, menus, toolbars and other resources on this basis
1, Assessment subject requirements
Questionnaire survey on learning habits:
- Create a single document application project (the project name is the student's Pinyin acronym)
- Under this application project, establish a dialog box for questionnaire survey and change the title of the dialog box. The content of the questionnaire is learning habits, including getting up time in the morning, learning hours per day, learning content, sleeping time, etc.
- In the dialog box, radio buttons, check buttons, edit boxes, rotation buttons, etc. are required for selection.
- Set a menu on the menu of the main frame of the application project to call the dialog box.
- Set a tool button on the toolbar, and click the tool button to call the dialog box.
- Display the survey results of the dialog box.
2, Step tutorial
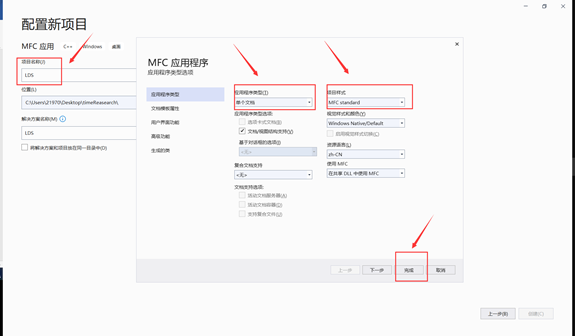
1. Create a single document application project with the name of LDS, the application type of single document and the project style of MFC standard. Other options can be selected by default. Click finish.
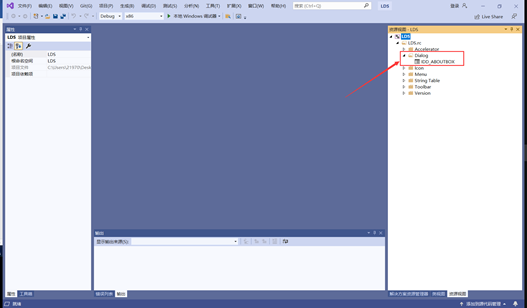
2. Create a new Dialog box as the questionnaire. Right click Dialog in the resource view and select Insert Dialog. The generated Dialog box is shown in the figure.
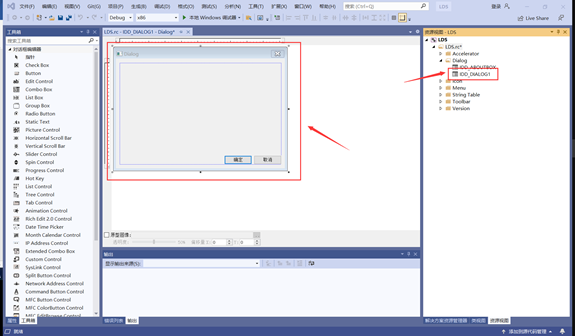
Click the dialog box and change the ID of the dialog box to IDD in the property box_ LDS, the description text is changed to "study habits questionnaire", and the title in the upper left corner of the dialog box becomes "study habits questionnaire"
3. Open the dialog editor in the toolbox, drag the required controls into the dialog box, change the description text in the property bar of the control, press and hold shift to select multiple controls, and use the layout tools above to arrange them at equal intervals. The final interface is shown in the figure.
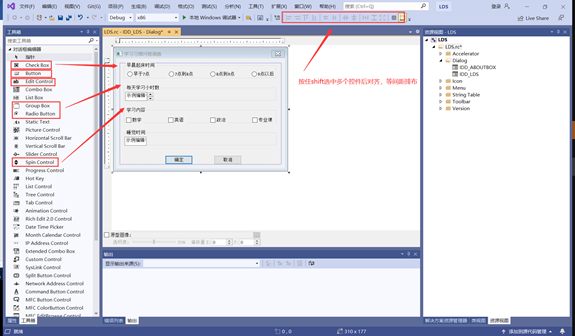
If you want to view the display status of the dialog box in advance, you can select Format - > create dialog box, and the shortcut key is ctrl+T;
Note that change the False of the automatic collaborator in the rotation control property to True, which means that the rotation control and the edit box are combined into a multi part control to jointly display and control a value.
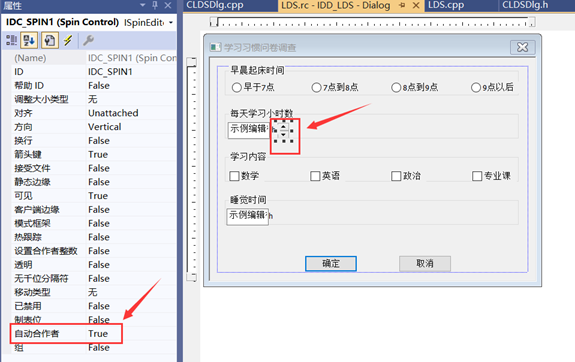
And press the TAB key after ctrl+D. the rotation control and edit box must be adjacent, as shown in the figure

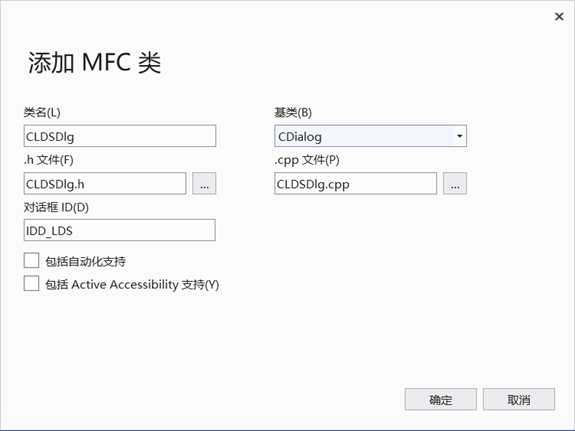
4. Add a dialog Class. Here, I don't use the Class wizard. Right click in the blank area next to the dialog box and click add Class. At this time, you will pop up add MFC Class. Note that you must add MFC Class. Select the base Class as Cdialog, and the Class name is CLDSDlg. Follow the naming format of VC + +: the Class name starts with C, that is, Class, as shown in the figure, and click OK.
5. Open the CLDSDlg class just created in the class view, open the attribute box on the left, click the sixth option "rewrite" above, find the OnInitDialog function, < add > OnInitDialog().
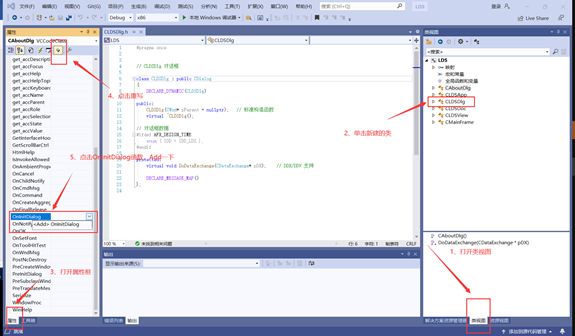
Note that many people can't find the WM of the dialog box_ Initdialog message mapping is because WM has been mapped since VS2003_ Initdialog is moved to the rewrite. There is an OnInitDialog in the rewrite, which corresponds to VC6 WM for 0_ Initdialog message.
Click the fourth option "event" and select IDC_ Udn of Spin1 drop-down box_ BN in deltapc and IDOK_ Clicked, click < add > to create the mapping function of the event corresponding to the control.

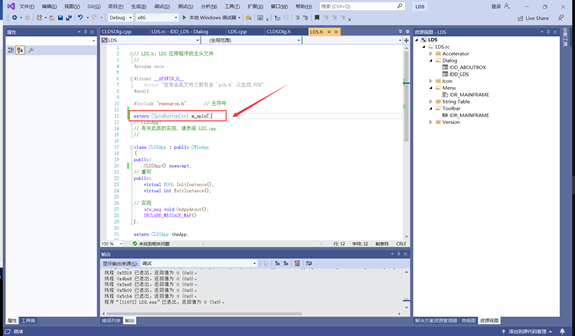
6. In solution explorer's LDS The cpp file defines the following variable CSpinButtonCtrl m_spinT, add code
CSpinButtonCtrl m_spinT;
BOOL CAboutDlg::OnInitDialog()
{
	CDialogEx::OnInitDialog();

	// TODO: add additional initialization here

	CheckRadioButton(IDC_RADIO1, IDC_RADIO4, IDC_RADIO2);
	//Add a check mark to a specified button in a group of radio buttons, and clear the check marks of other buttons in the group
	m_spinT.SetRange(0, 24);
	//Set M_ The range of spint, i.e. 0 to 24
	CButton* pBtn = (CButton*)GetDlgItem(IDC_CHECK1);
	//Function retrieves the control handle in the specified dialog box

	return TRUE;  // return TRUE unless you set the focus to a control
				  // Exception: OCX property page should return FALSE
}
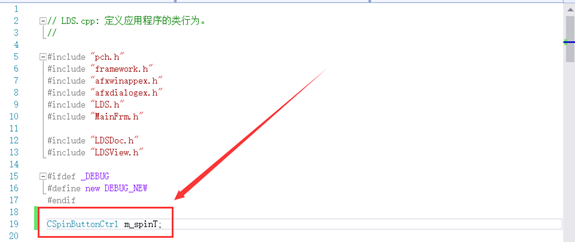
And in LDS H file to declare the global variable extern CSpinButtonCtrl m_spinT, as shown in the figure
extern CSpinButtonCtrl m_spinT;
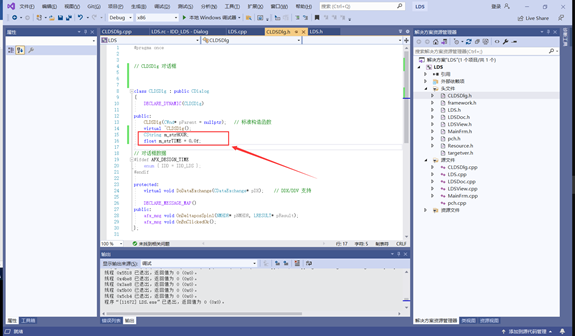
7. In cldsdlg H file declares the following two variables: CString m_strHOUR and float_ strTIME;
CString m_strHOUR;
float m_strTIME = 0.0f;
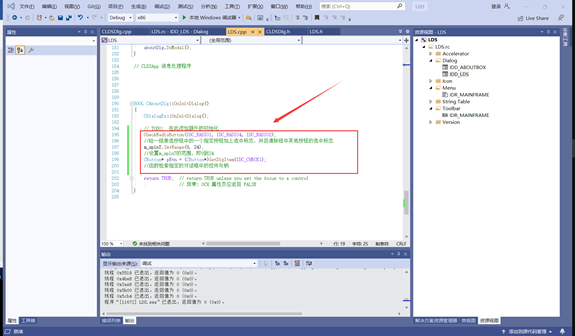
And in cldsdlg Add the following code to the cpp file
void CLDSDlg::DoDataExchange(CDataExchange* pDX)
{
	CDialog::DoDataExchange(pDX);
	DDX_Control(pDX, IDC_SPIN1, m_spinT);
	DDX_Text(pDX, IDC_EDIT1, m_strTIME);
}
void CLDSDlg::OnDeltaposSpin1(NMHDR* pNMHDR, LRESULT* pResult)
{
	LPNMUPDOWN pNMUpDown = reinterpret_cast<LPNMUPDOWN>(pNMHDR);
	// TODO: add control notification handler code here

	UpdateData(TRUE);
	m_strTIME -= (float)pNMUpDown->iDelta * 0.5f;
	//The edit box value is + / - 0.5 after each click of the rotate button
	if (m_strTIME < 0.0)m_strTIME = 0.0f;
	if (m_strTIME > 24.0)m_strTIME = 24.0f;
	UpdateData(FALSE);
	//Output the value of the variable to its associated EditBox

	*pResult = 0;
}
void CLDSDlg::OnBnClickedOk()
{
	// TODO: add control notification handler code here
	CString str, strCtrl;
	//Get user selection for the first question
	str = "Time to get up in the morning:";
	UINT nID = GetCheckedRadioButton(IDC_RADIO1, IDC_RADIO4);
	GetDlgItemText(nID, strCtrl);
	str = str + strCtrl;
	//Get the user selection for the second question
	str = str + (CString)"\n Learning content:";
	UINT nCheckIDs[4]
		= { IDC_CHECK1,IDC_CHECK2,IDC_CHECK3,IDC_CHECK4 };
	CButton* pBtn;
	for (int i = 0; i < 4; i++)
	{
		pBtn = (CButton*)GetDlgItem(nCheckIDs[i]);
		if (pBtn->GetCheck())
		{
			pBtn->GetWindowText(strCtrl);
			str = str + strCtrl;
			str = str + (CString)",";
		}
	}
	//Get the user selection for the third question
	str = str + (CString)"\n Study time every day:";
	GetDlgItem(IDC_EDIT1)->GetWindowText(strCtrl);
	str = str + strCtrl + (CString)"hour";
	//Get the user selection for the fourth question
	str = str + (CString)"\n sack time:";
	GetDlgItem(IDC_EDIT2)->GetWindowText(strCtrl);
	str = str + strCtrl + (CString)"hour";
	MessageBox(str);

	CDialog::OnOK();
}
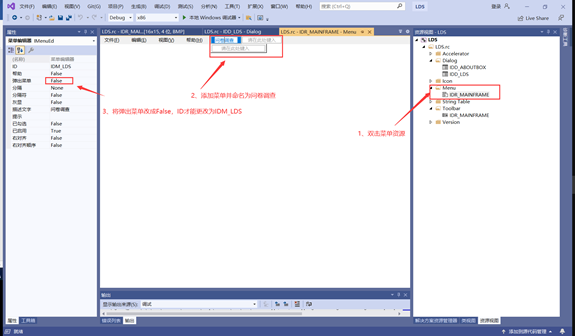
8. Open the resource menu in the resource view and double-click IDR_MAINFRAME, name the new menu as questionnaire, and change the pop-up menu to False in the property box, otherwise the ID cannot be changed to IDM_LDS
9. Click CLDSView in the class view, select the fourth option "event" in the property bar, and click the IDM just changed_ LDS, click command < add > below to add
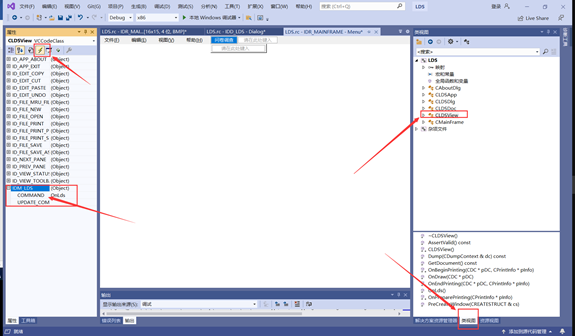
The generated function is in ldsview Add the following code to the cpp file. Note that add #include "CLDSDlg.h" file to this file first, otherwise the CLDSDlg class is not defined.
void CLDSView::OnLds()
{
	// TODO: add command handler code here
	CLDSDlg dlg;
	dlg.DoModal();
}
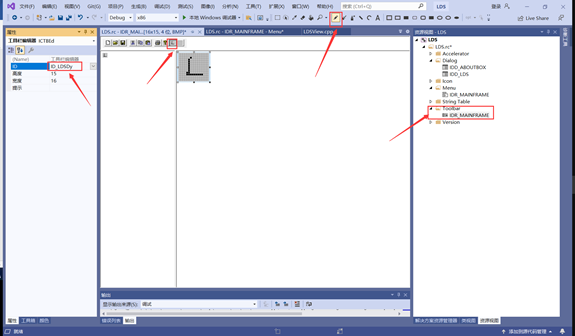
10. In the resource view, select the Toolbar of the Toolbar and click the tool button on the far right. You can select the pencil at the top right to draw a personalized pattern, and change the ID of this tool button to ID_LDSDy, as shown in the figure.
11. In VS, the tool button ID just changed cannot be found in the message in the property box of CmainFrame in class view
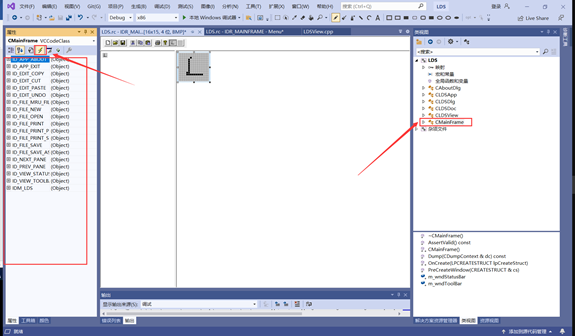
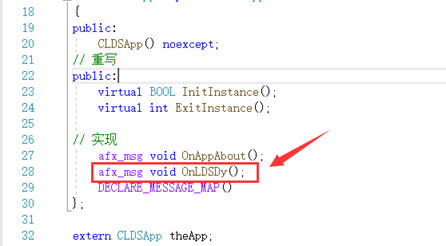
Message mapping can only be set through code, which can be found in LDS Add AFX to h file_ MSG void onldsdy(), as shown in the figure
afx_msg void OnLDSDy();
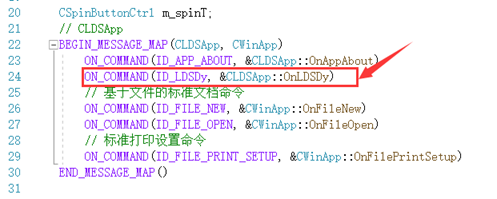
At LDS Add message mapping to cpp file
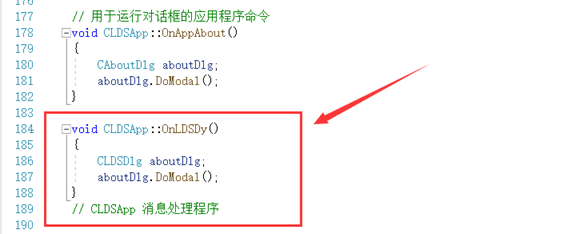
CSpinButtonCtrl m_spinT;
// CLDSApp
BEGIN_MESSAGE_MAP(CLDSApp, CWinApp)
	ON_COMMAND(ID_APP_ABOUT, &CLDSApp::OnAppAbout)
	ON_COMMAND(ID_LDSDy, &CLDSApp::OnLDSDy)
	// File based standard document commands
	ON_COMMAND(ID_FILE_NEW, &CWinApp::OnFileNew)
	ON_COMMAND(ID_FILE_OPEN, &CWinApp::OnFileOpen)
	// Standard print setup command
	ON_COMMAND(ID_FILE_PRINT_SETUP, &CWinApp::OnFilePrintSetup)
END_MESSAGE_MAP()
void CLDSApp::OnLDSDy()
{
	CLDSDlg aboutDlg;
	aboutDlg.DoModal();
}
// CLDSApp message handler
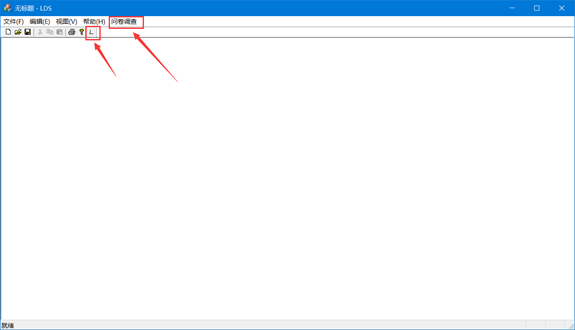
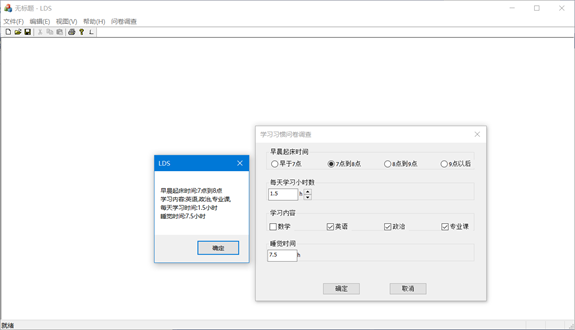
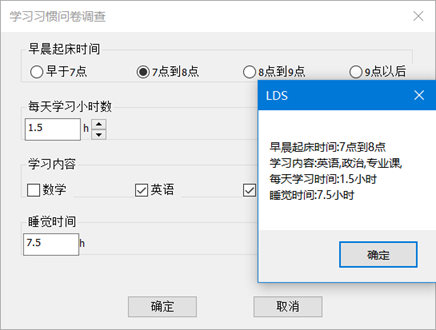
3, Operation results
Click the questionnaire or L-shaped tool button (marked in the figure above), fill in the questionnaire and click OK. It can be seen that the program runs normally, the questionnaire can be completed normally, the results are displayed, and the experiment is completed.