Node.js is a JavaScript running environment based on Chrome V8 engine, which is usually used to create web applications. It can handle multiple connections simultaneously and is not thread dependent like most other models.
For Web developers, the scenario of obtaining data from a database or Web server and then outputting it to an Excel file for further analysis occurs from time to time. In the process of communicating with users from all walks of life at home and abroad, our technical team found that many users tried to use node JS environment SpreadJS pure front-end table control , with this control, the information entered by the user can be collected and automatically exported to an Excel file without any Excel dependencies pre installed on the server.
In order to meet the needs of the majority of technology lovers and reduce the detours you take in the future technology selection, this paper will discuss SpreadJS and node Discuss the technical scheme between JS!
1, Install SpreadJS and node js
First, we need to install node JS, mock browser, BufferJS and FileReader. You can go to the following links to download and synchronize:
We will use Visual Studio to create applications. After opening Visual Studio, use JavaScript & gt; Node. js> Blank Node. JS console application template to create a new application. This will automatically create the required file and open the "app.js" file, which is the only file we will change.
For the BufferJS library, you need to download the package, and then manually install it into the project by navigating to the project folder (once created) and running the following command:
After the installation is complete, you may need to open the package. Of the project JSON file and add it to the "dependencies" section. The contents of the document shall be as follows:
{
"name": "spread-sheets-node-jsapp",
"version": "0.0.0",
"description": "SpreadSheetsNodeJSApp",
"main": "app.js",
"author": {
   "name": "admin"
},
"dependencies": {
   "FileReader": "^0.10.2",
   "bufferjs": "1.0.0",
   "mock-browser": "^0.92.14"
  }
}
In this example, we will use node JS file system module. We can load it into:
var fs = require('fs')
To connect SpreadJS with node JS, we also need to load the installed mock browser:
var mockBrowser =require('mock-browser').mocks.MockBrowser
Before loading the SpreadJS script, we need to initialize the simulation browser. Initialize the variables we may need to use later in the application, especially the "window" variable:
global.window =mockBrowser.createWindow()
global.document = window.document
global.navigator = window.navigator
global.HTMLCollection =window.HTMLCollection
global.getComputedStyle =window.getComputedStyle
Initialize FileReader Library:
var fileReader = require('filereader');
global.FileReader = fileReader;
2, Using the SpreadJS npm package
Add the SpreadJS Sheets and ExcelIO package in the SpreadJS installation file to the project.
You can right-click the "NPM" section of Solution Explorer and add them to your project, and then select "install new NPM package". You should be able to search for "GrapeCity" and install the following 2 packages:
@grapecity/spread-sheets
@grapectiy/spread-excelio
After the SpreadJS npm package is added to the project, the correct dependencies will be written to package json:
1.	{
2.	"name": "spread-sheets-node-jsapp",
3.	"version": "0.0.0",
4.	"description": "SpreadSheetsNodeJSApp",
5.	"main": "app.js",
6.	"author": {
7.	   "name": "admin"
8.	},
9.	  "dependencies":{
10.	   "@grapecity/spread-excelio": "^11.2.1",
11.	   "@grapecity/spread-sheets": "^11.2.1",
12.	   "FileReader": "^0.10.2",
13.	   "bufferjs": "1.0.0",
14.	   "mock-browser": "^0.92.14"
15.	  }
16.	}
Now we need the app JS file:
var GC =require('@grapecity/spread-sheets')
var GCExcel =require('@grapecity/spread-excelio');
When using the npm package, you also need to set the license key( Click here to apply for a license key for free):
GC.Spread.Sheets.LicenseKey ="<YOUR KEY HERE>"
In this particular application, we will show users which version of SpreadJS they are using. For this purpose, we can introduce package JSON file, and then reference the dependency to get the version number:
var packageJson =require('./package.json')
console.log('\n** Using Spreadjs Version"' + packageJson.dependencies["@grapecity/spread-sheets"] +'" **')
3, Load the Excel file into your node JS application
Click here, Download off the shelfExcel template file , this file contains the data obtained from the user. Next, put the data into a file and export it. In this case, the file is a state that the user can edit.
Initialize workbook and ExcelIO variables:
var wb = new GC.Spread.Sheets.Workbook();
var excelIO = new GCExcel.IO();
When we read the file, we wrap the code in a try / catch block. Then, initialize the variable "readline" to let you read the data entered by the user into the console. Next, we store it in a JavaScript array to easily fill in the Excel file:
// Instantiate the spreadsheet and modifyit
console.log('\nManipulatingSpreadsheet\n---');
try {
   var file = fs.readFileSync('./content/billingInvoiceTemplate.xlsx');
   excelIO.open(file.buffer, (data) => {
       wb.fromJSON(data);
       const readline = require('readline');
       var invoice = {
            generalInfo: [],
            invoiceItems: [],
            companyDetails: []
       };
   });
} catch (e) {
   console.error("** Error manipulating spreadsheet **");
   console.error(e);
}
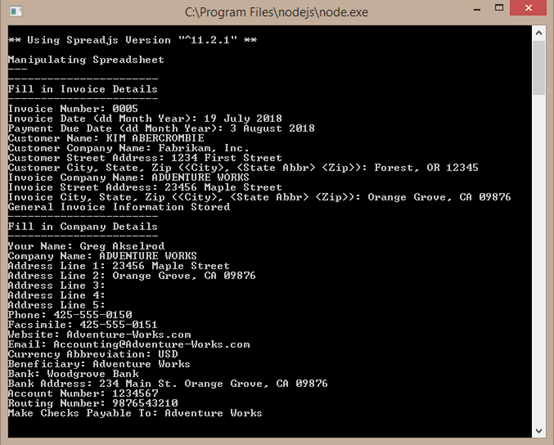
4, Collect user input information
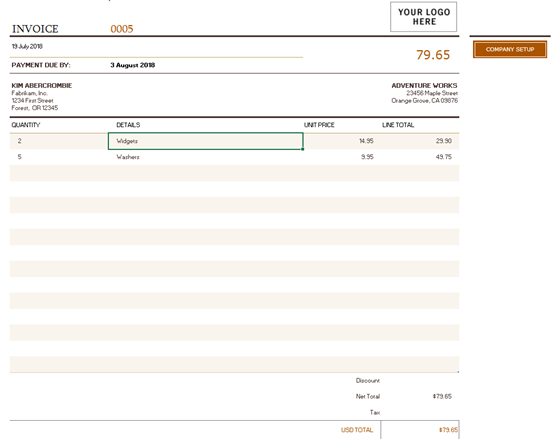
The figure above shows the excel file we are using. We can use Excel io Create a separate function in the open call to prompt the user for each item in the console. We can also create a separate array, save the data to each input, and then push it to the invoice we created In the GeneralInfo array:
fillGeneralInformation();
function fillGeneralInformation() {
   console.log("-----------------------\nFill in InvoiceDetails\n-----------------------")
   const rl = readline.createInterface({
       input: process.stdin,
       output: process.stdout
   });
   var generalInfoArray = [];
   rl.question('Invoice Number: ', (answer) => {
       generalInfoArray.push(answer);
       rl.question('Invoice Date (dd Month Year): ', (answer) => {
           generalInfoArray.push(answer);
            rl.question('Payment Due Date (ddMonth Year): ', (answer) => {
                generalInfoArray.push(answer);
                rl.question('Customer Name: ',(answer) => {
                   generalInfoArray.push(answer);
                    rl.question('CustomerCompany Name: ', (answer) => {
                       generalInfoArray.push(answer);
                        rl.question('Customer Street Address:', (answer) => {
                           generalInfoArray.push(answer);
                           rl.question('Customer City, State, Zip (<City>, <State Abbr><Zip>): ', (answer) => {
                                generalInfoArray.push(answer);
                               rl.question('Invoice Company Name: ', (answer) => {
                                   generalInfoArray.push(answer);
                                   rl.question('Invoice Street Address: ', (answer) => {
                                       generalInfoArray.push(answer);
                                       rl.question('Invoice City, State, Zip (<City>, <State Abbr><Zip>): ', (answer) => {
                                            generalInfoArray.push(answer);
                                           rl.close();
                                           invoice.generalInfo.push({
                                               "invoiceNumber": generalInfoArray[0],
                                               "invoiceDate": generalInfoArray[1],
                                               "paymentDueDate": generalInfoArray[2],
                                               "customerName": generalInfoArray[3],
                                               "customerCompanyName": generalInfoArray[4],
                                               "customerStreetAddress": generalInfoArray[5],
                                               "customerCityStateZip": generalInfoArray[6],
                                               "invoiceCompanyName": generalInfoArray[7],
                                               "invoiceStreetAddress": generalInfoArray[8],
                                               "invoiceCityStateZip": generalInfoArray[9],
                                            });
                                           console.log("General Invoice Information Stored");
                                           fillCompanyDetails();
                                        });
                                    });
                               });
                            });
                        });
                    });
                });
            });
       });
   });
}
This function is called "fillCompanyDetails" to collect information about the company to populate the second table in the Workbook:
function fillCompanyDetails() {
   console.log("-----------------------\nFill in CompanyDetails\n-----------------------")
   const rl = readline.createInterface({
       input: process.stdin,
       output: process.stdout
   });
   var companyDetailsArray = []
   rl.question('Your Name: ', (answer) => {
       companyDetailsArray.push(answer);
       rl.question('Company Name: ', (answer) => {
            companyDetailsArray.push(answer);
            rl.question('Address Line 1: ',(answer) => {
               companyDetailsArray.push(answer);
                rl.question('Address Line 2: ',(answer) => {
                   companyDetailsArray.push(answer);
                    rl.question('Address Line3: ', (answer) => {
                       companyDetailsArray.push(answer);
                        rl.question('AddressLine 4: ', (answer) => {
                           companyDetailsArray.push(answer);
                           rl.question('Address Line 5: ', (answer) => {
                               companyDetailsArray.push(answer);
                               rl.question('Phone: ', (answer) => {
                                   companyDetailsArray.push(answer);
                                   rl.question('Facsimile: ', (answer) => {
                                       companyDetailsArray.push(answer);
                                        rl.question('Website: ', (answer)=> {
                                           companyDetailsArray.push(answer);
                                           rl.question('Email: ', (answer) => {
                                                companyDetailsArray.push(answer);
                                               rl.question('Currency Abbreviation: ', (answer) => {
                                                   companyDetailsArray.push(answer);
                                                    rl.question('Beneficiary: ',(answer) => {
                                                       companyDetailsArray.push(answer);
                                                       rl.question('Bank: ', (answer) => {
                                                            companyDetailsArray.push(answer);
                                                           rl.question('Bank Address: ', (answer) => {
                                                               companyDetailsArray.push(answer);
                                                               rl.question('Account Number: ', (answer) => {
                                                                   companyDetailsArray.push(answer);
                                                                    rl.question('RoutingNumber: ', (answer) => {
                                                                       companyDetailsArray.push(answer);
                                                                       rl.question('Make Checks Payable To: ', (answer) => {
                                                                           companyDetailsArray.push(answer);
                                                                            rl.close();
                                                                           invoice.companyDetails.push({
                                                                               "yourName": companyDetailsArray[0],
                                                                               "companyName": companyDetailsArray[1],
                                                                               "addressLine1": companyDetailsArray[2],
                                                                               "addressLine2": companyDetailsArray[3],
                                                                               "addressLine3": companyDetailsArray[4],
                                                                               "addressLine4": companyDetailsArray[5],
                                                                               "addressLine5": companyDetailsArray[6],
                                                                                "phone":companyDetailsArray[7],
                                                                               "facsimile": companyDetailsArray[8],
                                                                                "website":companyDetailsArray[9],
                                                                               "email": companyDetailsArray[10],
                                                                               "currencyAbbreviation":companyDetailsArray[11],
                                                                               "beneficiary": companyDetailsArray[12],
                                                                               "bank":companyDetailsArray[13],
                                                                               "bankAddress": companyDetailsArray[14],
                                                                               "accountNumber": companyDetailsArray[15],
                                                                               "routingNumber": companyDetailsArray[16],
                                                                               "payableTo": companyDetailsArray[17]
                                                                           });
                                                                           console.log("Invoice Company Information Stored");
                                                                            console.log("-----------------------\nFillin Invoice Items\n-----------------------")
                                                                           fillInvoiceItemsInformation();
                                                                        });
                                                                   });
                                                               });
                                                           });
                                                       });
                                                   });
                                               });
                                            });
                                        });
                                    });
                                });
                            });
                        });
                    });
                });
            });
       });
   });
}
Now that we have the basic information of the user, we can concentrate on collecting a single item and name it "fillInvoiceItemsInformation" function. Before each project is executed, we will ask the user whether to add a project. If they continue to enter "y", we will collect information about the project and ask again until they type "n":
function fillInvoiceItemsInformation() {
   const rl = readline.createInterface({
       input: process.stdin,
       output: process.stdout
   });
   var invoiceItemArray = [];
   rl.question('Add item?(y/n): ', (answer) => {
       switch (answer) {
            case "y":
               console.log("-----------------------\nEnter ItemInformation\n-----------------------");
                rl.question('Quantity: ',(answer) => {
                   invoiceItemArray.push(answer);
                    rl.question('Details: ',(answer) => {
                       invoiceItemArray.push(answer);
                        rl.question('UnitPrice: ', (answer) => {
                           invoiceItemArray.push(answer);
                           invoice.invoiceItems.push({
                               "quantity":invoiceItemArray[0],
                               "details": invoiceItemArray[1],
                               "unitPrice": invoiceItemArray[2]
                            });
                            console.log("ItemInformation Added");
                            rl.close();
                           fillInvoiceItemsInformation();
                        });
                    });
                });
                break;
            case "n":
               rl.close();
                return fillExcelFile();
                break;
            default:
                console.log("Incorrectoption, Please enter 'y' or 'n'.");
       }
   });
}
5, Fill in your Excel file
After collecting all the necessary user information, we can fill it in the Excel file:
function fillExcelFile() {
   console.log("-----------------------\nFilling in Excelfile\n-----------------------");
   fillBillingInfo();
   fillCompanySetup();
}
function fillBillingInfo() {
   var sheet = wb.getSheet(0);
   sheet.getCell(0, 2).value(invoice.generalInfo[0].invoiceNumber);
   sheet.getCell(1, 1).value(invoice.generalInfo[0].invoiceDate);
   sheet.getCell(2, 2).value(invoice.generalInfo[0].paymentDueDate);
   sheet.getCell(3, 1).value(invoice.generalInfo[0].customerName);
   sheet.getCell(4, 1).value(invoice.generalInfo[0].customerCompanyName);
   sheet.getCell(5, 1).value(invoice.generalInfo[0].customerStreetAddress);
   sheet.getCell(6, 1).value(invoice.generalInfo[0].customerCityStateZip);
   sheet.getCell(3, 3).value(invoice.generalInfo[0].invoiceCompanyName);
   sheet.getCell(4, 3).value(invoice.generalInfo[0].invoiceStreetAddress);
   sheet.getCell(5, 3).value(invoice.generalInfo[0].invoiceCityStateZip);
}
function fillCompanySetup() {
   var sheet = wb.getSheet(1);
   sheet.getCell(2, 2).value(invoice.companyDetails[0].yourName);
   sheet.getCell(3, 2).value(invoice.companyDetails[0].companyName);
   sheet.getCell(4, 2).value(invoice.companyDetails[0].addressLine1);
   sheet.getCell(5, 2).value(invoice.companyDetails[0].addressLine2);
   sheet.getCell(6, 2).value(invoice.companyDetails[0].addressLine3);
   sheet.getCell(7, 2).value(invoice.companyDetails[0].addressLine4);
   sheet.getCell(8, 2).value(invoice.companyDetails[0].addressLine5);
   sheet.getCell(9, 2).value(invoice.companyDetails[0].phone);
   sheet.getCell(10, 2).value(invoice.companyDetails[0].facsimile);
   sheet.getCell(11, 2).value(invoice.companyDetails[0].website);
   sheet.getCell(12, 2).value(invoice.companyDetails[0].email);
   sheet.getCell(13, 2).value(invoice.companyDetails[0].currencyAbbreviation);
   sheet.getCell(14, 2).value(invoice.companyDetails[0].beneficiary);
   sheet.getCell(15, 2).value(invoice.companyDetails[0].bank);
   sheet.getCell(16, 2).value(invoice.companyDetails[0].bankAddress);
   sheet.getCell(17, 2).value(invoice.companyDetails[0].accountNumber);
   sheet.getCell(18, 2).value(invoice.companyDetails[0].routingNumber);
   sheet.getCell(19, 2).value(invoice.companyDetails[0].payableTo);
}
In order to prevent users from adding more rows than the maximum number of rows in the worksheet, we can automatically add more rows to the worksheet. Before setting the items in the form in the array, add rows by default:
function fillInvoiceItems() {
   var sheet = wb.getSheet(0);
   var rowsToAdd = 0;
   if (invoice.invoiceItems.length > 15) {
       rowsToAdd = invoice.invoiceItems.length - 15;
       sheet.addRows(22, rowsToAdd);
   }
   var rowIndex = 8;
   if (invoice.invoiceItems.length >= 1) {
       for (var i = 0; i < invoice.invoiceItems.length; i++) {
            sheet.getCell(rowIndex,1).value(invoice.invoiceItems.quantity);
            sheet.getCell(rowIndex,2).value(invoice.invoiceItems.details);
            sheet.getCell(rowIndex,3).value(invoice.invoiceItems.unitPrice);
            rowIndex++;
       }
   }
}
6, Remove the document content from node JS export to Excel file
After filling in the information in the workbook, we can export the workbook to an Excel file. To do this, we will use the Excel IO open function. In this case, just enter the date into the file name:
function exportExcelFile() {
   excelIO.save(wb.toJSON(), (data) => {
       fs.appendFileSync('Invoice' + new Date().valueOf() + '.xlsx', newBuffer(data), function (err) {
            console.log(err);
       });
       console.log("Export success");
   }, (err) => {
       console.log(err);
   }, { useArrayBuffer: true });
}
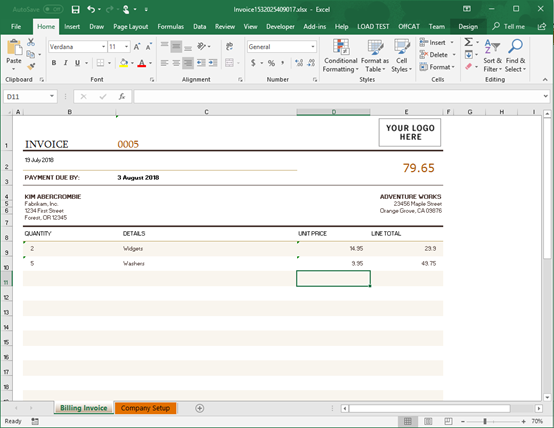
The completed documents will be as follows:
The above is the whole content of the first article "generating Excel spreadsheet from server (Node.js+SpreadJS)". In order to meet the requirements of batch binding data sources and exporting excel, batch modifying a large number of Excel contents and styles, batch printing at the server and generating PDF documents, we provide more mature official means: SpreadJS + GcExcel , this scheme provides better performance than node JS + spreadjs has better performance and stability, which is the main content of our next article generating Excel spreadsheet from server (GcExcel + SpreadJS). Please look forward to it.