This paper follows the above Build spring cloud alibaba microservice large application framework from 0 to 1 (III) (Mini cloud) build authentication service (authentication / resource separation version) oauth2.0 (Part I)
It still introduces the construction details of the certification center
1. Process introduction
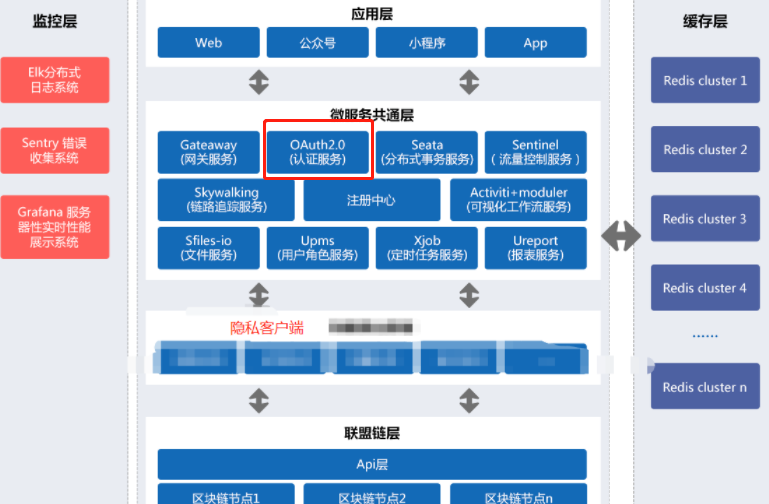
The overall process is described above and the following environments are completed

##1. Create authentication center service ✔
##2. Integrate the authentication center service into the spring cloud nacos registry ✔
##3. Select oauth2 authentication mode, separate authentication server and resource server, and design sinking resource side authentication mode ✔
##4. Build oauth2 client authentication according to the official memory authentication demo of spring ✔
##5. Add a test service module and integrate it into spring cloud nacos ✔
##6. The test service performs authentication test as a resource server ✔
##7. Bring the configuration file parameters into the nacos configuration center for management
##8. Change the in memory authentication to the actual redis and client detail, and the userdetail is obtained from the database
##9. Change the demo permission authentication to dynamically verify the permissions according to the current login user role
##10. Extract the common part between the authentication server and the resource server and change it to common module
Content covered in this article
Today, we will mainly introduce the following 7, 8 and 9 links. 10 will be taken as a common extraction and will be taken as a reconstruction article separately
The process of this paper is divided in detail
##7. Bring the configuration file parameters into the nacos configuration center for management
 ###7.1 why should it be included in the nacos configuration center for management
 ###7.2 spring cloud nacos configuration center interaction process
 ###7.3 description of local environment configuration file
 ###7.4 create nacos configuration center, create common configuration and environment configuration file corresponding to each service
 ###7.5 distinguish which are common configurations and put them into the nacos common file
 ###7.6 put the independent configuration of each service into the nacos configuration file of their corresponding environment
 ###7.7 start each service test
 ##8. Change the in memory authentication to the actual redis and client detail, and the userdetail is obtained from the database
 ###8.1 how to build a multi-level cluster of redis single machine and how to access the project
 ###8.2 integrating and using the persistence layer framework fluent mybatis
 ###8.3 create upms user unified authority management center service and develop user query interface
 ###8.4 integrate feign remote calling interface and feign related permission settings
 ###8.5 change the tokenStore mode from InMemory to redis
 ###8.6 change clientdetail from InMemory mode to persistent mode
 ###8.7 change userdetail from InMemory mode to persistent mode

##9. The authority authentication is changed to dynamically verify the authority according to the current login user role
 ###9.1 what is dynamic permission verification
 ###9.2 dynamic verification process of permission system
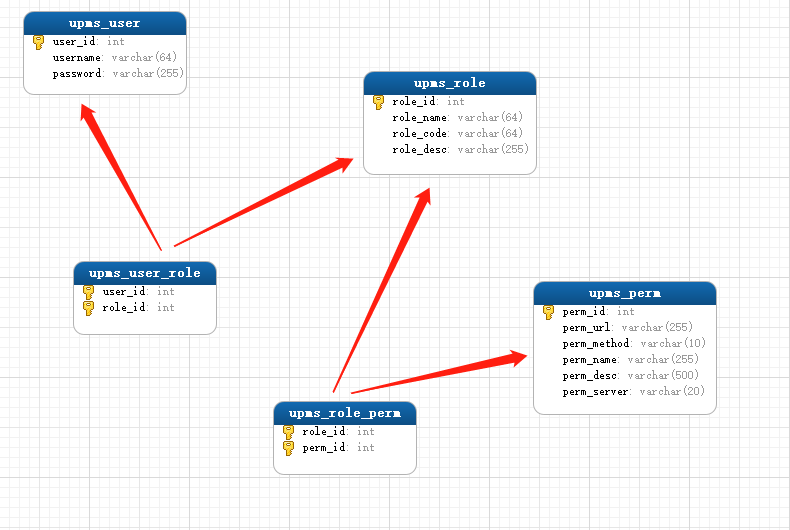
 ###9.3 create permission association table
 ###9.4 permission matching and interception
 ###9.5 unit test data and test
OK, let's explain them one by one according to the process
2. Bring the configuration file parameters into the nacos configuration center for management
2.1 why should it be included in the nacos configuration center for management
All our current configurations are written locally yml gets the in properties, although it can distinguish multiple environment settings, such as
-dev.yml,-test.yml,-prod.yml can be packaged into corresponding configuration jar s or wars during packaging, which is generally possible. However, if it is some variables that may need dynamic changes, it is not as good as some black-and-white lists that are not under database management, middleware expansion or ip changes. If it is too troublesome to package again during each modification, the concept of configuration center should be introduced, Bring the configuration of the corresponding environment into the configuration center management. If it is eureka, it can be git or apollo. This paper is developed in the nacos system and uses nacos
2.2 spring cloud nacos configuration center interaction process
Logical interaction flow chart
Simply draw a logical cross Hu flow chart
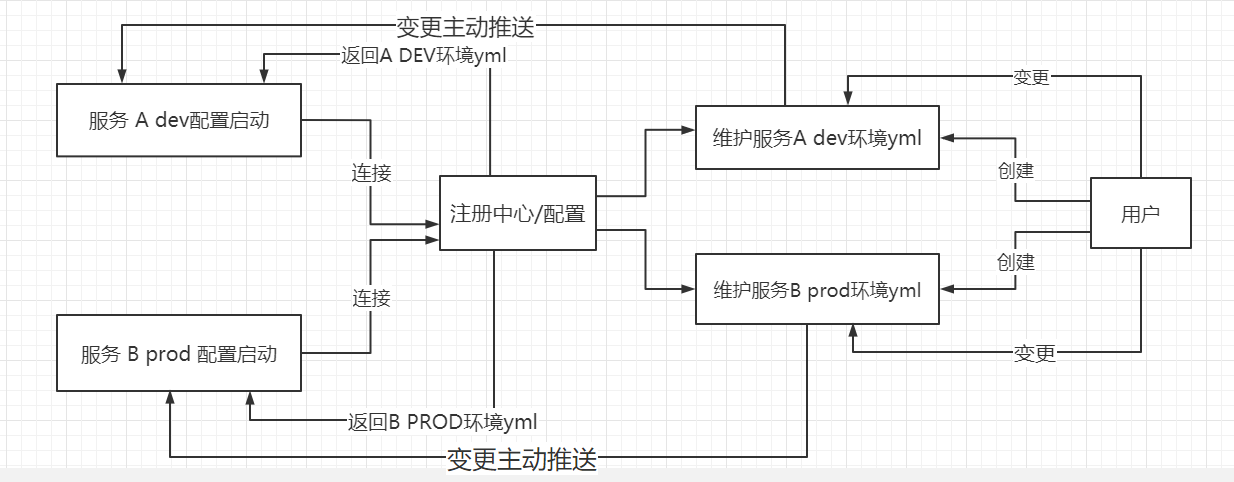
Brief sequence description: there will be a detailed description and screenshot of each step later
1. First, nacos configuration center} creates the startup environment file specified by services A and B
2. If A and B are started and connected to the nacos configuration center, the configuration file content corresponding to their respective environments will be obtained automatically
3. If a user makes a modification to a configuration, the modification will be actively pushed to the corresponding connection application
2.3 create local dev environment configuration file
In this paper, we only manage nacos for the local configuration of the certification center, and other applications are also put into nacos by default, so it is not superfluous to describe
First, let's take a look at the local configuration structure of our certification center
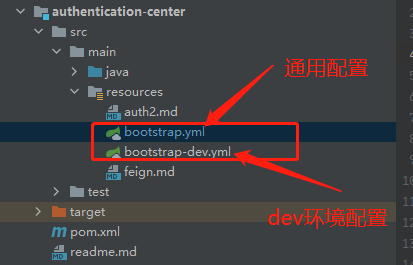
There is basically no configuration in our general. At present, they are directly placed in dev. the configuration of dev.yml is as follows
server:
  port: 8800

spring:
  application:
    name: @artifactId@
  cloud:
    nacos:
      discovery:
        server-addr: ${NACOS_HOST:127.0.0.1}:${NACOS_PORT:8848}
      config:
        server-addr: ${spring.cloud.nacos.discovery.server-addr}
        file-extension: yml
        shared-configs:
          - application-${spring.profiles.active}.${spring.cloud.nacos.config.file-extension}
  profiles:
    active: @profiles.active@
  datasource:
    type: com.alibaba.druid.pool.DruidDataSource
    #    driver-class-name: com.mysql.jdbc.Driver
    url: jdbc:mysql://${MYSQL_HOST:192.168.1.59}:${MYSQL_PORT:3306}/${MYSQL_DB:mini_cloud_auth}?characterEncoding=utf8&zeroDateTimeBehavior=convertToNull&useSSL=false&useJDBCCompliantTimezoneShift=true&useLegacyDatetimeCode=false&serverTimezone=GMT%2B8&allowMultiQueries=true&allowPublicKeyRetrieval=true
    username: root
    password: root
    driver-class-name: com.mysql.cj.jdbc.Driver
    druid:
      #   Druid data source configuration
      # Number of initial connections
      initialSize: 5
      # Minimum number of connection pools
      minIdle: 10
      # Maximum number of connection pools
      maxActive: 20
      # Configure the timeout time for getting connections
      maxWait: 60000
      # How often is the configuration interval detected? Idle connections that need to be closed are detected in milliseconds
      timeBetweenEvictionRunsMillis: 60000
      # Configure the minimum lifetime of a connection in the pool, in milliseconds
      minEvictableIdleTimeMillis: 300000
      # Configure the maximum lifetime of a connection in the pool, in milliseconds
      maxEvictableIdleTimeMillis: 900000
      # The configuration detects whether the connection is valid
      validationQuery: SELECT 1
      #Check when applying for connection. If the idle time is greater than timebetween evictionrunsmillis, execute validationQuery to check whether the connection is valid.
      testWhileIdle: true
      #Configure whether to check the validity of the connection when obtaining the connection from the connection pool. true is checked every time; false do not check. This configuration will reduce performance.
      testOnBorrow: false
      #Configure whether to check the validity of the connection when returning the connection to the connection pool. If true, check it every time; false do not check. This configuration will reduce performance.
      testOnReturn: false
      #Open pscache and specify the size of pscache on each connection
      poolPreparedStatements: true
      maxPoolPreparedStatementPerConnectionSize: 20
      #   Configure the filters for monitoring statistics interception. After removing the filters, the sql in the monitoring interface cannot be counted, and 'wall' is used for firewall
      #Merge monitoring data of multiple druiddatasources
      useGlobalDataSourceStat: true
      #Use the connectProperties property to open the mergesql function and open the sqlsql record
      connectionProperties: druid.stat.mergeSql=true;druid.stat.slowSqlMillis=500;

  feign:
    sentinel:
      enabled: true
    okhttp:
      enabled: true
    httpclient:
      enabled: false
    client:
      config:
        default:
          connectTimeout: 100000
          readTimeout: 100000

  redis:
    mode: sentinel
    password: 123456
    sentinel:
      master: local-master
      nodes:
        - 192.168.1.177:26379
        - 192.168.1.177:26380
        - 192.168.1.177:26381
    lettuce:
      pool:
        max-active: 10
        max-wait: -1
        max-idle: 5
        min-idle: 1
    database: 7
2.4 create nacos configuration center, create common configuration and environment configuration file corresponding to each service
Let's start the nacos registry first

Browser input http://localhost:8848/nacos Enter the nacos configuration center
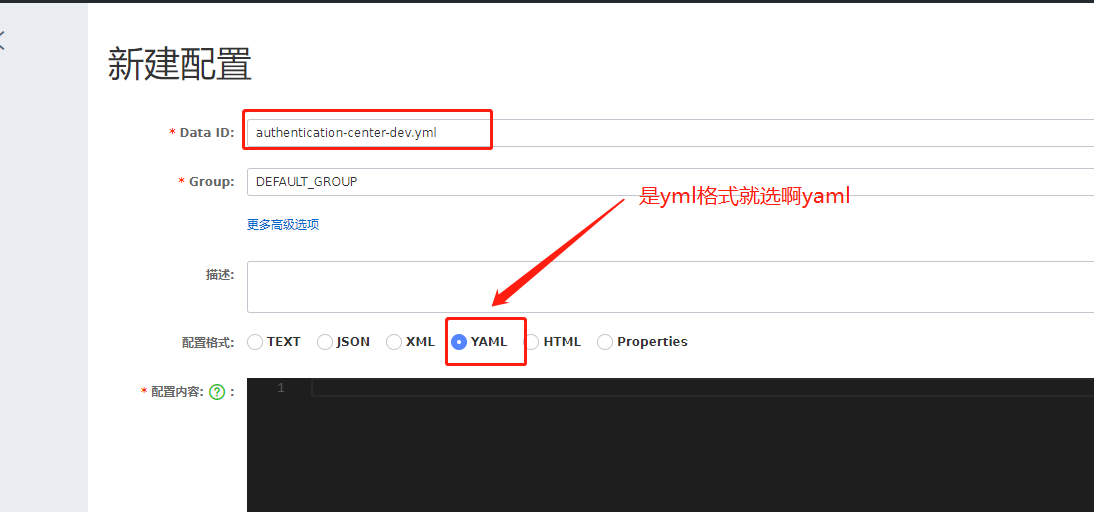
2.4.1 naming rules for creating Nacos configuration center files
I want to create the configuration file of the dev environment of the certification authority
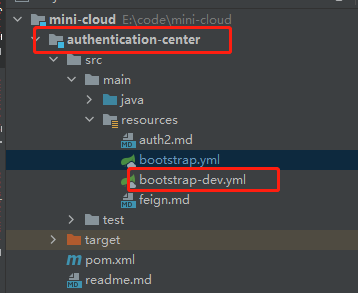
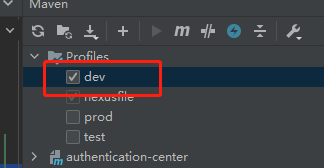
So name servername + env YML, as shown in the figure

2.4.2 # which configurations cannot be put into the nacos configuration center
The following figure of the previous configuration file must be in the local configuration file, because the configuration content can be obtained only after nacos is connected after startup
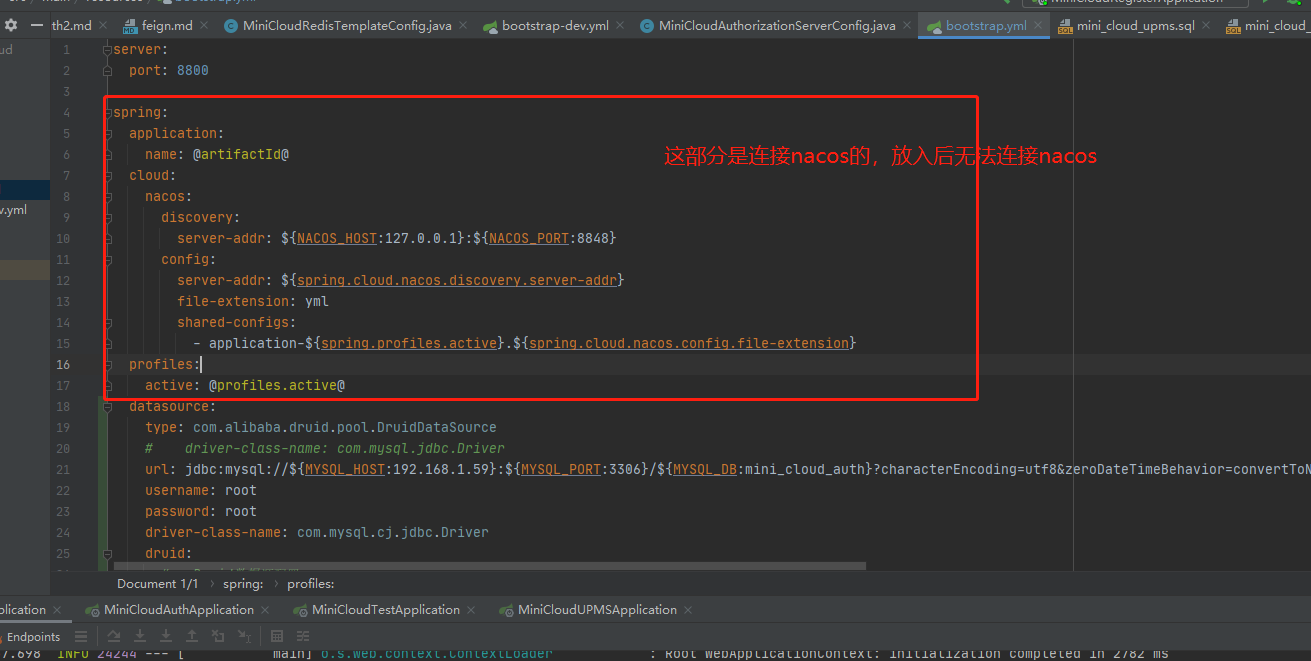
We move the other parts into nacos and pay attention to spring: don't leave this behind
| authentication-center-dev.yml |
server:
  port: 8800

spring:
  datasource:
    type: com.alibaba.druid.pool.DruidDataSource
    #    driver-class-name: com.mysql.jdbc.Driver
    url: jdbc:mysql://${MYSQL_HOST:192.168.1.59}:${MYSQL_PORT:3306}/${MYSQL_DB:mini_cloud_auth}?characterEncoding=utf8&zeroDateTimeBehavior=convertToNull&useSSL=false&useJDBCCompliantTimezoneShift=true&useLegacyDatetimeCode=false&serverTimezone=GMT%2B8&allowMultiQueries=true&allowPublicKeyRetrieval=true
    username: root
    password: root
    driver-class-name: com.mysql.cj.jdbc.Driver
    druid:
      #   Druid data source configuration
      # Number of initial connections
      initialSize: 5
      # Minimum number of connection pools
      minIdle: 10
      # Maximum number of connection pools
      maxActive: 20
      # Configure the timeout time for getting connections
      maxWait: 60000
      # How often is the configuration interval detected? Idle connections that need to be closed are detected in milliseconds
      timeBetweenEvictionRunsMillis: 60000
      # Configure the minimum lifetime of a connection in the pool, in milliseconds
      minEvictableIdleTimeMillis: 300000
      # Configure the maximum lifetime of a connection in the pool, in milliseconds
      maxEvictableIdleTimeMillis: 900000
      # The configuration detects whether the connection is valid
      validationQuery: SELECT 1
      #Check when applying for connection. If the idle time is greater than timebetween evictionrunsmillis, execute validationQuery to check whether the connection is valid.
      testWhileIdle: true
      #Configure whether to check the validity of the connection when obtaining the connection from the connection pool. true is checked every time; false do not check. This configuration will reduce performance.
      testOnBorrow: false
      #Configure whether to check the validity of the connection when returning the connection to the connection pool. If true, check it every time; false do not check. This configuration will reduce performance.
      testOnReturn: false
      #Open pscache and specify the size of pscache on each connection
      poolPreparedStatements: true
      maxPoolPreparedStatementPerConnectionSize: 20
      #   Configure the filters for monitoring statistics interception. After removing the filters, the sql in the monitoring interface cannot be counted, and 'wall' is used for firewall
      #Merge monitoring data of multiple druiddatasources
      useGlobalDataSourceStat: true
      #Use the connectProperties property to open the mergesql function and open the sqlsql record
      connectionProperties: druid.stat.mergeSql=true;druid.stat.slowSqlMillis=500;

  feign:
    sentinel:
      enabled: true
    okhttp:
      enabled: true
    httpclient:
      enabled: false
    client:
      config:
        default:
          connectTimeout: 100000
          readTimeout: 100000

  #  redis:
  #    mode: sentinel
  #    password: 123456
  #    sentinel:
  #      master: local-master
  #      nodes:
  #        - 192.168.1.177:26379
  #        - 192.168.1.177:26380
  #        - 192.168.1.177:26381
  #    lettuce:
  #      pool:
  #        max-active: 10
  #        max-wait: -1
  #        max-idle: 5
  #        min-idle: 1
  #    database: 7
  #
  redis:
    mode: singleten
    host: 127.0.0.1
    port: 6379
    password: 123456
    database: 7
    lettuce:
      pool:
        max-active: 10
        max-wait: -1
        max-idle: 5
        min-idle: 1
2.5 distinguish which are common configurations and put them into the nacos common file

We can extract the common configuration for each dev environment and manage it as an application-dev.yml, as shown in the figure above
Because of the same environment, generally speaking, some configurations of various applications are the same, such as:
redis configuration
mq configuration
Distributed file system configuration
Monitoring configuration
Environment constant configuration
We extract redis as common, and delete the redis originally placed in authentication-center-dev.yml
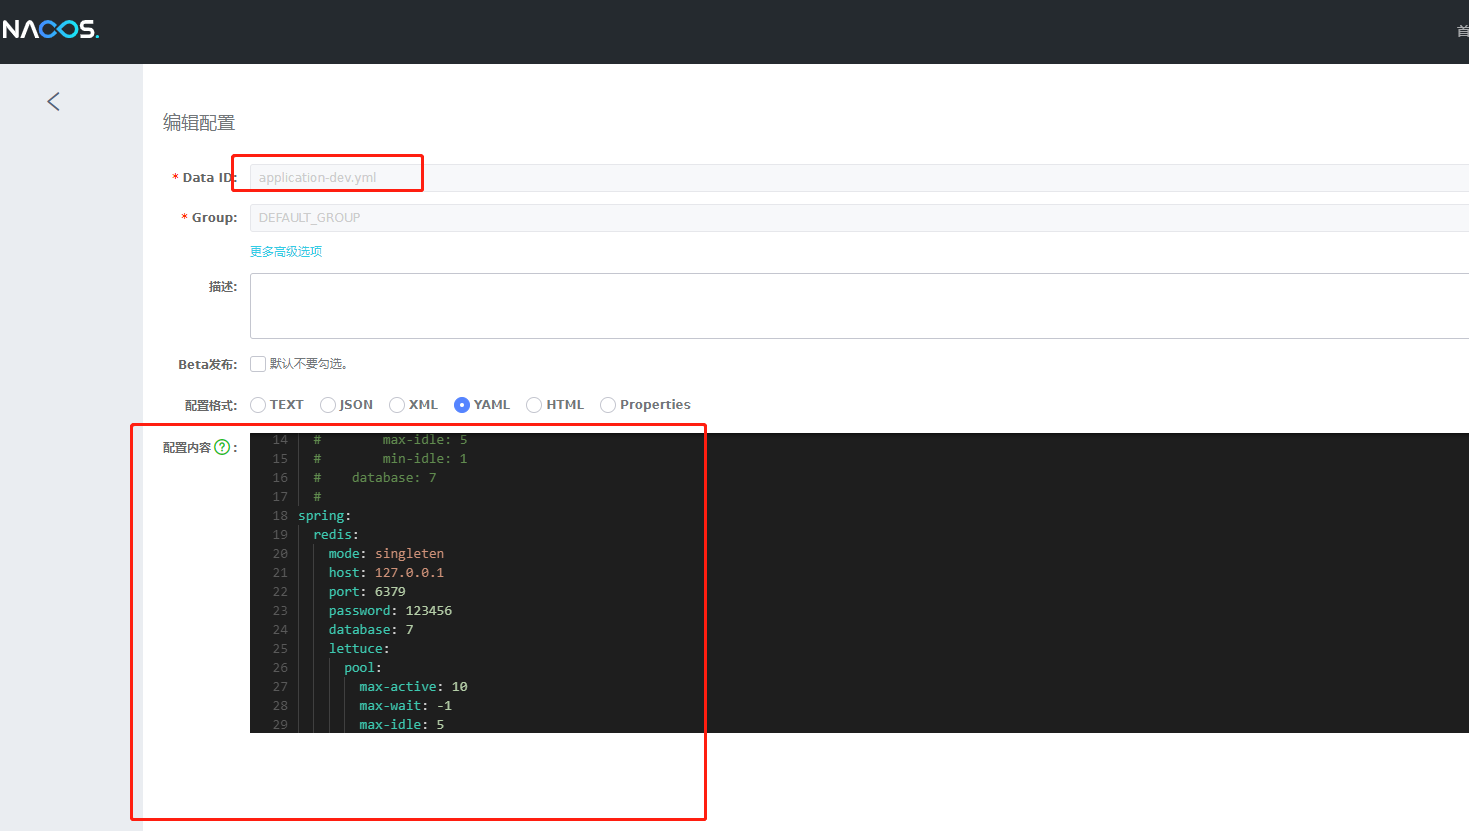
2.6 put the independent configuration of each service into the nacos configuration file of their corresponding environment
We do the same as above, creating authentication center test Dev and UPMS center biz dev.yml
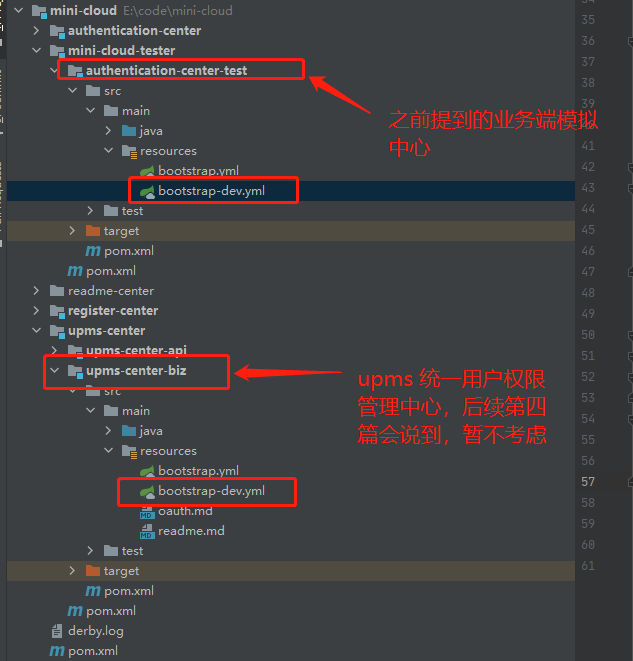
After being put into nacos management, the content changes are as follows
These profiles are available in nacos

The contents of the original local configuration file are as follows
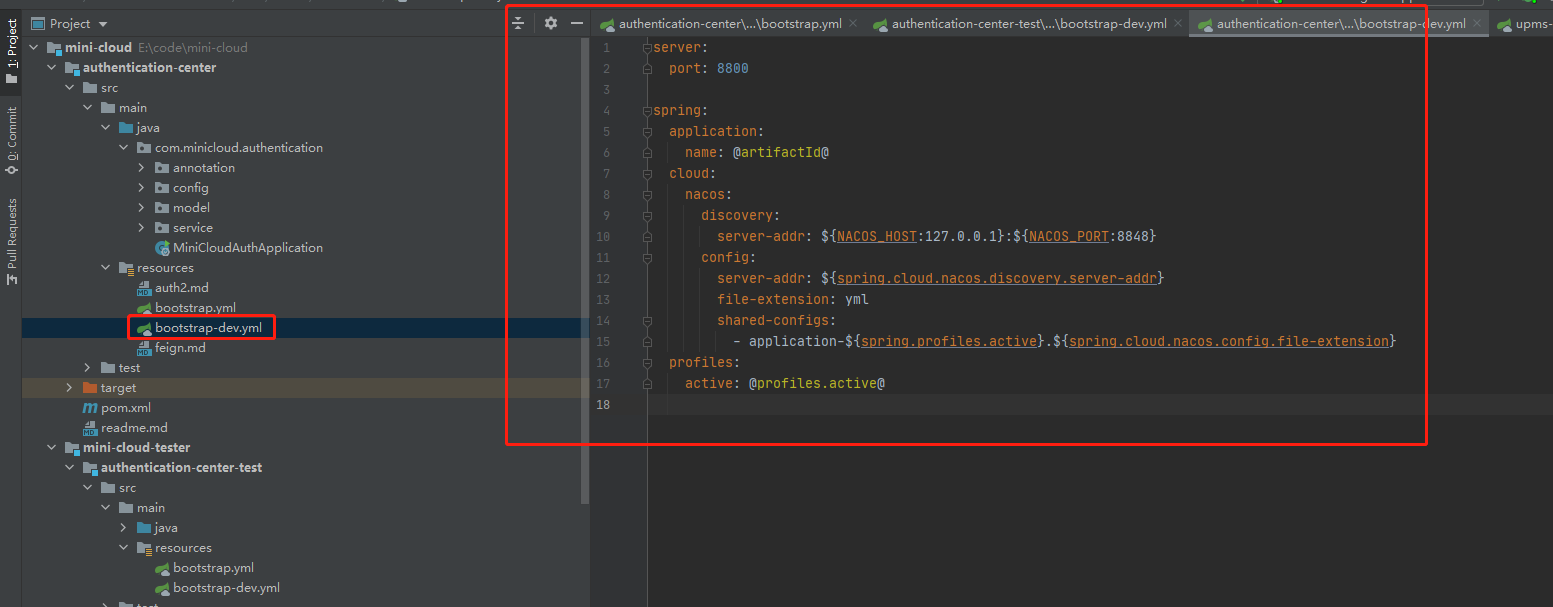
Does it look much simpler
2.7 start each service test
Let's start several services to see if there is no problem

It's all started. Let's go to nacos to see if the registration is successful

No problem
3. Change the in memory authentication to the actual redis and clientdetail, and the userdetail is obtained from the database
This section is the focus of this article, which changes the previous authentication processing from memory form to memory or database form in practical application
3.1 how to build a multi-level cluster of redis single machine and how to access the project
I use redis for caching. There are too many online related introductions, so I won't give a detailed description. You can integrate it yourself. Please refer to my previous articles
Docker compose building a single machine / multi machine redis sentinel cluster
3.2 integrating and using the persistence layer framework fluent mybatis
I choose fluent mybatis as my persistence layer, which mainly focuses on the automatic generation of mapper and the code implementation of all scenarios. There are many introductions on the Internet. You can integrate by yourself. Please refer to my previous articles
3.3 create upms user unified authority management center service and develop user query interface
upms module is the user unified authority management center in our mini cloud framework
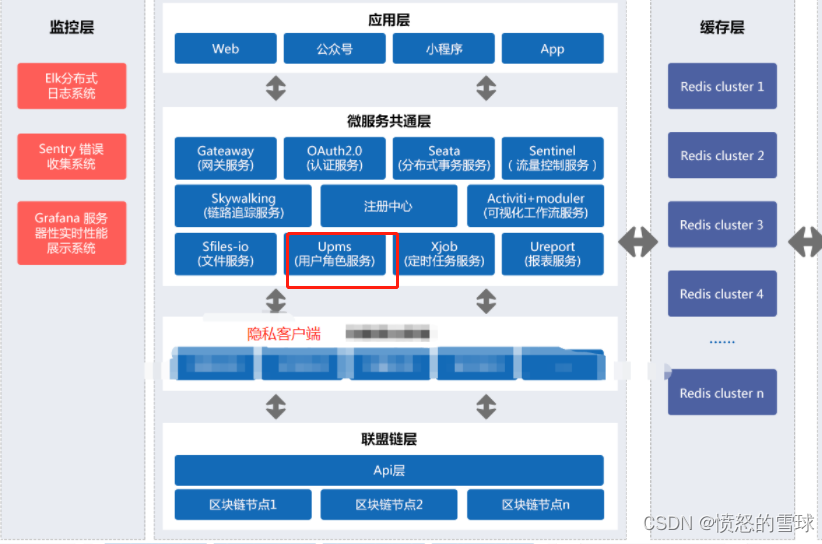
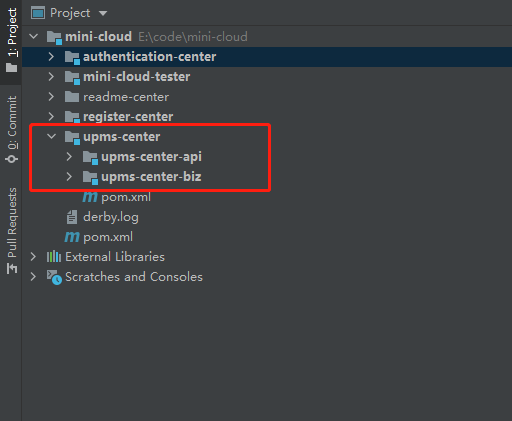
This article will not describe too much. There will be a separate introduction later. Here is a brief introduction
upm service mainly does two things:
1. It provides the management of users, roles and permissions.
2. A fegin interface is provided, which allows the authentication center to return user basic information, role information and permission information through fegin and user name
3.4 integrate feign remote calling interface and feign related permission settings
Please refer to my previous article spring cloud alibaba integration feign custom feign permission annotation an interface only allows feign to access all attached processes and codes
3.5 change the tokenStore mode from InMemory to redis
In the above, we integrated the tokenStore in the form of memory, that is to say, our login authentication information is saved in the local memory. It is certainly not possible for practical applications. We now integrate RedisTokenStore
position
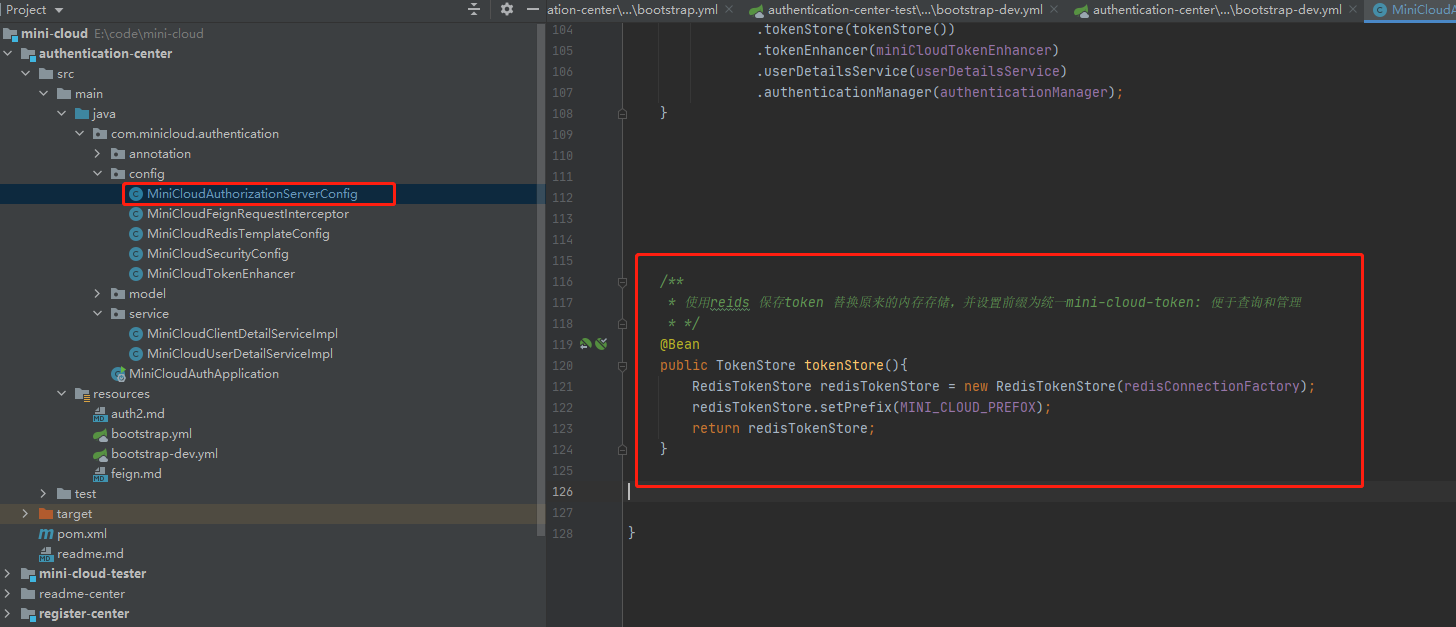
Added TokenStore bean
  /**
     * Use reids to save the token instead of the original memory storage, and set the prefix to unified Mini cloud token: it is convenient for query and management
     * */
    @Bean
    public TokenStore tokenStore(){
        RedisTokenStore redisTokenStore = new RedisTokenStore(redisConnectionFactory);
        redisTokenStore.setPrefix(MINI_CLOUD_PREFOX);
        return redisTokenStore;
    }
Then
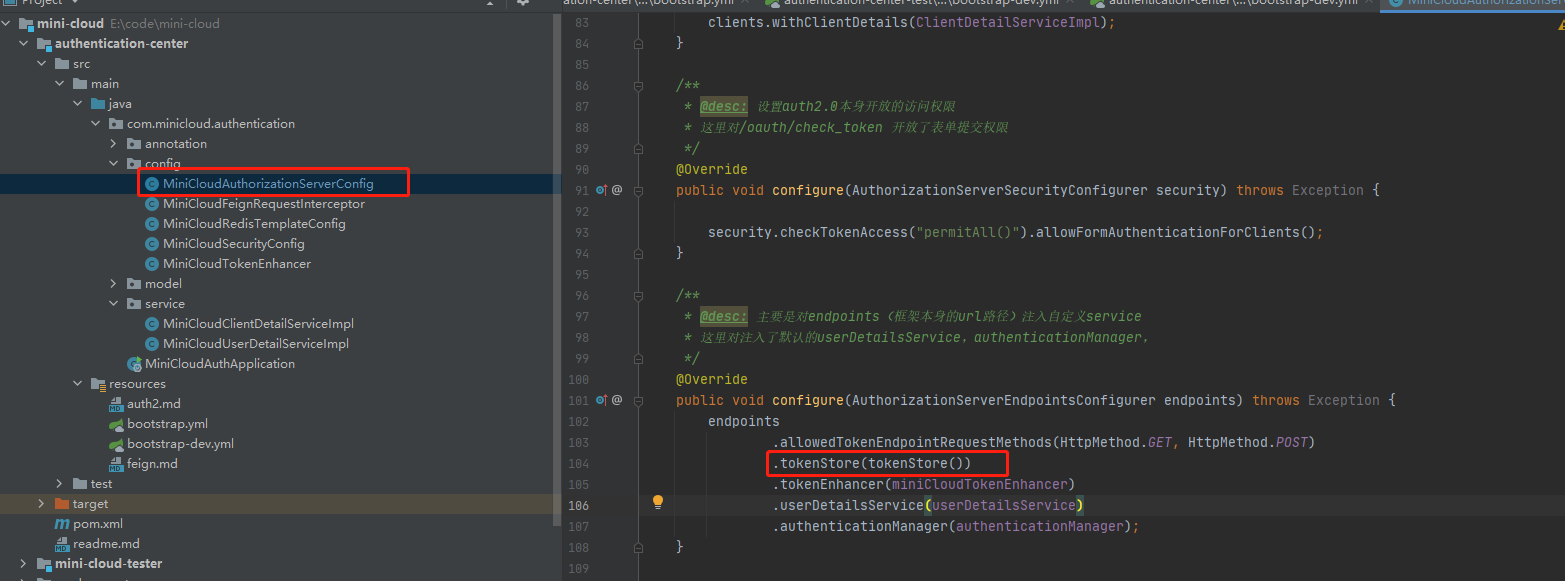
It's OK. Now visit and try to see if there will be token s stored in redis
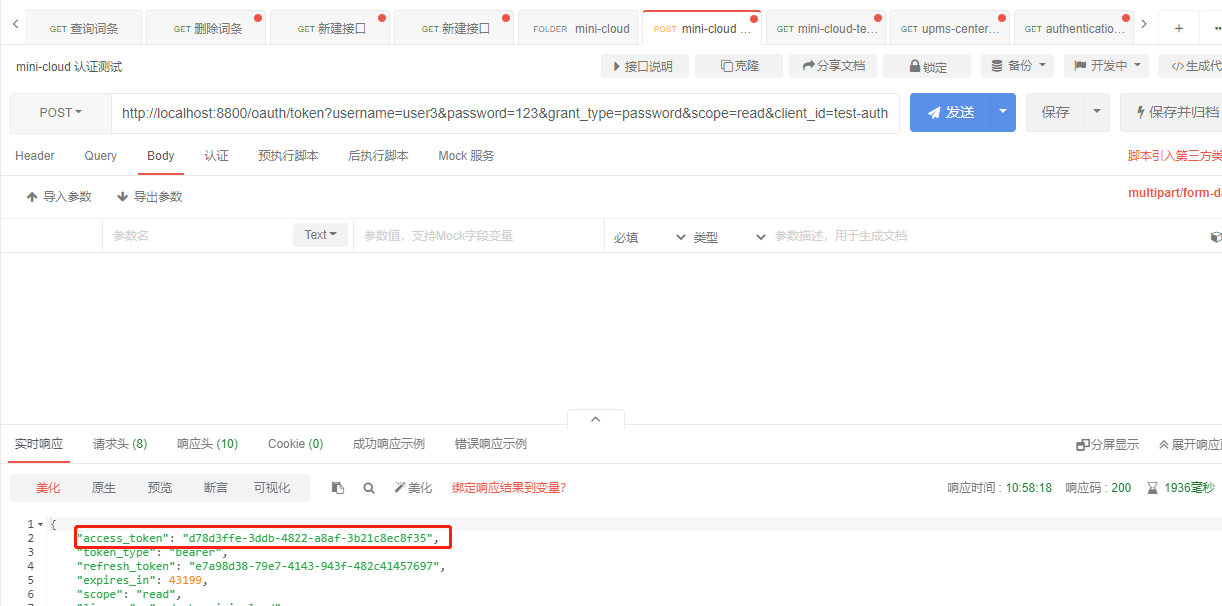
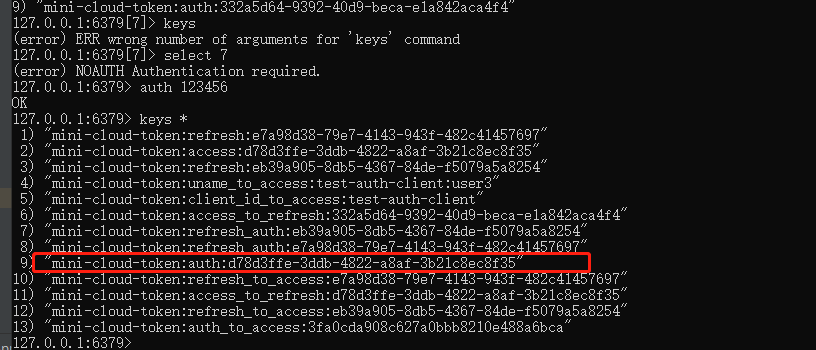
Confirm that you have entered redis
3.6 change clientdetail from InMemory mode to persistent mode
In the first part, we discuss the form of memory
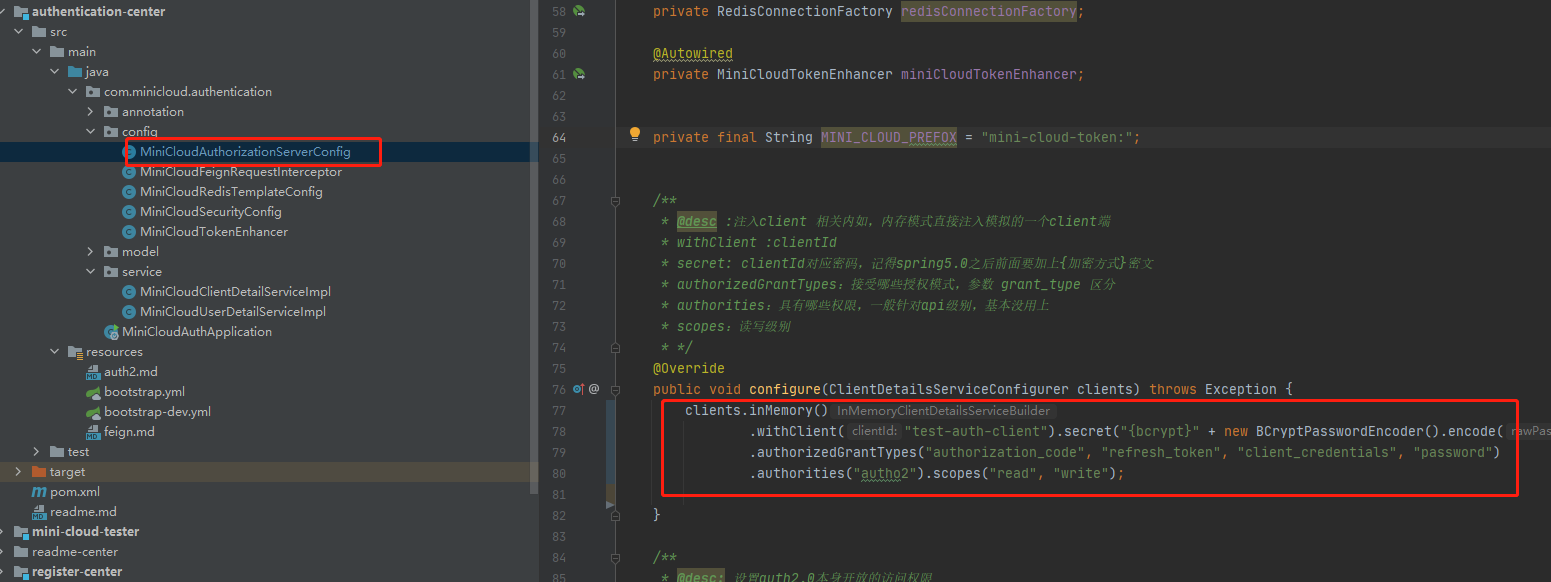
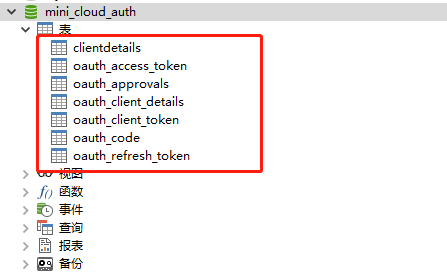
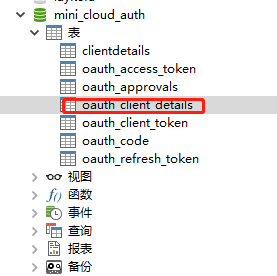
Specifically, we need to use our own service to handle the table structure involved in the service. We directly use the schema of the official website SQL create table
Specific address: https://github.com/spring-projects/spring-security-oauth/blob/master/spring-security-oauth2/src/test/resources/schema.sql
Create the corresponding database Mini of authentication center_ cloud_ Auth, the table structure after executing sql is as follows:
Then we connect the authentication center service to mini_cloud_auth library is specifically managed in the previous nacos
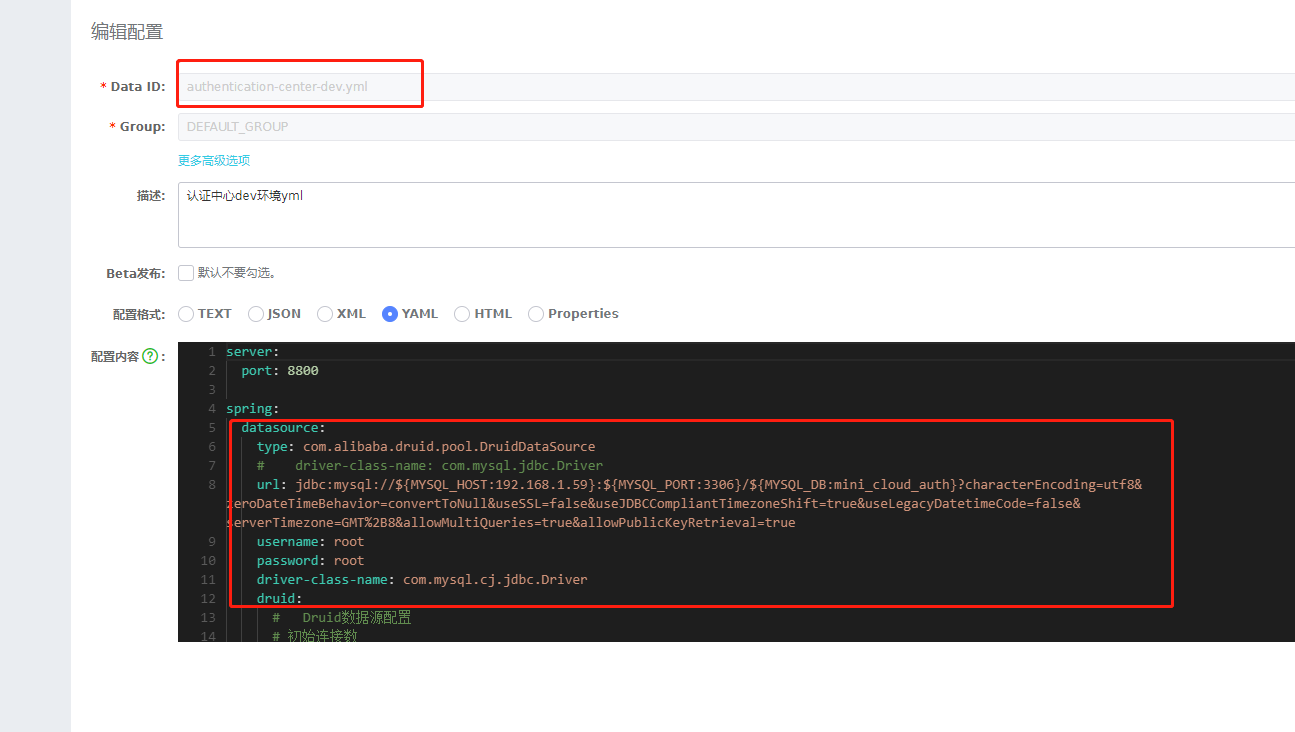
After connecting, try to start it. After no problem, we create our own clientService and the location
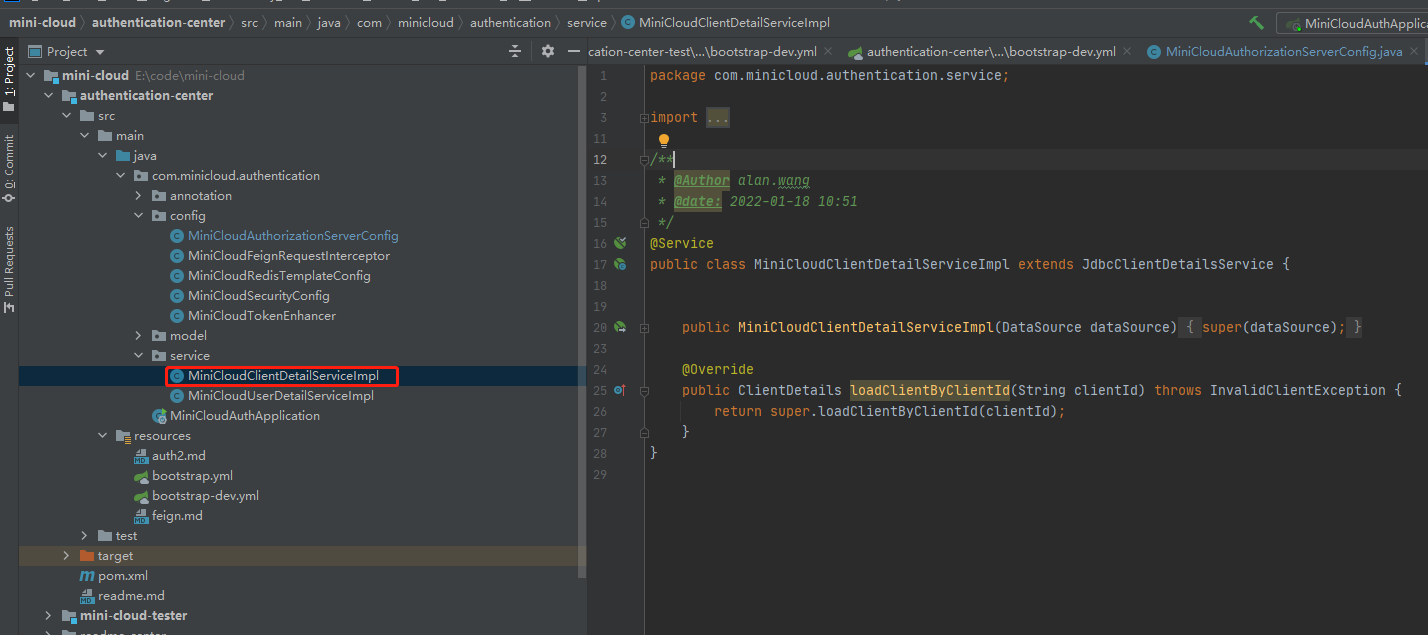
MiniCloudClientDetailServiceImpl.java
package com.minicloud.authentication.service;

import org.springframework.security.oauth2.common.exceptions.InvalidClientException;
import org.springframework.security.oauth2.provider.ClientDetails;
import org.springframework.security.oauth2.provider.ClientDetailsService;
import org.springframework.security.oauth2.provider.ClientRegistrationException;
import org.springframework.security.oauth2.provider.client.JdbcClientDetailsService;
import org.springframework.stereotype.Service;

import javax.sql.DataSource;

/**
 * @Author alan.wang
 * @date: 2022-01-18 10:51
 */
@Service
public class MiniCloudClientDetailServiceImpl extends JdbcClientDetailsService {


    public MiniCloudClientDetailServiceImpl(DataSource dataSource) {
        super(dataSource);
    }

    @Override
    public ClientDetails loadClientByClientId(String clientId) throws InvalidClientException {
        return super.loadClientByClientId(clientId);
    }
}
Replace the original memory form with

Adding a piece of data to the database can be consistent with the original memory data

3.7 change userdetail from InMemory mode to persistent mode
Original code
@Bean
    public UserDetailsService userDetailsService()   {
        InMemoryUserDetailsManager manager = new InMemoryUserDetailsManager();
        manager.createUser(User.builder().username("user1").password("{bcrypt}" + new BCryptPasswordEncoder().encode("123")).roles("USER").build());
        manager.createUser(User.builder().username("admin").password("{bcrypt}" + new BCryptPasswordEncoder().encode("123")).roles("USER", "ADMIN").build());
        return manager;
    }
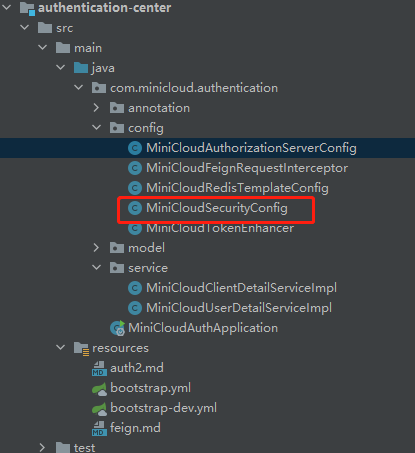
We create a new UserDetailsService
package com.minicloud.authentication.service;

import com.minicloud.authentication.model.MiniCloudGrantedAuthority;
import com.minicloud.authentication.model.MiniCloudUserDetails;
import com.minicloud.upms.perms.dto.UpmsPermDTO;
import com.minicloud.upms.user.dto.UpmsUserDTO;
import com.minicloud.upms.user.fegin.UpmsCenterRemoteUserService;
import org.springframework.security.core.userdetails.UserDetails;
import org.springframework.security.core.userdetails.UserDetailsService;
import org.springframework.security.core.userdetails.UsernameNotFoundException;
import javax.annotation.Resource;
import java.util.HashSet;
import java.util.List;
import java.util.Set;


/**
 * @Author alan.wang
 * @date: 2022-01-21 12:02
 * @desc: UserDetailsService Implementation class to implement user-defined userdetails query interface
 */
public class MiniCloudUserDetailServiceImpl implements UserDetailsService {

    @Resource
    private UpmsCenterRemoteUserService upmsCenterRemoteUserService;


    @Override
    public UserDetails loadUserByUsername(String username) throws UsernameNotFoundException {

        //Obtain user basic information, role and permission information through upms service
        UpmsUserDTO upmsUserDTO = upmsCenterRemoteUserService.queryUpmsUserByUsername(username);
        Set<UpmsPermDTO>  upmsPermDTOSet = new HashSet<>();
        List<UpmsPermDTO> upmsPermDTOSList = upmsUserDTO.getUpmsRoleDTOS().stream().map(upmsRoleDTO -> upmsRoleDTO.getUpmsPermDTOS()).reduce((result, upmsRoleDTOS) -> {
            result.addAll(upmsRoleDTOS);
            return result;
        }).get();
        upmsPermDTOSet.addAll(upmsPermDTOSList);

        //Adjust to custom GrantedAuthority
        List<MiniCloudGrantedAuthority> authorities = MiniCloudGrantedAuthority.loadAuthorities(upmsPermDTOSet);

        //Save the customized MiniCloudUserDetails into redisTokenStore
        MiniCloudUserDetails userDetails = new MiniCloudUserDetails(upmsUserDTO.getUserId(),upmsUserDTO.getUsername(), upmsUserDTO.getPassword(),authorities );
        return userDetails;
    }
}
The above code is mainly to obtain user information by calling findUserbyName of upms through feign, which will be described in detail later
Then the integration enters auth management

4. The authority authentication is changed to dynamically verify the authority according to the current login user role
4.1 what is dynamic permission verification
Dynamic permission verification generally refers to that each role has no access rights. For example, the administrator role can add ordinary user roles to the blacklist, and the roles are attached to each user. Generally, a user can have multiple user roles, and each role is bound with multiple permissions. It can be designed to query the roles and users according to the user account association when the user logs in, Then verify the access path
4.2 dynamic verification process of authority system

4.3 create permission association table
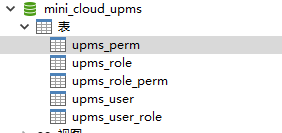
Simplest table structure
SET FOREIGN_KEY_CHECKS=0;

-- ----------------------------
-- Table structure for upms_perm
-- ----------------------------
CREATE TABLE `upms_perm` (
  `perm_id` int(6) NOT NULL AUTO_INCREMENT COMMENT 'Primary key',
  `perm_url` varchar(255) NOT NULL COMMENT 'jurisdiction url',
  `perm_method` varchar(10) NOT NULL COMMENT 'Request method: get,post,put,delete etc.',
  `perm_name` varchar(255) NOT NULL COMMENT 'Permission name',
  `perm_desc` varchar(500) DEFAULT NULL COMMENT 'Permission description',
  `perm_server` varchar(20) DEFAULT NULL COMMENT 'Affiliated services',
  PRIMARY KEY (`perm_id`)
) ENGINE=InnoDB AUTO_INCREMENT=45 DEFAULT CHARSET=utf8mb4;


-- ----------------------------
-- Table structure for upms_role
-- ----------------------------
CREATE TABLE `upms_role` (
  `role_id` int(11) NOT NULL AUTO_INCREMENT COMMENT 'Primary key',
  `role_name` varchar(64) DEFAULT NULL COMMENT 'Role name',
  `role_code` varchar(64) DEFAULT NULL COMMENT 'role code',
  `role_desc` varchar(255) DEFAULT NULL COMMENT 'Role description',
  PRIMARY KEY (`role_id`)
) ENGINE=InnoDB AUTO_INCREMENT=36 DEFAULT CHARSET=utf8mb4;


-- ----------------------------
-- Table structure for upms_role_perm
-- ----------------------------
CREATE TABLE `upms_role_perm` (
  `role_id` int(11) NOT NULL DEFAULT '0' COMMENT 'role id',
  `perm_id` int(5) NOT NULL COMMENT 'jurisdiction url',
  PRIMARY KEY (`role_id`,`perm_id`)
) ENGINE=InnoDB DEFAULT CHARSET=utf8mb4;

-- ----------------------------
-- Table structure for upms_user
-- ----------------------------
CREATE TABLE `upms_user` (
  `user_id` int(11) NOT NULL AUTO_INCREMENT COMMENT 'Primary key ID',
  `username` varchar(64) DEFAULT NULL COMMENT 'user name',
  `password` varchar(255) DEFAULT NULL COMMENT 'password',
  PRIMARY KEY (`user_id`)
) ENGINE=InnoDB AUTO_INCREMENT=39 DEFAULT CHARSET=utf8mb4;


-- ----------------------------
-- Table structure for upms_user_role
-- ----------------------------
CREATE TABLE `upms_user_role` (
  `user_id` int(11) NOT NULL COMMENT 'user ID',
  `role_id` int(11) NOT NULL COMMENT 'role ID',
  PRIMARY KEY (`user_id`,`role_id`),
  KEY `user_id` (`user_id`) USING BTREE
) ENGINE=InnoDB DEFAULT CHARSET=utf8mb4;
4.4 permission matching and interception
We combed our own development process in combination with 4.2 dynamic verification process of permission system
#1. First, we need to save the user information when logging in. This must be a subclass of UserDetails. We need to customize our own UserDetails. Because we want to verify permissions, it needs to include roles and permissions
#2. During verification, we need to obtain the role and permission of the current login user, match the url to be accessed, and verify whether to log in
First, we customize our own subclass of UserDetails containing roles and permissions
MiniCloudUserDetails.java
package com.minicloud.authentication.model;

import org.springframework.security.core.GrantedAuthority;
import org.springframework.security.core.SpringSecurityCoreVersion;
import org.springframework.security.core.userdetails.User;
import org.w3c.dom.stylesheets.LinkStyle;

import java.util.Collection;
import java.util.Collections;
import java.util.List;

/**
 * @Author alan.wang
 * @date: 2022-01-21 12:05
 * @desc: The data saved to oauth cache needs to be added if it carries custom attributes
 */
public class MiniCloudUserDetails  extends User  {

    private Integer id;
    private Collection<MiniCloudGrantedAuthority> miniCloudGrantedAuthorities;

    private static final long serialVersionUID = SpringSecurityCoreVersion.SERIAL_VERSION_UID;

    public MiniCloudUserDetails(Integer id,String username, String password, Collection<? extends GrantedAuthority> authorities) {
        super(username, password, Collections.EMPTY_LIST);
        this.id = id;
        this.miniCloudGrantedAuthorities = (Collection<MiniCloudGrantedAuthority>)authorities;
    }


    public MiniCloudUserDetails(Integer id,String username, String password, boolean enabled, boolean accountNonExpired, boolean credentialsNonExpired, boolean accountNonLocked, Collection<? extends GrantedAuthority> authorities) {
        super(username, password, enabled, accountNonExpired, credentialsNonExpired, accountNonLocked, Collections.EMPTY_LIST);
        this.id = id;
        this.miniCloudGrantedAuthorities = (Collection<MiniCloudGrantedAuthority>)authorities;
    }

    public Integer getId() {
        return id;
    }

    public Collection<MiniCloudGrantedAuthority> getMiniCloudGrantedAuthorities() {
        return miniCloudGrantedAuthorities;
    }

    public void setMiniCloudGrantedAuthorities(Collection<MiniCloudGrantedAuthority> miniCloudGrantedAuthorities) {
        this.miniCloudGrantedAuthorities = miniCloudGrantedAuthorities;
    }
}
Then we hope to use getauthentication() Getprincipal () gets our login information directly
For example:
MiniCloudUserDetails miniCloudUserDetails = (MiniCloudUserDetails)SecurityContextHolder.getContext().getAuthentication().getPrincipal();
The following steps are required
Customize TokenEnhancer to extend / OAuth / check_ map information returned by token
MiniCloudTokenEnhancer.java
package com.minicloud.authentication.config;

import com.minicloud.authentication.model.MiniCloudUserDetails;
import org.springframework.security.oauth2.common.DefaultOAuth2AccessToken;
import org.springframework.security.oauth2.common.OAuth2AccessToken;
import org.springframework.security.oauth2.provider.OAuth2Authentication;
import org.springframework.security.oauth2.provider.token.TokenEnhancer;
import org.springframework.stereotype.Component;

import java.util.HashMap;
import java.util.Map;

/**
 * @Author alan.wang
 * @date: 2022-01-25 15:06
 */
@Component
public class MiniCloudTokenEnhancer implements TokenEnhancer {

    /**
     * User defined basic information
     */
    private static final String DETAILS_USER = "user_info";
    /**
     * Client mode
     */
    private static final String CLIENT_CREDENTIALS  ="client_credentials";
    /**
     * Protocol field
     */
    private static final String DETAILS_LICENSE = "license";

    /**
     * The activation field is compatible with peripheral system access
     */
    private static final String ACTIVE = "active";

    /**
     * In the extended auth authentication, the map stores the token content, and the client mode does not handle it
     * */
    @Override
    public OAuth2AccessToken enhance(OAuth2AccessToken accessToken, OAuth2Authentication authentication) {
        if (CLIENT_CREDENTIALS.equals(authentication.getOAuth2Request().getGrantType())) {
            return accessToken;
        }

        final Map<String, Object> additionalInfo = new HashMap<>(8);
        MiniCloudUserDetails miniCloudUserDetails = (MiniCloudUserDetails) authentication.getUserAuthentication().getPrincipal();
        additionalInfo.put(DETAILS_USER, miniCloudUserDetails);
        additionalInfo.put(DETAILS_LICENSE, "made by mini-cloud");
        additionalInfo.put(ACTIVE, Boolean.TRUE);
        ((DefaultOAuth2AccessToken) accessToken).setAdditionalInformation(additionalInfo);
        return accessToken;
    }
}
The custom TokenEnhancer is integrated into the AuthorizationServerConfigurerAdapter
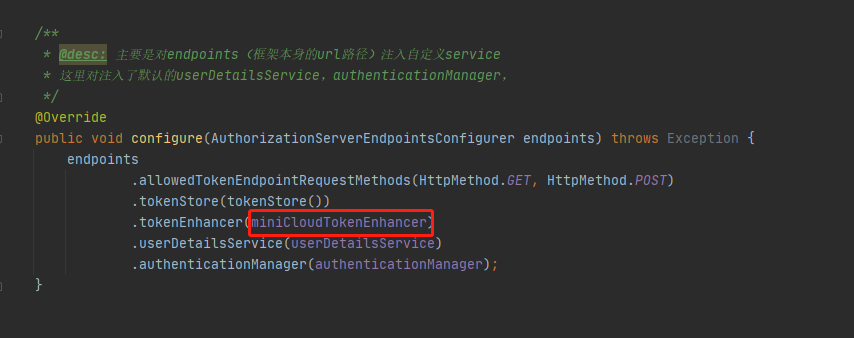
The custom UserAuthenticationConverter in the ResourceServerConfigurerAdapter resource service is spliced into custom userdetails
MiniCloudUserAuthenticationConverter.java
package com.minicloud.authentication.test.config;

import cn.hutool.core.map.MapUtil;
import com.minicloud.authentication.test.model.MiniCloudUserDetails;
import org.springframework.security.authentication.UsernamePasswordAuthenticationToken;
import org.springframework.security.core.Authentication;
import org.springframework.security.core.GrantedAuthority;
import org.springframework.security.core.authority.AuthorityUtils;
import org.springframework.security.oauth2.provider.token.UserAuthenticationConverter;
import org.springframework.util.StringUtils;

import java.util.Collection;
import java.util.LinkedHashMap;
import java.util.List;
import java.util.Map;
import java.util.stream.Collectors;

/**
 * @Author alan.wang
 * @date: 2022-01-25 13:59
 */
public class MiniCloudUserAuthenticationConverter implements UserAuthenticationConverter {


    /**
     * Not applicable mark, that is, the password is not given here
     * */
    private static final String N_A = "N/A";

    @Override
    public Map<String, ?> convertUserAuthentication(Authentication authentication) {
        Map<String, Object> response = new LinkedHashMap<>();
        response.put(USERNAME, authentication.getName());
        if (authentication.getAuthorities() != null && !authentication.getAuthorities().isEmpty()) {
            response.put(AUTHORITIES, AuthorityUtils.authorityListToSet(authentication.getAuthorities()));
        }
        return response;
    }

    /**
     *
     * Will check_ getPrincipal of OAuth2Authentication returned in token is rewritten as our own miniclouddetail
     * */
    @Override
    public Authentication extractAuthentication(Map<String, ?> responseMap) {
        if (responseMap.containsKey(USERNAME)) {
            Map<String, ?> map = MapUtil.get(responseMap, "user_info", Map.class);
            List<Map> authorities = MapUtil.get(map,"miniCloudGrantedAuthorities",List.class);
            List<MiniCloudGrantedAuthority> miniCloudGrantedAuthorities = authorities.stream().map(authoritity->{
                String method =  MapUtil.getStr((Map)authoritity,"method");
                String url = MapUtil.getStr((Map)authoritity,"url");
                return new MiniCloudGrantedAuthority(method,url);
            }).collect(Collectors.toList());
            MiniCloudUserDetails miniCloudUserDetails = new MiniCloudUserDetails(MapUtil.getInt(map,"id"),MapUtil.getStr(map,"username"),N_A,miniCloudGrantedAuthorities);
            return new UsernamePasswordAuthenticationToken(miniCloudUserDetails, N_A, miniCloudGrantedAuthorities);
        }
        return null;
    }

    /**
     * @desc: Will check_ Get authorities from map in token
     * */
    private Collection<? extends GrantedAuthority> getAuthorities(Map<String, ?> map) {
        Object authorities = map.get(AUTHORITIES);
        if (authorities instanceof String) {
            return AuthorityUtils.commaSeparatedStringToAuthorityList((String) authorities);
        }
        if (authorities instanceof Collection) {
            return AuthorityUtils.commaSeparatedStringToAuthorityList(StringUtils
                    .collectionToCommaDelimitedString((Collection<?>) authorities));
        }
        throw new IllegalArgumentException("Authorities must be either a String or a Collection");
    }
}
After the above steps are completed, restart the authentication service, and you will find that the returned data is more than our stored part
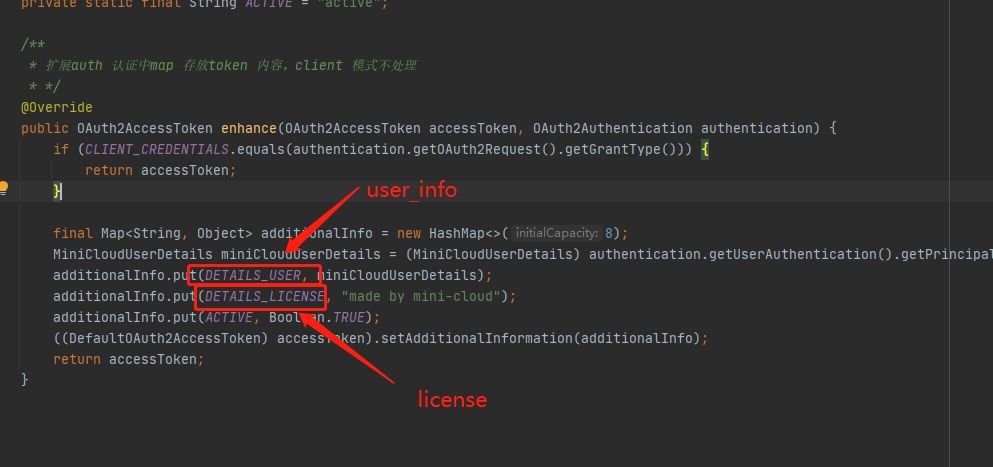
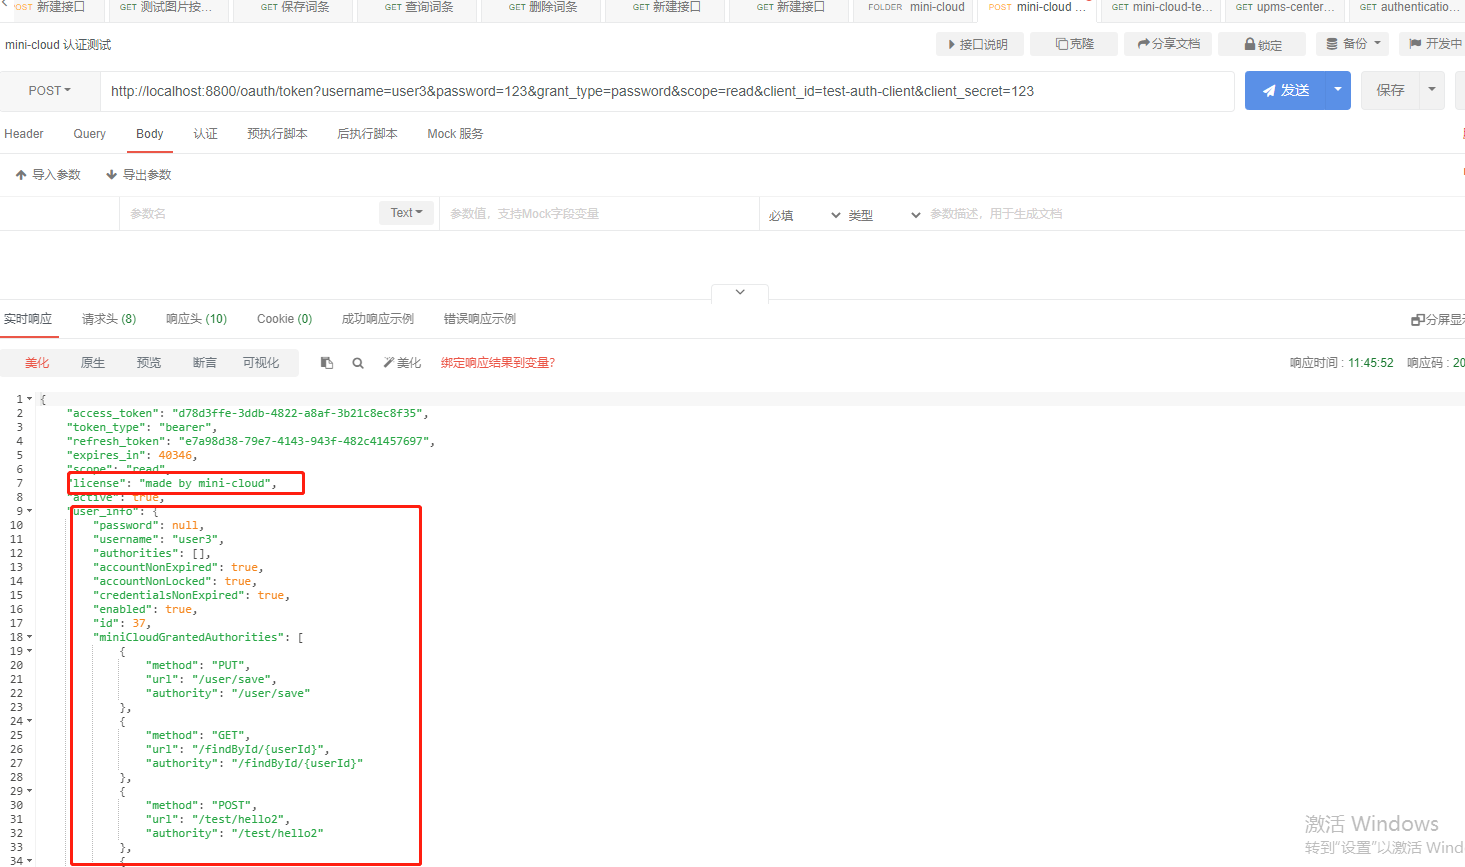
Now complete the final step of verification
We customize the AccessDecisionManager in the resource service to complete the permission verification
MiniCloudAccessDecisionManager.java
package com.minicloud.authentication.test.config;

import com.minicloud.authentication.test.model.MiniCloudUserDetails;
import org.springframework.security.access.AccessDecisionManager;
import org.springframework.security.access.AccessDeniedException;
import org.springframework.security.access.ConfigAttribute;
import org.springframework.security.authentication.InsufficientAuthenticationException;
import org.springframework.security.core.Authentication;
import org.springframework.security.core.GrantedAuthority;
import org.springframework.security.web.FilterInvocation;

import java.util.Collection;

/**
 * @Author alan.wang
 * @date: 2022-01-25 11:48
 */
public class MiniCloudAccessDecisionManager implements AccessDecisionManager {


    /**
     * @desc :By getting the customized MiniCloudUserDetails
     * Obtain all grantedAuthorities of the current login person, and then match the current access path one by one. If the request method is consistent with the url, it indicates that the authentication is successful
     * Otherwise, an AccessDeniedException exception is thrown
     *
     * */
    @Override
    public void decide(Authentication authentication, Object filterInvocation, Collection<ConfigAttribute> collection) throws AccessDeniedException, InsufficientAuthenticationException {


        String requestUrl = ((FilterInvocation) filterInvocation).getRequestUrl();
        String method = ((FilterInvocation) filterInvocation).getRequest().getMethod();
        if(authentication.getPrincipal() instanceof String){
            throw new AccessDeniedException(authentication.getName()+",No access url:"+requestUrl);
        }
        Collection<MiniCloudGrantedAuthority> grantedAuthorities = ((MiniCloudUserDetails)authentication.getPrincipal()).getMiniCloudGrantedAuthorities();
        for (MiniCloudGrantedAuthority grantedAuthority : grantedAuthorities) {
             if(requestUrl.equals(grantedAuthority.getAuthority())&&method.equals(grantedAuthority.getMethod())){
                 return;
             }
        }

        throw new AccessDeniedException(authentication.getName()+",No access url:"+requestUrl);
    }

    @Override
    public boolean supports(ConfigAttribute configAttribute) {
        return true;
    }

    @Override
    public boolean supports(Class<?> aClass) {
        return true;
    }
}
Custom AccessDecisionManager # code description
1. We passed authentication Getprincipal () gets the information of the current login user, that is, our customized MiniCloudUserDetails
2. Obtain all grantedAuthorities in the current login user information
3. Get the current access url
4. Loop through the url and method in the matched grantedAuthorities. If yes, it will pass, and if not, an exception will be thrown
4.5 unit test data and test
We write an initialization code to initialize a group of users, roles, permissions, and mount them
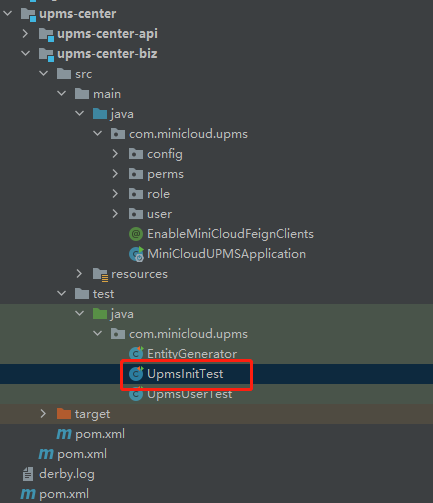
package com.minicloud.upms;

import com.alibaba.nacos.common.utils.HttpMethod;
import com.minicloud.upms.perms.dto.UpmsPermDTO;
import com.minicloud.upms.perms.dto.UpmsRolePermDTO;
import com.minicloud.upms.perms.service.UpmsPermService;
import com.minicloud.upms.perms.service.UpmsRolePermService;
import com.minicloud.upms.role.dto.UpmsRoleDTO;
import com.minicloud.upms.role.service.UpmsRoleService;
import com.minicloud.upms.user.dto.UpmsUserDTO;
import com.minicloud.upms.user.service.UpmsUserService;
import lombok.extern.slf4j.Slf4j;
import org.junit.Test;
import org.junit.runner.RunWith;
import org.springframework.beans.factory.annotation.Autowired;
import org.springframework.boot.test.context.SpringBootTest;
import org.springframework.security.crypto.bcrypt.BCryptPasswordEncoder;
import org.springframework.test.context.junit4.SpringRunner;
import org.springframework.transaction.annotation.Propagation;
import org.springframework.transaction.annotation.Transactional;

import java.util.ArrayList;
import java.util.Arrays;
import java.util.List;
import java.util.stream.Collectors;
import java.util.stream.Stream;

/**
 * @Author alan.wang
 * @date: 2022-01-20 13:51
 */
@RunWith(SpringRunner.class)
@SpringBootTest(classes = MiniCloudUPMSApplication.class)
@Slf4j
public class UpmsInitTest {

    @Autowired
    private UpmsUserService upmsUserService;

    @Autowired
    private UpmsRoleService upmsRoleService;

    @Autowired
    private UpmsPermService upmsPermService;

    @Autowired
    private UpmsRolePermService upmsRolePermService;


    /**
     *
     * Initialize role
     * */
    @Test
    public void testInitRoles() throws InterruptedException {
        UpmsRoleDTO upmsRoleDTO1 = UpmsRoleDTO.builder().roleName("Super administrator").roleCode("SUPER_ADMIN").roleDesc("Maximum permission").build();
        UpmsRoleDTO upmsRoleDTO2 = UpmsRoleDTO.builder().roleName("Ordinary user 1").roleCode("USER1").roleDesc("Ordinary user 1").build();
        UpmsRoleDTO upmsRoleDTO3 = UpmsRoleDTO.builder().roleName("Ordinary user 2").roleCode("USER1").roleDesc("Ordinary user 2").build();

        List<UpmsRoleDTO> upmsRoleDTOS= Stream.of(upmsRoleDTO1,upmsRoleDTO2,upmsRoleDTO3).collect(Collectors.toList());
        List<Integer> upmsRolesIds = upmsRoleService.saveRoles(upmsRoleDTOS);
        log.info("init roles successful:{} ",upmsRolesIds.toArray().toString());
        testInitUsers(upmsRolesIds);
        testInitPerms(upmsRolesIds);
    }

    /**
     * Initialize interface permission list
     * */
    public void testInitPerms(List<Integer> rolesIds){

        //Mini cloud test service
        UpmsPermDTO upmsPermDTO1 = UpmsPermDTO.builder().permServer("test").permUrl("/test/hello").permMethod(HttpMethod.GET).permName("hello Interface").permDesc("test hello get Interface").build();
        UpmsPermDTO upmsPermDTO2 = UpmsPermDTO.builder().permServer("test").permUrl("/test/hello").permMethod(HttpMethod.POST).permName("hello Interface").permDesc("test hello post Interface").build();
        UpmsPermDTO upmsPermDTO3 = UpmsPermDTO.builder().permServer("test").permUrl("/test/hello2").permMethod(HttpMethod.GET).permName("hello2 Interface").permDesc("test hello2 get Interface").build();
        UpmsPermDTO upmsPermDTO4 = UpmsPermDTO.builder().permServer("test").permUrl("/test/hello2").permMethod(HttpMethod.POST).permName("hello2 Interface").permDesc("test hello2 post Interface").build();

        //Mini cloud UPMS service
        UpmsPermDTO upmsPermDTO5 = UpmsPermDTO.builder().permServer("upms").permUrl("/user/save").permMethod(HttpMethod.PUT).permName("Save user interface").permDesc("Test save user interface").build();
        UpmsPermDTO upmsPermDTO6 = UpmsPermDTO.builder().permServer("upms").permUrl("/findById/{userId}").permMethod(HttpMethod.GET).permName("according to userId query user Interface").permDesc("Test basis userId query user Interface").build();

        List<UpmsPermDTO> upmsPermDTOS = Stream.of(upmsPermDTO1,upmsPermDTO2,upmsPermDTO5,upmsPermDTO6,upmsPermDTO3,upmsPermDTO4).collect(Collectors.toList());
        List<Integer> permIds =  upmsPermService.savePerms(upmsPermDTOS);

        //Permission set associated with role 1
        testInitRolePerms(rolesIds.get(1),permIds.subList(0,4));

        //Permission set of associated role 2
        testInitRolePerms(rolesIds.get(2),permIds.subList(4,6));

    }


    /**
     * Initialize role permission association table
     * */
    public void testInitRolePerms(Integer roleId,List<Integer> permsId){

        List<UpmsRolePermDTO> upmsRolePermDTOS = new ArrayList<>();
        permsId.stream().forEach(pid->{
            upmsRolePermDTOS.add(UpmsRolePermDTO.builder().roleId(roleId).permId(pid).build());
        });
        upmsRolePermService.saveRolePerms(upmsRolePermDTOS);
    }


    /**
     *
     * Initialize user
     * */

    public void testInitUsers(List<Integer> upmsRolesIds) throws InterruptedException {

        UpmsUserDTO upmsUserDTO1 = UpmsUserDTO.builder().username("admin").password("{bcrypt}" + new BCryptPasswordEncoder().encode("admin")).upmsRoleDTOS(Stream.of(UpmsRoleDTO.builder().roleId(upmsRolesIds.get(0)).build()).collect(Collectors.toList())).build();
        UpmsUserDTO upmsUserDTO2 = UpmsUserDTO.builder().username("user3").password("{bcrypt}" + new BCryptPasswordEncoder().encode("123")).upmsRoleDTOS(Stream.of(UpmsRoleDTO.builder().roleId(upmsRolesIds.get(1)).build()).collect(Collectors.toList())).build();
        UpmsUserDTO upmsUserDTO3 = UpmsUserDTO.builder().username("user4").password("{bcrypt}" + new BCryptPasswordEncoder().encode("123")).upmsRoleDTOS(Stream.of(UpmsRoleDTO.builder().roleId(upmsRolesIds.get(2)).build()).collect(Collectors.toList())).build();

        upmsUserService.saveUser(upmsUserDTO1);
        upmsUserService.saveUser(upmsUserDTO2);
        upmsUserService.saveUser(upmsUserDTO3);


    }


}
After execution, the following steps are taken:


User user3 has GET permission for / test/hello path
Let's test it
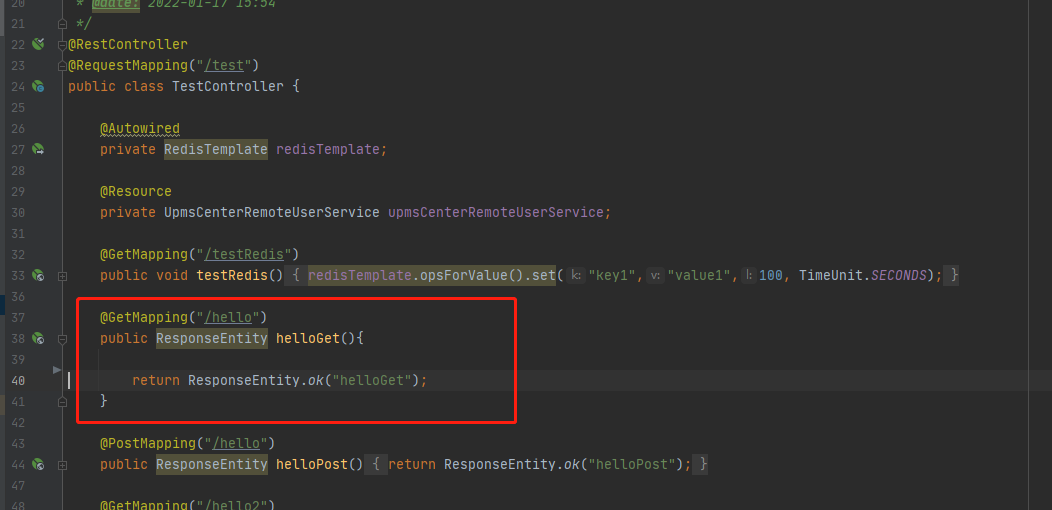

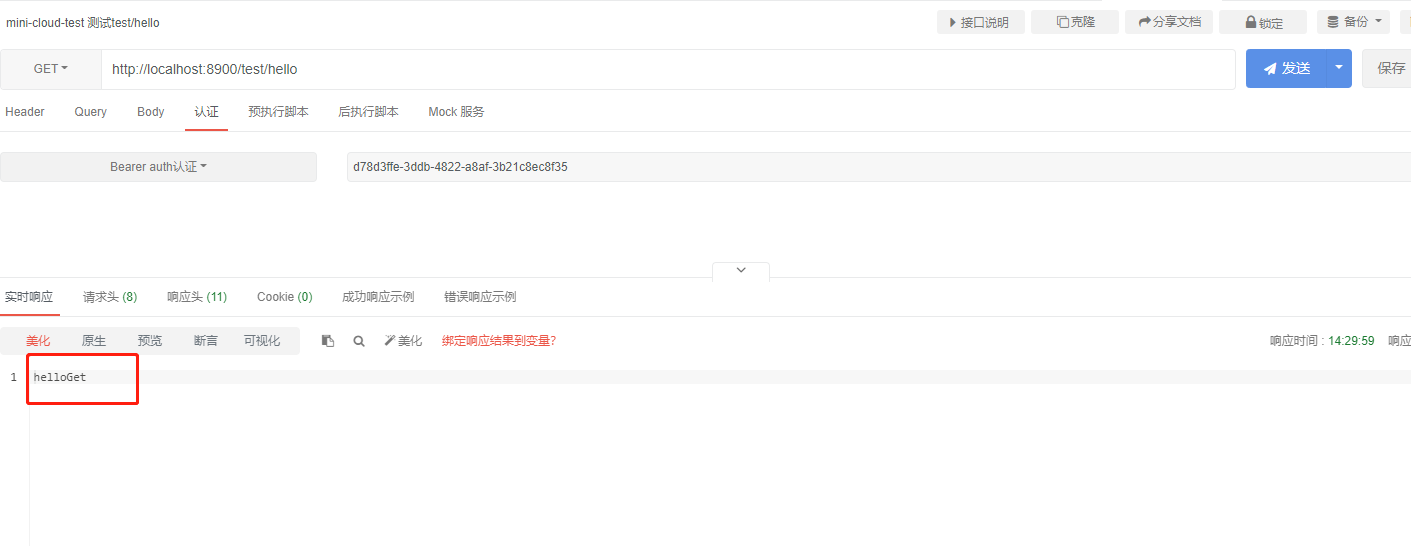
You can see that the match is indeed found and the execution is completed.
Refactoring code
So far, all the code parts of dynamic permission verification have been completed. At present, they are still the minimum closed-loop, and real applications need to be expanded on this basis. In fact, many codes in our development are redundant. A class will appear in multiple services, and there will also be many magic values. The next chapter will talk about how to reconstruct and extract common parts, When the gateway service integration is completed, the open source version 1.0 code will be opened ~ call me if necessary
