📑 Content of this article: SpringBoot integration popular framework (Part I)~
📘 Article column: Principle and project development of SpringBoot microservice
🎬 Last updated: January 26, 2022 SSM framework integrates Druid from simple to deep to SpringBoot taking over Druid configuration ~ learn the ideas and ideas of SpringBoot taking over
🙊 Personal profile: a Junior Program ape who is studying in a two-year college. In line with paying attention to foundation, clock in algorithm and sharing technology, as a blogger who summarizes personal experience, although he may be lazy sometimes, he will stick to it. If you like blog very much, it is suggested to look at the following line ~ (crazy hint QwQ)
🌇 give the thumbs-up 👍 Collection ⭐ Leaving a message. 📝 One key three connection care program ape, start with you and me
📝 SpringBoot integration popular framework (Part 1)
🙊 0. Talk about ideas
Because the learning of the integrated framework is constantly updated and iterated. As we all know, the technology of the program world of the program ape will be developing all the time, and the version will be updated all the time. If you need to learn new framework knowledge, you must study a set of your own learning methods. Good learning methods can make you in the endless updating technology, This is my original intention to get started quickly in the most effective and suitable way. This is some insights from my thinking and learning framework! I hope it will be more or less helpful to beginners and even adults, and radiate a little light to make the cold winter no longer cold~
📚 1. SpringBoot quickly integrates spring MVC
SpringBoot has helped us integrate the basis of previous Spring and Spring mvc configuration files. What we can do is to find the relevant configuration file classes corresponding to mvc marked with @ EnableConfigurationProperties annotation in webmvccautoconfiguration and read them according to the configuration.
By looking up @ EnableConfigurationProperties in webmvcoautoconfiguration class, we can find that this class has appeared three times in total, as shown in the figure:
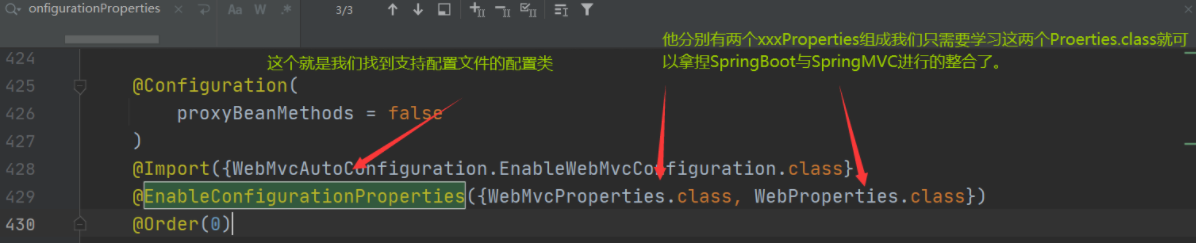
From the above annotation @ EnableConfigurationProperties, we can know that SpringBoot relies on these two things for WebMvc. Let's understand them one by one.
⭐1,WebProperties.class
@ConfigurationProperties("spring.web")
public class WebProperties {
}
What do we know from the above? This thing can be configured through the corresponding configuration in our configuration file properties|yaml, in which the configuration prefix is spring Web, let's go to yaml and see what it can configure~
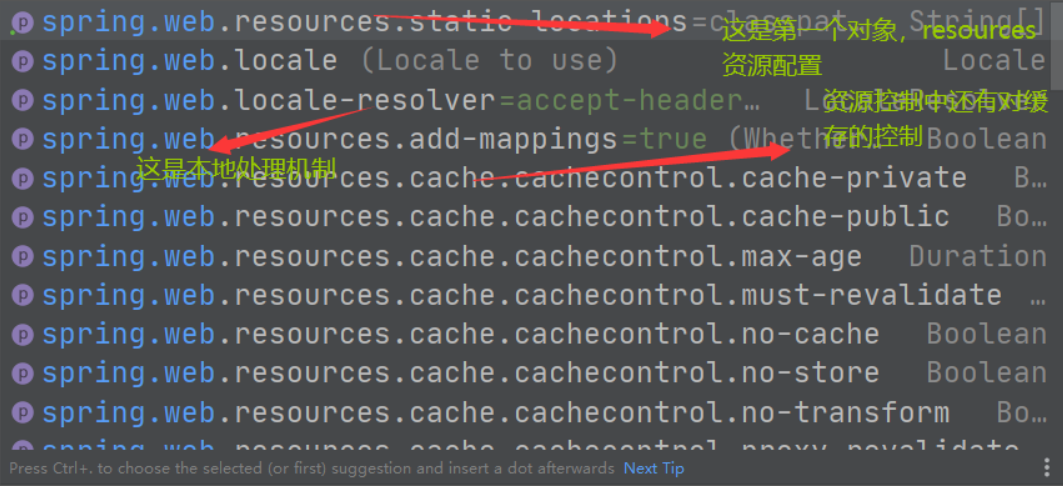
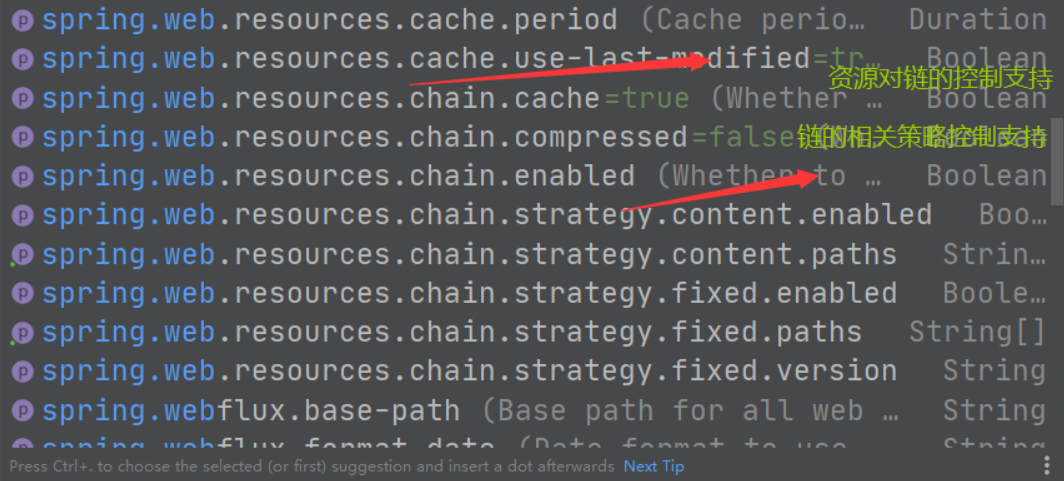
This is what webProperties can help us configure.
To sum up, it's just a webproperties Class is mainly to help us deal with the management and control of web program resources, including cache, web process chain, storage address control and configuration of static resources.
However, for beginners, they generally only need to configure a static resource path address.
This webProperties doesn't seem to help us configure the configuration of spring MVC. Let's take a look at another configuration class called webMvcProperties.
⭐2,webMvcProperties.class⭐
As expected, take a look at the following lines of code and you'll know it. It's enlightening.
@ConfigurationProperties(prefix = "spring.mvc")
public class WebMvcProperties {}
Sure enough, the prefix of this configuration class in the configuration file is spring MVC is the same as learning webProperties just now. Follow application Just study in yaml~
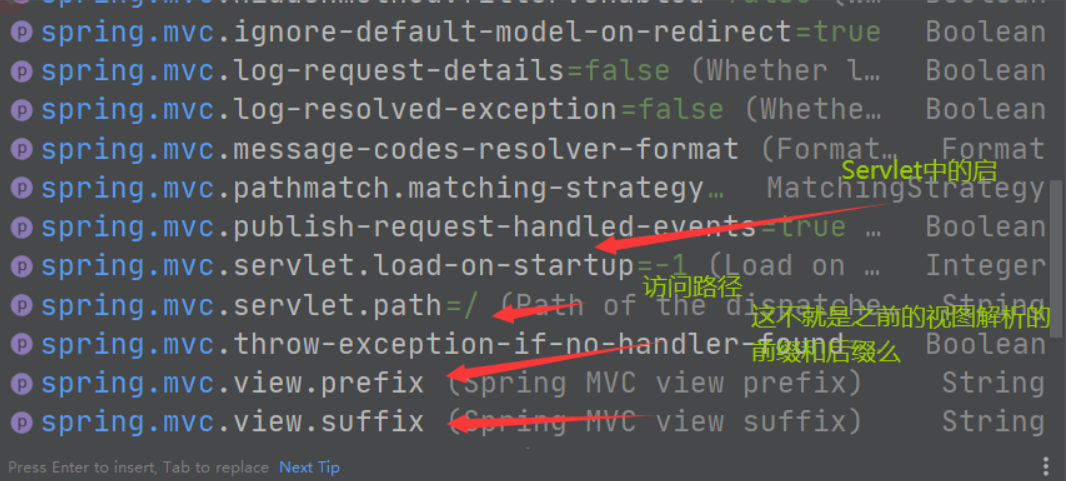
In the past, our configuration in xml can now pass a small application Properties|yaml is configured, which greatly simplifies the development. The rest is up to you to understand~
⭐ 3. SpringBoot configuration interceptor ⭐
The interceptor in spring MVC we learned before is used to intercept the methods in the controller, but the configuration file here does not mention how to configure the interceptor.
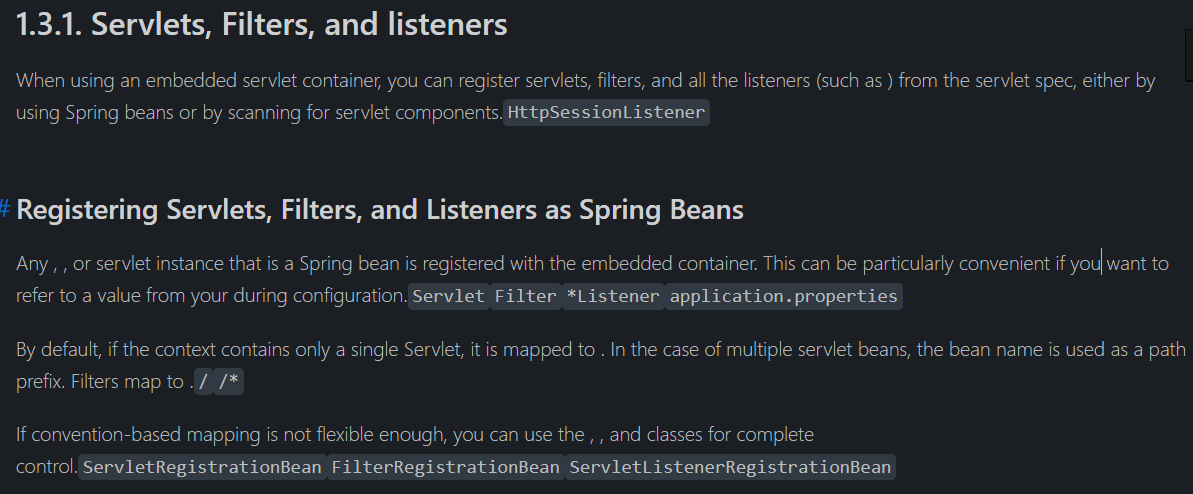
On the official website, I only found how to configure the three Java Web components of Servlet, Filter and listener. To put it simply, create beans, inject them into the Spring container through @ Bean annotation, and configure them.
Xiaofu also thinks that the interceptor should be configured by himself and then injected into the container. It should be able to be used.
Just do it
Wait, since it's WebMVCConfiguration, let's first see if there is a corresponding interface configuration in the automatic configuration class and try to add the configuration?
@ConditionalOnClass({ Servlet.class, DispatcherServlet.class, WebMvcConfigurer.class })
We can see such an annotation. In the annotation, this webmvc automatic assembly depends on these classes. We all know the first two classes. What is the third class? The official website also tells us that you can implement the extended Configuration of mvc by adding the class @ Configuration and implementing the WebMvcConfigurer interface.
Will not extend the configuration? It's okay. I'll teach you:
Let's read the method implemented by the WebMvcConfigurer interface to know what objects it can help us inject into the spring container~

This series of configurable are shown in the implementation of the interface. Now let's try to configure our own interceptor.
LoginInteceptor.java
/**
 * Function description
 * Login interceptor settings
 * @author Alascanfu
 * @date 2022/1/25
 */
public class LoginInterceptor implements HandlerInterceptor {
    private Logger logger = LoggerFactory.getLogger(LoginInterceptor.class);

    @Override
    public boolean preHandle(HttpServletRequest request, HttpServletResponse response, Object handler) throws Exception {
        logger.debug("Execute before interceptor");
        return true;
    }

    @Override
    public void postHandle(HttpServletRequest request, HttpServletResponse response, Object handler, ModelAndView modelAndView) throws Exception {
        logger.debug("Execute after interceptor");
    }

    @Override
    public void afterCompletion(HttpServletRequest request, HttpServletResponse response, Object handler, Exception ex) throws Exception {
        logger.debug("Execute after jump");
    }
}
Then we extend Spring MVC to add our own customized intelliceptor and inject it into the Spring container to complete the extension.
/**
 * Function description
 * SpringMVC Extension of
 * @author Alascanfu
 * @date 2022/1/26
 */
@Configuration
public class WebMVCConfiguration implements WebMvcConfigurer {

    /**
     * Function description
     * Inject the interceptor we have written into the container
     * @date 2022/1/26
     * @author Alascanfu
     */
    @Bean
    public LoginInterceptor loginInterceptor(){
        return new LoginInterceptor();
    }

    /**
     * Function description
     * Register the interceptor and set the interception path
     * @date 2022/1/26
     * @author Alascanfu
     */
    @Override
    public void addInterceptors(InterceptorRegistry registry) {
        registry.addInterceptor(this.loginInterceptor()).addPathPatterns("/**");
    }
}
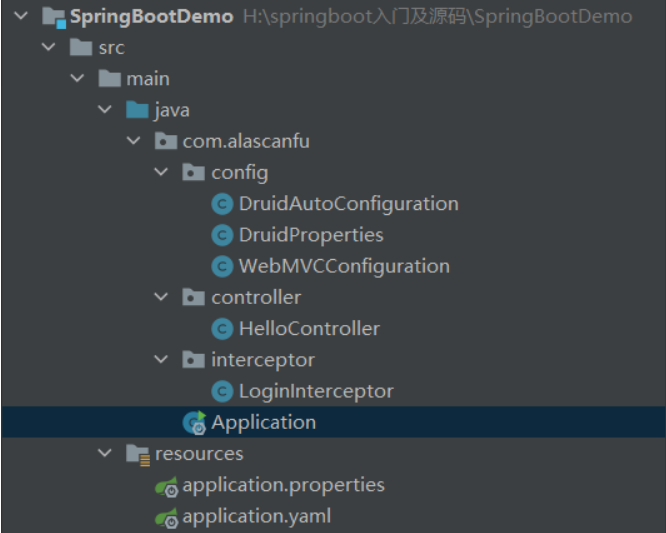
Project structure
Conduct interceptor test
The log output level must be set when opening the log. In springboot 2 Set the log level after X, and use the new version.
logging:
  level:
    root: debug  # Specify log level
Then visit the page to check whether the interceptor outputs the log on the console~
http://localhost:8080/hello

As shown in the figure, as we imagine~
📚 2. SpringBoot quickly integrates Mybatis
In any case, importing dependencies first is the most important QwQ, but the official website of SpringBoot does not provide the corresponding spring boot starter. Does it really not exist?
But if you search, you will find that Mybatis made it by itself
mybatis-spring-boot-autoconfigure – Introduction
Since you don't have it, you can make it yourself. It's built by the official Mybatis
All learning methods are basically the same. Many steps have been written on the official website. Let's just follow the steps.

Because Xiaofu here is the latest SpringBoot 2 6.3 so you can only import this version 2.2 Oh ~ import the corresponding mybatis spring boot starter according to your own spring boot version
<dependency>
       <groupId>org.mybatis.spring.boot</groupId>
       <artifactId>mybatis-spring-boot-starter</artifactId>
       <version>2.2.0</version>
</dependency>
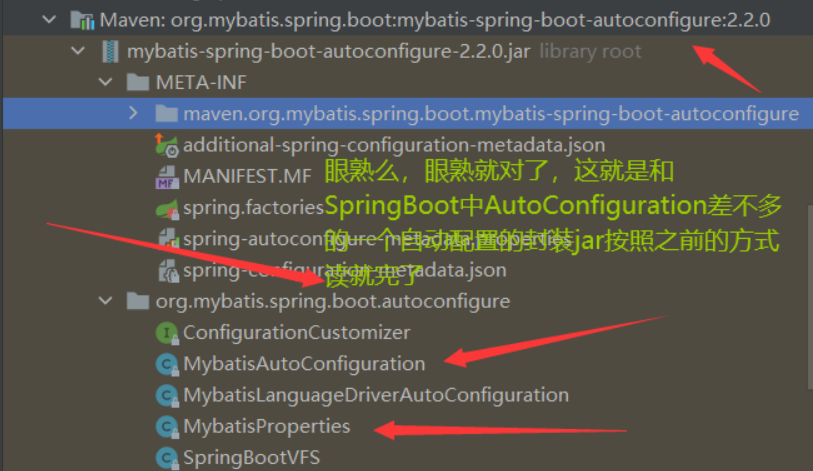
⭐1,MybatisAutoConfiguration.java
@Configuration
@ConditionalOnClass({SqlSessionFactory.class, SqlSessionFactoryBean.class})
@ConditionalOnSingleCandidate(DataSource.class)
@EnableConfigurationProperties({MybatisProperties.class})
@AutoConfigureAfter({DataSourceAutoConfiguration.class, MybatisLanguageDriverAutoConfiguration.class})
public class MybatisAutoConfiguration implements InitializingBean {}
The analysis of configuration basically depends on the two main annotations~
@ConditionalOnClass and @ EnableConfigurationProperties
Because it is included in @ ConditionalOnClass, needless to say, we all know that this is the most commonly used in spring mybatis. We complete our integration operation by injecting SqlSessionFactoryBean into the container and setting the data source to obtain SqlSessionFactory.
After this annotation is solved, look at the class in another annotation. We haven't seen it, but we can already guess what this thing can do! The configuration class of xxxProperties can inject properties into the container through the configuration file.
⭐2,MybatisProperties.class
@ConfigurationProperties(
    prefix = "mybatis"
)
public class MybatisProperties {}
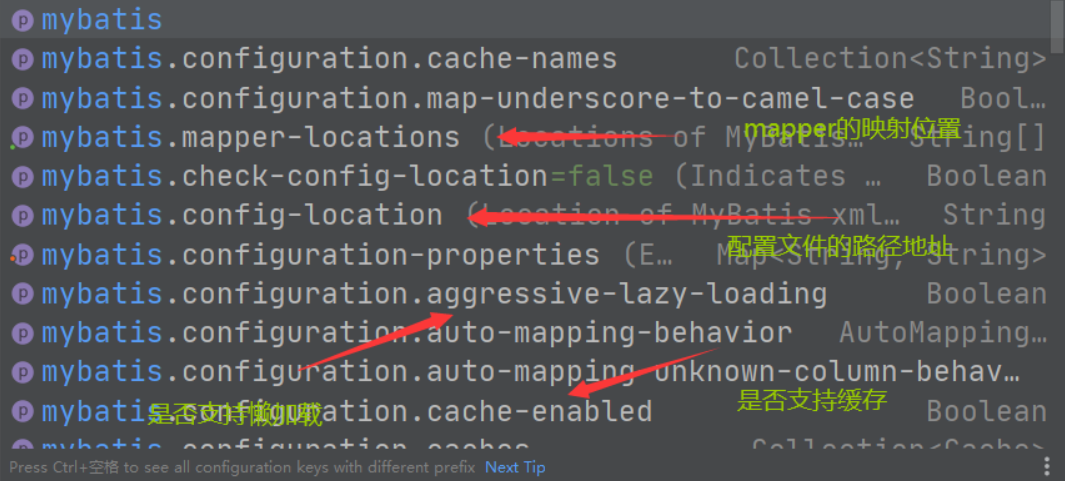
What comes into view is the prefix of the configuration class attribute in its corresponding configuration file. As always, let's try in the configuration file to know what Mybatis and SpringBoot have integrated and simplified the configuration for us.

There are many, many small payment examples. Ha, reading by yourself will gain more.
⭐ 3. Spring boot integration Mybatis test ⭐
Step 1: create a table in the database
CREATE TABLE `user`(
    `id` BIGINT(64) NOT NULL PRIMARY KEY AUTO_INCREMENT,
    `username` VARCHAR(32) NOT NULL COMMENT 'user id',
    `password` VARCHAR(32) NOT NULL COMMENT 'User account',
    `nameZh` VARCHAR(32) NOT NULL COMMENT 'User password',
    `age` INT NOT NULL COMMENT 'User age',
    `sex` INT NOT NULL DEFAULT 1 COMMENT 'Gender: 0 is female and 1 is male',
    `birthday` Date NOT NULL  COMMENT 'date of birth',
    `createdDate` Date NOT NULL  COMMENT 'Account creation date',
    `updatedDate` Date NOT NULL  COMMENT 'Account update date',
    `info` VARCHAR(256)   COMMENT 'User profile'
)engine = innodb default charset = utf8;
Step 2: insert relevant data of small payment for test
INSERT INTO `springboot`.`user`(`id`, `username`, `password`, `nameZh`, `age`, `birthday`, `createdDate`, `updatedDate`, `info`) VALUES (1, 'Alascanfu', '123456', 'Ape Xiaofu', 20, '2001-06-10', '2022-01-26', '2022-01-26', 'Forever young, forever tearful~')
Step 3: in application Configure the basic database connection information in yaml
spring:
  datasource:
    username: root
    password: 123456
    url: jdbc:mysql://localhost:3306/springboot?serverTimezone=Asia/Shanghai&characterEncoding=utf-8&useUnicode=true
    driver-class-name: com.mysql.cj.jdbc.Driver
Step 4: write the corresponding entity class and Mapper map
User.java
/**
 * Function description
 * User class
 * @author Alascanfu
 * @date 2022/1/26
 */
public class User implements Serializable {
    //User id
    private Long id ;
    //user name
    private String username;
    //User password
    private String password;
    //User Chinese name
    private String nameZh;
    //User age
    private Integer age ;
    // Gender 0 represents female and 1 represents male. The default is male
    private Integer sex;
    //date of birth
    private Date birthday;
    //Account creation date
    private Date createdDate;
    //Account update date
    private Date updatedDate;
    //User profile
    private String info;
    ... ...
    //Constructor, get/set method and toString() are omitted here
}
Note that the Serializable interface needs to be implemented, because the date data transmission needs the support of serialization
UserMapper.java
public interface UserMapper {
    public List<User> queryAllUsers();
}
UserMapper.xml
<?xml version="1.0" encoding="UTF-8" ?>
<!DOCTYPE mapper
        PUBLIC "-//mybatis.org//DTD Mapper 3.0//EN"
        "http://mybatis.org/dtd/mybatis-3-mapper.dtd">
<mapper namespace="com.alascanfu.mapper.UserMapper">

    <select id="queryAllUsers" resultType="com.alascanfu.pojo.User">
        select * from user
    </select>
</mapper>
Step 5 create a SpringBootTest class to test
- First import the dependencies of SpringBootTest
<dependency>
       <groupId>org.springframework.boot</groupId>
       <artifactId>spring-boot-starter-test</artifactId>
</dependency>
Write the test class QueryUserTest
@RunWith(SpringRunner.class)
@SpringBootTest
public class QueryUserTest {
    @Autowired
    UserMapper userMapper;

    @Test
    public void queryAllUsers(){
        for (User user : userMapper.queryAllUsers()) {
            System.out.println(user);
        }
    }
}
Don't forget to configure Mapper mapping~
@SpringBootApplication
@MapperScan("com.alascanfu.mapper")
//Scan all mappings under the package and configure spring MVC XML has the same meaning. Here it is simplified to the startup class of SpringBoot program.
public class Application {
    public static void main(String[] args) {
        SpringApplication.run(Application.class,args);
    }
}
The test result is as shown in the figure, that is, it is successful.

There may be some mistakes you have made before ~ try your best to recall the SSM framework configuration and whether the data source is successfully injected, such as whether the package in the pom file contains xml files, etc
The program ape that can DEBUG can not only make you lose a few hairs, but also exercise your thinking logic ability and the ability to find mistakes~
🙊 3. Summary
The two frameworks for this rapid integration are spring MVC and Mybatis. Xiaofu summarizes and integrates through the understanding of the source code and the reading of official references. After all, SpringBoot needs to integrate so many useful frameworks for project development, and the articles in this column will continue to be updated, Brothers and sisters who are mainly suitable for learning the second brush SpringBoot framework ~ the more proficient they are in the framework, the clearer the process of project development will be. Later, they will continue to update and integrate a series of popular frameworks and tools such as Mybatis plus, spring security and Shrio. Go, go, go!