Chapter 1 Introduction
- The project relies on CNN_Mobilenet_Training is a project. You can find the name in the list of completed projects and read relevant documents.
This item is connected in CSDN Here
This document mainly describes the technical branch of number recognition in question F of the National College Students' electronic design competition in 2021, and the relevant parts such as mechanical control are not involved.
This technology branch needs an input and an output. The input is a picture containing digital font, field sideline and guide line, and the output is to display the recognized numbers in the form of array.
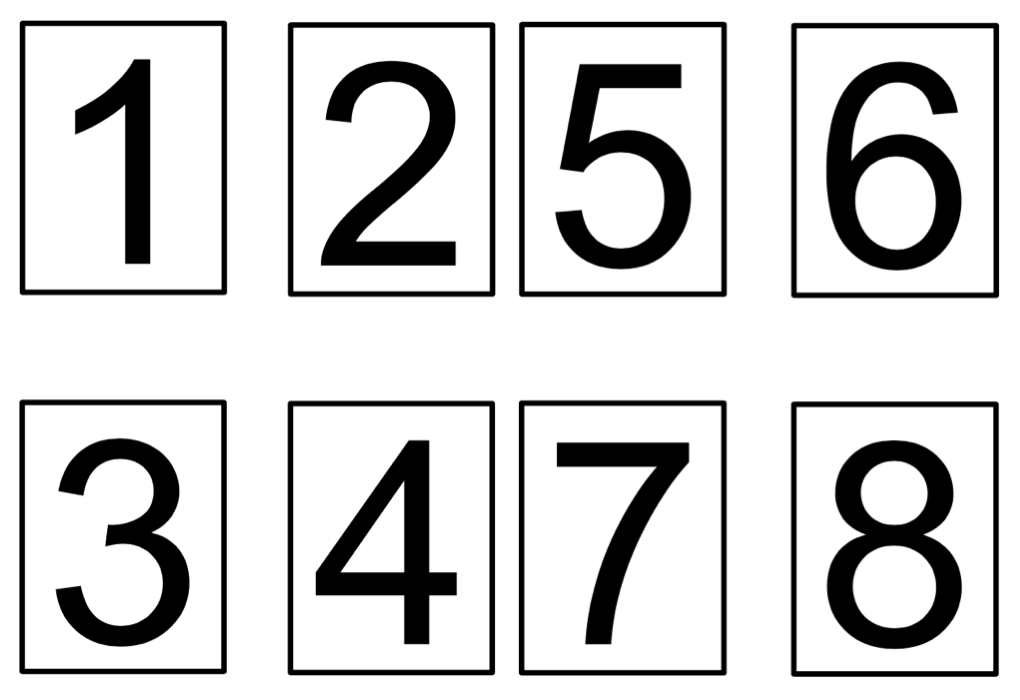
The figure below is the digital font provided by the competition organizing committee. In order to reduce the difficulty, only 8 numbers are provided.
Chapter 2 production ideas
Section 1 environment and imaging effects and ideas
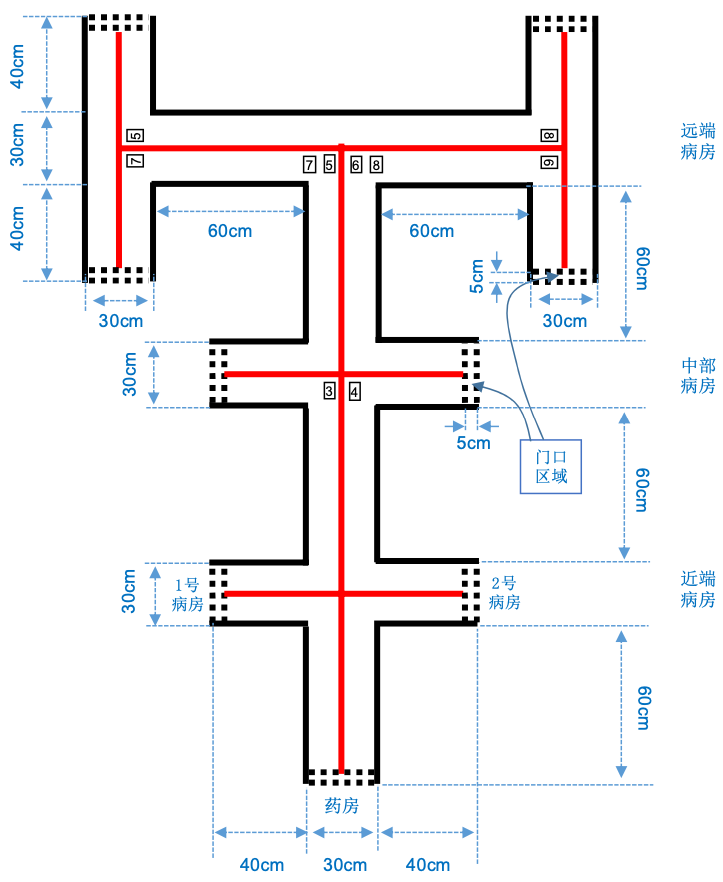
The background color of the competition ground is white, and the environment is natural light lighting without direct sunlight and overhead multi lamp lighting environment. There shall be no special lighting conditions during the formal competition, but a fill light can be installed in front of the camera to eliminate the impact of the environment on the imaging quality of the camera.
The actual shooting effect of the site is shown in the figure below:
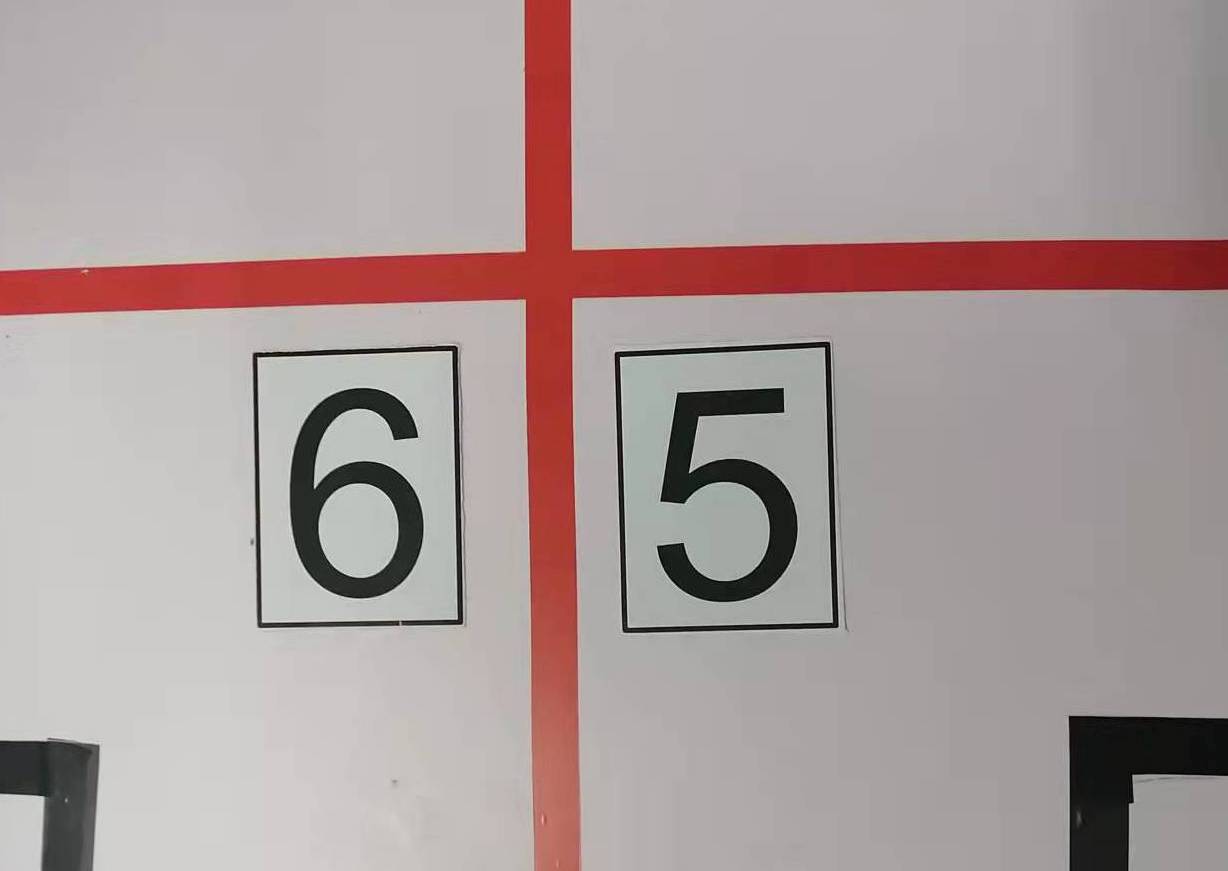
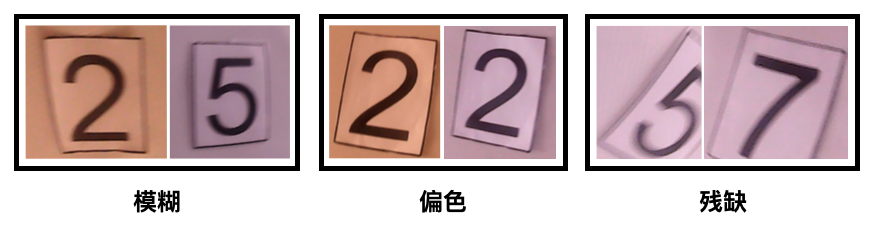
The car mounted camera is a special 3 Million Pixel camera for raspberry pie. Due to the sensor quality and lens quality, it will be incomplete (due to the focal length of the lens), color deviation, blur and so on. The specific diagram is shown in the figure below:
Therefore, I came up with the following ideas and methods:
- When collecting data sets, use raspberry pie to switch to camera for collection;
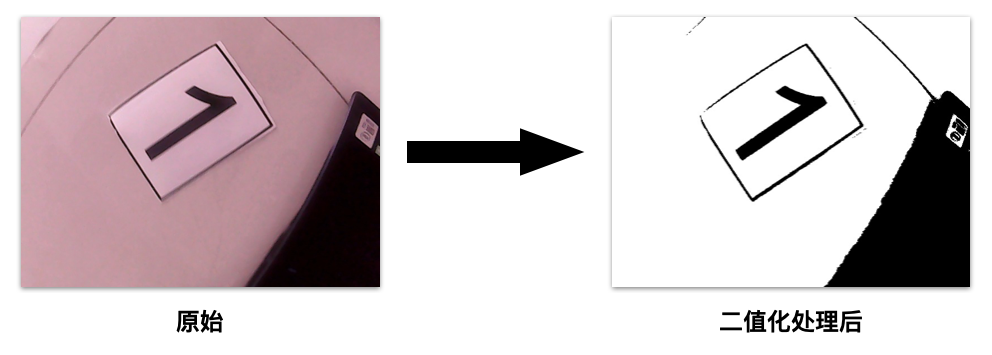
- Convert the original data into black-and-white pictures by means of binarization;
- The data set after binary processing is used in training;
- When recognizing, binarize the captured photos;
- resize the picture;
- Divide the picture through the set border value;
- Delete the pictures that do not meet the setting requirements;
- Identify the remaining pictures;
Section 2 making and training data sets
First understand what is called binary image
-
Color image has three channels, RGB. Each channel has 0 ~ 255, with a total of 2 ^ 24 bit space;
-
Gray image has a channel, 0 ~ 255, so there are 256 kinds of gray;
-
Binary image has only two colors, black and white;
These operations can be completed by using the functions in OpenCV. Since this part is not handled by me, I have no original code; I found some codes that can work on the Internet and put them below:
import cv2 as cv
import numpy as np

#Global threshold
def threshold_demo(image):
    gray = cv.cvtColor(image, cv.COLOR_RGB2GRAY)  #Graying the input image
    #Direct thresholding is to segment the input single channel matrix pixel by pixel.
    ret, binary = cv.threshold(gray, 0, 255, cv.THRESH_BINARY | cv.THRESH_TRIANGLE)
    print("threshold value %s"%ret)
    cv.namedWindow("binary0", cv.WINDOW_NORMAL)
    cv.imshow("binary0", binary)

#Local threshold
def local_threshold(image):
    gray = cv.cvtColor(image, cv.COLOR_RGB2GRAY)  #Graying the input image
    #Adaptive thresholding can change the threshold according to the brightness distribution of different regions of the image
    binary =  cv.adaptiveThreshold(gray, 255, cv.ADAPTIVE_THRESH_GAUSSIAN_C,cv.THRESH_BINARY, 25, 10)
    cv.namedWindow("binary1", cv.WINDOW_NORMAL)
    cv.imshow("binary1", binary)

#The user calculates the threshold
def custom_threshold(image):
    gray = cv.cvtColor(image, cv.COLOR_RGB2GRAY)  #Graying the input image
    h, w =gray.shape[:2]
    m = np.reshape(gray, [1,w*h])
    mean = m.sum()/(w*h)
    print("mean:",mean)
    ret, binary =  cv.threshold(gray, mean, 255, cv.THRESH_BINARY)
    cv.namedWindow("binary2", cv.WINDOW_NORMAL)
    cv.imshow("binary2", binary)

src = cv.imread('E:/imageload/kobe.jpg')
cv.namedWindow('input_image', cv.WINDOW_NORMAL) #Set to windows_ Normal can be scaled at will
cv.imshow('input_image', src)
threshold_demo(src)
local_threshold(src)
custom_threshold(src)
cv.waitKey(0)
cv.destroyAllWindows()
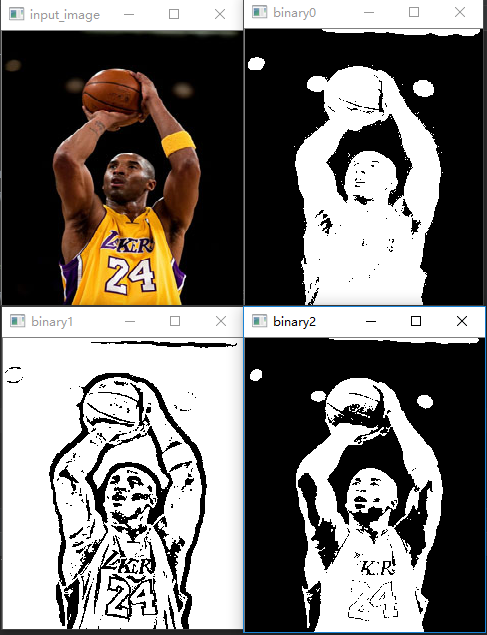
The operation effect of the corresponding code is as follows:
The thermodynamic diagram and broken line of the training results are as follows:
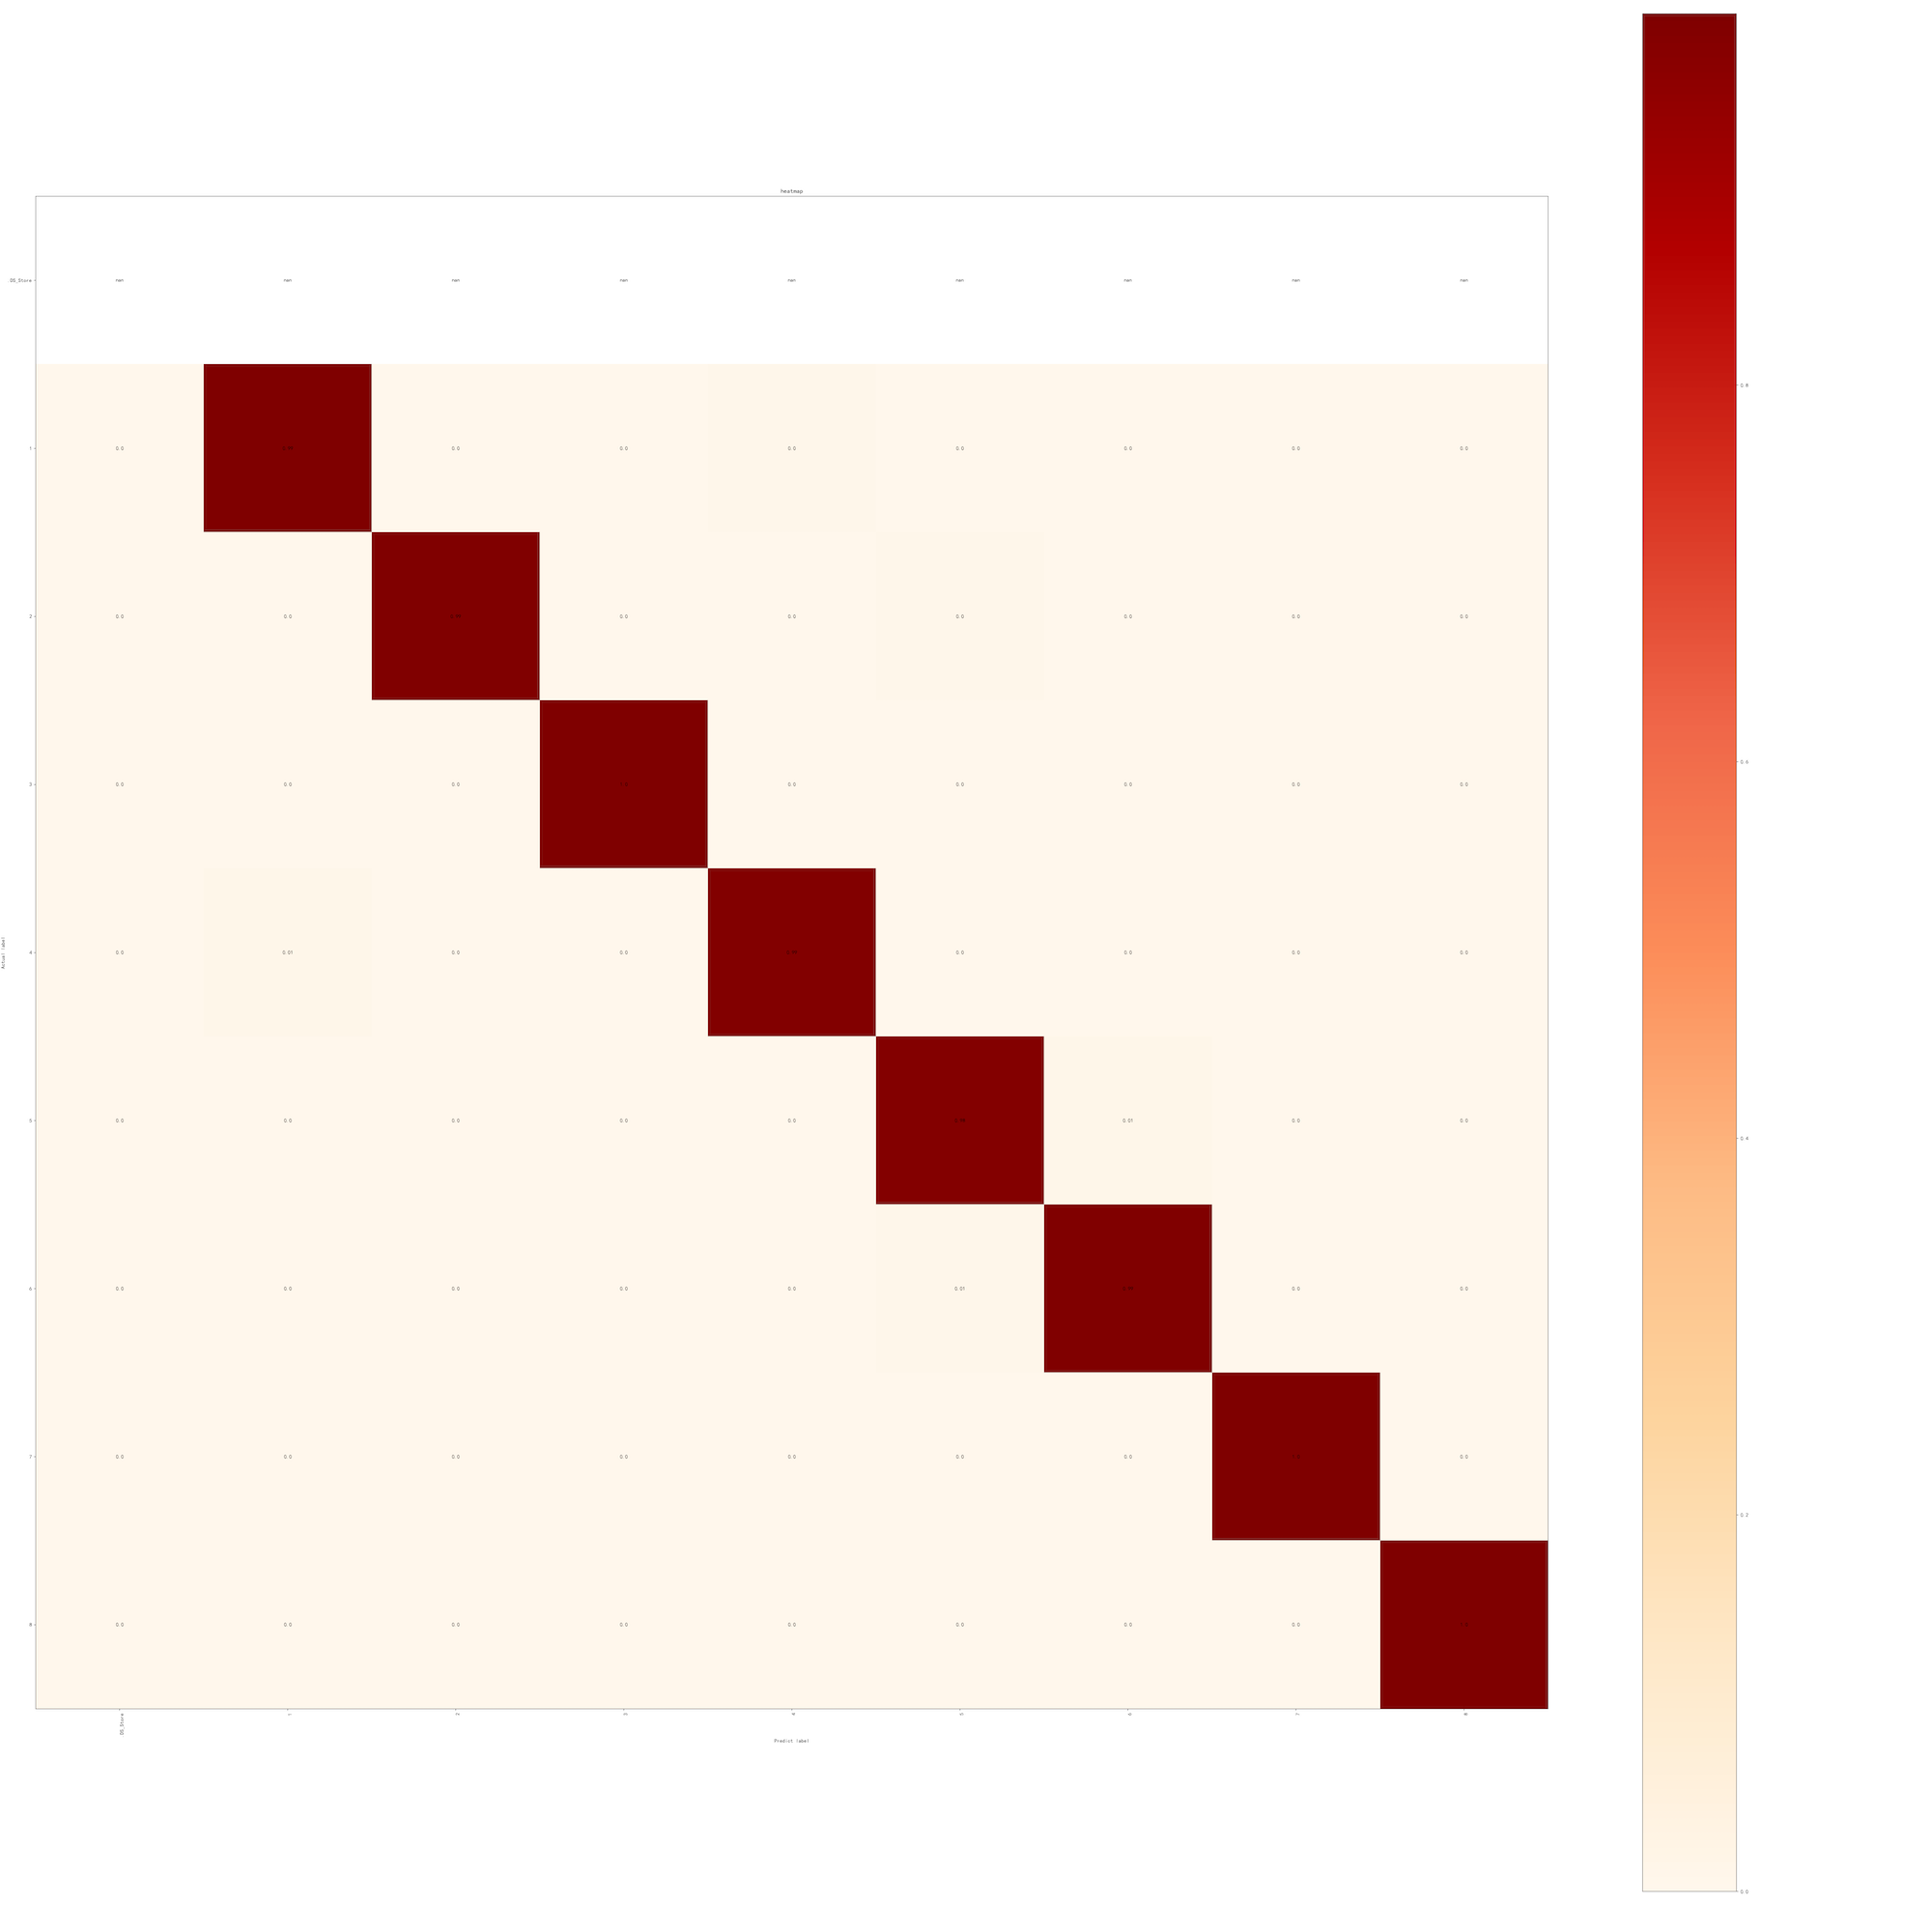
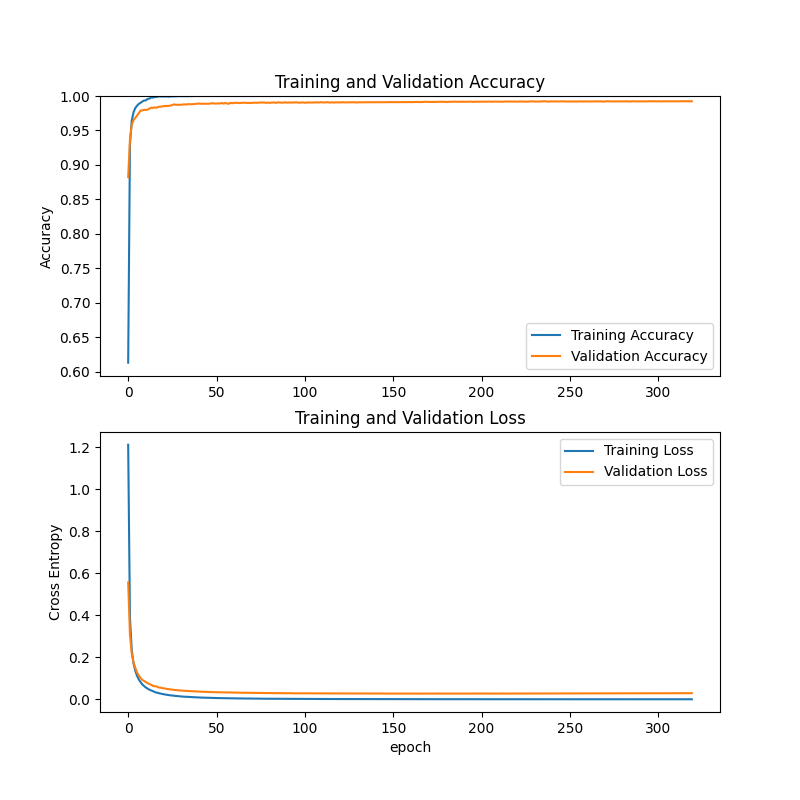
This is the result of the first training. 5000 pieces of 320 times of training. Because the time is too late and the number of training is too few, the recognition rate of some numbers is still not good.
Section 3 computer environment configuration
Because this part is related to CNN_Mobilenet_Training is consistent, so I copied it. Of course, the part about CUDA can be skipped directly.
First, Python 3.8 and conda environment need to be installed on the computer, which can be installed through anaconda
And create a new conda environment. yourEnvName represents the name of your new conda environment.
conda create --name yourEnvName python=3.8
Activate the conda environment you just created
windows ==> activate yourEnvName
linux/mac ==> source activate yourEnvName
Common conda instructions
conda info --envs: Output with[*]No. is the current environment
conda list: Look at the packages and versions installed in this environment
conda install numpy scikit-learn: install numpy sklearn package
conda env remove -n yourEnv: Delete your environment
conda env list: View all environments
As for how to install the conda environment, it can be installed separately or together through anaconda.
The development environment on Windows is quite special. You need to download the Python installation package from the Python official website to install Python. The specific installation version is 3.8, but the actual test versions 3.7 and 3.9 seem to have no big problem, but I still recommend installing version 3.8.
Mac users and Ubuntu users can install it in the normal way. If there is any problem, you can baidu or Google by yourself.
As for whether TensorFlow is installed with CPU version or GPU version, it seems that it has been integrated into an installation package after version 2.0. The program will first check whether your computer has correctly installed the graphics card and the corresponding CUDA and CUDNN. If it can, it will use GPU for training, and if not, it will use CPU for training.
In order to ensure the speed of training, your CPU should support AVX-2 instruction set or AVX instruction set. In this way, the program can run normally. If there is no AVX instruction set, either run on another computer or download a TensorFlow installation package that supports processors without AVX instruction set from TensorFlow's official website for installation. If I remember correctly, it seems that TensorFlow2 is used this time 3.1 there is no special installation package. What if you say you want to change a version of TensorFlow? Neither can it. This program supports TensorFlow version 2.3.1, because it needs to use some special APIs. If there is no API in the higher version or lower version, the program can't run, so it's the only way.
At that time, it took almost a week to successfully make TensorFlow run in this environment, and another week to make TensorFlow run on GPU. The installation process was extremely painful. It's like being forced into bed by someone.
As for the installation method of CUDA and CUDNN, please go to Baidu, CSDN or read the official documents of NVIDIA and TensorFlow. The version of each component must be corresponding, which is very, very uncomfortable. Even if all operations are carried out according to the documents, it may not be able to run, which has something to do with your graphics card driver, The driver version was too high for me last time. I lowered the driver version to run. Every time I see an error report, my mood can be explained by the following figure:

In a word, it will become unfortunate to have a relationship with NVIDIA, whether it's the installation process, the use experience or the wallet. Get back to the point.
The list of library files to be used has been made to requirement Txt to facilitate installation after changing the computer.
It should be emphasized here that TensorFlow version in this file conflicts with Panda and Numpy version in raspberry pie. If it cannot be installed, TensorFlow needs to be installed manually first. At this time, the other two libraries will be downgraded, and then the two libraries will be upgraded manually after installation, otherwise Keras will not be used. There was no error in the actual measurement.
When installing library files, you can install them in the created conda environment through the following commands
pip install -r requirement.txt

The above prompt will appear after the installation is completed. Use this time
pip list
Check whether the library files are installed successfully.
If requirement Txt is missing. You can rebuild the requirement through the following code Txt file
absl-py==0.11.0
aliyun-iot-linkkit==1.2.3
astunparse==1.6.3
cachetools==4.1.1
certifi==2021.10.8
charset-normalizer==2.0.4
crcmod==1.7
cycler==0.10.0
docopt==0.6.2
gast==0.3.3
google-auth==1.23.0
google-auth-oauthlib==0.4.2
google-pasta==0.2.0
grpcio==1.34.0
h2==2.6.2
h5py==2.10.0
hpack==3.0.0
hyper==0.7.0
hyperframe==3.2.0
idna==3.2
imutils==0.5.4
keras==2.7.0
Keras-Preprocessing==1.1.2
kiwisolver==1.3.2
labelImg==1.8.6
lxml==4.6.4
Markdown==3.3.3
matplotlib==3.4.3
numpy==1.18.5
oauthlib==3.1.0
opencv-python==4.5.3.56
opt-einsum==3.3.0
paho-mqtt==1.5.1
pandas==1.3.2
Pillow==8.3.2
protobuf==3.14.0
pyasn1==0.4.8
pyasn1-modules==0.2.8
pyparsing==2.4.7
PyQt5==5.15.4
PyQt5-Qt5==5.15.2
PyQt5-sip==12.9.0
python-dateutil==2.8.2
pytz==2021.1
requests==2.26.0
requests-oauthlib==1.3.0
rsa==4.6
schedule==1.1.0
scipy==1.7.1
seaborn==0.11.2
six==1.16.0
stomp.py==7.0.0
tensorboard==2.4.0
tensorboard-plugin-wit==1.7.0
tensorflow==2.3.1
tensorflow-estimator==2.3.0
termcolor==1.1.0
tqdm==4.62.2
urllib3==1.26.6
Werkzeug==2.0.1
wrapt==1.12.1
Section 4 program explanation
Part 1 get photos from camera
def take_pic(path,cam_v):
    cap = cv2.VideoCapture(cam_v)
    ret, frame = cap.read()
    cv2.imwrite(path, frame)
- @path: the storage address of the captured picture;
- @cam_v: Select the number of cameras to call. Generally speaking, it can be set to "0";
Part 2 cut photos according to threshold
ic.images_cut_img_input(PATH,BIN_LOW,BIN_HIGH)
PATH = './images/IMG_9281.JPG'  #Image path to process
BIN_LOW = 27					#Set binarization
BIN_HIGH = 255
Parameters are passed into the following function
def images_cut_img_input(IMG_PATH,BIN_LOW,BIN_HIGH):
    img = cv.imread(IMG_PATH)
    img_gray = cv.cvtColor(img, cv.COLOR_BGR2GRAY)  # The return value of the function is the converted image
    # Usually 25255
    ret, th1 = cv.threshold(img_gray, BIN_LOW, BIN_HIGH, cv.THRESH_BINARY)
    # After binarization, there are only 0 and 255 pictures. 0 is black and 255 is white
    img_list = cut_image_by_projection(th1)
    count = 1
    file_operate.custom_rmdir('./predict/data/')
    #time.sleep(10)
    for i in img_list:
        # Here you can operate, display or save the cut pictures
        cv.imwrite('./predict/data/'+str(count) + '.jpg', i)
        count += 1
The image is converted into a binary image through the threshold. IMG in_ The gray parameter corresponds to CV cvtColor(img, cv.COLOR_BGR2GRAY)
The function of cvtColor is to realize the conversion of picture color space. The function form is as follows
void cvCvtColor( const CvArr* src, CvArr* dst, int code );
#The parameters of each part are explained as follows
src: Source image (input 8)-bit , 16-bit Or 32-bit Single precision floating point image)

dst: Target image (input 8)-bit , 16-bit Or 32-bit Single precision floating point image)

code:

RGB <--> BGR: CV_BGR2BGRA,CV_RGB2BGRA,CV_BGRA2RGBA,CV_BGR2BGRA,CV_BGRA2BGR

RGB <--> 5X5: CV_BGR5652RGBA,CV_BGR2RGB555,(And so on, not to list them one by one)

RGB <---> Gray: CV_RGB2GRAY,CV_GRAY2RGB,CV_RGBA2GRAY,CV_GRAY2RGBA

RGB <--> CIE XYZ: CV_BGR2XYZ,CV_RGB2XYZ,CV_XYZ2BGR,CV_XYZ2RGB

RGB <--> YCrCb(YUV) JPEG: CV_RGB2YCrCb,CV_RGB2YCrCb,CV_YCrCb2BGR,CV_YCrCb2RGB,CV_RGB2YUV(take YCrCb use YUV Any alternative)

RGB <--> HSV: CV_BGR2HSV,CV_RGB2HSV,CV_HSV2BGR,CV_HSV2RGB

RGB <--> HLS: CV_BGR2HLS,CV_RGB2HLS,CV_HLS2BGR,CV_HLS2RGB

RGB <--> CIE L*a*b*: CV_BGR2Lab,CV_RGB2Lab,CV_Lab2BGR,CV_Lab2RGB

RGB <--> CIE L*u*v: CV_BGR2Luv,CV_RGB2Luv,CV_Luv2BGR,CV_Luv2RGB

RGB <--> Bayer: CV_BayerBG2BGR,CV_BayerGB2BGR,CV_BayerRG2BGR,CV_BayerGR2BGR,CV_BayerBG2RGB,CV_BayerGB2RGB, CV_BayerRG2RGB,CV_BayerGR2RGB(stay CCD and CMOS Commonly used in Bayer Mode)

YUV420 <--> RGB: CV_YUV420sp2BGR,CV_YUV420sp2RGB,CV_YUV420i2BGR,CV_YUV420i2RGB
I only use two parameters here: src and code.
It should also be noted that the default image channel order of OpenCV is BGR, not RGB!!!
The next step is to project and cut the picture
img_list = cut_image_by_projection(th1)
This function has three cutting modes. In order to cut the font more accurately, I chose horizontal and vertical cutting.
def cut_image_by_projection(img, cvalue=255, patern=2):
    """
    The image after the incoming binarization process obtains each individual number through projection cutting
    The default processing method is to cut horizontally and then vertically
    :param cvalue: According to the cutting value, the default value is 255 (cutting according to white), and 0 (cutting according to black) can be selected
    :param img:Incoming binary image
    :param patern: 2 It refers to two horizontal and vertical cuts, 0 refers to horizontal cutting and 1 refers to vertical cutting
    :return: Returns the image array after cutting
    """
    if patern == 2:
        return cut_vertical(cut_level(img, cvalue=cvalue), cvalue=cvalue)
    elif patern == 1:
        return cut_vertical(img, cvalue=cvalue)
    else:
        return cut_level(img, cvalue=cvalue)
Here, cut according to white, that is, keep the black edge line or black frame. Of course, it also includes those sidelines and guide lines.
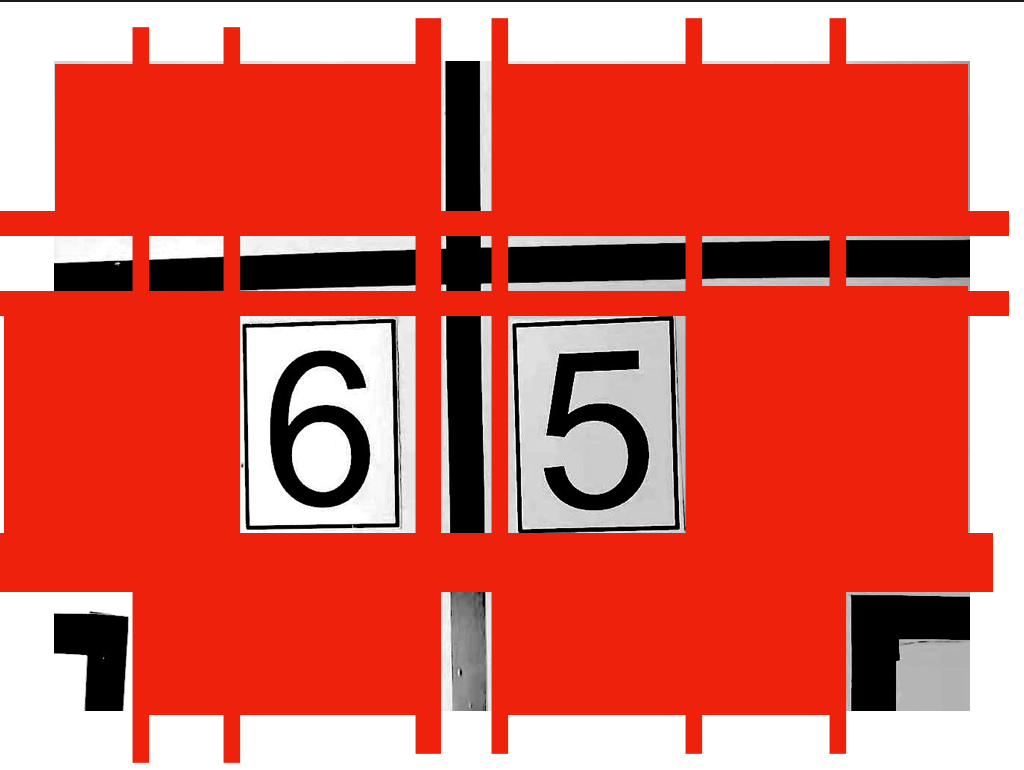
The red color block in this schematic diagram (I only used the image editing software for gray processing, without binary processing) represents the cutting part. Among the small parts cut, those containing black will be retained, and those not contained will be directly remove d. Therefore, the left part of this schematic diagram is the "6" and "5" digital font in the middle, site sideline and guide line.
The cut photos are placed in the predict/data directory. Number the pictures from top to bottom and from left to right.
Part 3 filter photos
The value of the screened photos is related to the size of the original photos and the installation position of the camera. The photos here are taken by the 3 Million Pixel camera, and the size is 640 x 480. Therefore, I set the screening size of the digital font to 70 x 80, and the screening results and accuracy can be improved, In all cases (crooked, incomplete, blurred), the area of digital font can be cut out accurately.
import os
from PIL import Image
import glob
dir1 = './predict/data'  # Image file storage address

def images_select(MAX_WIDTH,MAX_HEIGHT):
    paths = glob.glob(os.path.join(dir1, '*.jpg'))
    # Export all files and folders
    for file in paths:
        fp = open(file, 'rb')
        img = Image.open(fp)
        fp.close()
        width = img.size[0]
        height = img.size[1]
        if (width <= MAX_WIDTH) or (height <= MAX_HEIGHT):
            os.remove(file)
Traverse all the photos under the path to determine whether they meet the set size, and remove those that do not.
Part 4 identification photos
This is the most critical step
First in main Py preloads the model in advance, which can reduce the model loading time of 5 ~ 6 seconds.
model = tf.keras.models.load_model("models/number_rcog_mobilenet.h5")
The model is passed to def start by continuously passing parameters_ In the recognize (model) function.
class_names = ['1','2','3','4','5','6','7','8'] # This array will be output at the beginning of model training
Please refer to CNN for the specific source and usage of this class name_ Mobilenet_ Documentation for the training project.
Since I use macOS system, the system will automatically generate a file named DS_Store file, so you should first check whether this file exists in the target path, and delete it if it exists.
predict_dir = './predict/'
test = os.listdir(predict_dir)
if '.DS_Store' in test:
    test.remove('.DS_Store')
After deletion, save the path of each image to the images array
	#Create a new list to save the address of the prediction picture
    images = []
    #Get the address of each picture and save it in the list images
    for testpath in test:  #Loop to get the picture to be tested under the test path
        for fn in os.listdir(os.path.join(predict_dir, testpath)):
            if fn.endswith('JPG'):
                fd = os.path.join(predict_dir, testpath, fn)
                #print(fd)
                images.append(fd)
            elif fn.endswith('jpg'):
                fd = os.path.join(predict_dir, testpath, fn)
                #print(fd)
                images.append(fd)
            elif fn.endswith('png'):
                fd = os.path.join(predict_dir, testpath, fn)
                #print(fd)
                images.append(fd)
Generally speaking, this order problem does not need to be considered, so it has been sorted according to the rules when cutting. Unless the car doesn't stop or walk in the specified way, I can't help it. After all, I don't have time to consider so many problems for four days and three nights.
The next step is to enter the identified program block.
result_list = []
for img in images:
    imgpath = img
    img_init = cv2.imread(img)
    img_init = cv2.resize(img_init, (224, 224))  # Adjust the picture size to 224 * 224 for model reasoning
    cv2.imwrite(img, img_init)
    img = Image.open(img)  # Read picture
    img = np.asarray(img)  # Convert the picture to an array of numpy
    outputs = model.predict(img.reshape(1, 224, 224, 3))  # Input the picture into the model to get the result
    result_index = int(np.argmax(outputs))
    result = class_names[result_index]
    #result.setText(result)
    #return img,result #Returns the picture address and the recognized number
    imgf = imgpath.split('/')[3]
    imgb = imgf.split('.')[0]
    #print(result)
    result_list.append([imgb,result])

result_list = sorted(result_list, key=(lambda x:x[0]))
Here we need to explain the program. First of all, why should I resize the picture? When I train the model, I choose 224x224. If the picture resolution is not 224x224 when I call the model for recognition, the program will report an error. If you want to use pictures of other sizes for recognition, you should set it up during training.
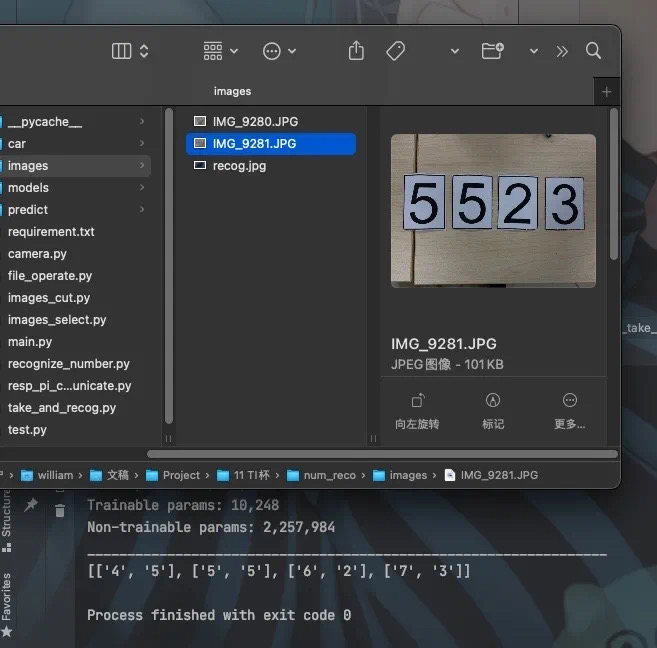
After the final recognition, the format returned is [[serial number, recognition result], [serial number, recognition result], [serial number, recognition result], [serial number, recognition result]].
The specific effect is shown in the figure below. The result is "5523", and there is no problem at all.
Chapter 3 Summary
Due to the error of application scenario analysis, the program runs very slowly on raspberry pie. Later, I saw the relevant solution for a long time. That is, when training the program, we should use INT8 model for quantification, that is, 8 Bit, rather than float 32 (I forgot whether it is float 32 or float 64, which is very large anyway), This requires a big floating change to the training program. I have no ability to change the program, so there is no way to verify it. Then, the image size of the data set used for training should also be appropriately reduced. The resolution of 640x480 is too high and should be reduced to 64x48. The resolution of the photo used for recognition should also be 64x48 or lower, so that it can run on the low-performance machine such as raspberry pie.
In short, this document involves the application of TensorFlow, the application of self training data set and a small part of OpenCV.
I hope some codes and ideas can be helpful.
Limited to my level, if the documents and codes are not properly expressed, please comment.
Chapter 4 complete program
The completion directory of the program is as follows
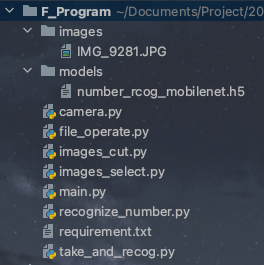
The models in the models need to be based on CNN_Mobilenet_Training program.
Make sure the resolution of the photos in images is 640x480, and then name them the same.
In this way, the project can be rebuilt in case of losing the program.
Section 1 main.py
import take_and_recog
import tensorflow as tf

def TwoDConverToOneD(List):
    new_list = []
    for line in List:
        new_list.append(line[1])
    return new_list

if __name__ == '__main__':
    model = tf.keras.models.load_model("models/number_rcog_mobilenet.h5")
    print(TwoDConverToOneD(take_and_recog.photo_take_and_recog(model)))
Section 2 camera.py
import cv2

def take_pic(path,cam_v):
    cap = cv2.VideoCapture(cam_v)
    ret, frame = cap.read()
    cv2.imwrite(path, frame)
Section 3 take_and_recog.py
import images_cut as ic
import images_select
import recognize_number
import camera

def photo_take_and_recog(model):
    # Save address and threshold setting parameters of photos to be cropped
    PATH = './images/IMG_9281.JPG'
    BIN_LOW = 27
    BIN_HIGH = 255

    # Filter the length and width parameters of photos
    MAX_WIDTH = 70      #70,80
    MAX_HEIGHT = 80

    #camera.take_pic(PATH,0) #Photo save path and camera bit
    #Crop photos according to threshold settings
    ic.images_cut_img_input(PATH,BIN_LOW,BIN_HIGH)
    #Filter out the area of digital cards
    images_select.images_select(MAX_WIDTH,MAX_HEIGHT)

    return recognize_number.start_recognize(model)
Section 4 images_cut.py
import cv2 as cv
import numpy as np
import file_operate
import time

def count_number(num_list, num):
    """
    Count the number of a number in a one-dimensional array
    :param num_list:
    :param num:
    :return: num Number of
    """
    t = 0
    for i in num_list:
        if i == num:
            t += 1
    return t


def cut_level(img, cvalue=255):
    """
    The projection method cuts a picture horizontally, mainly dealing with multiple lines of text
    :param cvalue:  Color of cutting line
    :param img: Incoming as a picture
    :return: Image array after horizontal cutting
    """
    r_list = []
    end = 0
    for i in range(len(img)):
        if count_number(img[i], cvalue) >= img.shape[1]:
            star = end
            end = i
            if end - star > 1:
                # If the difference is greater than one, it means crossing the area to be cut,
                # The region can be obtained according to the values of star and end
                r_list.append(img[star:end, :])
    return r_list


def cut_vertical(img_list, cvalue=255):
    """
    An array of vertically cut pictures by projection method
    :param img_list: The incoming data is an array of (two-dimensional) pictures, not just pictures
    :param cvalue: The value of cutting is the same as cut_level Medium cvalue
    :return: Array of cut pictures
    """
    # If an ordinary binary image is passed in, you need to first upgrade the binary image to an array of images
    if len(np.array(img_list).shape) == 2:
        img_list = img_list[None]
    r_list = []
    for img_i in img_list:
        end = 0
        for i in range(len(img_i.T)):
            if count_number(img_i.T[i], cvalue) >= img_i.shape[0]:
                star = end
                end = i
                if end - star > 1:
                    r_list.append(img_i[:, star:end])
    return r_list


def cut_image_by_projection(img, cvalue=255, patern=2):
    """
    The image after the incoming binarization process obtains each individual number through projection cutting
    The default processing method is to cut horizontally and then vertically
    :param cvalue: According to the cutting value, the default value is 255 (cutting according to white), and 0 (cutting according to black) can be selected
    :param img:Incoming binary image
    :param patern: 2 It refers to two horizontal and vertical cuts, 0 refers to horizontal cutting and 1 refers to vertical cutting
    :return: Returns the image array after cutting
    """
    if patern == 2:
        return cut_vertical(cut_level(img, cvalue=cvalue), cvalue=cvalue)
    elif patern == 1:
        return cut_vertical(img, cvalue=cvalue)
    else:
        return cut_level(img, cvalue=cvalue)


def images_cut_img_input(IMG_PATH,BIN_LOW,BIN_HIGH):
    img = cv.imread(IMG_PATH)
    img_gray = cv.cvtColor(img, cv.COLOR_BGR2GRAY)  # The return value of the function is the converted image
    # Usually 25255
    ret, th1 = cv.threshold(img_gray, BIN_LOW, BIN_HIGH, cv.THRESH_BINARY)
    # After binarization, there are only 0 and 255 pictures. 0 is black and 255 is white
    img_list = cut_image_by_projection(th1)
    count = 1
    file_operate.custom_rmdir('./predict/data/')
    #time.sleep(10)
    for i in img_list:
        # Here you can operate, display or save the cut pictures
        cv.imwrite('./predict/data/'+str(count) + '.jpg', i)
        count += 1
Section 5 file_operate.py
import os
import shutil

def custom_rmdir(rootdir):
    filelist=os.listdir(rootdir)
    for f in filelist:
      filepath = os.path.join( rootdir, f )
      if os.path.isfile(filepath):
        os.remove(filepath)
        #print(filepath+" removed!")
      elif os.path.isdir(filepath):
        shutil.rmtree(filepath,True)
        #print("dir "+filepath+" removed!")
Section 6 images_select.py
import os
from PIL import Image
import glob
dir1 = './predict/data'  # Image file storage address

def images_select(MAX_WIDTH,MAX_HEIGHT):
    paths = glob.glob(os.path.join(dir1, '*.jpg'))
    # Export all files and folders
    for file in paths:
        fp = open(file, 'rb')
        img = Image.open(fp)
        fp.close()
        width = img.size[0]
        height = img.size[1]
        if (width <= MAX_WIDTH) or (height <= MAX_HEIGHT):
            os.remove(file)
Section 7 recognize_number.py
import os
import numpy as np
import cv2
from PIL import Image


def start_recognize(model):
    model.summary() #Output the parameter status of each layer of the model
    class_names = ['1','2','3','4','5','6','7','8']  # This array will be output at the beginning of model training
    #The picture to be predicted is saved here
    predict_dir = './predict/'
    test = os.listdir(predict_dir)
    if '.DS_Store' in test:
        test.remove('.DS_Store')
    #Create a new list to save the address of the prediction picture
    images = []
    #Get the address of each picture and save it in the list images
    for testpath in test:  #Loop to get the picture to be tested under the test path
        for fn in os.listdir(os.path.join(predict_dir, testpath)):
            if fn.endswith('JPG'):
                fd = os.path.join(predict_dir, testpath, fn)
                #print(fd)
                images.append(fd)
            elif fn.endswith('jpg'):
                fd = os.path.join(predict_dir, testpath, fn)
                #print(fd)
                images.append(fd)
            elif fn.endswith('png'):
                fd = os.path.join(predict_dir, testpath, fn)
                #print(fd)
                images.append(fd)
    result_list = []
    for img in images:
        imgpath = img
        #print(img)
        img_init = cv2.imread(img)
        img_init = cv2.resize(img_init, (224, 224))  # Adjust the picture size to 224 * 224 for model reasoning
        cv2.imwrite(img, img_init)
        img = Image.open(img)  # Read picture
        img = np.asarray(img)  # Convert the picture to an array of numpy
        outputs = model.predict(img.reshape(1, 224, 224, 3))  # Input the picture into the model to get the result
        result_index = int(np.argmax(outputs))
        result = class_names[result_index]
        #result.setText(result)
        #return img,result #Returns the picture address and the recognized number

        imgf = imgpath.split('/')[3]
        imgb = imgf.split('.')[0]
        #print(result)
        result_list.append([imgb,result])

    result_list = sorted(result_list, key=(lambda x:x[0]))

    return result_list #Return to the two-dimensional list. The first item is the order and size of the photos, and the second item is the recognized number