J a v a learn Learn pen remember Java learning notes Java learning notes
| Number of layers | title |
|---|---|
| 10 | fledgling |
| 20 | Small trial ox knife |
| 30 | Gradually exposed head and foot |
| 40 | Subtle and refined |
| 50 | do a job with skill and ease |
| 60 | take charge as chief of |
| 70 | Technical champion |
| 80 | enigmatic |
| 90 | stand upon one's pantofles |
| 100 | recover one 's original simplicity |
Common exception throwing types:
| abnormal | Anomaly interpretation |
|---|---|
| ArrayIndexOutOfBoundsException | Error of array subscript out of bounds exception. |
| java.lang.NullPointerException | Null pointer exception |
| The constructor Person(int) is not visible | Constructor Person(int) is not visible |
1, New Java
2, Java syntax
1. Writing grammar
To write Java program code, you must first declare a class, and then write business code to realize the requirements in the class. Class needs to be defined with the class keyword. There can be some modifiers in front of class. Its syntax format is as follows:
[Modifier ] class Class name {
Program code
}
2. Notes
When writing a program, in order to make the code easy to read, some comments are usually added to the code while realizing the function. Annotation is an explanation of a function of a program or a line of code. It can make it easier for developers to understand the role of the code when they read and use the code later.
Comments are only valid in Java source files. When compiling the program, the compiler will ignore these comments and will not compile them into class bytecode files.
There are three types of annotations in Java, as follows:
1. Single line notes
Single line comment is usually used to explain a line of code in the program, which is represented by the symbol "/ /", followed by the annotated content. Specific examples are as follows:
int c = 10; // Define an integer variable c
2. Multiline comments
As the name suggests, multi line comments can be unified for multi line content at the same time. It starts with the symbol "/" and ends with the symbol "/". Specific examples are as follows:
/* Define an integer variable x
 Assign 5 to variable x */
int x;
x = 5;
3. Document notes
Document comments are usually a systematic explanation of a class or method in a program. Developers can extract document comments using the javadoc tool provided by JDK to generate an API help document. Document comments begin with the symbol "/" and end with the symbol "/". Specific examples are as follows:
/**
 * Title: HelloWorld class
 * @author srx
 * @version 1.0
 */
public class HelloWorld {
    /**
     * This is a main() method entry
     * @param args Parameter name
     */
    public static void main(String[] args){
        System.out.println("This is the first one Java Program!");
    }
}
 Note: Note nesting
In Java, some annotations can be nested, while others cannot. Here are two specific cases.
1. Single line comments "/ /" can be nested in multi line comments "/... /". Specific examples are as follows:
/* int c = 10;  // Define an integer c
  int x = 5; */
2. Multi line comment "/... /" cannot be nested in multi line comment "/... /". Specific examples are as follows:
/*
  /*int c = 10;*/
  int x=5;
*/
The code in the second case above cannot be compiled because the first "/" will be paired with the first "/", while the second "* /" will fail if no match is found.
To solve the problem that compilation exceptions may occur when using nested comments, nested use of code comments is usually avoided in actual development. Only in special cases can single line comments be nested in multi line comments.
3. Variable
During the running of the program, some temporary data may be generated at any time. The application program will save these data in some memory units, and each memory unit is identified by an identifier. These memory units are called variables. The defined identifier is the variable name, and the data stored in the memory unit is the value of the variable.
The syntax of defining variables is very simple. You only need to specify the type and name of variables. Its syntax format is as follows:
Variable type variable name [= Initial value];
In the syntax of defining variables above, the variable type determines the data nature and range of the variable, the number of bytes stored in memory and the legal operations that can be performed. The variable name must be a legal identifier, and the content in [] is optional, that is, the variable can be initialized and assigned while defining the variable.
Next, learn the definition of variables through specific code:
int x = 0,y;
y = x+3;
In the above code, the function of the first line of code is to define two int variables X and y, which is equivalent to allocating two memory units. While defining the variable, an initial value 0 is allocated to the variable x, while the variable y does not allocate the initial value. The state of variables X and Y in memory is shown in Figure 1.
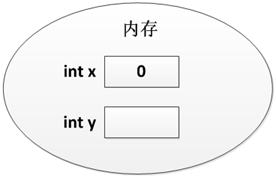
Figure 1 status of X and y variables in memory
The function of the second line of code is to assign value to variable y. when executing the second line of code, the program first takes the value of variable x from memory, then adds it to 3, and finally assigns the result to variable y. at this time, the state of variables X and Y in memory has changed, as shown in Figure 2.
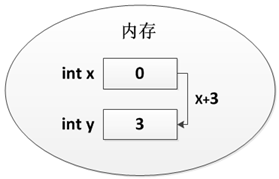
Figure 2 status of X and y variables in memory
4. Constant
A constant is a fixed value in a program. It is data that cannot be changed. For example, number 1, character 'a', floating point number 3.2, etc. In Java, constants include integer constants, floating-point constants, Boolean constants, character constants, etc. Next, we will explain these constants in detail.
1. Integer constant
Integer constant is data of integer type, which can be expressed in four forms: binary, octal, decimal and hexadecimal. The specific description is as follows:
● binary: a sequence of numbers consisting of numbers 0 and 1. After JDK 7, binary literal values can be used to represent integers. At this time, binary values should start with 0b or 0b in order to distinguish them from decimal systems, such as 0b010110100 and 0b1011001.
● octal: numeric sequence starting with 0 and followed by integers in the range of 0 ~ 7 (including 0 and 7), such as 0342.
● decimal system: a sequence of numbers consisting of integers in the range of numbers 0 ~ 9 (including 0 and 9). For example: 198.
● hexadecimal: character sequence starting with 0x or 0x and followed by 09 and AF (including 0 and 9, A and F), such as 0x25AF.
It should be noted that in order to indicate different hexadecimal in the program, the data has a specific identification, and the octal must start with 0, such as 0711 and 0123; Hexadecimal must start with 0x or 0x, such as 0xaf3, 0Xff; When an integer is expressed in decimal, the first bit cannot be 0, except 0 itself. For example, 127 in decimal system is represented as 01111111 in binary, 0177 in octal and 0x7F or 0x7F in hexadecimal.
2. Floating point constant
Floating point constants are decimals used in mathematics. They are divided into float single precision floating point numbers and double double double precision floating point numbers. Single precision floating-point numbers end with f or F, while double precision floating-point numbers end with D or D. Of course, when using floating-point numbers, you can also add no suffix at the end. At this time, Java virtual opportunity recognizes floating-point numbers as double double precision floating-point numbers by default. Floating point constants can also be expressed in exponential form. Specific examples are as follows:
2e3f 3.6d 0f 3.84d 5.022e+23f
3. Character constant
Character constants are used to represent a character. A character constant should be enclosed by a pair of single quotation marks (') in English half width format. It can be English letters, numbers, punctuation marks and special characters represented by escape sequences. Specific examples are as follows:
'a' '1' '&' '\r'
4. String constant
String constants are used to represent a string of consecutive characters. A string constant should be enclosed by a pair of double quotation marks ("") in English half width format. Specific examples are as follows:
"HelloWorld" "123" "Welcome \n XXX" ""
A string constant can contain one or more characters, or it can contain no characters, that is, the length is zero.
5. Boolean constant
Boolean constant is the two Boolean values true and false. This constant is used to distinguish the true and false of a condition.
6. null constant
The null constant has only one value, null, indicating that the reference of the object is empty.
Constants in Java are actually special variables and fixed quantities. They can only be assigned once. The syntax of defining constants in Java is also very simple. You only need to add a final keyword on the basis of the syntax of defining variables. Its syntax format is as follows:
final Constant type constant name [= Initial value];
The above syntax format of defining Java constants is basically the same as that of defining Java variables. Similarly, defining Java constants requires declaring the definition of constant type and constant name, and the constants can be initialized and assigned, or assigned subsequently. The only difference is that when defining Java constants, they must be modified with the final keyword to declare that they are immutable quantities. The specific use examples are as follows:
final int a=0, b; // Define a constant a and b of type int, and initialize the constant a with a value of 0
b= 1;        // Then assign a value to the constant b
 Learn more: Escape Character - backslash (\)
In character constants, the backslash (\) is a special character, called an escape character, which is used to escape the next character. Escaped characters are usually used to represent an invisible character or a character with special meaning. For example, "\ n" means line feed. Some common escape characters are listed below:
● \ r means enter. Position the cursor at the beginning of the current line without skipping to the next line.
● \ n indicates a line break and changes to the beginning of the next line.
● \ tis a Tab character. Move the cursor to the position of the next Tab character, just like using the Tab key in a document.
● \ b indicates Backspace, like Backspace on the keyboard.
The following characters have special meanings and cannot be expressed directly, so they are represented by slash plus another character:
● 'indicates the single quotation mark character. In Java code, the single quotation mark indicates the beginning and end of the character. If you directly write the single quotation mark character ('), the program will think that the first two are a pair and will report an error, so you need to use escape (').
● "indicates the double quotation mark character. In Java code, double quotation marks indicate the beginning and end of the string. The double quotation marks contained in the string need to be escaped, such as" he says, "thank you" ".
● \ refers to the escape character of backslash. Since the slash (\) in Java code is an escape character, it is necessary to use double slash if it is necessary to represent the literal \.
 Learn more: conversion between integer constant and base
From the previous introduction, we can know that integer constants can be expressed in binary, octal, decimal and hexadecimal respectively. Different hexadecimals do not affect the size of the data itself. The same integer constant can be converted between different hexadecimals. The specific conversion methods are as follows:
1. Conversion between decimal and binary
(1) Decimal to binary*
Converting decimal to binary is a process of dividing by 2 to get the remainder. Divide the number to be converted by 2 to get the quotient and remainder. Continue to divide the quotient by 2 until the quotient is 0. Finally, arrange all the remainder in reverse order, and the number obtained is the conversion result.
Take the 6 conversion from decimal to binary as an example, as shown in Figure 1.
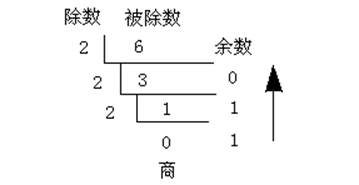
Figure 1 decimal to binary
The remainder calculated by dividing by 2 three times is: 0, 1 and 1. The reverse order of all the remainder is: 110. So the decimal 6 is converted to binary, and the result is 110.
(2) Binary to decimal
To convert binary to decimal, multiply each number on the binary bit by the corresponding power of 2 from right to left. For example, multiply the number of the rightmost first bit by the power of 0 of 2, the number of the second bit by the power of 1 of 2, and the number of the nth bit by the power of n-1 of 2. Then add all the multiplied results to get the converted decimal.
Take the conversion of binary number 01100100 to decimal as an example. The conversion method is as follows:
0 * 20 + 0 * 21 + 1 * 22 + 0 * 23 + 0 * 24 + 1 * 25 + 1 * 26+ 0 * 27 = 100
Since 0 times how much is 0, the above expression can also be abbreviated as:
1 * 22 + 1 * 25 + 1 * 26 = 100
The result 100 is the decimal representation of binary number 01100100.
2. Conversion between binary, octal and hexadecimal
The reason why octal and hexadecimal are used in programming is that they are easy to convert with binary, and they are easier to write and remember than a long string of binary numbers. Next, I will introduce in detail how to convert binary into octal and hexadecimal*
(1) Binary to octal
When converting binary to octal, first divide every three bits of binary number from right to left into a segment (if it is less than three bits, fill 0 on the left), and then convert the three digits of each segment of binary number into one bit of octal. The corresponding relationship of values in the conversion process is shown in Table 1.
Table 1 corresponding table of binary and octal values
| Binary | octal number system |
|---|---|
| 000 | 0 |
| 001 | 1 |
| 010 | 2 |
| 011 | 3 |
| 100 | 4 |
| 101 | 5 |
| 110 | 6 |
| 111 | 7 |
After understanding the rules of binary to octal conversion, we will explain in detail how to convert a binary number 00101010 to octal. The specific steps are as follows:
1) Every three digits are divided into one paragraph, and the result is 000 101 010
2) Replace the values of each paragraph by looking up the table respectively, and the results are as follows:
000→ 0
101→ 5
010→ 2
3) Combine the replacement results, and the conversion result is: 052 (note that octal must start with 0)
(2) Binary to hexadecimal
Binary to hexadecimal is similar to octal, except that every four bits of binary number should be divided into a section (if it is less than four bits, fill 0 on the left), and then convert the four digits of each section of binary number into each bit of octal by looking up the table. The corresponding relationship of values in the process of binary to hexadecimal is shown in Table 2.
Table 2 corresponding table of binary and hexadecimal values
| Binary | hexadecimal | Binary | hexadecimal | |
|---|---|---|---|---|
| 0000 | 0 | 1000 | 8 | |
| 0001 | 1 | 1001 | 9 | |
| 0010 | 2 | 1010 | A | |
| 0011 | 3 | 1011 | B | |
| 0100 | 4 | 1100 | C | |
| 0101 | 5 | 1101 | D | |
| 0110 | 6 | 1110 | E | |
| 0111 | 7 | 1111 | F |
Understand the rules of binary to hexadecimal. Next, learn from an example. Suppose you want to convert a binary number 10100101 to hexadecimal, the specific steps are as follows:
1) Every four bits are divided into one paragraph, and the result is 1010 0101
2) Replace the values of each paragraph by looking up the table respectively, and the results are as follows:
1010 → A
0101 → 5
3) Combine the replacement results, and the conversion result is 0XA5 or 0XA5 (note that hexadecimal must start with 0x or 0x).
5. Data type
Java is a strongly typed programming language, which has strict restrictions on the data types of variables. When defining a variable, the data type of the variable must be declared first, and the value of the same type as the variable must be given when assigning a value to the variable, otherwise the program will have the problem of type matching error during compilation.
In Java, the data types of variables are divided into two types: basic data type and reference data type. All data types in Java are shown in Figure 1.
[the external chain image transfer fails. The source station may have an anti-theft chain mechanism. It is recommended to save the image and upload it directly (img-emyoawig-1624149047165)( https://book.itheima.net/uploads/course/java/images/2.2.2/image-20200525153451748.png )]
Figure 1 data type
Among them, the eight basic data types are embedded in the Java language and have the same size and attributes in any operating system, while the reference data type is the data type defined by the programmer in the Java program. This chapter focuses on the basic data types in Java, and the reference data types will be explained in detail in later chapters.
1. Integer type variable
Integer type variables are used to store integer values, that is, values without decimal parts. In Java, in order to reasonably allocate storage space for integers in different size ranges, integer types are divided into four different types: byte, short, int and long. The storage space occupied by the four types and the value range are shown in Table 1.
Table 1 integer type
| Type name | Occupied space | Value range |
|---|---|---|
| byte | 8 bits (1 byte) | -27 ~ 27-1 |
| short | 16 bits (2 bytes) | -215 ~ 215-1 |
| int | 32 bits (4 bytes) | -231 ~ 231-1 |
| long | 64 bit (8 bytes) | -263 ~ 263-1 |
Table 1 lists the space size and value range of four integer type variables. Among them, the occupied space refers to the memory occupied by different types of variables. For example, an int type variable will occupy 4 bytes of memory space. The value range is the range that the value stored in the variable cannot exceed. For example, the value stored in a byte type variable must be an integer between - 27 and 27-1.
When assigning a value to a variable of long type, it should be noted that the assigned value should be followed by a letter "L" (or lowercase "L"), indicating that the assignment is of long type. If the assigned value does not exceed the value range of int type, the letter "L" (or lowercase "L") can be omitted. Specific examples are as follows:
long num = 2200000000L; // The assigned value exceeds the value range of int type, and the letter L must be added after it
long num = 198L;          // The assigned value does not exceed the value range of int type, and the letter L can be added after it
long num = 198;             // The assigned value does not exceed the value range of int type, and the letter L can be omitted after it
2. Floating point type variable
Floating point type variables are used to store decimal values. In Java, there are two types of floating point numbers: single precision floating point number (float) and double precision floating point number (double). The floating-point number represented by double type is more accurate than that of float type. The storage space occupied by the two floating-point numbers and the value range are shown in Table 2.
Table 2 floating point types
| Type name | Occupied space | Value range |
|---|---|---|
| float | 32 bits (4 bytes) | 1.4E-45 ~ 3.4E+38,-1.4E-45 ~ -3.4E+38 |
| double | 64 bit (8 bytes) | 4.9E-324 ~ 1.7E+308,-4.9E-324 ~ -1.7E+308 |
Table 2 lists the space size and value range occupied by two floating-point type variables. In the value range, E represents the index based on 10, and the "+" and "-" signs after E represent positive and negative indexes. For example, 1.4E-45 represents 1.4 * 10-45.
In Java, a decimal will be defaulted to the value of double type. Therefore, when assigning a value to a variable of float type, the letter "F" (or lowercase "F") must be added after the assigned value. When assigning a value to a variable of double type, the character "d" (or lowercase "d") can be added after the assigned value or not. Specific examples are as follows:
float f = 123.4f;           // Assigning a value to a variable of type float must be followed by the letter F or F
double d1 = 199.3d;       // Assign a value to a variable of type double, which can be followed by the letter D or D
double d2 = 100.1;           // Assign a value to a variable of type double, and the letter D or D can be omitted after it
In the program, you can also assign an integer value to a floating-point variable. For example, the following writing is also possible.
float f = 100;                // Declare a variable of type float and assign an integer value
double d = 100;            // Declare a variable of type double and assign an integer value
3. Character type variable
Character type variables are used to store a single character, which is represented by char in Java. Each char type character variable in Java will occupy 2 bytes. When assigning a value to a variable of char type, you need to enclose the characters with a pair of single quotation marks ('') in English half width format, such as' a ', or assign a variable of char type to an integer within the range of 0 ~ 65535, and the computer will automatically convert these integers into the corresponding characters, such as the character corresponding to value 97 is' a'. The following two lines of code can achieve the same effect.
char c = 'a';              // Assign the character 'a' to a variable of type char
char ch = 97;              // Assign an integer 97 to a variable of type char, which is equivalent to the assignment character 'a'
4. Boolean variable
boolean variables are used to store boolean values, which are represented by boolean in Java. Variables of this type have only two values, namely true and false. Specific examples are as follows:
boolean flag = false;     // Declare a boolean variable with an initial value of false
flag = true;              // Change the value of flag variable to true
5. Variable type conversion
In the program, when the value of one data type is assigned to a variable of another data type, data type conversion is required. According to different conversion methods, data type conversion can be divided into two types: automatic type conversion and forced type conversion.
1. Automatic type conversion
Automatic type conversion is also called implicit type conversion, which means that two data types do not need to be explicitly declared in the process of conversion. When a value with a small value range of one type is directly assigned to another data type variable with a large value range, the system will perform automatic type conversion, otherwise forced type conversion is required.
Automatic type conversion in Java is like the process of changing a small bottle of water into a large bottle. When we pour a small bottle of water into a large bottle, because the capacity of the small bottle is smaller than that of the large bottle, the poured water can never overflow the large bottle. Similarly, in Java, when the variable value of the data type with small value range is assigned to the variable of the data type with large value range, the program will not have any problems.
The automatic conversion between different data types supported in Java is shown in Figure 1.
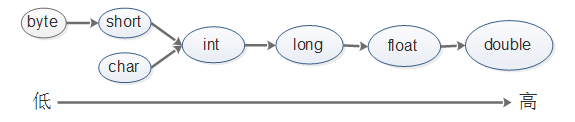
Figure 1 automatic type conversion diagram
As can be seen from Figure 1, byte, short, char and other types of data with small value range in Java can be automatically converted to data types with large value range (such as int type), and finally can be automatically converted to double precision floating-point number type. For example:
byte b = 3;
int x = b;             // The program converts the variable b of byte type into int type without special declaration
double y = x;         // Convert the variable x of int type to double type without special declaration
In the above statement, first assign the value of variable b of byte type to variable x of int type, and then assign variable x of int type to y of double type. Since the value range of int (double) type is larger than that of byte (int), the compiler will not cause data loss in the process of assignment, so the compiler can automatically complete this conversion without reporting any errors during compilation.
2. Cast type
Forced type conversion is also called explicit type conversion, which means that the conversion between two data types needs to be explicitly declared. When the two types are incompatible with each other, or the value range of the target type is less than that of the source type, automatic type conversion cannot be carried out, and forced type conversion is required.
Forced type conversion in Java is like pouring a large bottle of water into a small bottle. If the capacity of the water in the large bottle is less than the size of the small bottle, the water can be poured completely; If there is too much water in the large bottle and its capacity exceeds the size of the small bottle, the extra water will overflow and cause losses. Similarly, assigning a variable value of a data type with a large value range to a variable of a data type with a small value range may cause data loss. Therefore, the system does not support this behavior by default. It is up to the developer to decide whether to perform forced type conversion.
Next, first demonstrate an example of error type conversion, as shown in file 1.
File 1 example01 java
 1    public class Example01 {
 2        public static void main(String[] args) {
 3            int num = 4;
 4            byte b = num;
 5            System.out.println(b);
 6        }
 7    }
The program compiles with errors, and the results are shown in Figure 2.
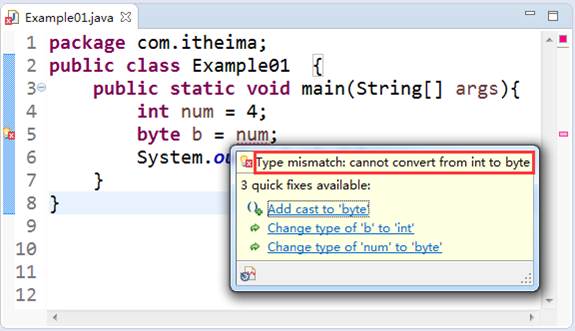
Figure 2 operation results
When writing Java code, the Eclipse development tool will automatically detect the written code. If problems are found, it will remind in the form of red wavy lines and red crosses. When hovering the mouse over the position where the red wavy line error occurs, a suspension box will appear, in which the error message and quick solution will be prompted.
As can be seen from Figure 2, type conversion exception occurs during program compilation, prompting "cannot convert from int to byte". The reason for this error is that when an int value is assigned to a byte type variable b, the value range of int type is greater than that of byte type. Such assignment may lead to value overflow, that is, a byte variable cannot store four bytes of integer value.
In this case, mandatory type conversion is required. The syntax format is as follows:
Target type variable name = (Target type) value;
Change the code on line 4 in file 1 to the following code:
byte b = (byte) num;
Save the source file after modification, and the program in Eclipse will no longer report errors. The running results of the program are shown in Figure 3.

Figure 3 operation results
It should be noted that during forced type conversion of variables, data types with a large value range will be converted to data types with a small value range. For example, converting a number of int type to byte type is very easy to cause loss of data accuracy. Next, it is illustrated by a case, as shown in document 2.
File 2 example02 java
 1    public class Example02 {
 2        public static void main(String[] args) {
 3            byte a;                // Define a variable of type byte
 4            int b = 298;          // Defines a variable b of type int, which is expressed in hexadecimal
 5            a = (byte) b;
 6            System.out.println("b=" + b);
 7            System.out.println("a=" + a);
 8        }
 9    }
The operation results are shown in Figure 4.

>Figure 4 operation results
In file 2, the fifth line of code performs forced type conversion, converts a variable b of int type into byte type, and then assigns the result of forced conversion to variable a of byte type. As can be seen from figure 2-7, the value of variable B itself is "298". However, after being assigned to variable a, the value of variable a is 42, which indicates that the accuracy is lost in the process of forced conversion. The reason for this phenomenon is that the variable B is of type int, which occupies 4 bytes in memory, while the data of type byte occupies 1 byte in memory. When the type of variable B is forcibly changed to type byte, the data of the first three high-order bytes has been lost, so the value has changed. The process of converting int type to byte type is shown in Figure 5.
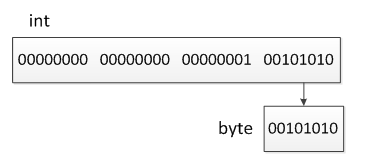
Figure 5 cast int type variable to byte type
 Learn more: automatic promotion of expression type
The so-called expression refers to an expression composed of variables and operators. When a variable is operated in an expression, automatic type conversion may also occur, which is the automatic promotion of the expression data type. For example, the type of byte, short and char variables will be automatically promoted to int during operation, and then the operation will be carried out. The following is a specific case to demonstrate, as shown in file 3*
File 3 example03 java
 1    public class Example03 {
 2        public static void main(String[] args) {
 3            byte b =3;
 4            short s =4;
 5            char c =5;
 6            //Add the values of byte, short and char, and assign them to byte
 7            byte b2 = b+s+c;
 8             System.out.println("b2=" + b2);
 9        }
 10    }
Program compilation error, as shown in Figure 6.
[the external chain picture transfer fails. The source station may have an anti-theft chain mechanism. It is recommended to save the picture and upload it directly (img-dhd5jqrf-1624149047171)( https://book.itheima.net/uploads/course/java/images/2.2.3/clip_image002-1590392532835.jpg )]
Figure 6 program compilation error
In Figure 6, the same type conversion error as in Figure 5 occurs because during the operation of expression b+s+c, b of byte type, s of short type and c of char type are automatically promoted to int type, and the operation result of the expression becomes int type. At this time, if the result is assigned to a variable of byte type, an error will be reported, and forced type conversion is required.
To resolve the error in file 3, the code on line 5 in file 3 must be modified to:
byte b2 = (byte) (b+s+c);
After compiling again, the program will not report errors, and the running results are shown in Figure 7.

Figure 7 operation results
3, Operator
1. Arithmetic operator
| operator | operation | example | result |
|---|---|---|---|
| + | Plus sign | +3 | 3 |
| - | minus sign | b=4;-b; | -4 |
| + | plus | 5+5 | 10 |
| - | reduce | 6-4 | 2 |
| * | ride | 3*4 | 12 |
| / | Division (i.e. the result of integral division in an arithmetic) | 7/5 | 1 |
| % | Modulo (i.e. remainder in arithmetic) | 7%5 | 2 |
| ++ | Self increasing (front) | a=2;b=++a; | a=3;b=3; |
| ++ | Self increasing (later) | a=2;b=a++; | a=3;b=2; |
| – | Self subtraction (front) | a=2;b=–a; | a=1;b=1; |
| – | Self subtraction (after) | a=2;b=a–; | a=1;b=2; |
Note: in the operation of modulus (%), the positive and negative of the operation result depends on the sign of the module (% the number on the left) and has nothing to do with the sign of the module (% the number on the right). For example: (- 5)% 3 results in - 2, while 5% (- 3) results in 2.
2. Assignment operator
| operator | operation | example | result |
|---|---|---|---|
| = | assignment | a=3;b=2; | a=3;b=2; |
| += | Plus equals | a=3;b=2;a+=b; | a=5;b=2; |
| -= | Minus equals | a=3;b=2;a-=b; | a=1;b=2; |
| *= | Multiply equal | a=3;b=2;a*=b; | a=6;b=2; |
| /= | Division equals | a=3;b=2;a/=b; | a=1;b=2; |
| %= | Modulo equal | a=3;b=2;a%=b; | a=1;b=2; |
In the process of assignment, the operation sequence is from right to left, and the result of the expression on the right is assigned to the variable on the left. In the use of assignment operators, we should pay attention to the following problems.
1. In Java, you can assign values to multiple variables through one assignment statement. Specific examples are as follows:
int  x, y, z;
x = y = z = 5;              // Assign values to three variables at the same time
In the above code, an assignment statement assigns the values of variables x, y and z to 5 at the same time. It should be noted that the following writing method is not allowed in Java:
int x = y = z = 5; // This is wrong because the data types of variables y and z are not declared in advance
3. Comparison operator
The comparison operator is used to compare the size of two constants or variables. The result is a Boolean value, that is, true or false.
| operator | operation | example | result |
|---|---|---|---|
| == | Equal to | 4 == 3 | false |
| != | Not equal to | 4 != 3 | true |
| < | less than | 4 < 3 | false |
| > | greater than | 4 > 3 | true |
| <= | Less than or equal to | 4 <= 3 | false |
| >= | Greater than or equal to | 4 >= 3 | true |
When using the comparison operator, you should pay attention to one problem. The comparison operator "= =" cannot be mistakenly written as the assignment operator "=".
4. Logical operator
Logical operators are used to operate on Boolean values or expressions, and the result is still a Boolean value. Next, a table is used to show the logical operators in Java and their usage.
| operator | operation | example | result |
|---|---|---|---|
| & | And | true & true | true |
| & | And | true & false | false |
| & | And | false & false | false |
| & | And | false &true | false |
| | | or | true | true | true |
| | | or | true | false | true |
| | | or | false| false | false |
| | | or | false| true | true |
| ^ | XOR | true ^ true | false |
| ^ | XOR | true ^ false | true |
| ^ | XOR | false ^ false | false |
| ^ | XOR | false ^ true | true |
| ! | wrong | !true | false |
| ! | wrong | !false | true |
| && | Short circuit and | true && true | true |
| && | Short circuit and | true && false | false |
| && | Short circuit and | false && false | false |
| && | Short circuit and | false && true | false |
| || | Short circuit or | true || true | true |
| || | Short circuit or | true || false | true |
| || | Short circuit or | false|| false | false |
| || | Short circuit or | false|| true | true |
In the process of using logical operators, you should pay attention to the following details:
1. Logical operators can perform logical operations on expressions with Boolean results. For example: 5 > 3 & & 1= The result of 0 is true.
2. Operators "&" and "& &" both represent and operations. If and only if the operands on both sides of the operator are true, the result is true, otherwise the result is false. When the right side of operators "&" and "& &" is an expression, there are some differences in their use. When "&" is used for operation, the expression on the right will operate whether the left is true or false. If "& &" is used for operation, when the left is false, the expression on the right will not operate. Therefore "& &" is called short circuit and.
Next, let's take a case to deeply understand the difference between the two, as shown in file 1.
File 1 example06 java
 1    public class Example06 {
 2        public static void main(String[] args) {
 3            int x = 0; // Define the variable x with an initial value of 0
 4            int y = 0; // Define the variable y with an initial value of 0
 5            int z = 0; // Define the variable z with an initial value of 0
 6            boolean a, b; // Define boolean variables a and b
 7            a = x > 0 & y++ > 1;  // Logical operator & operates on an expression and assigns the result to a
 8            System.out.println("a = " + a);
 9            System.out.println("y = " + y);
 10            b = x > 0 && z++ > 1; // The logical operator & & operates on the expression and assigns the result to b
 11            System.out.println("b = " + b);
 12            System.out.println("z = " + z);
 13        }
 14    }
The operation results are shown in Figure 1.
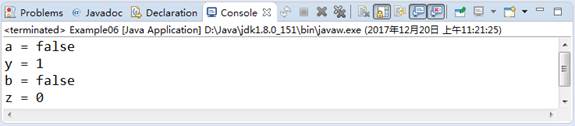
Figure 1 operation results
In file 1, three integer variables X, y and z are defined with initial values of 0, and two Boolean variables A and b are defined at the same time. The code in line 7 of the file uses the "&" operator to operate the two expressions. The result of the expression x > 0 on the left is false. At this time, no matter what the comparison result of the expression y + + > 0 on the right is, the result of the whole expression x > 0 & Y + + > 1 will be false. Since a single operator "&" is used, the expressions on both sides of the operator will be operated, so the variable y will be self incremented, and the value of Y at the end of the operation of the whole expression is 1. The code on line 10 in the file is short circuit and operation, and the operation result is false as the code on line 7. The difference is that the short circuit and "& &" operator are used. When the left is false, the expression on the right will no longer operate, so the value of variable z is still 0.
3. Operators "|" and "|" both represent or operate. When the operand or expression on either side of the operator is true, the result is true. When the values on both sides are false, the result is false. Similar to the operation, "||" indicates short circuit or. When the left side of the operator "|" is true, the expression on the right side will not operate. Specific examples are as follows:
int x = 0;
int y = 0;
boolean b = x==0 || y++>0
After the above code block is executed, the value of b is true and the value of y is still 0. The reason for this result is that if x==0 on the left of the operator "|", the result is true, then the expression on the right will not operate, and the value of y will not change.
4. The operator "^" indicates an exclusive or operation. When the Boolean values on both sides of the operator are the same (both true or false), the result is false. When the Boolean values on both sides are different, the result is true.
5. Bitwise operator
Bit operators are symbols that operate on each bit of binary numbers. They operate specifically on numbers 0 and 1. Next, use a table to show the bitwise operators in Java and their usage.
| operator | operation | example | result |
|---|---|---|---|
| & | Bitwise AND | 0 & 0 | 0 |
| & | Bitwise AND | 0 & 1 | 0 |
| & | Bitwise AND | 1 & 1 | 1 |
| & | Bitwise AND | 1 & 0 | 0 |
| | | Bitwise OR | 0 | 0 | 0 |
| | | Bitwise OR | 0 | 1 | 1 |
| | | Bitwise OR | 1 | 1 | 1 |
| | | Bitwise OR | 1 | 0 | 1 |
| ~ | Reverse | ~0 | 1 |
| ~ | Reverse | ~1 | 0 |
| ^ | Bitwise XOR | 0 ^ 0 | 0 |
| ^ | Bitwise XOR | 0 ^ 1 | 1 |
| ^ | Bitwise XOR | 1 ^ 1 | 0 |
| ^ | Bitwise XOR | 1 ^ 0 | 1 |
| << | Shift left | 00000010<<2 | 00001000 |
| << | Shift left | 10010011<<2 | 01001100 |
| >> | Shift right | 01100010>>2 | 00011000 |
| >> | Shift right | 11100010>>2 | 11111000 |
| >>> | unsigned right shift | 01100010>>>2 | 00011000 |
| >>> | unsigned right shift | 11100010>>>2 | 00111000 |
It can be seen that the essence of bit operators in Java is to operate on binary numbers 0 and 1. Therefore, when using bit operators, the operands will be converted into binary numbers for bit operation, and then the obtained results will be converted into the desired binary numbers.
Next, the bitwise operators described in table 2-10 will be explained in detail through some specific examples. For aspect description, the following operations are all for a byte type number, that is, a byte size number, as follows:
1. The bit operator "&" is to perform a bitwise and operation on the two operands involved in the operation in the form of binary numbers. If both binary bits on the same bit are 1, the operation result of this bit is 1, otherwise it is 0.
For example, the bitwise sum operation is performed on 6 and 11. The binary number corresponding to a byte type number 6 is 00000110 and the binary number corresponding to number 11 is 00001011. The specific calculation process is as follows:
00000110
 &
00001011
----—
00000010
The operation result is 00000010, corresponding to the decimal value 2.
2. The bitwise operator "|" is to "bitwise or" the two operands involved in the operation in the form of binary numbers. If one of the two binary bits on the same bit has a value of 1, the operation result of this bit is 1, otherwise it is 0.
For example, 6 and 11 are or calculated. The specific calculation process is as follows:
00000110
 |
00001011
----—
00001111
The operation result is 00001111, corresponding to the decimal value of 15.
3. The bitwise operator "~" operates on only one operand. It will negate each operand in binary form. If the binary bit is 0, the inverse value is 1; If it is 1, the inverse value is 0.
For example, the inverse operation of 6 is carried out. The specific calculation process is as follows:
~ 00000110
----—
11111001
The operation result is 11111001, corresponding to the decimal value - 7.
4. The bit operator "^" is to "XOR" the two operands involved in the operation in the form of binary numbers. If the two binary values on the same bit are the same, the value is 0, otherwise it is 1.
For example, 6 and 11 are XORed. The specific calculation process is as follows:
00000110
^
00001011
----—
00001101
The operation result is 000011101, corresponding to decimal value 13.
5. The bit operator "< <" is to move all binary bits of the binary form of the operand to the left by a specified number of bits. During operation, the part moved from the left is rounded off, and the space on the right is filled with 0.
For example, a byte type number 11 is represented as 00001011 in binary, and it is shifted to the left by one bit. The specific calculation process is as follows:
00001011 <<1
----—
00010110
The operation result is 00010110, corresponding to decimal value 22. Conditional operator
The conditional operator, also known as ternary operator (or ternary operator), is composed of the symbol "?:" and its syntax format is as follows:
(boolean_expr) ? true_statement : false_statement;
The operation rules of the above conditional operators are: Boolean the Boolean expression first_ Expr evaluation. If the result is true, execute the expression true before the colon ":_ Statement, if not, execute the following expression false_statement.
Basic usage examples of conditional operators are as follows:
int store = 5;
System.out.println(store <=0 ? "No stock!" : "The inventory is:"+store);
// The output result is "inventory quantity: 5"
The conditional operator "?:" is basically equivalent to the "if... else" conditional statement in the selection structure statement, which belongs to the simplified writing method. The "if... else" conditional statement will be explained in detail in the following sections. There is no need to delve into its specific usage here.
6. Bit operator "> >" is to move all binary bits of the operand to the right by the specified number of bits. During operation, the empty bits on the left are filled with 0 or 1 according to the sign bit of the original number (all negative numbers are filled with 1, and all positive numbers are filled with 0), and the part removed on the right is rounded off.
For example, a byte type number 11 is represented as 00001011 in binary. Move it one bit to the right. The specific calculation process is as follows.
00001011 >>1
----—
00000101
The operation result is 00000101, corresponding to decimal value 5.
7. The bit operator "> > >" is an unsigned right shift, which is to move all binary bits of the operand binary form to the right by the specified number of bits regardless of positive and negative numbers. During operation, all the blanks on the left are filled with 0 (regardless of the positive and negative of the original number), and the part moved on the right is rounded off.
For example, a byte type number 11 is represented as 00001011 in binary, and it is moved one bit to the right without sign. The specific calculation process is as follows:
00001011 >>>1
----—
00000101
The operation result is 00000101, corresponding to decimal value 5.
6. Conditional operator
The conditional operator, also known as ternary operator (or ternary operator), is composed of the symbol "?:" and its syntax format is as follows:
(boolean_expr) ? true_statement : false_statement;
The operation rules of the above conditional operators are: Boolean the Boolean expression first_ Expr evaluation. If the result is true, execute the expression true before the colon ":_ Statement, if not, execute the following expression false_statement.
Basic usage examples of conditional operators are as follows:
int store = 5;
System.out.println(store <=0 ? "No stock!" : "The inventory is:"+store);
// The output result is "inventory quantity: 5"
The conditional operator "?:" is basically equivalent to the "if... else" conditional statement in the selection structure statement, which belongs to the simplified writing method. The "if... else" conditional statement will be explained in detail in the following sections. There is no need to delve into its specific usage here.
7. Priority of operator
When calculating some complex expressions, it is necessary to clarify the order in which all operators in the expression participate in the operation. This order is usually called the priority of operators. Next, show the priority of operators in Java through a table. The smaller the number, the higher the priority.
| priority | operator |
|---|---|
| 1 | . [] () |
| 2 | ++ – ~ ! |
| 3 | * / % |
| 4 | + - |
| 5 | << >> >>> |
| 6 | < > <= >= |
| 7 | == != |
| 8 | & |
| 9 | ^ |
| 10 | | |
| 11 | && |
| 12 | || |
| 13 | ?: |
| 14 | = *= /= %= += -= <<= >>= >>>= &= ^= |= |
int a =2;
int b = a + 3*a;
System.out.println(b);
The running result is 8. Since the priority of operator '' is higher than that of operators "+" and "=", first operate 3a to get the result of 6, then add 6 to a, and finally assign value to variable b through operator "=" to get the final result of 8.
int a =2;
int b = (a+3) * a;
System.out.println(b);
The running result is 10. Since the operator "()" has the highest priority, first operate a+3 in parentheses to get the result of 5, then multiply 5 by a, and finally assign the operator "=" to variable b to get the final result of 10.
In fact, there is no need to deliberately remember the priority of operators. When writing programs, try to use parentheses "()" to realize the desired operation order to avoid ambiguity.
4, Select structure statement
1. if conditional statement
if conditional statements have three syntax formats:
1. if statement
If statement refers to processing if certain conditions are met. For example, if a person is under the age of 18, it can be determined that the person is a minor. This sentence can be described by the following pseudo code:
if (Under the age of 18) {
  This person is a minor!
}
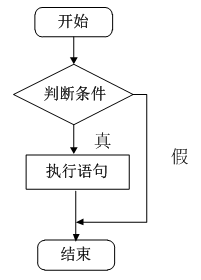
The above example describes the usage of if statement. In Java, the specific syntax format of if statement is as follows:
if (Judgment conditions){
  Execute statement
}
In the above syntax format, the judgment condition is a Boolean value. When the judgment condition is true, the execution statement in {} will be executed. The execution flow of if statement is shown in Figure 1.
Next, use the if conditional statement to demonstrate the above scenario description, as shown in file 1.
File 1 example07 java
 1    public class Example07 {
 2        public static void main(String[] args) {
 3            int age = 17;    //The assumed age is 17 years old
 4            if (age < 18) { // Judge whether the age is over 18 years old
 5                System.out.println("This person is a minor!");
 6            }
 7        }
 8    }
Operation results:

analysis:
In file 1, a variable age of type int is defined, and the attribute value is assumed to be 17. In the judgment condition of the if statement, judge whether the value of age is less than 18. It is obvious that the condition is true. You will choose to execute the execution statement in {} after the if statement and output "this person is a minor!" Information about.
2. if... else statement
If... else statement means that if certain conditions are met, some processing will be carried out, otherwise another processing will be carried out. For example, to judge the parity of a positive integer, if the number can be divided by 2, it is an even number, otherwise the number is an odd number.
The syntax format of if... else statement is as follows:
if (Judgment conditions){
    Execute statement 1
    ...
}else{
    Execute statement 2
    ...
}
In the above syntax format, the judgment condition is a Boolean value. When the judgment condition is true, the execution statement 1 in {} after if will be executed; otherwise, the execution statement 2 in {} after else will be executed. The execution flow of if... Else statement is shown in Figure 3.

Figure 3 flow chart of if... else statement
Next, use the if... else statement to implement a program to judge odd and even numbers, as shown in file 2.
File 2 example08 java
 1    public class Example08 {
 2        public static void main(String[] args) {
 3            int num = 19;
 4            if (num % 2 == 0) {
 5                // If the judgment condition holds, num can be divided by 2
 6                System.out.println(num+"Is an even number");
 7            } else {
 8                  // If the judgment condition is not tenable, num cannot be divided by 2
 9                System.out.println(num+"It's an odd number");
 10            }
 11        }
 12    }
The operation results are shown in Figure 4.

Figure 4 operation results
In file 2, the value of variable num is 19, and the result of 19% 2 is 1, which is not equal to 0. The judgment condition is not tenable. Therefore, the statement in {} after else will be executed and the information "19 is an odd number" will be output.
Tip:
The if... else statement in the above case can also be replaced by the ternary operation learned above. The output statement after replacement is as follows:
System.out.println(num % 2 == 0 ? num+"Is an even number" :num+"It's an odd number" );
3. If... else if... else statement
If... else if... else statements are used to branch multiple conditions for different processing. For example, grade a student's test score: if the score is greater than 80, the grade is excellent; Otherwise, if the score is greater than 70, the grade is good; Otherwise, if the score is greater than 60, the grade is medium; Otherwise, the grade is poor.
If... else the specific syntax format of if... else statement is as follows.
if (Judgment condition 1) {
    Execute statement 1
} else if (Judgment condition 2) {
    Execute statement 2
}
...
else if (Judgment conditions n) {
    Execute statement n
} else {
    Execute statement n+1
}
In the above syntax format, the judgment conditions are Boolean values. When the judgment condition 1 is true, the execution statement 1 in {} after if will execute; When judgment condition 1 is false, judgment condition 2 will continue to be executed. If it is true, statement 2 will be executed, and so on. If all judgment conditions are false, it means that all conditions are not met, and the execution statement n+1 in {} after else will be executed.
The execution flow of if... else statement is shown in Figure 5.

Figure 5 flow chart of if... else if... else statement
Next, use the if... else if... else statement to realize the program of grading students' test scores, as shown in file 3.
File 3 example09 java
 1    public class Example09 {
 2        public static void main(String[] args) {
 3            int grade = 75; // Define student achievement
 4            if (grade > 80) {
 5                // Meet the conditions grade > 80
 6                System.out.println("This grade is excellent");
 7            } else if (grade > 70) {
 8                // The condition grade > 80 is not met, but the condition grade > 70 is met
 9                System.out.println("This grade is good");
 10            } else if (grade > 60) {
 11                // The condition grade > 70 is not met, but the condition grade > 60 is met
 12                System.out.println("The grade of this grade is medium");
 13            } else {
 14                // The condition grade > 60 is not met
 15                System.out.println("The grade of this grade is poor");
 16            }
 17        }
 18    }
The operation results are shown in the figure below:

analysis:
In document 3, it is defined that the student's grade is 75. Since it does not meet the first judgment condition grade > 80, it will continue to execute the second judgment condition downward; Since the condition of grade > 70 is met, the message "the grade of this grade is good" will be output.
2. switch conditional statement
Switch conditional statement is also a very common choice structure statement, which is composed of a switch control expression and multiple case keywords. Different from the if conditional statement, the result type of the control expression of the switch conditional statement can only be byte, short, char, int, enum and String, but not boolean. The basic syntax format of the switch conditional statement is as follows:
switch (Control expression){
    case Target value 1:
        Execute statement 1
        break;
    case Target value 2:
        Execute statement 2
        break;
    ...
    case target value n:
        Execute statement n
        break;
    default:
        Execute statement n+1
        break;
}
In the above syntax format, the switch statement matches the value of the control expression with the target value in each case. If the matching value is found, the execution statement after the corresponding case will be executed, and the switch statement will be jumped out through the break keyword; If the target value in all cases is searched and no matching value is found, the statement after default will be executed. The break keyword in the switch statement will be introduced in detail in the following sections. Here, readers only need to know that the function of break is to jump out of the switch statement.
Next, a case of judging the current season according to the month is used to demonstrate the use of switch conditional statements, as shown in file 1.
File 1 example10 java
 1    public class Example10{
 2        public static void main(String[] args) {
 3            int month = 5; //It is assumed that the current month is May
 4            switch (month) {
 5            case 12:
 6            case 1:
 7            case 2:
 8                System.out.println("The current time is winter");
 9                break;
 10            case 3:
 11            case 4:
 12            case 5:
 13                System.out.println("The current time is spring");
 14                break;
 15            case 6:
 16            case 7:
 17            case 8:
 18                System.out.println("The current time is summer");
 19                break;
 20            case 9:
 21            case 10:
 22            case 11:
 23                System.out.println("The current time is winter");
 24                break;
 25            default:
 26                System.out.println("The month entered is incorrect!!!");
 27                break;
 28            }
 29        }
 30    }
The operation results are shown in Figure 1.

Figure 1 operation results
As can be seen from file 1, when multiple case target values will execute the same execution statement, you can write the multiple case labels side by side and write the execution statement only once.
In file 1, since the value of the variable month is 5 (i.e. the current month is may), the judgment result of the whole switch statement meets the conditions of line 12 code, so "the current time is spring" is output. The default statement in the file is used to handle the case that does not match the previous case target value. If the code in line 3 is replaced with "int month= 13;", After running the program again, the output result is shown in Figure 2.

Figure 2 operation results
be careful:
When using switch conditional statements, we should pay special attention to two points: first, the order of multiple cases and default tags in {} after switch conditional statements can be random, which does not affect the execution result of the program; Second, the break keyword must be added after the execution statement in the case and default tags to jump out of the current switch conditional statement after the execution of the statement. Otherwise, the program will then execute the subsequent execution statement until the break keyword or the end of the switch statement is encountered.
5, Array
1. Definition of array
Array type[] Array name = new Array type[Array length];
Array type[] Array name = new Array type[]{Array element 0,Array element 1,...};
Array type[] Array name = {Array element 0,Array element 1,...};
Examples of the actual use of the above three syntax formats for defining arrays are as follows:
int[] ids = new int[100];
String[] names = new String[]{"Zhang San","tom",...};
Object[] object = {"Zhang San","tom",...};
The first method defines a variable ids of int [] array type, and uses new int[100] to specify that the length of the array (that is, the number of elements) is 100, but does not assign a value to the elements in the array; The second and third methods define an array variable names and object of type String [] and object [] respectively, and both initialize and assign values to the array through the braces "{}" on the right of "=".
As for the storage mode of array in memory, the first method of defining array above is taken as an example to explain in detail. The first method of array definition is equivalent to defining 100 variables of int type in memory. The name of the first variable is ids[0], the name of the second variable is ids[1], and so on. The name of the 100th variable is ids[99], and the initial value of these variables is 0. In order to better understand the definition of array, the above code can be divided into two sentences, as follows:
int[] ids;      // Declare a variable of type int []
ids = new int[100]; // Create an array with a length of 100 and assign the array address to the variable x of array type
Next, the memory allocation during the creation of the array is explained in detail through two memory diagrams.
The first line of code int[] ids; Declared a variable ids, whose type is int [], that is, an array of int type. The variable ids will occupy a memory unit, and it is not assigned an initial value. At this time, the status of ids in memory is shown in the memory status diagram.
The second line of code ids = new int[100]; Create an array and assign the memory address of the array to the variable ids. During the program running, you can use the variable ids to reference the array. At this time, the state in memory will change, as shown in the memory state diagram.
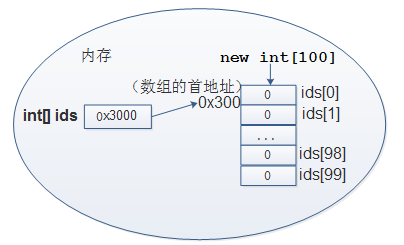
In the figure, the variable ids references the array. There are 100 elements in the array, and the initial value is 0. Each element in the array has an index (also known as a subscript). To access the elements in the array, you can use the form of "array name [subscript]", "ids[0],..., ids[99]". It should be noted that the minimum index in the array is 0 and the maximum index is "length of array - 1". In Java, in order to obtain the length of the array conveniently, a length attribute is provided. In the program, the length of the array, that is, the number of array elements, can be obtained by means of "array name. Length".
2. Array operation
2.1. Array traversal
- Using for loop traversal
 1    public class Example22 {
 2        public static void main(String[] args) {
 3            int[] arr = { 1, 2, 3, 4, 5 };  // Define array
 4            // Use the for loop to traverse the elements of the array
 5            for (int i = 0; i < arr.length; i++) {
 6                System.out.println(arr[i]+","); // Access elements by index
 7            }
 8        }
 9    }
2.2 acquisition of maximum value
A temporary variable Max is defined to remember the maximum value of the array. First, assume that the first element arr[0] in the array is the maximum value, and then use the for loop to traverse the array. In the process of traversal, as long as an element larger than max value is encountered, the element is assigned to max. in this way, the variable Max can remember the maximum value in the array at the end of the loop.
 1    public class Example23 {
 2        public static void main(String[] args) {
 3            // 1. Define an int [] array
 4            int[] arr = { 4, 1, 6, 3, 9, 8 };
 5            // 2. The variable max is defined to remember the maximum number. First, assume that the first element is the maximum value
 6            int max = arr[0];
 7            // 3. Traverse the array to find the maximum value
 8            for (int i = 1; i < arr.length; i++) {
 9                // Compare whether the value of arr[i] is greater than max
 10                if (arr[i] > max) {
 11                    // If the condition holds, assign the value of arr[i] to max
 12                    max = arr[i];
 13                }
 14            }
 15            System.out.println("array arr The maximum value in is:" + max); // Print Max
 16        }
 17    }
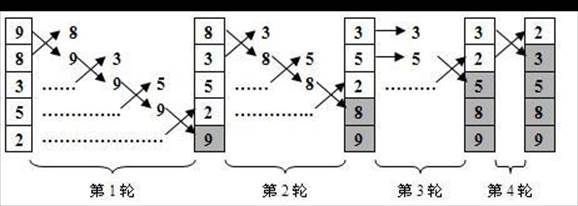
2.3 sorting of arrays
-
Bubble sorting
-
definition
- Continuously compare two adjacent elements in the array. The smaller one floats upward and the larger one sinks downward. The whole process is similar to the principle of bubble rise in water.
-
principle
-
Step 1: start from the first element and compare the two adjacent elements in turn until the last two elements complete the comparison. If the previous element is larger than the latter, swap their positions. After the whole process is completed, the last element in the array is naturally the maximum value, which completes the first round of comparison.
-
Step 2: in addition to the last element, continue to compare the remaining elements in pairs. The process is similar to step 1, so that the second largest number in the array can be placed in the penultimate position.
-
Step 3, and so on, continue to repeat the above steps for fewer and fewer elements until there is no pair of elements to compare.
-
Figure - bubble sorting
- Exchange steps
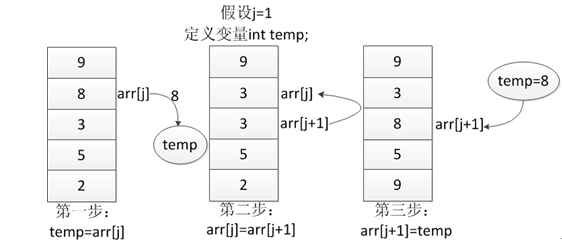
-
-
code
1 public class Example24 { 2 public static void main(String[] args) { 3 int[] arr = { 9, 8, 3, 5, 2 }; 4 // 1. Before bubble sorting, cycle through the array elements 5 for (int i = 0; i < arr.length; i++) { 6 System.out.print(arr[i] + " "); 7 } 8 System.out.println(); // For line feed 9 // 2. Bubble sort 10 // 2.1. The outer cycle defines the number of rounds to be compared (compare two numbers, and compare n-1 rounds) 11 for (int i= 1; i < arr.length; i++) { 12 // 2.2. The inner loop defines the two numbers to be compared in the i round 13 for (int j = 0; j < arr.length -i; j++) { 14 if (arr[j] > arr[j + 1]) { // Compare adjacent elements 15 // The following three lines of code are used to exchange two adjacent elements 16 int temp = arr[j]; 17 arr[j] = arr[j + 1]; 18 arr[j + 1] = temp; 19 } 20 } 21 } 22 // 3. After bubble sorting, cycle through the array elements again 23 for (int i = 0; i < arr.length; i++) { 24 System.out.print(arr[i] + " "); 25 } 26 } 27 } -
3. Multidimensional array
Two dimensional array can be regarded as a special one-dimensional array. There are many ways to define it. Next, we will explain several common ways in detail, as follows:
- The first method is to specify the length of two-dimensional array and the number of elements of each array. Its basic syntax format is as follows:
int[][] arr = new int[3][4];
The above code is equivalent to defining a two-dimensional array with a length of 3. We can regard it as three one-dimensional arrays of int [] type, and the elements in each one-dimensional array are a one-dimensional array with a length of 4. Next, this situation is represented by a diagram, as shown in the figure.

The second way is to specify the length of two-dimensional array without determining the number of elements of each array. Its basic syntax format is as follows:
int[][] arr = new int[3][];
The second method is similar to the first one, except that the length of each element in the array is uncertain. Next, a graph is used to represent this situation, as shown in the figure.

The third way is to directly use nested braces "{}" to initialize and assign values to two-dimensional arrays. Its basic syntax format is as follows:
int[][] arr = {{1,2},{3,4,5,6},{7,8,9}};
Three elements are defined in the above two-dimensional array. These three elements are arrays, namely {1,2}, {3,4,5,6}, {7,8,9}. Next, a figure is used to represent this situation, as shown in the figure.

The operation on the elements in the two-dimensional array is also completed by means of corner markers. The specific example code is as follows:
arr[0][1];  // Gets the second element of the first element group in a two-dimensional array
arr[0][1]=1; // Assign or modify the second element of the first element group in the two-dimensional array
Next, get familiar with the use of two-dimensional arrays through a case of counting the total sales of each of the company's three sales groups and the sales of the whole company, as shown in file 1.
File 1 example25 java
 1    public class Example25 {
 2        public static void main(String[] args) {
 3            int[][] arr = new int[3][];          // Define a two-dimensional array with a length of 3
 4            arr[0] = new int[] { 11, 12 };       // Assign values to the elements of the array
 5            arr[1] = new int[] { 21, 22, 23 };
 6            arr[2] = new int[] { 31, 32, 33, 34 };
 7            int sum = 0;                              // Define variables to record total sales
 8            for (int i = 0; i < arr.length; i++) {    // Traverse array elements
 9                int groupSum = 0;                     // Define variables to record total group sales
 10                for (int j = 0; j < arr[i].length; j++) {
 11                    groupSum += arr[i][j];
 12                }
 13                sum +=groupSum;                        // Cumulative Group sales
 14                System.out.println("The first" + (i + 1) + "Group sales are:"
 15                                         + groupSum + " Ten thousand yuan.");
 16            }
 17            System.out.println("Total sales are: " + sum + " Ten thousand yuan.");
 18        }
 19    }
The operation results are shown in the figure.
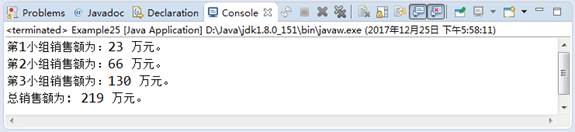
In file 1, the code in line 3 defines a two-dimensional array with a length of 3, and assigns values to each element of the array in lines 4 ~ 6. The file also defines two variables sum and groupSum, in which sum is used to record the total sales of the company and groupSum is used to record the sales of each sales group. When calculating sales through nested for loop, the outer loop traverses three sales groups, and the inner loop traverses the sales of employees in each group. Each time the inner loop completes the statistics of the total sales of employees in a group, it is assigned to groupSum, and then the value of groupSum is added with the value of sum to assign it to sum. When the outer cycle ends, the total sales of the three sales groups are added to the sum, that is, the total sales of the whole company are counted.
6, Object oriented (I)
1. Overview
-
Object-oriented programming is a kind of programming thought in line with human thinking habits. In real life, there are all kinds of things in different forms, and there are all kinds of connections between these things. In the program, objects are used to map things in reality, and the relationship between objects is used to describe the relationship between things. This idea is object-oriented.
-
Process oriented is to analyze the steps needed to solve the problem, and then use functions to realize these steps one by one, and call them in turn when using. Object oriented is to divide the transaction that constitutes the problem into multiple independent objects according to certain rules, and then solve the problem by calling the method of the object.
2. Three characteristics of object oriented
2. Three characteristics of object oriented
2. Three characteristics of object oriented
2.1. Packaging
Encapsulation is the core idea of object-oriented. It encapsulates the attributes and behaviors of objects without letting the outside world know the specific implementation details. This is the idea of encapsulation. For example, when using a computer, users only need to tap the keyboard with their fingers without knowing how the computer works. Even if users may happen to know the working principle of the computer, they do not completely rely on the details of the working principle of the computer when using it.
2.2 succession
Inheritance mainly describes the relationship between classes. Through inheritance, the functions of the original class can be extended without rewriting the original class. For example, there is a car class, which describes the general attributes and functions of the car. The car class should not only include the attributes and functions of the car, but also add the unique attributes and functions of the car. At this time, the car class can inherit the car class and add the unique attributes and functions of the car separately in the car class. Inheritance not only enhances the reusability of code and improves development efficiency, but also provides convenience for program maintenance and supplement.
2.3 polymorphism
Polymorphism refers to a variety of different behavior characteristics when variables of the same reference type call the same method when the subclass object is directly assigned to the parent class reference variable after the attributes and functions defined in a class are inherited by other classes. For example, when you hear the word "Cut", the barber's behavior is to Cut his hair, and the actor's behavior is to stop performing, etc. Different objects behave differently.
The idea of object-oriented cannot be truly understood by beginners only by the above introduction. Beginners can really understand the idea of object-oriented only through a lot of practical practice and thinking.
3. Classes and objects in Java
3.1 definition format of class
Classes in Java are defined through the class keyword, and their syntax format is as follows:
[Modifier ] class Class name [extends Parent class name] [implements Interface name]{
   // Class body, including member variables and member methods of the class
}
In the above syntax format, the modifier in front of class can be public or not written (default); Class is followed by the defined class name. The first letter of the class name should be capitalized, and its naming should comply with the naming rules of identifiers; Extensions and implements are optional and are keywords in Java. Extensions is used to describe which parent class the defined class inherits from, and implements is used to describe which interfaces the current class implements (these two keywords will be explained in detail in the next chapter and can be used as a solution here). The content in the following braces {} is the class body, that is, the content that needs to be written in the class. It mainly includes the member variables and member methods of the class.
3.2. Declare (define) member variables
Class member variables are also called class attributes, which are mainly used to describe the characteristics of objects. For example, a person's basic attribute features include name, age, occupation, address and other information. When you want to use name, age and other information in a class, you need to declare (define) them as member variables first.
The syntax format of declaring (defining) member variables is as follows:
[Modifier ] Data type variable name [ = value];
In the above syntax format, the modifier is optional, which is used to specify the access permission of the variable, and its value can be public, private, etc; The data type can be any type in Java; Variable name is the name of a variable, which must comply with the naming rules of identifiers. It can be given an initial value or not assigned a value. In general, variables that are not assigned (not initialized) are called declaration variables, while variables that are assigned (initialized) are called definition variables.
For example, the name and age attributes are declared and defined in the class as follows:
private String name; // Declare a name of string type;
private int age = 20; // Define an age of type int and assign a value of 20;
3.3 declaration (definition) member method
Member methods, also known as methods, are similar to functions in C language. They are mainly used to describe the behavior of objects. A person's basic behavior characteristics include eating, sleeping, exercise, etc. these behaviors can be defined as methods in Java classes.
The syntax format of defining a method is as follows:
[Modifier ] [return type] Method name([Parameter type parameter name 1,Parameter type parameter name 2,...]){
  //Method body
  ...
   return Return value; //When the return value type of a method is void, return and its return value can be omitted
}
In the above syntax format, the content in [] means optional, and the specific description of each part is as follows:
● modifiers: there are many modifiers for methods, including those that restrict access rights (such as public, protected and private), static modifiers, and final modifiers. These modifiers will be explained step by step in the later learning process.
● return value type: used to limit the data type of the method return value. If the return value is not required, the void keyword can be used.
● parameter type: used to limit the data type of the parameter passed in when calling the method.
● parameter name: it is a variable used to receive the data passed in when calling the method.
● return keyword: used to end the method and return the value of the specified type of the method. When the return value type of the method is void, return and its return value can be omitted.
● return value: the value returned by the return statement, which will be returned to the caller.
In the above syntax, the content before {} is called method signature (or method header), and the execution statement in {} is called method body. It should be noted that "[parameter type parameter name 1, parameter type parameter name 2,...]" in the method signature is called the parameter list. It is used to describe the parameters that the method needs to receive when called. If the method does not need to receive any parameters, the parameter list is empty, that is, nothing is written in (). The modifiers in the above syntax structure will be explained one by one later. Here, the reader only needs to know how to define classes, member variables and member methods.
After understanding the definition of a class and its members, let's demonstrate the definition of a class through a specific case, as shown in file 1.
File 1 person java
 1    public class Person {
 2        int age;        // Declare a variable of type int
 3        // Define the speak() method
 4        void speak() {
 5            System.out.println("I this year" + age + "Years old!");
 6        }
 7    }
A Person class is defined in file 1, and the member variables and member methods of the class are defined in the class. Where Person is the class name, age is the member variable of the class, and speak () is the member method of the class. The member variable age can be accessed directly in the member method speak().
 Watch your step
In Java, variables defined in classes are called member variables, and variables defined in methods are called local variables. If the local variable defined in a method has the same name as the member variable, this is allowed. At this time, the local variable is accessed through the variable name in the method, not the member variable. Please read the following example code:
public class Person {
  int age = 10;    // Variables defined in a class are called member variables
  void speak() {
    int age = 30; // Variables defined inside methods are called local variables
    System.out.println("I this year" + age + "Years old!");
  }
}
In the above code, the variable age accessed by the print statement in the speak() method is a local variable, that is, when another program calls the speak() method, the output value is 30 instead of 10.
3.4 creation and use of objects
If an application wants to complete specific functions, only classes are not enough. It also needs to create instance objects according to classes. In Java programs, you can use the new keyword to create objects. The specific syntax format is as follows:
Class name object name = new Class name();
For example, the object code for creating an instance of the Person class is as follows:
Person p = new Person();
In the above code, "new Person()" is used to create an instance object of the Person class, "Person p" declares a Person type variable p, and the middle equal sign is used to assign the address of the Person object in memory to the variable p, so that the variable p holds the reference of the object. For ease of description, the object referenced by variable p is usually referred to as P object in the following chapters of this book. In memory, the reference relationship between variable p and object is shown in the figure memory analysis.
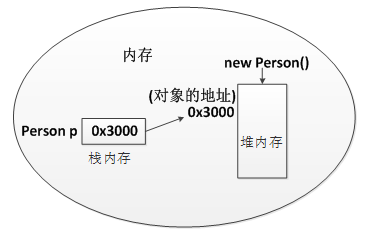
As can be seen from Figure 1, when creating a Person object, the program will occupy two memory areas, namely stack memory and heap memory. The variable p of Person type is stored in the stack memory. It is a reference and will point to the real object; The object created through new Person() is placed in heap memory, which is the real object.
Tip:
Java divides memory into two types: stack memory and heap memory. The stack memory is used to store variables of basic types and reference variables of objects (such as Person p), and the heap memory is used to store objects and arrays created by new.
After creating the Person object, you can access all members of the object through the reference of the object. The specific format is as follows:
object reference.Object member
Next, learn how to access the members of the object through a case, as shown in file 1.
File 1 example02 java
 1    public class Example02 {
 2        public static void main(String[] args) {
 3            Person p1 = new Person(); // Create the first Person class object
 4            Person p2 = new Person(); // Create a second Person class object
 5            p1.age = 18;                 // Assign a value to the age attribute
 6            p1.speak();                  // Method of calling object
 7            p2.speak();
 8        }
 9    }
The operation results are shown in Figure 2.
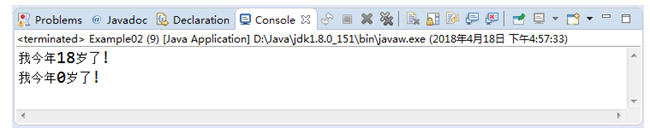
Figure 2 operation results
In file 1, p1 and p2 respectively refer to two instance objects of the Person class. As can be seen from Figure 2, p1 and p2 objects print different age values when calling the speak() method. This is because p1 object and p2 object are two completely independent individuals. They have their own age attribute respectively. Assigning the age attribute of p1 object will not affect the value of p2 object age attribute. The state of the objects referenced by p1 and p2 in memory during the program running is shown in the figure.
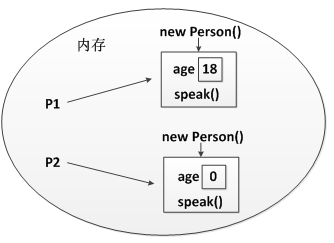
Tip:
In practice, in addition to using the object reference described in document 3-2 to access object members, you can also directly use the created object itself to reference object members. The specific format is as follows:
new Class name().Object member
This method is to access a member of the object while creating the instance object through the new keyword, and only one member can be accessed after creation, rather than multiple object members like object references. At the same time, because there is no object reference, after accessing an object member, the object will become a garbage object. Therefore, in actual development, object references are mostly used when creating instance objects.
In file 1, the age attribute of p1 object is assigned to 18 through "p1.age=18", but the age attribute of p2 object is not assigned. It is reasonable that the age attribute of p2 object should have no value. However, as can be seen from Figure 2, the age attribute of p2 object also has a value, and its value is 0. This is because when instantiating an object, the Java virtual opportunity automatically initializes the member variables and assigns different initial values to different types of member variables, as shown in Table 1.
Table 1 initialization values of member variables
| Member variable type | Initial value |
|---|---|
| byte | 0 |
| short | 0 |
| int | 0 |
| long | 0 |
| float | 0.0 |
| double | 0.0 |
| char | Null character, '\ u0000' |
| boolean | false |
| Reference data type | null |
After the object is instantiated, the members of the object can be accessed through the reference variables of the object in the program. It should be noted that when no variable references this object, it will become a garbage object and can no longer be used. Next, analyze how the object becomes garbage through two pieces of program code.
The first program code:
{
     Person p1 = new Person();
     ......
}
In the above code, an object of type Person is referenced using the variable p1. When this code runs, the variable p1 will be destroyed beyond its scope. At this time, the object of Person type will become garbage because it is not referenced by any variable.
The second program code:
{
     Person p2 = new Person();
     ......
     p2 = null;
     ......
}
In the above code, the variable p2 is used to reference an object of Person type, and then the value of the variable p2 is set to null, which means that the variable does not point to any object, and the Person object referenced by p2 will lose its reference and become a garbage object. The process is shown in the figure.
[the external chain image transfer fails. The source station may have anti-theft chain mechanism. It is recommended to save the image and upload it directly (img-aybl2qhs-1624149047185)( https://book.itheima.net/uploads/course/images/java/1.3/image-20200612143700978.png )]
3.5. Access control character
In Java, there are four access levels for classes, member methods and attributes, which are private, default, protected and public. Next, the four control levels are listed from small to large through a diagram, as shown in the figure.
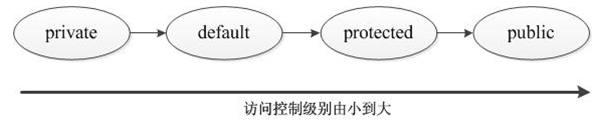
The figure shows four access control levels in Java, as follows:
● private (current class access level): if a member of a class is modified by a private access controller, this member can only be accessed by other members of the class, and other classes cannot access it directly. Class is well encapsulated through the private keyword.
● default (package access level): if a class or class member is not decorated with any access control character, it is called the default access control level. This class or class member can only be accessed by other classes in this package.
● protected (subclass access level): if a member of a class is modified by a protected access control character, the member can be accessed by other classes under the same package or subclasses of the class under different packages.
● public (public access level): This is the loosest access control level. If a class or class member is modified by the public access control character, the class or class member can be accessed by all classes, regardless of whether the access class and the accessed class are in the same package.
Next, these four access levels are more intuitively represented through a table, as shown in the table access control level.
| Access scope | private | default | protected | public |
|---|---|---|---|---|
| In the same category | √ | √ | √ | √ |
| In the same bag | √ | √ | √ | |
| In subclass | √ | √ | ||
| Global scope | √ |
Tip:
If all classes defined in a java source file are not decorated with public, the file name of the Java source file can be all legal file names; If a public modified class is defined in a source file, the file name of the source file must be the same as the class name of the public modified class.
4. Class encapsulation
4.1 definition
-
Make some restrictions on the access of member variables, and do not allow external access at will, which requires the encapsulation of classes.
-
Class encapsulation refers to hiding the state information of the object inside the object, which does not allow external programs to directly access the internal information of the object, but to realize the operational access to the internal information through the methods provided by the class.
4.2 realization
The specific implementation process is to privatize the attributes in the class when defining a class, that is, modify them with the private keyword. The private attributes can only be accessed in the class where they belong. If the outside world wants to access the private attributes, it is necessary to provide some public methods modified with public, including getXxx() method for obtaining the attribute value and setXxx() method for setting the attribute value.
 1    class Person{
 2        private String name;
 3        private int age;
 4        public String getName() {
 5            return name;
 6        }
 7        public void setName(String name) {
 8            this.name = name;
 9        }
 10        public int getAge() {
 11            return age;
 12        }
 13        public void setAge(int age) {
 14            if(age <= 0){
 15               System.out.println("The age you entered is incorrect!");
 16            } else {
 17               this.age = age;
 18            }
 19        }
 20        public void speak(){
 21            System.out.println("My name is"+name+",this year"+age+"Years old");
 22        }
 23    }
 24    public class Example04 {
 25        public static void main(String[] args) {
 26            Person p = new Person();
 27            p.setName("Zhang San");
 28            p.setAge(-18);
 29            p.speak();
 30        }
 31    }
The operation results are shown in the figure.
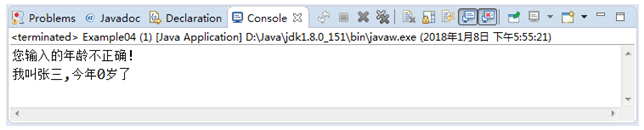
In the code, use the private keyword to declare the attribute name and age as private variables, and provide public access methods to the outside world. The getName() method is used to obtain the value of the name attribute, the setName() method is used to set the value of the name attribute, and so on.
The Person class object is created in the main() method, and the setAge() method is called to pass in a negative number of - 18. In the setAge() method, the value of the parameter age will be checked. Because the current passed in value is less than 0, it will print "the age you entered is incorrect!" Information about. Since the age attribute is not assigned at this time, it is still the initial value of 0.
5. Method overloading
Java allows you to define multiple methods with the same name but different types or numbers of parameters in a program, which is method overloading.
 1    public class Example06 {
 2        // 1. Add two integers
 3        public static int add(int x, int y) {
 4            return x + y;
 5        }
 6        // 2. Realize the addition of three integers
 7        public static int add(int x, int y, int z) {
 8            return x + y + z;
 9        }
 10        // 3. Add two decimals
 11        public static double add(double x, double y) {
 12            return x + y;
 13        }
 14        public static void main(String[] args) {
 15            // Call to summation method
 16            int sum1 = add(1, 2);
 17            int sum2 = add(3, 4, 7);
 18            double sum3 = add(0.2, 5.3);
 19            // Print the result of the summation
 20            System.out.println("sum1=" + sum1);
 21            System.out.println("sum2=" + sum2);
 22            System.out.println("sum3=" + sum3);
 23        }
 24    }
Three add() methods with the same name are defined in the file, but their number of parameters or parameter types are different, so the overloading of the method is realized. When you call the add() method in the main() method, you can determine which method of overloading is invoked by passing in different parameters, such as add(1,2), calling the two integer summation method add(int x, int y).
It should be noted that the overloading of a method has nothing to do with the return value type. It only needs to meet two conditions:
- First, the method name is the same
- Second, the number or type of parameters are different
6. Construction method
6.1 definition of construction method
The syntax format of the construction method is similar to that of the member method. Its syntax format is as follows:
[Modifier ] Method name ([parameter list]){
   // Method body
}
The construction method defined by the above syntax format needs to meet the following three conditions at the same time:
① The method name is the same as the class name.
② There is no declaration of return value type before the method name.
③ You cannot use a return statement to return a value in a method, but you can write a return statement alone as the end of the method.
After understanding the definition syntax of construction method, next, a case is used to demonstrate how to define construction method in class.
 1    class Person {
 2        // Construction method of class
 3        public Person() {
 4            System.out.println("A parameterless constructor was called");
 5        }
 6    }
 7    public class Example08 {
 8        public static void main(String[] args) {
 9            Person p = new Person();  // Instantiate the Person object
 10        }
 11    }
The operation results are shown in the figure.

In the file, a parameterless constructor Person () is defined in the Person class. As can be seen from the figure, the parameterless constructor in the Person class is called. This is because the code in line 9 will automatically call the constructor of this class when instantiating the Person object through "new Person()".
In a class, in addition to the parameterless construction method, the parameterless construction method can also be defined. The assignment of attributes can be realized through the parameterless construction method. Next, rewrite the code as shown in the following file.
 1    class Person {
 2        // Declare a variable of type int
 3        int age;
 4        // Define parametric construction method
 5        public Person(int a) {
 6            age = a;                  //Assign a value to the age attribute
 7        }
 8        // Define the speak() method
 9        public void speak() {
 10            System.out.println("I this year" + age + "Years old!");
 11        }
 12    }
 13    public class Example09 {
 14        public static void main(String[] args) {
 15            Person p = new Person(18); // Instantiate the Person object
 16            p.speak();
 17        }
 18    }
The operation results are shown in the figure.

In the file, a construction method Person(int a) with parameters is defined in the Person class, and "new Person(18);" in line 15 of the code The construction method with parameters will be called to instantiate a Person object, and the parameter 18 will be passed in to assign the age attribute. As can be seen from Figure 2, when the Person object calls the speak() method, its age attribute has been assigned 18.
6.2 overloading of construction method
Like ordinary methods, construction methods can also be overloaded. Multiple construction methods can be defined in a class, as long as the parameter type or number of each construction method is different. When creating an object, you can assign values to different properties by calling different construction methods. Next, learn the overloading of construction methods through a case, as shown below.
 1    class Person {
 2        // Declare variable name of type String
 3        String name;
 4        // Declare a variable of type int
 5        int age;
 6        // Define parametric construction method
 7        public Person(int a) {
 8            age = a;                  // Assign a value to the age attribute
 9        }
 10        public Person(String n,int a){
 11            name = n;                // Assign a value to the name attribute
 12            age = a;                 // Assign a value to the age attribute
 13        }
 14        // Define the speak() method
 15        public void speak() {
 16            System.out.println("I this year" + age + "Years old!");
 17        }
 18        // Define the say() method
 19        public void say(){
 20            System.out.println("My name is"+name+",this year" + age + "Years old!");
 21        }
 22    }
 23    public class Example10 {
 24        public static void main(String[] args) {
 25            Person p1 = new Person(18);
 26            Person p2 = new Person("Zhang San",32);
 27            p1.speak();
 28            p2.say();
 29        }
 30    }
The operation results are shown in the figure.

In file 1, two construction methods are defined in the Person class, which implement method overloading. When creating p1 and p2 objects, different construction methods are called according to the number of incoming parameters. It can be seen from Figure 1 that the two construction methods assign different values to the attribute, in which the p1 object only assigns the age attribute, and outputs the age information after calling the speak() method; The p2 object assigns values to the name and age attributes. After calling the say() method, the name and age information will be output.
 Watch your step
① Every class in Java has at least one constructor. If a constructor is not explicitly defined in a class, the system will automatically create a default constructor for the class. The default constructor has no parameters and no code in its method body, that is, it does nothing.
The effect of the two writing methods of the Person class in the following program is exactly the same.
The first way to write:
class Person {
}
The second way to write:
class Person {
  public Person() {
  }
}
For the first writing method, although the constructor is not explicitly declared in the class, you can still use the new Person() statement to create an instance object of the Person class. Since the parameterless construction method provided by the system often cannot meet the requirements, you can define the construction method in the class yourself. Once the construction method is defined for this class, the system will no longer provide the default parameterless construction method.
If you delete the parameter 18 passed in when instantiating the p1 object in file 1, you will find an error prompt that the constructor is not defined in Eclipse, as shown in the figure.

As can be seen from the figure, the program prompts "The constructor Person() is undefined", that is, The constructor Person() is undefined. The reason is that when you call new Person() to create an instance object of the Person class, you need to call the parameterless construction method, and two parameterless construction methods have been defined in the Person class. At this time, the system will no longer provide parameterless construction methods, so there are no parameterless construction methods in the Person class. In order to avoid the above error, if you define a construction method with parameters in a class, you'd better define another construction method without parameters.
② Think about it. Can I use the private access modifier when declaring a constructor? Let's test it and see what results will appear.
After modifying the first parameterized modifier public defined in the file to private, you will find another error in Eclipse, as shown in the figure.
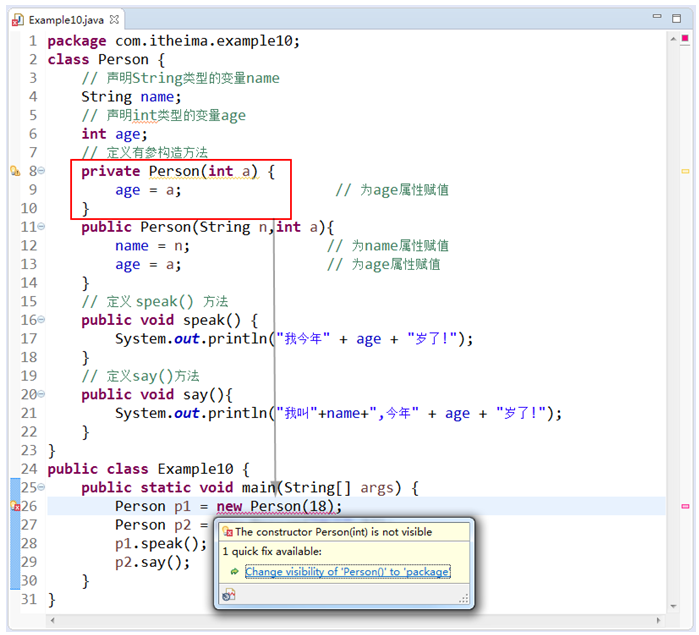
As can be seen from the figure, the error prompt in Eclipse is "The constructor Person(int) is not visible", that is, The constructor Person(int) is not visible. The reason for this error is that the constructor Person(int) modified by the private access control character can only be accessed in the current Person class and cannot be accessed outside the class. Therefore, the object cannot be created through this private constructor. Therefore, in order to facilitate the instantiation of objects, construction methods are usually decorated with public.
6.3. this keyword
1. Call member variables through this keyword to solve the problem of name conflict with local variables. The specific example code is as follows:
class Person {
    int age;                     // Member variable age
    public Person(int age) {      // Local variable age
        this.age = age;         // Assign the value of the local variable age to the member variable age
    }
}
In the above code, the parameter of the construction method is defined as age, which is a local variable. A member variable is also defined in the class, and the name is age. In the construction method, "age" is used to access local variables, but "this.age" is used to access member variables.
2. Call the member method through this keyword. The specific example code is as follows:
class Person {
    public void openMouth() {
        ...
    }
    public void speak() {
        this.openMouth();
    }
}
In the above speak() method, the openmouth () method is called with this keyword. It should be noted that this keyword here can be omitted. That is to say, in the above code, the effect of writing "this.openMouth()" and "openMouth()" is exactly the same.
3. Call the constructor through this keyword. The construction method is automatically called by the Java virtual machine when instantiating the object. The construction method cannot be called like other methods in the program, but other construction methods can be called in the form of "this([parameter 1, parameter 2...])" in one construction method.
Next, a case is used to demonstrate the call of this form of construction method.
 1    class Person {
 2        public Person() {
 3            System.out.println("The parameterless constructor was called...");
 4        }
 5        public Person(int age) {
 6            this();                  // Call parameterless constructor
 7            System.out.println("The constructor with parameters was called...");
 8        }
 9    }
 10    public class Example11 {
 11        public static void main(String[] args) {
 12            Person p = new Person(18); // Instantiate the Person object
 13        }
 14    }
The operation results are shown in the figure.

When instantiating the Person object, the code in line 12 calls the construction method with parameters. In the construction method with parameters, the construction method without parameters is called through this(). Therefore, the running result shows that both construction methods have been called.
When using this to call the constructor of a class, you should pay attention to the following points:
① this can only be used in constructor to call other constructor methods, not in member methods.
② In a construction method, the statement that uses this to call the construction method must be the first execution statement of the method and can only appear once. The following wording is wrong:
public Person(int age) {
   System.out.println("The constructor with parameters was called...");
   this();  // Call the parameterless constructor.
}
In the above code, since the call statement this() is not the first execution statement of the construction method, Eclipse will report an error message of "Constructor call must be the first statement in a constructor" when compiling.
③ You cannot call each other with this in two constructor methods of a class. The following wording is wrong:
class Person {
  public Person() {
     this(18);    // Call the construction method with parameters
    System.out.println("The parameterless constructor was called...");
  }
  public Person(int age) {
    this();     // Call parameterless constructor
    System.out.println("The constructor with parameters was called...")
  }
}
In the above code, the nonparametric construction method and the parametric construction method use the this keyword to call each other. At this time, an error message of "Recursive constructor invocation Person() (Recursive constructor invocation Person())" will be reported during compilation.
7. static keyword
7.1 static variables
7.1.1 definition
When defining a class, it only describes the characteristics and behavior of something, and does not produce specific data. Only after the instance object of this class is created through the new keyword will the system allocate memory space for each object and store their own data. Sometimes, developers want to have only one copy of certain data in memory and can be shared by all instance objects of a class. For example, all students in a school share the same school name. At this time, there is no need to declare a variable in the memory space occupied by each student object to represent the school name, but a variable representing the school name can be declared in the space outside the object to be shared by all objects. The specific memory allocation is shown in the figure.
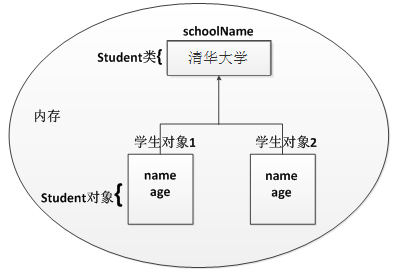
7.1.2 use
Static variables can be accessed using the following syntax:
Class name.Variable name
File 1 example12 java
 1    class Student {
 2        static String schoolName;  // Declare static variable schoolName
 3    }
 4    public class Example12 {
 5        public static void main(String[] args) {
 6            Student stu1 = new Student();         // Create the first student object
 7            Student stu2 = new Student();       // Create the second student object
 8            Student.schoolName = "Tsinghua University";        // Assign values to static variables
 9            // Output the information of two student objects respectively
 10            System.out.println("I am" + stu1.schoolName+"Students");
 11            System.out.println("I am" + stu2.schoolName+"Students");
 12        }
 13    }
The operation results are shown in the figure.

In the file, a static variable schoolname is defined in the Student class to represent the school where the Student is located. It is shared by all instance objects. Since schoolname is a static variable, you can directly use Student It can also be called through the instance object of Student, such as stu2 schoolName. After assigning the variable schoolname to "Tsinghua University" in the code in line 8, the schoolname attribute value of Student objects stu1 and stu2 is "Tsinghua University".
 Note: static keyword precautions
The static keyword can only be used to modify member variables, not local variables. Otherwise, an error will be reported during compilation
7.2 static method
7.2.1 definition
If you want to use member methods in a class, you need to instantiate the class first. In actual development, developers sometimes want to call a method without creating an object. In this case, you can use static methods.
The definition of static methods is very simple. You only need to add the static keyword before the methods defined in the class. When in use, static methods can be accessed in the following two ways:
Class name.method
or
Instance object name.method
7.2.2 use
 1    class Person {
 2        public static void say() { // Define static methods
 3            System.out.println("Hello!");
 4        }
 5    }
 6    public class Example13 {
 7        public static void main(String[] args) {
 8            // Call static methods by "class name. Method"
 9            Person.say();
 10            // Instantiate object
 11            Person person = new Person();
 12            // "Instance object name. Method" to call the static method
 13            person.say();
 14        }
 15    }
The operation results are shown in the figure.

First, the static method say () is defined in the Person class, and then the static method is called in two ways in the main() method. At line 9, the static method is called in the form of "Person.say()", which shows that the static method can be called directly through the class name without creating an object. In line 13, the static method is called by instantiating the object, which shows that the static method can also be called by instantiating the object.
be careful:
In a static method, only members decorated with static can be accessed. The reason is that members not decorated with static need to create objects before they can be accessed, while static methods can not create any objects when called.
7.3 static code block
In Java classes, several lines of code surrounded by a pair of braces are called a code block, and the code block modified with static keyword is called a static code block. The syntax of static code block is as follows:
static {
...
}
When the class is loaded, the static code block will be executed. Since the class is loaded only once, the static code block will be executed only once. In programs, static code blocks are usually used to initialize the member variables of classes. Next, learn about the use of static code blocks through a case.
 1    class Person{
 1        static {
 2            System.out.println("Yes Person Static code block in class");
 3        }
 4    }
 5    public class Example14{
 6        static{
 7            System.out.println("The static code block in the test class was executed");
 8        }
 9        public static void main(String[] args){
 10            // Instantiate 2 Person objects
 11            Person p1 = new Person();
 12            Person p2 = new Person();
 13        }
 14    }
The operation results are shown in Figure 1.

It can be seen that both static code blocks in the program are executed. After running the file, the Java virtual machine will first load the class Example14, execute the static code block of the class while loading the class, and then call the main() method. Two Person objects are created in the main() method, but in the process of instantiating the object twice, the content in the static code block is only output once, which means that the static code block will be loaded only once when the class is used for the first time.
7, Object oriented (Part 2)
1. Class inheritance
1.1 succession
To declare that one class inherits another class, you need to use the extends keyword. Its basic syntax format is as follows:
[Modifier ] class Subclass name extends Parent class name {
  // Program core code
}
In the above syntax format, the class modifier is optional, which is used to specify the access permission of the class. You can use public or omit writing; Both the subclass name and the parent name are required, and the extension keyword should be used between the subclass and the parent to realize the inheritance relationship.
 1    // Define an Animal class
 2    class Animal {
 3        String name; // Declare the name attribute
 4        // How to define an animal's name
 5        void shout() {
 6            System.out.println("Animals make noises");
 7        }
 8    }
 9    // Define Dog class to inherit Animal class
 10    class Dog extends Animal {
 11        // Define a method to print name
 12        public void printName() {
 13            System.out.println("name=" + name);
 14        }
 15    }
 16    // Define test class
 17    public class Example01 {
 18        public static void main(String[] args) {
 19            Dog dog = new Dog();  // Create an instance object of the Dog class
 20            dog.name = "Shapi dog";   // Assign a value to the name attribute of the dog object
 21            dog.printName();       // Call the printName() method of the dog object
 22            dog.shout();            // Call the shot () method inherited from the Dog class
 23        }
 24    }
The operation results are shown in the figure.

The Dog class inherits the Animal class through the extends keyword, so the Dog class is a subclass of the Animal class. It can be seen that although the subclass does not declare the name attribute and the shot () method, it can access these two members. This means that when a subclass inherits from the parent class, it will automatically have all the public members of the parent class.
In the implementation of class inheritance, you need to pay attention to some problems, as follows:
(1) In Java, classes only support single inheritance and multiple inheritance is not allowed, that is, a class can only have one direct parent class. For example, the following situation is illegal.
class A{}
     class B{}
     class C extends A,B{}  // Class C cannot inherit class A and class B at the same time
(2) Multiple classes can inherit the same parent class. For example, the following cases are allowed.
   class A{}
   class B extends A{}
   class C extends A{}  // Both class B and class C can inherit class A
(3) In Java, multi-layer inheritance is possible, that is, the parent class of a class can inherit another parent class. For example, the following cases are allowed.
   class A{}
   class B extends A{}  // Class B inherits class A, and class B is a subclass of class A
   class C extends B{}  // Class C inherits class B. class C is a subclass of class B and a subclass of class A
(4) In Java, subclasses and superclasses are relative concepts, that is, a class can be a subclass of another class while it is the parent of a class. For example, in the third example above, class B is a subclass of class A and a parent of class C.
1.2. Method of overriding parent class
The method overridden in the subclass needs to have the same method name, parameter list and return value type as the method overridden in the parent class. Note: when a subclass overrides a method of a parent class, it cannot use more strict access rights than the method overridden in the parent class. For example, if the access permission of the method in the parent class is public and the subclass overrides the parent class, the access permission of the method cannot be private
1.3. super keyword
Problem: when the subclass overrides the method of the parent class, the subclass object will not have direct access to the overridden method of the parent class.
In order to solve this problem, a super keyword is specially provided in Java to access the members of the parent class, such as the member variables, member methods and constructor of the parent class. Here are two cases to learn the specific usage of super keyword.
(1) Use the super keyword to call the member variable and member method of the parent class. The specific format is as follows:
super.Member variable
super.Member method([Parameter 1,Parameter 2...])
Next, learn how to use the super keyword to call the member variables and member methods of the parent class through a case.
 1    // Define an Animal class
 2    class Animal {
 3        String name = "animal";
 4         // How to define an animal's name
 5        void shout() {
 6            System.out.println("Animals make noises");
 7        }
 8    }
 9    // Define Dog class to inherit animal class
 10    class Dog extends Animal {
 11        String name = "Dogs";
 12         // Override the shoot() method of the parent class
 13         void shout() {
 14            super.shout();    // Accessing member methods of the parent class
 15        }
 16         // Define how to print name
 17        void printName() {
 18            System.out.println("name=" + super.name);// Accessing member variables of the parent class
 19        }
 20    }
 21    // Define test class
 22    public class Example03{
 23        public static void main(String[] args) {
 24            Dog dog = new Dog();  // Create a dog object
 25            dog.shout();           // Call the shot () method overridden by the dog object
 26            dog.printName();      // Call the printName() method of the dog object
 27        }
 28    }
The operation results are shown in the figure.

A Dog class is defined to inherit the Animal class, override the shot () method of the Animal class, and redefine the name attribute of the subclass. The overridden method of the parent class is called with "super. Shot()" in the shot() method of the subclass Dog, and the member variable of the parent class is accessed with "super.name" in the printName() method. It can be seen from the running results that the subclass successfully accesses the parent class member variables and member methods through the super keyword.
(2) Use the super keyword to call the construction method of the parent class. The specific format is as follows:
super([Parameter 1,Parameter 2...])
Next, we will learn how to use the super keyword to call the construction method of the parent class through a case.
 1    // Define an Animal class
 2    class Animal {
 3        // Define the construction method of Animal class with parameters
 4        public Animal(String name) {
 5            System.out.println("I am a" + name);
 6        }
 7    }
 8    // Define Dog class to inherit Animal class
 9    class Dog extends Animal {
 10        public Dog() {
 11            super("Shapi dog");          // Call the constructor with parameters of the parent class
 12        }
 13    }
 14    // Define test class
 15    public class Example04 {
 16        public static void main(String[] args) {
 17            Dog dog = new Dog();   // Create an instance object of the Dog class
 18        }
 19    }
The operation results are shown in the figure.

According to the previous knowledge, the construction method of dog class will be called when creating Dog class objects. From the running results, it can be seen that when the construction method of dog class is called, the internal super("sand dog") method is executed, thus calling the parametric construction method of the parent class. It should be noted that the code calling the parent class construction method through super must be in the first line of the child class construction method and can only appear once, otherwise the program will report an error during compilation.
Comment the code on line 11 of file 1, and the program will have a compilation error, as shown in the figure.
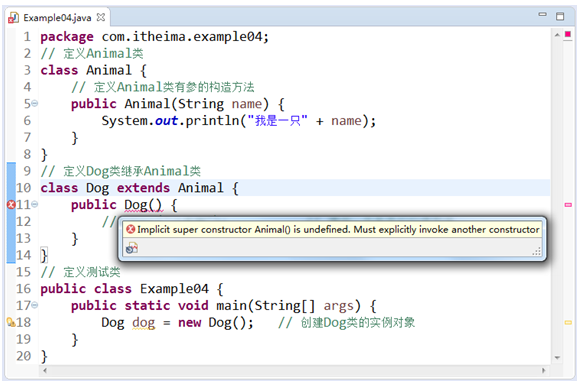
It can be seen that there is an error in program compilation, showing the error of "Implicit super constructor Animal() is undefined. Must explicitly invoke another constructor". The reason for the error is that a constructor of the parent class must be called in the constructor of the child class. At this time, you can specify which constructor of the parent class to call through the super keyword in the constructor of the subclass. If it is not specified, the constructor of the parent class without parameters will be called by default when instantiating the subclass object. However, in file 2, the constructor of the parent class Animal is only defined with parameters but not with parameters, Therefore, there will be an error when the subclass calls the parameterless construction method of the parent class by default.
In order to solve the compilation error of the above program, you can explicitly call the existing constructor in the parent class in the subclass, or define the parameterless constructor in the parent class. Now modify the Animal class and add a parameterless construction method to the parent class to solve the above compilation errors.
 1    // Define an Animal class
 2    class Animal {
 3         // Define the construction method of Animal without parameters
 4        public Animal() {
 5            System.out.println("I am an animal");
 6        }
 7         // Define the construction method of Animal with parameters
 8        public Animal(String name) {
 9            System.out.println("I am a" + name);
 10        }
 11    }
 12    // Defines the Dog class, which inherits from the Animal class
 13    class Dog extends Animal {
 14         // Define the construction method of Dog class without parameters
 15        public Dog() {
 16        }
 17    }
 18    // Define test class
 19    public class Example05 {
 20        public static void main(String[] args) {
 21            Dog dog = new Dog(); // Create an instance object of the Dog class
 22        }
 23    }
The operation results are shown in the figure.

It can be seen that the subclass invokes the parameterless construction method of the parent class by default when instantiating. Through this case, we can also draw a conclusion: when defining a class, if there are no special requirements, after defining the parameter construction method, try to define a parameter free construction method in the class, so as to avoid errors when the class is inherited.
1.4 Object class
An Object class is provided in Java, which is the parent class of all classes, that is, each class directly or indirectly inherits from this class. Therefore, the Object class is usually called super class, base class or root class. When defining a class, if you do not use the extends keyword to explicitly specify the parent class for the class, the class will inherit the Object class by default.
Some methods are customized in the Object class, and the common methods are shown in Table 1.
Table 1 common methods of object class
| Method declaration | Function description |
|---|---|
| boolean equals(Object) | Determine whether an object is equal to this object |
| final Class<?> getClass() | Returns the runtime class of this Object |
| int hashCode() | Returns the hash code value of the object |
| String toString() | Returns a string representation of the object |
| void finalize() | The garbage collector calls this method to clean up resources that are not referenced by any referenced variables |
After understanding the common methods in the Object class, let's take the toString() method as an example to demonstrate the use of methods in the Object class.
 1    // Define an Animal class
 2    class Animal {
 3         // How to define an animal's name
 4        void shout() {
 5            System.out.println("Animals call!");
 6        }
 7    }
 8    // Define test class
 9    public class Example06 {
 10        public static void main(String[] args)  {
 11            Animal animal = new Animal();               // Create an Animal class object
 12            System.out.println(animal.toString());    // Call the toString() method and print
 13        }
 14    }
The operation results are shown in Figure 1.

Figure 1 operation results
In file 1, the 12th line of code calls the toString() method of the Animal Object. Although this method is not defined in the Animal class, the program does not report an error. This is because Animal inherits the Object class by default, defines the toString() method in the Object class, and outputs the basic information of the Object in this method.
The specific format of output information in toString() method of Object class is as follows:
getClass().getName() + "@" + Integer.toHexString(hashCode());
In order to facilitate beginners to understand the above code, the methods used are explained as follows:
● getClass().getName(): represents the class name of the class to which the returned object belongs, that is, the fully qualified name of package name + class name.
● hashCode(): represents the hash value of the returned object.
● Integer.toHexString(hashCode()): indicates that the hash value of the object is represented in hexadecimal. Among them,
hashCode() is a method defined in the Object class, which hashes the memory address of the Object
Operation to return a hash value of type int.
In actual development, it is usually expected that the toString() method returns not only the basic information of the Object, but some unique information. Therefore, it can be realized by rewriting the toString() method of Object, as shown in file 2.
File 2 example07 java
 1  // Define an Animal class
 2  class Animal {
 3    // Override the toString() method of the Object class
 4    public String toString() {
 5      return "This is an animal";
 6    }
 7  }
 8  // Define test class
 9  public class Example07 {
 10   public static void main(String[] args) {
 11     Animal animal = new Animal();      // Create an Animal object
 12     System.out.println(animal.toString()); // Print toString() of animal
 13   }
 14 }
The operation results are shown in Figure 2.

Figure 2 operation results
In file 2, the Animal class overrides the toString() method of the Object class. When the toString() method is invoked in the main() method, it outputs the description information of the Animal class, "this is an animal".
2. final keyword
2.1. final keyword modification class
After a class in Java is modified by the final keyword, the class cannot be inherited, that is, it cannot generate subclasses. Next, a case is used for verification, as shown in file 1.
File 1 example08 java
 1    // Use the final keyword to decorate the Animal class
 2    final class Animal {
 3    }
 4    // Dog class inherits Animal class
 5    class Dog extends Animal {
 6    }
 7    // Define test class
 8    public class Example08 {
 9        public static void main(String[] args) {
 10            Dog dog = new Dog(); // Create an instance object of the Dog class
 11        }
 12    }
Program compilation error, as shown in Figure 1.
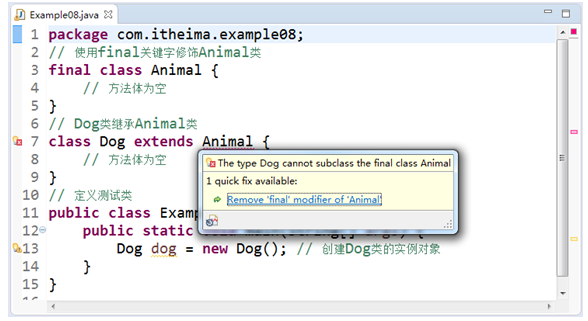
Figure 1 operation results
In file 1, because the Animal class is decorated by the final keyword, when the Dog class inherits the Animal class, the error "The type Dog cannot subclass the final class Animal" appears in the Eclipse editor. Thus, the class modified by the final keyword is the final class and cannot be inherited by other classes.
2.2 modification method of final keyword
When the method of a class is modified by the final keyword, the subclass of the class cannot override the method. Next, a case is used for verification, as shown in file 1.
File 1 example09 java
 1    // Define an Animal class
 2    class Animal {
 3         // Modify the shot () method with the final keyword
 4        public final void shout() {
 5        }
 6    }
 7    // Define Dog class to inherit Animal class
 8    class Dog extends Animal {
 9         // Override the shot () method of the Animal class
 10        public void shout() {
 11        }
 12    }
 13    // Define test class
 14    public class Example09 {
 15        public static void main(String[] args) {
 16            Dog dog=new Dog(); // Create an instance object of the Dog class
 17        }
 18    }
Program compilation error, as shown in Figure 1.
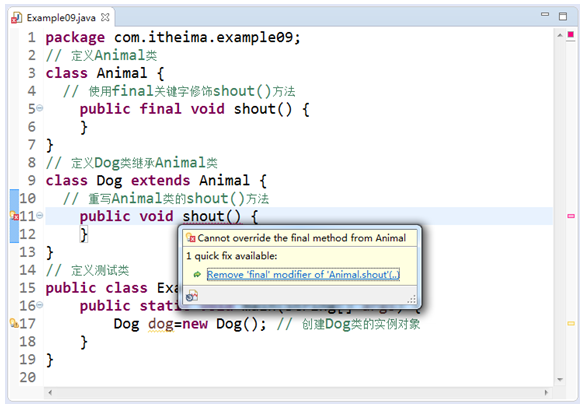
Figure 1 operation results
In file 1, after the Dog class rewrites the shot () method in the parent class Animal, the program has an error of "Cannot override the final method from Animal". It can be seen that the method modified by the final keyword is the final method, and subclasses cannot override the method. Because of this characteristic of final, when defining a method in the parent class, if you don't want to be overridden by the subclass, you can use the final keyword to modify the method.
2.3. final keyword modifies variables
In Java, the variable modified by final is called a constant, which can only be assigned once, that is, once the variable modified by final is assigned, its value cannot be changed. If the variable is assigned again, the program will report an error during compilation. Next, a case is used for verification, as shown in file 1.
File 1 example10 java
 1    public class Example10 {
 2        public static void main(String[] args) {
 3            final int num = 2; // Can be assigned for the first time
 4            num = 4;             // Another assignment will result in an error
 5        }
 6    }
Program compilation error, as shown in Figure 1.
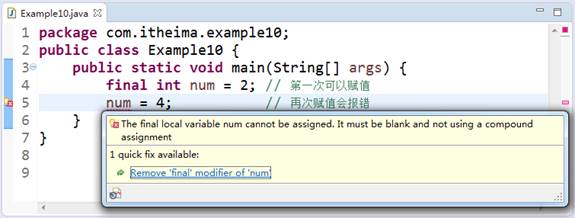
Figure 1 operation results
In file 1, when assigning value to num again on line 4, the error "The final local variable num cannot be assigned. It must be blank and not using a compound assignment" appears in the program. It can be seen that the variable modified by final is a constant, which can only be assigned once, and its value cannot be changed.
In document 1, it is demonstrated that the local variable is modified by final. When the local variable is modified with the final keyword, the variable can be assigned while declaring the variable, or the variable can be declared first and then assigned only once. When the member variable is finally modified, the initialization and assignment must be carried out while declaring the variable, otherwise the program compilation will report an error. Next, a case is used to demonstrate the final modification of member variables and local variables, as shown in file 2.
File 2 example11 java
 1    public class Example11 {
 2        // The member variable modified by final must be assigned at the same time of declaration, otherwise the compilation will be wrong
 3        final int m;
 4        public static void main(String[] args) {
 5            // The local variable modified by final can be declared first and then assigned again
 6            final int n;
 7            n = 4;
 8        }
 9    }
Program compilation error, as shown in Figure 2.

Figure 2 operation results
As can be seen from Figure 2, the program has a compilation error and prompts "The blank final field m may not have been initialized". This is because the Java virtual machine will not initialize the member variable when it is decorated with the final keyword. Therefore, when using final to modify a member variable, you need to give an initial value while defining the variable. Next, modify the code in line 3 as follows:
final int m = 0; // Initialize the assignment for the member variable m of the final modifier
After saving, the Eclipse editor will not prompt errors.
3. Abstract classes and interfaces
3.1 abstract class
When defining a class, it is often necessary to define some methods to describe the behavior characteristics of the class, but sometimes the implementation of these methods is uncertain. For example, when defining the Animal class, the shout() method is used to represent Animal calls, but different animals have different calls, so the shout() method cannot accurately describe Animal calls. How can we make the Animal class contain the shot () method without providing the implementation of its method?
In view of the above situation, Java provides abstract methods to meet this demand. Abstract methods must be decorated with the abstract keyword, and there is no need to implement the method body when defining the method. When a class contains abstract methods, the class must also be modified with the abstract keyword. The class modified with the abstract keyword is an abstract class.
The basic syntax format of abstract class and abstract method definition is as follows:
// Define abstract classes
[Modifier ] abstract class Class name {
    // Define abstract methods
    [Modifier ] abstract Method return value type method name([parameter list]);
    // Other methods or properties
 }
It should be noted that classes containing abstract methods must be defined as abstract classes, but abstract classes may not contain any abstract methods. In addition, abstract classes cannot be instantiated, because abstract classes may contain abstract methods. Abstract methods have no method body and cannot be called. If you want to call the abstract method defined in the abstract class, you need to create a subclass and implement the abstract method in the abstract class in the subclass.
Tip:
To define an abstract method, you only need to add the abstract keyword to the ordinary method, remove all the method bodies (curly braces and parts in curly braces) of the ordinary method, and then add an English semicolon after the method name, such as public abstract void shout();.
Next, learn how to implement the methods in the abstract class through a case, as shown in file 1.
File 1 example12 java
 1    // Define abstract class Animal
 2    abstract class Animal {
 3         // Define abstract method shot ()
 4        public abstract void shout();
 5    }
 6    // Define Dog class to inherit abstract class Animal
 7    class Dog extends Animal {
 8         // Implement the abstract method shout() and write the method body
 9        public void shout() {
 10            System.out.println("Woof woof");
 11        }
 12    }
 13    // Define test class
 14    public class Example12 {
 15        public static void main(String[] args) {
 16            Dog dog = new Dog(); // Create an instance object of the Dog class
 17            dog.shout();           // Call the shot() method of the dog object
 18        }
 19    }
The operation results are shown in Figure 1.

Figure 1 operation results
As can be seen from Figure 1, after the subclass implements the abstract method of the parent class, it can be instantiated normally, and the implemented method can be called through the instantiated object.
3.2 interface
If all the methods in an abstract class are abstract, this class can be defined as another form in Java - interface. Interface is a special abstract class. It cannot contain ordinary methods. All its internal methods are abstract methods, which makes the abstraction more thorough.
In JDK 8, the interface is redefined. In addition to abstract methods, the interface can also have default methods and static methods (also known as class methods). The default methods are modified by default and the static methods are modified by static. Both methods allow method bodies.
Different from defining a class, when defining an interface, the class keyword is no longer used, but the interface keyword is used to declare it. The basic syntax format of interface definition is as follows:
[Modifier ] interface Interface name [extends Parent interface 1,Parent interface 2,...] {
    [public] [static] [final] Constant type constant name = constant value;
    [public] [abstract] Method return value type method name([parameter list]);
    [public] default Method return value type method name([parameter list]){
        // Method body of default method
    }
     [public] static Method return value type method name([parameter list]){
        // Method body of class method
    }
}
In the above syntax format, the contents in "[]" are optional, and the modifier can be public or omitted directly (the package permission access control character is adopted by default when omitted); "extends parent interface 1, parent interface 2,..." means that when defining an interface, multiple parent interfaces can be inherited at the same time, which is also to solve the limitation of single class inheritance; Multiple constants and abstract methods can be defined inside the interface. When defining constants, initialization and assignment must be carried out. When defining default methods and static methods, there can be method bodies.
Tip:
When defining constants in the interface, you can omit the "public static final" modifier. At this time, the interface will add the "public static final" modifier for constants by default. Similarly, when defining abstract methods in the interface, you can also omit the "public abstract" modifier. When defining default and static static methods, you can omit the "public" modifier. These modifiers will be added by default.
It can be seen from the syntax format of the interface definition that the interface can contain three types of methods: abstract method, default method and static method. The static method can be called in the form of "interface name. Method name", while the abstract method and default method can only be called through the instance object of the interface implementation class. Therefore, it is necessary to define an implementation class of the interface, This class implements the current interface through the implements keyword and implements all abstract methods in the interface. It should be noted that a class can implement multiple interfaces while inheriting another class, and multiple interfaces need to be separated by English commas (,).
The syntax format of the implementation class defining the interface is as follows:
[Modifier ] class Class name [extends Parent class name] [implements Interface 1,Interface 2,...] {
  ...
}
After understanding the definition of interface and its methods, next, learn the implementation of interface and method call through a case, as shown in file 1.
File 1 example13 java
 1    // Defines the Animal interface
 2    interface Animal {
 3        int ID = 1;       // Define global constants
 4        void breathe();  // Define abstract method breathe()
 5        // Define a default method
 6        default void getType(String type){
 7            System.out.println("The animal belongs to:"+type);
 8        }
 9        // Define a static method
 10        static int getID(){
 11            return Animal.ID;
 12        }
 13    }
 14    // Dog class implements the Animal interface
 15    class Dog implements Animal {
 16        // Implement the breathe() method
 17        public void breathe() {
 18            System.out.println("The dog is breathing");
 19        }
 20    }
 21    // Define test class
 22    public class Example13 {
 23        public static void main(String args[]) {
 24            System.out.println(Animal.getID()); // Call class method by interface name
 25            Dog dog = new Dog();          // Create an instance object of the Dog class
 26            System.out.println(dog.ID); // Get the interface global constant in the implementation class
 27            dog.breathe();                 // Call the breathe() method of the dog object
 28            dog.getType("Canidae"); // The instantiated object of Dog class is realized through the interface, and the default method of the interface is called
 29        }
 30    }
The operation results are shown in Figure 1.
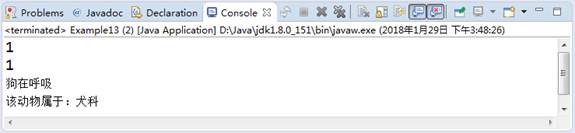
Figure 1 operation results
In file 1, the Dog class implements the Animal interface through the implements keyword and implements the abstract method breathe() in the interface. As can be seen from figure 4-15, the instantiated object of the interface implementation class Dog can access the constants, interface implementation methods and default methods in the interface, while the static methods in the interface can be called directly using the interface name. It should be noted that the implementation class of the interface must implement all abstract methods in the interface, otherwise the program compilation will report an error.
In file 1, the implementation relationship between classes and interfaces is demonstrated. In fact, the inheritance relationship between interfaces can also be inheritance relationship. The inheritance in the interface is also realized by using the extends keyword. Next, slightly modify file 1 to demonstrate the inheritance relationship between interfaces. The modified code is shown in file 2.
File 2 example14 java
 1    // Defines the Animal interface
 2    interface Animal {
 3        int ID = 1;       // Define global constants
 4        void breathe();  // Define abstract method breathe()
 5        // Define a default method
 6        default void getType(String type){
 7            System.out.println("The animal belongs to:"+type);
 8        }
 9        // Define a static method
 10        static int getID(){
 11            return Animal.ID;
 12        }
 13    }
 14    // Defines the LandAnimal interface and inherits the Animal interface
 15    interface LandAnimal extends Animal {
 16        void run();      // Define abstract method run()
 17    }
 18    // The Dog class implements the LandAnimal interface
 19    class Dog implements LandAnimal {
 20        // Implement the breathe() method
 21        public void breathe() {
 22            System.out.println("The dog is breathing");
 23        }
 24        // Implement the run() method
 25        public void run() {
 26            System.out.println("The dog ran on the land");
 27        }
 28    }
 29    // Define test class
 30    public class Example14 {
 31        public static void main(String args[]) {
 32            System.out.println(Animal.getID()); // Call class method by interface name
 33            Dog dog = new Dog();          // Create an instance object of the Dog class
 34            System.out.println(dog.ID); // Get the interface global constant in the implementation class
 35            dog.breathe();                 // Call the breathe() method of the dog object
 36            dog.getType("Canidae");          // Call the default method of the interface through the dog object
 37            dog.run();                     // Call the run() method of the dog object
 38        }
 39    }
The operation results are shown in Figure 2.
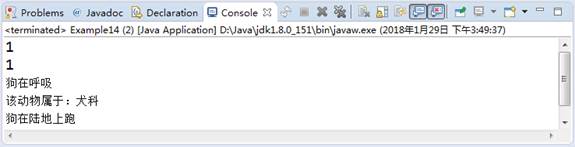
Figure 2 operation results
In file 2, two interfaces are defined, among which the LandAnimal interface inherits the Animal interface, so the LandAnimal interface contains two abstract methods. When the Dog class implements the LandAnimal interface, it needs to implement these two abstract methods. As can be seen from Figure 2, the instantiated object of the interface implementation class Dog can call the members in the interface.
In order to deepen beginners' understanding of the interface, the characteristics of the interface are summarized as follows:
(1) Before JDK 8, the methods in the interface must be abstract, and the method cannot contain the method body. When calling an abstract method, the implementation method can only be called through the object of the implementation class of the interface; Starting from JDK 8, the methods in the interface include not only abstract methods, but also default methods and static methods. Both default methods and static methods can have method bodies, and static methods can be called directly through "interface. Method name".
(2) When a class implements an interface, if the class is an abstract class, it only needs to implement some abstract methods in the interface, otherwise it needs to implement all abstract methods in the interface.
(3) A class can implement multiple interfaces at the same time through the implements keyword, and the implemented interfaces should be separated by English commas (,).
(4) Interfaces can inherit through the extends keyword, and an interface can inherit multiple interfaces at the same time, separated by English commas (,).
(5) A class can also implement interfaces while inheriting a class. In this case, the extends keyword must precede the implements keyword. Specific examples are as follows:
class A extends B implements C { // Inherit first and then implement
...
}
4. Polymorphism
4.1 overview
In Java, polymorphism refers to a variety of different behaviors of different objects when calling the same method. Generally speaking, after the attributes and methods defined in a class are inherited or overridden by other classes, when the subclass object is directly assigned to the parent class reference variable, the variables of the same reference type call the same method, showing a variety of different forms. Through polymorphism, the coupling relationship between classes is eliminated, and the scalability and maintainability of the program are greatly improved.
Java polymorphism is embodied by class inheritance, method rewriting and parent class reference pointing to child class objects. Because a parent class can have multiple subclasses, multiple subclasses can override the parent method, and multiple different subclass objects can also point to the same parent class. In this way, only when the program is running can the program know which subclass object it represents, which reflects polymorphism.
After understanding the concept of Java polymorphism, we will demonstrate it through a case, as shown in file 1.
File 1 example15 java
 1    // Define abstract class Animal
 2    abstract class Animal {
 3        abstract void shout(); // Define abstract shot() method
 4    }
 5    // Define Cat class to inherit Animal abstract class
 6    class Cat extends Animal {
 7        // Implement the shot() method
 8        public void shout() {
 9            System.out.println("Meow");
 10        }
 11    }
 12    // Define Dog class to inherit Animal abstract class
 13    class Dog extends Animal {
 14        // Implement the shot() method
 15        public void shout() {
 16            System.out.println("Woof woof");
 17        }
 18    }
 19    // Define test class
 20    public class Example15 {
 21        public static void main(String[] args) {
 22            Animal an1 = new Cat();
 23            Animal an2 = new Dog();
 24            an1.shout();
 25            an2.shout();
 26        }
 27    }
The operation results are shown in Figure 1.

Figure 1 operation results
In file 1, an abstract class Animal and abstract method are first defined, and then two classes cat and Dog are defined. Cat and Dog inherit Animal. In lines 22 ~ 25 of code, cat and Dog class objects are created respectively, pointing to a parent class object at the same time, and the shot () method is called. The program automatically identifies the specific subclass object during compilation, so as to selectively call the corresponding method, This is the embodiment of polymorphism in Java. It can be seen that polymorphism not only solves the problem of the same name of the method, but also makes the program more flexible, so as to effectively improve the scalability and maintainability of the program.
4.2. Object type conversion
In polymorphic learning, it involves the use of subclass objects as parent types. This situation is called "upward transformation" in the Java language environment. For example, the following two lines of code:
Animal an1 = new Cat(); // Use Cat class objects as Animal types
Animal an2 = new Dog(); // Use Dog class objects as Animal types
When using a subclass object as a parent class, there is no need for any explicit declaration. It should be noted that at this time, subclass specific methods cannot be called through parent variables.
Next, a case is used to demonstrate the type conversion of objects, as shown in file 1.
File 1 example16 java
 1    // Define interface Animal
 2    interface Animal {
 3        void shout(); // Define abstract shot() method
 4    }
 5    // Define Cat class to implement Animal interface
 6    class Cat implements Animal {
 7        // Implement interface shot() method
 8        public void shout() {
 9            System.out.println("Meow");
 10        }
 11        // Define the catchMouse() method specific to Cat class
 12        public void catchMouse() {
 13            System.out.println("Kittens catch mice");
 14        }
 15    }
 16    // Define test class
 17    public class Example16 {
 18        public static void main(String[] args) {
 19            Animal an1 = new Cat();
 20            an1.shout();
 21            an1.catchMouse();
 22        }
 23    }
Program compilation error, as shown in Figure 1.
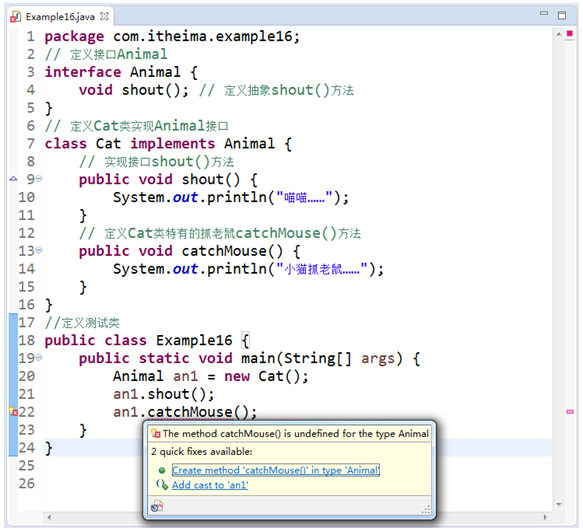
Figure 1 operation results
As can be seen from Figure 1, the error "the method catchMouse() is undefined for the type Animal" appears in the program compilation. The reason is that when the Cat object is created, it points to the Animal parent class type, so the newly created Cat object will automatically transform upward into the Animal class. Then, through the parent object an1, the shot () method and the child Cat specific catchmouse () method are called respectively, and the catchmouse () method is Cat specific. Therefore, when called through the parent object, an error will be reported during compilation.
In file 1, due to the adoption of "new Cat();" The created object is essentially Cat type, so it is feasible to call catchMouse() method through Cat type object. Therefore, to solve the above problem, you can convert the object an1 of parent type to Cat type. Next, modify the main() method in file 1. The specific code is as follows:
// Define test class
public class Example16 {
    public static void main(String[] args) {
        Animal an1 = new Cat();
        Cat cat = (Cat) an1;
        cat.shout();
        cat.catchMouse();
    }
}
Compile again after modification, the program does not report an error, and the operation result is shown in Figure 2.

Figure 2 operation results
It can be seen from Figure 2 that after the an1 object which is essentially Cat type is transformed from Animal type to Cat type, the program can run successfully. It should be noted that when the object is down typed, it must be converted to the essential type, otherwise an error will occur during the conversion. If the Animal type reference in file 4-16 points to a Dog type object, an error will occur when the forced type conversion to Cat class, as shown in file 2.
File 2 example17 java
 1    // Define interface Animal
 2    interface Animal {
 3        void shout(); // Define abstract shot() method
 4    }
 5    // Define Cat class to implement Animal interface
 6    class Cat implements Animal {
 7        // Implement interface shot() method
 8        public void shout() {
 9            System.out.println("Meow");
 10        }
 11        // Define the catchMouse() method specific to Cat class
 12        public void catchMouse() {
 13            System.out.println("Kittens catch mice");
 14        }
 15    }
 16    // Define Dog class to implement Animal interface
 17    class Dog implements Animal {
 18        // Implement interface shot() method
 19        public void shout() {
 20            System.out.println("Woof woof");
 21        }
 22    }
 23    // Define test class
 24    public class Example17 {
 25        public static void main(String[] args) {
 26            Animal an1 = new Dog();
 27            Cat cat = (Cat) an1;
 28            cat.shout();
 29            cat.catchMouse();
 30        }
 31    }
The operation results are shown in Figure 3.

Figure 3 operation results
The compilation of file 2 is normal, but an error will be reported when running, indicating that the Dog type cannot be converted to Cat type. The reason for the error is that the created Animal object is essentially a Dog object. When casting, the Dog object obviously cannot be forcibly converted to Cat type.
In order to avoid the above exceptions, Java provides a keyword instanceof, which can judge whether an object is an instance or subclass instance of a class (or interface). The syntax format is as follows:
Object (or object reference variable) instanceof Class (or interface)
Next, modify the test class Example17 in file 2. The specific code is as follows:
// Define test class
public class Example17 {
    public static void main(String[] args) {
        Animal an1 = new Dog();
        if(an1 instanceof Cat){ // Judge an1 essential type
            Cat cat = (Cat) an1;
            cat.shout();
            cat.catchMouse();
        }else{
            System.out.println("Object of this type is not Cat Type!");
        }
    }
}
Run the program again, and the results are shown in Figure 4.

Figure 4 operation results
In the code modified to file 2, use the instanceof keyword to judge whether the object an1 is Cat type in nature. If it is Cat type, it will be forcibly converted to Cat type. Otherwise, it will print "the object of this type is not Cat type!". Since the judged object an1 is essentially Dog type, not Cat type, the operation result in Figure 4 appears.
5. Inner class
5.1. Member internal class
In a class, in addition to defining member variables and member methods, you can also define classes. Such classes are called member inner classes. In the member inner class, you can access all members of the external class, including member variables and member methods; In the external class, you can also access the variables and methods of the internal class of the member.
Next, learn the definition and use of internal classes of members through a case, as shown in file 1.
File 1 example18 java
 1    // Define external class Outer
 2    class Outer {
 3        int m = 0; // Define member variables of external classes
 4        // Define external class member methods
 5        void test1() {
 6            System.out.println("External class member method");
 7        }
 8        // Define member Inner class
 9        class Inner {
 10            int n = 1;
 11            // 1. Define internal class methods and access external class member variables and methods
 12            void show1() {
 13                System.out.println("External class member variable m="+m);
 14                test1();
 15            }
 16            void show2(){
 17                System.out.println("Inner class member method");
 18            }
 19        }
 20        // 2. Define external class methods and access internal class variables and methods
 21        void test2() {
 22            Inner inner = new Inner();
 23            System.out.println("Internal class member variable n="+inner.n);
 24            inner.show2();
 25        }
 26    }
 27    // Define test class
 28    public class Example18 {
 29        public static void main(String[] args) {
 30            Outer outer = new Outer();                // Create an external class object
 31            Outer.Inner inner = outer.new Inner(); // Create internal class object
 32            inner.show1();  // The test accesses the external class member variables and methods in the internal class of the member
 33            outer.test2(); // The test accesses the internal class member variables and methods in the external class
 34        }
 35    }
The operation results are shown in Figure 1.
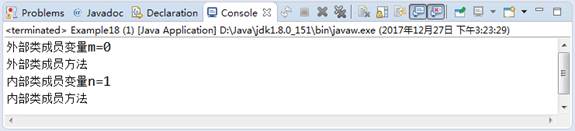
Figure 1 operation results
In file 1, an external class Outer is defined, and the member variable, member method and member internal class Inner are defined in this class. In the member Inner class, the show1() method is written to test the call of the Inner class to the external class member variables and methods; At the same time, in the external class Outer, the test2() method is written to test the call of the external class to the internal class variables and methods. As can be seen from Figure 1, the internal class of a member can access all members of the external class, and the external class can also access all members of the internal class of a member.
It should be noted that the code in line 31 of file 1 is an internal class object created through an external class object, so that members in the internal class can be operated. The specific syntax format for creating internal class objects is as follows:
External class name.Internal class name variable name = new External class name().new Internal class name();
5.2 local internal class
Local inner class, also known as method inner class, is a class defined in a local scope. Like local variables, it is defined in the method, and its effective scope is limited to the inside of the method.
In the local inner class, the local inner class can access all member variables and methods of the external class, while the variables and methods in the local inner class can only be accessed in the method that created the local inner class. Next, learn the definition and use of local internal classes through a case, as shown in file 1.
File 1 example19 java
 1    // Define external class Outer
 2    class Outer {
 3        int m = 0;
 4        void test1(){
 5            System.out.println("External class member method");
 6        }
 7        void test2() {
 8            // 1. Define the local Inner class and access external class variables and methods in the local Inner class
 9            class Inner {
 10                int n = 1;
 11                void show() {
 12                    System.out.println("External class variable m="+m);
 13                    test1();
 14                }
 15            }
 16            // 2, in the method of creating local internal class, we call local internal class variables and methods.
 17            Inner inner = new Inner();
 18            System.out.println("Local internal class variable n="+inner.n);
 19            inner.show();
 20        }
 21    }
 22    // Define test class
 23    public class Example19 {
 24        public static void main(String[] args) {
 25            Outer outer= new Outer();
 26            outer.test2();    // A method that creates a local internal class by calling an external class object
 27        }
 28    }
The operation results are shown in Figure 1.

Figure 1 operation results
In file 1, an external class Outer is defined, in which member variables and member methods are defined, and then a local internal class Inner is defined in the member method test2() of the external class; Then, in the local Inner class, the show() method is written to test the calls to external class variables and methods; At the same time, a local internal class object is created in the test2() method that creates the local internal class to test the calls to local internal class variables and methods.
As can be seen from Figure 1, the local inner class can access all members of the outer class, while all members of the inner class can be accessed only in the method containing the local inner class.
5.3 static internal class
The so-called static inner class is a member inner class modified with the static keyword. Compared with the internal class of members, in form, the static internal class only adds the static keyword in front of the internal class, but in function, the static internal class can only access the static members of the external class. At the same time, when accessing the static internal class members through the external class, you can skip the external class and directly access the static internal class members through the internal class.
The basic syntax format for creating static internal class objects is as follows:
External class name.Static internal class name variable name = new External class name.Static internal class name();
Next, learn the definition and use of static internal classes through a case, as shown in file 1.
File 1 example20 java
 1    // Define external class Outer
 2    class Outer {
 3        static int m = 0; // Define external class static variable m
 4        static class Inner {
 5            void show() {
 6                // Static inner classes access static members of outer classes
 7                System.out.println("External class static variable m="+m);
 8            }
 9        }
 10    }
 11    // Define test class
 12    public class Example20 {
 13        public static void main(String[] args) {
 14            // Static inner classes can be created directly from outer classes
 15            Outer.Inner inner = new Outer.Inner();
 16            inner.show();
 17        }
 18    }
The operation results are shown in Figure 1.

Figure 1 operation results
In file 1, an external class Outer is defined, in which static member variables and static internal class Inner are defined. Then, in the static Inner class, the show() method is written to test the call to the static variables of the external class.
5.4. Anonymous inner class
When calling a method in Java, if the parameter of the method is an interface type, it can also use anonymous inner class to implement the interface as the parameter of the method besides the introduction of a parameter interface implementation class. Anonymous inner class is actually an inner class without name. When calling a method containing interface type parameters, usually in order to simplify the code, an interface implementation class will not be created and passed in as a method parameter, but an interface type parameter will be directly passed in the form of anonymous inner class to directly complete the implementation of the method in the anonymous inner class.
The basic syntax format for creating anonymous inner classes is as follows:
new Parent interface(){
  // Anonymous inner class implementation part
}
Next, learn the definition and use of anonymous inner classes through a case, as shown in file 1.
File 1 example21 java
 1    // Define animal class interface
 2    interface Animal {
 3        void shout();
 4    }
 5    public class Example21{
 6        public static void main(String[] args) {
 7              String name = "floret";
 8              // Define an anonymous inner class and pass it as a parameter to the animalShout() method
 9            animalShout(new Animal() {
 10                   // Implement the shot() method
 11                 public void shout() {
 12                       // Starting from JDK 8, local inner classes and anonymous inner classes can access non final local variables
 13                    System.out.println(name+"Meow meow...");
 14                }
 15            });
 16        }
 17         //Define the static method animalShout() to receive interface type parameters
 18        public static void animalShout(Animal an) {
 19            an.shout(); // Call the shot() method of the incoming object an
 20        }
 21    }
The operation results are shown in Figure 1.

Figure 1 operation results
In file 1, when calling the animalShout(Animal an) method, we need a parameter of the Animal interface type. In line 9~15, we use the anonymous internal class to implement the Animal interface and pass it in as a parameter.
It should be noted that the anonymous inner class in file 1 accesses the local variable name, and the local variable name is not modified with the final modifier, and the program does not report an error. This is a new feature from JDK 8, which allows access to non final modified local variables in local inner classes and anonymous inner classes. Before JDK 8, the final modifier must be added to the local variables, Otherwise, the program compilation will report an error.
For beginners, it may be difficult to understand the writing of anonymous inner classes. Next, we will introduce the writing of anonymous inner classes in two steps, as follows:
1. When calling the animalShout() method, write new Animal() {} in the parameter position of the method, which is equivalent to creating an instance object and passing the object as a parameter to the animalShout() method. There are a pair of braces after new Animal(), indicating that the created object is an instance of a subclass of Animal, which is anonymous. The specific code is as follows:
animalShout(new Animal(){});
2. Write the implementation code of anonymous subclass in braces, as shown below:
animalShout(new Animal()
{
  public void shout() {
    System.out.println(name+"Meow meow...");
  }
});
So far, the anonymous inner class has been written. For beginners, it is not required to fully master this writing method, just try to understand the grammar.
6. JDK8 -- Lamabda expression
6.1 introduction to Lambda expression
One problem with anonymous inner classes is that if the implementation of anonymous inner classes is very simple, such as an interface containing only one abstract method, the syntax of anonymous inner classes still appears redundant. To this end, a new feature Lambda expression is added in JDK 8. This expression is only for the interface implementation with an abstract method, and the interface function is implemented in the form of concise expression as the method parameter.
A Lambda expression consists of three parts: parameter list, "- >" and expression body. Its syntax format is as follows:
([Data type parameter name,Data type parameter name,...]) -> {Expression body}
From the above syntax format, the writing of Lambda expression is very simple. The following is a brief introduction to the components of Lambda expression, as follows:
(1) ([data type parameter name, data type parameter name,...]): used to pass the parameters required by the interface method to the expression body. Multiple parameter names must be separated by English comma "," in the middle; When writing a Lambda expression, you can omit the data type of the parameter, and the body of the following expression will be checked and matched automatically; At the same time, if there is only one parameter, the bracket "()" can be omitted.
(2) - >: represents a Lambda expression Wrigley, which is used to specify the parameter data point. It cannot be omitted, and must be written with English horizontal line and greater than sign.
(3) {expression body}: a body composed of a single expression or statement block. Its essence is the concrete implementation of the abstract method in the interface. If the expression body has only one statement, the braces containing the body can be omitted; In addition, return values are allowed in the body of Lambda expressions. When there is only one return statement, the return keyword can also be omitted.
After learning the syntax of Lambda expression, further modify file 4-21 to explain the basic use of Lambda expression, as shown in file 1.
File 1 example22 java
 1    // Define animal class interface
 2    interface Animal {
 3        void shout(); // Define method shot ()
 4    }
 5    public class Example22 {
 6        public static void main(String[] args) {
 7           String name = "floret";
 8           // 1. The anonymous inner class is passed as a parameter to the animalShout() method
 9          animalShout(new Animal() {
 10                 public void shout() {
 11                    System.out.println("Anonymous inner class output:"+name+"Meow meow...");
 12                }
 13          });
 14          // 2. Pass a Lambda expression as an argument to the animalShout() method
 15           animalShout(()-> System.out.println("Lambda Expression output:"
 16                                                       +name+"Meow meow..."));
 17        }
 18        // Create a static animalShout() method to receive parameters of interface type
 19        public static void animalShout(Animal an) {
 20            an.shout();
 21        }
 22    }
The operation results are shown in Figure 1.

Figure 1 operation results
In file 1, the interface Animal with only one abstract method is defined, and then the interface method is implemented by anonymous inner class and Lambda expression respectively. As can be seen from Figure 1, both anonymous inner classes and Lambda expressions can be used to implement the methods in the interface, but it is obvious that using Lambda expressions is more concise and clear.
6.2 functional interface
Although lambda expression can realize the function of anonymous inner class, it has a limitation in use, that is, when there is and only one abstract method in the interface, lambba expression can be used to replace anonymous inner class. This is because Lamdba expression is implemented based on functional interface. The so-called functional interface refers to the interface with and only one abstract method. Lambda expression is the embodiment of functional programming in Java. Only by ensuring that there is and only one abstract method in the interface, can lambda expression successfully deduce the method in the implemented interface.
In JDK 8, a @ FunctionalInterface annotation is specifically introduced for the functional interface. This annotation only indicates that the interface is a functional interface, and forces the editor to conduct more strict inspection to ensure that the interface is a functional interface. If it is not a functional interface, the compiler will report an error and has no substantial impact on the program operation,
Next, a case is used to demonstrate the definition and use of functional interfaces, as shown in file 1.
File 1 example23 java
 1    // Define a functional interface without parameters and return values
 2    @FunctionalInterface
 3    interface Animal {
 4        void shout();
 5    }
 6    // Define a functional interface with parameters and return values
 7    interface Calculate {
 8        int sum(int a, int b);
 9    }
 10    public class Example23 {
 11        public static void main(String[] args) {
 12           // Test two functional interfaces respectively
 13           animalShout(() -> System.out.println("Function interface call without parameter and return value"));
 14           showSum(10, 20, (x, y) -> x + y);
 15        }
 16        // Create a method called Animal and pass in the interface object Animal as a parameter
 17        private static void animalShout(Animal animal) {
 18            animal.shout();
 19        }
 20        // Create a summation method and pass in two parameters of int type and interface Calculate type
 21        private static void showSum(int x, int y, Calculate calculate) {
 22            System.out.println(x + "+" + y + "The sum of is:" + calculate.sum(x, y));
 23        }
 24    }
The operation results are shown in Figure 1.

Figure 1 operation results
In file 1, two functional interfaces Animal and Calculate are defined first, then two static methods are written in the test class, and the two functional interfaces are passed in as parameters. Finally, the two static methods are called in the main() method, and the required functional interface parameters are passed in as Lambda expressions. As can be seen from Figure 1, the definition and use of functional interfaces in the program are completely correct.
6.3 method reference and constructor reference
When the body of a Lambda expression has only one statement, the program can not only omit the curly braces containing the body, but also reference the method and constructor (i.e. construction method) through the syntax format of English double colon "::" which can further simplify the writing of Lambda expression, Its essence is to directly reference the existing methods in the main part of Lambda expression. The main difference is the reference to ordinary methods and construction methods.
In JDK 8, Lambda expressions support the following reference types, as shown in Table 1.
Table 1 reference forms of lambda expression to common methods and construction methods
| type | Lambda expression example | Corresponding reference example |
|---|---|---|
| Class names refer to common methods | (x,y,...) - > object name X. class common method name (y,...) | Class name: common method name of class |
| Class name refers to static method | (x,y,...) - > class name Class static method name (x,y,...) | Class name: class static method name |
| Object name reference method | (x,y,...) - > object name Instance method name (x,y,...) | Object name:: instance method name |
| Constructor reference | (x,y,...) - > new class name (x,y,...) | Class name:: new |
After understanding the reference types supported by Lambda expressions, we will demonstrate the use of these references through cases. Because the form of class name referencing ordinary methods here is complex, we will explain them at the end.
1. Class name refers to static method
The class name refers to the static method, that is, the reference to the static method through the class name. This class can be a special class of Java or a custom ordinary class. Next, an absolute value case is used to demonstrate the use of static methods referenced by class names (Math special classes), as shown in file 1.
File 1 example24 java
 1    //Define a functional interface
 2    @FunctionalInterface
 3    interface Calcable {
 4        int calc(int num);
 5    }
 6    // Define a class and define a static method in the class
 7    class Math {
 8        // Define an absolute value method
 9        public static int abs(int num) {
 10            if (num < 0) {
 11                return -num;
 12            } else {
 13                return num;
 14            }
 15        }
 16    }
 17    // Define test class
 18    public class Example24 {
 19        private static void printAbs(int num, Calcable calcable) {
 20            System.out.println(calcable.calc(num));
 21        }
 22        public static void main(String[] args) {
 23            // Using Lambda expressions
 24            printAbs(-10, n -> Math.abs(n));
 25            // How to use method references
 26            printAbs(-10, Math::abs);
 27        }
 28    }
The operation results are shown in Figure 1.

Figure 1 operation results
In file 1, a functional interface Calcable and a Math class containing static methods are defined first, and then a static method printAbs() and a main() method are written in the test class. Finally, Lambda expression and method reference are used in the main() method as parameters of the static method printAbs().
As can be seen from Figure 1, the program function can be realized through Lambda expression and class name referencing static methods, and the implementation of class name referencing static methods is more concise.
2. Object name reference method
Object name reference method refers to the reference of its method by the name of the instantiated object. Next, the use of the object name reference method is demonstrated by a case that returns all uppercase letters of the string, as shown in file 2.
File 2 example25 java
 1    // Define a functional interface
 2    @FunctionalInterface
 3    interface Printable{
 4        void print(String str);
 5    }
 6    class StringUtils {
 7        public void printUpperCase(String str) {
 8            System.out.println(str.toUpperCase());
 9        }
 10    }
 11    // Define test class
 12    public class Example25 {
 13        private static void printUpper(String text, Printable pt) {
 14            pt.print(text);
 15        }
 16        public static void main(String[] args) {
 17            StringUtils stu = new StringUtils();
 18            // Using Lambda expressions
 19            printUpper("Hello", t -> stu.printUpperCase(t));
 20            // How to use method references
 21            printUpper("Hello", stu::printUpperCase);
 22        }
 23    }
The operation results are shown in Figure 2.

Figure 2 operation results
File 2 first defines a functional interface Printable and a StringUtils class containing non static methods, which is used to realize capital conversion. Then a static method printUpper() and a main() method are written in the test class. Finally, Lambda expression and method reference are used in the main() method as parameters of the static method printUpper().
It can be seen from Figure 2 that the program function can be realized through Lambda expression and object name reference method, and the implementation of object name reference method is more concise.
3. Constructor reference method
Constructor reference refers to the reference to the constructor of the class. Next, the use of constructor reference method is demonstrated through a case where the constructor obtains attributes, as shown in file 3.
File 3 example26 java
 1    // Define a functional interface
 2    @FunctionalInterface
 3    interface PersonBuilder {
 4        Person buildPerson(String name);
 5    }
 6    // Define a Person class and add a parameter constructor
 7    class Person {
 8        private String name;
 9        public Person(String name) {
 10            this.name = name;
 11        }
 12        public String getName() {
 13            return name;
 14        }
 15    }
 16    // Define test class
 17    public class Example26 {
 18        public static void printName(String name, PersonBuilder builder) {
 19            System.out.println(builder.buildPerson(name).getName());
 20        }
 21        public static void main(String[] args) {
 22            // Using Lambda expressions
 23            printName("Zhao Liying", name -> new Person(name));
 24            // How to use constructor references
 25            printName("Zhao Liying", Person::new);
 26        }
 27    }
The operation results are shown in Figure 3.

Figure 3 operation results
In file 3, a functional interface PersonBuilder and a class Person containing construction methods are defined first, and then a static method printName() and a main() method are written in the test class. Finally, Lambda expression and constructor reference are used in the main() method as parameters of the static method printName().
It can be seen from Figure 3 that the program function can be realized through Lambda expression and constructor reference method, and the implementation of constructor reference method is more concise.
4. The class name refers to the common method
Class name refers to the reference of a common method through the class name of a common class. Next, we still demonstrate the use of common methods for class name reference through a case that returns all uppercase letters of the string, as shown in file 4.
File 4 example27 java
 1    // Define a functional interface
 2    @FunctionalInterface
 3    interface Printable{
 4        void print(StringUtils su, String str);
 5    }
 6    class StringUtils {
 7        public void printUpperCase(String str) {
 8            System.out.println(str.toUpperCase());
 9        }
 10    }
 11    // Define test class
 12    public class Example27 {
 13        private static void printUpper(StringUtils su, String text,
 14                                    Printable pt) {
 15            pt.print(su, text);
 16        }
 17        public static void main(String[] args) {
 18            // Using Lambda expressions
 19            printUpper(new StringUtils(), "Hello",
 20                                         (object, t) -> object.printUpperCase(t));
 21            // How to use method references
 22          printUpper(new StringUtils(), "Hello",
 23                                         StringUtils::printUpperCase);
 24        }
 25    }
The operation results are shown in Figure 4.

Figure 4 operation results
In file 4, a functional interface Printable and a class StringUtils containing ordinary methods are defined first, and then a static method printUpper() and a main() method are written in the test class. Finally, Lambda expression and method reference are used in the main() method as parameters of the static method printUpper().
As can be seen from Figure 4, the program function can be realized through Lambda expression and class name referencing ordinary methods, and the implementation of class name referencing ordinary methods is more concise.
7. Abnormal
7.1. What is an exception
Although everyone hopes to be healthy and everything goes well, they will always encounter various conditions in real life, such as cold and fever, blue screen of computer at work, crash, etc. Similarly, in the process of program running, this abnormal condition will also occur, such as insufficient disk space, interruption of network connection, nonexistence of loaded classes, etc. In view of these abnormal situations, exceptions are introduced into Java language. These abnormal situations are encapsulated in the form of exception classes, and various problems occurring during program running are handled through exception handling mechanism.
Next, let's understand what an exception is through a case, as shown in file 1.
File 1 example28 java
 1    public class Example28 {
 2        // The following method divides two integers
 3        public static int divide(int x, int y) {
 4            int result = x / y;           // Define a variable result to record the result of dividing two numbers
 5            return result;                 // Return results
 6        }
 7          public static void main(String[] args) {
 8            int result = divide(4, 0);   // Call the divide() method
 9            System.out.println(result);
 10        }
 11    }
The operation results are shown in Figure 1.
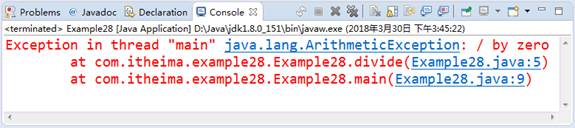
Figure 1 operation results
As can be seen from Figure 1, the program has an exception and displays the error message of "java.lang.arithmetexception: / by zero". The exception prompt message has been very clear, indicating that there is an arithmetic exception of dividing by 0 in the program. Since the parameter 0 was passed in when the code in line 8 of the program called the divide() method, the problem of division by 0 occurred in the operation of the code in line 4 of the file. After this exception occurs, the program will end immediately and cannot continue to execute downward.
In file 1, an ArithmeticException exception is generated. The ArithmeticException exception is only one of the Java exception classes. A large number of exception classes are also provided in Java, which inherit from Java Lang. throwable class.
Next, a diagram is used to show the inheritance system of Throwable class, as shown in Figure 2.
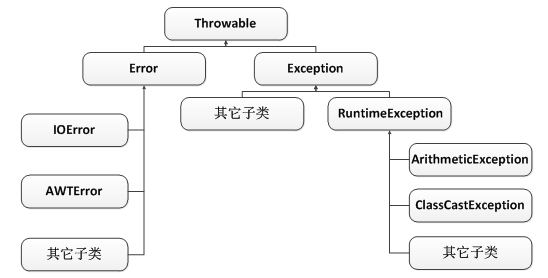
Figure 2 Throwable exception architecture
As can be seen from Figure 2, Throwable has two direct subclasses, Error and Exception, in which Error represents the Error generated in the program and Exception represents the Exception generated in the program. Next, we will explain these two direct subclasses.
● Error class is called Error class. It indicates that the internal system Error or resource depletion Error generated by Java runtime is relatively serious, and the execution cannot be resumed only by modifying the program itself, such as system crash, virtual machine Error, etc.
● exception class is called exception class, which represents the error that the program itself can handle. Exception handling in Java program development is aimed at exception class and its subclasses. Among the many subclasses of exception class, there is a special RuntimeException class, which and its subclasses are used to represent runtime exceptions. In addition to this class, all other subclasses under the exception class are used to represent compile time exceptions.
Through the previous study, the reader has learned about Throwable class and its subclasses. In order to facilitate the later study, the common methods in Throwable class are listed, as shown in Table 1.
Table 1 common methods of throwable
| Method declaration | Function description |
|---|---|
| String getMessage() | Returns the detailed message string of this throwable |
| void printStackTrace() | Output this throwable and its trace to the standard error stream |
| void printStackTrace(PrintStream s) | Outputs this throwable and its trace to the specified output stream |
In Table 1, these methods are used to obtain Exception information. Since Error and Exception inherit from Throwable class, they all have these methods. Readers will gradually contact the use of these methods in the later Exception learning.
7.2 types of exceptions
In actual development, some exceptions often occur during program compilation, and these exceptions must be handled. This kind of exception is called compilation time exception, also known as checked exception. In addition, there is an exception generated during the running of the program. Even if the exception handling code is not written, it can still be compiled. Therefore, we call it runtime exception, also known as unchecked exception. Next, the two exceptions will be explained in detail.
1. Compile time exception
In the subclass of Exception, except RuntimeException class and its subclasses, other subclasses are compile time exceptions. The characteristic of compile time Exception is that in the process of programming, the Java compiler will check the written code. If there are obvious exceptions, the exceptions must be handled, otherwise the program cannot pass the compilation.
There are two ways to handle compile time exceptions, as follows:
● use the try... Catch statement to catch exceptions;
● use the throws keyword to declare that an exception is thrown and let the caller handle it.
2. Abnormal operation
The RuntimeException class and its subclasses are runtime exceptions. The runtime exception is automatically captured and handled by the Java virtual machine when the program is running. Even if it is not captured with the try... catch statement or declared to be thrown with the throw keyword, the program can be compiled and passed, but an error may be reported during the running process.
In Java, there are many common runtime exceptions, as shown in Table 1.
Table 1 common runtime exceptions
| Exception class name | Exception class description |
|---|---|
| ArithmeticException, | Arithmetic anomaly |
| IndexOutOfBoundsException | Angle mark out of bounds anomaly |
| ClassCastException | Type conversion exception |
| NullPointerException | Null pointer exception |
| NumberFormatException | Number format exception |
Runtime exceptions are generally caused by logic errors in the program and cannot be recovered when the program is running. For example, when accessing the elements of the array through the angle of the array, if the maximum angle of the array is exceeded, a runtime exception will occur. The code example is as follows:
int [] arr=new int[5];
System.out.println(arr[5]);
In the above code, since the length of array arr is 5, the maximum subscript should be 4. When using arr[5] to access the elements in the array, the array subscript will be out of bounds.
7.3 try... catch and finally
When an exception occurs to the program, it will terminate immediately and cannot continue to execute downward. In order to ensure the effective execution of programs, Java provides a way to deal with exceptions - exception capture.
The try... catch statement is usually used for exception capture, and its specific syntax format is as follows:
try {
  // Statements with possible exceptions
} catch(Exception Class or its subclasses e){
  // Handle the caught exception accordingly
}
In the above code, the try {} code block contains statements that may cause exceptions, and the catch() {} code block writes code to handle the caught exceptions. When an Exception occurs in the program in the try {} code block, the system will encapsulate the Exception information into an Exception object and pass the object to the catch() {} code block. catch() {} code block needs a formal parameter to indicate the Exception type it can receive. The type of this parameter must be Exception class or its subclass.
Next, use the try... Catch statement to catch and handle the exceptions in file 4-28, as shown in file 1.
File 1 example29 java
 1    public class Example29 {
 2        // The following method divides two integers
 3        public static int divide(int x, int y) {
 4            try {
 5                int result = x / y;      // Define a variable result to record the result of dividing two numbers
 6                return result;            // Return results
 7            } catch (Exception e) {      // Capture and handle exceptions
 8                System.out.println("The exception information captured is:" + e.getMessage());
 9            }
 10            // Defines that - 1 is returned directly when an exception occurs in the program
 11            return -1;
 12        }
 13        public static void main(String[] args) {
 14             int result = divide(4, 0);    // Call the divide() method
 15            if(result == -1){               // Judge the returned result of the calling method
 16                System.out.println("Program exception!");
 17            }else{
 18                System.out.println(result);
 19            }
 20        }
 21    }
The operation results are shown in Figure 1.

Figure 1 operation results
In file 1, in the defined integer division operation method divide(), the code that may cause exceptions is captured with the try... Catch statement. If an Exception divided by 0 occurs in the try {} code block, the program will instead execute the code in catch() {}. By calling the getMessage() method of the Exception object, the Exception information "/ by zero" can be returned. After the Exception is handled by the catch() {} code block, the program will still execute downward without terminating due to the Exception.
It should be noted that in the try {} code block, the code behind the exception statement will not be executed. For example, the return statement in line 6 of file 4-29 is not executed.
In a program, sometimes you want some statements to be executed no matter whether the program has an exception or not. At this time, you can add a finally {} code block after the try... catch statement. Next, modify file 4-29 to demonstrate the usage of finally {} code block, as shown in file 2.
File 2 example30 java
 1    public class Example30 {
 2        // The following method divides two integers
 3        public static int divide(int x, int y) {
 4            try {
 5                int result = x / y;      // Define a variable result to record the result of dividing two numbers
 6                return result;            // Return results
 7            } catch (Exception e) {      // Capture and handle exceptions
 8                System.out.println("The exception information captured is:" + e.getMessage());
 9            } finally {
 10               System.out.println("implement finally Code block,Whether the program is abnormal or not, it will be executed");
 11            }
 12            // Defines that - 1 is returned directly when an exception occurs in the program
 13            return -1;
 14        }
 15        public static void main(String[] args) {
 16                int result = divide(4, 0);    // Call the divide() method
 17            if(result == -1){               // Judge the returned result of the calling method
 18                System.out.println("Program exception!");
 19            }else{
 20                System.out.println(result);
 21            }
 22        }
 23    }
The operation results are shown in Figure 2.
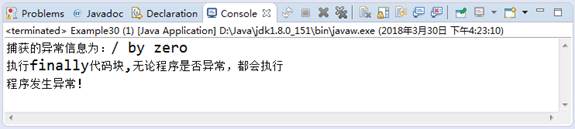
Figure 2 operation results
In file 2, a finally {} code block is added to the divide() method to handle the statements to be executed regardless of whether the program has an exception or not. This code block is not affected by the return statement and program exception. Because of this particularity, in program design, we often use the finally {} code block after try... catch to complete the things that must be done, such as releasing system resources, closing thread pool, etc.
It should be noted that the code in finally will not be executed in one case, that is, the system. In try... catch Exit (0) statement. System.exit(0) means to exit the current Java virtual machine. The Java virtual machine stops and no code can be executed.
7.4. throws keyword
In the case of the previous chapter, when defining the division operation, the developer is usually aware of the possible exceptions and can directly capture and handle the exceptions through try... catch. However, sometimes, the developer is not clear or in a hurry to deal with whether there will be exceptions in the code in the method. Therefore, Java allows this exception to be thrown from the current method, Then let subsequent callers handle exceptions when using.
In Java, throwing an exception needs to be realized by using the throw keyword, which is used after the name of the method that will throw an exception. At the same time, it supports throwing multiple types of exceptions at one time. The basic syntax format is as follows:
[Modifier ] Return value type method name([Parameter type parameter name 1...]) throws Exception class 1,Exception class 2,... {
  // Method body
}
It can be seen from the above syntax format that the throws keyword needs to be written after the method declaration, and the type of exception in the method needs to be declared after throws. This practice is usually called method declaration throwing an exception. Next, modify the case in the previous section and declare an exception thrown on the devide() method, as shown in file 1.
File 1 example31 java
 1    public class Example31 {
 2         // The following method divides two integers and throws an exception with the throw keyword declaration
 3        public static int divide(int x, int y) throws Exception {
 4            int result = x / y;            // Define the variable result to record the result of dividing two numbers
 5            return result;                  // Return results
 6        }
 7        public static void main(String[] args) {
 8            int result = divide(4, 0);    // Call the divide() method
 9            System.out.println(result);
 10        }
 11    }
The compiler reports an error, and the result is shown in Figure 1.
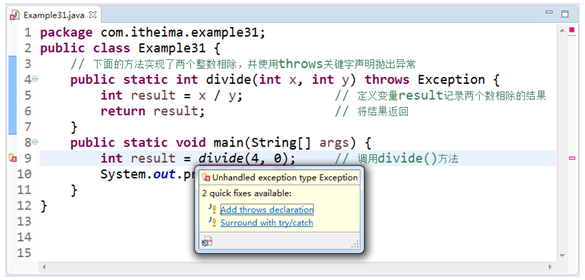
Figure 1 operation results
In file 1, when calling the divide() method, because the method claims to throw an exception, the caller must handle it when calling the divide() method, otherwise a compilation error will occur. As can be seen from Figure 1, the problem of "Unhandled exception type Exception" occurs in Eclipse during program compilation, and two quick solutions are given. Where "Add throws declaration" means to continue to use the throws keyword on the method to throw exceptions, while "Surround with try/catch" means to use the try... Catch code block for capture processing at the code where the exception occurs.
Next, modify file 1 and try... catch it when calling the divide() method, as shown in file 2.
File 2 example32 java
 1    public class Example32 {
 2         // The following method divides two integers and throws an exception with the throw keyword declaration
 3        public static int divide(int x, int y) throws Exception {
 4            int result = x / y;      //Define a variable result to record the result of dividing two numbers
 5            return result;            //Return results
 6        }
 7        public static void main(String[] args) {
 8                try {
 9                int result = divide(4, 0);  //Call the divide() method
 10                System.out.println(result);
 11            } catch (Exception e) {           //Handle the caught exception
 12                System.out.println("The exception information captured is:" + e.getMessage());
 13            }
 14        }
 15    }
The operation results are shown in Figure 2.
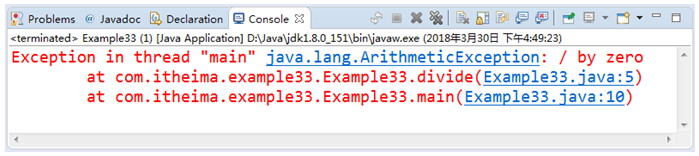
Figure 2 operation results
In file 2, when calling the divide() method, the exception is not handled, but the throws keyword is used to throw the exception. It can be seen from the running results that although the program can be compiled, the program terminates because the exception of "/ by zero" is not handled during running.
7.5. throw keyword
In addition to throwing exceptions through the throw keyword, you can also use the throw keyword to throw exceptions. Different from throws, throw is used in the method body and throws an exception class object, while throws keyword is used in the method declaration to indicate multiple exceptions that the method may throw.
After throwing an exception through the throw keyword, you also need to use the throw keyword or try... catch to handle the exception. It should be noted that if throw throws Error, RuntimeException or their subclass exception objects, there is no need to use the throws keyword or try... catch to handle the exception.
The syntax format of throwing an exception using throw keyword is as follows:
[Modifier ] Return value type method name([Parameter type parameter name,...]) throw Exception class thrown {
  // Method body
  throw new Exception Class or its subclass construction method;
}
Next, a case is used to demonstrate the use of throw keyword, as shown in file 1.
File 1 example34 java
 1    public class Example34 {
 2        // Define printAge() output age
 3        public static void printAge(int age) throws Exception {
 4            if(age <= 0){
 5                // Judge the business logic and throw an exception when the input age is negative
 6                throw new Exception("The age entered is incorrect. It must be a positive integer!");
 7            }else {
 8                System.out.println("This person is:"+age);
 9            }
 10        }
 11        public static void main(String[] args)  {
 12            // The following code defines a try... Catch statement to catch exceptions
 13            int age = -1;
 14            try {
 15                printAge(age);
 16            } catch (Exception e) {  // Handle the caught exception
 17                System.out.println("The exception information captured is:" + e.getMessage());
 18            }
 19        }
 20    }
The operation results are shown in Figure 1.

Figure 1 operation results
In file 1, the printAge() method makes a logical judgment on the age of the input. Although the input negative number can be grammatically compiled and the program can run normally, this is obviously inconsistent with the actual situation. Therefore, it is necessary to judge the input content in the method. When the value is less than 0, use the throw keyword to throw an exception and specify the exception prompt information, At the same time, continue to use the throws keyword to handle the thrown exception after the method.
As can be seen from Figure 1, for the business logic exception in the code, after throwing the exception with the throw keyword, the exception can also be caught correctly, so as to ensure the normal operation of the program. Of course, the throw keyword can throw not only the logical exception of the code, but also the exception that Java can automatically recognize.
7.6. Custom exception
A large number of Exception classes are defined in Java. Although these Exception classes can describe most of the exceptions during programming, it may be necessary to describe the unique exceptions in the program sometimes in program development. For example, when designing the divide() method, the divisor is not allowed to be negative. To solve this problem, Java allows users to customize exceptions, but the custom Exception class must inherit from Exception or its subclasses.
Next, learn the creation of custom exceptions through a case, as shown in file 1.
File 1 dividebyminusexception java
 1    // The following code is to customize an Exception class, which inherits from Exception
 2    public class DivideByMinusException extends Exception{
 3        public DivideByMinusException (){
 4            super();          // Call Exception parameterless constructor
 5        }
 6        public DivideByMinusException (String message){
 7            super(message); // Call the constructor with Exception parameters
 8        }
 9    }
In actual development, if there are no special requirements, the custom Exception class only needs to inherit the Exception class, and use the super() statement in the construction method to call the construction method of Exception.
Since the exception is customized, how to use it? At this time, you need to use the throw keyword explained in the previous section to throw a custom exception object at the specified position of the program through the throw keyword, and then handle the thrown exception.
Next, rewrite the divide() method again. In the divide() method, judge whether the divisor is negative. If it is negative, throw the custom DivideByMinusException exception exception object to the caller with the throw keyword, as shown in file 2.
File 2 example36 java
 1    public class Example36 {
 2        // The following method divides two integers,
 3         public static int divide(int x,int y) throws DivideByMinusException {
 4            if (y == 0) {
 5                // Declare an exception object using the throw keyword
 6                throw new DivideByMinusException("The divisor is 0");
 7            }
 8            int result = x / y; // Define a variable result to record the result of dividing two numbers
 9            return result;       // Return results
 10        }
 11        public static void main(String[] args) {
 12            try {
 13                int result = divide(4, 0);
 14                System.out.println(result);
 15            } catch (DivideByMinusException e) {
 16                System.out.println("The exception information captured is:" + e.getMessage());
 17            }
 18        }
 19    }
The operation results are shown in Figure 1.

Figure 1 operation results
In file 2, the divide() method judges whether the divisor of the division operation is 0 through logical judgment. If the divisor is 0, use the throw keyword to throw a custom DivideByMinusException exception exception object, then throw an exception through the throws keyword, and finally catch the exception through the try... Catch statement. As can be seen from Figure 2, after the program is executed, it is judged that the divisor is 0 and the specified exception information is thrown.
8. Garbage recycling
In Java, when an object becomes garbage, it will still occupy memory space. Over time, it will lead to insufficient memory space. In view of this situation, the garbage collection mechanism (Java GC) is introduced into Java. With this mechanism, programmers do not need to care too much about garbage object recycling. Java virtual opportunity automatically recycles the memory space occupied by garbage objects.
When an object is running in heap memory, its state can be divided into the following three types according to the state referenced by the referenced variable:
● available state: after an object is created, if more than one reference variable references it, the object will be available in the program, and the program can call the instance variables and methods of the object by referencing variables.
● recoverable state: if an object in the program no longer has any reference variables to reference it, it enters the recoverable state. In this state, the garbage collection mechanism of the system is ready to recycle the memory occupied by the object. Before recycling the object, the system will call the finalize() method of all recoverable state objects to clean up resources. If the system makes a reference variable refer to the object again before calling the finalize () method, the object will become available again; Otherwise, the object will become unavailable.
● unavailable state: when an object loses the association of all reference variables and the system has called the finalize() method of all objects and still does not make the object available, the object will permanently lose its reference and become unavailable. Only when an object is unavailable, the system will really reclaim the memory space occupied by the object.
The transition diagram of the above three states is shown in Figure 1.
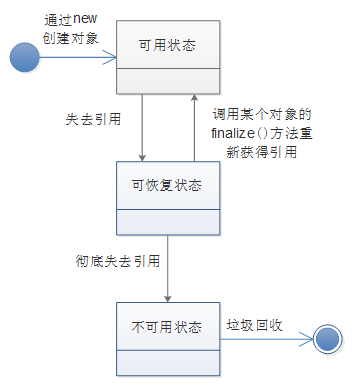
Figure 1 object state transition
After an object completely loses its reference and becomes garbage, it will be temporarily retained in memory. When such garbage accumulates to a certain extent, the Java virtual machine will start the garbage collector to release these garbage objects from memory, so as to make the program obtain more available memory space. Although the program can control when an object is no longer referenced by any reference variable, it can not accurately control the timing of Java garbage collection. In addition to waiting for the Java virtual machine to conduct automatic garbage collection, you can also force the system to conduct garbage collection in the following two ways.
● call GC () static method of System class: System gc().
● call GC () instance method of Runtime object: Runtime getRuntime(). gc().
In fact, call system When using GC () method, it also executes runtime getRuntime(). GC () method. It should be noted that calling these two methods can force the garbage collector to start garbage collection, but it is still uncertain whether the system will conduct garbage collection immediately. In most cases, mandatory system garbage collection always has a certain effect.
When an Object is released in memory, its finalize() method will be called automatically. The finalize() method is an instance method defined in the Object class. Its method prototype is as follows:
protected void finalize() throws Throwable { }
Any Java class can override the finalize() method of the Object class and clean up the resources occupied by the Object in this method. If there is no garbage collection before the program terminates, the finalize() method that loses the reference Object will not be called to clean up the resources.
It should be noted that the garbage collector will automatically garbage collect only when the program thinks it needs more additional memory. In some cases, the finalize() method of the object will not necessarily be called. For example, an object that has lost its reference only occupies a small amount of memory, and the system has no serious memory demand, At this time, the garbage collection mechanism may not recycle the resources occupied by the object, so the finalize() method of the object will not be called.
Next, a case is used to demonstrate the garbage collection process of Java virtual machine, as shown in file 1.
File 1 example37 java
 1    class Person {
 2        // The finalize() method defined below will be called before garbage collection
 3        public void finalize() {
 4            System.out.println("Objects will be recycled as garbage...");
 5        }
 6    }
 7    public class Example37 {
 8        // 1. Demonstrates a method of forcing garbage collection without notification
 9        public static void recyclegWaste1(){
 10            Person p1 = new Person();
 11            p1 = null;
 12            int i = 1;
 13            while (i < 10) {
 14                System.out.println("Method 1 in cycle...........");
 15                i++;
 16            }
 17        }
 18        // 2. Demonstrates a method of notifying forced garbage collection
 19        public static void recyclegWaste2(){
 20            Person p2 = new Person();
 21            p2 = null;
 22            // Notify the garbage collector to force garbage collection
 23            System.gc();
 24            // Runtime.getRuntime().gc();
 25            int i = 1;
 26            while (i < 10) {
 27                System.out.println("Method 2 in cycle...........");
 28                i++;
 29            }
 30        }
 31        public static void main(String[] args) {
 32            // Call two simulation demonstration garbage collection methods respectively
 33            recyclegWaste1();
 34            System.out.println("================");
 35            recyclegWaste2();
 36        }
 37    }
The operation results are shown in Figure 2.
Figure 2 operation results
In file 1, the Person class rewrites the finalize() method and writes an output statement in the method to see the execution effect of garbage collection. In the test class, two methods for demonstrating garbage collection, recyclegWaste1() and recyclegWaste2(), are created respectively. After removing a newly created object reference in the recyclegWaste1() method, the garbage collector is not forced to be called, but after removing a newly created object reference in the recyclegWaste2() method, the garbage collector is forced to be called immediately for garbage collection, A while loop is added to both methods to simulate other execution processes in the program. Finally, in the main() method, recyclegWaste1 () and recyclegWaste2 () methods are called sequentially.
As can be seen from Figure 2, in the recyclegWaste1() method, an object loses its reference and will not be recycled immediately as garbage, even if the whole method ends; In the recyclewaste2 () method, after an object loses its reference, it will immediately start the garbage collector for garbage collection. However, this process is not to collect garbage instantaneously, but to collect all garbage successively during the continuous execution of the program, including the garbage generated by the current recyclewaste2 () method and recyclewaste1 () method.
If in the main() method in file 1, the two methods that will be called to demonstrate garbage collection, recyclewaste1 () and recyclewaste2 (), execute the sequence interchangeably, and run the program again. The results are shown in Figure 3.
Figure 3 operation results
As can be seen from Figure 3, there is only one output message of "object will be used as garbage collection" in the whole execution process, which indicates that only one forced garbage collection is executed immediately in this process, that is, the garbage object p2 that has lost its reference in the recyclewaste2 () method is forcibly collected. The reason is that in the main() method, the recyclegWaste2() method is called first. In this method, when the garbage collector is notified to perform forced garbage collection, only the garbage object p2 is found, so garbage collection will be carried out at a certain time. When the recyclegWaste1() method is executed, a garbage object p1 is generated, but the garbage collector is not notified again, Therefore, garbage collection will not be carried out immediately.
8, Common classes in Java
1. String class and StringBuffer class
1.1 initialization of String class
Before operating the String class, you need to initialize the String class first. In Java, the String class can be initialized in the following two ways:
1. Directly initialize a String object with a String constant. Its syntax format is as follows:
String Variable name= character string;
When initializing a string object, you can either set the initialization value of the string object to null or initialize it to a specific string. Examples are as follows:
String str1 = null;    // Initialization is null
String str2 = "";      // Initialize to empty string
String str3 = "abc";  // Initialize to abc, where abc is a string constant
2. Use the construction method of String to initialize the String object. Its syntax format is as follows:
String Variable name = new String(character string);
In the above syntax, the String can also be empty or a specific String. When it is a concrete String, the constructor of different parameter types of String class will be used to initialize the String object.
The String class contains multiple construction methods. The common construction methods are shown in Table 1.
Table 1 common construction methods of string class
| Method declaration | Function description |
|---|---|
| String() | Create a string with empty content |
| String(String value) | Creates an object based on the specified string content |
| String(char[] value) | Creates an object based on the specified character array |
Table 1 lists three construction methods of String class. The initialization of String class can be completed by calling the construction methods of different parameters. Next, learn how the String class initializes the String object through the construction method through a case, as shown in file 1.
File 1 example01 java
 1    public class Example01 {
 2        public static void main(String[] args) {
 3            // Create an empty string
 4            String str1 = new String();
 5            // Create a string with abc content
 6            String str2 = new String("abc");
 7            // Create a string with an array of characters
 8            char[] charArray = new char[] { 'A', 'B', 'C' };
 9            String str3 = new String(charArray);
 10             // Output results
 11            System.out.println("a" + str1 + "b");
 12            System.out.println(str2);
 13            System.out.println(str3);
 14        }
 15    }
The operation results are shown in Figure 1.
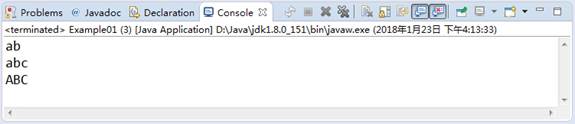
Figure 1 operation results
In file 1, the three construction methods in Table 1 are used to create String objects. The code in line 4 creates an empty String using the parameterless construction method, so str1 in the first output statement is empty ("). When hyphen (+) is used to connect a and b, the output result is ab. The code in line 6 creates a String with abc content by using the construction method with String parameter type, and the code in lines 8 ~ 9 creates a String with character array content by using the construction method with character array parameter type. As you can see from Figure 1, their final output is the content stored in the String object.
Tip:
The connection String can be realized by the operator "+". For example, the function of "+" in the above case code ("a" + str1 + "b") is to combine the two strings and generate a new String. In Java, if one of the operands on both sides of "+" is of String type, then "+" represents a String concatenation operator.
2.1 common operations of String class
String class is widely used in practical development, so it is very important to use string class flexibly. Next, let's explain some common methods of string class, as shown in Table 1.
Table 1 common methods of string class
| Method declaration | Function description |
|---|---|
| int indexOf(int ch) | Returns the index of the first occurrence of the specified character in this string |
| int lastIndexOf(int ch) | Returns the index of the last occurrence of the specified character in this string |
| int indexOf(String str) | Returns the index of the specified substring at the first occurrence in this string |
| int lastIndexOf(String str) | Returns the index of the last occurrence of the specified substring in this string |
| char charAt(int index) | Returns the character at the index position in the string, where the value range of index is: 0 ~ (string length - 1) |
| boolean endsWith(String suffix) | Determines whether this string ends with the specified string |
| int length() | Returns the length of this string |
| boolean equals(Object anObject) | Compares this string with the specified string |
| boolean isEmpty() | Returns true if and only if the string length is 0 |
| boolean startsWith(String prefix) | Determines whether this string starts with the specified string |
| boolean contains(CharSequence cs) | Determines whether this string contains the specified character sequence |
| String toLowerCase() | Converts all characters in a String to lowercase using the rules of the default locale |
| String toUpperCase() | Converts all characters in a String to uppercase using the rules of the default locale |
| static String valueOf(int i) | Returns the string representation of the int parameter |
| char[] toCharArray() | Converts this string to an array of characters |
| String replace(CharSequence oldstr, CharSequence newstr) | Returns a new string obtained by replacing all oldstr s that appear in this string with newstr |
| String[] split(String regex) | The string is divided into several substrings according to the parameter regex (regex is a regular expression used to limit the separation rules) |
| String substring(int beginIndex) | Returns a new string containing all the characters from the specified beginIndex starting angle to the end of the string |
| String substring(int beginIndex, int endIndex) | Returns a new string that contains all characters from the specified beginIndex start corner to the index endIndex-1 corner |
| String trim() | Returns a new string, which removes the spaces at the beginning and end of the original string |
In Table 1, the common methods of String class are listed. In order to make readers more familiar with the functions of these methods, next, learn the use of common methods in String class through several cases.
1. Basic operation of string
In the program, some basic operations need to be carried out on the String, such as obtaining the length of the String, obtaining the characters at the specified position, etc. The String class provides corresponding methods for each operation. Next, learn the use of these methods through a case, as shown in file 1.
File 1 example02 java
 1    public class Example02 {
 2        public static void main(String[] args) {
 3            String s = "abcabcbacdba"; // Initialization string
 4            System.out.println("The length of the string is:" + s.length());
 5            System.out.println("First character in string:" + s.charAt(0));
 6            System.out.println("character c Location of the first occurrence:" + s.indexOf('c'));
 7            System.out.println("character c Location of the last occurrence:" + s.lastIndexOf('c'));
 8            System.out.println("First occurrence of substring:" + s.indexOf("ab"));
 9            System.out.println("Last occurrence of substring:"
 10                                                        + s.lastIndexOf("ab"));
 11         }
 12    }
The operation results are shown in Figure 1.
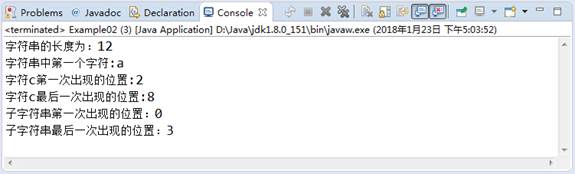
Figure 1 operation results
As can be seen from Figure 1, the method provided by the String class can easily obtain the length of the String, the characters at the specified position and the positions of the specified characters and strings.
2. String conversion
In program development, it is often necessary to convert strings, such as converting strings into character arrays, converting characters in strings to case, etc. Next, a case is used to demonstrate the string conversion operation, as shown in file 2.
File 2 example03 java
 1    public class Example03 {
 2        public static void main(String[] args) {
 3            String str = "java";
 4            char[] charArray = str.toCharArray(); // Convert string to character array
 5             System.out.print("Traversal result after converting string into character array:");
 6            for (int i = 0; i < charArray.length; i++) {
 7                if (i != charArray.length - 1) {
 8                    // If it is not the last element of the array, add a comma after the element
 9                    System.out.print(charArray[i] + ",");
 10                } else {
 11                    // The last element of the array is not followed by a comma
 12                    System.out.println(charArray[i]);
 13                }
 14            }
 15            System.out.println("take int Convert value to String Results after type:"
 16                                    + String.valueOf(12));
 17            System.out.println("The result of converting a string to uppercase:"
 18                                    + str.toUpperCase());
 19        }
 20    }
The operation results are shown in Figure 2.
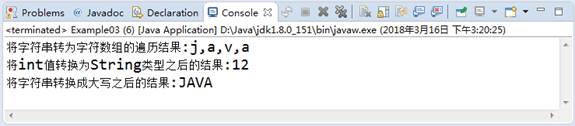
Figure 2 operation results
In file 2, the toCharArray() method of String class is used to convert a String into a character array, the static method valueOf() converts an integer of type int into a String, and the toUpperCase() method converts all characters in the String into uppercase. Among them, valueOf() method has many overloaded forms. Other basic types of data such as float, double and char can be converted to String type through this method.
3. String replacement and space removal
In the process of developing the program, we need to consider that there will be some errors and spaces when users input data. At this time, we can use the replace() and trim() methods of String class to replace strings and remove spaces. Next, learn the use of these two methods through a case, as shown in file 3.
File 3 example04 java
 1    public class Example04 {
 2        public static void main(String[] args) {
 3            String s = "     http :// localhost : 8080     ";
 4            // String space removal operation
 5            System.out.println("Result after removing spaces at both ends of the string:" + s.trim());
 6            // String replacement operation
 7            System.out.println("The result after removing all spaces in the string:"
 8                                  + s.replace(" ", ""));
 9        }
 10    }
The operation results are shown in Figure 3.

Figure 3 operation results
In file 3, we call the two methods of the String class, where the trim() method is used to remove the spaces in the beginning and the end of the string. The replace() method is used to replace all substrings matching the specified string in the string to another string.
It should be noted that the trim() method can only remove the spaces at both ends, not the spaces in the middle. If you want to remove the space in the middle of the String, you can implement it through the replace() method of the String class.
4. String judgment
When operating a String, you often need to judge the String, such as whether the String starts and ends with the specified String, whether it contains the specified String, whether the String is empty, etc. There are many methods for judging strings in the String class. Next, learn the use of these judgment methods through a case, as shown in file 4.
File 4 example05 java
 1    public class Example05 {
 2        public static void main(String[] args) {
 3            String s1 = " Starter"; // Declare a string
 4            String s2 = "St";
 5            System.out.println("Determine whether to use string St start:" + s1.startsWith("St"));
 6            System.out.println("Determine whether to use string er ending:" + s1.endsWith("er"));
 7            System.out.println("Determine whether the string is included ar:" + s1.contains("ar"));
 8            System.out.println("Judge whether the string is empty:" + s1.isEmpty());
 9            System.out.println("Judge whether two strings are equal" + s1.equals(s2));
 10        }
 11    }
The operation results are shown in Figure 4.
Figure 4 operation results
All the methods involved in file 4 are used to judge the String, and the return values are of boolean type. Among the methods used, the equals() method is more important. The equals() method in the parent class Object is overridden in the String class.
In the program, strings can be compared by = = and equals(), but there are significant differences between the two methods. The equals() method is used to compare whether the character values in two strings are equal, and the = = method is used to compare whether the memory addresses of two string objects are the same. For two string objects, when their character values are exactly the same, the result will be true by using equals, but the result must be false by using = =. For ease of understanding, the following example code is given:
String str1 = new String("abc");
String str2 = new String("abc");
// The result is false because str1 and str2 are two objects
System.out.println(str1 == str2);
// The result is true because str1 and str2 have the same character content
System.out.println(str1.equals(str2));
5. String interception and segmentation
In the String class, two methods are provided for String interception and segmentation. substring() method is used to intercept part of the String, and split() method can divide the String according to a certain character. Next, learn the use of these two methods through a case, as shown in file 5.
File 5 example06 java
 1    public class Example06 {
 2        public static void main(String[] args) {
 3            String str = "2018-01-24";
 4            // The following is the string interception operation
 5            System.out.println("Result intercepted from the 6th character to the end:"
 6                                   + str.substring(5));
 7            System.out.println("The result of intercepting from the 6th character to the 7th character:"
 8                                   +str.substring(5, 7));
 9            // The following is the string segmentation operation
 10            System.out.print("The elements in the split string array are:");
 11            // Converts a string to an array of strings using the hyphen '-'
 12            String[] strArray = str.split("-");
 13            // Loop out elements in array
 14            for (int i = 0; i < strArray.length; i++) {
 15                if (i != strArray.length - 1) {
 16                    // If it is not the last element of the array, add a stop sign after the element
 17                    System.out.print(strArray[i] + ",");
 18                } else {
 19                    // The last element of the array is not followed by a stop sign
 20                    System.out.println(strArray[i]);
 21                }
 22            }
 23        }
 24    }
The operation results are shown in Figure 5.
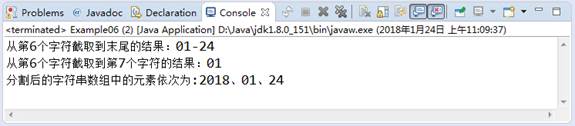
Figure 5 operation results
In file 5, we call the two substring() method loaded in the String class. When the sixth line code invokes the substring(5) method, because the character index in the string starts from 0, it will intercept sixth characters in the string and all characters after it. When the substring(5,7) method is called in line 8, the 6th and 7th characters will be intercepted. Lines 12 to 22 in the file demonstrate the usage of the split() method, which divides the string into three parts according to the specified symbol "-" and stores them in an array of string type. Use the for loop to traverse the array and output the required content as required. Here, the dates are separated by a stop sign.
 Watch your step:
String string when obtaining a character, the character index will be used. When accessing the character in the string, if the character index does not exist, StringIndexOutOfBoundsException (string corner mark out of bounds exception) will occur.
Next, a case is used to demonstrate this exception, as shown in file 6.
File 6 example07 java
 1    public class Example07 {
 2        public static void main(String[] args) {
 3            String s = "abcde";
 4            System.out.println(s.charAt(10));
 5        }
 6    }
The operation results are shown in Figure 6.

Figure 6 operation results
As can be seen from Figure 6, when accessing the characters in the string, you cannot exceed the index range of the characters, otherwise an exception will occur, which is similar to the out of bounds exception of the corner mark in the array.
3.1. StringBuffer class
In Java, because the String class is of final type, the String defined by String is a constant. Therefore, once it is created, its content and length cannot be changed. If you need to modify a String, you can only create a new String. To facilitate the modification of strings, a StringBuffer class (also known as String buffer) is provided in JDK to operate strings. The biggest difference between StringBuffer class and String class is that its content and length can be changed. StringBuffer is similar to a character container. When adding or deleting characters in it, the operation is this character container, so no new StringBuffer object will be generated.
The StringBuffer class provides a series of methods for adding and deleting characters, as shown in Table 1.
Table 1 common methods of StringBuffer class
| Method declaration | Function description |
|---|---|
| StringBuffer append(char c) | Adds a character to the end of the StringBuffer object |
| StringBuffer insert(int offset,String str) | Insert the string str at the offset position in the StringBuffer object |
| StringBuffer deleteCharAt(int index) | Removes the character at the specified position from the StringBuffer object |
| StringBuffer delete(int start,int end) | Deletes the character or string in the specified range in the StringBuffer object |
| StringBuffer replace(int start,int end,String s) | Replace the character or string in the specified range in the StringBuffer object with the new string s |
| void setCharAt(int index, char ch) | Modify the character at the specified position |
| String toString() | Returns the string object in the StringBuffer buffer |
| StringBuffer reverse() | Replace this StringBuffer object with its inverted form |
In Table 1, a series of common methods of StringBuffer class are listed, which is difficult for beginners to understand. Next, learn the specific use of the methods in the table through a case, as shown in file 1.
File 1 example08 java
 1    public class Example08 {
 2        public static void main(String[] args) {
 3            System.out.println("1,add to------------------------");
 4            add();
 5            System.out.println("2,modify------------------------");
 6            update();
 7            System.out.println("3,delete------------------------");
 8            delete();
 9        }
 10        // add to
 11        public static void add() {
 12            StringBuffer sb = new StringBuffer(); // Define a string buffer
 13            sb.append("ABC");          // Add string
 14            System.out.println("append Add results:" + sb);
 15            sb.insert(3, "DE");        // Inserts a string at the specified location
 16            System.out.println("insert Add results:" + sb);
 17        }
 18        // modify
 19        public static void update() {
 20            StringBuffer sb = new StringBuffer("ABAAA");
 21            sb.setCharAt(2, 'C');      // Modify character at specified position
 22            System.out.println("Modify the character result at the specified position:" + sb);
 23            sb.replace(3, 5, "DE");    // Replaces a string or character at the specified location
 24            System.out.println("Replace character (string) at specified position result:" + sb);
 25            System.out.println("String flip result:" + sb.reverse());
 26        }
 27        // delete
 28        public static void delete() {
 29            StringBuffer sb = new StringBuffer("ABCDEFG");
 30            sb.delete(3, 7);             // Specified range deletion
 31            System.out.println("Delete specified location result:" + sb);
 32            sb.deleteCharAt(2);         // Delete at specified location
 33            System.out.println("Delete specified location result:" + sb);
 34            sb.delete(0, sb.length()); // Empty buffer
 35            System.out.println("Empty buffer result:" + sb);
 36        }
 37    }
The operation results are shown in Figure 1.

Figure 1 operation results
Many methods of the StringBuffer class are involved in file 1, of which the append() and insert() methods are the most commonly used, and these two methods have many overloaded forms, both of which are used to add characters. The difference is that the append() method always adds these characters to the end of the buffer, while the insert() method can add characters at the specified position. In addition, the delete() method of the StringBuffer object is used to delete the characters at the specified position, including the start index and not the end index. The setCharAt() and replace() methods are used to replace the characters at the specified position.
StringBuffer class and String class have many similarities, which are easy to be confused by beginners. Next, compare the two classes and briefly summarize their differences, as follows:
① The String defined by the String class is a constant. Once created, the content and length cannot be changed. StringBuffer represents a character container whose content and length can be modified at any time. When operating a String, if the String is only used to represent the data type, you can use the String class. However, if you need to add or delete characters in the String, you can use the StringBuffer class.
② The String class overrides the equals() method of the Object class, while the StringBuffer class does not override the equals() method of the Object class. Specific examples are as follows:
String s1 = new String("abc");
String s2 = new String("abc");
System.out.println(s1.equals(s2));      // The print result is true
StringBuffer sb1 = new StringBuffer("abc");
StringBuffer sb2 = new StringBuffer("abc");
System.out.println(sb1.equals(sb2));   // The print result is false
③ String objects can be connected by the operator "+", but not between StringBuffer objects. Specific examples are as follows:
String s1 = "a";
String s2 = "b";
String s3 = s1+s2;                             // legitimate
System.out.println(s3);                       // Printout ab
StringBuffer sb1 = new StringBuffer("a");
StringBuffer sb2 = new StringBuffer("b");
StringBuffer sb3 = sb1 + sb2;                // Compilation error
 Learn more: the use of StringBuilder
In addition to using StringBuffer, a StringBuilder class is provided after JDK 1.5, which can also operate on strings. The functions of StringBuilder and StringBuffer are similar, and the methods provided in the two classes are basically the same. The difference between the two is that StringBuffer is thread safe, while StringBuilder does not implement thread safe function, so the performance is slightly higher. Generally, if you create a string object with variable content, you should give priority to the StringBuilder class.
The StringBuilder class also provides a series of methods for append, insert, replace, and delete. If the StringBuffer in file 1 is replaced by StringBuilder, the program can also be executed correctly.
2. System class and Runtime class
2.1. System class
The System class is no stranger to readers, because in the previous knowledge, when you need to print results, you use "System.out.println();" Statement, which uses the System class. The System class defines some properties and methods related to the System. The properties and methods it provides are static. Therefore, if you want to reference these properties and methods, you can call them directly with the System class.
The common methods of System class are shown in Table 1.
Table 1 common methods of system class
| Method declaration | Function description |
|---|---|
| static void exit(int status) | This method is used to terminate the currently running Java virtual machine. The parameter status indicates the status code. If the status code is not 0, it indicates abnormal termination |
| static void gc() | Run the garbage collector and recycle the garbage |
| static native long currentTimeMillis() | Returns the current time in milliseconds |
| static void arraycopy(Object src,int srcPos,Object dest,int destPos,int length) | Copy from the specified source array referenced by src to the array referenced by dest. The copy starts at the specified location and ends at the specified location of the target array |
| static Properties getProperties() | Get current system properties |
| static String getProperty(String key) | Gets the system properties of the specified key description |
In Table 1, the common methods of System class are listed. Next, the methods in the table are explained one by one through some cases.
1. getProperties() method
The getProperties() method of the System class is used to obtain all the Properties of the current System. This method will return a Properties object, which encapsulates all the Properties of the System. These Properties exist in the form of key value pairs. Next, a case is used to demonstrate the use of the getProperties() method, as shown in file 1.
File 1 example09 java
 1    import java.util.*;
 2    public class Example09 {
 3        public static void main(String[] args) {
 4            // Get current system properties
 5            Properties properties = System.getProperties();
 6            System.out.println(properties);
 7            // Get the key (property name) of all system properties and return the Set object
 8            Set<String> propertyNames = properties.stringPropertyNames();
 9            for (String key : propertyNames ) {
 10                //Get the value (attribute value) corresponding to the current key (attribute name)
 11                String value = System.getProperty(key);
 12                System.out.println(key +"--->"+ value);
 13            }
 14        }
 15    }
The operation results are shown in Figure 1.
Figure 1 operation results
File 1 realizes the function of obtaining the current System Properties. First, get the Properties collection that encapsulates the System Properties through the getProperties() method of System, and then iterate over the Properties collection to print out the keys and corresponding values of all System Properties. The collection will be explained in the next chapter, where the reader only needs to know through System The getProperties() method can obtain the System Properties. As can be seen from Figure 1, these System attributes include virtual machine version number, user's country, operating System version, etc.
2.currentTimeMillis()
The currentTimeMillis() method returns a value of type long, which represents the time difference between the current time and 0:0:0:0 on January 1, 1970. The unit is milliseconds. This value is also commonly referred to as a timestamp. In order to facilitate readers to understand the use of this method, next, a case is used to calculate the time consumed by the program in the summation operation, as shown in file 2.
File 2 example10 java
 1    public class Example10 {
 2        public static void main(String[] args) {
 3            long startTime = System.currentTimeMillis();// Current time at the beginning of the cycle
 4            int sum = 0;
 5            for (int i = 0; i < 100000000; i++) {
 6                sum += i;
 7            }
 8            long endTime = System.currentTimeMillis();// Current time after the end of the cycle
 9            System.out.println("The running time of the program is:"+(endTime - startTime)+ "millisecond");
 10        }
 11    }
The operation results are shown in Figure 2.

Figure 2 operation results
File 2 demonstrates the summation operation of numbers. At the beginning and end of summation, the program calls the currentTimeMillis() method to obtain two time stamps respectively. The difference between the two time stamps is the time consumed by the summation operation. It should be noted that due to processor performance and other reasons, the running time of the program will also be different.
3.arraycopy(Object src,int srcPos,Object dest,int destPos,int length)
The arraycopy() method is used to quickly copy the elements in one array to another array. The parameters in the parameter list are described as follows:
● src: indicates the source array;
● dest: indicates the target array;
● srcPos: indicates the starting position of the copied element in the source array;
● destPos: refers to the starting position of the target array;
● length: indicates the number of copied elements.
When copying the array, the target array must have enough space to store the copied elements, otherwise the corner mark out of bounds exception will occur. Next, a case is used to demonstrate the copy of array elements, as shown in file 3.
File 3 example11 java
 1    public class Example11 {
 2        public static void main(String[] args) {
 3            int[] srcArray = { 101, 102, 103, 104, 105, 106 }; // Source array
 4            int[] destArray = { 201, 202, 203, 204, 205};       // target array
 5            System.arraycopy(srcArray, 2, destArray, 0, 4);    // Copy array elements
 6            // Print elements in target array
 7            for (int i = 0; i < destArray.length; i++) {
 8                System.out.println(i + ": " + destArray[i]);
 9            }
 10        }
 11    }
The operation results are shown in Figure 3.
Figure 3 operation results
In file 3, two arrays srcararray and destArray are created, representing the source array and the target array respectively. When the arraycopy() method is called to copy elements, since it is specified to start copying from the elements with index 2 in the source array, and the copied four elements are stored at the position with index 0 in the target group, when printing the elements of the target array, The program first prints out the last four elements copied from the source array srcrarray, and then prints out the last element in the destArray.
It should be noted that when using the arraycopy() method to copy array elements, you must ensure that the source array element type is the same as the target array element type, otherwise the ArrayStoreException exception will appear when the program runs. In addition, when using the arraycopy() method, the length of the last copied element length parameter can neither exceed the number of elements remaining in the intercepted source array from the specified position srcPos, nor exceed the number of elements that the target array can hold from the specified position destPos. Otherwise, the program will run with ArrayIndexOutOfBoundsException.
Tip:
In addition to the methods involved in the above cases, the System class also has two common methods, namely gc() and exit(int status) methods. The gc() method is used to start the Java garbage collector and recycle the garbage objects in memory. The exit(int status) method is used to terminate the currently running Java virtual machine. The parameter status is used to indicate the current abnormal state. It is usually specified as 0 to indicate normal exit, otherwise it indicates abnormal termination.
2.2. Runtime class
The Runtime class is used to represent the running state of the Java virtual machine. It is used to encapsulate the Java virtual machine process. Every time you use the "Java" command to start the Java virtual machine, there will be a Runtime instance, and there is only one instance. The application will be connected to its Runtime environment through this instance. The application cannot create its own Runtime instance. If you want to obtain a Runtime instance in the program, you can obtain the relevant Runtime object through the getRuntime() method. The specific methods are as follows:
Runtime run = Runtime.getRuntime();
Because the Runtime class encapsulates the Java virtual machine process, you can obtain the relevant information of the current virtual machine through the instance object of this class. Next, a case is used to demonstrate the use of the Runtime class, as shown in file 1.
File 1 example12 java
 1    public class Example12 {
 2        public static void main(String[] args) {
 3            Runtime rt = Runtime.getRuntime(); // Gets the runtime object associated with the Java program
 4            System.out.println("Number of processors: "
 5                                   + rt.availableProcessors() + "individual");
 6            System.out.println("Free memory size: "
 7                                   + rt.freeMemory() / 1024 / 1024 + "M");
 8            System.out.println("Maximum available memory size: "
 9                                   + rt.maxMemory() / 1024 / 1024 + "M");
 10        }
 11    }
The operation results are shown in Figure 1.
Figure 1 operation results
In file 1, through "Runtime.getRuntime();" Method creates an instance object of Runtime, and calls the availableProcessors() method, freeMemory() method and maxMemory() method of the object respectively to print out the number of processors, free memory size and maximum available memory size of the current virtual machine.
It should be noted that due to the different configuration and performance of each computer, the print results of this file will be different. In addition, the free memory size and the maximum available memory size are calculated in bytes. The running results of the program in file 1 have been converted into values in megabytes (M).
An exec() method is provided in the Runtime class, which is used to execute a DOS command to achieve the same effect as entering a DOS command in the command line window. For example, you can open a notepad that comes with Windows by running the "notepad.exe" command. The program code is shown in file 2.
File 2 example13 java
 1    import java.io.IOException;
 2    public class Example13 {
 3        public static void main(String[] args) throws IOException {
 4            Runtime rt = Runtime.getRuntime(); // Create Runtime instance object
 5            rt.exec("notepad.exe");              // Call exec() method
 6        }
 7    }
In file 2, the exec() method of the Runtime object is invoked and the system command "notepad.exe" is passed to the method as a parameter. After running the program, a notepad will be opened on the desktop, as shown in Figure 2.
Figure 2 Notepad
At this time, a new process notepad.com will be generated in the Windows system Exe, which can be observed through the task manager, as shown in Figure 3.
Figure 3 Task Manager
The exec() method of the Runtime class will return a Process object that represents a Process of the operating system, here Notepad Exe Process. The new Process generated can be managed through the Process object. If you close this Process, you only need to call the destroy() method.
Next, a case is used to realize the function of opening the notepad and automatically closing it after 3 seconds, as shown in file 3.
File 3 example14 java
 1    public class Example14 {
 1        public static void main(String[] args) throws Exception {
 2             // Create a Runtime instance object
 3            Runtime rt = Runtime.getRuntime();
 4            // Get the Process object representing the Process
 5            Process process = rt.exec("notepad.exe");
 6            // Program sleep for 3 seconds
 7            Thread.sleep(3000);
 8            // Close process
 9            process.destroy();
 10        }
 11    }
In file 3, the open Notepad is closed by calling the destroy() method of the Process object. In order to highlight the effect of demonstration, the static method sleep(long millis) of Thread class is used to make the program sleep for 3 seconds. Therefore, after the program runs, you will see that the open Notepad will close automatically after 3 seconds.
3. Math class and Random class
3.1 Math class
Math class is a tool class, which is mainly used to complete complex mathematical operations, such as absolute value, trigonometric function, exponential operation, etc. Because its construction method is defined as private, the object of math class cannot be created. All methods in the math class are static methods that can be called directly through the class name. In addition to static methods, there are two static constants PI and E in math class, which represent π and E in mathematics respectively.
Because the Math class is relatively simple, beginners can learn the specific usage of the Math class by viewing the API documentation. Next, the commonly used methods in Math class are demonstrated through a case, as shown in file 1.
File 1 example15 java
 1    public class Example15 {
 2        public static void main(String[] args) {
 3             System.out.println("Result of calculating absolute value: " + Math.abs(-1));
 4            System.out.println("Calculate the result of sine: " + Math.sin(1.57));
 5            System.out.println("The result of calculating cosine: " + Math.cos(2.0));
 6            System.out.println("Result of calculating tangent: " + Math.tan(0.8));
 7            System.out.println("The result of calculating the square root: " + Math.sqrt(4));
 8            System.out.println("Result of calculating cube root: " + Math.cbrt(9));
 9            System.out.println("Result of power calculation: " + Math.pow(2,2));
 10            System.out.println("Find the smallest integer greater than the parameter: " + Math.ceil(4.6));
 11            System.out.println("Find the maximum integer less than the parameter: " + Math.floor(-5.2));
 12            System.out.println("The result of rounding decimals: " + Math.round(-8.6));
 13            System.out.println("Find the larger value of two numbers: " + Math.max(5.1, 5.5));
 14            System.out.println("Find the smaller value of two numbers: " + Math.min(5.1, 5.5));
 15            System.out.println("Generate a random value greater than or equal to 0 and less than 1: "+
 16                                                          Math.random());
 17        }
 18    }
The operation results are shown in Figure 1.
Figure 1 operation results
In file 1, the common methods of Math class are demonstrated. The function of each method can be seen from the operation results in Figure 1.
It should be noted that the round() method is used to round a decimal point. This method will ignore all the numbers after the decimal point and return an int type number, while the ceil() method and floor() method return double type numbers, which are equal to an integer in number value.
3.2 Random
Java. Net in JDK In the util package, there is a Random class, which can randomly generate numbers within the specified value range. Two construction methods are provided in the Random class, as shown in Table 1.
Table 1 construction method of random
| Method declaration | Function description |
|---|---|
| Random() | The construction method is used to create a Random number generator. Each instantiation of the Random object will generate different Random numbers |
| Random(long seed) | The construction method uses a long seed to create a pseudo-Random number generator. When the seeds are the same, each instantiation of the Random object will generate the same Random number |
Table 1 lists two construction methods of Random class. The first construction method is parameterless. The Random seed used by the Random instance object created by it is Random every time, so the Random number generated by each object is different. If you want to create multiple Random instance objects to generate Random numbers of the same sequence, you can call the second construction method when creating the object and pass in the same seed.
Compared with Math's random() method, the Random class provides more methods to generate various pseudo-Random numbers. It can generate not only Random numbers of integer type, but also Random numbers of floating-point type. The common methods in Random class are shown in Table 2.
Table 2 common methods of random class
| Method declaration | Function description |
|---|---|
| boolean nextBoolean() | Randomly generate random numbers of boolean type |
| double nextDouble() | Randomly generate random numbers of type double |
| float nextFloat() | Randomly generate random numbers of float type |
| int nextInt() | Randomly generate random numbers of type int |
| int nextInt(int n) | Randomly generate random numbers of type int between [0,n) |
| long nextLong() | Randomly generate random numbers of type long |
Table 2 lists the commonly used methods of Random class. The nextDouble() method of Random class returns the value of double type between 0.0 and 1.0, the nextFloat() method returns the value of float type between 0.0 and 1.0, and nextInt(int n) returns the value between 0 (including) and the specified value n (excluding). Next, learn the use of these methods through a case, as shown in file 1.
File 1 example16 java
 1    import java.util.Random;
 2    public class Example16 {
 3        public static void main(String[] args) {
 4             Random r = new Random();
 5            System.out.println("generate boolean Random number of type:"
 6                                    + r.nextBoolean());
 7            System.out.println("generate double Random number of type:"
 8                                    + r.nextDouble());
 9            System.out.println("generate float Random number of type:"
 10                                     + r.nextFloat());
 11            System.out.println("generate int Random number of type:"
 12                                     + r.nextInt());
 13            System.out.println("Generate between 0 and 10 int Random number of type:"
 14                                     + r.nextInt(10));
 15            System.out.println("generate long Random number of type:"
 16                                     + r.nextLong());
 17        }
 18    }
The operation results are shown in Figure 1.
Figure 1 operation results
As can be seen from Figure 1, different types of Random numbers are generated by calling different methods of Random class.
4. Packaging
Although Java is an object-oriented programming language, the eight basic data types it contains do not support object-oriented programming mechanism (no properties and methods). The reason why Java provides these eight basic data types is to facilitate the processing of conventional data. In Java, the methods of many classes need to receive objects of reference type. At this time, the value of a basic data type cannot be passed in. In order to solve this problem, JDK provides a series of wrapper classes, which can wrap the value of basic data type as an object referencing data type.
In Java, each basic type has a corresponding wrapper class, as shown in Table 1.
Table 1 packaging classes corresponding to basic types
| Basic data type | Corresponding packaging class |
|---|---|
| byte | Byte |
| char | Character |
| int | Integer |
| short | Short |
| long | Long |
| float | Float |
| double | Double |
| boolean | Boolean |
In Table 1, eight basic data types and their corresponding packaging classes are listed. Except Integer and Character classes, the names of other corresponding wrapper classes are the same as their basic data types, except that the initial letter needs to be capitalized.
The concepts of Autoboxing and AutoUnboxing are introduced in the conversion between packaging class and basic data type. Automatic boxing refers to assigning the variables of basic data type to the corresponding packaging class variables; Conversely, unpacking refers to directly assigning the packaging object type to a corresponding basic data type variable.
Next, take the basic type of int and the corresponding packing class Integer as an example to learn the process of packing and unpacking, as shown in file 1.
File 1 example17 java
 1    public class Example17 {
 2         public static void main(String args[]) {
 3            // Define a basic type of variable a and assign a value of 20
 4            int a = 20;
 5            // Auto boxing: assign variable a of basic type to variable b of Integer type
 6            Integer b = a;
 7            System.out.println(b);
 8            // Automatic unpacking: assign variable b of Integer type to variable a of basic type
 9            int c = b;
 10            System.out.println(c);
 11        }
 12    }
The operation results are shown in Figure 1.

Figure 1 operation results
In file 1, through the packaging class and automatic unpacking and packing function, developers can convert the variables of basic data type into objects for use, and can also convert the instances of packaging class into variables of basic type for use.
In Java, in addition to supporting the conversion between basic data types and corresponding wrapper classes, other methods are also provided to support the conversion between basic data types, basic data wrapper classes and strings. The details are as follows:
(1) Eight basic data types can be converted into corresponding String types by referring to the valueOf() method of data type String class;
(2) Through the static method valueOf() of 8 wrapper classes, you can convert the corresponding basic data type into wrapper class, and you can also convert the string matching the variable content into the corresponding wrapper class (except Character wrapper class);
(3) Through the parametric construction methods of 8 packaging classes, you can also convert the corresponding basic data type into packaging class, and the string matching the variable content into the corresponding packaging class (except Character packaging class);
(4) The string matching the variable content can be converted to the corresponding basic data type through the static method parseXxx() of 8 kinds of packaging classes;
(5) Wrapper classes override the toString() method in the Object class to return the value of the wrapped basic data type in the form of string.
Next, the above method is used to realize the mutual conversion between basic data types, wrapper classes and strings, as shown in file 2.
File 2 Example18
 1    public class Example18 {
 2        public static void main(String args[]) {
 3            int num = 123;
 4            // 1. Through string The valueof () method converts the base type to a string
 5            String string = String.valueOf(num);
 6            System.out.println("take int Result of converting variable to string:"+string);
 7            // 2. The basic type and string are converted to the wrapper class through the valueOf() static method of the wrapper class
 8            String str = "998";
 9            Integer integer = Integer.valueOf(num);
 10            Integer integer2 = Integer.valueOf(str);
 11            System.out.println("take int Result of converting variable to wrapper class:"+integer);
 12            System.out.println("The result of converting a string variable to a wrapper class:"+integer2);
 13            // 3. The basic types and strings are converted into wrapper classes through the parametric construction method of wrapper classes
 14            Integer integer3 = new Integer(num);
 15            Integer integer4 = new Integer(str);
 16            System.out.println("By constructor int Result of converting variable to wrapper class:"
 17                                        +integer3);
 18            System.out.println("The string variable is converted to the result of the wrapper class through the constructor:"
 19                                        +integer4);
 20            // 4. The string is converted to the basic data type through the parseXxx() static method of the wrapper class
 21            int parseInt = Integer.parseInt(str);
 22            System.out.println("The result of converting a string to a basic type:"+parseInt);
 23            // 5. Convert the wrapper class to a string through the toString() method of the wrapper class
 24            String string2 = integer.toString();
 25            System.out.println("Result of converting wrapper class to string:"+string2);
 26        }
 27    }
The operation results are shown in Figure 2.
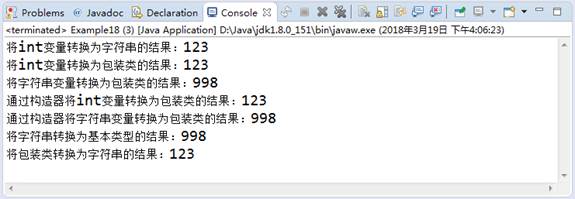
Figure 2 operation results
As can be seen from Figure 2, the introduced methods can realize the mutual conversion between basic data types, wrapper classes and strings. However, when using valueOf(String s) and parseXxx(String s) methods, you should also pay attention to the following points:
① In addition to Character, all wrapper classes have valueOf(String s) methods, which can create wrapper class objects according to String type parameters, but the parameter String s cannot be null, and the String must be data that can be parsed into corresponding basic types. Otherwise, although it is compiled, an error will be reported at run time. Specific examples are as follows:
Integer i = Integer.valueOf("123");       // legitimate
Integer i = Integer.valueOf("12a");      // wrongful
② In addition to Character, the wrapper class has a static method of parseXxx(String s) to convert the string into the corresponding basic type of data. The parameter s cannot be null, and it must also be data that can be parsed into the corresponding basic type. Otherwise, although it is compiled, an error will be reported at run time. Specific examples are as follows:
int i = Integer.parseInt("123");     // legitimate
Integer in = Integer.parseInt("itcast");// wrongful
5. Date and time class
5.1 Date class
Java. Net in JDK In the util package, a Date class is provided to represent the Date and time. This class has been used since JDK 1.0. With the continuous upgrading and development of JDK version, most construction methods and common methods in Date class are no longer recommended. At present, in JDK 8, only two construction methods of Date class can be used, as follows:
● Date(): the Date object used to create the current Date and time.
● Date(long date): used to create a date object at a specified time, where the date parameter represents the number of milliseconds since 0:0:0 on January 1, 1970 (called epoch), that is, the timestamp.
Next, an example is given to illustrate how to use these two constructors to create a Date object, as shown in file 1.
File 1 example19 java
 1    import java.util.*;
 2    public class Example19 {
 3        public static void main(String[] args) {
 4            // Create a Date object that represents the current time
 5            Date date1 = new Date();
 6            // Gets the time 1 second after the current time
 7            Date date2 = new Date(System.currentTimeMillis() + 1000);
 8            System.out.println(date1);
 9            System.out.println(date2);
 10        }
 11    }
The operation results are shown in Figure 1.

Figure 1 operation results
As can be seen from Figure 1, the first output statement outputs the date and time of the current computer, and the second output statement outputs the date and time of the current computer plus one second.
For the Date class, you only need to know how to encapsulate the time value by creating an object. Since the Date class did not consider internationalization at the beginning of its design, the corresponding functions of the Date class have been replaced by the methods in the Calendar class since JDK 1.1.
5.2 Calendar
Calendar class is used to complete the operation of date and time fields. It can set and read specific parts of the date through specific methods, such as year, month, day, hour, minute and second. Calendar class is an abstract class and cannot be instantiated. In the program, you need to call its static method getInstance() to get a calendar object, and then you can call its corresponding method. Specific examples are as follows:
Calendar calendar = Calendar.getInstance();
Calendar class provides a large number of methods for operating date and time. Some common methods are listed below, as shown in Table 1.
Table 1 common methods of calendar
| Method declaration | Function description |
|---|---|
| int get(int field) | Returns the value of the specified calendar field |
| void add(int field,int amount) | Adds or subtracts the specified amount of time for the specified calendar field according to calendar rules |
| void set(int field,int value) | Sets the specified value for the specified calendar field |
| void set(int year,int month,int date) | Set the values of the year, month and day fields of the Calendar object |
| void set(int year.int month,int date,int hourOfDay,int minute,int second) | Set the values of the year, month, day, hour, minute and second fields of the Calendar object |
In Table 1, most methods use the parameter field of type int, which needs to receive constant values defined in the Calendar class. These constant values represent different fields, such as Calendar Year is used to indicate the year, Calendar Month is used for month, Calendar Second is used to indicate seconds, etc. In particular, when using Calendar In the month field, the starting value of the month starts from 0, not from 1. Therefore, to obtain the current month, you need to use Calendar Add 1 to month.
Next, learn how the Calender class obtains the date and time of the current computer through a case, as shown in file 1.
File 1 example20 java
 1    import java.util.*;
 2    public class Example20 {
 3        public static void main(String[] args) {
 4             // Gets the Calendar object that represents the current time
 5            Calendar calendar = Calendar.getInstance();
 6            int year = calendar.get(Calendar.YEAR);        // Get current year
 7            int month = calendar.get(Calendar.MONTH) + 1; // Get current month
 8            int date = calendar.get(Calendar.DATE);        // Get current day
 9            int hour = calendar.get(Calendar.HOUR);        // When getting
 10            int minute = calendar.get(Calendar.MINUTE);   // Get points
 11            int second = calendar.get(Calendar.SECOND);   // Get seconds
 12            System.out.println("Current time is:" + year + "year " + month + "month "
 13                + date + "day "+ hour + "Time " + minute + "branch " + second + "second");
 14        }
 15    }
The operation results are shown in Figure 1.

Figure 1 operation results
In file 1, calling the getInstance() method of Calendar creates a Calendar object representing the current time in the default time zone, and then calls the get(int field) method of the object to get the values of date and time fields by passing in different constant field values.
In the program, in addition to obtaining the time of the current computer, a certain time will often be set or modified. For example, the start time of a project is January 1, 2018. Assuming that it is to be completed in 100 days, if you want to know the completion date, you need to set the date on the start day first, and then increase the number of days of the date. If it is not completed as expected, The date may also need to be modified. The function of adding and modifying time can be realized through the add() and set() methods in the Calendar class.
Next, we will implement the above example through a case, as shown in file 2.
File 2 example21 java
 1    import java.util.*;
 2    public class Example21 {
 3        public static void main(String[] args) {
 4            // Gets the Calendar object that represents the current time
 5            Calendar calendar = Calendar.getInstance();
 6            // Set the specified date
 7            calendar.set(2018, 1, 1);
 8            // Add time to the specified date
 9            calendar.add(Calendar.DATE, 100);
 10            // Returns the year of the specified date
 11            int year = calendar.get(Calendar.YEAR);
 12            // Returns the month of the specified date
 13            int month = calendar.get(Calendar.MONTH) + 1;
 14            // Returns the day of a specified date
 15            int date = calendar.get(Calendar.DATE);
 16            System.out.println("The planned completion date is:" + year + "year"
 17                                   + month + "month" + date + "day");
 18        }
 19    }
The operation results are shown in Figure 2.

Figure 2 operation results
In code 2, the set() method called Calendar sets the date to January 1, 2018, then calls the add() method to Calendar.. Add 100 to the date field. As can be seen from figure 5-21, the date of adding 100 days is May 12, 2018.
It should be noted that calendar Date refers to the number of days. When the number of days is added to the maximum value of the current month, if you continue to add it again, it will start counting from 1, and the month value will be added by 1, which is a little similar to the carry in arithmetic operation.
 Learn more: Calendar calendar fault-tolerant mode and non fault-tolerant mode
Calendar has two modes of interpreting calendar fields - lenient mode (fault-tolerant mode) and non lenient mode (non fault-tolerant mode). When calendar is in lenient mode, its fields can receive values beyond the allowable range. When calling get(int field) method to obtain a field value, calendar will recalculate the values of all fields and standardize the values of the fields. In other words, in lenient mode, some numerical errors are allowed. For example, the month has only 12 months and the value is 0 to 11, but in this mode, it is also possible to specify the month value as 13. When calendar is in non lenient mode, the program will throw an exception if the value of a field exceeds its allowable range. Next, a case is used to demonstrate this exception, as shown in file 3.
File 3 example22 java
 1    import java.util.*;
 2    public class Example22 {
 3        public static void main(String[] args) {
 4            // Gets the Calendar object that represents the current time
 5            Calendar calendar = Calendar.getInstance();
 6            // Set the specified date and set MONTH to 13
 7            calendar.set(Calendar.MONTH, 13);
 8            System.out.println(calendar.getTime());
 9            // Turn on non lenient mode
 10            calendar.setLenient(false);
 11            calendar.set(Calendar.MONTH, 13);
 12            System.out.println(calendar.getTime());
 13        }
 14    }
The operation results are shown in Figure 3.
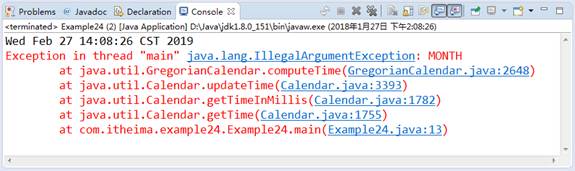
Figure 3 operation results
As can be seen from Figure 3, the first output statement in file 3 can normally output the time value, while the second output statement reports an error in the output time value. The reason for this phenomenon is that the Calendar class uses the lenient mode by default. When calling the set() method of Calendar to set the MONTH field to 13, carry will occur. The YEAR field will increase by 1, and then the MONTH field will change to 1. The result printed by the first output statement is "Feb 27" (February 27). When the code calls the setLenient(false) method of Calendar to start the non lenient mode, similarly set the MONTH field to 13, and an exception will be thrown because it exceeds the range of MONTH fields 0 ~ 11.
In this example, the getTime() method of Calendar is used. The getTime() method will return a Date object representing the time value of Calendar. At the same time, Calendar has a setTime(Date date) method. The setTime() method receives a Date object and sets the time value represented by the Date object to the Calendar object. The conversion between Date and Calendar objects can be completed through these two methods.
5.3. JDK8 added date and day classes
In order to meet more requirements, a new Java. Java is added to JDK 8 Time package, which contains more date and time operation classes. The common classes are shown in Table 1.
Table 1 JDK 8 new date and time common classes
| Class name | Function description |
|---|---|
| Clock | Used to obtain the current date and time of the specified time zone. |
| DayOfWeek | Enumeration class, which defines the enumeration values from Monday to Sunday, seven days a week |
| Duration | Indicates the duration. The ofXxx() method provided by this class is used to obtain the hours, minutes, seconds, etc. of the specified time. |
| Instant | Represents a specific moment, which can be accurate to nanoseconds. This class provides a static now() method to obtain the current time, and a static now (clock) method to obtain the time corresponding to the clock. At the same time, it also provides a series of plusXxx() methods to add a period of time based on the current time, and a series of minusXxx() methods to subtract a period of time based on the current time. |
| LocalDate | Indicates a date without time zone, such as January 27, 2018. This class provides a static now() method to get the current date and a static now (clock) method to get the date corresponding to the clock. At the same time, it also provides a series of plusXxx() methods to add a few years, months, days, etc. to the current year, and a series of minusXxx() methods to subtract a few years, months, days, etc. from the current year. |
| LocalTime | Indicates the time without time zone, such as 14:49:20. This class provides a static now() method to get the current time and a static now (clock) method to get the time corresponding to the clock. At the same time, it also provides a series of plusXxx() methods to add hours, minutes, seconds, etc. on the basis of the current year, and a series of minusXxx() methods to subtract hours, minutes, seconds, etc. on the basis of the current year. |
| LocalDateTime | Represents the date and time without time zone. This class provides a static now() method to obtain the current date and time, and a static now (clock) method to obtain the date and time corresponding to the clock. At the same time, it also provides a series of plusXxx() methods to add years, months, days, hours, minutes, seconds, etc. on the basis of the current year, and a series of minusXxx() methods to subtract years, months, days, hours, minutes, seconds, etc. on the basis of the current year. |
| Month | Enumeration class, which defines the enumeration values from January to December |
| MonthDay | Indicates month and day, e.g. – 01-27. This class provides a static now() method to get the current month and day, and a static now (clock) method to get the month and day corresponding to the clock. |
| Year | Indicates the year, such as 2018. This class provides a static now() method to get the current year and a static now (clock) method to get the year corresponding to the clock. It also provides the plusYears() method to add a few years to the current year, and the minusYears() method to subtract a few years from the current year. |
| YearMonth | Indicates the month and year, such as 2018-01. This class provides a static now() method to obtain the current month and year, and a static now (clock) method to obtain the month and year corresponding to the clock. At the same time, it also provides the plusXxx() method to add a few years and months based on the current month and year, and the minusXxx() method to subtract a few years and months based on the current month and year. |
| ZoneId | Represents a time zone |
| ZonedDateTime | Represents a time zone date and time |
After understanding the functions of the above classes, we will demonstrate the usage of these classes through a specific case, as shown in file 1.
File 1 Example23
 1    import java.time.*;
 2    public class Example23 {
 3        public static void main(String[] args) {
 4            // 1. Use of Clock
 5            Clock clock = Clock.systemUTC();
 6            System.out.println("obtain UTC Current time of time zone conversion:" + clock.instant());
 7            System.out.println("obtain UTC Milliseconds for time zone conversion:" + clock.millis());
 8            // 2. Use of Duration
 9            Duration d = Duration.ofDays(1);
 10            System.out.println("One day equals" + d.toHours() +"hour");
 11            System.out.println("One day equals" + d.toMinutes() +"minute");
 12            System.out.println("One day equals" + d.toMillis() +"second");
 13            // 3. Use of Instant
 14            Instant instant = Instant.now();
 15            System.out.println("obtain UTC The current time in the time zone is:" + instant);
 16            System.out.println("The current time is one hour later:"
 17                                   + instant.plusSeconds(3600));
 18            System.out.println("The current time is one hour ago:"
 19                                   + instant.minusSeconds(3600));
 20            // 4. Use of LocalDate
 21            LocalDate localDate = LocalDate.now();
 22            System.out.println("Get the current date from the system clock in the default time zone:" + localDate);
 23            // 5. Use of LocalTime
 24            LocalTime localTime = LocalTime.now();
 25            System.out.println("Get the current time from the system clock in the default time zone:" + localTime);
 26            // 6. Use of LocalDateTime
 27            LocalDateTime localDateTime = LocalDateTime.now();
 28            System.out.println("Get the date and time from the system clock in the default time zone:"
 29                                    + localDateTime);
 30            LocalDateTime times = localDateTime.plusDays(1)
 31                                .plusHours(3).plusMinutes(30);
 32            System.out.println("After the current date and time plus 1 day, 3 hours and 30 minutes:" + times);
 33            // 7. Use of Year, YearMonth and MonthDay
 34            Year year = Year.now();
 35            System.out.println("The current year is:" + year);
 36            YearMonth yearMonth = YearMonth.now();
 37            System.out.println("Current year:" + yearMonth);
 38            MonthDay monthDay = MonthDay.now();
 39            System.out.println("The current date is:" + monthDay);
 40            // 8. Get the system default time zone
 41            ZoneId zoneId = ZoneId.systemDefault();
 42            System.out.println("The default time zone of the current system is:" + zoneId);
 43        }
 44    }
The operation results are shown in Figure 1.
[the external chain image transfer fails. The source station may have an anti-theft chain mechanism. It is recommended to save the image and upload it directly (img-zihxmfz5-1624149047235)( https://book.itheima.net/uploads/course/images/java/1.5/image-20200615100948301.png )]
Figure 1 operation results
File 1 demonstrates the new date and time of JDK 8 and some usage of classes in the package. It should be noted that it can be seen from figure 5-23 that through clock Instant() and instant There is a time difference of 8 hours between the current time obtained by now() and the time displayed by the local system. This is because instant uses UTC (Universal Time Coordinated) world coordinated time by default, also known as world standard time. UTC provides a time independent of time zone, which is 8 hours different from CST (China Standard Time) China Standard Time (Beijing time).
6. Format class
6.1. DateFormat class
When using the Date class, the current time output by printing the Date object in the program is output in the default English format. If you want to output the Date represented by the Date object in the specified format, such as the time in Chinese format, you need to use the DateFormat class.
The DateFormat class is specifically used to format a Date into a string or convert a Date string displayed in a specific format into a Date object. DateFormat is an abstract class and cannot be instantiated directly, but it provides a series of static methods to obtain the instance object of DateFormat class and call other corresponding methods for operation.
The common methods provided in the DateFormat class are shown in Table 1.
Table 1 common methods of dateformat
| Method declaration | Function description |
|---|---|
| static DateFormat getDateInstance() | Date formatter for creating default locale and formatting style |
| static DateFormat getDateInstance(int style) | Date formatter for creating default locale and specifying formatting style |
| static DateFormat getDateTimeInstance() | Date / time formatter for creating default locales and formatting styles |
| static DateFormat getDateTimeInstance( int dateStyle,int timeStyle) | Date / time formatter for creating default locale and specifying formatting style |
| String format(Date date) | Format a Date as a Date / time string. |
| Date parse(String source) | Parses the given string into a date |
In Table 1, four static methods of DateFormat class are listed. These four static methods can be used to obtain the instance object of DateFormat class. The objects returned by each method have different functions. They can format the date or time part respectively.
Many constants are also defined in the DateFormat class, of which four constant values are used to pass to the method as parameters, including FULL, LONG, MEDIUM and SHORT. The FULL constant is used to represent the FULL format, the LONG constant is used to represent the LONG format, the MEDIUM constant is used to represent the normal format, and the SHORT constant is used to represent the SHORT format.
Next, a case is used to demonstrate the use of DateFormat class, as shown in file 1.
File 1 example24 java
 1    import java.text.*;
 2    import java.util.*;
 3    public class Example24 {
 4        public static void main(String[] args) {
 5            // Creating Date Objects
 6            Date date = new Date();
 7            // Date formatter object in Full format
 8            DateFormat fullFormat =
 9                    DateFormat.getDateInstance(DateFormat.FULL);
 10            // Date formatter object in Long format
 11            DateFormat longFormat =
 12                    DateFormat.getDateInstance(DateFormat.LONG);
 13            // Date / time formatter object in MEDIUM format
 14            DateFormat mediumFormat = DateFormat.getDateTimeInstance(
 15                    DateFormat.MEDIUM, DateFormat.MEDIUM);
 16            // Date / time formatter object in SHORT format
 17            DateFormat shortFormat = DateFormat.getDateTimeInstance(
 18                    DateFormat.SHORT, DateFormat.SHORT);
 19            // Print the formatted date or date / time below
 20            System.out.println("The full format of the current date is:"
 21                                + fullFormat.format(date));
 22            System.out.println("The long format of the current date is:"
 23                                + longFormat.format(date));
 24            System.out.println("The normal format of the current date is:"
 25                                + mediumFormat.format(date));
 26            System.out.println("The short format of the current date is:"
 27                                + shortFormat.format(date));
 28        }
 29    }
The operation results are shown in Figure 1.
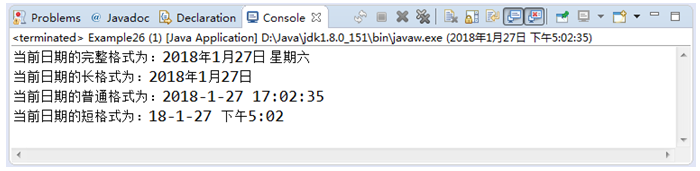
Figure 1 operation results
In file 1, the effect of time and date formatting output under four formats is demonstrated. The instance object obtained by calling the getDateInstance() method is used to format the date part, and the instance object obtained by getDateTimeInstance() method can format the date and time part.
DateFormat also provides a parse(String source) method, which can parse a string into a Date object, but it requires that the string must meet the Date / time format requirements, otherwise an exception will be thrown.
Next, a case is used to demonstrate the use of parse() method, as shown in file 2.
File 2 example25 java
 1    import java.text.*;
 2    public class Example25 {
 3        public static void main(String[] args) throws ParseException {
 4            // Create DateFormat object
 5            DateFormat dt1 = DateFormat.getDateInstance();
 6            // Create a DateFormat object in Long format
 7            DateFormat dt2 = DateFormat.getDateInstance(DateFormat.LONG);
 8            // A string that defines two date formats
 9            String str1 = "2018-01-27";
 10            String str2 = "2018 January 27";
 11            // Output the result of parsing the string in the corresponding format into a Date object
 12            System.out.println(dt1.parse(str1));
 13            System.out.println(dt2.parse(str2));
 14        }
 15    }
The operation results are shown in Figure 2.

Figure 2 operation results
In file 2, we first created a plain DateFormat object and LONG format DateFormat object, and then defined two date format strings. Finally, in the output statement, we call parse() method to parse the corresponding format string into Date object.
6.2. SimpleDateFormat class
When using the parse() method of the DateFormat object to parse a string into a date, you need to enter a fixed format string, which is obviously not flexible enough. In order to better format dates and parse strings, a SimpleDateFormat class is provided in Java.
The SimpleDateFormat class is a subclass of the DateFormat class, which can use the new keyword to create an instance object. When creating an instance object, its construction method needs to receive a string parameter representing the date format template.
Next, a case demonstrates how to use the SimpleDateFormat class to convert a date object into a string in a specific format, as shown in file 1.
File 1 example26 java
 1    import java.text.*;
 2    import java.util.*;
 3    public class Example26 {
 4        public static void main(String[] args) throws Exception {
 5            // Create a SimpleDateFormat object
 6            SimpleDateFormat sdf = new SimpleDateFormat(
 7                                "Gyyyy year MM month dd Day: today is yyyy The second day of the year D God, E");
 8            // Format the Date object according to the Date template of the SimpleDateFormat object
 9            System.out.println(sdf.format(new Date()));
 10        }
 11    }
The operation results are shown in Figure 1.

Figure 1 operation results
In file 1, when creating the SimpleDateFormat object, the Date format template "MM, dd, yyyy: today is the day D, E of yyyy" is passed in. When calling the format() method of SimpleDateFormat, the Date object will be formatted into the time format in the template format, that is, "January 27, 2018: today is the 27th day, Saturday, 2018".
The SimpleDateFormat class is used to convert a Date time object into a specified format string. Next, a case is used to demonstrate how to use the SimpleDateFormat class to parse a specified Date format string into a Date object, as shown in file 2.
File 2 example27 java
 1    import java.text.*;
 2    public class Example27 {
 3        public static void main(String[] args) throws ParseException{
 4             // Create a SimpleDateFormat object and specify the date format
 5             SimpleDateFormat sdf = new SimpleDateFormat("yyyy/MM/dd");
 6             // Define a date format string
 7             String str = "2018/01/27";
 8             // Parses a string into a Date object
 9             System.out.println(sdf.parse(str));
 10        }
 11    }
The operation results are shown in Figure 2.

Figure 2 operation results
In file 2, first, when we create the SimpleDateFormat object, we import the date format template "yyyy/MM/dd", and then define a specified date format string "2018/01/27". Finally, we call the SimpleDateFormat parse() method to parse the character string that matches the date template format into a Date object.
SimpleDateFormat is very powerful. When creating SimpleDateFormat object, you can parse various forms of Date string or format Date date into any form of string as long as you pass in appropriate format string parameters. Where the format string parameter is a Date template that uses a placeholder for the Date / time field.
6.3DateTimeFormatter class
In addition to DataFormat and SimpleDateFormat classes, JDK 8 is in Java time. A DateTimeFormatter class is also provided under the format package. This class is also a formatting class. Its function is equivalent to the combination of DataFormat and SimpleDateFormat. It can not only format date and time objects into strings, but also parse strings in a specific format into date and time objects.
To use DateTimeFormatter for formatting or parsing, you must first obtain the DateTimeFormatter object. There are three ways to obtain DateTimeFormatter objects, as follows:
● create a DateTimeFormatter formatter using static constants. The DateTimeFormatter class contains a large number of static constants, such as BASIC_ISO_DATE,ISO_LOCAL_DATE,ISO_LOCAL_TIME, etc. through these static constants, you can get the DateTimeFormatter instance.
● use enumeration values of different styles to create DateTimeFormatter formatter formatter. The FormatStyle class defines four enumeration values: FULL, LONG, MEDIUM and SHORT, which represent different styles of date and time.
● create a DateTimeFormatter formatter based on the pattern string.
After understanding the function of DateTimeFormatter and its object acquisition method, we will explain how to use DateTimeFormatter to format and parse date and time.
1. Finish date and time formatting
The DateTimeFormatter can be used to format the date and time into a string in the following two ways:
● call the format (TemporalAccessor temporary) method of DateTimeFormatter to perform formatting. The parameter temporary is a TemporalAccessor type interface, and its main implementation classes include LocalDate and LocalDateTime.
● call the format(DateTimeFormatter formatter) method of date and time objects such as LocalDate and LocalDateTime to perform formatting.
Next, a case is used to demonstrate how to use DateTimeFormatter to format date and time, as shown in file 1.
File 1 example28 java
 1    import java.time.*;
 2    import java.time.format.*;
 3    public class Example28 {
 4        public static void main(String[] args) {
 5            LocalDateTime date = LocalDateTime.now();
 6            // 1. Create DateTimeFormatter using constants
 7            System.out.print("Create with constants DateTimeFormatter:");
 8            System.out.println(DateTimeFormatter
 9                                          .ISO_LOCAL_DATE.format(date));
 10            // 2. Use DateTimeFormatter with Long style
 11            System.out.print("use Long Type style DateTimeFormatter:");
 12            DateTimeFormatter dtf = DateTimeFormatter
 13                                       .ofLocalizedDateTime(FormatStyle.LONG);
 14            System.out.println(dtf.format(date));
 15            // 3. Creates a DateTimeFormatter formatter based on the pattern string
 16            System.out.print("Create from pattern string DateTimeFormatter:");
 17            DateTimeFormatter formatter = DateTimeFormatter
 18                                       .ofPattern("yyyy MM dd HH:mm:ss");
 19            // Format using the format() method of LocalDateTime
 20            String text = date.format(formatter);
 21            // Use the formatter to parse the text and return the date and time
 22            LocalDateTime parsedDate = LocalDateTime.parse(text, formatter);
 23            System.out.println(parsedDate);
 24        }
 25    }
The operation results are shown in Figure 1.
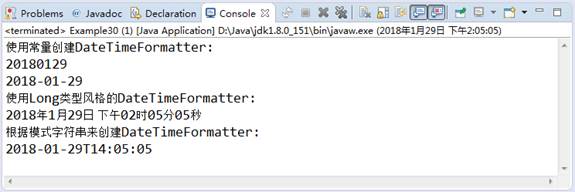
Figure 1 operation results
In file 1, DateTimeFormatter formatters are created in three ways, and formatters created in different ways are used to format LocalDateTime.
2. Parse string
To use DateTimeFormatter to parse the string in the specified format into date and time objects, you can use the parse(CharSequence text, DateTimeFormatter formatter) method provided by the date and time object.
The following is a specific case to demonstrate how to use DateTimeFormatter to parse date and time, as shown in file 2.
File 2 example29 java
 1    import java.time.*;
 2    import java.time.format.*;
 3    public class Example29 {
 4        public static void main(String[] args) {
 5            // A string that defines two date formats
 6            String str1 = "2018-01-27 12:38:36";
 7            String str2 = "2018 January 29, 2015 15:01:20";
 8            // Defines the formatter used for parsing
 9            DateTimeFormatter formatter1 = DateTimeFormatter
 10                                 .ofPattern("yyyy-MM-dd HH:mm:ss");
 11            DateTimeFormatter formatter2 = DateTimeFormatter
 12                                 .ofPattern("yyyy year MM month dd day HH Time mm branch ss second");
 13            // Parse is performed using the parse() method of LocalDateTime
 14            LocalDateTime localDateTime1 = LocalDateTime
 15                                                       .parse(str1, formatter1);
 16            LocalDateTime localDateTime2 = LocalDateTime
 17                                                       .parse(str2, formatter2);
 18            // Output results
 19            System.out.println(localDateTime1);
 20            System.out.println(localDateTime2);
 21        }
 22    }
The operation results are shown in Figure 2.

Figure 2 operation results
In file 2, two date format strings are defined first, and then formatter for parsing different format strings is defined through DateTimeFormatter object. Next, the string is parsed through parse() method of LocalDateTime, and finally the parsed results are output by output statement.
9, Assemble
1. Collection overview
A collection in Java is like a container, which is specially used to store Java objects (actually references to objects, but they are customarily called objects). These objects can be of any data type and variable length. Among them, these collection classes are located in Java In the util package, you must pay attention to the problem of guiding the package when using it, otherwise exceptions will occur.
Collections can be divided into two categories according to their storage structure, namely, single column Collection and double column Map. The characteristics of these two collections are as follows:
● Collection: the root interface of a single column Collection, which is used to store a series of elements that conform to certain rules.
Collection has two important sub interfaces, List and set. Among them, the feature of List set is that the elements are orderly and repeatable; Set sets are characterized by disordered and non repeatable elements. The main implementation classes of the List interface are ArrayList and LinkedList, and the main implementation classes of the set interface are HashSet and TreeSet.
● Map: the root interface of double column set, which is used to store elements with key and value mapping relationship.
Each element in the Map set contains a pair of Key values, and the Key is unique. When using the Map set, you can find the corresponding Value through the specified Key. For example, according to a student's student number, you can find the corresponding student. The main implementation classes of Map interface include HashMap and TreeMap.
It can be seen from the above description that Java provides a rich collection class library. In order to facilitate beginners to learn systematically, next, a diagram is used to describe the core inheritance system of the whole collection, as shown in Figure 1.
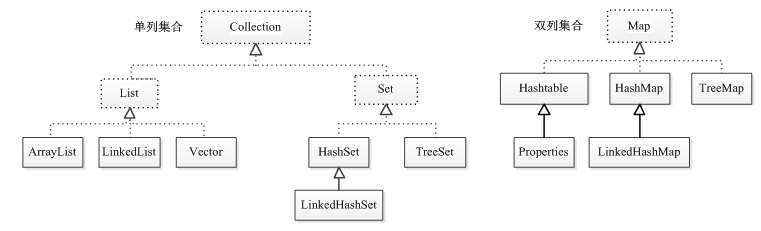
Figure 1 core architecture of collection system
Figure 1 lists some collection classes commonly used in Java development. The dotted box is filled with interface types, while the solid box is filled with specific implementation classes.
2. Collection interface
Collection is the root interface of all single column collections. Therefore, some general methods of single column collections (such as List and Set) are defined in collection. These methods can be used to operate all single column collections, as shown in Table 1.
Table 1 main methods of collection interface
| Method declaration | Function description |
|---|---|
| boolean add(Object o) | Add an element to the collection |
| boolean addAll(Collection c) | Adds all elements in the specified set c to the set |
| void clear() | Delete all elements in the collection |
| boolean remove(Object o) | Deletes the specified element in the collection |
| boolean removeAll(Collection c) | Deletes all elements in the specified set c contained in the set |
| boolean isEmpty() | Judge whether the collection is empty |
| boolean contains(Object o) | Determine whether the collection contains an element |
| boolean containsAll(Collection c) | Determines whether the set contains all the elements in the specified set c |
| Iterator iterator() | Returns an Iterator that iterates over the elements of the collection and is used to traverse all the elements of the collection |
| int size() | Gets the number of elements in the collection |
| Stream stream() | Convert a collection source into a stream object of ordered elements (JDK 8 new method) |
Table 1 lists some main methods in the root interface collection of single column collection. The stream() method is added in JDK 8 to aggregate collection elements. This method will be explained in detail in subsequent sections.
In addition, the main methods of collectionset listed in Table 1 are from Java API documents. Beginners can learn more about the specific usage of collectionset methods by querying API documents. These methods are listed here just to facilitate later learning.
3. List interface
3.1 introduction to List interface
The List interface inherits from the Collection interface and is an important branch of a single column Collection. It is customary to call the object that implements the List interface a List Collection. Duplicate elements are allowed in the List set. All elements are stored in a linear way. In the program, the specified elements in the set can be accessed by index (similar to the element corner mark in the array). In addition, a feature of List set is that the elements are orderly, that is, the storage order of elements is consistent with the extraction order.
As a sub interface of the Collection, List not only inherits all the methods in the Collection interface, but also adds some special methods for operating the Collection, as shown in Table 1.
Table 1 common methods of list set
| Method declaration | Function description |
|---|---|
| void add(int index,Object element) | Inserts the element element at the specified index position in the List collection |
| boolean addAll(int index,Collection c) | Inserts all elements contained in the set c into the specified index position of the List set |
| Object get(int index) | Returns the element at the collection index |
| Object remove(int index) | Delete element at index |
| Object set(int index, Object element) | Replace the element at the index with the element element element, and return the replaced element |
| int indexOf(Object o) | Returns the location index of the object o in the List collection for the first time |
| int lastIndexOf(Object o) | Returns the index of the last occurrence of the object o in the List collection |
| List subList(int fromIndex, int toIndex) | Returns a subset of all element sets from index fromIndex (inclusive) to toIndex (exclusive) |
| Object[] toArray() | Convert collection elements to arrays |
| default void sort(Comparator<? super E> c) | Sort the collection elements according to the specified comparator rules (JDK 8 new method) |
Table 1 lists the common methods in the List set. All List implementation classes can call these methods to operate the set elements. The sort (Comparator <? Super E > C) method is added in JDK 8 to sort the set elements. The parameter of this method is a Comparator of interface type. You can pass a functional interface as a parameter through the Lambda expression explained above to specify the sorting rules of the set elements.
3.2. ArrayList set
ArrayList is an implementation class of the List interface. It is the most common collection in programs. An array object with variable length is encapsulated in ArrayList. When the stored elements exceed the length of the array, ArrayList will allocate a larger array in memory to store these elements. Therefore, the ArrayList set can be regarded as an array with variable length.
It is precisely because the internal data storage structure of ArrayList is in the form of array. When adding or deleting elements at a specified position, a new array will be created, which is inefficient. Therefore, it is not suitable for a large number of addition and deletion operations. However, this array structure allows programs to access elements by index, so it is very efficient to use ArrayList collection to traverse and find elements.
Most of the methods in the ArrayList Collection are inherited from the interfaces Collection and List. Next, learn how to use the methods of the ArrayList Collection to access elements through a case, as shown in file 1.
File 1 example01 java
 1    import java.util.ArrayList;
 2    public class Example01 {
 3        public static void main(String[] args) {
 4             // Create an ArrayList collection
 5            ArrayList list = new ArrayList();
 6             // Add elements to the collection
 7            list.add("stu1");
 8            list.add("stu2");
 9            list.add("stu3");
 10            list.add("stu4");
 11            System.out.println("Length of collection:" + list.size());
 12            System.out.println("The second element is:" + list.get(1));
 13        }
 14    }
The operation results are shown in Figure 1.

Figure 1 operation results
In file 1, first, an empty ArrayList collection is created through the "new ArrayList (") statement. Then, add(Object o) method is added to the ArrayList collection to add 4 elements, and then the size() method is used to get the number of elements in the collection. Finally, the element of the specified index position is extracted by calling ArrayList get (int) method.
As can be seen from Figure 1, the element with index position 1 is the second element in the set, which shows that the set is the same as the array. The index value starts from 0, and the last index is size-1. When accessing the element, be sure to pay attention that the index cannot exceed this range, otherwise the corner marker out of bounds exception IndexOutOfBoundsException will be thrown.
be careful:
1. When compiling file 1, you will get a warning as shown in Figure 1, which means that what type of elements are stored in the specified collection that is not displayed when using the ArrayList collection will cause security risks, which involves the problem of generic security mechanism. The knowledge related to generics will be explained in detail in later chapters, so it doesn't need to be considered now.
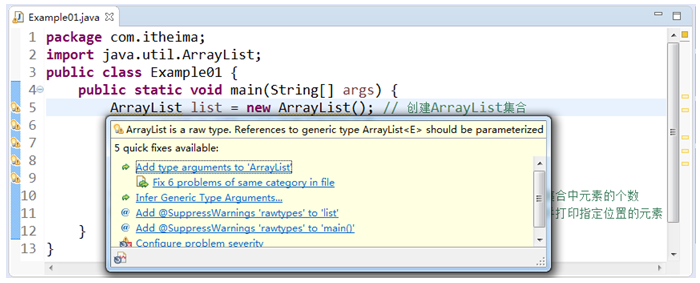
Figure 2 operation results
2. When writing programs, don't forget to use something like "import java.util.ArrayList;" Statement, otherwise the program will fail to compile and the display class cannot be found, as shown in Figure 6-4. To solve this problem, just click the "Import 'ArrayList' (java.util)" link in the first line of the error window shown in Figure 6-4, so that Eclipse will automatically Import the package of ArrayList. In addition, a large number of collection classes may be used in later cases. In addition to importing the package where the specified collection class is located in the above way, Import Java can also be used uniformly in the program for convenience util.; To guide the package, which is a wildcard. The whole statement means to use Java The contents of util package are imported.
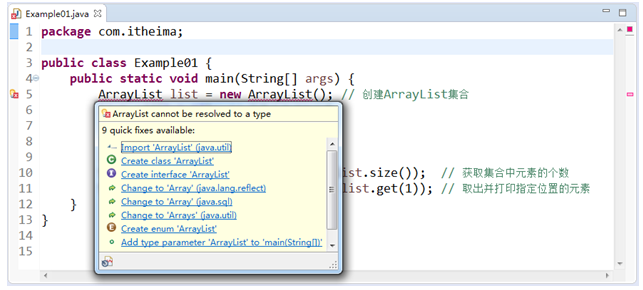
Figure 3 compilation error
3.3. LinkedList set
ArrayList set is very fast when querying elements, but the timeliness rate of adding and deleting elements is low. In order to overcome this limitation, another implementation class LinkedList of the List interface can be used. The LinkedList set contains two first and last attributes of Node type. It maintains a two-way circular linked List. Each element in the linked List uses reference to remember its previous element and subsequent element, so that all elements can be connected with each other. When inserting a new element, you only need to modify the reference relationship between the elements, and the same is true for deleting a Node. Because of this storage structure, the LinkedList set shows high efficiency in the addition and deletion of elements. The process of adding and deleting elements in the LinkedList set is shown in Figure 1.

Figure 1 structure diagram of bidirectional circular linked list
In Figure 1, the process of adding and deleting elements in the LinkedList set is described through two diagrams. Among them, the left figure shows a new element. Element 1 and element 2 in the figure are related to each other in the set. When adding an element between them, only let element 1 remember that the element behind it is a new element, and let element 2 remember that the element in front of it is a new element. The figure on the right shows the deletion of elements. To delete element 3 between element 1 and element 2, you only need to make element 1 and element 2 into a context relationship.
In addition to inheriting and implementing the Collection operation methods from the interfaces Collection and List, the LinkedList set also defines some special methods for the addition and deletion of elements, as shown in Table 1.
Table 1 unique methods in LinkedList
| Method declaration | Function description |
|---|---|
| void add(int index, E element) | Inserts the specified element at the location specified in this list. |
| void addFirst(Object o) | Inserts the specified element at the beginning of the collection |
| void addLast(Object o) | Adds the specified element to the end of the collection |
| Object getFirst() | Returns the first element of the collection |
| Object getLast() | Returns the last element of the collection |
| Object removeFirst() | Removes and returns the first element of the collection |
| Object removeLast() | Removes and returns the last element of the collection |
| boolean offer(Object o) | Adds the specified element to the end of the collection |
| boolean offerFirst(Object o) | Adds the specified element to the beginning of the collection |
| boolean offerLast(Object o) | Adds the specified element to the end of the collection |
| Object peek() | Gets the first element of the collection |
| Object peekFirst() | Gets the first element of the collection |
| Object peekLast() | Gets the last element of the collection |
| Object poll() | Removes and returns the first element of the collection |
| Object pollFirst() | Removes and returns the first element of the collection |
| Object pollLast() | Removes and returns the last element of the collection |
| void push(Object o) | Adds the specified element to the beginning of the collection |
| Object pop() | Removes and returns the first element of the collection |
The methods listed in Table 1 are mainly used to add, delete and obtain elements in the set. Next, learn the use of common methods in LinkedList through a case, as shown in file 1.
File 1 example02 java
 1    import java.util.LinkedList;
 2    public class Example02 {
 3        public static void main(String[] args) {
 4              // Create LinkedList collection
 5            LinkedList link = new LinkedList();
 6            // 1. Add element
 7            link.add("stu1");
 8            link.add("stu2");
 9             System.out.println(link);   // Elements in the output collection
 10            link.offer("offer");         // Append elements to the end of the collection
 11            link.push("push");           // Add an element to the collection header
 12            System.out.println(link);   // Elements in the output collection
 13            // 2. Get element
 14             Object object = link.peek();//Gets the first element of the collection
 15            System.out.println(object); // Elements in the output collection
 16            // 3. Delete element
 17            link.removeFirst();          // Delete the first element of the collection
 18            link.pollLast();              // Delete the last element of the collection
 19            System.out.println(link);
 20        }
 21    }
The operation results are shown in Figure 2.
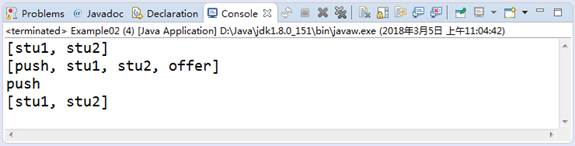
Figure 2 operation results
In file 1, we first create a LinkedList set, then insert elements into the set by using the methods of add(), offer(), and push(), then obtain the first element of the set by using the method of peek(), and finally remove the elements at the specified position in the set by using the methods of removeFirst(), pollLast(), so as to complete the operations of adding, querying, and deleting elements. Thus, it is very convenient to add or delete elements with LinkedList.
4. collection traversal
4.1 Iterator traversal set
The Iterator interface is a member of the Java Collection framework, but it is different from the Collection and Map interfaces. The Collection interface and Map interface are mainly used to store elements, while the Iterator is mainly used to iteratively access (i.e. traverse) the elements in the Collection. Therefore, the Iterator object is also called an Iterator.
Next, use a case to learn how to use the Iterator to iterate over the elements in the collection, as shown in file 1.
File 1 example03 java
 1    import java.util.ArrayList;
 2    import java.util.Iterator;
 3    public class Example03 {
 4        public static void main(String[] args) {
 5             // Create an ArrayList collection
 6            ArrayList list = new ArrayList();
 7             // Adds a string to the collection
 8            list.add("data_1");
 9            list.add("data_2");
 10            list.add("data_3");
 11             // Get Iterator object
 12            Iterator iterator = list.iterator();
 13                // Determines whether the next element exists in the collection
 14            while (iterator.hasNext()) {
 15                Object obj = iterator.next();   // Take out the elements in the ArrayList collection
 16                System.out.println(obj);
 17            }
 18        }
 19    }
The operation results are shown in Figure 1.
Figure 1 operation results
File 1 demonstrates the whole process of Iterator traversing the collection. When traversing an element, first obtain the Iterator object by calling the iterator() method of the ArrayList set, and then use the hashNext() method to judge whether there is the next element in the set. If so, call the next() method to take out the element. Otherwise, it indicates that the end of the set has been reached, and stop traversing the element. It should be noted that when obtaining elements through the next() method, you must ensure that the elements to be obtained exist. Otherwise, NoSuchElementException will be thrown.
When Iterator iterator object traverses the set, it internally uses pointer to track the elements in the set. In order to enable beginners to better understand the working principle of Iterator, next, a legend is used to demonstrate the iterative process of Iterator object elements, as shown in Figure 2.

Figure 2 process diagram of traversing elements
In Figure 2, before calling the next() method of Iterator, the Iterator's index is located before the first element and does not point to any element. After calling the next() method of Iterator for the first time, the Iterator's index will move back one bit, point to the first element and return the element. When calling the next() method again, The index of the Iterator will point to the second element and return it, and so on until the hasNext() method returns false, indicating that the end of the collection is reached and the traversal of the element is terminated.
4.2. foreach traversal set
Although Iterator can be used to traverse the elements in the set, it is cumbersome in writing. In order to simplify writing, a foreach loop is provided from JDK 5. Foreach loop is a more concise for loop, also known as enhanced for loop. Foreach loop is used to traverse the elements in an array or collection. Its specific syntax format is as follows:
for(Element type temporary variable in container: container variable) {
  // Execute statement
}
As can be seen from the above format, compared with the for loop, the foreach loop does not need to obtain the length of the container or access the elements in the container according to the index, but it will automatically traverse each element in the container. Next, the foreach loop is explained in detail through a case, as shown in file 1.
File 1 example04 Java
 1    import java.util.ArrayList;
 2    public class Example04 {
 3        public static void main(String[] args) {
 4            ArrayList list = new ArrayList();
 5            list.add("data_1");
 6            list.add("data_2");
 7            list.add("data_3");
 8             // Traversing a collection using a foreach loop
 9            for (Object obj : list) {
 10                 System.out.println(obj);    // Take out and print the elements in the collection
 11            }
 12        }
 13    }
The operation results are shown in Figure 1.
Figure 1 operation results
As can be seen from file 1, the syntax of foreach loop traversing the collection is very concise. There are no loop conditions and iteration statements. All these work are left to the JVM. The number of foreach cycles is determined by the number of elements in the container. During each cycle, foreach remembers the elements of the current cycle through variables, so as to print out the elements in the set respectively.
 Watch your step:
1. Although the foreach loop is concise in writing, it also has some limitations in use. When using foreach loop to traverse a set and array, you can only access the elements in the set and cannot modify the elements. Next, take an array of String type as an example, as shown in file 2.
File 2 example05 java
 1    public class Example05 {
 2        static String[] strs = { "aaa", "bbb", "ccc" };
 3        public static void main(String[] args) {
 4            // 1. foreach loop traverses array
 5            for (String str : strs) {
 6                str = "ddd";
 7            }
 8            System.out.println("foreach Circularly modified array:" + strs[0] + ","
 9                                     + strs[1] + "," + strs[2]);
 10            // 2. for loop traversal array
 11            for (int i = 0; i < strs.length; i++) {
 12                strs[i] = "ddd";
 13            }
 14            System.out.println("ordinary for Circularly modified array:" + strs[0] + ","
 15                                   + strs[1] + "," + strs[2]);
 16        }
 17    }
The operation results are shown in Figure 2.

Figure 2 operation results
In file 2, foreach loop and ordinary for loop are used to modify the elements in the array respectively. From the running results, we can see that the foreach loop cannot modify the value of the elements in the array. The reason is that str = "ddd" in line 6 just points the temporary variable str to a new string, which has nothing to do with the elements in the array. In the ordinary for loop, the elements in the array can be referenced by index and their values can be modified.
2. When Iterator iterator is used to iterate the elements in the collection, if the remove() method of the collection object is called to delete the elements, an exception will appear. Next, a case is used to demonstrate this exception, as shown in file 3.
File 3 example06 java
 1    import java.util.ArrayList;
 2    import java.util.Iterator;
 3    public class Example06 {
 4        public static void main(String[] args) {
 5        ArrayList list = new ArrayList();
 6            list.add("Jack");
 7            list.add("Annie");
 8            list.add("Rose");
 9            list.add("Tom");
 10            Iterator it = list.iterator();   // Get Iterator object
 11            while (it.hasNext()) {            // Determines whether the collection has the next element
 12                Object obj = it.next();      // Gets the elements in the collection
 13                if ("Annie".equals(obj)) {  // Judge whether the element in the collection is Annie
 14                    list.remove(obj);        // Delete the elements in the collection
 15                }
 16            }
 17             System.out.println(list);
 18        }
 19    }
The operation results are shown in Figure 3.

Figure 3 operation results
Concurrent modificationexception occurred in file 3 at runtime. This exception is thrown by the iterator object. The reason for the exception is that deleting elements in the collection will change the expected number of iterations of the iterator, resulting in inaccurate results of the iterator.
In order to solve the above problems, two methods can be adopted, as follows:
The first method: from the perspective of business logic, we only want to delete the element Annie. We don't care how many elements are left behind, so we just need to find the element and jump out of the loop without iteration, that is, add a break statement under the code in line 14. The code is as follows:
if ("Annie".equals(obj)) {
    list.remove(obj);
    break;
}
After using the break statement to jump out of the loop, because the iterator is not used to iterate the elements in the collection, deleting the elements in the collection has no impact on the program and no exceptions will occur.
The second way: if you need to delete the elements in the collection during the iteration of the collection, you can use the deletion method of the iterator itself to replace the 14th line of code in file 3 with it Remove() can solve this problem. The code is as follows:
if ("Annie".equals(obj)) {
    it.remove();
}
After replacing the code, run the program again, and the running results are shown in Figure 4.

Figure 4 operation results
As can be seen from Figure 4, the element Annie was indeed deleted without exception. Therefore, it can be concluded that the change in the number of iterations caused by calling the remove() method of the iterator object to delete elements is predictable for the iterator object itself.
4.3. JDK8 - foreach traversal set
In JDK 8, according to the Lambda expression feature, a forEach(Consumer action) method is added to traverse the collection. The parameter required by this method is a functional interface. Next, a case is used to demonstrate how to use forEach(Consumer action) to traverse the collection object, as shown in file 1.
File 1 example07 java
 1    import java.util.ArrayList;
 2    public class Example07 {
 3        public static void main(String[] args) {
 4            ArrayList list = new ArrayList();
 5            list.add("data_1");
 6            list.add("data_2");
 7            list.add("data_3");
 8            System.out.println(list);
 9            // Use the forEach(Consumer action) method added in JDK 8 to traverse the collection
 10            list.forEach(obj -> System.out.println("Iteration set elements:"+obj));
 11        }
 12    }
The operation results are shown in Figure 1.
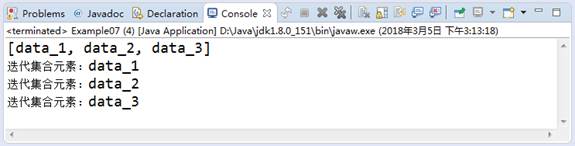
Figure 1 operation results
In file 1, first create a collection object and call the add() method to add three elements to the collection, then print the collection information, and then use the forEach(Consumer action) method to traverse the elements in the collection. This method passes a functional interface written in the form of Lambda expression. When the forEach(Consumer action) method is executed, it will automatically traverse the collection elements and pass the elements to the formal parameters of the Lambda expression one by one.
JDK 8 not only adds a forEach(Consumer action) method for all collection type objects to traverse the collection, but also provides a forEachRemaining(Consumer action) method for Iterator iterator objects to traverse. This method also needs a functional interface. Next, a case is used to demonstrate how to use the forEachRemaining(Consumer action) method to traverse the Iterator interface elements, as shown in file 2.
File 2 example08 java
 1    import java.util.ArrayList;
 2    import java.util.Iterator;
 3    public class Example08 {
 4        public static void main(String[] args) {
 5            ArrayList list = new ArrayList();
 6            list.add("data_1");
 7            list.add("data_2");
 8            list.add("data_3");
 9            System.out.println(list);
 10            // Converts a collection to an Iterator iterator object
 11            Iterator it = list.iterator();
 12            // Use the new forEachRemaining(Consumer action) in JDK 8 to traverse the iterator object
 13           it.forEachRemaining(obj -> System.out.println("Iteration set elements:"+obj));
 14        }
 15    }
The operation results are shown in Figure 2.
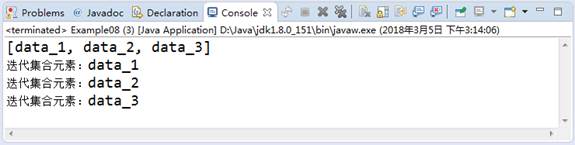
Figure 2 operation results
Compared with file 1, it can be seen that file 2 only converts the set object into Iterator iterator object, and then uses the forEachRemaining(Consumer action) method to traverse the elements in the set. From the program running results, it can be seen that the results obtained by the two set traversal methods are exactly the same, and the set elements can be traversed correctly.
Tip:
In the List Set traversal in this section, three main methods of List Set traversal are explained. These methods can be used to traverse the single instance Collection, including List Set and Set set Set to be explained later.
5. Set interface
5.1 introduction to Set interface
Like the List interface, the Set interface also inherits from the Collection interface. It is basically the same as the methods in the Collection interface. It does not expand the functions of the Collection interface, but is more strict than the Collection interface. Different from the List interface, the elements in the Set interface are out of order, and some rules will be used to ensure that the stored elements are not repeated.
The Set interface mainly has two implementation classes: HashSet and TreeSet. Among them, HashSet determines the storage location of elements in the Set according to the hash value of the object, so it has good access and search performance; TreeSet stores elements in the form of binary tree, which can sort the elements in the collection. Next, we will explain these two implementation classes of the Set set in detail.
5.2. HashSet set
HashSet is an implementation class of set interface. The elements stored in it are non repeatable and unordered. When adding an element to the HashSet collection, the hashCode() method of the element will be called first to determine the storage location of the element, and then the equals() method of the element object will be called to ensure that there are no duplicate elements in the location. Set sets and List sets access elements in the same way, which will not be repeated here. Next, a case is used to demonstrate the usage of HashSet sets, as shown in file 1.
File 1 example09 java
 1    import java.util.HashSet;
 2    public class Example09 {
 3        public static void main(String[] args) {
 4            HashSet set = new HashSet();
 5            set.add("Jack");
 6            set.add("Eve");
 7            set.add("Rose");
 8            set.add("Rose");                // Add a duplicate element to the Set collection
 9            // Traverses the elements in the output Set collection
 10            set.forEach(o -> System.out.println(o));
 11        }
 12    }
The operation results are shown in Figure 1.
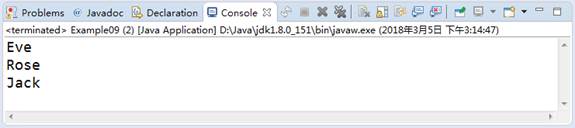
Figure 1 operation results
In file 1, first, four string elements are added to the HashSet set through the add() method, and then all elements are traversed through the forEach(Consumer action) method and printed. It can be seen from the print results that the order of taking out elements is inconsistent with the order of adding elements, and the repeatedly stored string element "Rose" is removed and added only once.
The HashSet collection ensures that there are no duplicate elements because it does a lot of work when storing elements. When calling the add() method of the HashSet set to store the element, first call the hashCode() method of the currently stored element to obtain the hash value of the object, and then calculate a storage location according to the hash value of the object. If there is no element in the location, the element will be stored directly. If there is an element in the location, the equals() method will be called to compare the currently stored element with the element in the location in turn. If the returned result is false, the element will be stored in the collection. If the returned result is true, it indicates that there are duplicate elements, and the element will be discarded. The whole storage process is shown in Figure 2.
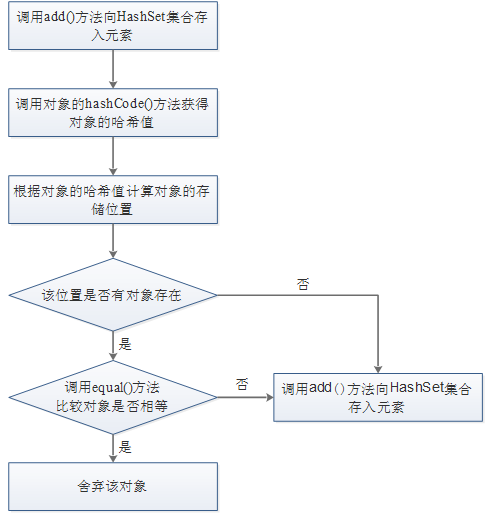
Figure 2 HashSet object stored procedure
According to the previous analysis, it is not difficult to see that when storing elements into the set, in order to ensure the normal operation of HasheSet, it is required to rewrite the hashCode() and equals() methods in the Object class when storing objects. When the String is stored in HashSet in file 6-9, the hashCode() and equals() methods have been overridden by default in the String class. But what happens if the type objects customized by the developer are stored in the HashSet? Next, a case is used to demonstrate the storage of Student type objects in HashSet, as shown in file 2.
File 2 example10 java
 1    import java.util.*;
 2    class Student {
 3        String id;
 4        String name;
 5        public Student(String id,String name) {
 6            this.id=id;
 7            this.name = name;
 8        }
 9        public String toString() {
 10            return id+":"+name;
 11        }
 12    }
 13    public class Example10 {
 14        public static void main(String[] args) {
 15            HashSet hs = new HashSet();
 16            Student stu1 = new Student("1", "Jack");
 17            Student stu2 = new Student("2", "Rose");
 18            Student stu3 = new Student("2", "Rose");
 19            hs.add(stu1);
 20            hs.add(stu2);
 21            hs.add(stu3);
 22            System.out.println(hs);
 23        }
 24    }
The operation results are shown in Figure 3.

Figure 3 operation results
In file 2, store three Student objects into the HashSet Set, and then print the Set for viewing. Two identical Student information "2:Rose" appear in the running result shown in Figure 6-17. Such Student information should be regarded as repeated elements and should not appear in the HashSet Set set at the same time. The reason why such duplicate elements are not removed is that the hashCode() and equals() methods are not overridden when defining the Student class. Therefore, the object addresses referenced by the two Student objects sut2 and sut3 are different, so the HashSet collection will consider these two different objects. Next, rewrite the Student class in file 2 and add the rewritten hashCode() and equals() methods. It is assumed that the Student with the same id is the same Student. The modified code example is as follows:
class Student {
    private String id;
    private String name;
    public Student(String id, String name) {
        this.id = id;
        this.name = name;
    }
      // Override toString() method
    public String toString() {
        return id + ":" + name;
    }
      // Override hashCode() method
    public int hashCode() {
        return id.hashCode();    // Returns the hash value of the id property
    }
      // Override the equals() method
    public boolean equals(Object obj) {
        if (this == obj) {     // Determine whether it is the same object
            return true;       // If yes, return true directly
        }
        if (!(obj instanceof Student)) {     // Judge whether the object is of Student type
            return false;       // Returns false if the object is not of type Student
        }
        Student stu = (Student) obj;          // Force object to Student type
         boolean b = this.id.equals(stu.id); // Determine whether the id values are the same
        return    b;                                 // Return judgment result
    }
Run file 2 again and the result is shown in Figure 4.

Figure 4 operation results
In the modified file 2, the student class overrides the hashCode() and equals() methods of the Object class. In the hashCode() method, return the hash value of the id attribute. In the equals() method, compare whether the id of the Object is equal and return the result. When calling the add() method of HashSet set to add stu3 Object, it is found that its hash value is the same as stu2 Object, and stu2 Equals (stu3) returns true. The HashSet collection considers that the two objects are the same, so the duplicate Student Object is discarded.
5.3 TreeSet set
TreeSet is another implementation class of the Set interface. It internally uses a balanced binary tree to store elements. Such a structure can ensure that there are no duplicate elements in the TreeSet Set and can sort the elements. The so-called binary tree is an ordered tree in which each node has at most two child nodes. The tree composed of each node and its child nodes is called a subtree. Usually, the child node on the left is called "left subtree" and the node on the right is called "right subtree". The elements on the left subtree are smaller than its root node, while the elements on the right subtree are larger than its root node. The storage structure of elements in binary tree is shown in Figure 1.

Fig. 1 storage structure of binary tree
In the binary tree shown in Figure 1, for the elements of the same layer, the elements on the left are always smaller than those on the right. In order to make beginners better understand the principle of storing elements in binary tree in TreeSet set, next, we will analyze the storage procedure of elements in binary tree. When a new element is stored in the binary tree, the new element will first be compared with the first element (the topmost element). If it is less than the first element, the left branch will be executed and the child elements of the branch will continue to be compared; If it is larger than the first element, execute the branch on the right and continue to compare with the child elements of the branch. This goes back and forth until it is compared with the last element. If the new element is smaller than the last element, it will be placed on the left subtree of the last element. If it is larger than the last element, it will be placed on the right subtree of the last element.
The above explains the storage principle of binary tree through text description, and then demonstrates the storage process of binary tree through a specific legend. Suppose eight elements are stored in the set, 13, 8, 17, 17, 1, 11, 15 and 25 in sequence. If they are stored in a binary tree, the storage structure in the set will form a tree structure, as shown in Figure 2.

Figure 2 binary tree
As can be seen from Figure 2, when storing elements into the TreeSet set in turn, first put the first stored element on the top of the binary tree, and then compare the stored element with the first element. If it is less than the first element, put the element on the left subtree; if it is greater than the first element, put the element on the right subtree, and so on, Sort according to the order in which the left subtree elements are smaller than the right subtree elements. When an element of 17 has been stored in the binary tree, and then an element of 17 is stored in the set, TreeSet will remove the duplicate elements.
According to the particularity of TreeSet Set storage elements, TreeSet implements some unique methods on the basis of inheriting the Set interface, as shown in Table 1.
Table 1 unique methods of TreeSet set
| Method declaration | Function description |
|---|---|
| Object first() | Returns the first element of the TreeSet collection |
| Object last() | Returns the last element of the TreeSet collection |
| Object lower(Object o) | Returns the largest element in the TreeSet collection that is smaller than the given element. If it does not return null |
| Object floor(Object o) | Returns the largest element in the TreeSet collection that is less than or equal to the given element. If it does not return null |
| Object higher(Object o) | Returns the smallest element larger than the given element in the TreeSet collection. If it does not return null |
| Object ceiling(Object o) | Returns the smallest element in the TreeSet collection that is greater than or equal to the given element. If it does not return null |
| Object pollFirst() | Removes and returns the first element of the collection |
| Object pollLast() | Removes and returns the last element of the collection |
After understanding the principle of storing elements in TreeSet set and some common element operation methods, next, a case is used to demonstrate the use of common methods in TreeSet set, as shown in file 1.
File 1 example11 java
 1    import java.util.TreeSet;
 2    public class Example11 {
 3        public static void main(String[] args) {
 4            // Create TreeSet collection
 5             TreeSet ts = new TreeSet();
 6            // 1. Adds an element to the TreeSet collection
 7            ts.add(3);
 8            ts.add(9);
 9            ts.add(1);
 10            ts.add(21);
 11            System.out.println("Created TreeSet The set is:"+ts);
 12            // 2. Get first and last elements
 13            System.out.println("TreeSet The first element of the set is:"+ts.first());
 14            System.out.println("TreeSet The tail elements of the collection are:"+ts.last());
 15            // 3. Compare and get elements
 16            System.out.println("The largest element less than or equal to 9 in the collection is:"
 17                                   +ts.floor(9));
 18            System.out.println("The smallest element greater than 10 in the set is:"+ts.higher(10));
 19            System.out.println("The smallest element greater than 100 in the set is:"
 20                                   +ts.higher(100));
 21            // 4. Delete element
 22            Object first = ts.pollFirst();
 23            System.out.println("The first element deleted is:"+first);
 24            System.out.println("After deleting the first element TreeSet Set becomes:"+ts);
 25        }
 26    }
The operation results are shown in Figure 3.
Figure 3 operation results
As can be seen from Figure 3, the method of using TreeSet set correctly completes the operation of set elements. In addition, it can be seen from the output results that when adding elements to the TreeSet set, these elements can be arranged in a certain order regardless of the order in which they are added. The reason is that each time an element is stored in the TreeSet set, it will be compared with other elements, and finally inserted into the ordered object sequence. When comparing the elements in the collection, the CompareTo () method will be called. This method is defined in the Comparable interface. Therefore, to sort the elements in the collection, you must implement the Comparable interface. Most classes in Java implement the Comparable interface and implement the CompareTo () method in the interface by default, such as Integer, Double and String.
In actual development, in addition to storing some default type data in Java into the TreeSet collection, some user-defined type data will also be stored, such as Student type data, Teacher type data, etc. Since these user-defined types of data do not implement the Comparable interface, it is impossible to sort directly in the TreeSet collection. In order to solve this problem, Java provides two sorting rules of TreeSet: natural sorting and custom sorting. By default, TreeSet sets adopt natural sorting. Next, we will explain these two sorting rules in detail.
1. Natural sorting
Natural sorting requires that the class of the elements stored in the TreeSet collection must implement the Comparable interface and override the compareTo() method. Then, the TreeSet collection will compare the elements of this type with the compareTo() method and sort in ascending order by default.
Next, take the custom Teacher class as an example to demonstrate the use of natural sorting in the TreeSet collection, as shown in file 2.
File 2 example12 java
 1    import java.util.TreeSet;
 2    // Define the Teacher class to implement the Comparable interface
 3    class Teacher implements Comparable {
 4        String name;
 5        int age;
 6        public Teacher(String name, int age) {
 7            this.name = name;
 8            this.age = age;
 9        }
 10        public String toString() {
 11            return name + ":" + age;
 12        }
 13        //Override the compareTo() method of the Comparable interface
 14        public int compareTo(Object obj){
 15            Teacher s = (Teacher) obj;
 16             // Define the comparison method. First compare the age and then the name
 17            if(this.age -s.age > 0) {
 18                    return 1;
 19            }
 20            if(this.age -s.age == 0) {
 21                return this.name.compareTo(s.name);
 22            }
 23            return -1;
 24        }
 25    }
 26    public class Example12 {
 27        public static void main(String[] args) {
 28            TreeSet ts = new TreeSet();
 29            ts.add(new Teacher("Jack",19));
 30            ts.add(new Teacher("Rose",18));
 31            ts.add(new Teacher("Tom", 19));
 32            ts.add(new Teacher("Rose",18));
 33            System.out.println(ts);
 34       }
 35    }
The operation results are shown in Figure 4.

Figure 4 operation results
In file 2, the Teacher class implements the Comparable interface and rewrites the compareTo() method. In the compareTo() method, first compare the age value, return - 1 and 1 according to the comparison result, and then compare the name when the age is the same. Therefore, it can be seen from the running results that the Teacher teacher objects are first sorted in ascending order according to their age, the same age will be sorted in ascending order according to their names, and the TreeSet set will remove the duplicate elements.
2. Customized sorting
Sometimes, the class of user-defined type data does not implement the Comparable interface, or the classes that implement the Comparable interface do not want to be sorted according to the defined compareTo() method. For example, if you want the strings stored in the TreeSet set to be sorted by length rather than alphabetical order, you can customize the sorting of elements by customizing a comparator when creating the TreeSet set. Next, a case is used to realize the customized sorting of strings according to length in TreeSet set, as shown in file 3.
File 3 example13 java
 1    import java.util.Comparator;
 2    import java.util.TreeSet;
 3    // Define Comparator and implement Comparator interface
 4    class MyComparator implements Comparator {
 5        public int compare(Object obj1, Object obj2) {  // Customize sorting method
 6            String s1 = (String) obj1;
 7            String s2 = (String) obj2;
 8            int temp = s1.length() - s2.length();
 9            return temp;
 10        }
 11    }
 12    public class Example13 {
 13        public static void main(String[] args) {
 14            // 1. When creating a collection, pass in the Comparator interface to implement the custom collation
 15            TreeSet ts = new TreeSet(new MyComparator());
 16            ts.add("Jack");
 17            ts.add("Helena");
 18            ts.add("Eve");
 19            System.out.println(ts);
 20            // 2. When you create a collection, you use Lambda expressions to customize the collation
 21            TreeSet ts2 = new TreeSet((obj1, obj2) -> {
 22                String s1 = (String) obj1;
 23                String s2 = (String) obj2;
 24                return s1.length() - s2.length();
 25            });
 26            ts2.add("Jack");
 27            ts2.add("Helena");
 28            ts2.add("Eve");
 29            System.out.println(ts2);
 30        }
 31    }
The operation results are shown in Figure 5.

Figure 5 operation results
In file 3, the public TreeSet (comparator <? Super E > comparator) parametric construction method of TreeSet set is used to create a TreeSet set with customized ordering rules by passing in the two parameter methods of MyComparator and Lambda expression. When adding elements to the set, the TreeSet set will be compared according to the customized sorting rules, Thus, the strings stored in the TreeSet set are sorted by length.
be careful:
When using the TreeSet set to store data, the TreeSet set will compare and sort the stored elements. Therefore, in order to ensure the normal operation of the program, we must ensure that the elements stored in the TreeSet set are of the same data type.
6. Map interface
6.1 introduction to Map interface
In real life, everyone has the unique ID number. The ID number can be used to query the person's information. These two are one to one relationship. In the application, if you want to store this data with corresponding relationship, you need to use the Map interface provided in Java.
The Map interface is a two column set. Each element of it contains a Key object Key and a Value object Value. There is a corresponding relationship between the Key and the Value object, which is called mapping. The mapping relationship in the Map is one-to-one. A Key object Key corresponds to the only Value object Value. The Key object Key and Value object Value can be any data type, and the Key object Key cannot be repeated. In this way, when accessing the elements in the Map set, as long as the Key is specified, the corresponding Value can be found. In order to facilitate the learning of the Map interface, first learn about some common methods defined in the Map interface, as shown in Table 1.
Table 1 common methods of map set
| Method declaration | Function description |
|---|---|
| void put(Object key, Object value) | Adds the element of the specified key value mapping to the Map collection |
| int size() | Returns the number of Map set key value pairs mapped |
| Object get(Object key) | Returns the value mapped by the specified key. If the mapping does not contain the mapping relationship of the key, null is returned |
| boolean containsKey(Object key) | Check whether the specified key object key exists in the Map collection |
| boolean containsValue(Object value) | Check whether the specified value object value exists in the Map collection |
| Object remove(Object key) | Delete and return the Key value mapping element of the specified Key object Key in the Map collection |
| void clear() | Clear the key value mapping elements in the entire Map collection |
| Set keySet() | Returns all Key objects in the Map Set in the form of Set |
| Collection values() | Returns all Value objects in the Map Collection in the form of Collection |
| Set<Map.Entry<Key,Value>> entrySet() | Convert a Map Set to a Set set whose storage element type is Map |
| Object getOrDefault(Object key, Object defaultValue) | Returns the value mapped by the specified key in the Map set. If it does not exist, it returns the default value defaultValue (JDK 8 new method) |
| void forEach(BiConsumer action) | Traverse Map collection elements by passing in a functional interface (JDK 8 new method) |
| Object putIfAbsent(Object key, Object value) | Add the element of the specified key Value mapping to the Map collection. If the key Value mapping element already exists in the collection, the existing Value object Value will not be added, but will be returned (JDK 8 new method) |
| boolean remove(Object key, Object value) | Delete the elements matching the key value mapping in the Map set at the same time (JDK 8 new method) |
| boolean replace(Object key, Object value) | Modify the value mapped by the specified Key object Key in the Map set to value (JDK 8 new method) |
In Table 1, some main methods of adding, deleting, modifying and querying in the root interface Map of double column set are listed. In addition, JDK 8 version has added many new methods on the basis of the original methods to operate the Map set. These methods will be explained in detail in the following sections.
6.2. HashMap set
HashMap collection is an implementation class of Map interface. It is used to store key value mapping relationships. The keys and values of the collection can be empty, but the keys cannot be repeated, and the elements in the collection are out of order. The bottom layer of HashMap is composed of hash table structure, which is actually the combination of "array + linked list". Array is the main structure of HashMap, and linked list is the branch structure mainly to solve the hash value conflict. Because of this special storage structure, HashMap set shows high efficiency in the addition, deletion, modification and query of elements. Next, a diagram is used to show the underlying implementation of HashMap collection, as shown in Figure 1.
Figure 1 internal structure and storage schematic diagram of HashMap set
In the structure shown in Figure 1, the hash table structure in HashMap takes the array structure as the main body in the horizontal direction and the linked list structure in the vertical direction. In the hash table structure, the length of the horizontal array is called the capacity of the HashMap set, and the linked list structure corresponding to the position of each element in the vertical direction is called a bucket. The position of each bucket has a corresponding bucket value in the set, which is used to quickly locate the position of the collection element when adding and searching.
In Figure 1, on the basis of showing the internal hash table structure of HashMap set, the principle of storage elements is also shown. When adding an element to the HashMap collection, it will first call the hash(k) method of the key object K to quickly locate and address the location of the element to be stored in the collection. After locating the bucket location corresponding to the hash value of the storage element key object K, there will be two situations: the first situation is that if the bucket location of the hash value of the key object K is empty, the element object can be directly inserted into the bucket location; In the second case, if the bucket position of the hash value of the key object K is not empty, you need to continue to compare whether the newly inserted element key object K and the existing element key object K are the same through the equals(k) method of the key object K. if the key object K is the same, the value object v of the original element will be replaced and the original old value will be returned, Otherwise, a new node will be added at the head of the linked list structure of the bucket to insert a new element object.
Next, learn the basic usage of HashMap through a case, as shown in file 1.
File 1 example14 java
 1    import java.util.HashMap;
 2    import java.util.Map;
 3    public class Example14 {
 4        public static void main(String[] args) {
 5            // Create a HashMap object
 6             Map map = new HashMap();
 7            // 1. Store key value pair elements to Map
 8            map.put("1", "Jack");
 9            map.put("2", "Rose");
 10            map.put("3", "Lucy");
 11            map.put("4", "Lucy");
 12            map.put("1", "Tom");
 13            System.out.println(map);
 14            // 2. Check whether the key object exists
 15            System.out.println(map.containsKey("1"));
 16            // 3. Gets the value of the specified key object mapping
 17            System.out.println(map.get("1"));
 18            // 4. Gets the collection of key and value objects in the collection
 19            System.out.println(map.keySet());
 20            System.out.println(map.values());
 21            // 5. Replaces the value of the specified key object mapping
 22            map.replace("1", "Tom2");
 23            System.out.println(map);
 24            // 6. Deletes the key value pair element of the specified key object mapping
 25            map.remove("1");
 26            System.out.println(map);
 27        }
 28    }
The operation results are shown in Figure 2.
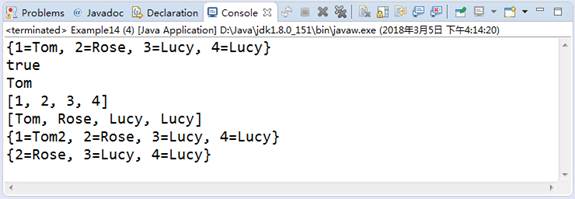
Figure 2 operation results
In file 1, first use the put(Object key, Object value) method of Map to add five elements to the set, and then use the relevant methods of HashMap to query, modify and delete the elements in the set. As can be seen from the results in Figure 2, the keys in the Map set are unique. When adding existing key value elements to the set, the existing key value elements will be overwritten. If necessary, the returned old values can be received.
Tip:
When using the HashMap set, you also need to consider a problem. If the bucket position located through the key object K does not contain the linked list structure, the operations such as finding and adding are fast, and only one positioning addressing is needed; If the bucket location contains a linked list structure, the time complexity of the addition operation is still small, because the latest element will be inserted into the head of the linked list, and you only need to simply change the reference chain; For the search operation, you need to traverse the linked list at this time, and then find and compare one by one through the equals(k) method of the key object K. therefore, from the perspective of performance, the less the linked list appears in the HashMap, the better the performance will be. This requires that the more buckets in the HashMap set, the better.
We know that the number of buckets of HashMap is the length of the main array structure in the collection. Because the array is a continuous storage unit in memory, it takes up a lot of space, but its random access speed is the fastest in Java collection. By increasing the number of buckets and reducing the length of the entry < K, V > linked list, the speed of reading data from HashMap can be improved. This is a typical strategy of exchanging space for time. However, we can't allocate too many buckets to HashMap at the beginning. This is because the array is a continuous memory space, and its creation cost is very high. Moreover, we can't determine how much space to allocate to HashMap is reasonable. In order to solve this problem, HashMap adopts the strategy of dynamically allocating the number of buckets according to the actual situation.
HashMap dynamically allocates the number of buckets. When creating a HashMap through the new HashMap() method, the default collection capacity capacity is 16 and the loading factor is 0.75 (the empirical value of the HashMap bucket trade-off strategy). At this time, the threshold value of the collection bucket is 12 (the product of capacity capacity and loading factor), If completely different key value pairs < K, V > are continuously added to the HashMap set, when there are more than 12 storage elements, the HashMap set will double the number of buckets by default (that is, the capacity of the set), and the capacity of the set will become 32. Of course, if developers do not require high access efficiency and want to save some space, they can use the new HashMap(int initialCapacity, float loadFactor) construction method to specify the collection capacity and loading factor when creating the HashMap collection, and set the loading factor larger.
6.3 traversal of Map set
In program development, it is often necessary to take out all the keys and values in the Map, so how to traverse all the key value pairs in the Map? The traversal mode of Map Collection is basically the same as that of single column Collection collection. There are two main ways: the first way is to use Iterator iterator to traverse the Collection; The second way is to use the forEach(Consumer action) method provided by JDK 8 to traverse the Collection. Next, take the HashMap set learned earlier as an example to explain the traversal methods of these two sets in detail.
1. Iterator iterator traverses Map set
To traverse the Map set using the Iterator iterator, you need to convert the Map set into the Iterator interface object first, and then traverse. Because the elements in the Map set are composed of key value pairs, when traversing the Map set using the Iterator interface, there are two methods to convert the Map set into the Iterator interface object and then traverse: keySet() method and entrySet() method.
Among them, the keySet() method needs to first convert all key objects in the Map Set into a Set single column Set, then convert the Set containing key objects into an Iterator interface object, then traverse all keys in the Map Set, and then obtain the corresponding values according to the keys. Next, a case will be used to demonstrate how to traverse all the keys in the Map Set first, and then obtain the corresponding values according to the keys, as shown in file 1.
File 1 example15 java
 1    import java.util.*;
 2    public class Example15 {
 3        public static void main(String[] args) {
 4            Map map = new HashMap();            // Create a Map collection
 5            map.put("1", "Jack");               // Storage element
 6            map.put("2", "Rose");
 7            map.put("3", "Lucy");
 8             System.out.println(map);
 9            Set keySet = map.keySet();         // Gets the collection of keys
 10            Iterator it = keySet.iterator();  // Set of iteration keys
 11            while (it.hasNext()) {
 12                Object key = it.next();
 13                Object value = map.get(key);  // Get the value corresponding to each key
 14                System.out.println(key + ":" + value);
 15            }
 16        }
 17    }
The operation results are shown in Figure 1.
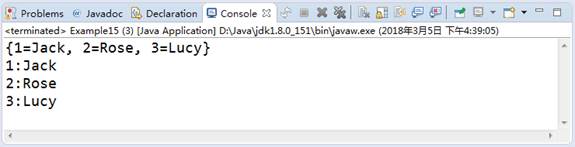
Figure 1 operation results
In file 1, first call the KeySet() method of the Map object to obtain the Set set storing all the keys in the Map Set, then iterate each key element of the Set set through the Iterator, and finally obtain the corresponding value according to the key through the get(Objectkey) method.
Another way to traverse the Set through the Iterator iterator in the Map Set is to use the entrySet() method, which returns the key value pairs in the original Map Set as a whole to the Set set Set, then converts the Set set containing the key value pair object into the Iterator interface object, and then obtains all the key value pair mapping relationships in the Set, Then take out the key and value from the mapping relationship. Next, modify the code on lines 9 to 15 in file 1 and traverse the Map Set by using the entrySet() method. The modified code example is as follows:
import java.util.*;
public class Example15 {
    public static void main(String[] args) {
        Map map = new HashMap();
        map.put("1", "Jack");
        map.put("2", "Rose");
        map.put("3", "Lucy");
         System.out.println(map);
        Set entrySet = map.entrySet();
        Iterator it = entrySet.iterator();            // Get Iterator object
        while (it.hasNext()) {
              // Gets the mapping relationship of key value pairs in the collection
            Map.Entry entry = (Map.Entry) (it.next());
            Object key = entry.getKey();              // Get key in Entry
            Object value = entry.getValue();         // Gets the value in the Entry
            System.out.println(key + ":" + value);
        }
    }
}
Run file 1 again, and the operation result is shown in Figure 2.

Figure 2 operation results
In the above modified code example, first call the entrySet() method of the Map object to obtain the Set set that stores all key value mappings in the Map, and this Set stores the Map Element of type Entry (Entry is the internal class of Map interface), each Map The Entry object represents a key value pair in the Map, then iterates over the Set set to obtain each mapping object, and calls the getKey() and getValue() methods of the mapping object to obtain the key and value respectively.
2. JDK 8 new method traverses the Map set
Similar to the Collection traversal, JDK 8 also adds a forEach(BiConsumer action) method to traverse the Map Collection according to the Lambda expression feature. The parameters required by this method are also a functional interface. Therefore, the written form of Lambda expression can be used for Collection traversal. Next, a case is used to demonstrate how to use the forEach(BiConsumer action) method to traverse the Map set, as shown in file 2.
File 2 example16 java
 1    import java.util.HashMap;
 2    import java.util.Map;
 3    public class Example16 {
 4        public static void main(String[] args) {
 5            Map map = new HashMap();
 6            map.put("1", "Jack");
 7            map.put("2", "Rose");
 8            map.put("3", "Lucy");
 9            System.out.println(map);
 10            // Use the forEach(BiConsumer action) method added in JDK 8 to traverse the collection
 11            map.forEach((key,value) -> System.out.println(key + ":" + value));
 12        }
 13    }
The operation results are shown in Figure 3.
External chain picture transferring... (img-4PEuVySJ-1624149947653)
Figure 3 operation results
In file 2, the forEach(BiConsumer action) method added to the Map set in JDK 8 is used to traverse the elements in the set. This method passes a functional interface BiConsumer written in Lambda expression. When the forEach(BiConsumer action) method is executed, it will automatically traverse the keys and values of the collection elements and pass the results to the formal parameters of the Lambda expression one by one.
In the Map set, in addition to the above two main traversal methods, a values() method is also provided. Through this method, you can directly obtain the Collection set of all values stored in the Map. Next, it is demonstrated by a case, as shown in file 3.
File 3 example17 java
 1    import java.util.*;
 2    public class Example17 {
 3        public static void main(String[] args) {
 4            Map map = new HashMap();
 5            map.put("1", "Jack");
 6            map.put("2", "Rose");
 7            map.put("3", "Lucy");
 8            System.out.println(map);
 9            Collection values = map.values(); // Gets the value collection object in the Map collection
 10            // Traverse all value objects in the Map set
 11            values.forEach(v -> System.out.println(v));
 12        }
 13    }
The operation results are shown in Figure 4.
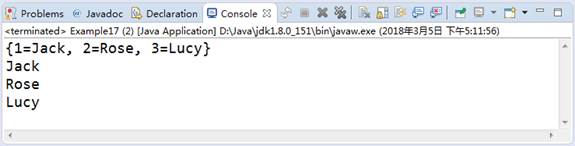
Figure 4 operation results
In file 3, get the Collection collection containing all the values in the Map by calling the values() method of the Map, and then iterate out each value in the Collection.
 Learn more: use the LinkedHashMap set to ensure the addition order of elements
When introducing the HashMap set in the previous section, it has been explained that the HashMap set does not guarantee the order in which the set elements are stored and taken out. If you want these two sequences to be consistent, you can use the LinkedHashMap class provided in Java, which is a subclass of HashMap. Like LinkedList, you can also use a two-way linked list to maintain the relationship between internal elements, so that the iterative order of LinkedHashMap elements is consistent with the storage order. Next, learn the usage of LinkedHashMap through a case, as shown in file 4.
File 4 example18 java
 1    import java.util.*;
 2    public class Example18 {
 3        public static void main(String[] args) {
 4            Map map1 = new HashMap();         // Create a HashMap collection
 5            map1.put(2, "Rose");
 6            map1.put(1, "Jack");
 7            map1.put(3, "Lucy");
 8            map1.forEach((key,value) -> System.out.println(key + ":" + value));
 9            System.out.println("=====================");
 10            Map map2 = new LinkedHashMap(); // Create a LinkedHashMap collection
 11            map2.put(2, "Rose");
 12            map2.put(1, "Jack");
 13            map2.put(3, "Lucy");
 14            map2.forEach((key,value) -> System.out.println(key + ":" + value));
 15        }
 16    }
The operation results are shown in Figure 5.
[external chain pictures are being transferred... (imgaocmnaetnhyenc-162415087285)]( https://img-blog.csdnimg.cn/img_convert/3a27fb4ffa2bb1ba80ca1bb1ce83dee7.png )
Figure 5 operation results
In file 4, two sets of HashMap and LinkedHashMap are created respectively, and the same elements are inserted in the same order, and then the elements are traversed and taken out using the forEach(BiConsumer action) method. It can be seen from the running results that the elements extracted by using the HashMap set cannot be guaranteed to be consistent with the order of the stored elements, while the LinkedHashMap set can ensure the consistency of the stored and extracted elements.
In general, we use HashMap most. HashMap is the best choice for inserting, deleting and locating elements in the Map. However, if the order of output is the same as that of input, LinkedHashMap can be used, and it can also be arranged according to the reading order.
6.4. TreeMap set
In Java, the Map interface also has a commonly used implementation class TreeMap, which is also used to store the key value mapping relationship, and duplicate keys are not allowed. In TreeMap, the principle of binary tree is used to ensure the uniqueness of keys, which is the same as the principle of TreeSet set storage. Therefore, all keys in TreeMap are arranged in a certain order. Next, learn about the specific usage of TreeMap through a case, as shown in file 1.
File 1 example19 java
 1    import java.util.Map;
 2    import java.util.TreeMap;
 3    public class Example19 {
 4        public static void main(String[] args) {
 5            Map map = new TreeMap();
 6            map.put("2", "Rose");
 7            map.put("1", "Jack");
 8            map.put("3", "Lucy");
 9            System.out.println(map);
 10        }
 11    }
The operation results are shown in Figure 1.

Figure 1 operation results
In file 1, first create a TreeMap collection, add three elements to the collection in order using the put() method, and then print out the collection information. It can be seen from the running results that the extracted elements are sorted according to the natural order of key objects. This is because the key objects in the added elements are of String type, and the String class implements the Comparable interface. Therefore, the elements will be sorted according to the natural order by default.
Like the TreeSet set, when using the TreeMap set, you can also customize the sorting of all keys by customizing the Comparator. Next, modify file 6-19 to sort the elements in the collection from large to small according to the key object, as shown in file 2.
File 2 example20 java
 1    import java.util.*;
 2    // Custom comparator
 3    class CustomComparator implements Comparator {
 4        public int compare(Object obj1, Object obj2) {
 5            String key1 = (String) obj1;
 6            String key2 = (String) obj2;
 7            return key2.compareTo(key1);  // Return the value after comparison
 8        }
 9    }
 10    public class Example20 {
 11        public static void main(String[] args) {
 12            Map map = new TreeMap(new CustomComparator());
 13            map.put("2", "Rose");
 14            map.put("1", "Jack");
 15            map.put("3", "Lucy");
 16            System.out.println(map);
 17        }
 18    }
The operation results are shown in Figure 2.

Figure 2 operation results
The comparator CustomComparator is defined in file 2. It compares the key object k of String type. When implementing the compare() method, it calls the compareTo() method of String object. Since the method returns "key2.compareTo(key1)", the elements in the final output result are sorted in the order of key objects from large to small.
6.5. Properties collection
The Map interface also has an implementation class Hashtable, which is very similar to HashMap. One of the main differences is that Hashtable is thread safe. In addition, in terms of use, Hashtable is not as efficient as HashMap. Therefore, it is basically replaced by HashMap class, but Hashtable class has a subclass properties, which is very important in practical application. Properties is mainly used to store keys and values of string type. In actual development, the properties collection class is often used to access the configuration items of the application.
Suppose there is a text editing tool that requires the default background color to be red, the font size to be 14px, and the language to be Chinese. These requirements can be configured using the properties file corresponding to the properties collection class. The effect is shown in file 1 (assuming that the file name of the configuration file is test.properties).
File 1 test properties
 1    Backgroup-color = red
 2    Font-size = 14px
 3    language = chinese
Next, learn how the properties collection class reads and writes the properties configuration file through a case (assuming that the test.Properties configuration file is in the root directory of the project), as shown in file 2.
File 2 example22 java
 1    import java.io.FileInputStream;
 2    import java.io.FileOutputStream;
 3    import java.util.Properties;
 4    public class Example22 {
 5       public static void main(String[] args) throws Exception {
 6             // 1. Read the property file through Properties
 7            Properties pps = new Properties();
 8            // Load the file to read test properties
 9            pps.load(new FileInputStream("test.properties"));
 10            // Traverse test Properties key value pair element information
 11            pps.forEach((k, v) -> System.out.println(k + "=" + v));
 12            // 2. Write property file through Properties
 13            // Specify the file name and location to write to
 14            FileOutputStream out = new FileOutputStream("test.properties");
 15            // Write key value pair information to the Properties class file
 16            pps.setProperty("charset", "UTF-8");
 17            // Write the new key value pair information in this Properties collection to the configuration file
 18            pps.store(out, "newly added charset code");
 19        }
 20    }
The operation results are shown in Figure 1.
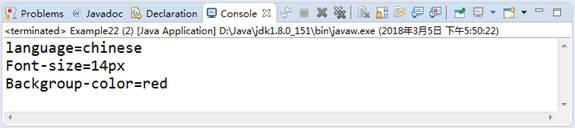
Figure 1 operation results
After executing the file 1 program, refresh and view the original test Properties configuration file, as shown in Figure 2.

Figure 2 test Properties configuration file content
In file 1, the properties collection object is created first, and then test. XML is read in the form of IO stream The content in the properties configuration file and traverse it, completing the operation of reading the properties configuration file from the properties collection. Then, the file address and name to be written are also specified in the form of IO stream, a key value pair element is added using the setProperty() method of properties, and the new information is written into the properties configuration file using the store() method. The configuration file test involved in this file Properties is operated in the form of IO stream. The relevant contents of IO stream will be explained in detail in the next chapter, so there is no need to go deep here.
7. Generics
Through the previous study, we learned that any type of Object element can be stored in the collection, but when an Object is stored in the collection, the collection will "forget" the type of the Object. When the Object is taken out of the collection, the compilation type of the Object will be unified into the Object type. In other words, it is impossible to determine the type of elements in a collection in the program, so it is easy to make mistakes if forced type conversion is carried out when taking out elements. Next, a case is used to demonstrate this situation, as shown in file 1.
File 1 example23 java
 1    import java.util.ArrayList;
 2    public class Example23 {
 3        public static void main(String[] args) {
 4            ArrayList list = new ArrayList();
 5            list.add("String");                     // Add string object
 6            list.add("Collection");
 7            list.add(1);                        // Add Integer object
 8            for (Object obj : list) {
 9                String str = (String) obj;        // Cast to String type
 10                System.out.println(str);
 11            }
 12        }
 13    }
The operation results are shown in Figure 1.
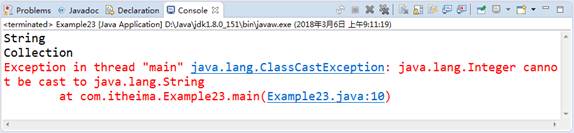
Figure 1 operation results
In file 1, three elements are stored into the List set, which are two strings and an Integer respectively. When these elements are taken out, they are forcibly converted to String type. Because Integer objects cannot be converted to String type, the error of "ClassCastException" as shown in Figure 6-35 will appear when the program is running. In order to solve this problem, the concept of "parameterized type" is introduced into Java, that is, generic type. Generic types can limit the data types of operations. When defining a collection class, you can specify the data types stored in the collection in the way of "< parameterized type >". The specific format is as follows:
ArrayList<Parametric type> list = new ArrayList<Parametric type>();
The following class modifies the code in line 4 of file 1 and uses generics to limit that only String type data can be stored in the ArrayList set, as shown below:
ArrayList<String> list = new ArrayList<String>();
After the code is modified, you will find that the error prompt will appear during the compilation of the program, as shown in Figure 2.

Figure 2 compilation error
In Figure 2, the reason for the program compilation error is that the modified code defines the data type of set elements. A set such as ArrayList can only store elements of String type. When the program is compiled, the compiler checks that the element of Integer type does not match the specified type of List set, and the compilation fails, so the error can be solved during compilation, Avoid errors in the program at run time.
Next, rewrite file 1 again using generics, as shown in file 2.
File 2 example24 java
 1    import java.util.ArrayList;
 2    public class Example24 {
 3        public static void main(String[] args) {
 4             // Create an ArrayList collection using generics
 5            ArrayList<String> list = new ArrayList<String>();
 6            list.add("String");             // Add string object
 7            list.add("Collection");
 8            for (String str : list) {     // Traversing the collection, you can directly specify the element type
 9                System.out.println(str);
 10            }
 11        }
 12    }
The operation results are shown in Figure 3.

Figure 3 operation results
In file 2, generics are used to specify that the ArrayList set can only store String type elements. Then two String type elements are stored in the set and the set is traversed. As can be seen from Figure 3, the file can operate normally. It should be noted that after using generics, each time you traverse the collection elements, you can specify that the element type is String instead of Object, so as to avoid forced type conversion in the program.
8. Common tools
8.1 Collections tool class
In Java, operations on Collections are very frequent, such as sorting the elements in the collection, finding an element from the collection, and so on. For these common operations, Java provides a tool class specially used to operate Collections. This class is Collections, which is located in Java Util package. A large number of static methods are provided in the Collections class to sort, find and modify the elements in the collection. Next, we will explain these common methods.
1. Add and sort
The Collections class provides a series of methods for adding and sorting List Collections, as shown in Table 1.
Table 1 common addition and sorting methods of collections
| Method declaration | Function description |
|---|---|
| static boolean addAll(Collection<? super T> c, T... elements) | Adds all specified elements to the specified set c |
| static void reverse(List list) | Reverses the order of the elements in the specified List collection |
| static void shuffle(List list) | Randomly sort the elements in the List collection |
| static void sort(List list) | Sort the elements in the List collection according to the natural order of the elements |
| static void swap(List list,int i,int j) | Exchange the elements at corner i and j in the specified List set |
Next, learn the methods in the table through a case, as shown in file 1.
File 1 example25 java
 1    import java.util.ArrayList;
 2    import java.util.Collections;
 3    public class Example25 {
 4        public static void main(String[] args) {
 5            ArrayList<String> list = new ArrayList<>();
 6            Collections.addAll(list, "C","Z","B","K");    // Add element
 7            System.out.println("Before sorting: " + list);
 8            Collections.reverse(list);                       // Reverse set
 9            System.out.println("After reversal: " + list);
 10            Collections.sort(list);                           // In natural order
 11            System.out.println("After sorting in natural order: " + list);
 12            Collections.shuffle(list);                       // Randomly disrupt set elements
 13            System.out.println("After sorting in random order:  " + list);
 14            Collections.swap(list, 0, list.size()-1);     // Swap the beginning and end elements of the collection
 15            System.out.println("After exchanging the first and last elements of the set: " + list);
 16        }
 17    }
The operation results are shown in Figure 1.
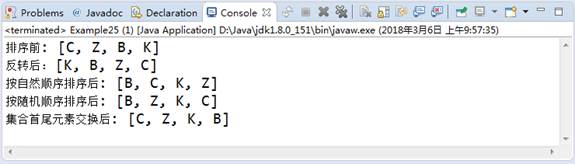
Figure 1 operation results
2. Find and replace
The Collections class also provides some common methods for finding and replacing elements in a collection, as shown in Table 2.
Table 2 common search and replacement methods of collections
| Method declaration | Function description |
|---|---|
| static int binarySearch(List list,Object key) | Use dichotomy to search the index of the specified object in the List set. The elements in the List set must be ordered |
| static Object max(Collection col) | Returns the largest element in a given set according to the natural order of the elements |
| static Object min(Collection col) | Returns the smallest element in a given set according to the natural order of the elements |
| static boolean replaceAll(List list,Object oldVal,Object newVal) | Replace all old values oldVal in the List set with a new value newVal |
Next, a case is used to demonstrate how to find and replace the elements in the set, as shown in file 2.
File 2 example26 java
 1    import java.util.ArrayList;
 2    import java.util.Collections;
 3    public class Example26 {
 4        public static void main(String[] args) {
 5            ArrayList<Integer> list = new ArrayList<>();
 6            Collections.addAll(list, -3,2,9,5,8);// Adds all specified elements to the collection
 7            System.out.println("Elements in the collection: " + list);
 8            System.out.println("The largest element in the collection: " + Collections.max(list));
 9            System.out.println("The smallest element in the collection: " + Collections.min(list));
 10            Collections.replaceAll(list, 8, 0); // Replace 8 in the collection with 0
 11            System.out.println("Replaced set: " + list);
 12            Collections.sort(list);               //Before using binary search, you must ensure that the elements are in order
 13            System.out.println("After the collection is sorted as: "+list);
 14            int index = Collections.binarySearch(list, 9);
 15            System.out.println("The set finds element 9 through the binary search method. The corner mark is:"+index);
 16        }
 17    }
The operation results are shown in Figure 2.
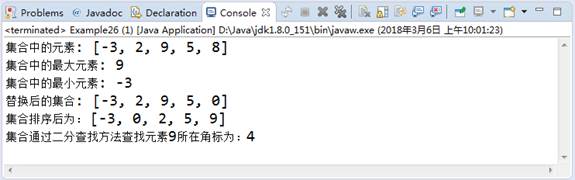
Figure 2 operation results
There are other methods in the Collections tool class. Interested readers can self-study the API help documents as needed, which will not be introduced here.
8.2. Arrays tools
In Java In the util package, in addition to a collection tool class Collections for collection operations, an array tool class arrays is also provided for array operations. Arrays tool class provides a large number of static methods for array operation. Next, we will explain some common methods.
1. Use sort() method to sort
In the previous study of Arrays, you need to customize a sorting method to sort the array. In fact, you can also use the static method sort() in the Arrays tool class to realize this function. Next, learn the use of the sort() method through a case, as shown in file 1.
File 1 example27 java
 1    import java.util.Arrays;
 2    public class Example27 {
 3        public static void main(String[] args) {
 4            int[] arr = { 9, 8, 3, 5, 2 };   // Initialize an array
 5            System.out.print("Before sorting:");
 6            printArray(arr);                    // Print original array
 7            Arrays.sort(arr);                   // Call the sort() method of Arrays to sort
 8            System.out.print("After sorting:");
 9            printArray(arr);                    // Print sorted array
 10        }
 11         // Define how to print array elements
 12        public static void printArray(int[] arr) {
 13            System.out.print("[");
 14            for (int x = 0; x < arr.length; x++) {
 15                if (x != arr.length - 1) {
 16                    System.out.print(arr[x] + ", ");
 17                } else {
 18                    System.out.println(arr[x] + "]");
 19                }
 20            }
 21        }
 22    }
The operation results are shown in Figure 1.

Figure 1 operation results
As can be seen from Figure 1, when using the sort () method of Arrays, the array elements will be sorted according to the natural order, which is very convenient to use. For array sorting, array tool class Arrays also provides several other overloaded sort() methods, which can sort according to natural order or pass in comparator parameters to sort according to custom rules. At the same time, it also supports the selection of the element range of sorting.
2. Use the binarySearch(Object[] a, Object key) method to find elements
In program development, we often find some specific elements in the array. If there are many elements in the array, it will be very cumbersome to find an element. Therefore, the Arrays tool class also provides a binarySearch(Object[] a, Object key) method to find elements. Next, we will learn the use of this method through a case, as shown in file 2.
File 2 example28 java
 1    import java.util.Arrays;
 2    public class Example28 {
 3        public static void main(String[] args) {
 4            int[] arr = { 9, 8, 3, 5, 2 };
 5            Arrays.sort(arr);                            // Sort the array
 6            int index = Arrays.binarySearch(arr, 3); // Find specified element 3
 7            System.out.println("The index of element 3 is:" + index);
 8        }
 9    }
The operation results are shown in Figure 2.

Figure 2 operation results
As can be seen from Figure 2, using the bianrySearch(Object[] a, Object key) method of Arrays, it is found that the index of 3 in the array is 1 (the sorted array index). It should be noted that the bianrySearch() method can only search the elements of the sorted array, because it uses the dichotomy search. The so-called dichotomy search is to compare the specified element with the element in the middle of the array every time, so as to eliminate half of the elements. This search is very efficient. Next, a legend is used to demonstrate the process of finding elements by dichotomy, as shown in Figure 3.
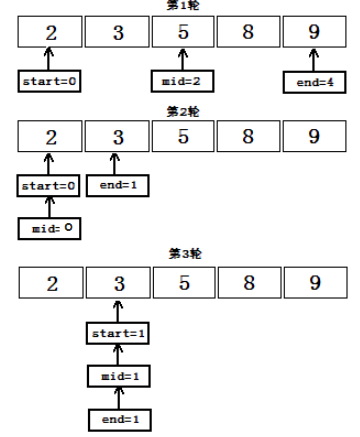
Figure 3 binary search method
In Figure 3, start, end and mid (mid=(start+end)/2) respectively represent the start index, end index and intermediate index of the search interval in the array. Assuming that the searched element is a key, the search process of the element will be explained step by step.
Step 1: judge the start index start and end index end. If start < = end, the key and arr[mid] are compared. If they are equal, the element is found; If they are not equal, you need to go to step 2 and continue to compare the size of the two.
Step 2: continue to compare key and arr[mid]. If key < arr[mid], it means that the searched value is between index start and mid, then execute step 3; Otherwise, it means that the value to be searched is between the index mid and end. In this case, execute step 4.
In step 3, set the end index end of the search interval to mid-1, the start index remains unchanged, the middle index mid is reset to (start+end)/2, and continue to search until start > end, indicating that the searched array does not exist. At this time, execute step 5.
In step 4, set the start index of the search interval to mid+1, the end index remains unchanged, the middle index mid is reset to (start+end)/2, and continue to search until start > end, indicating that the searched array does not exist. At this time, execute step 5.
Step 5, return to "(insertion point) - (start+1)". This "insertion point" refers to the position of the first element greater than the key value in the array. If the values of all elements in the array are less than the object to be found, "insertion point" is equal to "- array.length".
3. Use the copyOfRange(int[] original, int from, int to) method to copy elements
In program development, it is often necessary to use some elements in the array without destroying the original array. At this time, you can use the copyOfRange(int[] original,int from,int to) method of Arrays tool class to copy the elements of the specified range in the array to a new array. In this method, the parameter original represents the copied array, From represents the initial index (including) of the copied element, and to represents the last index (excluding) of the copied element. Next, learn how to copy the array through a case, as shown in file 3.
File 3 example29 java
 1    import java.util.Arrays;
 2    public class Example29 {
 3        public static void main(String[] args) {
 4            int[] arr = { 9, 8, 3, 5, 2 };
 5             // Copies an array of the specified range
 6            int[] copied = Arrays.copyOfRange(arr, 1, 7);
 7            for (int i = 0; i < copied.length; i++) {
 8                System.out.print(copied[i] + " ");
 9            }
 10        }
 11    }
The operation results are shown in Figure 4.

Figure 4 operation results
In file 3, use the copyOfRange(arr, 1, 7) method of Arrays to copy the six elements in array {9, 8, 3, 5, 2} from arr[1] (including the elements corresponding to the start index) to arr[7] (excluding the elements corresponding to the end index) into the new array copied. Since the maximum index of the original group of arr is 4, Therefore, only the four elements "8, 3, 5, 2" from arr[1] to arr[4] are copied into the new array copied, and the other two elements are put into the default value 0 of the int type array.
4. Use the fill(Object[] a, Object val) method to replace the element
In program development, it may be necessary to replace all elements in an array with the same element. At this time, you can use the fill(Object[] a, Object val) method of Arrays tool class, which can assign the specified value to each element in the array. Next, a case is used to demonstrate how to replace elements, as shown in file 4.
File 4 example30 java
 1    import java.util.Arrays;
 2    public class Example30 {
 3        public static void main(String[] args) {
 4            int[] arr = { 1, 2, 3, 4 };
 5            Arrays.fill(arr, 8);       // Replace each element in the array with 8
 6            for (int i = 0; i < arr.length; i++) {
 7                System.out.println(i + ": " + arr[i]);
 8            }
 9        }
 10    }
The operation results are shown in Figure 5.
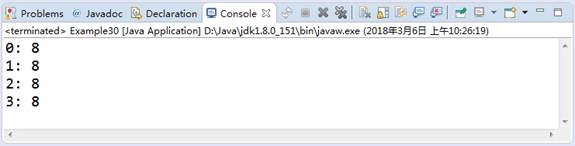
Figure 5 operation results
As can be seen from Figure 5, after calling the fill(arr,8) method of the Arrays tool class, all the elements in the array arr are replaced with 8.
There are other methods in the Arrays tool class. Interested readers can also self-study the API help documents as needed, which will not be introduced here.
9. JDK8 - aggregation operation
9.1 introduction to polymerization operation
In the development, the operation of elements in sets and arrays will be involved in most cases. Before JDK 8, each element is traversed through ordinary loops, and then some if conditional statements will be interspersed to selectively find, filter and modify the elements. Although this original operation method is feasible, it has a large amount of code and low execution efficiency.
To this end, a Stream interface is added in JDK 8, which can convert the elements in the set and array into the form of Stream stream. Combined with the advantages of Lambda expression, it can further simplify the operations such as searching, filtering and conversion of elements in the set and array. This new function is the aggregation operation in JDK 8.
In the program, there is no absolute syntax specification for aggregation operation. According to the actual operation process, it can be divided into the following three steps:
(1) Convert the original set or array object into a Stream object;
(2) Perform a series of Intermediate Operations such as filtering and searching on the elements in the Stream stream object, and then still return a Stream stream object;
(3) Perform terminal operations such as traversal, statistics and collection on the Stream to obtain the desired results.
Next, according to the above three steps of aggregation operation, a case is used to demonstrate the basic usage of aggregation operation, as shown in file 1.
File 1 example31 java
 1    import java.util.*;
 2    import java.util.stream.Stream;
 3    public class Example31 {
 4        public static void main(String[] args) {
 5              // Create a List collection object
 6            List<String> list = new ArrayList<>();
 7            list.add("Zhang San");
 8            list.add("Li Si");
 9            list.add("Xiao Ming Zhang");
 10            list.add("Zhang Yang");
 11            // 1. Create a Stream object
 12            Stream<String> stream = list.stream();
 13            // 2. Filter and intercept the elements in the Stream respectively
 14            Stream<String> stream2 = stream.filter(i -> i.startsWith("Zhang"));
 15            Stream<String> stream3 = stream2.limit(2);
 16            // 3. Terminate the elements in the Stream and traverse the output
 17            stream3.forEach(j -> System.out.println(j));
 18            System.out.println("=======");
 19             // The aggregation operation is completed in the form of chain expression
 20            list.stream().filter(i -> i.startsWith("Zhang"))
 21                         .limit(2)
 22                         .forEach(j -> System.out.println(j));
 23        }
 24    }
The operation results are shown in Figure 1.

Figure 1 operation results
In file 1, a List collection is created first, and then the aggregation operation of collection objects is realized according to the three steps of aggregation operation. The elements in the collection are filter ed, intercepted and output in the form of Stream stream. The code in line 1217 shows the aggregation operation in detail step by step, while the code in line 2022 uses a chain expression (when calling a method with a return value, it does not obtain the return value, but directly calls another method) to realize the aggregation operation. The syntax format of the expression is simpler and more efficient. This chain call is also called operation pipeline flow.
Tip:
When using aggregation operations in JDK 8, two new terms, Intermediate Operations and Terminal Operation, are usually involved. Java officials do not specify the concepts of Intermediate Operations and terminal operations, just to facilitate the identification and management of methods in aggregation operation steps, These methods are distinguished according to the return type: the methods whose return type is still Stream flow object after executing a method are classified as Intermediate Operations, such as filtering, interception, sorting and so on. Methods whose return type is no longer a Stream stream object after method execution are classified as termination operations, such as traversal, statistics, collection and so on.
It should be noted that during aggregation, only the data in the Stream object is changed, and the source data in the original collection or array will not be changed.
9.2. Create a Stream object
In the previous section, we introduced the main steps of aggregation operation. The first problem to be solved is to create a Stream object. Aggregation operation is aimed at the operation of iteratable data, such as collection, array, etc., so creating a Stream object is actually to convert the collection, array, etc. into a Stream object through some methods.
In Java, a collection object has a corresponding collection class. You can create a Stream object through the static method provided by the collection class, but the array data does not have a corresponding array class, so you must create a Stream object through other methods. For different source data, Java provides a variety of ways to create Stream objects, as follows:
● all Collections can use the stream() static method to obtain Stream stream objects;
● the of() static method of the Stream interface can obtain the basic type packing class array, reference type array and Stream stream object of a single element;
● the stream() static method of Arrays tool class can also obtain the Stream stream object of array elements.
Next, learn how to create a Stream object in the aggregation operation through a case, as shown in file 1.
File 1 example32 java
 1    import java.util.*;
 2    import java.util.stream.Stream;
 3    public class Example32 {
 4        public static void main(String[] args) {
 5              // Create an array
 6            Integer[] array = { 9, 8, 3, 5, 2 };
 7              // Convert array to List collection
 8            List<Integer> list = Arrays.asList(array);
 9            // 1. Create a Stream stream object using the stream() static method of the collection object
 10            Stream<Integer> stream = list.stream();
 11            stream.forEach(i -> System.out.print(i+" "));
 12            System.out.println();
 13            // 2. Create a Stream object using the of() static method of the Stream interface
 14            Stream<Integer> stream2 = Stream.of(array);
 15            stream2.forEach(i -> System.out.print(i+" "));
 16            System.out.println();
 17            // 3. Create a Stream stream object using the stream() static method of the Arrays tool class
 18            Stream<Integer> stream3 = Arrays.stream(array);
 19            stream3.forEach(i -> System.out.print(i+" "));
 20        }
 21    }
The operation results are shown in Figure 1.
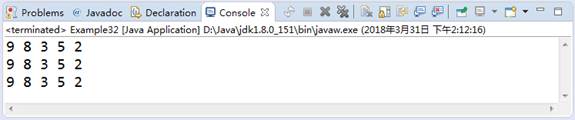
Figure 1 operation results
In file 1, an array and a set are created first, and then the creation of Stream flow object is realized in three ways. The traversal of elements in the set and array is completed through the forEach() method of Stream flow object and Lambda expression.
Tip:
In JDK 8, only the static method of stream() is provided for the interface object of single column collection to obtain the Stream stream object, and no relevant method is provided for the Map collection to obtain the Stream object. Therefore, if you want to create a Stream object with the Map collection, you must first convert the Map collection into a single column Set through the methods of keySet(), values(), entrySet() and so on, Then use the stream() static method of single column Set to obtain the Stream stream object of the corresponding key and value Set.
9.3 common methods of Stream flow
JDK 8 provides very rich operation methods for Stream flow objects in aggregation operation. These methods are divided into two types: intermediate operation and termination operation. The fundamental difference between these two types of operation methods is the return value of the method. As long as the return value type is not Stream type, it is the termination operation, which will terminate the current flow model, while other operations belong to intermediate operations.
Next, show the common methods of Stream flow objects through a table, as shown in Table 1.
Table 1 common methods of stream flow
| Method declaration | Function description |
|---|---|
| Stream filter(Predicate<? super T> predicate) | Filters the elements in the specified stream object and returns a sub stream object |
| Stream map(Function<? super T, ? extends R> mapper) | Map elements in a flow to another flow according to rules |
| Stream distinct() | Delete duplicate elements in the stream |
| Stream sorted() | Sort the elements in the stream in natural order |
| Stream limit(long maxSize) | Intercepts the length of the element in the stream |
| Stream skip(long n) | Discard the first n elements in the stream |
| static Stream concat(Stream<? extends T> a, Stream<? extends T> b) | Merge two flow objects into one flow |
| long count() | Count the number of elements in the stream |
| R collect(Collector<? super T, A, R> collector) | Collect the elements in the stream into a container (such as a collection) |
| Object[] toArray() | Collect the elements in the stream into an array |
| void forEach(Consumer<? super T> action) | Traverse the elements in the stream |
Table 6-8 only lists the common methods of Stream flow objects, some of which have multiple overloaded methods. The common methods in Table 1 will be selected for demonstration.
1. Traversal
Although the name of the traversal foreach() method is the same as "foreach()" in the for loop, this method is used to traverse flow elements in the Stream interface newly added in JDK 8, and this method does not guarantee that the traversal process of elements is executed orderly in the flow. The method statement is as follows:
void forEach(Consumer<? super T> action);
The above method receives a Consumer functional interface parameter (which can be a Lambda or method reference) as a traversal action. Next, the forEach() method is explained in detail through a case, as shown in file 1.
File 1 example33 java
 1    import java.util.stream.Stream;
 2    public class Example33 {
 3        public static void main(String[] args) {
 4            // A Stream stream object is created from the string source data
 5            Stream<String> stream = Stream.of("Zhang San","Li Si","Xiao Ming Zhang","Zhang Yang");
 6            // Traverse the elements in the Stream object through the forEach method
 7            stream.forEach(i -> System.out.println(i));
 8        }
 9    }
The operation results are shown in Figure 1.
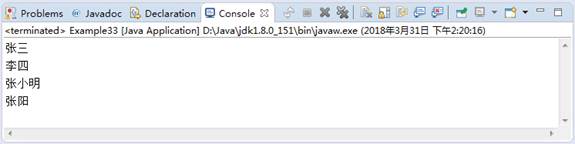
Figure 1 operation results
In file 1, a Stream stream object is created from a set of string source data, and then the elements in the Stream object are traversed directly using the termination operation forEach() method. The code in line 7 can also use the method reference explained in Chapter 4 to print the traversed Stream elements. The modification method of the code in line 7 is as follows:
stream.forEach(System.out::println);
2. Filtration
The filter() method can be used to filter the elements in one Stream stream into another subset Stream. The method is declared as follows:
Stream<T> filter(Predicate<? super T> predicate);
The above method receives a predict functional interface as a parameter as a filter condition. Next, the filter() method is explained in detail through a case, as shown in file 2.
File 2 example34 java
 1    import java.util.stream.Stream;
 2    public class Example34 {
 3        public static void main(String[] args) {
 4            // A Stream stream object is created from the string source data
 5            Stream<String> stream = Stream.of("Zhang San","Li Si","Xiao Ming Zhang","Zhang Yang");
 6            stream.filter(i -> i.startsWith("Zhang"))//Filter elements starting with "Zhang"
 7                  .filter(i -> i.length()>2)       //Filter length greater than 2 elements
 8                  .forEach(System.out::println);  // Traversal output of stream elements
 9        }
 10    }
The operation results are shown in Figure 2.

Figure 2 operation results
In file 2, a Stream stream object is created through a set of string source data, and then the filter() method and forEach() method are called respectively in the form of chain expression to filter and traverse the Stream stream object. In the filtering operation, the filter() method is executed twice to filter the elements starting with "Zhang" in the string and the length of the string is greater than 2. The two filter conditions in the two filter() methods in the code in lines 6 to 7 can be filtered by using the logical operator "& &" in one filter() method. The specific method can be modified as follows:
stream.filter(i -> i.startsWith("Zhang") && i.length() >2)
3. Mapping
The map() method of the Stream object can modify the elements in the Stream object through specific rules, and then map them to another Stream object. The method is declared as follows:
<R> Stream<R> map(Function<? super T, ? extends R> mapper);
The above method receives a Function interface parameter as the mapping condition. Next, the map() method is explained in detail through a case, as shown in file 35.
File 3 example35 java
 1    import java.util.stream.Stream;
 2    public class Example35 {
 3        public static void main(String[] args) {
 4            // A Stream stream object is created from the string source data
 5            Stream<String> stream = Stream.of("a1", "a2", "b1", "c2", "c1");
 6            stream.filter(s -> s.startsWith("c")) // Filter out elements starting with "c" in the stream
 7                  .map(String::toUpperCase)  // Map the stream elements and change all characters to uppercase
 8                  .sorted()                            // Sort flow elements
 9                  .forEach(System.out::println);   // Traversal output of stream elements
 10        }
 11    }
The operation results are shown in Figure 3.

Figure 3 operation results
In file 3, a Stream flow object is created through a set of string source data, and then the filter() method, map() method, sorted() method and forEach() method are called respectively in the form of chain expression to aggregate the Stream flow object. In file 3, map(String::toUpperCase) is used for flow object mapping. The parameter "String::toUpperCase" in the form of the incoming method converts the letters of all elements in the flow to uppercase, while sorted() has no parameters and is used for natural sorting of flow elements.
4. Interception
The limit() method of the Stream object is used to intercept the elements in the Stream object. This method requires only one parameter and intercepts the first n elements in the Stream. In most cases, the limit() method is used in combination with the skip() method to intercept multiple elements at a specified location in the Stream object. Next, the limit() method is explained in detail through a case, as shown in file 4.
File 4 example36 java
1 import java.util.stream.Stream;
2 public class Example36 {
3 public static void main(String[] args) {
4 // A Stream stream object is created from the string source data
5 Stream<String> stream = Stream.of("Zhang San","Li Si","Xiao Ming Zhang","Zhang Yang");
6 stream.skip(1) // Skip the first element in the stream
7 .limit(2) // Intercept the first 2 elements in the stream
8 .forEach(System.out::println); // Traversal output of stream elements
9 }
10 }
The operation results are shown in Figure 4.

Figure 4 operation results
In file 4, a Stream stream object is created from a set of string source data, and then the skip(), limit() and forEach() methods are called to aggregate the object data in the form of chain expression. There are four elements in the original Stream object. Firstly, skip the first element through the skip(1) method, then intercept the first two elements with the limit(2) method in the remaining elements, and finally traverse and print out the intercepted two elements "Li Si" and "Zhang Xiaoming" with the forEach() method.
5. Collection
In the previous cases, after performing intermediate operations on Stream elements, the forEach() termination operation method is used to traverse the elements and output them, and the displayed element information after aggregation operation is viewed. Termination operations such as forEach() are not feasible in some scenarios, because it cannot save the flow elements after intermediate operations as familiar objects or data types. Therefore, JDK 8 also adds an important termination operation - collect to the operation flow objects.
collect is a very useful termination operation. It can save the elements in the Stream in another form, such as collection, string, etc. The method is declared as follows:
<R, A> R collect(Collector<? super T, A, R> collector);
The collect() method uses the Collector as a parameter. The Collector contains four different operations: supplier (initial constructor), accumulator (accumulator), combiner (combiner) and finisher (Terminator). These operations sound complicated, but the good news is that JDK 8 passes through Java util. The Collectors class under the stream package has built-in various complex collection operations, so for most operations, developers do not need to implement the operation methods in the Collectors class themselves. Next, the collect() method is explained in detail through a case, as shown in file 5.
File 5 example37 java
1 import java.util.List;
2 import java.util.stream.Collectors;
3 import java.util.stream.Stream;
4 public class Example37 {
5 public static void main(String[] args) {
6 // A Stream stream object is created from the string source data
7 Stream<String> stream = Stream.of("Zhang San","Li Si","Xiao Ming Zhang","Zhang Yang");
8 // Filter out the elements starting with "Zhang" in the string through the filter() method,
9 // Finally, conduct the termination operation through the collect() method to collect the flow elements into a List collection
10 List<String> list = stream.filter(i -> i.startsWith("Zhang"))
11 .collect(Collectors.toList());
12 System.out.println(list);
13 Stream<String> stream2 = Stream.of("Zhang San","Li Si","Xiao Ming Zhang","Zhang Yang");
14 // Filter out the elements starting with "Zhang" in the string through the filter() method,
15 //Conduct the termination operation through the collect() method, and collect the flow elements into a string using the "and" connection
16 String string = stream2.filter(i -> i.startsWith("Zhang"))
17 .collect(Collectors.joining(" and "));
18 System.out.println(string);
19 }
20 }
The operation results are shown in Figure 5.

Figure 5 operation results
In file 5, two Stream flow objects are created from the same set of string source data, and then the filter() method and the collect() method are called respectively in the form of chain expression to aggregate the object data. In the collect() method, through collectors Tolist() method and collectors The joining ("and") method collects the elements in the filtered Stream object into a List collection and a string.
File 5 only demonstrates the usage of collecting Stream object elements as collections and strings through the collect() method of the Stream interface, while another toArray() method of the Stream interface supports collecting Stream object elements as arrays, which will not be demonstrated here.
be careful:
A Stream object can perform multiple intermediate operations continuously and still return a Stream object, but a Stream object can only perform one termination operation, and once the termination operation is performed, the Stream object no longer exists.
9.4 Parallel Stream
In the previous section, the three ways to create Stream objects are to create a Serial Stream. The so-called Serial Stream is a Stream that converts source data into a Stream object and then performs aggregation operations under a single thread (that is, a single pipe Stream). JDK 8 also provides a parallel Stream for mass data processing. Parallel Stream is to divide the source data into multiple sub Stream objects for multi-threaded operation (i.e. multiple pipeline streams), and then summarize the processing results into a Stream object.
Next, we will show the main differences between Stream serial flow and parallel flow through a simple schematic diagram, as shown in Figure 1.
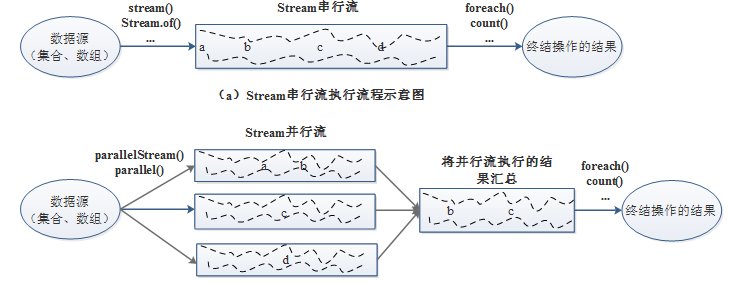
Figure 1 Schematic diagram of stream serial flow and parallel flow
The bottom layer of Stream parallel Stream will disassemble the source data into multiple Stream objects and execute them in parallel in multiple threads, which depends on the fork/join framework added in JDK 7, which solves the ability of parallel computing of applications. However, when using this framework alone, you must specify how to split the source data in detail, and the aggregation operation in JDK 8, The combination based on fork/join framework solves this problem.
Using Stream parallel flow can improve the execution efficiency of the program to a certain extent, but there will be a big problem of thread safety in multi-threaded execution. Therefore, in order to use Stream parallel flow in aggregation operation, the premise is that the source data to be executed will not be modified in the parallel execution process.
When creating a Stream object, unless otherwise specified, the default is to create a serial Stream. JDK 8 provides two ways to create a Stream parallel Stream: the first way is to directly convert the source data of the Collection type into a Stream parallel Stream through the parallelStream() method of the Collection interface; The second way is to change the Stream serial flow into Stream parallel flow through the parallel() method of the BaseStream interface. In addition, an isParallel() method is also provided in the BaseStream interface to judge whether the current Stream object is a parallel Stream. The return value of the method is boolean.
Next, learn the creation and basic use of Stream parallel flow in aggregation operation through a case, as shown in file 1.
File 1 example38 java
1 import java.util.*;
2 import java.util.stream.Stream;
3 public class Example38 {
4 public static void main(String[] args) {
5 // Create a List collection data source
6 List<String> list = Arrays.asList("Zhang San","Li Si","Xiao Ming Zhang","Zhang Yang");
7 // 1. Directly use the parallelStream() of the Collection interface to create a parallel stream
8 Stream<String> parallelStream = list.parallelStream();
9 System.out.println(parallelStream.isParallel());
10 // Create a Stream serial Stream
11 Stream<String> stream = Stream.of("Zhang San","Li Si","Xiao Ming Zhang","Zhang Yang");
12 // 2. Use the parallel() method of the BaseStream interface to change the serial flow into a parallel flow
13 Stream<String> parallel = stream.parallel();
14 System.out.println(parallel.isParallel());
15 }
16 }
The operation results are shown in Figure 2.

Figure 2 operation results
In file 1, a Stream parallel Stream is created in two ways, and the isParallel() method is used to verify whether the created Stream object is a parallel Stream. In addition, both Stream parallel Stream and serial Stream belong to Stream stream objects, so they all have the same Stream operation method, which will not be demonstrated here.
10, IO stream
11, GUI
12, JDBC
13, Multithreading
14, Network programming
See the next chapter for follow-up
This article is reproduced from IT dark horse